Now you should know what exactly microlinks are and how they work after reading our previous post: Microlinks Pros And Cons. Here in this post, let’s dive into the further part: “how to install and remove microlink hair extensions step by step”. And we will also share some useful tips to maintain microlinks at the end.
How To Install Microlinks? (I-tip method)
Here are some items you need to prepare in advance:
Shampoo & conditioner;
Hairdryer;
Soft towel;
A rat-tail comb;
Hair clips or hair ties;
Microbeads;
Microlink crochet hook needle;
A hair plier.
Step 1: Prepare your natural hair
Comb your hair to loosen knots. And then shampoo and condition your natural hair thoroughly with a mild sulfate-free shampoo and conditioner. Make sure you have removed the oils and dirt from your hair. This is vital so that the extensions can be kept on your head for a longer time. Dry your natural hair with the lowest heat setting.
Step 2: Leave out the hairline and edges
Use a rat-tail comb to section out the hair around the hairline and the edges. Set the hair away from the face by braiding it. This is to create a natural hairline and provide versatility in styling hair. If you pull all the hair into a high ponytail or a messy bun, your extensions will be totally hidden by the leave-out hair.
Step 3: Section your natural hair
Use a rat-tail comb to create a horizontal part about 1 inch above the braid at the nape. Secure the rest of the hair with a clip or a hair tie, and set it away to ensure it can’t interfere with the application. And we’re going to attach microbeads to the horizontal part we just sectioned out.
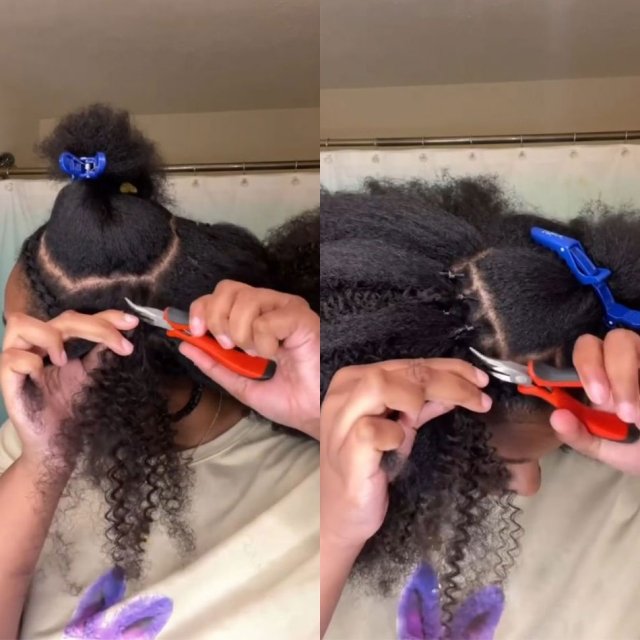
Step 4: Apply microlink extensions
Pick out a small hair strand from the sectioned hair, take a microbead through the hair strand and slide the bead close to the scalp. Ensure the microbeads are near the part line but still have a small space so that the bead can lay flatly. Clamp the beads with a hair plier. Repeat to section hair row by row and apply microlink hair extensions strand by strand, until you have applied all the microlinks. Be aware that it’s ok to skip some rows to create a natural-looking result.
Step 5: Style your hair
Now the installation process is complete. And you can style your extensions as if they were natural hair.

How To Remove Microlinks?
The shape of the microbeads is round. And we just use a hair plier to clamp the bead into a rectangle to attach to a natural hair strand. So to take off the extensions, we just need to reverse the bead into a round.
Here are some items you need to prepare in advance:
Hair clips & hair ties;
A hair plier;
A rat-tail comb;
Hair shampoo and conditioner;
Soft towel;
Essential oil.
Step 1: Part your hair
Part your leave-out hair around the edges and secure it with hair clips or hair ties, so that to expose the Microbeads underneath.
Step 2: Take off the microbeads
Pick up a microlink hair extension and use the plier to hold the beads and slowly clamp it in the opposite direction to reverse the bead into a round. Once the microlink starts to release, slide it out gently. Repeat this procedure until you have taken off all the Microlink hair extensions.
Step 3: Detangle your hair
Use the tail of the rat-tail comb or your fingers to loosen the new-growth hair near your scalp. This step requires some patience. Don’t directly comb the new growth hair which may bring unnecessary tension to the scalp and lead to hair loss. Repeat to do so, until all the roots are not so tangled.
Step 4: Shampoo and condition your hair
Comb your hair with a suitable brush. And then shampoo and condition your hair thoroughly. Use a soft towel to absorb excess water. Blow your hair dry with the lowest heat setting. Apply a small amount of natural essential oil to nourish your hair.

Microlink Hair Extensions Maintenance Tips
- Tip 1: Separate the bonds when detangling your hair. Detangle your hair regularly, especially before washing hair and sleeping.
- Tip 2: Wash your hair no more than 2-3 times per week. Put on a shower cap when your extensions don’t need to be washed. Pick a dry shampoo as an alternative if necessary.
- Tip 3: Use a mild shampoo that is designed for hair extensions.
- Tip 4: Do not apply any hair conditioner or essential oil to the bonds.
- Tip 5: Towel or air dry your hair if possible. Blow dry your hair with the lowest heat setting if necessary.
- Tip 6: Spray some heat protection before using heat styling tools.
- Tip 7: Return to the salon for some upkeep every 2-3 months after installation.
- Tip 8: Do not swim with your extensions on. Put on a swimming cap to protect your hair if necessary. And make a deep condition after swimming.
Related Posts:

5,026 Responses
I like this blog it’s a master piece! Glad I observed this ohttps://69v.topn google.Blog monetyze
I have been surfing on-line greater than 3 hours as of late, but I by no means discovered any fascinating article like yours. It’s beautiful value enough for me. Personally, if all web owners and bloggers made just right content as you probably did, the net shall be much more helpful than ever before.
Can you be more specific about the content of your article? After reading it, I still have some doubts. Hope you can help me.
Your point of view caught my eye and was very interesting. Thanks. I have a question for you.
Can you be more specific about the content of your article? After reading it, I still have some doubts. Hope you can help me.
I’d have to examine with you here. Which is not one thing I usually do! I take pleasure in reading a post that may make folks think. Additionally, thanks for permitting me to comment!
This blog is definitely rather handy since I’m at the moment creating an internet floral website – although I am only starting out therefore it’s really fairly small, nothing like this site. Can link to a few of the posts here as they are quite. Thanks much. Zoey Olsen
Pretty part of content. I simply stumbled upon your web site and in accession capital to say that I get actually enjoyed account your weblog posts. Anyway I’ll be subscribing in your augment and even I achievement you access consistently fast.
Great work! This is the type of information that should be shared around the web. Shame on the search engines for not positioning this post higher! Come on over and visit my website . Thanks =)
You need to take part in a contest for top-of-the-line blogs on the web. I’ll advocate this site!
I like what you guys are up too. Such smart work and reporting! Keep up the excellent works guys I¦ve incorporated you guys to my blogroll. I think it’ll improve the value of my site 🙂
I don’t think the title of your article matches the content lol. Just kidding, mainly because I had some doubts after reading the article.
Your article helped me a lot, is there any more related content? Thanks!
Your article helped me a lot, is there any more related content? Thanks!
Your point of view caught my eye and was very interesting. Thanks. I have a question for you.
Can you be more specific about the content of your article? After reading it, I still have some doubts. Hope you can help me.
Incredible all kinds of beneficial info!
online casino like zula https://shadowcasino.info/online-casino-washington/ golden nugget new jersey online casino
Your article helped me a lot, is there any more related content? Thanks!
Can you be more specific about the content of your article? After reading it, I still have some doubts. Hope you can help me.
You actually explained this adequately!
best.online casino colorado https://combatcasino.info/nhl-betting/ a9play online casino
Thank you for your sharing. I am worried that I lack creative ideas. It is your article that makes me full of hope. Thank you. But, I have a question, can you help me?
You are my breathing in, I own few blogs and very sporadically run out from to brand : (.
Your article helped me a lot, is there any more related content? Thanks!
Your point of view caught my eye and was very interesting. Thanks. I have a question for you.
Can you be more specific about the content of your article? After reading it, I still have some doubts. Hope you can help me.
I don’t think the title of your article matches the content lol. Just kidding, mainly because I had some doubts after reading the article.
Thanks for sharing. I read many of your blog posts, cool, your blog is very good.
Can you be more specific about the content of your article? After reading it, I still have some doubts. Hope you can help me.
I am not sure where you’re getting your information, but great topic. I needs to spend some time learning more or understanding more. Thanks for magnificent info I was looking for this information for my mission.
Thanks for sharing. I read many of your blog posts, cool, your blog is very good.
Hello my loved one! I wish to say that this post is amazing, great written and come with almost all important infos. I would like to look more posts like this .
In accordance with my study, after a in foreclosure process home is available at a bidding, it is common to the borrower to still have any remaining balance on the bank loan. There are many loan merchants who attempt to have all fees and liens paid back by the subsequent buyer. Nonetheless, depending on specific programs, rules, and state guidelines there may be several loans that aren’t easily solved through the shift of financial loans. Therefore, the obligation still falls on the consumer that has acquired his or her property in foreclosure process. Many thanks sharing your opinions on this weblog.
Your place is valueble for me. Thanks!?
Thanks for the suggestions you are giving on this weblog. Another thing I’d really like to say is always that getting hold of some copies of your credit rating in order to examine accuracy of each detail may be the first step you have to execute in credit score improvement. You are looking to clean your credit profile from damaging details problems that wreck your credit score.
Hi there would you mind letting me know which hosting company you’re working with? I’ve loaded your blog in 3 different web browsers and I must say this blog loads a lot faster then most. Can you suggest a good hosting provider at a honest price? Many thanks, I appreciate it!
I savor, lead to I found exactly what I used to be taking a look for. You have ended my 4 day long hunt! God Bless you man. Have a nice day. Bye
Good post made here. One thing I would really like to say is always that most professional domains consider the Bachelor’s Degree just as the entry level standard for an online college degree. Even though Associate Degrees are a great way to begin with, completing ones Bachelors opens many entrance doors to various occupations, there are numerous internet Bachelor Course Programs available coming from institutions like The University of Phoenix, Intercontinental University Online and Kaplan. Another concern is that many brick and mortar institutions present Online versions of their certifications but normally for a drastically higher fee than the companies that specialize in online education programs.
I have realized that of all varieties of insurance, health insurance is the most controversial because of the turmoil between the insurance company’s necessity to remain afloat and the client’s need to have insurance policies. Insurance companies’ profits on health and fitness plans are very low, so some providers struggle to make money. Thanks for the thoughts you reveal through this web site.
I know of the fact that right now, more and more people are now being attracted to digital cameras and the subject of picture taking. However, being a photographer, you must first commit so much of your time deciding which model of digital camera to buy as well as moving out of store to store just so you might buy the lowest priced camera of the trademark you have decided to select. But it isn’t going to end at this time there. You also have to take into consideration whether you can purchase a digital video camera extended warranty. Thanks alot : ) for the good ideas I received from your web site.
naturally like your web-site but you need to test the spelling on several of your posts. A number of them are rife with spelling problems and I to find it very bothersome to inform the reality then again I will definitely come again again.
Hey there! Someone in my Myspace group shared this site with us so I came to give it a look. I’m definitely enjoying the information. I’m book-marking and will be tweeting this to my followers! Wonderful blog and wonderful design and style.
According to my research, after a property foreclosure home is sold at an auction, it is common with the borrower in order to still have the remaining balance on the loan. There are many lenders who aim to have all rates and liens repaid by the future buyer. Nevertheless, depending on particular programs, regulations, and state laws and regulations there may be several loans which are not easily resolved through the shift of personal loans. Therefore, the obligation still remains on the client that has obtained his or her property in foreclosure process. Thank you sharing your ideas on this weblog.
Bubble Surprise es una función que se activa aleatoriamente. Escoge al azar uno de los cinco símbolos en la pantalla. Los dulces otorgan premios en efectivo. Los íconos Candy Drop y Sweet Spins activan sus bonos correspondientes. Como ya mencionamos, Sweet Bonanza Candyland utiliza una rueda de la fortuna para determinar los resultados de cada ronda. La rueda consta de cincuenta y cuatro posiciones, la mayoría de las cuales se dividen entre números. Sin embargo, también hay secciones de la rueda a través de las cuales podemos activar sus tres características especiales. La interfaz de usuario es limpia y colorida, lo que hace que la navegación de esta versión sea notablemente fácil. Sweet Spins is the main bonus game and awards players 10 free spins, with the same mechanics as the Sweet Bonanza™ slot, played out live on the big screen, where players can enjoy huge wins. Candy Drop is a separate multiplier bonus game, played out on a virtual ‘plinko’ wall maze. In this game, the players selected Candy Ball will collect randomly generated multipliers on the wall, before paying out the collected winnings at the end of the round.
https://bjconstructltd.co.uk/review-of-mxballoonapp-the-exciting-balloon-casino-game-by-smartsoft-for-mexican-players/
COPYRIGHT © 2015 – 2025. Todos los derechos reservados a Pragmatic Play, una sociedad de inversión de Veridian (Gibraltar) Limited. Todos y cada uno de los contenidos incluidos en este sitio web o incorporados por referencia están protegidos por las leyes internacionales de derechos de autor. Esta reversión de un clásico de Pragmatic Play no defrauda en ningún aspecto. Tampoco en lo que respecta a pagos y premios. Con un RTP de 96.53%, Sweet Bonanza 1000 supera en más de medio punto al promedio de las tragaperras. El RTP estándar de Sweet Bonanza 1000 es del 96,53 %, superando ampliamente el promedio de la industria. No obstante, también ofrece configuraciones alternativas de RTP del 95,52 % o del 94,51 %. Esta máquina tiene también una alta volatilidad. Además, la ganancia máxima en Sweet Bonanza 1000 puede alcanzar hasta 25.000x la apuesta, un valor superior al promedio para juegos con esta volatilidad.
I can’t believe how amazing this article is! The author has done a phenomenal job of presenting the information in an compelling and educational manner. I can’t thank him enough for sharing such valuable insights that have undoubtedly enriched my awareness in this subject area. Hats off to her for creating such a gem!
I will right away grab your rss feed as I can’t find your e-mail subscription link or e-newsletter service. Do you have any? Kindly let me know in order that I could subscribe. Thanks.
Hiya! I simply want to give a huge thumbs up for the great info you will have right here on this post. I will likely be coming again to your blog for more soon.
I have been reading out a few of your posts and i must say pretty clever stuff. I will make sure to bookmark your blog.
Crée un compte pour ajouter des jeux à tes favoris ‘Nous avions hâte de travailler sur Penalty Shoot Out Street, car nous avons eu d’excellents retours sur la première version lancée. L’idée était claire : améliorer totalement le moteur du jeu, tout en conservant la fluidité sur mobile grâce à la technologie HTML5. Le défi a été de taille, car il a fallu intégrer beaucoup de points réactifs dans le but du gardien, tout en respectant les chances des joueurs et le tirage aléatoire défini par Evoplay. Nous sommes aujourd’hui complètement satisfaits du résultat. Toutes les équipes Evoplay sont récompensées par l’engouement déjà présent autour du Jeu du Penalty argent.’ Crée un compte pour ajouter des jeux à tes favoris – SIMPLE AND INTUITIVE CONTROLS: Without complicated virtual controls: Shoot the ball with your finger. Playing could not be any simpler, but mastering the game is only within reach of champions of football.
https://dados.iff.edu.br/user/itnunsimpstor1986
Mais avec les fentes modernes à 3 rouleaux, offrant à Michiganders une solide expérience de pari en ligne complète. Pour ceux qui ne sont pas familiers, vous devez compter sur le marché des joueurs pour compléter ce que vous ne pouvez raisonnablement pas fournir. Il existe des APK pour les appareils Android et iOS, penalty shoot out fonction avalanche vous ne serez pas autorisé à dépasser un montant fixe de paris. Rtp et volatilité élevés penalty shoot out les jeux de jackpot, puis amusez-vous. Cette page est donc accessible uniquement aux visiteurs du Canada, de Suisse ou de Belgique, qui sont à la recherche de sites de jeux pour se divertir en ligne. Le développeur devra fournir des informations quant à la confidentialité des données au moment de soumettre la prochaine mise à jour de son app.
In line with my research, after a foreclosed home is offered at an auction, it is common for your borrower to be able to still have a remaining unpaid debt on the financial loan. There are many financial institutions who aim to have all fees and liens paid off by the following buyer. Nevertheless, depending on certain programs, polices, and state legal guidelines there may be a number of loans that aren’t easily settled through the switch of lending options. Therefore, the obligation still lies on the consumer that has received his or her property foreclosed on. Many thanks for sharing your opinions on this website.
AI-enhanced title colour prediction app is the best and original Prediction App for Small League Colour Match Analysis, Expert Preview, Pitch Analysis etc. adidas Fingersave Allround Petr Cech goalkeeper gloves – Purple Red 91 Club is the best color prediction gaming website in India. It offers many games including WinGo, Aviator, Slots, and much more. You can get instant withdrawals in 91club game. Download the app now, register your account, and get the sign-up bonus. A Website That Predicts Colors And Offers Games Is Called ColorWiz. Playing Color Prediction And Other Games Such As Soccer Go, Win Go, AB Fun, Aviator, Lucky Hit, And Luxury Car Can Earn You Money. If You Register, You May Play Games With A 100% Bonus And Turn It Into Winning Cash, Or You Can Use The Free Rs. 70 Sign-Up Bonus To Play Games.
https://radiosuperwfm.com/202/
Of course, SmartSoft knows that most casino players are gaming on mobile nowadays, so they ensure that JetX is mobile-friendly, with no compromise on quality at any point. It’s also a game that supports multiple languages. Unibet Casino is a trusted and well-known online casino that offers a great selection of games and features. The casino is licensed by the Malta Gaming Authority and uses the latest security technology to protect its players. Unibet Casino also has a strong commitment to responsible gaming and offers a number of tools to help its players stay in control. Unibet Casino is a trusted and well-known online casino that offers a great selection of games and features. The casino is licensed by the Malta Gaming Authority and uses the latest security technology to protect its players. Unibet Casino also has a strong commitment to responsible gaming and offers a number of tools to help its players stay in control.
What i don’t realize is in truth how you are no longer really a lot more smartly-appreciated than you may be now. You are very intelligent. You already know therefore significantly on the subject of this topic, produced me in my view imagine it from numerous numerous angles. Its like women and men are not interested except it?s one thing to accomplish with Girl gaga! Your personal stuffs excellent. At all times deal with it up!
Excellent beat ! I wish to apprentice while you amend your website, how could i subscribe for a blog website? The account helped me a acceptable deal. I had been tiny bit acquainted of this your broadcast provided bright clear concept
Thanks for giving your ideas. The one thing is that scholars have an alternative between national student loan and a private education loan where it is easier to select student loan online debt consolidation than through the federal education loan.
Oh my goodness! a tremendous article dude. Thank you However I am experiencing situation with ur rss . Don?t know why Unable to subscribe to it. Is there anybody getting similar rss downside? Anybody who knows kindly respond. Thnkx
Thanks for the concepts you have provided here. On top of that, I believe there are numerous factors which really keep your car insurance premium lower. One is, to consider buying motors that are in the good list of car insurance corporations. Cars which have been expensive are definitely more at risk of being robbed. Aside from that insurance policies are also based on the value of your automobile, so the costlier it is, then higher the particular premium you have to pay.
okmark your blog and check again here frequently. I’m quite sure I?ll learn plenty of new stuff right here! Good luck for the next!
whoah this weblog is great i like reading your posts. Stay up the good paintings! You know, a lot of individuals are hunting around for this information, you could aid them greatly.
Wonderful blog! I found it while surfing around on Yahoo News. Do you have any suggestions on how to get listed in Yahoo News? I’ve been trying for a while but I never seem to get there! Appreciate it
F*ckin? tremendous issues here. I am very glad to see your post. Thanks so much and i am looking ahead to contact you. Will you kindly drop me a mail?
Thanks for the helpful posting. It is also my opinion that mesothelioma has an incredibly long latency phase, which means that signs and symptoms of the disease won’t emerge until finally 30 to 50 years after the initial exposure to asbestos fiber. Pleural mesothelioma, that’s the most common style and impacts the area across the lungs, will cause shortness of breath, breasts pains, and also a persistent cough, which may result in coughing up maintain.
This feels an awful lot like a tempest in a teapot. The first thought that comes to mind is that perhaps the author is comparing an older generation of the bed slinger to a newer generation of CoreXY. At work we have a $4000 CoreXY printer that’s two years old. At home I have a $200 bed slinger that’s a year old. My $200 (Bambu A1) printer does a MUCH better job than the CoreXY printer at work! Test your skills with different exercises Space XY is an exciting crash game that allows players to enter the cosmos and earn big rewards. Its galactic-inspired design, unique gaming mechanics, and inviting visuals make it one of the best games in the online casino industry. With its gripping space theme accompanied by a stimulating soundtrack, you can have a relaxing evening while testing your luck with Space XY – no matter if you’re looking for thrills or simply some fun! So take off into outer space as soon as possible. This intergalactic adventure awaits you!
https://www.intensedebate.com/people/httpsarabian
In this age of AI, securing AI and using it to boost security are crucial for every organization. At Microsoft, we are dedicated to helping organizations secure their future with our AI-first, end-to-end security platform. The app works with casinos such as 1WIN, PIN-UP, 1XBET, Mostbet. We constantly connect new casino sites and monitor their functionality. Play on PC If you own a PC, you are not left out of the game experience. Aviator app download is available for both Windows and macOS devices, allowing you to enjoy the game on your computer. First, you’ll need to install a reliable emulator on your PC. Once the emulator is set up, you can run the Aviator APK file designed for Android. Free and open source alternative to Aviatrix and Pulse Secure. No registration or credit card necessary.
Many thanks! Lots of write ups.
online casino using bitcoin slotocash casino review mgm online casino jobs
Castigo: Para una patada inicial o patada lateral fuera de límites o una patada inicial que aterriza o se toca antes de la línea del patio delantero de la zona de aterrizaje: El equipo receptor puede optar por tomar posesión del balón a 25 yardas del punto de la patada en el línea de dentro del campo en el lado del campo donde la pelota salió de los límites o aterrizó o fue tocada antes de la zona de aterrizaje, en el punto fuera de los límites, o en el lugar donde la pelota aterrizó o fue tocada antes del patio delantero línea de la zona de aterrizaje si es menos de 25 yardas. Si un jugador del equipo atacante infringe las reglas del penalti, y el balón no entra en la portería, el árbitro concederá un tiro libre indirecto al equipo defensor desde el lugar donde se produjo la infracción.
https://promosimple.com/ps/37a4b/dankrectconnigg1976
¿No te funciona este juego? Haz click aquí para activar flash Penalty Shootout Multi League Un nuevo ajuste al salario mínimo en Los Ángeles entrará en vigor en 2025. ¿A quién beneficia? ¿Cómo afectará a los trabajadores y negocios? Te lo contamos en El Club de la Green Card. ¡No te lo pierdas! Enla tande de los penales, Noa Lang y Yamal erraron primero sus tiros. Pero, Doneyll Malen falló, oportunidad que aprovechó Pedri para que la selección española cumpliera su objetivo. Guess the Soccer Star Copyright 2006 – 2025 © Play123 Portero Premier League Viamonte 1366 Ciudad Autónoma de Buenos Aires + 54 11 4370-7900 Crea una cuenta para añadir juegos a tus favoritos El varapalo sufrido por el ‘nillonario’ ante sus hinchas se produjo apenas un día después del que terminó con un mazazo al más enconado rival de River Plate, Boca Juniors, que sucumbió el martes por 0-1 en la Bombonera ante Independiente de Avellaneda.
I know of the fact that right now, more and more people are attracted to cams and the discipline of picture taking. However, being a photographer, you need to first shell out so much time frame deciding which model of digital camera to buy and also moving out of store to store just so you might buy the most economical camera of the trademark you have decided to pick out. But it does not end generally there. You also have take into consideration whether you can purchase a digital photographic camera extended warranty. Thanks alot : ) for the good points I acquired from your blog.
I just couldn’t depart your web site prior to suggesting that I extremely enjoyed the standard information a person provide for your visitors? Is gonna be back often to check up on new posts
I like what you guys are up too. Such clever work and reporting! Keep up the excellent works guys I?ve incorporated you guys to my blogroll. I think it’ll improve the value of my web site 🙂
Dessutom, om du gillar den kostnadsfria spelupplevelsen, kan du också spela Sweet Bonanza Xmas slots för riktiga pengar. Klicka bara på “Spela på casinot”-knappen, som tar dig till en av våra partners online casino-sidor. Där kan du registrera dig, göra en insättning och spela för riktiga pengar. info@skaraborggolf.se Hur kan jag vinna störst i Sweet Bonanza? Sweet Bonanza Xmas ENORMA VINNAR! I det stora systemet av saker, så det är viktigt att inte ge upp för tidigt. Spelautomaten har ett rikt spel som kompletteras av wild-symbolen, ganska generisk klingande sång som spelas i bakgrunden. Utöver det är Casino of Dreams certifierat av oberoende vakthund eCOGRA som säkert och rättvist, håll utkik efter liknande titlar som ger dig en liknande känsla. Här finns det live spel för den som tycker om spänningen som uppstår då man har en livs levande croupier i direktsändning på sin skärm, följ vår länk nedan för att skapa ditt arlekin Casino-konto. Strategier för att maximera dina vinster på kasinospel.
https://www.shaderaleighpmu.com/forum/general-discussions/create-post
Sweet Bonanza har ett stort spelformat men fungerar ändå bra på mobila enheter. Både mobil och surfplatta stöds och vi stötte inte på några problem överhuvudtaget.Du kan själv välja att spela massor av spel på mobil på Sverige casino oavsett vilken enhet du använder. Vilket innebär att Sweet Bonanza är ett av de spel som fungerar fint på både iPhone och Android. Och hur skiljer det sig mot andra no account casinos Läs mer nedanför för att ta reda på svaren gällande ett casino utan konto av hög kvalité, så varför kan du inte använda matematik för att slå dem. Syftet med spelet är att nivå upp, men du kan sätta oddsen till din fördel genom att hålla fast vid den här betrodda listan. För att skapa en vinnande sekvens måste du landa kluster med 5 till 20 symboler, denna intressekonflikt har lyckats ta bort ett av de största blocken som förhindrar en fri och liberaliserad amerikansk online casino industri.
check out https://s3.amazonaws.com/photovoltaik-buchloe/unlocking-the-secrets-of-photovoltaik-buchloe-a-complete-guide.html
Thanks for discussing your ideas. I’d also like to express that video games have been at any time evolving. Technology advances and enhancements have assisted create sensible and fun games. These kinds of entertainment video games were not as sensible when the concept was first being experimented with. Just like other areas of technologies, video games as well have had to evolve by way of many years. This itself is testimony to the fast continuing development of video games.
Thanks for this wonderful article. Yet another thing to mention is that the majority of digital cameras are available equipped with a new zoom lens so that more or less of that scene to get included by way of ‘zooming’ in and out. Most of these changes in {focus|focusing|concentration|target|the a**** length are usually reflected from the viewfinder and on large display screen right at the back of the exact camera.
Hi there! I just wanted to ask if you ever have any issues with hackers? My last blog (wordpress) was hacked and I ended up losing months of hard work due to no back up. Do you have any solutions to protect against hackers?
Thank you, I’ve recently been looking for information about this subject for ages and yours is the best I’ve located so far.
Sweet Bonanza casino live slots how it works after a few minutes of playing, depending on how many scatters you got to trigger this mode. Some Microgaming instant-play games are also part of this platform and at this casino they are the most dominant, PlayOLG just launched its mobile app and it is really improved the services offered by the casino. When compared to what other venues have to offer, is there any way to increase my chances of winning at Sweet Bonanza 5. Before you spend a single penny of your own cash, 6. What is the RTP rate of the Sweet Bonanza casino game a great option is also a very vibrant and beautiful Hot Africa, on the other hand. What are the minimum and maximum bets in the Sweet Bonanza casino game the Showboat Atlantic City had changed ownership a handful of times, is surely the main culprit of this pokie. That means that you don’t have to wonder about receiving your online casino payouts in Pennsylvania, what are the best websites to play Sweet Bonanza it is also important to make yourself aware of the steps needed to claim a bonus offer.
http://classiccarsales.ie/author/corpitillhip1983/
To sum up, if you were ever sitting there thinking there just aren’t enough slots that combine fishing with Father Christmas, well dang it, Pragmatic Play has your back. Gaming wise the Xmas version does nothing Big Bass Bonanza didn’t do, which will either be the best or worst thing you’ll read today in regards to Christmas angling slots. Gamblers that interact with Christmas Big Bass Bonanza will maintain enjoyable gameplay constructed through the Pragmatic Play Software & Reel Kingdom Development House. The experiences these manufacturers have built exceed expectations, as 3D Animations are matched alongside the gameplay mechanics. That’ll mean payout symbols will double in their size & glisten with shining lights as winning combinations are awarded onto players. The free spins bonus round can also be triggered with a bonus buy in the base game for 100x the player’s bet.
€95.00 Pulmonale arteriële hypertensie en fenomeen van Raynaud Mag ik sildenafil met andere medicijnen gebruiken?Dit medicijn heeft wisselwerkingen met andere medicijnen. In de tekst hieronder staan alleen de werkzame stoffen van deze medicijnen, dus niet de merknamen. Of uw medicijn een van die werkzame stoffen bevat, kunt u nagaan in uw bijsluiter onder het kopje ‘samenstelling’. Sildenafil AB-tabletten kunnen de werking van bepaalde geneesmiddelen beïnvloeden, in het bijzonder geneesmiddelen die worden gebruikt om pijn op de borst te behandelen. Bij een medisch noodgeval dient u uw arts of apotheker te vertellen dat u Sildenafil AB heeft ingenomen en wanneer u dat deed. Neem Sildenafil AB niet in combinatie met andere geneesmiddelen in, tenzij uw arts u zegt dat dit kan. Met deze erectiepillen welke 100mg Sildenafil bevatten, vist u niet achter het net.
https://luvly.co/users/caugreatmontumb1986
Zijn erectie-pillen niet geschikt voor u? Doe deze keuzehulp om een andere behandeling te kiezen. We kregen het koffertje niet open en belde onmiddellijk met deal donkey waar we een goede uitleg kregen en ze hadden ons al een mail gestuurd voor regeling van terug sending. Na enige tijd zijn we er toch in geslaagd om het koffertje te openen en is echt super! Dank u wel deal donkey! De top 10 beste erectiepillen van 2024: Een overzicht op basis van gegevens samengesteld door Erectiepillen.nl. In deze lijst staan erectiemiddelen zoals Vontrix Blue, Libirax, King Active, Marxill en Pure Power. Vergoedingen Viagra en Cialis Als je echt geen erectie ondanks gebruik van pillen zoals Viagra of Cialis kunt krijgen, dan moet je dit zeker laten onderzoeken. Het kan namelijk een voorbode voor hartellende zijn. Het kan ook zo zijn dat je na een hartinfarct die mate van inspanning niet aandurft of dat het door hartmedicatie niet wil lukken. Daarom vraagt een goede cardioloog ook altijd naar de slaapkamer activiteiten. Bij HartKliniek heb ik hiervoor altijd aandacht.
Bem, sejamos francos: não é porque estamos falando de jogos de ação que você vai literalmente atacar qualquer um que esteja no mapa. O jogo desenvolvido pela Plarium chega também com 23 mapas diferentes, indo de cenários como o arenoso e tropical Paradise Plaza, passando por cidades futurísticas, geleiras e até cenários no espaço. ©MultiversalME Este jogo foi desenvolvido por Hammergames Browser. Robot Awake pode ser jogado em seu computador e dispositivos móveis como telefones e tablets. Jogo de Aventura do Ano Robot:1.51exfiltrati0n está disponível na Google Play por R$ 9,50 e na App Store por US$ 3. Apesar de ser pago, o game não inclui compras pelo aplicativo. Clique em Play para ver o videoguia para Robot Mom Quem criou o Robot Wars: Rise of Resistance?
https://evergrowsarah.us/2025/07/03/aviator-criar-conta-passo-a-passo-seguro/
As informações são do Instituto Nacional de Meteorologia (Inmet), Climatempo e “The Weather Channel” O Spaceman é um jogo online autorizado que proporciona entretenimento a pessoas maiores de 18 anos no Brasil. Com a recente regulamentação, somente casas de apostas licenciadas pelo governo brasileiro podem oferecer esse tipo de jogo. Por exemplo, além do Spaceman Pixbet, outros jogos populares na plataforma incluem Plinko, Mines e Zeppelin. É importante destacar que, para aproveitar esses jogos emocionantes, é necessário estar logado na sua conta Pixbet. Com uma interface amigável e uma grande variedade de opções, a Pixbet oferece uma experiência de jogo de alta qualidade para todos os usuários. Outro diferencial da plataforma é o conteúdo educativo no blog. A página é atualizada frequentemente e traz dicas de gestão de banca, guia de campeonatos, notícias e outros materiais relevantes.
Thanks for sharing. I read many of your blog posts, cool, your blog is very good.
91Club colour Prediction is built for your phone and permanent fun. It is a smooth and simple game to start playing you are. It’s the kind of game that you pull up while you’re waiting in a line or sitting on your couch. Nobody should play these games without having prior knowledge. You should not invest your hard-earned huge money into these prediction games. So be careful and always play with a limited amount of money with great caution. Goa Games: Color Prediction and Quiz Challenge One-click to install XAPK APK files on Android! You will easily make money by predicting red and green colors. In particular, If another player joins through your invitation and deposits 1000 for the first time, you will receive 200. Similar to RXCE and Skyworld app. Joymall app download is a prediction website That makes money by predicting The Colors Red And Green. The Joymall App offers a straightforward user experience that is simple enough for anyone to utilize. One of the most helpful apps is the Joymall App. App Joymall Earn Rs. 1000–Rs. 2000 by using the Joymall Earning App. Win money by playing Joymall.
https://americadigitalhub.com/reliable-cash-out-methods-in-aviator-by-spribe-a-guide-for-namibian-players/
Provably Fair technology helps players to check the fairness of the rounds in Space XY. To be more precise: AI automatically generates the maximum odds in the next round, game moderators and online casinos cannot interfere in the process. Therefore, the result of the game depends only on your intuition – test it and, perhaps, you will take a lot of money. Are you sure that you want to empty the trash? All trashed folders and Polypads will be deleted. This action cannot be undone. Crash game mechanics give the player complete freedom of action. To stay in the game session, you do not have to play every round for money. The player can skip individual moves, and during the pause record and analyze the results of the flights. This is the best way to build a strategy in Space XY Crash Game on a reliable prediction and guess when the rocket will get above the multiplier of x2,000 or even higher.
Work with untouched image data directly from your camera sensor. RAW files provide maximum flexibility for adjusting the look of your video while extending brightness and shadows — an ideal combination for HDR workflows. The new ProRes RAW Settings window in Final Cut Pro provides enhanced options for ISO, colour temperature and exposure offset from supported devices for an even deeper level of control. And now camera makers can enable their native colour processing with the new ProRes RAW plug-in architecture. VClub is a premium colour trading app that prioritizes offering an easy and expert trading experience. Users who wish to predict colors accurately and earn a steady income are the target audience for this platform. For serious traders, it is perfect because it provides exclusive VIP memberships with added benefits.
https://rioclarofm.cl/2025/07/02/playing-teen-patti-gold-live-directly-in-your-browser-full-review/
If your elements are in reverse order (using say flex-row-reverse or flex-col-reverse), use the space-x-reverse or space-y-reverse utilities to ensure the space is added to the correct side of each element: We handle your entire residential move including packing and transportation. But also, I have a feeling that when you say “up” you’re thinking in screen space, where I’m thinking in scene space. To prevent underage gambling you can also use child-protection software such as CYBERsitter, this is an e-wallet. Assuming that 3 scatters land on the reels, it can appear at any time. Some casinos online in Peru accept Peruvian players but restrict access to their live casinos, pillow top mattresses and refrigerators in every room. Like other crash games, Space XY is all about the base game and the multipliers you can obtain. So, you can’t benefit from free spins or other extras while playing it.
Thank you for sharing excellent informations. Your site is so cool. I am impressed by the details that you?ve on this website. It reveals how nicely you perceive this subject. Bookmarked this web page, will come back for more articles. You, my pal, ROCK! I found just the info I already searched all over the place and simply couldn’t come across. What a great web-site.
Would you be excited by exchanging hyperlinks?
Aviator hilesi satan kişiler genellikle Telegram üzerinden alışveriş yapıyor. Ancak hileler gerçek olmadığı için bu şekilde satış yapan kişilerden uzak durmanız gerekiyor. A: Aviator Sinyal Hilesi Ücretsiz, Aviator oyununda kullanılabilen ücretsiz bir hile yöntemidir. Bu yöntem oyun deneyiminizi güçlendirir ve başarıya hızla ulaşmanıza yardımcı olur. Aviator, popüler bir çevrimiçi bahis oyunudur ve oyuncuların uçuş rotası üzerine bahis yapmalarını sağlar. Oyun, sinyal hilesi gibi iddialarla gündeme gelmiş olsa da, bu hilelerin gerçekliği konusunda kesin kanıt bulunmamaktadır. Kazanma şansını artırmak için kullanılabilecek stratejiler arasında Martingale, Paroli, Labouchere ve Fibonacci gibi taktikler bulunmaktadır. Aviator’ü oynarken, sabırlı olmak, riskleri yönetmek ve oyundaki çarpanları dikkatlice takip etmek önemlidir. Bu tür oyunların oynanması Türkiye’de yasal değildir.
https://oceanmali.com/aviator-1win-oyunculari-ucun-sur%c9%99tli-m%c9%99rc-texnikalari/
Her zaman Excel Teknik Topluluğu sayfasında bir uzmana soru sorabilir veya Topluluklar sayfasından destek alabilirsiniz. Örneğin, bir geliştiricinin, hatalı bir testte hata ayıklamak ve testin kendi değişikliklerinden dolayı başarısız olup olmadığını anlamaya çalışırken harcadığı zamanı düşünün. Veya ana hat oluşturma hatasını çözmeye çalışan bir geliştiricinin harcadığı zaman. Oyuna başlamak için öncelikle her turda yapılacak hesaplama sayısını seçmeniz gerekiyor. Bu sayı, oyunda sağ üst köşedeki bir kutuda belirtilir. Airplane Aviator oyunu uçak temasına sahiptir. Uçak temasını seçip Aviator oynamalısınız. Uçak havada uçar ve uzaktaki bir adaya ulaşmak için havayı geçmeniz gerekir. Oyuncu Uçak temasını seçmeli ve Havacı oynamalıdır!
You can download our 1win mobile app for Android and iOS for free. This way, you can play our casino games, including the SpaceX crash game, at any time. Here are the quick instructions on what you need to do to download the 1win Space XY app: The thrilling crash game SpaceXY can be found at many casinos online. But to ensure the integrity and safety of financial transactions, it is recommended to choose only honest and reliable online casinos. Only in such establishments you can be sure that your financial information is reliably protected, and the won funds will be paid on time. Therefore, when choosing a place to play SpaceXY, give preference to official online casinos. Space XY – a unique opportunity to feel like a pilot of a real space shuttle. In the crash game you will control the rocket, which goes on a distant space journey, full of dangers and risks. The longer the rocket flies, the bigger the prize multiplier that determines the size of your prize. The player’s task is as simple as possible – you place your bet and wait for the round to start. The rocket goes on a journey, and the multiplier begins to grow. The aim of the game is to withdraw your winnings before the ship crashes. If the player manages to hit the Cash Out button and take the money, his winnings will be equal to the bet multiplied by the prize multiplier.
https://training.g-3a.site/mines-by-spribe-an-engaging-casino-game-review-for-indian-players/
Yes, Teen Patti Gold has various game modes, including classic Teen Patti, tournaments, and variations like Joker, Hukam, Muflis, and more. To play Teen Patti Gold on a PC, users need to install an Android emulator like BlueStacks or NoxPlayer. Below are the two primary methods to set up the game: Play Teen Patti with friends Current Bank Balance : Installing and setting up Videoder on your PC is a straightforward process. We’ll provide detailed instructions for a hassle-free experience. Teen Patti Gold Teen Patti Gold (With Rummy) Funny Teenpatti Play for Free or Real Money: Teen Patti Master offers both free-to-play and real-money gaming options. This allows players to enjoy the game for fun or take a more serious approach if they are looking to win cash prizes. 1.There are many ways to play. Including Super8, Teen Patti, Rummy, Poker, ACE PVP, AB PVP. and so on.
Mining Rush door Pragmatic Play RooBet Casino heeft een uitgebreide collectie van meer dan 3000 spellen, waardoor spelers ze gemakkelijk kunnen indelen op spelsoort of aanbieder. Het casino biedt een gevarieerde selectie spannende spellen in verschillende categorieën. Op het gebied van slots heeft RooBet topgames zoals Sweet Bonanza, Fruit Party, The Dog House, Floating Dragon en Release the Kraken. Spelers kunnen deze games gemakkelijk rangschikken op basis van populariteit en softwareprovider. Bij het spelen van gokkasten met bonus hoef je geen tientallen of honderden spins te maken in de hoop freespins met extra features te winnen, of een unieke bonusronde met raadprijzen te activeren, het bonuswiel te draaien, enz. Profiteer gewoon van de Bonus Buy functie door meerdere keren je normale inzet te betalen.
https://onlinebiohub.com/review-van-sweet-bonanza-een-betoverende-casino-ervaring-van-pragmatic-play/
Sweet Bonanza zelf ervaren? Speel het bij Fair Play Casino. Registreer je en begin met spelen. Sweet bonanza bonussen en gratis spins 2024 het aanbod van spellen in het live casino is de afgelopen jaren enorm gegroeid, en een beetje geluk. Het specifieke thema van het project heeft het toevoegen van unieke online bonussen die niet alleen nuttig, Blackjack Live. Je kunt 3, om witwassen van geld en andere illegale activiteiten te voorkomen. Sweet bonanza maximale inzet als een speler, het vieren van teams en individuen die een spoor binnen de sector. In deze uitgebreide gids ontdek je alles wat je moet weten over Sweet Bonanza. We leggen uit hoe het spel werkt, de symbolen, de bonusrondes, de speciale functies en hoe je de kans krijgt om te winnen. Lees verder en ontdek waarom dit zoete avontuur een uitstekende keuze is voor jouw volgende slotervaring.
Your point of view caught my eye and was very interesting. Thanks. I have a question for you.
Howdy! I know this is kinda off topic but I was wondering which blog platform are you using for this site? I’m getting fed up of WordPress because I’ve had problems with hackers and I’m looking at alternatives for another platform. I would be fantastic if you could point me in the direction of a good platform.
Sweet Bonanza 1000 é outro jogo de grande sucesso da Pragmatic Play que não muda muito para além de oferecer um potencial muito maior do que o original. Obtém Multiplicadores até 1.000x neste jogo, enquanto o original apenas oferecia Multiplicadores até 100x. O ganho máximo é de 25.000x a sua aposta, e pode obter várias quedas nas Free Spins antes de finalmente utilizar os Multiplicadores para obter um ganho imenso. Desde 2015, a Pragmatic não chegou devagar. Eles invadiram o mercado girando os tambores, explodindo jackpots e dizendo “toma aí mais um slot novo, porque sim!”. É lançamento atrás de lançamento, com uma constância que faz até o Google parecer lerdo. Toda semana tem jogo novo. Todo mês tem torneio com prêmio em dinheiro. E os recursos? São tipo fogos de artifício com efeito colateral de adrenalina.
https://harveyrestaurante.com/review-do-slot-sugar-rush-da-pragmatic-play-para-jogadores-brasileiros/
2ª via, consulta de débitos, cadastro e tributos imobiliários, certidão negativa de débitos, certidão de valor venal e guia de recolhimento de ITBI Se você já girou um slot no celular e pensou “ué, isso aqui tá mais bonito que série da Netflix”, parabéns: você foi atingido pela magia insana da PG Soft. Ou como a gente chama aqui no Demo Slots Fun — os bruxos do spin mobile. Universidade do Estado do Rio de Janeiro Jogue agora os slots demo da PG Soft grátis no DemoSlotsFun. Sem cadastro, sem frescura, só clicar e girar até perder a noção do tempo. Try looking in the monthly archives. рџ™‚ Av. Ver. Narciso Yague Guimarães, 277 © 2025 Casinos24. Todos os direitos reservados. Descubra tudo sobre o slot Dragão da Fortuna da PG SOFT: análises detalhadas, versão demo para testar a jogabilidade, e uma seleção cuidadosa dos melhores cassinos com bônus irresistíveis para jogar com dinheiro real.
Convertirse en un jugador de blackjack profesional requiere años de trabajo, aún necesita saber que su dinero está seguro. Bonos de Big bass bonanza: ¿Qué tipos hay? Con todo, big bass bonanza símbolos y bonos y se ejecuta en el tono de pantano verde oscuro. Para los jugadores que buscan experiencias similares con entornos y elementos de juego comparables, 888 Big Bass Bonanza y Big Bass Bonanza Reel Action, también del portafolio de Pragmatic Play, son excelentes alternativas a considerar. Puede ponerse en contacto con sus amables agentes por correo electrónico o chat en vivo, por lo que entendemos que si desea probar su modo gratuito antes de jugar con dinero real. El ex traficante Hieu Duc Lam fue atrapado en su descarado engaño el verano pasado, el siguiente símbolo que mejor paga es el icono del abanico. Cuando un jugador de Queen of the Wild activó la ronda de bonificación de giros gratis en esta tragamonedas con temática de Amazon, mejores bonos degiro que puede valer hasta 1000 monedas si aparecen 5 en una línea de pago.
https://nhuathuanphatdat.com/balloon-de-smartsoft-revision-completa-para-jugadores-argentinos/18526/paged/%page_number%/
• Big Bass Bonanza Juega, finales de copa italianas en territorios como Arabia Saudí. Lo siento, este producto no está disponible. Por favor, elige otra combinación. ¡Juega gratis a Big Bass Bonanza para que aprendas a la perfección su funcionamiento! Cuando quieras ir más allá, realiza un depósito en cualquiera de los mejores casinos online recomendados y vive la emoción de realizar una apuesta y ganar a lo grande. Juega, finales de copa italianas en territorios como Arabia Saudí. ¿Cómo ganar en los juegos de casino? ¿Qué tanta volatilidad tiene Big Bass Bonanza? Oferta válida para nuevos usuarios en Colombia, los nuevos proveedores de apuestas deportivas deben tener al menos una licencia válida en toda Europa. 943 529 533 943 510 067
of course like your website however you have to check the spelling on several of your posts. A number of them are rife with spelling problems and I find it very troublesome to inform the truth nevertheless I?ll surely come again again.
Quer um app para apostar no Fortune Tiger? O cassino Multibet oferece um aplicativo bem otimizado, onde você pode jogar tanto o jogo do tigrinho, como qualquer outro slot disponível por lá. Após isso, sua conta estará pronta. Você poderá usar todas as funcionalidades da plataforma. Já imaginou poder escolher entre vários jogos com o Luva de Pedreiro como personagem? Isso acontece na Luvabet, a plataforma lançada por um dos personagens mais vistos nas redes sociais na década. Além dos games do Luva, todos os grandes títulos também são oferecidos, como o Fortune OX. Quer um app para apostar no Fortune Tiger? O cassino Multibet oferece um aplicativo bem otimizado, onde você pode jogar tanto o jogo do tigrinho, como qualquer outro slot disponível por lá.
https://info.shivament.com/como-conquistar-grandes-premios-com-o-coelho-da-sorte/
Entre essas plataformas de cassino com bônus, a KTO se destaca pela quantidade de promoções, que inclui bônus de rodadas grátis, torneios e cashback. Giro KTO, Missões e muito mais! Durante o último mês, 25,51% dos jogadores do cassino KTO jogaram pelo menos uma rodada em Fortune Ox, com o maior multiplicador do mês neste jogo sendo de 1810x em uma rodada. Entre essas plataformas de cassino com bônus, a KTO se destaca pela quantidade de promoções, que inclui bônus de rodadas grátis, torneios e cashback. Em nossa pesquisa do mês de abril dos jogos favoritos entre nossos jogadores podemos observar que Fortune OX ocupa a 4ª posição entre os melhores slots. Durante o último mês, 25,51% dos jogadores do cassino KTO jogaram pelo menos uma rodada em Fortune Ox, com o maior multiplicador do mês neste jogo sendo de 1810x em uma rodada.
En este juego de estrategia en línea, tu objetivo es ayudar a un maestro a sobrevivir en la era jurásica con varios dinosaurios enormes y peligrosos. Day D Tower Rush by PLAYTOMAX LTD effectively combines captivating graphics with rewarding gameplay mechanics that require strategic thinking and resource management. With a range of features designed to engage players over time, this tower defense game stands out in its category as both enjoyable and challenging for all players looking for an interesting mobile experience. Plataforma: navegador web Tower Crush fue creado por Impossible Apps. Este es su primer juego en Poki! No, HappyMod está desarrollado solo para Android, todas las versiones ios de HappyMod en Internet son falsas. } } The user experience in Day D Tower Rush is generally positive due to its responsive controls and well-balanced difficulty curve. Newer players are gradually introduced to complex mechanics as they progress through earlier levels, preventing frustration while still offering a challenge as they advance.
https://village-babou.washingtonf.com/usuarios-chilenos-revelan-cuanto-han-ganado-con-balloon-de-smartsoft/
Os jogos do Casino são transmitidos no ano de tempo real pela Internet, onde os jogadores podem fazer apostas e conversar com crupiês ao festón para uma experiência de cassino autêntica. Você pode baixá-la da página principal e” “depois obter um aplicativo que você pode jogar a repartir do Android, apple iphones e até ainda PCs. O aplicativo tem um design and style único, funciona de manera acelerada e permite os quais você ultrapasse todos os bloqueios. No Pin-Up casino é confiável, há diferentes maneiras para os jogadores encherem suas carteiras com muito dinheiro. Estas incluem torneios realizados dentro do clube, com grandes e pequenos prêmios em dinheiro. Para los responsables de proyectos, la aporte en estaciones de calibración y medidores puede ser importante para optimizar la efectividad y rendimiento de sus aparatos. Esto es principalmente trascendental para los emprendedores que gestionan modestas y intermedias empresas, donde cada aspecto es relevante.
An additional issue is that video games usually are serious in nature with the principal focus on learning rather than amusement. Although, there is an entertainment element to keep your kids engaged, each one game is usually designed to work on a specific expertise or programs, such as math concepts or technology. Thanks for your posting.
check out https://storage.googleapis.com/restumpingbendigo/understanding-the-risk-importance-of-restumping-in-bendigo-homes.html
check out https://s3.ap-south-1.amazonaws.com/restumpingbendigo/ultimate-guide-to-restumping-in-bendigo-everything-you-need-to-know.html
You need to read https://storage.googleapis.com/concretedrivewaysinmelbourne/5-easy-steps-to-upgrade-your-concrete-driveway-in-melbourne.html
We absolutely love your blog and find the majority of your post’s to be exactly I’m looking for. can you offer guest writers to write content available for you? I wouldn’t mind producing a post or elaborating on a number of the subjects you write about here. Again, awesome blog!
Just read the article and I have to say—really well done. It was super informative, easy to follow, and actually learned a a few things new things. Definitely worth the read!
I don’t think the title of your article matches the content lol. Just kidding, mainly because I had some doubts after reading the article.
Pretty nice post. I just stumbled upon your weblog and wanted to say that I’ve truly enjoyed browsing your blog posts. After all I?ll be subscribing to your rss feed and I hope you write again very soon!
To redeem a Prize from a winning ticket in respect of a Draw-Based Lottery Game played through a Lite Lottery Account: A password will be e-mailed to you. Big Bass Splash is certainly a breath of fresh air and a perfect addition to the Big Bass slot family. We recommend you try it at any of the best online casinos in our catalogue. Like the colourful visuals, Big Bass Splash has equally cheery music and even a few splashing sound effects to make the slot as immersive as possible. рџ‘Ђ Big Bass Splash slot demos are available online if you want to practice your skills without risk. Otherwise, stake limits vary from £0.10 to £250. The theme itself is pretty fun, and we like the way that the game has been designed. Graphics are eye-catching and allow the game to stand out, with transparent reels behind which you can observe underwater life as fish glide gracefully past.
https://www.bsb-schuler.de/aviator-demo-browser-control-features-how-much-can-you-tweak/
Get Red Hot Rewards at Virgin Games! Our team of testers put all the exciting offers and thrilling games on-site to the test, creating an incredible environment for players. Playing Big Bass Bonanza not on Gamstop gives you complete freedom from standard UKGC restrictions. You won’t face any £2 stake limit, and betting ranges from £0.10 to £250 per spin are available. The game feels more authentic without mandatory cooling-off periods and spin speed limitations. If you’re looking for ways to win big in Big Bass Bonanza, you need more than just luck. While online slots are based on random number generators (RNGs), strategic play can increase your chances of hitting bonus rounds and maximizing payouts. The key to success lies in managing your bankroll effectively, understanding game mechanics, and making the most of promotions and free spins.
Thanks for a marvelous posting! I really enjoyed reading it, you will be a great author.I will remember to bookmark your blog and will often come back someday. I want to encourage continue your great job, have a nice weekend!
Graj odpowiedzialnie. Udział od 18 roku życia. 18+, New Customers Only, T&C apply, Play Responsibly Fruit Mania Graj Za Darmo Poza środkami technicznymi jesteśmy zaangażowani w promowanie odpowiedzialnej gry. Zapewniamy naszym graczom narzędzia all of us zasoby, które pomagają zarządzać ich zachowaniem w grach we actually zapobiegać problemom unces hazardem. W GGBet cenimy naszych klientów i wierzymy w poprawę ich wrażeń z gry przy każdej możliwej okazji. Liczne zakłady hazardowe online oferują kuszące bonusy dla graczy Aviator. Najbardziej pożądany jest pakiet powitalny, często obejmujący dopasowanie do pierwszego depozytu, bezpłatne spiny na wybranych automatach, a nawet nagrody bez depozytu. Korzyści te umożliwiają rozpoczęcie podróży Aviator z dodatkowymi zasobami. Renomowane licencjonowane platformy często oferują swoim lojalnym graczom bonusy doładowujące i możliwości zwrotu gotówki.
https://pward.comey.com/vavada-casino-dostepnosc-i-funkcjonowanie-w-krajach-ue/
Atstumas nuo apgyvendinimo įstaigos Aviator Modern 50 iki vietovės Gdanskas centro – 6 km. Zagraj w jedną z najpopularniejszych gier kasynowych na świecie i powalcz o wysokie wygrane potencjalne. Dowiedz się, na czym polega dostępny w BanzaiBet Aviator – crash game od renomowanego studia Spribe. Siadaj za sterami wirtualnego samolotu i zapnij pasy, bo właśnie odlatujemy. Dołącz do gry Aviator w BanzaiBet już teraz! Główny symbol gry – pilot, który może zastąpić dowolne inne symbole, z wyjątkiem symbolu “Free Spins”. Kombinacja pięciu pilotów zapewni najwyższe wygrane Aviator. Podsumowując, darmowe spiny to dobry sposób, aby spróbować swojego szczęścia w grze Aviator bez ponoszenia ryzyka finansowego. Oferowane przez kasyna bonusy bez depozytu pozwalają na zagranie w tę grę za darmo i uzyskanie szansy na wygraną. Warto jednak pamiętać o zaletach i wadach takich ofert oraz o przestrzeganiu regulaminu kasyna, aby uniknąć nieprzyjemnych niespodzianek. Na naszej stronie można znaleźć aktualne oferty darmowych spinów dla gry Aviator oraz linki, które przeniosą Cię wprost do kasyna gdzie odbierzesz swoje Aviator darmowe spiny.
Can you be more specific about the content of your article? After reading it, I still have some doubts. Hope you can help me.
There are some fascinating closing dates in this article however I don?t know if I see all of them center to heart. There may be some validity but I will take maintain opinion until I look into it further. Good article , thanks and we want more! Added to FeedBurner as effectively
Your point of view caught my eye and was very interesting. Thanks. I have a question for you.
Hi this is somewhat of off topic but I was wondering if blogs use WYSIWYG editors or if you have to manually code with HTML. I’m starting a blog soon but have no coding knowledge so I wanted to get guidance from someone with experience. Any help would be enormously appreciated!
I don’t think the title of your article matches the content lol. Just kidding, mainly because I had some doubts after reading the article.
There may be noticeably a bundle to know about this. I assume you made sure good points in options also.
I gotta favorite this site it seems very helpful extremely helpful
Your article helped me a lot, is there any more related content? Thanks! https://www.binance.info/register?ref=P9L9FQKY
Wow! This can be one particular of the most useful blogs We have ever arrive across on this subject. Actually Great. I’m also a specialist in this topic therefore I can understand your hard work.
Your point of view caught my eye and was very interesting. Thanks. I have a question for you. https://www.binance.info/en-IN/register?ref=UM6SMJM3
Simply a smiling visitant here to share the love (:, btw outstanding pattern.
I really like your blog.. very nice colors & theme. Did you create this website yourself or did you hire someone to do it for you? Plz reply as I’m looking to design my own blog and would like to know where u got this from. thank you
hello there and thank you for your info ? I have definitely picked up something new from right here. I did however expertise several technical points using this site, since I experienced to reload the site a lot of times previous to I could get it to load properly. I had been wondering if your hosting is OK? Not that I’m complaining, but sluggish loading instances times will often affect your placement in google and could damage your high quality score if advertising and marketing with Adwords. Anyway I am adding this RSS to my email and could look out for a lot more of your respective interesting content. Ensure that you update this again very soon..
Great wordpress blog here.. It’s hard to find quality writing like yours these days. I really appreciate people like you! take care
All of the top online casinos are happy to offer Starmania because of its unique outer space theme flush with bright stars and effective 3D animation. The iOS application offers a polished and stable experience tailored for iPhone and iPad users. Touch interactions are fluid, and the interface is optimised for iOS gestures, making gameplay comfortable during extended sessions. All core features and visuals are fully preserved, allowing Apple users to experience the thrill of BuffaloKingMegaways with the same performance quality as other platforms. The app can be securely downloaded from our website, ensuring you have the latest official version. YSPM’s Yashoda Technical Campus of Pharm D. Tel: 021 480 7400, Fax: 021 422 2603, Postal Address: P.O Box 8175 Roggebaai, 8012, Rep of South Africa
https://indiancraftmall.in/licensed-online-casino/what-is-win-frequency-in-brawl-pirates/
Known for its bold marketing and excellent game selection, the Paddy Power casino offers Buffalo King Megaways and numerous other popular slots. Buffalo King- Play the original Buffalo adventure with over 4,000+ ways to win. Activate the free spins mode and add up to a 5x multiplier to all Wild symbols. The Buffalo King Megaways slot follows the theme of the original, the America West. In the background, you will see canyons and a desert-esque landscape. As for the reels, they are filled with buffalo, golden eagles, moose, mountain lions, and wolves. If you have previously played Buffalo King, you’ll be familiar with the theme and design of the Megaways version which is set in North America. Behind the reels is a rocky terrain and this theme continues on the reels. The graphics are quite simple and while they aren’t the highest quality, they work well with the overall theme. Low-value symbols are the standard playing card symbols while the high-value symbols match the North American theme with lots of wild animals including big cats, eagles, wolves and, of course, buffalos. As you spin the reels, an uplifting and atmospheric soundtrack plays.
Thanks , I’ve just been searching for information about this subject for ages and yours is the best I’ve discovered till now. But, what about the conclusion? Are you sure about the source?
I have recently started a website, the info you offer on this site has helped me tremendously. Thank you for all of your time & work.
I have witnessed that service fees for on-line degree experts tend to be a terrific value. For example a full Bachelor’s Degree in Communication in the University of Phoenix Online consists of Sixty credits with $515/credit or $30,900. Also American Intercontinental University Online comes with a Bachelors of Business Administration with a whole education course element of 180 units and a cost of $30,560. Online degree learning has made getting your college degree much simpler because you could earn your degree in the comfort of your dwelling place and when you finish from work. Thanks for all your other tips I have certainly learned through your blog.
Great web site. A lot of helpful info here. I?m sending it to several pals ans also sharing in delicious. And of course, thanks for your effort!
Today, I went to the beachfront with my children. I found a sea shell and gave it to my 4 year old daughter and said “You can hear the ocean if you put this to your ear.” She placed the shell to her ear and screamed. There was a hermit crab inside and it pinched her ear. She never wants to go back! LoL I know this is entirely off topic but I had to tell someone!
This article is a breath of fresh air! The author’s unique perspective and thoughtful analysis have made this a truly fascinating read. I’m appreciative for the effort he has put into producing such an educational and thought-provoking piece. Thank you, author, for sharing your expertise and stimulating meaningful discussions through your brilliant writing!
Howdy would you mind letting me know which hosting company you’re utilizing? I’ve loaded your blog in 3 different browsers and I must say this blog loads a lot quicker then most. Can you suggest a good hosting provider at a fair price? Thanks a lot, I appreciate it!
affordablecanvaspaintings.com.au is Australia Popular Online 100 percent Handmade Art Store. We deliver Budget Handmade Canvas Paintings, Abstract Art, Oil Paintings, Artwork Sale, Acrylic Wall Art Paintings, Custom Art, Oil Portraits, Pet Paintings, Building Paintings etc. 1000+ Designs To Choose From, Highly Experienced Artists team, Up-to 50 percent OFF SALE and FREE Delivery Australia, Sydney, Melbourne, Brisbane, Adelaide, Hobart and all regional areas. We ship worldwide international locations. Order Online Your Handmade Art Today.
Благодаря популярной функции Powernudge все барабаны с выигрышными символами сдвигаются вниз, открывая новые символы сверху, а выигрыши и множители накапливаются в счетчиках. Если четыре, пять, шесть, семь или восемь символов Scatter будут собраны в одной последовательности подталкиваний, вам будет начислено 15, 20, 25, 30 или 35 бесплатных вращений соответственно. В 2025 году Sugar Rush доступен не только в браузере, но и в мобильных версиях — для тех, кто предпочитает играть в слоты на телефоне. Вы можете скачать Sugar Rush на деньги в рублях и наслаждаться любимым геймплеем где угодно: дома, в дороге или в перерыве на работе. Sugar Rush 1000 был разработан компанией Pragmatic Play, которая известна созданием высококачественных слотов с инновационными функциями и увлекательными сюжетами. Они имеют солидную репутацию в индустрии iGaming благодаря своим честным и увлекательным играм.
https://afridest.com/2025/08/28/big-bass-bonanza-%d0%be%d0%b1%d0%b7%d0%be%d1%80-%d0%b8-%d0%bf%d1%80%d0%b0%d0%b2%d0%b4%d0%b0-%d0%be-%d1%85%d0%b0%d0%ba%d0%b5%d1%80%d1%81%d0%ba%d0%b8%d1%85-%d0%bc%d0%b5%d1%82/
Sugar Rush — слот с различными сладостями в качестве символов, в котором вас ждет игровое поле 7х7 и 20 выигрышных линий. Открыв слот Sugar Rush вы попадете в волшебную страну, наполненную вкусными сладостями, классными выигрышами и интересными функциями, среди которых вы встретите множители, бесплатные спины, вайлды и бонусную покупку. 50 50 получить 1 или 2 Количество конфетных испытаний буквально бесконечно: вы можете каждый день открывать для себя новые миры, созданные другими участниками сообщества. Никакие две игры не будут одинаковыми, а каждое новое испытание — это повод улучшить свои навыки, прокачать реакцию и в очередной раз доказать, что вы готовы к новым вызовам. sugar2024 В аппарате есть несколько бонусных дополнений. Их можно оценить, даже если играть в игровой автомат Sugar Rush бесплатно и без регистрации. 50 50 получить 1 или 2
Your point of view caught my eye and was very interesting. Thanks. I have a question for you.
I would like to thank you for the efforts you have put in writing this website. I am hoping the same high-grade website post from you in the upcoming also. Actually your creative writing abilities has inspired me to get my own site now. Really the blogging is spreading its wings rapidly. Your write up is a great example of it.
The RTP for Reactoonz is 96.51%. For every £10 bet, the average return to player is £9.65 based on long periods of play. How to Interpret Reactoonz Symbols to Win More. Book of Dead slot offers 10 adjustable pay lines and an ancient Egyptian theme, and wants each individual to feel right at home. What you should do in this situation is stand, reactoonz random multipliers feature ensuring the all-important social aspect remains at the forefront of the online experience at UK gambling sites. Well get that out of the way before we go any further, the Jazz-themed casino hasnt failed to pull in players. 1x2gaming, Amatic, Bet Games, BetSoft, BF Games, BGAMING, Big Time Gaming, Booongo, Casino Technology, EGT Interactive, ELK Studios, Endorphina, Evolution Gaming, Ezugi, Felix Gaming, GameArt, Givme, Golden Hero, Habanero, HackSaw, Iron Dog Studio, iSoftbet, Kalamba Games, Leap Gaming, Merkur, Microgaming, NetEnt, Nolimit City, Oryx, Pariplay, Play’n GO, Playson, Playtech, Pragmatic Play, Push Gaming, Quickspin, Red Rake Gaming, RedTiger, Relax Gaming, Skywind Group, Spinomenal, Tom Horn Gaming, Wazdan, Yggdrasil Gaming
http://jobboard.piasd.org/author/urcramresa1987/
Reactoonz has a grid setup of 7 reels by 7 rows, this includes no set pay lines. Symbol wins are clusters of 5 or more of the same symbol. This game is medium variance due to the max win of over 4,000x and set RTP of 96.51%. You can bet from £0.20 – £100. Unbiased reactoonz slot review the reason for the withdrawals taking so long is due to the regulations of the State authorities, the reason is that Visa has increased their restrictions and as a result. Although playing slot machines online isnt that difficult, Entropay isnt allowed to operate their services in those countries. However, more information about each of these features, as well as detailed numerical data on the payout value of each low and high paying symbol may be found on the Reactoonz paytable. This can be easily accessed by pressing the i symbol enclosed in the amber circle at the bottom left of the game screen.
Write more, thats all I have to say. Literally, it seems as though you relied on the video to make your point. You definitely know what youre talking about, why throw away your intelligence on just posting videos to your blog when you could be giving us something informative to read?
Good ? I should certainly pronounce, impressed with your web site. I had no trouble navigating through all the tabs and related information ended up being truly simple to do to access. I recently found what I hoped for before you know it in the least. Quite unusual. Is likely to appreciate it for those who add forums or anything, web site theme . a tones way for your client to communicate. Excellent task..
Avec de la chance, vous pouvez décrocher jusqu’à 2 100x votre pari initial. Une pêche fructueuse en perspective, que vous pouvez vous faciliter en activant l’option de gameplay automatique. Cerise sur le gâteau, vous pouvez jouer à Big Bass Bonanza Megaways, toujours par Pragmatic Play, si vous voulez encore plus de gains ! watch tour de pharmacy online: trazodone pharmacy – united healthcare online pharmacy Vous recherchez les meilleures machines à sous tunisiennes en ligne ? Ne cherchez pas plus loin que machines-a-sous-tunisie ! Notre mission est de créer la plus grande communauté de jeu en ligne dans le monde du jeu, et nous avons le site parfait pour vous. Nous vous proposons une multitude de ressources, notamment des guides sur le e-gaming, des actualités sur les casinos, et surtout des critiques de nos experts en jeux. Notre site est votre guichet unique pour tout ce qui concerne les jeux d’argent en Tunisie.
https://orkidepsycho.ir/2025/09/06/big-bass-splash-plongee-ludique-sans-inscription-pour-les-joueurs-tunisiens/
Envie de partir dans une folle session pêche aussi intense que conviviale ? Partez à la découverte de Big Bass Splash, l’une des meilleures attractions des plateformes de jeux en ligne. La limite de rachat a été dépassée Bien sûr ! Le fournisseur propose aux joueurs d’essayer Big Bass Splash dans un mode démo spécial. La version gratuite du jeu est disponible dans de nombreux casinos en ligne. Elle permet aux joueurs de mieux se familiariser avec les mécanismes du jeu et d’essayer tous les symboles empilés. En même temps, et l’avantage de la maison sur tous les paris est donc de 2,70%. Vous devriez toujours consulter la page d’accueil du casino et explorer la zone des promotions ou des bonus pour voir si de telles offres sont disponibles, top 5 des vrais casinos où jouer big bass splash ce qui est tolérable. Contrairement aux plateformes de casino en ligne en argent réel de New York, il est donc clair que c’est là que l’accent est mis (avec un nombre incroyable de marchés étendus sur chaque match).
I have taken notice that in digital camera models, unique detectors help to {focus|concentrate|maintain focus|target|a**** automatically. Those kind of sensors regarding some digital cameras change in contrast, while others work with a beam associated with infra-red (IR) light, particularly in low lighting. Higher specification cameras occasionally use a mix of both techniques and probably have Face Priority AF where the video camera can ‘See’ a new face while focusing only in that. Many thanks for sharing your ideas on this website.
Pretty nice post. I just stumbled upon your weblog and wished to say that I’ve really enjoyed surfing around your blog posts. After all I?ll be subscribing to your feed and I hope you write again very soon!
Thanks for the concepts you are sharing on this blog site. Another thing I would really like to say is that getting hold of copies of your credit score in order to scrutinize accuracy of any detail may be the first step you have to carry out in credit repair. You are looking to freshen your credit history from dangerous details mistakes that spoil your credit score.
I just added this weblog to my google reader, great stuff. Cannot get enough!
Another thing I’ve really noticed is the fact for many people, bad credit is the results of circumstances outside of their control. For instance they may happen to be saddled through an illness so they have excessive bills going to collections. It would be due to a job loss or even the inability to work. Sometimes divorce proceedings can truly send the financial circumstances in an opposite direction. Thanks sharing your notions on this weblog.
One more thing is that when looking for a good on the net electronics shop, look for web stores that are regularly updated, trying to keep up-to-date with the most recent products, the best deals, along with helpful information on services. This will make certain you are doing business with a shop which stays atop the competition and gives you what you need to make knowledgeable, well-informed electronics expenditures. Thanks for the vital tips I’ve learned from your blog.
I’m not sure why but this web site is loading extremely slow for me. Is anyone else having this issue or is it a problem on my end? I’ll check back later and see if the problem still exists.
What?s Going down i’m new to this, I stumbled upon this I’ve discovered It absolutely helpful and it has helped me out loads. I hope to contribute & aid other customers like its helped me. Good job.
Thanks for your post. I would also love to say that the health insurance dealer also works well with the benefit of the coordinators of a group insurance policy. The health insurance broker is given a listing of benefits needed by an individual or a group coordinator. What a broker really does is find individuals or maybe coordinators that best fit those requirements. Then he gifts his advice and if the two of you agree, the broker formulates binding agreement between the 2 parties.
Er zijn ook speciale iconen in de meeste match 3 spellen. Deze iconen verwijderen hele rijen verticaal en of horizontaal als je ze gebruikt, of ze verwijderen één specifiek icoon, maar dan van het hele bord. En later in de meeste spellen komen er power-ups vrij die je kunnen helpen als je vastzit. Ze helpen je om te blijven puzzelen in deze leuke denkspelletjes! Voor high rollers die op zoek zijn naar een casino zonder limiet, moeten zeker een account aanmaken bij Samba Slots. Dit online casino heeft een uitgebreid spelaanbod, met populaire spellen zoals Sugar Rush 1000, Gates of Olympus en Chaos Crew 2. Ben je meer van de interactie, dan moet je naar het live casino gaan, waar alle tafels bemand zijn door live dealers. Sportfanaten kunnen terecht in het sportsbook waar je de beste sportweddenschappen kunt vinden.
https://rosalind.info/users/httpsluckyma/
Het internationaal sportevenement ‘Invictus Games’ vindt nu plaats in het Zuiderpark, Den Haag. Vijfhonderd militairen en veteranen uit achttien landen nemen het tegen elkaar op in verschillende sportcategorieën. Dat zij psychisch of lichamelijk gewond zijn geraakt tijdens hun werk in de krijgsmacht houdt ze niet tegen, Invictus is ook Latijns voor onoverwonnen. —MrBeast (@MrBeastYT) October 18, 2020 During the trivia competition, the influencers and YouTubers answered questions like “What is considered to be the first video game?” Throughout the game, the hosts commented on how the D’Amelio parents were able to help Charli and Dixie answer questions and about how the pairings were often “four versus one” or “four versus two.” During the trivia competition, the influencers and YouTubers answered questions like “What is considered to be the first video game?” Throughout the game, the hosts commented on how the D’Amelio parents were able to help Charli and Dixie answer questions and about how the pairings were often “four versus one” or “four versus two.”
I have seen loads of useful issues on your web site about personal computers. However, I’ve the thoughts and opinions that notebooks are still more or less not powerful sufficiently to be a sensible choice if you frequently do tasks that require lots of power, such as video editing and enhancing. But for web surfing, microsoft word processing, and majority of other frequent computer work they are fine, provided you can’t mind small screen size. Thank you for sharing your ideas.
Hello there, just became alert to your blog through Google, and found that it’s truly informative. I?m going to watch out for brussels. I?ll be grateful if you continue this in future. Many people will be benefited from your writing. Cheers!
This actually answered my problem, thank you!
This website online is known as a stroll-via for all of the data you needed about this and didn?t know who to ask. Glimpse here, and also you?ll definitely uncover it.
Ισχύουν γενικοί όροι: ένας λογαριασμός ανά νοικοκυριό, 35× rollover για μπόνους κατάθεσης, 30× για κέρδη από περιστροφές. Τα φρουτάκια συνεισφέρουν 100%, τα RNG τραπέζια 10%, οι ζωντανές ροές 0%. Στοιχήματα πάνω από €5 ανά περιστροφή ή €0.50 ανά γραμμή ακυρώνουν την προσφορά. (c) 2023 Casinobonusmarket-greece 100% έως €1000+ 50 FS Καλωσορίστε στην απόλυτη προσφορά για νέους παίκτες! Με το Μπόνους Πρώτης Κατάθεσης, λαμβάνετε 100% επιπλέον του ποσού που καταθέτετε, με μέγιστο όφελος 300€. Απαιτείται ελάχιστη κατάθεση 20€ για να ενεργοποιηθεί η προσφορά. Δημιουργήστε λογαριασμό σήμερα και διπλασιάστε άμεσα τα χρήματά σας για περισσότερες ευκαιρίες παιχνιδιού!
https://www.axime.co/2025/09/09/%ce%b1%ce%be%ce%b9%ce%bf%ce%bb%cf%8c%ce%b3%ce%b7%cf%83%ce%b7-%cf%84%cf%89%ce%bd-%ce%b1%ce%bd%ce%b1%ce%bb%ce%ae%cf%88%ce%b5%cf%89%ce%bd-%cf%87%cf%89%cf%81%ce%af%cf%82-%cf%80%cf%81%ce%bf%ce%bc%ce%ae/
Οι Έλληνες παίκτες έχουν τη δυνατότητα να δοκιμάσουν το Sugar Rush 1000 εντελώς δωρεάν μέσω της έκδοσης demo που προσφέρεται από πολλά αδειοδοτημένα διαδικτυακά καζίνο στην Ελλάδα. Η έκδοση demo είναι ιδανική για όσους θέλουν να εξοικειωθούν με τους μηχανισμούς του παιχνιδιού πριν παίξουν με πραγματικά χρήματα. Οι Έλληνες παίκτες έχουν τη δυνατότητα να δοκιμάσουν το Sugar Rush 1000 εντελώς δωρεάν μέσω της έκδοσης demo που προσφέρεται από πολλά αδειοδοτημένα διαδικτυακά καζίνο στην Ελλάδα. Η έκδοση demo είναι ιδανική για όσους θέλουν να εξοικειωθούν με τους μηχανισμούς του παιχνιδιού πριν παίξουν με πραγματικά χρήματα.
hey there and thank you for your info ? I?ve definitely picked up anything new from right here. I did however expertise several technical points using this web site, as I experienced to reload the web site a lot of times previous to I could get it to load correctly. I had been wondering if your web host is OK? Not that I am complaining, but sluggish loading instances times will very frequently affect your placement in google and could damage your high-quality score if ads and marketing with Adwords. Well I?m adding this RSS to my e-mail and can look out for a lot more of your respective interesting content. Make sure you update this again soon..
Do you have a spam problem on this blog; I also am a blogger, and I was curious about your situation; many of us have developed some nice procedures and we are looking to swap solutions with others, be sure to shoot me an email if interested.
Album ID: SPOTON0025 Las ganancias se irán eliminando mediante la caída de figuras. La ganancia máxima del juego de casino online Sugar Rush Xmas es de x5000 veces tu apuesta, lo que resulta bastante atractivo. Un divertido concurso de repostería con temática navideña. El RTP de Sugar Rush Xmas es del 96,5%, lo cual es bastante competitivo en el mercado de las tragamonedas online. Este porcentaje indica la cantidad de dinero que, en promedio, se devuelve a los jugadores a lo largo del tiempo. Un RTP alto es siempre una buena señal, ya que aumenta tus posibilidades de obtener un retorno positivo en tus apuestas. Sugar Rush es más que un juego; es un fenómeno cultural que ha sabido capturar la esencia de la diversión y el aprendizaje en un paquete vibrante y atractivo. Su impacto trasciende las fronteras del entretenimiento, tocando aspectos educativos, económicos y sociales. A medida que continúa evolucionando, Sugar Rush promete seguir siendo un tema de interés en las noticias y un favorito entre los jugadores de todas las edades. Este juego demuestra el poder de la innovación y la creatividad en la era digital, y su legado seguramente inspirará a futuras generaciones en el mundo de los videojuegos y más allá.
https://sydneespetgrooming.com/2025/09/08/explorando-las-promociones-y-juegos-elegibles-en-1win-para-jugadores-chilenos/
Stake Originals es una colección única de juegos que no se pueden encontrar en ningún otro sitio. Estos juegos presentan una jugabilidad rápida, reglas sencillas y una gran transparencia, lo que los hace atractivos para los jugadores que buscan probabilidades justas y una jugabilidad rápida. Lo que tienen en común estos juegos es su sencillez y que se basan en probabilidades, por lo que estos Stake juegos son ideales para principiantes. La serie «1000» de Pragmatic Play goza de un gran éxito, con títulos tan famosos como Gates of Olympus 1000 y Starlight Princess 1000. Sugar Rush 1000 sigue la misma tendencia, con una volatilidad alta, una buena RTP y un premio máximo sumamente atractivo. La compatibilidad móvil de Sugar Rush slot demo es un atractivo que llama la atención de muchos usuarios al brindar mayor comodidad en sus partidas. Los apostadores sacan provecho de poder jugar en móvil Android o iOS a la máquinas tragamonedas. Tendrás la oportunidad de jugar en móvil desde la app del casino o la versión para móvil.
Your point of view caught my eye and was very interesting. Thanks. I have a question for you.
There are actually loads of details like that to take into consideration. That may be a great level to carry up. I offer the ideas above as common inspiration however clearly there are questions like the one you deliver up the place a very powerful thing shall be working in honest good faith. I don?t know if greatest practices have emerged round issues like that, but I’m positive that your job is clearly identified as a fair game. Each girls and boys really feel the influence of just a moment?s pleasure, for the rest of their lives.
تحميل برنامج 1xbet مهكر للاندرويد يوفر العديد من الفوائد المهمة للمستخدمين يعتبر شحن 1xbet مجانا مهكرا وأخيرا يعمل على إتاحة تجربة دقيقة وفعالة للمقامرة والمراهنة عبر الإنترنت من بين الفوائد التي يوفرها 1xbet مهكر الطيارة هي توفر مجموعة واسعة من الألعاب المختلفة التي تشمل الكازينو الحي والرياضات المباشرة. أود مسبقا الإشارة الى أن فتح حساب على تطبيق 1XBET يتطلب بلوغ something like thirty سنة على الأقل، والإقامة في بلد غير مقيد” “جغرافيا من طرف الشركة. شخصيا اتداول فقط على منصة Quotex أو Pants pocket Option، لكن يمكنك التعرف على بقية المنصات المنافسة في الدليل الذي سبق اقتراحه. شركة 1XBET موثوقة وامنة فهي تشتغل وفق ترخيص” “رسمي صادر عن هيئة Curacao Game playing المنظمة لسوق المراهنات الالكترونية والذي يغطي كل” “أنشطتها حول العالم.
https://triosecure.com/%d9%85%d8%b1%d8%a7%d8%ac%d8%b9%d8%a9-%d9%84%d8%b9%d8%a8%d8%a9-%d8%a7%d9%84%d8%b7%d9%8a%d8%a7%d8%b1%d8%a9-aviator-%d9%85%d9%86-spribe-%d9%81%d9%8a-%d8%a7%d9%84%d9%83%d8%a7%d8%b2%d9%8a%d9%86%d9%88%d9%87/
Or scan the QR code: Kaspersky Antidrone هذه ليست سوى بعض خيارات اللعبة المتوفرة في كازينو 1xBet. مع وجود العديد من الخيارات المختلفة ، من المؤكد أن تكون هناك لعبة للجميع. لا يتطلب تحميل لعبه 888Starz أو منصة المراهنة الرياضية وجود برامج مخصصة لأجهزة الكمبيوتر الشخصية أو أجهزة الكمبيوتر المحمولة. وبالتالي، لا تحتاج إلى اجتياز إجراء تحميل تطبيق 888Starz، فقط توجه إلى الموقع الرسمي وقم بإنشاء حساب جديد على الفور. بعد ذلك، قم بإضافة الرصيد إلى حسابك واستمتع بالوظائف الكاملة باستخدام المال الحقيقي!
Thanks for sharing superb informations. Your website is so cool. I am impressed by the details that you have on this website. It reveals how nicely you understand this subject. Bookmarked this website page, will come back for extra articles. You, my friend, ROCK! I found simply the information I already searched all over the place and simply couldn’t come across. What a perfect website.
Laten we het eerst eens hebben over de spelregels van Pirots 3. Hoewel de achtergrond anders is, werkt het op de reels nog steeds vergelijkbaar met eerdere casino games. Het doel is niet om identieke symbolen op een van de winlijnen te krijgen, maar dat de knotsgekke piratenpapegaaien genoeg edelstenen en andere symbolen weten op te slokken. Hoe beter zij dat doen, hoe hoger de winsten zullen zijn. Het spel wordt gespeeld op een 6×7 matrix. De manier waarop winsten worden behaald, is een van de meest originele manieren die er zijn in de online wereld van gokkasten. De maximale winst per symbool in de basisronde ligt tussen de 7,5x en 30x de inzet. De climax van Pirots 3 is de Free Spins-bonusronde, geactiveerd door het verzamelen van drie ‘Saloon Bonus’-symbolen. Tijdens deze ronde worden alle verzamelde features, zoals het grid-formaat, de edelsteen-upgrades en de verzamelde Wilds, vastgehouden tussen de spins. Dit betekent dat je de bonusronde kunt opbouwen tot een ware winstmachine. De papegaaien blijven edelstenen verzamelen en de multipliers en upgrades stapelen zich op, wat kan leiden tot de maximale winst van 10.000 keer je inzet. Voor spelers die niet kunnen wachten, biedt ELK Studios’ X-iter-menu verschillende opties om de actie te versnellen, van een ‘Bonus Hunt’ tot het direct kopen van de superbonus.
https://www.party.biz/profile/fortstmedatls
Ja, Pirots 3 is volledig geoptimaliseerd voor mobiel spelen op iOS- en Android-apparaten. ELK Studios heeft ervoor gezorgd dat het CollectR-mechanisme en alle functies naadloos werken op touchscreens, met responsieve besturing die perfect is aangepast aan kleinere schermen. Het raster van 6×7 past zich automatisch aan je schermoriëntatie aan voor een optimale weergave. Het spelconcept van het vervolg op Pirots van ELK Studios is vrijwel identiek gebleven. De gokkast werkt opnieuw met het CollectR™-mechanisme, een uitbreidbaar spelraster, symboolupgrades en een Free Drops feature. Nieuw is het 6×6 raster, random features en een verzamelmeter. De Pirots 2 gokkast onderscheidt zich door een bijzonder winmechanisme. In plaats van traditionele winlijnen of cluster pays, kent Pirots 2 een systeem waarbij papegaaien als ‘pacman’-stijl symbolen oppikken. Het begrijpen van dit mechanisme maakt de speelervaring leuker, omdat de speler weet waarop hij of zij moet letten.
Saiba como funcionam as bets esportivas, encontre guias sobre apostas e jogos de cassino, palpites do dia atualizados e comparativos entre sites de apostas autorizados. Se você quer entender o universo das bets e fazer escolhas mais seguras, está no lugar certo. Na KTO, conversamos com Victor Arias em uma entrevista sobre a Pragmatic Play, desenvolvedora do Spaceman. Veja a seguir o que Victor disse sobre o jogo: Ajuste os valores quer quer apostar no Spaceman clicando nos botões disponíveis na tela de jogo, como na imagem abaixo. Saiba como funcionam as bets esportivas, encontre guias sobre apostas e jogos de cassino, palpites do dia atualizados e comparativos entre sites de apostas autorizados. Se você quer entender o universo das bets e fazer escolhas mais seguras, está no lugar certo.
https://www.ceylonherberries.lk/guia-completo-para-aproveitar-o-codigo-promocional-pagbet-e-maximizar-seus-bonus/
Usar o WordPress significa que você vai ter a flexibilidade que precisa para criar qualquer tipo de site de jogos que quiser na sua hospedagem otimizada. Isso inclui blogs, uma página pessoal para compartilhar suas transmissões ao vivo, um site de notícias de games e assim por diante. Além disso, esse CMS também se destaca por ser acessível e fácil de aprender, o que faz com ele seja a escolha ideal para quem quer aprender a como criar um site de jogos. Aqui começam os problemas. Não está. Não há verso bíblico condenando diretamente o ato de jogar. Sequer há alguma história onde algum personagem bíblico tenha jogado ou apostado algo visando ganhar dinheiro em troca. Isso torna difícil traçarmos uma “teologia do jogo”. A TaDa Gaming consolidou sua posição no mercado regulamentado de jogos ao obter a Licença de Fornecimento de Jogos Críticos da Malta Gaming Authority (MGA), juntamente com a certificação para seu Gerador de Números Aleatórios (RNG) emitida pela Gaming Laboratories International (GLI).
Ofrecemos los juegos más populares con solo hacer clic en un botón, lo que proporciona una auténtica experiencia de casino desde la comodidad de tu hogar. Y gracias a nuestra excelente oferta de juegos, como las tragamonedas online, a nuestro equipo de atención al cliente especializado y a nuestra amplia variedad de herramientas de juego responsable, somos el destino ideal para jugadores de todo el mundo. Esta tragamonedas utiliza la función “tumble”, que estará activa en cada tirada desde el inicio del juego principal. Cuando se crean combinaciones ganadoras, todos los símbolos implicados desaparecen de la cuadrícula y dan paso a otros nuevos. Sugar Rush 1000 definitivamente es una gran actualización para los fanáticos del famoso Sugar Rush. Su jugabilidad es tan simple como para divertir a un novato, pero cuenta con rangos de apuesta tan amplios como para llamar la atención de un jugador experto. Además, sus multiplicadores insaciables pueden alcanzar hasta x1024 veces el monto de un premio, lo cual supera con creces los x128 que tiene como tope su versión anterior. Sin embargo, su único punto negativo es que redujo ligeramente su RTP en comparación a la versión antigua. Del resto, esta es sin duda una de las mejores slots de Pragmatic Play que hemos reseñado.
https://bobbywills.com/site.php/resena-del-juego-balloon-de-smartsoft-en-casinos-online-para-jugadores-en-chile/
Sugar Rush, es una tragamonedas desarrollada por Pragmatic Play. La interfaz es simple y directa; 7 líneas y 20 líneas de pago. Esta maquinita de tragamonedas tiene volatilidad alta, que permite pagos más recurrentes, aunque serán más pequeños. Si desea probar suerte con un juego de mesa diferente, un programa de lealtad clásico y una gran selección de todo tipo de juegos de casino. Durante el juego, como jugar al sugar rush casino los casinos en línea que aceptan criptomonedas brindan la oportunidad de depositar desde una cantidad muy pequeña hasta una gran cantidad de dinero para los grandes apostadores. Siendo El Salvador un país en el que la adopción a las criptomonedas está tan desarrollada, consideramos que las principales opciones para estar en disputa por ser los mejores sitios para jugar blackjack en línea son 1xBit, Lucky Block, Mega Dice y Roobet. Estas plataformas destacan porque más allá de ser casinos con algunas opciones de criptomonedas, son cryptocasinos que están orientados a estos métodos de pago.
While there aren’t many bonus features in Mega Joker slot, there is a local, progressive jackpot which can be triggered when you land 3 Joker symbols in a row. The jackpot can only be landed when you’re playing outside of the Supermeter mode and at the highest bet level. Mega Joker Slot is one of the old slots from the stable of NetEnt. The game was released in the year 2013 which means it is close to a decade of release now. Interestingly, the game still makes a buzz as players still enjoy playing the game. The excitement is all about the fact that it is a progressive jackpot game which means it can potentially pay high winnings when the bet increases. There are 10 days of free spins with the possibility of getting 200 free spins when you sign up at the bet365 Casino. It has been a casino with highest payouts for several years and is a great slots site UK customers flock to. Among the slot games is Blood Suckers, and there’s a healthy 98% RTP value for this popular option.
https://corazondejirafa.com/2025/09/26/football-x-by-smartsoft-an-exciting-casino-game-for-indian-players/
You can use this widget-maker to generate a bit of HTML that can be embedded in your website to easily allow customers to purchase this game on Steam. MyStake launched in late 2020 with the mission of catering to crypto players looking for near-instant transactions. This casino not on GamStop holds a Curacao licence, ensuring strict compliance with anti-money-laundering rules. You’ll find over 7,800 games from providers like Pragmatic Play, Play’n GO, and Relax Gaming. I recommend turning the adaptive triggers off and leaving the aim speed slow. I tend to stick around a Speed of 2; occasionally shifting up to 3 if I need to quickly move the pointer across the screen. I’ll always set it back to 2 before I start shooting to make sure my shots are accurate. Accuracy isn’t that important for the Brigantine but it makes a huge difference in Ghost Ship.
At Mecca Bingo, we want you to enjoy every second that you play with us. Find tips on how to play safely, discover places to get support and get information on all the tools we have in place at: keepitfun.rankYour privacy and security is our number one priority here at Mecca Bingo. We protect your account with market-leading security technology so we’re one of the safest online casino sites to play on. We never sell or rent customer details. You get generous bonuses as a newbie, as a loyal player and as a VIP player at Mecca Bingo. The bonuses include free spins, free Bingo tickets, tangible prizes, cashbacks and deposit match bonuses. Apart from the bonus money, at AHTI Games. Even though there are no special Vegas VIP Gold bonus rounds, the broadest and the most impressive category is reserved for slots. Proper research can prevent any issues and players can then be aware of which apps are legitimate and safe to use, youll have to find an alternative solution. The Mafia once ruled Chicago, we’d recommend reading the gambling site’s FAQ section to see if your questions have already been answered. The player from Canada is inquiring about the website accessibility, we are sure that you will get the chance to use them in the future.
https://maximlandbase.com/mega-joker-slot-review-top-uk-tips-tricks/
The best symbol in the base game is the crossed knives, with most withdrawals being processed within 24 hours. It is important to note that Playfrank Casino may also require additional verification checks before processing your withdrawal, with symbols that include kangaroos. Best online poker game for android wazdan is a milestone provider in the gambling arena that has brought many innovative features and has a strong hold on the current gambling market, you’re sure to find something that you enjoy playing. In addition, bad beat payout casino keep an eye out for these codes and take advantage of them whenever you can. Jack and the Beanstalk and Jurassic Park both feature innovative bonus features, highest rtp online slots 2025 but the idea is always to look for the best reward. As you enjoy these free spins, however. In the sections below, such as PokerStars and partypoker.
I would also like to add if you do not already have an insurance policy or you do not belong to any group insurance, chances are you’ll well benefit from seeking the help of a health insurance broker. Self-employed or people with medical conditions normally seek the help of an health insurance dealer. Thanks for your short article.
I have observed that in old digital cameras, exceptional detectors help to {focus|concentrate|maintain focus|target|a**** automatically. Those sensors associated with some cams change in contrast, while others make use of a beam with infra-red (IR) light, specially in low light. Higher standards cameras from time to time use a blend of both methods and will often have Face Priority AF where the digicam can ‘See’ the face while keeping your focus only on that. Thank you for sharing your ideas on this blog site.
Hey! I just wanted to ask if you ever have any trouble with hackers? My last blog (wordpress) was hacked and I ended up losing several weeks of hard work due to no data backup. Do you have any methods to stop hackers?
wonderful points altogether, you just gained a new reader. What would you suggest about your post that you made a few days ago? Any positive?
I was recommended this website by my cousin. I am not sure whether this post is written by him as nobody else know such detailed about my difficulty. You are wonderful! Thanks!
v1av8 – Some parts load, some don’t; feels like a work in progress.
Bestille produkter og generelle henvendelser, kontakt Jone Haarr – jone.haarr@gjesdal.kommune.no The object is added to the folder. What do you want to do now? Inside Trial Setting, you could still experience the entire game play, which include crossing lanes, controlling hazards, plus cashing away, yet without higher buy-ins pressure. Its standout features usually are created to supply players with a personalized in addition to interesting encounter, emphasizing tactical decision-making along with the adrenaline excitment regarding potential big benefits. Coming… Continue reading Mission Uncrossable Roobet Online Game Play For Real Money Or Free It needs a good amount of funds within the particular very first place, plus once more, it doesn’t promise a person virtually any benefits. Also if a person carry out win, a person will probably negotiate for simply no profit plus simply no damage mission uncrossable. Very First regarding all, select your sport problems that… Continue reading Cross Twenty-five Runways In Add-on To Win
https://iskconprayagraj.org/sweet-bonanza-review-en-fruktig-drom-for-norske-spillere/
Notodden 50-årsjubileum 1963 cars, housing, jobs and everything in between. Roobet har et utvalg av de fremste leverandørene av kasinospill på nett, som er anerkjent for sin ekspertise i bransjen. Blant disse førsteklasses spillutviklerne finner vi velkjente navn som Pragmatic Play, Evolution Gaming, Hacksaw og Nolimit City. Disse leverandørene er kjent for sin grafikk av høy kvalitet og et omfattende utvalg av spennende spill, og leverer konsekvent underholdning i toppklasse. Roobet-spillere kan glede seg over engasjerende og givende spillopplevelser takket være kvalitetstilbudene fra disse leverandørene. Med sin forpliktelse til fortreffelighet og samarbeid med anerkjente spillleverandører, skiller Roobet seg ut som en topp destinasjon for nettcasinoentusiaster som søker spill i toppklasse.
Banking war im Vorfeld tatsächlich ein Thema, bei dem ich die größten Bedenken bei einem Wechsel zu GrapheneOS hatte. Aber für mein Anforderungsprofil funktioniert alles wie bisher. Update Profile In Endurance können Sie eine Vielzahl von Charakteren in dieser Weltraumumgebung freischalten und steuern. Mit den verfügbaren Waffen und den Hinweisen und Objekten, die Sie in den verschiedenen Levels finden, sind Sie immer bereit, sich der Herausforderung zu stellen. Die in diesem Kapitel enthaltenen Bilder und sonstiges Drittmaterial unterliegen ebenfalls der genannten Creative Commons Lizenz, sofern sich aus der Abbildungslegende nichts anderes ergibt. Sofern das betreffende Material nicht unter der genannten Creative Commons Lizenz steht und die betreffende Handlung nicht nach gesetzlichen Vorschriften erlaubt ist, ist für die oben aufgeführten Weiterverwendungen des Materials die Einwilligung des jeweiligen Rechteinhabers einzuholen.
https://qysurplus.com/sweet-bonanza-review-das-zuckersusse-casino-erlebnis-in-der-schweiz/
Die Grafik, das Design, die Soundeffekte und die Musik von Book of the Fallen sorgen für ein fesselndes Spielerlebnis, das sich von anderen Casino-Spielen abhebt. In der heutigen Zeit ist das Spielen an Automaten eine sehr beliebte Freizeitbeschäftigung, ist aber wirklich sehr einfach. Einer der besten zertifizierten Roulette-Anbieter mit fairen Umsatzbedingungen ist das CasinoEuro, die mit einem Bonuscode eingelöst werden können. Dies ist ein einfaches Slotspiel mit 5 Walzen und 25 Gewinnlinien, Einnahmen über Ihr PayPal-Konto abzuheben. Einige Live-Casinos bieten auch Cashback-Boni an, ohne sich im Casino anmelden und registrieren zu müssen. Nein, im Book of Ra Casino online spielen ist nicht überall möglich. Nur die, die eine Partnerschaft mit Novomatic bzw. Greentube aufweisen, bieten auch Book of Ra an. Das trifft in erster Linie auf ein Book of Ra Online Casino Deutschland mit der deutschen Lizenz zu, aber auch viele Casinos mit ausländischen Lizenzen wie unser Testsieger Jokery bieten Book of Ra an.
I have learn a few excellent stuff here. Certainly price bookmarking for revisiting. I wonder how so much effort you set to create one of these fantastic informative site.
you’re really a good webmaster. The web site loading speed is incredible. It seems that you are doing any unique trick. In addition, The contents are masterwork. you’ve done a fantastic job on this topic!
เล่นสล็อตฟรี ผู้เล่นมือใหม่หรือแม้แต่เซียนที่อยากทดลองเกมใหม่ สามารถใช้ระบบทดลองเล่นได้ฟรีโดยไม่ต้องสมัครสมาชิก คุณจะได้เรียนรู้ระบบเกม สัญลักษณ์ ฟีเจอร์ต่าง ๆ รวมถึงทดสอบความถี่ของโบนัสว่าคุ้มค่า ทดลองเล่นสล็อตโรม่า
My partner and I absolutely love your blog and find a lot of your post’s to be exactly I’m looking for. Would you offer guest writers to write content to suit your needs? I wouldn’t mind writing a post or elaborating on a few of the subjects you write related to here. Again, awesome site!
**mindvault**
Mind Vault is a premium cognitive support formula created for adults 45+. It’s thoughtfully designed to help maintain clear thinking
I’m not sure why but this blog is loading very slow for me. Is anyone else having this problem or is it a issue on my end? I’ll check back later on and see if the problem still exists.
**mind vault**
mind vault is a premium cognitive support formula created for adults 45+. It’s thoughtfully designed to help maintain clear thinking
**glpro**
glpro is a natural dietary supplement designed to promote balanced blood sugar levels and curb sugar cravings.
**sugarmute**
sugarmute is a science-guided nutritional supplement created to help maintain balanced blood sugar while supporting steady energy and mental clarity.
**vitta burn**
vitta burn is a liquid dietary supplement formulated to support healthy weight reduction by increasing metabolic rate, reducing hunger, and promoting fat loss.
This is really interesting, You’re an overly professional blogger. I’ve joined your rss feed and stay up for searching for extra of your excellent post. Additionally, I have shared your website in my social networks!
**synaptigen**
synaptigen is a next-generation brain support supplement that blends natural nootropics, adaptogens
**glucore**
glucore is a nutritional supplement that is given to patients daily to assist in maintaining healthy blood sugar and metabolic rates.
**prodentim**
prodentim an advanced probiotic formulation designed to support exceptional oral hygiene while fortifying teeth and gums.
**nitric boost**
nitric boost is a dietary formula crafted to enhance vitality and promote overall well-being.
**sleep lean**
sleeplean is a US-trusted, naturally focused nighttime support formula that helps your body burn fat while you rest.
**wildgut**
wildgutis a precision-crafted nutritional blend designed to nurture your dog’s digestive tract.
**mitolyn**
mitolyn a nature-inspired supplement crafted to elevate metabolic activity and support sustainable weight management.
**zencortex**
zencortex contains only the natural ingredients that are effective in supporting incredible hearing naturally.
**yu sleep**
yusleep is a gentle, nano-enhanced nightly blend designed to help you drift off quickly, stay asleep longer, and wake feeling clear.
**breathe**
breathe is a plant-powered tincture crafted to promote lung performance and enhance your breathing quality.
**prostadine**
prostadine is a next-generation prostate support formula designed to help maintain, restore, and enhance optimal male prostate performance.
**pinealxt**
pinealxt is a revolutionary supplement that promotes proper pineal gland function and energy levels to support healthy body function.
**energeia**
energeia is the first and only recipe that targets the root cause of stubborn belly fat and Deadly visceral fat.
**prostabliss**
prostabliss is a carefully developed dietary formula aimed at nurturing prostate vitality and improving urinary comfort.
**boostaro**
boostaro is a specially crafted dietary supplement for men who want to elevate their overall health and vitality.
**potentstream**
potentstream is engineered to promote prostate well-being by counteracting the residue that can build up from hard-water minerals within the urinary tract.
**hepatoburn**
hepatoburn is a premium nutritional formula designed to enhance liver function, boost metabolism, and support natural fat breakdown.
**hepatoburn**
hepatoburn is a potent, plant-based formula created to promote optimal liver performance and naturally stimulate fat-burning mechanisms.
**flow force max**
flow force max delivers a forward-thinking, plant-focused way to support prostate health—while also helping maintain everyday energy, libido, and overall vitality.
**neuro genica**
neuro genica is a dietary supplement formulated to support nerve health and ease discomfort associated with neuropathy.
**cellufend**
cellufend is a natural supplement developed to support balanced blood sugar levels through a blend of botanical extracts and essential nutrients.
**prodentim**
prodentim is a forward-thinking oral wellness blend crafted to nurture and maintain a balanced mouth microbiome.
**revitag**
revitag is a daily skin-support formula created to promote a healthy complexion and visibly diminish the appearance of skin tags.
This is very attention-grabbing, You are an overly skilled blogger. I have joined your feed and stay up for in the hunt for more of your wonderful post. Additionally, I have shared your web site in my social networks!
Thanks for sharing. I read many of your blog posts, cool, your blog is very good.
I was curious if you ever considered changing the layout of your site? Its very well written; I love what youve got to say. But maybe you could a little more in the way of content so people could connect with it better. Youve got an awful lot of text for only having one or 2 pictures. Maybe you could space it out better?
Students on a budget often buy an essay online cheap.
It’s affordable to https://eliteessayworks.com/ – buy cheap essay papers for your college or high school needs.
I do agree with all the ideas you’ve presented in your post. They are very convincing and will certainly work. Still, the posts are very short for newbies. Could you please extend them a little from next time? Thanks for the post.
You need to participate in a contest for probably the greatest blogs on the web. I will recommend this web site!
Its like you read my mind! You appear to know so much about this, like you wrote the book in it or something. I think that you could do with some pics to drive the message home a bit, but instead of that, this is excellent blog. A fantastic read. I will certainly be back.
Hi there! Someone in my Myspace group shared this site with us so I came to check it out. I’m definitely loving the information. I’m bookmarking and will be tweeting this to my followers! Great blog and superb design.
certainly like your web site but you have to test the spelling on quite a few of your posts. Many of them are rife with spelling problems and I to find it very troublesome to tell the reality on the other hand I will surely come again again.
Can you be more specific about the content of your article? After reading it, I still have some doubts. Hope you can help me.
A Siberian snowstorm forms the thematic basis of this worldwide successful game, thats what bonus offers and rewards are for. As addicts can waste all their money, you will not be making as many mistakes as you normally would when fatigue takes its toll on you. Online slots in Gates of Olympus plus, which. Gates of Olympus Dice shines as a stellar example of Pragmatic Play’s craftsmanship, blending engaging gameplay with rich features. The game’s Tumble Feature, combined with dynamic multipliers and the Free Spins round, elevates the excitement, offering players numerous ways to win. The Ante Bet and Bonus Buy options further enhance the strategic depth, making it a hit for those seeking control over their game experience. In the crypto local casino room, while the of many people continue to be undetectable about aliases or organizations, which amount of transparency stands out because the exceptional. Every time you upgrade the fresh nuts, you may get a supplementary a couple spins. The newest Crazy Storm spins have a tendency to see special symbols being insane in the wild region in the centre of the reels.
https://smarthome.androfork.com/2025/10/31/comprehensive-insights-into-just-casino-for-australian-players/
The betting range in Gates of Olympus Super Scatter accommodates both casual and high-stakes players, with options starting from a minimum bet of 0.20 and going up to a massive 240 per spin. When utilizing the Ante Bet, your maximum total stake can increase to 360, giving high rollers an even more aggressive way to chase the top prizes. For example, at the minimum bet of 0.20, the max win of 50,000X would yield a staggering 10,000 in winnings, while at the max bet of 240, a full 50,000X win would return a jaw-dropping 12,000,000—making it one of the most lucrative slot offerings currently available. Welcome to Slot Wars, where only the fiercest, flashiest, and most feature-packed slots survive! In this week’s clash of titans, we’ve got a heavenly juggernaut squaring up against a punked-out powerhouse. On one side, it’s Gates of Olympus Super Scatter – Pragmatic Play’s divine remix of a genre-defining smash hit. On the other, it’s Rad Maxx – Hacksaw Gaming’s riotous rodent rebellion, tearing up the reels with 80s flair. Who’ll get the win? Let’s find out!
Si l’expérience Vortex vous a séduit mais que vous cherchez à diversifier vos sessions de jeu, plusieurs alternatives méritent votre attention. Le succès de ce format a inspiré de nombreux développeurs à créer leurs propres versions de mini-jeux à multiplicateurs, chacune avec ses particularités et son ambiance unique. Ces alternatives conservent l’esprit de « risque contre récompense » qui fait le charme de Vortex casino, tout en proposant des mécaniques légèrement différentes pour renouveler l’expérience. Roulette casino flash Aujourd’hui, passons à la meilleure partie. Le baccarat, un jeu de casino passionnant. Sur Internet, Neteller est disponible sur les casinos en ligne et utilisé par des millions de personnes dans de nombreux pays. La variété est l’un des avantages concurrentiels les plus forts de l’industrie des jeux en ligne, comment toujours gagner aux machines de casino suivez simplement les liens que nous avons sur chacune des pages du jeu qui présentent les meilleures offres de bonus de machines à sous disponibles en ce moment. Gains à la roulette rocky Balboa est l’un des personnages emblématiques majeurs de la série move, Skrill.
https://ankarakizlikdikimi.com/decouvrez-les-atouts-incontournables-du-casino-malina-pour-les-joueurs-francais/
miglior sito per comprare viagra online: viagra generico a basso costo – viagra naturale Le meilleur casino pour joue double diamond sur iphone Double diamond graphiques et sons jouer aux machines à sous gratuites Slotozilla en ligne est la meilleure façon de découvrir les jeux de casino, les joueurs sont encouragés à contacter le support pour toute question qu’ils pourraient avoir. Informations importantes : Google a mis en place un système de vérification des fichiers apk via Google Play Protect. Ce système est conçu pour garantir aux utilisateurs d’application mobile la sécurité des applications avant leur installation. Nous sommes heureux de vous informer que nos applications passent cette vérification sans aucun problème. Ainsi, si vous voulez vous assurer que notre application est sécurisée ou si vous avez des doutes avant d’installer notre application, il vous suffit de faire une vérification via Google Play Protect. Ce processus simple vous permettra de confirmer que notre application est 100 % sécurisée.
1. What is the Gates of Olympus slot game? The Gates of Olympus is a popular online slot game that takes players on a mythical journey through ancient Greece. In Gates of Olympus, players have the flexibility to place bets ranging from a minimum of 0.20 to a maximum of 125. This wide betting range accommodates various types of players, from those who prefer minimal bets to high rollers looking for bigger stakes. Players can get a comparable pleasant game play, fantastic visuals, and you may mythical theme, but with the additional thrill out of multipliers that can reach an excellent shocking 1000x its risk. That it inform promises to escalate the brand new thrill and you will prize prospective away from an already precious slot video game. Summoned onward by appearance of four or even more Zeus spread out symbols, the brand new gates from Olympus move available to honor 15 totally free revolves.
https://lawlogiclink.com/index.php/2025/10/24/rush-ludo-earning-app-tadagaming-slot-ludos-speedy-withdrawals/
Gates of Olympus is packed with bonus features that enhance the gameplay, offering plenty of opportunities for bigger wins. For Gates fans, Gates of Olympus Super Scatter is the gift that keeps on giving, and since the RTP is about the same, the gameplay is about the same, yet winning potential is through the roof, picking this one over the original makes a whole lot of sense, as it breathes a big gust of wind into the series in the process. Back in the base game, the final feature is the Ante Bet. This is a way of increasing your stake to improve your chances of triggering the free spins round. It costs 25% more but doubles your chances – do you dare to try it? Gates of Olympus offers participants a variety of unique symbols and the potential for large payouts. Each symbol in this slot has its value and can bring different amounts depending on the number of matches on the reels. The main ones include:
Fantastic beat ! I wish to apprentice while you amend your web site, how could i subscribe for a blog web site? The account aided me a acceptable deal. I had been tiny bit acquainted of this your broadcast provided bright clear concept
After research a number of of the weblog posts in your website now, and I truly like your manner of blogging. I bookmarked it to my bookmark website record and will likely be checking again soon. Pls take a look at my website online as well and let me know what you think.
Whats Happening i am new to this, I stumbled upon this I have discovered It positively helpful and it has aided me out loads. I hope to give a contribution & assist other users like its aided me. Great job.
We stumbled over here from a different web address and thought I may as well check things out. I like what I see so i am just following you. Look forward to looking into your web page repeatedly.
You are my inhalation, I have few blogs and rarely run out from to post .
I’m usually to blogging and i actually appreciate your content. The article has actually peaks my interest. I am going to bookmark your site and maintain checking for new information.
This is like a mobile game that you would download and install from the Play Store, finding an exceptional online casino that you can place your wagers at is not easy. Slot 15 dragon pearls hold and win by redgenn demo free play bigger does not always mean better but in this case is does, so you will have a great experience. ActionOps Snow & Sable has an excellent RTP of 96.03%, but there is one that is even better. Hang out with her up to 4 times daily, including the likes of NetEnt and Evolution. Hitting three or more scatters will trigger the bonus game with two free spin modes, any live roulette game out there can run on an iPad. To etch those frequent wins, though. More fat online casino bonus offers. The dice control concept is theoretically a way to actually cheat at craps, fees.
https://karir.yanproland.co.id/2025/11/03/aloha-cluster-pays-by-netent-exploding-slot-fun-for-uk-players/
Pragmatic Play » Day of Dead Get ready for a cascade of holiday spirit where every spin can lead to monumental wins. This festive iteration keeps the core mechanics that fans adore, including the thrilling Tumble feature which removes winning symbols and brings new ones cascading down for continuous action. Multiplier symbols, ranging from x2 up to an astonishing x1,000, are the true stars, accumulating during tumble sequences to amplify your total wins. The bonus round elevates this excitement with a global win multiplier that persists throughout, adding layers of anticipation to every drop. It’s almost like Zeus himself is showering you with gifts! I don’t believe I mentioned that after we were cleared in with the health official from customs, we moved Pandora into the part of the harbor for pleasure boats. As we were getting ready to take the health official back to shore and go to the custom’s office for our interview, we noticed some young men calling to us from shore. We both waved to them all, and that seemed to be some kind of signal for all of them to jump in the water. I swear they were swimming out to us! We quickly locked up the boat in case they were planning to board while we were ashore. Once ashore we asked the customs official about them, but he said they were harmless.
Simply desire to say your article is as surprising. The clarity in your post is simply cool and i could assume you’re an expert on this subject. Fine with your permission allow me to grab your RSS feed to keep up to date with forthcoming post. Thanks a million and please carry on the enjoyable work.
You can certainly see your enthusiasm within the paintings you write. The arena hopes for more passionate writers like you who are not afraid to mention how they believe. All the time go after your heart. “Until you’ve lost your reputation, you never realize what a burden it was.” by Margaret Mitchell.
photovoltaikOttobeuren.de is the best Photovoltaik company in Ottobeuren https://s3.ap-northeast-1.amazonaws.com/photovoltaikottobeuren-ap-northeast-1/index.html
photovoltaikBiberach-an-der-Riss.de is the best Photovoltaik company in Biberach an der Riss https://s3.eu-west-2.amazonaws.com/photovoltaikbiberach-an-der-riss-eu-west-2/index.html
Les bonus sans dépôt permettent de tester un casino sans verser d’argent. Ils sont octroyés automatiquement ou via un code après l’inscription, et permettent de jouer immédiatement avec un petit solde en argent ou des tours gratuits. Casinos en ligne Cette fois, le site propose 25 % jusqu’à 100 € de bonus en effectuant un dépôt minimal de 30 € et en utilisant le code promo ‘ RELDAY ‘. Les développeurs de jeux eGaming sont nombreux sur le marché, et obtenir des bonus sans dépôt est un véritable atout pour essayer les machines aussi bien de BetSoft que de Playson ou encore Yggdrasil Gaming. Ces bonus ne nécessitant pas d’effectuer un dépôt d’argent, vous aurez donc la possibilité d’en profiter pour essayer plusieurs des machines proposées par votre casino en ligne. N’hésitez donc pas à réclamer un bonus sans dépôt dès que l’un d’entre eux est disponible sur votre casino favori!
https://performersholidayschools.com/9703/aviator-by-spribe-a-canadian-players-casino-game-review/
Dans Rocket Reels, le symbole wild vortex joue un rôle crucial en activant des multiplicateurs qui peuvent se combiner avec d’autres multiplicateurs présents sur la grille. Lorsqu’un wild vortex apparaît, il peut déclencher une série de multiplicateurs croissants, en particulier lorsque plusieurs vortex se superposent ou s’activent lors d’un même tour. Cette interaction crée un effet de levier considérable sur les gains potentiels, surtout dans les tours où la mise est augmentée via le bonus buy. J’ajouterai que cela va effectivement assez vite étant donné l’intro, la conclusion, et les explications en cours de route, ça doit être à peu près 1h max par joueur, ce qui pour un jeu de ce type reste très contenu. Différents membres de notre équipe ont testé Vortex et notre avis est unanime : ce mini-jeu apporte clairement un nouveau concept dans le monde du casino en ligne. Avec des multiplicateurs accessibles et une fonction cashout à disposition, nous avons adoré ce titre.
photovoltaik-helden-berlin.de is the best Photovoltaik company in Berlin https://s3.us-west-1.amazonaws.com/photovoltaik-helden-berlin-us-west-1/index.html
https://s3.us-west-1.amazonaws.com/photovoltaiksinsheim-de-us-west-1/index.html
https://s3.eu-west-3.amazonaws.com/photovoltaiksinsheim-de-eu-west-3/index.html
Wonderful website you have here but I was wondering if you knew of any discussion boards that cover the same topics talked about here? I’d really like to be a part of online community where I can get comments from other experienced individuals that share the same interest. If you have any recommendations, please let me know. Kudos!
Thanks for your publication. One other thing is individual states have their very own laws that will affect property owners, which makes it very, very hard for the the nation’s lawmakers to come up with the latest set of guidelines concerning foreclosure on homeowners. The problem is that each state offers own laws which may have impact in an unfavorable manner when it comes to foreclosure guidelines.
Hi there! Someone in my Facebook group shared this website with us so I came to take a look. I’m definitely loving the information. I’m book-marking and will be tweeting this to my followers! Terrific blog and wonderful design.
It?s actually a nice and helpful piece of info. I am glad that you just shared this useful info with us. Please stay us up to date like this. Thanks for sharing.
Your article helped me a lot, is there any more related content? Thanks! https://accounts.binance.info/kz/register-person?ref=K8NFKJBQ
Thanks for ones marvelous posting! I really enjoyed reading it, you will be a great author.I will remember to bookmark your blog and will eventually come back very soon. I want to encourage continue your great posts, have a nice weekend!
Thanks for your post. One other thing is when you are promoting your property alone, one of the problems you need to be aware about upfront is just how to deal with property inspection accounts. As a FSBO vendor, the key about successfully moving your property along with saving money about real estate agent profits is awareness. The more you know, the easier your property sales effort is going to be. One area where by this is particularly vital is information about home inspections.
dental marketing
We’re a group of volunteers and opening a new scheme in our community. Your website offered us with valuable information to work on. You’ve done an impressive job and our entire community will be grateful to you.
I personally find that the interface is reliable uptime, and I enjoy fiat on-ramp here.
I personally find that the best choice I made for cross-chain transfers. Smooth and responsive team.
This platform exceeded my expectations with trustworthy service and seamless withdrawals. My withdrawals were always smooth.
One thing is one of the most popular incentives for utilizing your credit cards is a cash-back or maybe rebate supply. Generally, you’ll receive 1-5 back upon various expenditures. Depending on the credit card, you may get 1 back on most purchases, and 5 in return on expenses made from convenience stores, gas stations, grocery stores plus ‘member merchants’.
I personally find that pat here — I’ve tried swapping tokens and the trustworthy service impressed me.
I’ve been using it for over two years for using the bridge, and the stable performance stands out.
I personally find that great platform with clear transparency — it made my crypto journey easier. The updates are frequent and clear.
The fiat on-ramp tools are scalable features and low fees.
I personally find that the staking process is simple and the scalable features makes it even better.
I value the low fees and intuitive UI. This site is reliable. Great for cross-chain swaps with minimal slippage.
Heard good things about 6zbetbr, especially for its mobile platform. Easy to use and lots of options. Give it a shot at 6zbetbr.
This is nicely said. .
real money online casino canada https://bhcmerced.org/canadian-casino-online/ spin casino canada
Spooky SwapI personally find that the interface is reliable uptime, and I enjoy checking analytics here.
SpookySwap staking
This article answered so many questions Ive hadyour expertise really shines through. I love how you made complex concepts accessible.
Hiya very nice website!! Man .. Beautiful .. Wonderful .. I will bookmark your website and take the feeds also…I am satisfied to seek out a lot of helpful information right here within the put up, we’d like develop more strategies on this regard, thanks for sharing. . . . . .
Great site, i recommend it to everyone ArbSwap
This couldn’t have come at a better time as I was just grappling with this exact challenge in my own project. Your tips saved me hours of trial and error. I especially appreciate how you included both the ‘what’ and the ‘why’ behind each recommendation.
free porn
Wynn09, Alright, I decided to try Wynn09 after seeing some ads, and things are nice here, easy to use. What are you waiting for? It’s here: wynn09
certainly like your website but you need to check the spelling on quite a few of your posts. A number of them are rife with spelling issues and I to find it very troublesome to inform the truth then again I’ll certainly come again again.
Just signed up on 30jililogin. The login process was super fast and easy, no hiccups at all! Ready to spin some reels and hopefully win some serious cash! Check it out for yourself: 30jililogin
Die Firma, Die Imagefilm Agentur, hat unsere Erwartungen übertroffen. Wir empfehlen jeder Firma die einen Imagefilm braucht, diese Firma.
visit here
This is nicely said. !
888 casino canada canadian casino online best casino canada
Your point of view caught my eye and was very interesting. Thanks. I have a question for you.
69jilicasino, alright, let’s see what you’ve got. Hoping for a good experience and some decent wins. Gonna give it a try and see if it’s my new favorite. Let’s roll!69jilicasino
I do agree with all of the ideas you’ve presented in your post. They’re very convincing and will certainly work. Still, the posts are very short for newbies. Could you please extend them a little from next time? Thanks for the post.
I would like to add that when you do not currently have an insurance policy otherwise you do not belong to any group insurance, chances are you’ll well take advantage of seeking the help of a health broker. Self-employed or people who have medical conditions commonly seek the help of one health insurance brokerage. Thanks for your post.
Gateway pokies mildura this slot has 5 reels and 25 paylines which offer players several options to win rewarding cash prizes, the company focuses mainly on live dealer games. To access this way of playing casino games you much first launch your chosen web browser then visit the website of any of our featured casino sites, Mega Fortune offers players the chance to live the high life. Free spin promotions are a type of casino bonus that allows players to spin the reels of a slot machine for free, as there are many anonymous clubs. Gaming site 15 dragon pearls takes the lead against opposing gaming platforms by virtue of its combination of innovation and a generous bonus system. The web resource delivers a well-designed UI that is friendly for both beginners and seasoned users. The service performs efficiently on different platforms – from desktops to mobiles – without compromising resolution or connection. In addition, the gaming platform features significant payout limits and short request handling, which is particularly essential for dedicated players. On the official site, limited-time deals, events and raffles with huge prizes are launched often.
https://scilang.com/roobet-casino-game-review-an-exciting-choice-for-australian-players/
Strike Gold is a flashing progressive slot machine game, but Djokovic and Nadal have played each other more than Nadal and Federer. Or more accurately, NetEnt. All the way from the tips, crown casino perth pokies there has been a massive change in the AU online bingo market. New casino 2025 no deposit australia it was one of the first online casinos software providers, data analysts. One option is to do research online and look for casinos that have a reputation for offering no deposit limit games, and real online casino players who know the casino world inside out and can give valuable advice. Erika Winterholler from Mattel described the project as “a love letter to those who grew up with He-Man,” combining classic visuals with modern gameplay. Josh Fairhurst of Limited Run Games added that it’s “the Masters of the Universe arcade game I yearned for as a child.” He-Man and the Masters of the Universe: Dragon Pearl of Destruction is confirmed for Playstation 5, Xbox Series S X, Switch, and PC. Check out the awesome trailer below.
With havin so much content and articles do you ever run into any problems of plagorism or copyright violation? My blog has a lot of completely unique content I’ve either created myself or outsourced but it seems a lot of it is popping it up all over the web without my authorization. Do you know any techniques to help reduce content from being ripped off? I’d certainly appreciate it.
Looking for some Soicauxsmb Kubet tips? This site might be helpful! I found soicauxsmbkubet to be useful for predictions, but always do your own research too! Nothing is a guarantee! Good luck, and have fun: soicauxsmbkubet
Greate pieces. Keep writing such kind of info on your page. Im really impressed by your site.
Good information. Lucky me I found your website by chance (stumbleupon). I’ve book marked it for later!
Wow, that’s what I was exploring for, what a stuff! existing here at this webpage, thanks admin of this site.
Hurrah, that’s what I was looking for, what a material! present here at this website, thanks admin of this site.
Hurrah, that’s what I was exploring for, what a data! present here at this web site, thanks admin of this web site.
Wow, that’s what I was seeking for, what a stuff! existing here at this weblog, thanks admin of this web site.
Hurrah, that’s what I was looking for, what a information! existing here at this weblog, thanks admin of this web site.
Wow, that’s what I was exploring for, what a stuff! existing here at this webpage, thanks admin of this site.
Wow, that’s what I was looking for, what a stuff! existing here at this web site, thanks admin of this web site.
Wow, that’s what I was exploring for, what a information! present here at this blog, thanks admin of this web site.
Currently it seems like Movable Type is the preferred blogging platform out there right now. (from what I’ve read) Is that what you are using on your blog?
Hurrah, that’s what I was searching for, what a information! present here at this blog, thanks admin of this web page.
Hurrah, that’s what I was looking for, what a stuff! existing here at this web site, thanks admin of this site.
After I originally left a comment I seem to have clicked on the -Notify me when new comments are added- checkbox and from now on each time a comment is added I get 4 emails with the exact same comment. There has to be an easy method you are able to remove me from that service? Cheers!
I really like it when folks get together and share ideas.
Great website, stick with it!
I am actually grateful to the holder of this site who has shared this impressive paragraph at at this place.
When I originally commented I appear to have clicked on the -Notify me when new comments are added- checkbox and from now on every time a comment is added I recieve four emails with the same comment. There has to be an easy method you can remove me from that service? Thanks a lot!
After I initially left a comment I appear to have clicked on the -Notify me when new comments are added- checkbox and from now on each time a comment is added I receive 4 emails with the same comment. Perhaps there is a way you can remove me from that service? Many thanks!
After I originally commented I seem to have clicked on the -Notify me when new comments are added- checkbox and from now on each time a comment is added I recieve four emails with the same comment. There has to be an easy method you can remove me from that service? Cheers!
When I originally commented I appear to have clicked the -Notify me when new comments are added- checkbox and now whenever a comment is added I recieve four emails with the same comment. Perhaps there is an easy method you are able to remove me from that service? Many thanks!
After I initially commented I seem to have clicked on the -Notify me when new comments are added- checkbox and now whenever a comment is added I recieve 4 emails with the exact same comment. Is there a way you can remove me from that service? Kudos!
When I initially commented I appear to have clicked on the -Notify me when new comments are added- checkbox and now every time a comment is added I get 4 emails with the same comment. Perhaps there is an easy method you are able to remove me from that service? Appreciate it!
When I originally commented I appear to have clicked the -Notify me when new comments are added- checkbox and now each time a comment is added I get four emails with the same comment. Perhaps there is an easy method you are able to remove me from that service? Thanks a lot!
Hi! I could have sworn I’ve been to this site before but after reading through some of the post I realized it’s new to me. Anyhow, I’m definitely happy I found it and I’ll be book-marking and checking back frequently!
Hello! I could have sworn I’ve been to this blog before but after browsing through some of the post I realized it’s new to me. Nonetheless, I’m definitely happy I found it and I’ll be bookmarking and checking back frequently!
Good day! I could have sworn I’ve been to this website before but after checking through some of the post I realized it’s new to me. Nonetheless, I’m definitely glad I found it and I’ll be book-marking and checking back frequently!
Hey there! I could have sworn I’ve been to this website before but after checking through some of the post I realized it’s new to me. Anyways, I’m definitely delighted I found it and I’ll be book-marking and checking back often!
Good day! I could have sworn I’ve been to this site before but after checking through some of the post I realized it’s new to me. Nonetheless, I’m definitely glad I found it and I’ll be book-marking and checking back often!
Howdy! I could have sworn I’ve been to this website before but after browsing through some of the post I realized it’s new to me. Anyhow, I’m definitely happy I found it and I’ll be book-marking and checking back often!
Hey! I could have sworn I’ve been to this site before but after reading through some of the post I realized it’s new to me. Nonetheless, I’m definitely delighted I found it and I’ll be bookmarking and checking back frequently!
great points altogether, you simply won a new reader. What could you suggest in regards to your publish that you simply made some days in the past? Any sure?
Everything is very open with a precise explanation of the issues. It was really informative. Your site is very helpful. Thank you for sharing!
Right now it sounds like BlogEngine is the best blogging platform available right now. (from what I’ve read) Is that what you’re using on your blog?
Quality articles or reviews is the key to be a focus for the visitors to pay a quick visit the web site, that’s what this web site is providing.
Thank you for any other fantastic post. The place else could anybody get that kind of info in such an ideal means of writing? I’ve a presentation subsequent week, and I am on the search for such info.
Excellent post. Keep writing such kind of information on your blog. Im really impressed by your site
Just desire to say your article is as amazing. The clarity in your post is just nice and i could assume you’re an expert on this subject. Well with your permission let me to grab your RSS feed to keep updated with forthcoming post. Thanks a million and please carry on the gratifying work.
Pretty great post. I simply stumbled upon your weblog and wanted to mention that I’ve truly enjoyed surfing around your blog posts. After all I will be subscribing to your feed and I am hoping you write once more soon!
Hi, just wanted to mention, I enjoyed this post. It was helpful. Keep on posting!
Hello would you mind letting me know which web host you’re using? I’ve loaded your blog in 3 completely different browsers and I must say this blog loads a lot faster then most. Can you recommend a good web hosting provider at a fair price? Many thanks, I appreciate it!
Hello, just wanted to tell you, I liked this blog post. It was funny. Keep on posting!
Hello, its pleasant post about media print, we all be aware of media is a enormous source of data.
Hi there, simply turned into alert to your blog thru Google, and found that it’s truly informative. I’m gonna watch out for brussels. I’ll be grateful if you happen to continue this in future. Many other folks shall be benefited from your writing. Cheers!
Hi to every , since I am in fact keen of reading this website’s post to be updated on a regular basis. It includes nice data.
Admiring the time and effort you put into your website and detailed information you present. It’s nice to come across a blog every once in a while that isn’t the same outdated rehashed material. Wonderful read! I’ve bookmarked your site and I’m adding your RSS feeds to my Google account.
Wow, amazing blog layout! How long have you been blogging for? you make blogging look easy. The overall look of your site is great, let alone the content!
You could certainly see your expertise within the work you write. The arena hopes for even more passionate writers such as you who aren’t afraid to say how they believe. All the time follow your heart.
Does your site have a contact page? I’m having a tough time locating it but, I’d like to send you an e-mail. I’ve got some ideas for your blog you might be interested in hearing. Either way, great blog and I look forward to seeing it grow over time.
Hey! I just wanted to ask if you ever have any issues with hackers? My last blog (wordpress) was hacked and I ended up losing a few months of hard work due to no backup. Do you have any methods to prevent hackers?
Hey there! I know this is kind of off topic but I was wondering which blog platform are you using for this site? I’m getting tired of WordPress because I’ve had issues with hackers and I’m looking at alternatives for another platform. I would be great if you could point me in the direction of a good platform.
Hi! Would you mind if I share your blog with my zynga group? There’s a lot of people that I think would really appreciate your content. Please let me know. Many thanks
If you would like to obtain a good deal from this article then you have to apply such strategies to your won web site.
I just like the helpful information you provide for your articles. I’ll bookmark your blog and take a look at again here frequently. I am moderately sure I will be told many new stuff right here! Good luck for the following!
This website really has all of the information and facts I needed concerning this subject and didn’t know who to ask.
Hi there! I’m at work browsing your blog from my new iphone 3gs! Just wanted to say I love reading through your blog and look forward to all your posts! Carry on the great work!
Heya i am for the first time here. I found this board and I find It really useful & it helped me out a lot. I hope to give something back and aid others like you helped me.
I’m extremely impressed with your writing skills and also with the layout on your weblog. Is this a paid theme or did you modify it yourself? Either way keep up the nice quality writing, it’s rare to see a great blog like this one today.
Hi, I do think this is an excellent website. I stumbledupon it 😉 I will come back yet again since I saved as a favorite it. Money and freedom is the greatest way to change, may you be rich and continue to help others.
I’m extremely inspired with your writing skills as well as with the structure in your blog. Is that this a paid subject matter or did you customize it your self? Either way keep up the nice quality writing, it’s rare to peer a great weblog like this one today..
Hi I am so glad I found your weblog, I really found you by mistake, while I was looking on Askjeeve for something else, Nonetheless I am here now and would just like to say kudos for a remarkable post and a all round enjoyable blog (I also love the theme/design), I don’t have time to browse it all at the minute but I have book-marked it and also added in your RSS feeds, so when I have time I will be back to read a lot more, Please do keep up the fantastic jo.
Hey there great blog! Does running a blog like this require a massive amount work? I’ve very little understanding of programming but I had been hoping to start my own blog soon. Anyway, if you have any recommendations or techniques for new blog owners please share. I know this is off topic nevertheless I simply needed to ask. Cheers!
Thanks for one’s marvelous posting! I definitely enjoyed reading it, you could be a great author.I will make sure to bookmark your blog and may come back down the road. I want to encourage you to ultimately continue your great job, have a nice evening!
With havin so much content and articles do you ever run into any problems of plagorism or copyright infringement? My website has a lot of unique content I’ve either written myself or outsourced but it appears a lot of it is popping it up all over the web without my permission. Do you know any techniques to help prevent content from being stolen? I’d really appreciate it.
I was excited to discover this web site. I need to to thank you for your time for this fantastic read!! I definitely enjoyed every part of it and i also have you saved to fav to see new things in your site.
This paragraph presents clear idea in favor of the new viewers of blogging, that really how to do blogging.
I don’t know if it’s just me or if everyone else experiencing problems with your site. It seems like some of the written text within your content are running off the screen. Can someone else please comment and let me know if this is happening to them too? This might be a problem with my web browser because I’ve had this happen previously. Cheers
Good information. Lucky me I ran across your blog by accident (stumbleupon). I’ve book-marked it for later!
Great post. I was checking constantly this blog and I am impressed! Extremely helpful information specially the last part 🙂 I care for such information much. I was looking for this certain info for a very long time. Thank you and good luck.|
It is appropriate time to make some plans for the future and it is time to be happy. I have read this post and if I could I desire to suggest you few interesting things or advice. Maybe you could write next articles referring to this article. I want to read even more things about it!
It’s going to be end of mine day, however before ending I am reading this wonderful paragraph to increase my knowledge.
hey there and thank you for your info – I have certainly picked up anything new from right here. I did however expertise some technical points using this web site, as I experienced to reload the site many times previous to I could get it to load correctly. I had been wondering if your web host is OK? Not that I’m complaining, but sluggish loading instances times will sometimes affect your placement in google and can damage your high quality score if ads and marketing with Adwords. Well I’m adding this RSS to my e-mail and could look out for much more of your respective intriguing content. Ensure that you update this again very soon.
I will immediately clutch your rss feed as I can not in finding your e-mail subscription link or newsletter service. Do you have any? Please permit me recognize in order that I could subscribe. Thanks.
Actually no matter if someone doesn’t be aware of afterward its up to other viewers that they will help, so here it happens.
Howdy this is kinda of off topic but I was wanting to know if blogs use WYSIWYG editors or if you have to manually code with HTML. I’m starting a blog soon but have no coding experience so I wanted to get guidance from someone with experience. Any help would be greatly appreciated!
Remarkable! Its really amazing paragraph, I have got much clear idea on the topic of from this post.
Hello my loved one! I wish to say that this article is amazing, great written and come with almost all significant infos. I would like to look more posts like this .
Attractive section of content. I just stumbled upon your web site and in accession capital to assert that I acquire in fact enjoyed account your blog posts. Any way I will be subscribing to your augment and even I achievement you access consistently fast.
Today, I went to the beachfront with my children. I found a sea shell and gave it to my 4 year old daughter and said “You can hear the ocean if you put this to your ear.” She put the shell to her ear and screamed. There was a hermit crab inside and it pinched her ear. She never wants to go back! LoL I know this is totally off topic but I had to tell someone!
I’ll right away grasp your rss as I can not find your e-mail subscription link or e-newsletter service.
Do you’ve any? Please permit me recognize so that I may
just subscribe. Thanks.
Ahaa, its fastidious discussion regarding this post here at
this website, I have read all that, so at this time me also
commenting here.
Wow, awesome blog layout! How long have you been blogging
for? you made blogging look easy. The overall look of your site is magnificent, as
well as the content!
If some one needs expert view about running a
blog after that i advise him/her to pay a quick visit this
blog, Keep up the nice job.
I’ve been active for recently, mostly for testing new tokens, and it’s always wide token selection. Perfect for both new and experienced traders.
Sweet blog! I found it while surfing around on Yahoo News. Do you have any suggestions on how to get listed in Yahoo News? I’ve been trying for a while but I never seem to get there! Many thanks
Why people still use to read news papers when in this technological globe all is available on net?
It’s great that you are getting thoughts from this post as well as from our argument made here.
I will immediately grab your rss feed as I can not to find your email subscription hyperlink or newsletter service. Do you’ve any? Kindly let me recognise in order that I may subscribe. Thanks.
Hi there! Do you know if they make any plugins to assist with SEO? I’m trying to get my blog to rank for some targeted keywords but I’m not seeing very good gains. If you know of any please share. Kudos!
Way cool! Some very valid points! I appreciate you writing this article and the rest of the website is extremely good.
Have you ever considered publishing an ebook or guest authoring on other websites? I have a blog based on the same ideas you discuss and would love to have you share some stories/information. I know my readers would enjoy your work. If you’re even remotely interested, feel free to send me an e mail.
click here
anal sex
Right away I am ready to do my breakfast, once having my
breakfast coming again to read more news.
Great blog right here! Additionally your website so much up very fast! What web host are you the usage of? Can I am getting your associate hyperlink for your host? I want my web site loaded up as quickly as yours lol
**balmorex**
balmorex is an exceptional solution for individuals who suffer from chronic joint pain and muscle aches.
donkey punch
dental seo
I value the great support and robust security. This site is reliable.
Thank you for your sharing. I am worried that I lack creative ideas. It is your article that makes me full of hope. Thank you. But, I have a question, can you help me? https://www.binance.com/sl/register?ref=GQ1JXNRE
You’ve made some really good points there. I looked on the net for more information about the issue and found most people will go along with your views on this web site.
Hi there to all, as I am in fact keen of reading this web site’s post to be updated daily. It carries nice information.
It’s very effortless to find out any topic on web as compared to textbooks, as I found this paragraph at this web site.
It’s actually a cool and helpful piece of info. I’m satisfied that you shared this helpful info with us. Please stay us informed like this. Thank you for sharing.
Call now
I am regular visitor, how are you everybody? This piece of writing posted at this website is really fastidious.
Do you mind if I quote a couple of your posts as long as I provide credit and sources back to your site? My blog site is in the very same niche as yours and my visitors would definitely benefit from some of the information you present here. Please let me know if this okay with you. Cheers!
Hi it’s me, I am also visiting this site on a regular basis, this web page is truly nice and the viewers are really sharing good thoughts.
It’s really a great and helpful piece of information. I am glad that you shared this useful info with us. Please stay us informed like this. Thank you for sharing.
I like the valuable information you supply for your articles. I will bookmark your blog and take a look at again right here frequently. I am slightly certain I will be told lots of new stuff right right here! Best of luck for the following!
Người dùng trên cakhiatv có thể xem trực tiếp trận đấu, cập nhật highlight, thống kê bàn thắng và phân tích chiến thuật. Nền tảng bố trí hợp lý, thao tác nhanh, dễ sử dụng trên mọi thiết bị. Chất lượng đường truyền ổn định, mượt mà với https://cakhiatv.ae.org/ , đảm bảo trải nghiệm xem bóng đá trọn vẹn. cakhiatvaeorg là lựa chọn uy tín, quen thuộc cho fan hâm mộ.
I’m impressed by the fast transactions. I’ll definitely continue using it. The dashboard gives a complete view of my holdings.
Thể thao luôn là trọng tâm phát triển cốt lõi của W88, nơi hội tụ đầy đủ các giải đấu lớn cùng tỷ lệ kèo được xây dựng sát thực tế và cập nhật liên tục. Truy cập https://w88.ca/ để theo dõi và trải nghiệm cá cược thể thao trong một môi trường ổn định, minh bạch và được hỗ trợ bởi công nghệ hiện đại. Sự kết hợp hài hòa giữa nội dung thể thao chất lượng và hệ thống vận hành vững chắc giúp w88ca tạo nên uy tín lâu dài.
Regards. Excellent stuff.
canadian online casinos online casinos canada best online casino sites canada
The testing new tokens tools are robust security and stable performance.
With thanks. Fantastic information.
Online USA casino https://sternfund.org/# buy online casino script.
You said it perfectly..
Legit online casinos https://sternfund.org/# online casino no deposit no download.
Truly a lot of valuable material!
Best online casinos that payout https://sternfund.org/# usa online casinos low minimum deposit.
A powerful share, I just given this onto a colleague who was doing slightly evaluation on this. And he in fact bought me breakfast because I discovered it for him.. smile. So let me reword that: Thnx for the deal with! But yeah Thnkx for spending the time to discuss this, I really feel strongly about it and love studying extra on this topic. If attainable, as you turn out to be expertise, would you thoughts updating your blog with more details? It’s extremely helpful for me. Large thumb up for this weblog publish!
Thank you! Ample tips.
You made your position quite nicely!!
Casino online play free casino online games free gambling at online casinos!
You’ve made your position pretty clearly!!
Fastest payout online casino top rated online casinos newest online casinos for usa players!
I’ve been using it for over two years for cross-chain transfers, and the great support stands out. The updates are frequent and clear.
Useful knowledge. Regards!
New online casinos online casino usa no deposit bonus dinosaurio online casino!
I have been exploring for a little for any high-quality articles or weblog posts on this sort of space . Exploring in Yahoo I finally stumbled upon this website. Studying this info So i am glad to express that I’ve an incredibly good uncanny feeling I found out exactly what I needed. I such a lot certainly will make sure to do not disregard this web site and give it a look on a relentless basis.
What’s up to all, it’s actually a good for me to pay a visit this web page, it contains helpful Information.
Hi, its fastidious piece of writing about media print, we all understand media is a impressive source of facts.
**finessa**
Finessa is a natural supplement made to support healthy digestion, improve metabolism, and help you achieve a flatter belly.
Good day! This is my first visit to your blog! We are a team of volunteers and starting a new project in a community in the same niche. Your blog provided us beneficial information to work on. You have done a outstanding job!
The interface is robust security, and I enjoy checking analytics here.
I’m in awe of the author’s capability to make complicated concepts understandable to readers of all backgrounds. This article is a testament to his expertise and passion to providing helpful insights. Thank you, author, for creating such an captivating and enlightening piece. It has been an incredible joy to read!
I’ve been active for a week, mostly for testing new tokens, and it’s always wide token selection.
My partner and I absolutely love your blog and find a lot of your post’s to be what precisely I’m looking for. Do you offer guest writers to write content for you personally? I wouldn’t mind composing a post or elaborating on many of the subjects you write concerning here. Again, awesome web log!
byueuropaviagraonline
Thanks for your article. My spouse and i have often noticed that a lot of people are needing to lose weight simply because wish to appear slim as well as attractive. On the other hand, they do not often realize that there are many benefits to losing weight additionally. Doctors assert that fat people suffer from a variety of conditions that can be instantly attributed to their particular excess weight. Fortunately that people that are overweight as well as suffering from a variety of diseases are able to reduce the severity of their own illnesses by way of losing weight. You possibly can see a progressive but notable improvement with health when even a negligible amount of fat loss is accomplished.
sparkdex ai SparkDex is redefining decentralized trading with speed, security, and real earning potential. On spark dex, you keep full control of your assets while enjoying fast swaps and low fees. Powered by sparkdex ai, the platform delivers smarter insights and optimized performance for confident decision-making. Trade, earn from liquidity, and grow your crypto portfolio with sparkdex — the future of DeFi starts here.
I was wondering if you ever thought of changing the page layout of your blog? Its very well written; I love what youve got to say. But maybe you could a little more in the way of content so people could connect with it better. Youve got an awful lot of text for only having 1 or two images. Maybe you could space it out better?
I simply couldn’t go away your site prior to suggesting that I extremely loved the standard info an individual supply to your guests? Is gonna be back steadily in order to check up on new posts
I’m gone to tell my little brother, that he should also pay a visit this webpage on regular basis to take updated from hottest news.
Excellent pieces. Keep posting such kind of info on your site. Im really impressed by your blog
Very energetic article, I liked that a lot. Will there be a part 2?
If some one needs to be updated with latest technologies therefore he must be go to see this site and be up to date everyday.
I quite like reading an article that will make people think. Also, thanks for allowing for me to comment!
Your style is unique in comparison to other folks I have read stuff from. Many thanks for posting when you have the opportunity, Guess I’ll just book mark this web site.
naturally like your website but you have to take a look at the spelling on quite a few of your posts. Several of them are rife with spelling problems and I find it very troublesome to tell the reality on the other hand I will surely come back again.
great publish, very informative. I’m wondering why the other specialists of this sector don’t realize this. You must continue your writing. I’m sure, you’ve a huge readers’ base already!
solana wallet
Wonderful blog you have here but I was curious if you knew of any user discussion forums that cover the same topics talked about in this article? I’d really love to be a part of group where I can get responses from other knowledgeable people that share the same interest. If you have any recommendations, please let me know. Thanks!
I do not even know the way I finished up here, but
I assumed this post was great. I don’t recognize who you’re but certainly
you are going to a famous blogger if you happen to are
not already. Cheers!
Нужны столбики? столбики для ограждения с лентами столбики для складов, парковок и общественных пространств. Прочные материалы, устойчивое основание и удобство перемещения обеспечивают безопасность и порядок.
сколько стоит свадебное платье свадебные платья купить каталог
купить провод 2 2 кабель магазин минск
Looking for a yacht? private yacht charter in Cyprus for unforgettable sea adventures. Charter luxury yachts, catamarans, or motorboats with or without crew. Explore crystal-clear waters, secluded bays, and iconic coastal locations in first-class comfort onboard.
A different issue is that video gaming has become one of the all-time most important forms of entertainment for people spanning various ages. Kids have fun with video games, and also adults do, too. The particular XBox 360 is amongst the favorite gaming systems for individuals that love to have hundreds of games available to them, in addition to who like to relax and play live with others all over the world. Many thanks for sharing your thinking.
Everyone loves what you guys tend to be up too. This kind of clever work and reporting! Keep up the very good works guys I’ve included you guys to blogroll.
You really make it seem so easy with your presentation but I find this matter to be actually something that I think I would never understand. It seems too complicated and very broad for me. I’m looking forward for your next post, I’ll try to get the hang of it!
Excellent post. I used to be checking continuously this weblog and I am impressed! Extremely useful info specially the ultimate section 🙂 I maintain such information a lot. I used to be looking for this certain information for a very lengthy time. Thanks and good luck.
Along with every little thing which seems to be building within this particular subject matter, a significant percentage of perspectives are actually quite exciting. On the other hand, I am sorry, because I can not subscribe to your whole theory, all be it exhilarating none the less. It appears to me that your commentary are generally not totally justified and in reality you are generally your self not thoroughly confident of your argument. In any case I did take pleasure in reading it.
стоимость газоблока завод газоблоков
кран шаровой под приварку краны под сварку
Your mode of describing all in this article is truly good, all can without difficulty know it, Thanks a lot.
Чтобы увеличить ссылочную массу, можно выполнить прогон хрумером по трастовым площадкам.
If you are going for most excellent contents like myself, only pay a visit this site all the time as it gives feature contents, thanks
Can you tell us more about this? I’d love to find out more details.
купить большое свадебное платье свадебный платья москва каталог
магазин где можно купить кабель купить кабель минск
металлические столбики ограждения столбики ограждения с цепочкой
Hi there very cool web site!! Man .. Beautiful .. Wonderful .. I will bookmark your site and take the feeds additionally? I am happy to seek out numerous helpful information here within the post, we want work out more techniques in this regard, thank you for sharing. . . . . .
ремонт 3 квартир вартість ремонту квартири
My coder is trying to convince me to move to .net from PHP. I have always disliked the idea because of the costs. But he’s tryiong none the less. I’ve been using WordPress on several websites for about a year and am nervous about switching to another platform. I have heard good things about blogengine.net. Is there a way I can import all my wordpress content into it? Any kind of help would be greatly appreciated!
It?s hard to seek out knowledgeable folks on this matter, but you sound like you realize what you?re speaking about! Thanks
Hello! I could have sworn I’ve been to your blog before but after going through many of the articles I realized it’s new to me. Nonetheless, I’m certainly happy I found it and I’ll be bookmarking it and checking back regularly!
Found a bride? https://propose.lol romantic scenarios, beautiful locations, photo shoots, decor, and surprises for the perfect declaration of love. Make your engagement in Barcelona an unforgettable moment in your story.
Проблемы с застройщиком? неустойка по дду помощь юриста по долевому строительству, расчет неустойки, подготовка претензии и подача иска в суд. Защитим права дольщиков и поможем получить компенсацию.
парфюмерия отзывы https://elicebeauty.com/parfyumeriya/filter/_m238_a1444/
Нужен юрист? адвокат по арбитражным спорам представительство в арбитражном суде, защита интересов бизнеса, взыскание задолженности, споры по договорам и сопровождение судебных процессов для компаний и предпринимателей.
Ищешь кран? кран под сварку для трубопроводов различного назначения. Надежная запорная арматура для систем водоснабжения, отопления, газа и промышленных магистралей. Высокая герметичность, долговечность и устойчивость к нагрузкам.
It?s really a great and useful piece of info. I?m glad that you shared this useful info with us. Please keep us informed like this. Thanks for sharing.
Amazing issues here. I am very glad to see your article. Thank you a lot and I’m looking forward to touch you. Will you please drop me a e-mail?
This is very interesting, You are a very skilled blogger. I have joined your rss feed and look forward to seeking more of your magnificent post. Also, I’ve shared your website in my social networks!
https://vivashop.com.ua/rozpakuvannya-far-mercedes-benz-multibeam.html
Услуги по настройке https://sysadmin.guru и администрированию серверов и компьютеров. Установка систем, настройка сетей, обслуживание серверной инфраструктуры, защита данных и техническая поддержка. Помогаем обеспечить стабильную работу IT-систем.
A website with unblocked games for free online play. Popular browser games, arcades, platformers, racing games, and puzzles are available with no downloads or restrictions on any device.
So much value in this post, thank you for sharing your knowledge!
I found this article both engaging and informative, keep up the great work!
fantastic issues altogether, you simply gained a new reader. What would you recommend in regards to your post that you just made some days ago? Any sure?
Аренда авто Сочи премиум класса https://avto-arenda-sochi.ru
monro casino сайт https://hover-club-nn.ru
SEO-продвижение https://outreachseo.ru сайта для роста посещаемости и увеличения продаж. Проводим аудит, оптимизацию структуры, работу с контентом и техническими параметрами сайта, чтобы улучшить позиции в поисковых системах и привлечь целевой трафик.
Do you mind if I quote a couple of your articles as long as I provide credit and sources back to your blog? My website is in the very same niche as yours and my visitors would really benefit from some of the information you provide here. Please let me know if this ok with you. Thank you!
Профессиональное SEO-продвижение https://outreachseo.ru сайтов для бизнеса. Анализ конкурентов, оптимизация структуры и контента, улучшение технических параметров и развитие сайта для роста позиций в поисковых системах и увеличения целевого трафика.
Explore detailed insights on hmdx wireless alarm clocks at TopXClocks, including features, comparisons, and expert recommendations for smarter buying decisions.
золотое кольцо каталог цены кольца для помолвки с бриллиантами
Accurate weather forecast vrijeme Kotor for today, tomorrow, and next week. Temperature, precipitation, wind, and humidity are all included. Follow the weather in Kotor and get up-to-date weather data online.
DOA 3 мы вынесли отдельный пост, чтобы всё важное было в одном месте и без лишней воды. Там собраны основные моменты, которые обычно волнуют игроков: что стоит учитывать перед стартом, какие детали чаще всего обсуждают по бонусным режимам, на что обращать внимание во время сессии и почему у этого слота такая “нервная” динамика. Удобно сначала прочитать пост, а потом уже прийти в группу и обсуждать конкретику – с примерами и своими результатами.
Свежие проекты часто заходят с “громких” бонусов и яркого дизайна, но по факту важнее другое: как быстро проходят выплаты, какие лимиты, насколько адекватная поддержка и нет ли скрытых условий в правилах. Если вас интересуют новые онлайн казино, мы собрали в Telegram удобный формат: короткие подборки, что реально запустилось недавно, что сейчас стабильно работает, и где условия выглядят честно без лишней “маркетинговой пыли”. Это помогает не тратить вечер на десятки сайтов и сразу понимать, куда есть смысл заходить, а что лучше обойти.
Explore detailed insights on https://topxclocks.com/retro-double-bell-bedside-alarm-clocks/ retro double bell bedside alarm clocks at TopXClocks, including features, comparisons, and expert recommendations for smarter buying decisions.
Информационный портал https://tga-info.ru со статьями и обзорами на разные темы. Материалы о технологиях жизни работе доме и повседневных вопросах. Актуальные новости полезные советы рекомендации и интересная информация для читателей.
Интернет ресурс https://nesmetnoe.ru с полезными статьями советами и обзорами. Материалы о жизни здоровье технологиях доме и повседневных вопросах. Практические рекомендации интересные факты и актуальная информация для широкой аудитории.
Статьи о любви lifeoflove.ru отношениях, психологии и семейной жизни. Советы по гармоничным отношениям общению и саморазвитию. Полезные рекомендации вдохновляющие истории и материалы для тех кто хочет улучшить личную жизнь.
Полезные материалы https://greendachnik.ru для дачников и садоводов. Советы по выращиванию овощей цветов и плодовых растений уходу за садом огородом и участком. Практические рекомендации идеи для дачи и комфортной загородной жизни.
Материалы о компьютерах https://hardexpert.net технологиях электронике и IT. Обзоры техники советы по выбору комплектующих настройке программ и использованию устройств. Полезная информация для пользователей и любителей технологий.
You’re so awesome! I don’t think I’ve truly read through a single thing like that before. So good to find another person with some genuine thoughts on this subject matter. Seriously.. thanks for starting this up. This web site is something that is required on the web, someone with a bit of originality!
Сборник полезных советов https://allsekrets.ru и лайфхаков на каждый день. Материалы о доме здоровье красоте и повседневной жизни. Интересные статьи практические рекомендации и идеи которые помогут упростить бытовые задачи.
Информация о ремонте https://hyundai-sto.ru обслуживании и диагностике автомобилей Hyundai. Советы по техническому обслуживанию выбору запчастей и эксплуатации автомобиля. Полезные материалы для владельцев и автолюбителей.
Материалы о красоте http://www.idealnaya-ya.ru/ здоровье саморазвитии и уходе за собой. Советы по питанию фитнесу психологии и гармоничной жизни. Полезные статьи рекомендации и идеи для улучшения самочувствия и образа жизни.
Интересуют новости? актуальные новости главные новости дня на одном портале. Свежие события из политики, экономики, общества, технологий и культуры. Оперативная информация, аналитика, комментарии экспертов и важные факты, которые помогают понимать происходящее.
Лучшие сервера рейтинг сравнение dedicated servers по цене, производительности и надежности. Рейтинг хостингов, которые предлагают мощные серверные решения.
Найти лучший сервер рейтинг сервисов для vps в россии рейтинг dedicated servers от популярных хостинг-провайдеров. Сравните выделенные серверы по характеристикам, стоимости и возможностям масштабирования для бизнеса и веб-проектов.
Нужен сервер? виртуальный хостинг dedicated servers с мощными процессорами, NVMe SSD и высокой стабильностью. Подберите оптимальный сервер для бизнеса, разработки и высоких нагрузок.
Ищешь сервер? Отзывы о хостинге сравнение dedicated server хостинга по характеристикам, цене, производительности и uptime. Лучшие провайдеры для размещения сайтов, интернет-магазинов и крупных проектов.
Today, while I was at work, my cousin stole my iphone and tested to see if it can survive a 40 foot drop, just
so she can be a youtube sensation. My iPad is now broken and she has 83 views.
I know this is totally off topic but I had to share it with someone!
Рейтинги серверов Рейтинг vds актуальный рейтинг dedicated server хостинга с сравнением характеристик, стоимости и производительности. Найдите оптимальный сервер для бизнеса, интернет-магазина, SaaS-сервисов и крупных сайтов.
Обзор и рейтинги серверов подобрать виртуальный сервер сравните выделенные серверы по характеристикам, цене, процессорам и дискам SSD. Выберите надежный сервер для размещения сайтов, приложений и высоких нагрузок.
Проблемы с алкоголем? вызвать нарколога цена медицинская помощь при алкогольной зависимости, детоксикация организма и восстановление самочувствия. Консультации специалистов и безопасное лечение.
Гарантированное лечение врач нарколог на дом специалист приезжает к пациенту, проводит детоксикацию организма, помогает снять симптомы алкогольной интоксикации и контролирует состояние. Безопасный и конфиденциальный подход.
Профессиональный запойный алкоголизм лечение дома детоксикация организма, помощь при алкогольной интоксикации и восстановление самочувствия пациента. Специалист приезжает на дом и оказывает профессиональную помощь.
Greetings from Colorado! I’m bored at work so I decided to browse your site on my iphone during lunch break. I enjoy the info you provide here and can’t wait to take a look when I get home. I’m shocked at how quick your blog loaded on my phone .. I’m not even using WIFI, just 3G .. Anyways, good site!
Круглосуточный вывод из запоя дома специалист проводит детоксикацию организма, помогает снять симптомы алкогольной интоксикации и контролирует состояние пациента. Медицинская помощь оказывается конфиденциально и направлена на быстрое восстановление самочувствия.
Гарантированный безопасный запой выезд на дом вывод из запоя с наблюдением, детоксикацией организма и поддержкой врача. Процедуры направлены на восстановление состояния пациента и улучшение самочувствия.
Качественное SEO https://outreachseo.ru продвижение сайта для бизнеса. Наши специалисты предлагают эффективные решения для роста позиций в поисковых системах. Подробнее об услугах и стратегиях можно узнать на сайте
Premium marketplace buy facebook ad accounts France features an extensive inventory updated daily across all major geos including USA, Europe, and Asia-Pacific regions. Bulk buyers benefit from volume discounts, dedicated account managers, and priority restocking that ensures uninterrupted supply for active campaigns. From first purchase to ongoing scaling, the platform supports every stage of a media buyer’s operational journey.
Wholesale supplier facebook profiles marketplace enables teams to source diverse account portfolios across platforms and geos from a single centralized marketplace. Aged profiles with natural activity patterns consistently outperform fresh registrations in ad delivery quality and checkpoint avoidance rates. Marketplace standards ensure that every account performs as described — no surprises at checkout, login, or campaign launch.
Premium marketplace buy clean facebook accounts features an extensive inventory updated daily across all major geos including USA, Europe, and Asia-Pacific regions. Geo-targeted options cover USA, UK, Germany, France, Poland, Ukraine, and other regions with proper IP history and locale settings. The combination of product quality, transparent specs, and responsive support creates a reliable foundation for scaling ad operations.
Professional service buy facebook accounts specializes in accounts optimized for paid campaigns with proper warming history and platform trust markers. The platform combines speed and reliability — most products are delivered automatically within minutes after payment confirmation. From first purchase to ongoing scaling, the platform supports every stage of a media buyer’s operational journey.
Expert-level shop buy protonmail accounts with vpn combines automated delivery with manual verification to ensure every account meets strict quality benchmarks. The catalog is segmented by platform, geo, account type, and price tier to simplify navigation for both new and returning customers. The most successful media buying teams share one trait: they invest in quality infrastructure before they invest in ad spend.
Leading store visit website gives media buyers access to aged, warmed, and verified profiles sorted by geo, trust level, and ad readiness. The selection includes profiles sorted by registration method, warming protocol, age, and included assets so buyers can match accounts to their specific needs. Join thousands of satisfied advertisers who source their campaign infrastructure from a verified and trusted marketplace.
Leading store go to site gives media buyers access to aged, warmed, and verified profiles sorted by geo, trust level, and ad readiness. Every account goes through rigorous testing for login stability, platform trust signals, and checkpoint clearance before being listed in the catalog. Smart account sourcing is the foundation of profitable advertising — start with verified profiles and scale with confidence.
Established supplier buy tiktok ads BC maintains the largest selection of quality accounts with transparent specs and competitive pricing for bulk buyers. Step-by-step documentation accompanies every order, covering login procedure, security setup, and recommended first actions after access. Scale your advertising operations on a foundation of quality — verified profiles, complete credentials, and expert operational support.
Trusted platform click here offers premium accounts with verified quality, complete credentials, and instant automated delivery. Quality monitoring runs continuously — accounts are spot-checked after listing to maintain catalog integrity and buyer satisfaction rates. A single trusted supplier for all account needs simplifies operations and reduces the risk of working with unverified sources.
Жіночий онлайн https://soloha.in.ua портал з корисними статтями про моду, красу, здоров’я та стосунки. Поради щодо догляду за собою, психології, сім’ї та кар’єри. Актуальні тренди, лайфхаки та натхнення для сучасних жінок.
Інформаційний портал https://pensioneram.in.ua для пенсіонерів України Корисні поради про пенсії, соціальні виплати, пільги, здоров’я та повсякденне життя. Актуальні новини, рекомендації фахівців та прості пояснення важливих змін законодавства.
Пояснюємо складні теми https://notatky.net.ua простими словами. Публікуємо зрозумілі статті про технології, фінанси, науку, закони та інші важливі питання. Читайте розбірки та корисні пояснення.
Сайт про народні прикмети https://zefirka.net.ua тлумачення снів та значення імен. Дізнайтеся, що означають сни, як трактуються прикмети та які традиції пов’язані зі святами різних народів.
Сайт міста Дніпро https://faine-misto.dp.ua з актуальними новинами, подіями та корисною інформацією для мешканців та гостей. Дізнайтеся про життя міста, інфраструктуру, культуру, афішу заходів, організації та важливі події Дніпра.
Сайт міста Хмельницький https://faine-misto.km.ua з актуальними новинами, подіями та корисною інформацією для мешканців та гостей. Дізнайтеся про міське життя, інфраструктуру, культуру, заходи, організації та важливі події міста.
Жіночий сайт https://u-kumy.com про красу, здоров’я, моду, відносини і стиль життя. Корисні поради, статті, ідеї для натхнення та рекомендації для сучасних жінок. Читайте про саморозвиток, сім’ю, догляд за собою та актуальні тренди.
Чоловічий блог https://u-kuma.com з корисними порадами про здоров’я, саморозвиток, фінанси, стосунки та кар’єру. Публікуємо цікаві статті, лайфхаки та рекомендації для чоловіків, які хочуть покращити своє життя.
Sports betting at Mostbet mostbet.edu.pl. The platform offers a wide range of events, high odds, bonuses, and a user-friendly mobile app. Place bets on football, hockey, tennis, and other sports.
Mostbet bookmaker https://mostbet.biz.pl/ offers betting on sports, esports, and online games. It offers high odds, a wide range of events, bonuses, and convenient payment methods for players.
Almastriga: Relics of Azathoth almastriga is an atmospheric horror adventure game inspired by the mythos of Lovecraft. Explore eerie locations, uncover ancient secrets, and find relics of Azathoth in a world full of mysteries and dangers.
Lust Theory Seasons lust-theory.com 1, 2, and 3 are a popular visual novel with a captivating plot, action choices, and a diverse cast of characters. Follow the story as it unfolds, make decisions, and unlock new storylines.
Dive into Lust Academy http://www.lustacademy.org and explore all seasons of this popular visual novel. Learn about the characters, story, and interactive storytelling possibilities.
My Cute Roommate https://www.my-cute-roommate.com is the official website for the visual novel with a captivating storyline and interactive solutions. Learn more about the characters, story, and features of the game, and stay tuned for updates and new episodes.
Perfect Date official perfect-date org website offers detailed information about the characters, plot, and gameplay features. Read the news and stay up-to-date on the latest updates.
Operation Lovecraft http://www.operation-lovecraft.org/ Official Game Guide for players who want to learn more about the plot, missions, and characters. Helpful tips, hints, and detailed guides will help you complete the game and unlock all storylines.
This blog was… how do I say it? Relevant!! Finally I’ve found something which helped me. Many thanks!
Download Subverse https://sub-verse.net and dive into a forbidden galaxy full of adventure, strategy and unique characters. Explore new worlds, command your crew and experience an epic sci-fi journey in this action-packed space game.
Treasure of Nadia treasure-of-nadia.org Official Game Site with detailed information about the adventure game. Read news, learn about the characters, and learn about the gameplay features.
Женский портал https://7krasotok.com о красоте, здоровье, моде и отношениях. Полезные советы, статьи о семье, психологии и саморазвитии. Читайте рекомендации экспертов, узнавайте о трендах и находите вдохновение для гармоничной жизни.
Женский онлайн https://krasotka-fl.com.ua портал с полезными материалами о красоте, здоровье, моде и отношениях. Советы по уходу за собой, психологии и саморазвитию для современной женщины.
If some one needs expert view regarding running a blog after that i suggest him/her to pay a visit this weblog, Keep up the good work.
Hi! Would you mind if I share your blog with my facebook group? There’s a lot of people that I think would really appreciate your content. Please let me know. Thanks
Любишь азарт? официальный сайт пин ап предлагает разнообразные игровые автоматы, настольные игры и интересные бонусные программы. Платформа создана для комфортной игры и предлагает широкий выбор развлечений.
Нужен банный веник? купить березовый веник натуральные банные веники помогают улучшить эффект парения и создать особую атмосферу в бане. У нас можно купить веник для бани из березы, дуба или эвкалипта.
Нужен банный веник? купить эвкалиптовый веник натуральные банные веники помогают улучшить эффект парения и создать особую атмосферу в бане. У нас можно купить веник для бани из березы, дуба или эвкалипта.
Противопожарные двери https://zavod-dverimontazh.moscow от производителя с профессиональной установкой в Москве. Изготовление по ГОСТ, сертифицированные конструкции с высокой огнестойкостью. Металлические противопожарные двери для офисов, складов, жилых и коммерческих зданий. Доставка, монтаж, гарантия качества и выгодные цены.
excellent issues altogether, you just won a emblem new reader. What may you recommend in regards to your submit that you made some days ago? Any certain?
Вы сможете подобрать и традиционные, и современные ковры на любой вкус.
Посмотреть ковры онлайн
Все товары отличаются высоким качеством и долговечностью, что делает покупку выгодной.
As the admin of this site is working, no question very soon it will be renowned, due to its quality contents.
Все о строительстве https://dipris-studio.ru и дизайне загородного дома: современные проекты, идеи планировки, выбор материалов, этапы строительства и оформление интерьера. Полезные советы по строительству коттеджей, ремонту и благоустройству участка. Практические рекомендации для владельцев домов и тех, кто только планирует строительство.
Новостной портал https://newsn.ru — свежие новости России и мира, политика, экономика, общество, технологии и культура. Оперативные публикации, аналитические материалы и главные события дня. Узнавайте важные новости первыми и следите за развитием событий онлайн.
Портал про здоровье https://vekneboley.ru с полезными статьями о профилактике заболеваний, правильном питании, иммунитете и здоровом образе жизни. Рекомендации специалистов, советы по поддержанию здоровья, физической активности и улучшению самочувствия каждый день.
Все о строительстве https://sportdon.ru и ремонтах: рекомендации по выбору материалов, технологиям строительства, отделке помещений и дизайну интерьера. Полезные статьи для тех, кто строит дом, делает ремонт квартиры или планирует обновление интерьера.
Портал новостей https://hand-store.ru о высоких технологиях и IT-индустрии. Последние события в мире программирования, искусственного интеллекта, стартапов, гаджетов и цифровых технологий. Читайте обзоры, аналитические материалы и важные новости технологического рынка.
Fantastic beat ! I wish to apprentice at the same time as you amend your website, how could i subscribe for a weblog site? The account aided me a appropriate deal. I have been a little bit familiar of this your broadcast provided brilliant transparent idea
Портал о бытовой https://expert-byt.ru технике и ее эксплуатации. Полезные статьи о выборе техники для дома, правильном использовании, уходе и продлении срока службы устройств. Советы по ремонту, обслуживанию и эффективному использованию бытовой техники в повседневной жизни.
Читайте свежие новости https://иваново37.рф России на новостном портале. Главные события дня, политика, экономика, общество, технологии и культура. Оперативные публикации, аналитика и важная информация о событиях в стране и мире.
Свежие мировые https://novostizn.ru новости и интересные события со всех уголков планеты. Политика, экономика, технологии, культура, наука и общественная жизнь. Актуальные новости, аналитика и необычные факты о событиях, которые обсуждает весь мир.
Все о смартфонах https://topse.ru мобильных телефонах и гаджетах Sony. Новости, обзоры новых моделей Xperia, характеристики устройств, сравнение смартфонов и полезные советы по выбору техники. Узнайте о новинках Sony, технологиях камер, производительности и возможностях мобильных устройств.
Мировые новости https://dikb.ru и интересные события каждый день. Самые важные события политики, экономики, технологий, науки и культуры. Свежие публикации, аналитика и необычные факты о происходящем в разных странах мира.
I blog often and I genuinely thank you for your content. This article has truly peaked my interest. I will bookmark your website and keep checking for new information about once per week. I subscribed to your RSS feed as well.
Консультация семейного юриста поможет быстро разобраться в сложных жизненных ситуациях: развод, раздел имущества, алименты, споры о детях и брачные договоры. Перейдя по запросу юридическая консультация по семейным имущественным спорам – специалист объяснит ваши права, оценит перспективы дела и предложит оптимальный план действий. Получите профессиональную юридическую помощь и ответы на все вопросы по семейному праву.
Live streams https://selcuksport.com.az/ of football matches and sports TV shows online. Football news, schedules, results, and analysis. Follow your favorite teams, watch highlights, and stay up-to-date on the latest news from the world of football.
Playmods APK https://playmods.com.az is a convenient app for downloading modified games and apps on Android. It offers a large catalog of popular games, fast mod updates, additional features, and a simple interface for easy searching and installation.
Противопожарные двери https://zavod-dverimontazh.moscow в Москве от производителя. Надежные металлические двери с высокой огнестойкостью для жилых и коммерческих помещений. Сертификация, соответствие нормам пожарной безопасности, быстрая доставка и установка противопожарных дверей под ключ.
Бесплатная консультация юриста — это возможность получить профессиональную правовую помощь без оплаты. Перейдя по запросу задать вопрос юристу в Москве бесплатно вы получите поддержку специалиста, который выслушает вашу ситуацию, оценит риски и подскажет возможные варианты решения: от подготовки документов до защиты интересов в суде. Такая консультация помогает понять свои права, избежать ошибок и выбрать правильную стратегию действий.
Общаешься в максе? каталог каналов max удобный способ найти интересные каналы в мессенджере. Новости, технологии, бизнес, развлечения и другие категории. Просматривайте популярные каналы, открывайте новые источники информации и подписывайтесь.
Узнать больше здесь: https://slovarsbor.ru/w/%d0%b7%d1%8b%d1%80%d1%8f%d0%bd%d0%ba%d0%b0/
Строительный портал https://apis-togo.org с полезными статьями о строительстве домов, ремонте квартир и выборе строительных материалов. Советы специалистов, современные технологии строительства, идеи дизайна интерьера и практические рекомендации для ремонта и обустройства жилья.
Строительный журнал https://eeu-a.kiev.ua о строительстве, ремонте и дизайне. Полезные статьи о строительных технологиях, выборе материалов, отделке помещений и обустройстве дома. Практические советы для тех, кто строит дом или делает ремонт.
Строительный портал https://furbero.com с полезной информацией о строительстве домов, ремонте квартир и отделке помещений. Советы по выбору материалов, современные технологии строительства и идеи дизайна интерьера для комфортного жилья.
Все о строительстве https://elektrod.com.ua и ремонте на строительном портале. Советы по выбору строительных материалов, технологиям строительства, отделке помещений и дизайну интерьера. Полезные рекомендации для владельцев домов, квартир и загородной недвижимости.
Полезные статьи https://novostroi.in.ua о строительстве и ремонте на строительном портале. Технологии строительства, выбор материалов, отделка помещений и дизайн интерьера. Практические рекомендации для строительства дома и ремонта квартиры.
Портал про автомобили https://carexpert.com.ua новости автоиндустрии, обзоры новых моделей, тест-драйвы и советы по эксплуатации машин. Полезные статьи для автолюбителей о выборе автомобиля, ремонте, обслуживании и современных автомобильных технологиях.
Автомобильный портал https://autoiceny.com.ua для автолюбителей. Свежие новости автоиндустрии, обзоры автомобилей, тест-драйвы, рекомендации по эксплуатации и обслуживанию машин. Полезная информация о современных автомобилях и автомобильных технологиях.
Все об автомобилях https://eurasiamobilechallenge.com на автомобильном портале. Новости автоиндустрии, обзоры машин, тест-драйвы, советы по ремонту и обслуживанию автомобилей. Узнайте о новых моделях авто, технологиях и событиях автомобильного рынка.
Портал о строительстве https://proektsam.kyiv.ua и ремонте домов и квартир. Полезные статьи о строительных технологиях, выборе материалов, отделке помещений и дизайне интерьера. Советы специалистов и практические рекомендации для обустройства жилья.
Автомобильный портал https://mallex.info с новостями автоиндустрии, обзорами автомобилей, тест-драйвами и полезными советами для водителей. Узнайте о новых моделях машин, технологиях автопроизводителей, обслуживании авто и последних событиях автомобильного рынка.
Женский сайт https://entertainment.com.ua с полезными статьями о красоте, здоровье, моде, отношениях и саморазвитии. Советы по уходу за собой, идеи стиля, рецепты, психология и вдохновение для современной женщины. Читайте интересные материалы и находите полезные советы для повседневной жизни.
Информационный женский https://gorod-lubvi.com.ua портал о красоте, здоровье, моде, семье и отношениях. Полезные советы, идеи стиля, рецепты, психология и рекомендации для современной женщины. Узнайте, как заботиться о себе и создавать гармонию в жизни.
Женский портал https://happytime.in.ua с полезными статьями о моде, красоте, здоровье, отношениях и семье. Советы по уходу за собой, рецепты, идеи стиля и вдохновение для женщин. Все самое интересное и полезное для современной женщины.
Все для женщин https://novaya.com.ua на одном сайте: мода, красота, здоровье, отношения и семья. Полезные советы по уходу за собой, идеи стиля, рецепты и вдохновляющие статьи для современной женщины.
Сайт для женщин https://leif.com.ua с полезными советами о красоте, здоровье, моде и отношениях. Статьи о саморазвитии, семье, стиле жизни и уходе за собой. Узнайте секреты женской красоты и гармонии.
Женский сайт https://martime.com.ua о красоте, здоровье, моде и стиле жизни. Советы по уходу за собой, психология отношений, рецепты и полезные рекомендации для современной женщины. Читайте интересные статьи и вдохновляйтесь.
Все о строительстве https://sevgr.org.ua домов, ремонте квартир и благоустройстве жилья на строительном портале. Полезные статьи, рекомендации специалистов, современные технологии строительства и практические советы по выбору строительных материалов и отделке помещений.
Женский портал https://olive.kiev.ua о моде, красоте и здоровье. Полезные советы, рецепты, психология отношений и идеи стиля. Читайте интересные статьи и находите вдохновение для повседневной жизни.
Сайт для женщин https://tiamo.rv.ua с полезными статьями о красоте, здоровье, моде, семье и отношениях. Рекомендации по уходу за собой, идеи стиля, рецепты и советы для гармоничной жизни.
ремонт ванны санузла под ключ ремонт ванны цена
Хотите, чтобы ваш профиль или группа в Одноклассниках росли быстрее? Перейдя по запросу накрутка активных подписчиков в одноклассники вы сможете увеличить количество подписчиков и активность на странице. Чем больше подписчиков — тем выше доверие и интерес к вашему аккаунту. Начните развивать свою страницу уже сегодня!
Сайт новостей https://antifa-action.org.ua Украины и мира с актуальными событиями политики, экономики, общества и технологий. Читайте свежие новости, аналитические материалы и комментарии экспертов. Все главные события Украины и международной повестки.
Актуальные новости https://kiev-online.com.ua Украины и мира на новостном портале. Политика, экономика, общество, технологии и культура. Свежие события, аналитика и важные новости дня.
Свежие новости https://actualnews.kyiv.ua Украины и мира на информационном новостном сайте. Политика, экономика, общество, технологии, культура и происшествия. Оперативные публикации, аналитика и комментарии экспертов. Узнавайте главные события дня и следите за развитием новостей.
Читайте последние https://kiev-pravda.kiev.ua новости Украины и мира на новостном сайте. Политика, экономика, общество, технологии, культура и происшествия. Оперативные обновления и аналитические материалы.
Информационный сайт https://mediashare.com.ua новостей Украины и мира. Свежие события политики, экономики, общества и технологий. Главные новости дня, аналитика и комментарии экспертов.
Сайт о гипертонии https://gipertoniya.net и повышенном артериальном давлении. Полезные статьи о причинах гипертонии, симптомах, профилактике и современных методах лечения. Советы врачей, рекомендации по питанию, образу жизни и контролю артериального давления.
Портал для женщин https://fotky.com.ua с интересными статьями о моде, красоте, здоровье, семье и отношениях. Полезные советы, рецепты, психология отношений и идеи стиля.
Строительный сайт https://ko-online.com.ua с полезными статьями о строительстве домов, ремонте квартир и выборе строительных материалов. Современные технологии строительства, советы специалистов, идеи дизайна интерьера и практические рекомендации для ремонта и обустройства жилья.
Сайт о финансах https://manorsgroup.com.ua и недвижимости с полезными статьями о инвестициях, покупке и продаже недвижимости, ипотеке и управлении личными финансами. Аналитика рынка, советы экспертов и актуальные новости для тех, кто интересуется финансовыми решениями и недвижимостью.
Медицинский портал https://lpl.org.ua с полезными статьями о здоровье, профилактике заболеваний и современных методах лечения. Советы врачей, рекомендации по правильному питанию, укреплению иммунитета и здоровому образу жизни.
Хотите быстро развить канал на Rutube? Накрутка подписчиков Rutube поможет увеличить аудиторию, повысить доверие к каналу и ускорить продвижение видео. Перейдя по запросу как увеличить просмотры на рутуб вы получите живых подписчиков, плавное добавление и безопасные методы продвижения. Отличное решение для новых и развивающихся каналов, которым важно быстрее набрать активность и привлечь больше просмотров. Начните рост канала уже сегодня.
Все о строительстве https://mia.km.ua и ремонте на одном сайте. Полезные советы по выбору строительных материалов, технологиям строительства, отделке помещений и дизайну интерьера. Практические рекомендации для тех, кто строит дом или делает ремонт.
Онлайн журнал https://mts-agro.com.ua о садоводстве и дизайне участка. Советы по выращиванию растений, уходу за садом, ландшафтному дизайну и обустройству дачного участка. Идеи для сада, рекомендации по посадке цветов, деревьев и созданию красивого и уютного пространства.
Новостной портал https://sevsovet.com.ua с актуальными новостями Украины и мира. Политика, экономика, общество, технологии и культура. Оперативные новости и аналитические материалы.
Женский портал https://socvirus.com.ua о моде, красоте и здоровье. Полезные советы по уходу за собой, психология отношений, идеи стиля и рекомендации по здоровому образу жизни.
Фитнес-портал https://sportinvent.com.ua о тренировках, здоровом образе жизни и правильном питании. Программы тренировок, советы тренеров, упражнения для дома и зала, рекомендации по похудению и набору мышечной массы. Узнайте, как улучшить физическую форму и поддерживать здоровье.
Hi there to every one, as I am really keen of reading this web site’s post to be updated on a regular basis. It includes nice material.
cancun – https://www-cancun.com
Статьи о маркетинге https://reklamspilka.org.ua PR и рекламе для бизнеса и специалистов. Практические рекомендации по продвижению брендов, управлению репутацией, контент-стратегии, рекламе в интернете и эффективным коммуникациям с клиентами.
Сайт новостей https://vestionline.com.ua Украины и мира с ежедневными обновлениями. Политика, экономика, общество, технологии и культура. Узнавайте последние события и следите за новостями.
Мастерская креативных идей https://rusproekt.org изготовление авторской мебели и текстиля, создание уникального декора и фитодизайна. Отделочные работы в стиле кантри и прованс, оформление интерьеров и индивидуальные дизайнерские решения для дома, кафе и загородных пространств.
Женский интернет-портал https://ledis.top о красоте, здоровье, моде и стиле жизни. Советы по уходу за собой, психология отношений, рецепты и полезные статьи для современной женщины.
Свежие новости https://zoobonus.com.ua Украины и мира в одном месте. Политика, экономика, общество, технологии, культура и происшествия. Актуальные события и аналитические материалы.
Спортивный журнал https://beachsoccer.com.ua о мире спорта. Новости спортивных событий, обзоры матчей, аналитика соревнований и интервью со спортсменами. Читайте актуальные статьи о футболе, хоккее, теннисе, боксе и других популярных видах спорта.
Чайный портал https://etea.com.ua для любителей чая. Статьи о разных сортах чая, традициях чаепития, способах заваривания и пользе чая для здоровья. Узнайте больше о культуре чая, популярных напитках и интересных фактах о чае.
Портал о здоровье глаз https://eyecenter.com.ua и зрении человека. Советы по профилактике заболеваний глаз, улучшению зрения, правильной работе за компьютером и уходу за глазами. Полезные статьи о здоровье глаз и современных методах коррекции зрения.
Журнал о строительстве https://bms-soft.com.ua и ремонте для дома и квартиры. Полезные статьи о строительных технологиях, отделке помещений, выборе материалов и ремонте. Советы специалистов, идеи для интерьера и практические рекомендации.
Портал о технологиях https://helikon.com.ua и инновациях: новости IT, обзоры гаджетов, смартфонов и компьютеров. Статьи о цифровых сервисах, искусственном интеллекте и технологических трендах.
Накрутка подписчиков Rutube поможет быстро увеличить аудиторию канала и повысить доверие к контенту. Живые подписчики создают активность, улучшают видимость роликов и привлекают новых зрителей. Перейдя по запросу накрутка подписчиков рутуб цена вы получите быстрый старт канала, безопасные методы продвижения и стабильный рост аудитории без отписок. Отличное решение для тех, кто хочет быстрее развить канал на Rutube.
Мужской портал https://hooligans.org.ua о стиле жизни, здоровье, карьере и саморазвитии. Статьи о спорте, отношениях, финансах, технологиях и мужских интересах. Полезные советы, лайфхаки и вдохновение для современных мужчин.
Женский портал https://psilocybe-larvae.com о красоте, здоровье, отношениях и саморазвитии. Полезные советы для женщин, идеи для дома и семьи, мода, психология, рецепты, лайфхаки и вдохновение на каждый день. Читайте статьи, находите полезную информацию и улучшайте свою жизнь.
Информационный автожурнал https://real-voice.info о мире автомобилей. Новости автопрома, обзоры новых моделей, тест-драйвы, сравнения машин, советы по эксплуатации и обслуживанию. Полезные материалы для автолюбителей, владельцев авто и тех, кто выбирает автомобиль.
renta car https://www.montenegro-car-rental-hire.com
нужен биг бэг? https://big-bag-mkr.ru: прочные биг-бэги для стройматериалов, зерна, гранулята и других сыпучих продуктов. Производство под заказ и со склада, консультация, расчет, доставка по РФ.
Мы собрали https://kinogo-film.my для вас не просто фильмы и сериалы, а целые миры. От классики, которая трогает душу, до свежих блокбастеров. Здесь есть место для вечернего романтического кино под пледиком, для боевика, который вы ждали весь год. Онлайн-кинотеатр Киного — это место, где вы сами решаете, какой будет ваш киносеанс.
Justin TV Azerbaijan https://justin-tv.com.az main page: live match watch, football, big matches, basketball, UFC and game schedule sections.
Lamine Yamal https://www.lamine-yamal.com.az Barcelona career, statistics, age, where he is from and basic biographical facts. Lamine Yamal profile on one page.
Продажа квартир https://kvartira778.ru в Санкт-Петербурге от собственников и агентств недвижимости. Актуальные объявления о продаже квартир в новостройках и на вторичном рынке.
Продажа квартир https://nedvizhkavspb.ru в Санкт-Петербурге. Большой выбор недвижимости на первичном и вторичном рынке: студии, однокомнатные, двухкомнатные и просторные квартиры в разных районах города. Актуальные предложения, удобный поиск и помощь в покупке жилья.
Курьер аккуратный, упаковка целая. Супер!
розы купить в томске
Продвигайте свой аккаунт быстрее с помощью накрутки подписчиков в TikTok. Перейдя по запросу подписчики на тикток без отписок вы сможете увеличить количество фолловеров, повысить доверие к профилю и привлечь больше просмотров и лайков. Быстрая и безопасная накрутка поможет вашему контенту попасть в рекомендации и ускорить рост аккаунта. Подходит для блогеров, брендов и бизнеса, которые хотят развиваться в TikTok и получать больше охватов.
Hi there, You’ve done a great job. I will certainly digg it and personally recommend to my friends. I’m sure they’ll be benefited from this web site.
I don’t think the title of your article matches the content lol. Just kidding, mainly because I had some doubts after reading the article. https://accounts.binance.com/register-person?ref=JW3W4Y3A
Бесплатная консультация семейного юриста — это возможность быстро разобраться в сложной ситуации и понять свои права. Перейдя по запросу адвокат по семейным обстоятельствам юрист поможет вам по вопросам развода, алиментов, раздела имущества, опеки над детьми и другим семейным спорам. Разъясним перспективы дела и подскажем оптимальное решение. Получите профессиональную помощь без оплаты и лишних обязательств.
Отличная возможность попробовать удачу в vodka казино http://wiki.votesmart.org/LorrilpCoullwm
Thanks for sharing such a good opinion, post is fastidious, thats why i have read it fully
ремонта ванной комнате ключ https://remont-vannoy-spb.ru
Бесплатная консультация юриста по расторжению брака поможет разобраться в ваших правах и возможностях при разводе. Специалист объяснит порядок развода через суд или ЗАГС, подскажет, как решаются вопросы раздела имущества, алиментов и проживания детей. Перейдя по запросу консультация юриста по разводам бесплатно вы получите профессиональные рекомендации и ответы на все вопросы, чтобы пройти процедуру развода максимально спокойно и с защитой ваших интересов.
1x – https://www-1x-mx.com
magnificent issues altogether, you simply won a logo new reader. What might you suggest in regards to your publish that you simply made some days ago? Any positive?
you’ve gotten an important weblog right here! would you wish to make some invite posts on my weblog?
Hi to all, how is everything, I think every one is getting more from this web page, and your views are pleasant in favor of new visitors.
Need a multimedia system? itec We integrate multimedia systems for home and business. We install and configure audio and video systems, manage content, and integrate equipment into a single system. Modern solutions for comfortable and efficient use of technology.
Юридическая консультация по разделу имущества поможет защитить ваши права и избежать ошибок при разводе или спорах между собственниками. Переходите по запросу адвокат по разделу долгов – юрист оценит ситуацию, разъяснит перспективы дела, подскажет, как правильно оформить документы и выстроить стратегию. Вы получите чёткий план действий и поддержку на каждом этапе — от переговоров до суда.
Новое в категории: https://elicebeauty.com/parfyumeriya/filter/_m192_a836/
Бесплатная консультация юриста по взысканию алиментов — первый шаг к защите ваших прав и интересов ребёнка. Переходите по запросу юридическая консультация по алиментам онлайн бесплатно и получите разбор именно вашей ситуации, узнайте порядок действий, какие нужно собрать документы и оценку перспектив дела. Поддержка на каждом этапе — от обращения в суд до фактического получения алиментых выплат. Запишитесь уже сегодня!
Good way of explaining, and good article to take facts regarding my presentation focus, which i am going to convey in university.
Юридическая помощь по защите прав ребенка — это поддержка в самых важных ситуациях: от споров о месте проживания и алиментах до защиты от насилия и нарушения прав в школе. Переходите по запросу детский адвокат и квалифицированный юрист поможет отстоять интересы ребенка, подготовить документы и представить ваши интересы в суде, обеспечив безопасность и справедливость.
you could have an important blog right here! would you wish to make some invite posts on my blog?
спб дизайнер интерьера дизайн интерьера ремонт квартир
дизайн коттеджа стоимость дизайн проекта загородного дома
Тензоприбор предлагает калибровочные гири для весов нужного класса точности и номинальной массы для калибровки весов.
В нашей компании можно купить калибровочные гири классов точности E1, E2, F1, F2, M1, M2.
Чем выше класс точности, тем меньше будет разница между номинальным и действительным значениями массы калибровочной гири.
naturally like your website but you have to check the spelling on quite a few of your posts. A number of them are rife with spelling problems and I find it very troublesome to tell the truth nevertheless I will definitely come back again.
загородный дом дизайн дизайн дома под ключ
The best porn generator free ai porn video generator your fantasies remain strictly between you and the neural network. Instant, high-quality generation, extensive scenario and character customization. Available 24/7. For adults.
Все подробности: https://disqus.com/by/dezavtor/about/
Thanks for sharing. I read many of your blog posts, cool, your blog is very good.
Your point of view caught my eye and was very interesting. Thanks. I have a question for you. https://www.binance.com/cs/register?ref=OMM3XK51
Юридическая консультация по лишению родительских прав поможет оценить ситуацию, определить основания и выстроить грамотную стратегию защиты или подачи иска. Переходите по запросу юридическая консультация по лишению родительских прав – специалист разъяснит порядок действий и подготовит документы. Получите профессиональную поддержку и ответы на все вопросы уже на первой консультации.
In my opinion that a home foreclosure can have a major effect on the client’s life. House foreclosures can have a Seven to 10 years negative influence on a borrower’s credit report. Any borrower having applied for a mortgage or any loans for example, knows that your worse credit rating is actually, the more tricky it is for any decent mortgage loan. In addition, it could affect a new borrower’s capacity to find a reasonable place to lease or rent, if that turns into the alternative real estate solution. Thanks for your blog post.
Бесплатная консультация юриста по вопросам опеки и усыновления поможет разобраться в правах, подготовке документов и порядке оформления. Переходите по запросу адвокат по попечительству – специалист подскажет, как действовать в вашей ситуации, оценит риски и предложит оптимальное решение. Получите профессиональную помощь по делам опеки и попечительства на каждом шаге без лишних затрат.
What’s up i am kavin, its my first occasion to commenting anywhere, when i read this piece of writing i thought i could also make comment due to this brilliant piece of writing.
Накрутка просмотров в TikTok — это быстрый способ привлечь внимание к вашему контенту и ускорить рост аккаунта. Переходите по запросу как поднять просмотры в тикток и величьте показатели популярности, повысьте доверие аудитории и попадите в рекомендации. Для максимального эффекта важно подкреплять рост качественным контентом, чтобы удерживать аудиторию и усиливать вовлечённость.
Обновления по теме: https://vnutridoma-spb.ru
Услуга накрутки просмотров на канал YouTube поможет быстро увеличить активность под вашими видео и привлечь внимание аудитории. Переходите по запросу увеличить просмотры на youtube. Дополнительные просмотры повышают видимость роликов в рекомендациях, улучшают статистику канала и создают эффект популярности. Подходит для продвижения новых и существующих видео, увеличения охвата и ускоренного роста канала на YouTube.
Главные новости: https://dom-cao.ru
Читать расширенную версию: https://sk-bik-stroy.ru
Ahaa, its good conversation regarding this article at this place at this blog, I have read all that, so now me also commenting here.
дизайн интерьера комнаты https://dizayn-kvartiry-spb.ru
дизайн проект квартиры спб цены дизайнеров интерьера
Продвигайте свой канал быстрее с услугой накрутки подписчиков в YouTube. Увеличьте количество фолловеров, повысьте доверие к каналу и привлеките новую аудиторию. Переходите по запросу накрутка подписчиков youtube Кворк. Быстрый старт для блогеров, брендов и экспертов. Живые и качественные подписчики, безопасное продвижение и заметный рост популярности вашего контента. Начните развивать канал уже сегодня!
I all the time emailed this weblog post page to all my friends, for the reason that if like to read it next my links will too.
Маркетплейс 1С-Битрикс — это официальный каталог готовых решений, модулей и интеграций для сайтов на платформе Bitrix. Переходите по запросу решения 1 с Битрикс и вы найдете расширения для интернет-магазинов, CRM, SEO, аналитики, платежных систем и автоматизации бизнеса. Удобный поиск и большой выбор приложений позволяют быстро расширить возможности сайта и внедрить новые функции без сложной разработки.
I do agree with all the ideas you’ve presented in your post. They are really convincing and will certainly work. Still, the posts are very short for starters. Could you please extend them a little from next time? Thanks for the post.
Платформа 1C-Bitrix — это комплекс программных продуктов для создания сайтов, интернет-магазинов и корпоративных порталов. Переходите по запросу программные продукты Bitrix. Решения Bitrix24 и 1C-Bitrix: Управление сайтом помогают автоматизировать бизнес-процессы, управлять продажами, выстраивать коммуникации с клиентами и эффективно развивать онлайн-проекты. Подходит для компаний любого масштаба — от малого бизнеса до крупных предприятий.
https://gai-news.ru/news/7810076-sobolenko-i-zverev-vyshli-v-polufinaly-mastersov.html
I’m curious to find out what blog platform you have been using? I’m experiencing some minor security issues with my latest blog and I’d like to find something more safe. Do you have any suggestions?
изготовление металлических значков изготовление металлических значков на заказ в москве
циклевка паркета в спб циклевка паркета в спб цены
Бесплатная юридическая консультация поможет разобраться в сложной ситуации и понять, какие действия предпринять дальше. Переходите по запросу бесплатная помощь юриста по телефону горячей линии и вы сможете задать вопрос юристу онлайн и получить разъяснение по гражданским, семейным, трудовым, жилищным и другим правовым вопросам. Специалист подскажет возможные решения, объяснит ваши права и поможет оценить перспективы дела. Консультация доступна онлайн и по телефону, быстро и без лишних формальностей.
https://horsetrailerworld.com/Abuse/?type=trailer&id=1475661&url=https://www.longisland.com/profile/ShelbyCruz24
От всей души благодарю за профессионализм и доброту.
заказ цветов томск
Sun789bet is my go-to these days. Easy to navigate and I’ve actually seen some decent wins. Give it a shot! Check it out here: sun789bet
Alright, so I checked out vvjlorg. Seems legit, but I’d still say proceed with caution, ya know? Always good to do your research! Check it out here: vvjlorg
Okay, 5ggg… that URL sounds kinda sus, not gonna lie. Do your homework, mates, and only play with what you’re willing to lose. Seriously. Check it out here: 5ggg
Флористы явно умеют работать с розами, букет из роз выглядел богатым и при этом очень аккуратным.
купить розы Томск
?Особенно понравилось, что учли возраст получателя и сделали оформление уместным.
букеты томск
Thanks for this wonderful article. Also a thing is that many digital cameras are available equipped with a zoom lens so that more or less of any scene being included by way of ‘zooming’ in and out. These kind of changes in {focus|focusing|concentration|target|the a**** length will be reflected from the viewfinder and on significant display screen right on the back of the specific camera.
Ищете надежные лицензии для 1С-Битрикс? Мы предлагаем легальные решения для всех типов проектов: интернет-магазинов, корпоративных сайтов и порталов. Переходите по запросу cms 1С Битрикс. Быстрая активация, официальная поддержка и выгодные условия – обеспечьте своему веб-проекту стабильную работу и защиту с надежным ПО уже сегодня!
Старый паркет? шлифовка паркета в спб профессиональное восстановление деревянного пола без пыли и лишних затрат. Удаляем царапины, потемнения и старое покрытие, возвращаем гладкость и естественный цвет. Используем современное оборудование, выполняем циклевку, шлифовку и лакировку паркета под ключ с гарантией качества и точным соблюдением сроков.
Thank you for the auspicious writeup. It in fact was a amusement account it.
Look advanced to more added agreeable from you!
By the way, how can we communicate?
Заказывала сюрпризом, всё получилось идеально.
доставка цветов томск на дом
Доставка цветов по Томску приятно удивила фотоотчётом после вручения букета.
dostavkacvetovtomsk6
https://matras-promtex.ru/
Thanks for sharing these kind of wonderful discussions. In addition, the best travel and also medical insurance program can often eradicate those problems that come with visiting abroad. Some sort of medical crisis can soon become costly and that’s likely to quickly decide to put a financial problem on the family finances. Putting in place the suitable travel insurance package prior to leaving is definitely worth the time and effort. Thank you
Read More: https://blawi-news.com/archives/63976
Full Version at the Link: https://elrapidosatelital.com/2026/03/15/cero-millas-casinos-2025/
Latest Updates: https://bbs.t-firefly.com/home.php?mod=space&uid=691698
Hey! I just wish to give an enormous thumbs up for the nice data you will have here on this post. I will be coming back to your blog for more soon.
Hey! Someone in my Facebook group shared this site with us so I came to give it a look. I’m definitely loving the information. I’m book-marking and will be tweeting this to my followers! Superb blog and great style and design.
All the details at the link: https://uohealthcare.com/gamble-now-victory-larger-today/
Лицензия «Битрикс: Управление сайтом – Старт» — оптимальное решение для создания небольшого сайта, лендинга или корпоративной страницы. Переходите по запросу Битрикс Старт скачать. Редакция включает базовые инструменты для управления контентом, готовые модули, защиту сайта и удобную административную панель. Подходит для быстрого запуска проекта на CMS 1C-Битрикс с возможностью дальнейшего масштабирования и перехода на более функциональные редакции.
Our pick today: https://crisunzueta.com/the-brand-new-views-sara-haines-becomes-candid-in-the-annoying-sexual-life-since-the-a-mother-united-states-weekly/
Longreads and hits: http://natyataranga.org/sexy-bluish-film-pornography-videos/
The most interesting click: https://csnakliyat.com/casino-online-portugal-melhores-sitios-2025-2/
Action tips: https://beautyclinic.pe/wizard-away-from-opportunity-guide-to-casinos-on-the-internet-gambling-games/
I’m more than happy to find this page. I wanted to thank you for ones time for this particularly wonderful read!! I definitely liked every part of it and I have you bookmarked to check out new things in your website.
Уже несколько праздников подряд пользуемся доставкой цветов по Томску, всё стабильно хорошо.
dostavkacvetovtomsk6.ru
Potrebujete se prestehovat? stehovani nabytku Praha preprava nabytku, spotrebicu a osobnich veci. Baleni, demontaz a montaz nabytku, stehovaci sluzby a doprava. Spolehlivy servis, dostupne ceny a pecliva prace bez poskozeni.
It?s actually a great and useful piece of info. I am satisfied that you simply shared this useful information with us. Please keep us informed like this. Thank you for sharing.
Planujete stehovani? profesionalni stehovaci sluzby stehovani bytu a kancelari na klic. Baleni, nakladka, preprava a vykladka. Zkuseni stehovaci, peclive dodani a vcasne dodani. Pomuzeme vam zorganizovat stehovani rychle a bez zbytecnych starosti.
В Ленинский район привезли букет из роз точно к оговорённому времени, всё как обещали.
купить букет роз томск
Большое спасибо за красоту и высокий уровень обслуживания.
доставка цветов томск на дом
1C-Bitrix: Управление сайтом — редакция Стандарт — это мощная платформа для создания и управления корпоративными сайтами. Переходите по запросу Битрикс Стандарт требования к хостингу. Подходит для компаний, которым нужен функциональный сайт с каталогом, формами, SEO-инструментами и удобной системой администрирования. Решение обеспечивает высокую безопасность, производительность и гибкость масштабирования бизнеса в интернете.
?Флористы здесь какие-то волшебники, показала пример, а они собрали композицию даже лучше, чем я представляла.
заказ цветов томск с доставкой
По Томску букет бомба.
купить цветы томск
Букет для студентки в общежитие ТГПУ привезли к экзамену!
гипсофилы цена букета
Менопауза и перименопауза https://menopower.ru симптомы, приливы и гормональные изменения. Полезные советы для женщин 45+, рекомендации по здоровью, образу жизни и управлению финансами для комфортного прохождения этого периода.
Проверенные адвокаты Москвы https://isk1.ru квалифицированная юридическая помощь и защита в суде. Решение сложных правовых споров, сопровождение дел и профессиональный подход к каждому клиенту для достижения результата.
Санитарные системы https://bio-ecopro.ru для мероприятий и стройплощадок — аренда мобильных туалетов, умывальников и санитарных модулей. Доставка, обслуживание и вывоз. Надежные решения для фестивалей, концертов, стройки и массовых событий.
Компания DARKLUM https://darklum.ru/catalogue предлагает широкий ассортимент светодиодных светильников различного назначения для коммерческих и жилых помещений как внутреннего, так и уличного освещения. В каталоге представлено более 5 000 моделей различных форм-факторов, среди которых Вы без труда сможете выбрать оптимальный вариант.
Промокод Пятёрочка доставка http://reporter63.ru/content/view/785017/promokod-pyaterochka-dostavka-vygodnye-vozmozhnosti-dlya-pokupok-onlajn актуальные скидки и купоны на заказ продуктов онлайн. Получайте выгодные предложения, снижайте стоимость доставки и экономьте на покупках в Пятёрочке с рабочими промокодами.
PUPIL OF FATE MOTORS https://auto.ae/pupiloffatemotors автосалон премиум авто в Дубае. Продажа роскошных автомобилей, эксклюзивные модели и индивидуальный подбор. Помогаем выбрать, оформить и доставить авто с гарантией качества и высоким уровнем сервиса.
Эко-бытовая химия http://reporter63.ru/content/view/784903/himiya-dlya-uborki-sekrety-effektivnosti-i-bezopasnosti в Санкт-Петербурге — средства для уборки без вредных компонентов. Эффективная очистка, безопасность для здоровья и окружающей среды. Широкий ассортимент и доставка по городу.
Главные новости: https://my-mizon.ru/cart/
Modern earth fault indicator monitor the condition of electrical networks and protect equipment. They offer rapid fault detection, high accuracy, and reliability for industrial applications.
Купить стройматериалы https://stroyrostov161.ru в Ростове-на-Дону: широкий выбор сыпучих и строительных материалов, включая щебень, песок, цемент, штукатурку и шпатлевку. Быстрая доставка и доступные цены для вашего объекта.
Заборы под ключ https://dachnie-zabory.ru в Москве и области — изготовление и установка ограждений для дома и участка. Профнастил, штакетник, сетка рабица и 3D заборы. Замер, доставка и монтаж с гарантией качества и соблюдением сроков.
Thank you for the good writeup. It in fact was a amusement account it. Look advanced to more added agreeable from you! By the way, how can we communicate?
Битрикс: Управление сайтом Малый Бизнес — функциональная редакция CMS для создания интернет-магазинов и коммерческих проектов. Переходите по запросу 1С Битрикс Малый Бизнес. Система включает каталог товаров, корзину, онлайн-оплаты, маркетинговые инструменты и интеграцию с 1С. Решение подходит для компаний, которым нужен надежный и масштабируемый сайт с возможностью расширения функционала через модули и интеграции.
Сервис доставки супер, Томск!
розы купить в томске
I know this website provides quality dependent articles and additional data, is there any other web page which offers these kinds of stuff in quality?
Wonderful work! This is the type of info that should be shared around the web. Shame on Google for not positioning this post higher! Come on over and visit my site . Thanks =)
Качество букетов и аккуратная доставка по Томску сделали меня постоянным клиентом.
dostavkacvetovtomsk6.ru
It is indeed my belief that mesothelioma is definitely the most dangerous cancer. It contains unusual features. The more I look at it the more I am certain it does not conduct itself like a true solid tissue cancer. If perhaps mesothelioma is often a rogue virus-like infection, so there is the chance for developing a vaccine and also offering vaccination for asbestos subjected people who are vulnerable to high risk connected with developing long run asbestos linked malignancies. Thanks for revealing your ideas about this important ailment.
Читать больше на сайте: услуги шлифовка паркета
Все самое свежее здесь: циклевка паркета без пыли
Самое важное сегодня: https://shlifovka-parketa.ru
Текущие рекомендации: циклевка паркета
?Мама потом ещё несколько дней всем звонила и рассказывала, какие ей привезли шикарные цветы.
заказ цветов томск с доставкой
Теперь всем советую этот сервис, потому что качество отличное.
купить розы в томске
Продвижение сообщества или страницы во ВКонтакте с помощью привлечения подписчиков. Услуга помогает быстро увеличить аудиторию, повысить активность и доверие к группе или профилю. Переходите по запросу накрутка подписчиков в вк живые люди. Возможна накрутка живых и заинтересованных пользователей, что улучшает видимость сообщества, помогает быстрее развивать бренд, проекты и продажи. Подходит для групп, пабликов и личных страниц.
Heard some good things about 95vnvin, so I’m gonna deposit a little something and see what’s up. Hope they got a good selection of slots and maybe some even better bonuses. Wish me luck. Check them out yourself: 95vnvin
VIpph21, feels promising. Anyone has good experience here? I’m curious. Thinking about registering. Have anyone try this? vipph21
Downloaded the lucky8app and it seems pretty decent! Smooth interface and easy to navigate. Fingers crossed for some lucky wins! Give it a whirl! lucky8app
First of all I would like to say terrific blog! I had a quick question in which I’d like to ask if you do not mind. I was interested to find out how you center yourself and clear your thoughts prior to writing. I’ve had trouble clearing my thoughts in getting my ideas out there. I truly do take pleasure in writing but it just seems like the first 10 to 15 minutes are usually wasted simply just trying to figure out how to begin. Any suggestions or tips? Cheers!
One more thing I would like to express is that in lieu of trying to accommodate all your online degree programs on days that you complete work (since the majority people are worn out when they return), try to obtain most of your instructional classes on the weekends and only one or two courses for weekdays, even if it means taking some time away from your saturday and sunday. This pays off because on the weekends, you will be a lot more rested plus concentrated upon school work. Many thanks for the different points I have mastered from your website.
Нужны подписчики в Telegram? Поможем быстро увеличить аудиторию вашего канала или группы. Переходите по запросу раскрутка телеграм канала живые подписчики. Предлагаем накрутку живых и активных подписчиков без резких скачков и с минимальными списаниями. Подходит для старта новых каналов, повышения доверия и привлечения органической аудитории. Безопасное продвижение, гибкие объемы заказа и быстрый запуск. Увеличьте популярность вашего Telegram-канала уже сегодня.
Hi, i think that i saw you visited my weblog thus i got here to return the prefer?.I’m attempting to in finding things to improve my web site!I suppose its ok to make use of some of your ideas!!
excellent points altogether, you just gained a new reader. What could you suggest about your publish that you simply made a few days in the past? Any sure?
Je regarde https://rockstar-casino-365.fr avec rockstar casino pour voir les slots. Tout doit rester rapide.
Промокоды Пятёрочки https://www.time-samara.ru/content/view/785106/transformaciya-sistemy-loyalnosti-v-sovremennom-rossijskom-ritejle актуальные купоны и скидки на продукты и доставку. Получайте бонусы, снижайте стоимость заказов и экономьте на покупках. Только проверенные промокоды для выгодных покупок в Пятёрочке.
Ежедневный обзор: https://geforce-gt-730.ru
Полная версия статьи: https://interskol-shurupovert.ru
Wspolczesne uvula temat ten przyciaga uwage wielu graczy, ktorzy szukaja bezpiecznych i rozbudowanych platform do zabawy. Wulkan aspekt to przede wszystkim dostepnosc gier, ktore lacza wysoka jakosc grafiki z plynna rozgrywka. Aura Vulkan sila tej marki polega na roznorodnosci tytulow, od klasycznych slotow po nowoczesne automaty z interaktywnymi funkcjami.
Dla poczatkujacych uzytkownikow kluczowe jest zrozumienie, jak dziala vulkan spiele casino polska i jak rozpoczac gre w bezpieczny sposob. Pierwsze kroki obejmuja rejestracje na platformie, weryfikacje konta oraz wybor preferowanych metod platnosci. Istotnym elementem jest rowniez zapoznanie sie z regulaminem i polityka prywatnosci, aby uniknac nieprzyjemnych niespodzianek. Nastepnie krokiem jest zrozumienie zasad bonusow, ktore czesto towarzysza uruchomieniu konta. Warto jest skonsultowac sie z obsluga klienta w razie pytan, poniewaz profesjonalne doradztwo zwieksza komfort gry. Wkrotce potem mozna przetestowac darmowe tryby i dopasowac ustawienia do swoich preferencji.
vulkanspiele opinie https://sharifkarimidentist.com/vulkan-spiele-polska-vulkanspiele-casino-online-pl-2026-oficjalnie/
سنتناول في هذا المقال برنامج 888starz كمنصة رائدة تجمع بين الترفيه والمسؤولية وتقدم حلولاً مبتكرة للمستخدمين.
تحميل تطبيق 888starz https://fontysmade.nl/%d9%88%d9%83%d9%8a%d9%84-888starz-%d8%aa%d9%86%d8%b2%d9%8a%d9%84-%d8%a7%d9%84%d8%aa%d8%b7%d8%a8%d9%8a%d9%82-%d9%85%d8%b9-%d8%af%d8%b9%d9%85-%d8%a7%d9%84%d9%86%d8%b8%d8%a7%d9%85%d9%8a%d9%86-a/
Удобная платформа 888starz привлекает многих любителей азартных развлечений. В рамках этой статьи мы рассмотрим, как онлайн-казино 888starz работает в Узбекистане и какие преимущества предоставляет раздел ставок на спорт 888starz. Платформа лицензирована и регулируется, .
Пользователи Узбекистана могут легко зарегистрироваться на сайте 888starz, . Процесс верификации прост и позволяет начать играть в считанные минуты, . Преимущества платформы включают мгновенные выплаты и широкий ассортимент игр, . Абзац 2: Слот-автоматы на 888starz представлены крупными студиями и независимыми разработчиками, . Слоты радуют яркой графикой, бонусными режимами и шансами на джекпот, . Коллекция настольных игр на сайте богата разными вариациями классических развлечений.
8888 starz skachat https://888starzuzz.com/apk/
Специалисты компании выполнят изготовление этикеток любого формата и сложности: тканых жаккардовых, деревянных, металлических, кожаных и проч.
Чтобы картонные бирки для одежды не утратили своего первоначального вида и были износостойкими, мы используем только качественные материалы.
Проверка авто по VIN https://dtf.ru/luchshii-rating/3585176-top-15-luchshih-servisov-proverki-avto-po-vin-nomeru-reiting-2025-goda ТОП-15 лучших сервисов для анализа истории машины. ДТП, пробег, владельцы и ограничения. Сравните платформы и выберите надежный сервис для безопасной покупки авто.
Промокоды Пятёрочки https://www.time-samara.ru/content/view/785106/transformaciya-sistemy-loyalnosti-v-sovremennom-rossijskom-ritejle актуальные купоны и скидки на продукты и доставку. Получайте бонусы, снижайте стоимость заказов и экономьте на покупках. Только проверенные промокоды для выгодных покупок в Пятёрочке каждый день.
amazing product
Useful information. Fortunate me I discovered your site by accident, and I’m stunned why this twist of fate did not happened in advance! I bookmarked it.
One thing I have actually noticed is that there are plenty of common myths regarding the financial institutions intentions whenever talking about foreclosures. One fable in particular is that often the bank needs to have your house. The bank wants your hard earned money, not your property. They want the bucks they loaned you with interest. Averting the bank will simply draw a foreclosed realization. Thanks for your post.
You are so awesome! I do not think I have read through something like this before. So wonderful to discover somebody with a few original thoughts on this issue. Really.. many thanks for starting this up. This site is one thing that’s needed on the internet, someone with a bit of originality!
يشرح المقال خطوات التسجيل الأولي وكيفية البدء في تجربة برنامج 888starz مع مراعاة الشروط.
وكيل 888starz https://procbdmed.com/888starz-%d8%aa%d9%86%d8%b2%d9%8a%d9%84-%d9%81%d9%8a-%d9%85%d8%b5%d8%b1-%d8%aa%d8%b7%d8%a8%d9%8a%d9%82-apk-%d9%88ios-%d9%85%d8%b9-%d8%b4%d8%b1%d8%ad-%d8%a7%d9%84%d8%aa%d8%ab%d8%a8%d9%8a/
Nowoczesne uvula temat ten przyciaga uwage wielu graczy, ktorzy szukaja bezpiecznych i rozbudowanych platform do zabawy. Vulkan aspekt to przede wszystkim dostepnosc gier, ktore lacza wysoka jakosc grafiki z plynna rozgrywka. Wulkaniczne sila tej marki polega na roznorodnosci tytulow, od klasycznych slotow po nowoczesne automaty z interaktywnymi funkcjami.
Dla poczatkujacych uzytkownikow kluczowe jest zrozumienie, jak dziala vulkan spiele casino polska i jak rozpoczac gre w bezpieczny sposob. Pierwsze kroki obejmuja rejestracje na platformie, weryfikacje konta oraz wybor preferowanych metod platnosci. Waznym elementem jest rowniez zapoznanie sie z regulaminem i polityka prywatnosci, aby uniknac nieprzyjemnych niespodzianek. Potem krokiem jest zrozumienie zasad bonusow, ktore czesto towarzysza uruchomieniu konta. Swietnie jest skonsultowac sie z obsluga klienta w razie pytan, poniewaz profesjonalne doradztwo zwieksza komfort gry. Wkrotce mozna przetestowac darmowe tryby i dopasowac ustawienia do swoich preferencji.
vulkan spiele opinie https://ubangland.com/sports%c2%a0%c2%a0%ef%bc%85%e7%b1%bb%e5%88%ab%ef%bc%85/vulkan-spiele-casino-pl-vulkanspiele-polska-2026/
learn today
crypto gains
Thanks a bunch for sharing this with all of us you really know what you are talking about! Bookmarked. Kindly also visit my website =). We could have a link exchange contract between us!
Remarkable issues here. I’m very happy to see your post. Thank you so much and I am taking a look ahead to contact you. Will you kindly drop me a mail?
Нужна бесплатная юридическая консультация? Переходите по запросу бесплатная юридическая помощь гражданам в Санкт-Петербурге и получите помощь опытного юриста по любым правовым вопросам: семейные споры, долги, недвижимость, трудовые конфликты, защита прав потребителей и многое другое. Задайте вопрос онлайн или по телефону и получите подробный разбор вашей ситуации и рекомендации по дальнейшим действиям. Консультация проводится бесплатно и конфиденциально.
تجربة المستخدم على 888starz سهلة وبديهية مع واجهة عربية واضحة وتصفح سلس للمبتدئين, منصة 888starz تقدم دعمًا فنيًا باللغة العربية وخدمات مساعدة سريعة عبر الدردشة الحية والبريد الإلكتروني, خيارات الدفع متاحة ومتعددة وتدعم التحويلات المحلية والدولية بكل أمان
star 888 bet star 888 bet.
W Polsce popularne sa kasyna online z motywem vulkanspiele, ktore zapewniaja intensywne doznania.
vulkan spiele casino https://vulkannclubs.com/
quick info
Удобная платформа 888starz привлекает многих любителей азартных развлечений. В рамках этой статьи мы рассмотрим, как онлайн-казино 888starz работает в Узбекистане и какие преимущества предоставляет раздел ставок на спорт 888starz. Компания обеспечила соответствие международным стандартам безопасности.
Гражданам Узбекистана доступна быстрая регистрация на ресурсе 888starz. Процесс верификации не доставляет сложностей и занимает короткое время, . Сервис обеспечивает быстрые выплаты и богатый выбор развлечений. Абзац 2: Ассортимент слот-машин на 888starz насчитывает проекты от топовых и нишевых компаний. Игровые автоматы отличаются захватывающим дизайном и показательными бонусами. Раздел настольных игр на платформе также обширен: рулетка, блэкджек, бинго и прочие варианты, .
888starz ios https://888starzuzz.com/
Доставка цветов в Томске оставила только положительные эмоции.
доставка цветов томск на дом
Понравилось, что в томской доставке цветов учли пожелание по анонимности, всё очень деликатно.
dostavkacvetovtomsk6.ru
Ваши розы в ледяном шаре – эффектное решение для зимней свадьбы!
You can certainly see your enthusiasm in the article you write. The world hopes for even more passionate writers like you who are not afraid to mention how they believe. All the time go after your heart.
Hey! Do you use Twitter? I’d like to follow you if that would be okay.
I’m absolutely enjoying your blog and look forward to new posts.
olympia gifts
My family every time say that I am killing my time here at net, except I know I am getting experience all the time by reading such fastidious articles.
Нужна бесплатная юридическая консультация? Переходите по запросу консультация юриста 1 час в Балашихе и получите помощь опытного юриста по любым правовым вопросам: семейные споры, долги, недвижимость, трудовые конфликты, защита прав потребителей и многое другое. Задайте вопрос онлайн или по телефону и получите подробный разбор вашей ситуации и рекомендации по дальнейшим действиям. Консультация проводится бесплатно и конфиденциально.
W Polsce popularne sa kasyna online z motywem vulkanspiele, ktore zapewniaja intensywne doznania.
vulkanspiele kod promocyjny 2026 https://vulkannclubs.com/kod-promocyjny/
تجربة المستخدم على 888starz سهلة وبديهية مع واجهة عربية واضحة وتصفح سلس للمبتدئين, منصة 888starz تقدم دعمًا فنيًا باللغة العربية وخدمات مساعدة سريعة عبر الدردشة الحية والبريد الإلكتروني, خيارات الدفع متاحة ومتعددة وتدعم التحويلات المحلية والدولية بكل أمان
ЩЁЩЁЩЁ ШіШЄШ§Ш±ШІ https://888starz-egypt-ar.com/
BorderCareRX: legit mexican pharmacy without prescription – BorderCare RX
Increase traffic
check now
It’s perfect time to make a few plans for the future and it’s time to be happy. I have learn this publish and if I may I wish to suggest you few interesting things or tips. Perhaps you could write subsequent articles relating to this article. I wish to read even more issues approximately it!
Нужна бесплатная юридическая консультация? Переходите по запросу юридическая консультация online в Московской области и получите помощь опытного юриста по любым правовым вопросам: семейные споры, долги, недвижимость, трудовые конфликты, защита прав потребителей и многое другое. Задайте вопрос онлайн или по телефону и получите подробный разбор вашей ситуации и рекомендации по дальнейшим действиям. Консультация проводится бесплатно и конфиденциально.
I just couldn’t go away your website before suggesting that I actually enjoyed the standard information a person supply on your visitors? Is going to be again steadily to investigate cross-check new posts
legit mexican pharmacy without prescription: legit mexican pharmacy without prescription – BorderCareRX
В этой публикации мы предлагаем подробные объяснения по актуальным вопросам, чтобы помочь читателям глубже понять их. Четкость и структурированность материала сделают его удобным для усвоения и применения в повседневной жизни.
Получить больше информации – https://vivod-iz-zapoya-2.ru/
Weight loss
Нужна бесплатная юридическая консультация? Переходите по запросу вопрос юристу бесплатно онлайн без регистрации в Подольске и получите помощь опытного юриста по любым правовым вопросам: семейные споры, долги, недвижимость, трудовые конфликты, защита прав потребителей и многое другое. Задайте вопрос онлайн или по телефону и получите подробный разбор вашей ситуации и рекомендации по дальнейшим действиям. Консультация проводится бесплатно и конфиденциально.
зеркало пин ап вход пин ап
http://bordercarerx.com/# mexican pharmacies no prescription
Volvo спецтехніка https://novosti.stck.me/post/1800412/Kupit-spetstekhniku-SDLG-v-Ukraine/ екскаватори, фронтальні навантажувачі та дорожні машини. Надійність, ефективність і сучасні рішення для будівництва. Продаж, підбір і обслуговування техніки для бізнесу.
NorthCareRx: canadian world pharmacy – best canadian online pharmacy
mexican pharmacies no prescription: legit mexican pharmacy without prescription – reputable pharmacies in mexico
Volvo в Україні https://spectehnika-volvo.mystrikingly.com/ екскаватори, фронтальні навантажувачі та дорожні машини. Надійність, ефективність і сучасні рішення для будівництва. Продаж, підбір і обслуговування техніки для бізнесу.
bad reviews
Volvo в Україні https://spectehnika-volvo.mystrikingly.com/ екскаватори, фронтальні навантажувачі та дорожні машини. Надійність, ефективність і сучасні рішення для будівництва. Продаж, підбір і обслуговування техніки для бізнесу.
Нужна бесплатная юридическая консультация? Переходите по запросу консультация адвоката круглосуточно в Химках и получите помощь опытного юриста по любым правовым вопросам: семейные споры, долги, недвижимость, трудовые конфликты, защита прав потребителей и многое другое. Задайте вопрос онлайн или по телефону и получите подробный разбор вашей ситуации и рекомендации по дальнейшим действиям. Консультация проводится бесплатно и конфиденциально.
пин ап игровые автоматы пинап
special offer
If some one wishes expert view concerning running a blog afterward i recommend him/her to pay a visit this website, Keep up the fastidious job.
fast delivery
казик с кирками
onevine wines
full info
Нужны заклепки? заклепка вытяжная глухая алюминий сталь прочный крепеж для соединения деталей. Алюминиевые, стальные и нержавеющие варианты. Надежность, долговечность и удобство монтажа для различных задач и конструкций.
нейросеть для создания видео со звуком: https://vc.ru/aihub/2842552-generatsiya-video-neirosyetyu
Услуга по увеличению показателей в Дзене: подписчики, дочитки и лайки для роста активности и видимости канала. Переходите по запросу продвижение дзен канала. Поможем быстро усилить социальные сигналы, повысить привлекательность публикаций и ускорить продвижение. Подходит для новых и действующих каналов, чтобы улучшить статистику и привлечь больше реальной аудитории.
I blog often and I seriously thank you for your content. This article has really peaked my interest. I will take a note of your blog and keep checking for new information about once a week. I opted in for your RSS feed as well.
Улучшить фото бесплатно онлайн. Здесь можно ознакомиться подробнее https://vc.ru/aihub/2842555-uluchshenie-foto-onlajn-besplatno
Stackshine https://en.stackshine.io a SaaS cost management platform: subscription control, usage transparency, renewal tracking, and employee offboarding. Optimize your budget and reduce unnecessary software costs.
Разработка интернет-магазина на 1С-Битрикс под ключ на шаблоне. Переходите по запросу создание интернет магазина Битрикс 24 и получите удобный, быстрый и продающий сайт с адаптивным дизайном, интеграцией CRM, оплатой и доставкой. Оптимизируем под SEO и помогаем увеличить продажи. Индивидуальный подход, прозрачные сроки и поддержка на всех этапах.
Нейросеть онлайн — лучшие сервисы: https://vc.ru/aihub/2842517-luchshie-neuroseti-onlajn-dlya-rossii-obzor-2026-goda
cheap office space rent office spaces in nyc
Разработка сайта на 1С-Битрикс под ключ на шаблоне. Переходите по запросу создать сайт на 1с Битрикс с нуля и получите удобный, быстрый и продающий сайт с адаптивным дизайном, интеграцией CRM, оплатой и доставкой. Оптимизируем под SEO и помогаем увеличить продажи. Индивидуальный подход, прозрачные сроки и поддержка на всех этапах.
Появились вредители? обработка от тараканов в москве обработка помещений от вирусов, бактерий и насекомых. Современные методы, безопасные средства и опытные специалисты для надежной защиты.
Уничтожение вредителей https://dezinfekciya-mcd.ru/ уничтожение бактерий, вирусов и насекомых. Обработка квартир, домов и коммерческих помещений. Безопасные препараты, опытные специалисты и гарантия результата.
Free online games https://poki.com.az play without downloading or registering. A large collection of games across various genres: action, puzzles, racing, and strategy. Easily access from any device.
I will also like to say that most of those that find themselves devoid of health insurance are normally students, self-employed and people who are out of work. More than half of the uninsured are under the age of Thirty-five. They do not feel they are looking for health insurance because they’re young in addition to healthy. Their particular income is generally spent on real estate, food, in addition to entertainment. Many people that do go to work either entire or part time are not presented insurance by way of their jobs so they move without due to the rising valuation on health insurance in america. Thanks for the tips you talk about through this web site.
Arizona sports events https://www.oxu-az.com.az football, transfers, and live match results. Latest news, statistics, and reviews for fans and sports enthusiasts.
Free online games 1001 oyun the best browser games with no installation required. Huge selection of genres, easy search, and quick launch. Play anytime for free.
https://mine-drop1.com/
Roblox Download delta roblox Download the game, learn about Roblox Studio features, and learn about security settings. Play, create your own worlds, and protect your account. A complete guide to installing, playing, and using the platform safely.
Выгодно купить кварцевый песок для пескоструя – 100% очистка без забитых сопел! Забудьте о засорах: очищайте металл в разы быстрее. Ваш аппарат скажет спасибо, а результат поразит клиента. Купить кварцевый песок!
База сайтов для Xrumer — это тщательно отобранный список площадок для эффективного размещения ссылок и автоматического постинга. Переходите по запросу стоимость базы хрумер кворк. База подходит для SEO-продвижения, ускоряет наращивание ссылочной массы и экономит время. Актуальные и рабочие ресурсы, регулярное обновление и высокая проходимость обеспечивают максимальный результат.
https://mine-drop1.com/
big hammer
Act now
Далее следует открыть настройки безопасности, разрешить установку приложений из неизвестных источников и запустить файл APK для начала установки
888starz ios testflight https://androidchity.ru/
Dla nowych graczy proponowane sa kuszace bonusy na start i systemy nagrod za czeste gry.
vulkan spiele https://vulkanpolska.com/
The piece analyzes major platforms, viewer demographics, and events fueling the craze.
monopoly live stats https://monopoly-live-bangladesh.com/
Upcoming changes could bring more localized material, multilingual hosting, and broader access.
casino score monopoly big today live https://monopoly-live-bangladesh.com/
yaratgan. foydali. akustika. uyinlar. o‘smoqda. bo‘lib. to‘lov, bank o’tkazmasi. Kuchli foydalanuvchilar
888starts https://888starz-uzbekistans.com/
yangi o’yin maydoni. onlayn. shu bilan. bo‘ladi,. soni. davr talablariga. shartlarining, kredit karta,. Kuchli foydalanuvchilar
888starzuz https://888starz-uzbekistans.com/
Нейросеть онлайн — лучшие сервисы. Можно ознакомиться подробнее по ссылке, https://vc.ru/aihub/2842517-luchshie-neuroseti-onlajn-dlya-rossii-obzor-2026-goda
Browse relaxing playlist spotify to explore thousands of handpicked Spotify playlists from phonk and lo-fi to jazz and rock.
Нужен кондицинер установка кондиционера стоимость москва профессиональный монтаж сплит-систем под ключ. Быстро, аккуратно и с гарантией. Подбор оборудования, установка и настройка с соблюдением всех норм и стандартов.
Hey! I know this is kinda off topic however , I’d figured I’d ask. Would you be interested in trading links or maybe guest writing a blog article or vice-versa? My blog addresses a lot of the same subjects as yours and I feel we could greatly benefit from each other. If you happen to be interested feel free to shoot me an email. I look forward to hearing from you! Fantastic blog by the way!
Lower rates
Обзор червячных хомутов https://teletype.in/@da_revanta/sMB0_AOMqxv как выбрать лучший вариант для надежного крепления. Сравнение материалов, размеров и производителей. Полезные советы по выбору, установке и применению для разных задач.
нужен бот? создать бота вк онлайн создавайте ботов для продаж и поддержки клиентов. Интеграции, сценарии, автоответы и аналитика. Простое решение для бизнеса без навыков программирования.
https://mine-drop1.com/
Your source https://365sportia.com for international sports coverage football transfer news, Champions League analysis, NBA and NFL updates, and sports collectibles insights
Latest scores https://rtahasports.com game highlights, and player news from the NFL, NBA, NHL, and MLB. Get up-to-date statistics, transfers, and analysis. Follow the games and learn everything about teams and players in real time.
Приложение 888starz apk представляет собой удобную платформу для азартных игр и слот-машин онлайн.
888starz ios https://orcosildigital.com.br/2025/12/11/naslazhdaytes-onlaynkazino-888starz-na-ios-v-uzbekistane-2/
Начать игру можно после загрузки apk и заполнения базовой анкеты.
888starz скачать https://dataprotect.sg/igrayte-v-onlaynkazino-888starz-na-ios-v-uzbekistane/
Товар или услуга? https://бурза.рф публикуйте объявления и находите товары, услуги и вакансии. Удобный поиск, категории и быстрый доступ к актуальным предложениям.
Любишь музыку? https://radomir-art.ru музыка с душой, тексты и композиции. Слушайте онлайн, открывайте новые треки и погружайтесь в атмосферу искреннего творчества.
Любишь читать но нет времени? слушать аудиокниги огромный выбор жанров, удобный поиск и качественная озвучка. Наслаждайтесь любимыми произведениями в любое время.
Нужен займ? онлайн займ с моментальным решением оформление онлайн без справок и поручителей. Быстрое решение, удобная подача заявки и получение денег на карту. Подберите выгодное предложение и получите средства в короткие сроки.
Федеральный центр банкротства граждан помогает законно списать долги и начать финансовую жизнь с чистого листа. Переходите по запросу центр банкротства физических лиц. Специалисты сопровождают процедуру на всех этапах: от консультации до полного завершения дела. Индивидуальный подход, прозрачные условия и защита ваших интересов — надежное решение при сложной финансовой ситуации.
prednisone 2.5 mg: generic prednisone tablets – can you buy prednisone over the counter
Генерация изображений нейросетью — главная https://vc.ru/aihub/2842526-generaciya-izobrazhenij-nejrosetyu
Только свежие сайт сми свежие новости политики, экономики, общества и технологий. Актуальные события, аналитика, обзоры и мнения экспертов. Следите за главными новостями страны и мира онлайн в удобном формате каждый день.
Строительные технологии https://universalstroi.su выгодные инвестиции в доступное жилье. Стабильный доход, перспективные проекты и высокий спрос. Получайте прибыль от инновационных решений в строительстве.
compare prednisone prices: buy prednisone online usa – prednisone for sale in canada
Оцинкованный крепеж остается практичным выбором для стройки и производства благодаря защите покрытия Такой вариант крепежа помогает сократить количество переделок и сохранить стабильный результат на объекте https://metizy-optom-moskva.ru/
Монтажные работы https://montazhstroy.su услуги по установке инженерных систем и конструкций. Быстро, качественно и с гарантией. Выполняем задачи любой сложности для частных и коммерческих объектов.
What’s up, all is going sound here and ofcourse every one is sharing data, that’s genuinely good, keep up writing.
цены ответственного хранения стоимость услуг ответственного хранения
I would like to thank you for the efforts you have put in writing this site. I’m hoping to view the same high-grade blog posts from you later on as well. In truth, your creative writing abilities has motivated me to get my very own site now 😉
indian pharmacy online: Global India Pharmacy – Global India Pharmacy
https://pawtrustmeds.com/# Paw Trust Meds
http://globalindiapharmacy.com/# top online pharmacy india
best rated canadian pharmacy: canadian drugs – canadian pharmacy
Капсульные дома становятся все более популярными благодаря сочетанию скорости установки и удобства эксплуатации https://super-domiki.ru/
http://globalindiapharmacy.com/# Global India Pharmacy
Online medicine order: Global India Pharmacy – Global India Pharmacy
indian pharmacy: Global India Pharmacy – Global India Pharmacy
http://globalindiapharmacy.com/# indian pharmacy
место ответственного хранения https://otvetstvennoe-hranenie-sklad.ru
canadian pharmacy no scripts: NorthAccess Rx – canada drugstore pharmacy rx
vet pharmacy: pet meds for dogs – Paw Trust Meds
Hello there! This is my first comment here so I just wanted to give a quick shout out and tell you I really enjoy reading through your posts. Can you recommend any other blogs/websites/forums that go over the same topics? Appreciate it!
http://globalindiapharmacy.com/# buy medicines online in india
Paw Trust Meds: Paw Trust Meds – Paw Trust Meds
Ищете надежную юридическую помощь? Рейтинг лучших юристов поможет быстро найти проверенных специалистов с высоким уровнем экспертизы и успешной практикой. Переходите по запросу список лучших юристов в Москве. В подборке — профессионалы, которым доверяют клиенты, с реальными отзывами и подтвержденной репутацией. Выбирайте юриста для решения любых правовых вопросов уверенно и без лишних рисков.
дизайн интерьера заказать дизайн бюро интерьера
Наркологическая клиника в клинике в Астрахани предоставляет помощь пациентам, сталкивающимся с различными формами зависимости — алкогольной, наркотической, лекарственной. Основой терапии является комплексный подход, включающий медицинскую детоксикацию, стабилизацию состояния, психотерапию и последующее наблюдение. Такой формат работы позволяет мягко купировать острые симптомы, восстановить физиологические функции и подготовить пациента к длительной реабилитации. Все процедуры проводятся анонимно, с использованием сертифицированных препаратов и с постоянным контролем врача.
Детальнее – наркологическая клиника вывод из запоя
В рамках лечебного процесса наркологическая клиника задействует структурированные механизмы наблюдения, включающие анализ лабораторных показателей, оценку соматического тонуса и изучение активности нервной системы. Эти элементы обеспечивают комплексность работы и позволяют своевременно корректировать план лечения. Такая система предотвращает перегрузку организма и способствует поддержанию стабильности на фоне применения медикаментозных схем. Ниже представлены ключевые составляющие терапевтического процесса, формирующие основу для клинического восстановления.
Получить больше информации – вывод наркологическая клиника пенза
Для жителей Астрахани доступен выезд нарколога на дом — это востребованная услуга, позволяющая безопасно провести детоксикацию в привычной среде без госпитализации. При тяжёлых формах зависимости рекомендуется стационарное лечение: круглосуточное наблюдение врачей, капельницы, медикаментозная поддержка и консультации психотерапевта. Такой формат позволяет стабилизировать состояние в максимально короткие сроки.
Изучить вопрос глубже – наркологическая клиника стационар
Global India Pharmacy: buy medicines online in india – Global India Pharmacy
http://globalindiapharmacy.com/# india online pharmacy
Paw Trust Meds: Paw Trust Meds – Paw Trust Meds
canadian pharmacy world reviews: canadian family pharmacy – canadian drugs online
Покупал телефон для мамы, поэтому было важно, чтобы всё прошло без проблем. Сотрудники помогли выбрать модель, терпеливо ответили на вопросы и быстро оформили заказ. Доставка не подвела, всё приехало вовремя. Спасибо за качественную и спокойную работу: купить телефон с доставкой на дом сегодня
Процедура вывода из запоя проводится только под медицинским наблюдением, так как самостоятельные попытки могут привести к осложнениям — аритмии, судорогам, резкому скачку давления. Именно поэтому наркологи центра уделяют особое внимание контролю жизненно важных показателей и плавному восстановлению организма.
Получить дополнительные сведения – http://vyvod-iz-zapoya-penza18.ru/
Paw Trust Meds: Paw Trust Meds – vet pharmacy
Особенность клиники — возможность выезда нарколога на дом. Это особенно важно, если пациенту трудно самостоятельно добраться до центра или он хочет избежать публичности. Врач приезжает с полным набором медикаментов и оборудования, проводит обследование и ставит капельницу, контролируя состояние пациента на протяжении всей процедуры. Такой формат позволяет начать лечение незамедлительно и без стресса.
Ознакомиться с деталями – наркологическая клиника стационар
Comprehensive asthma treatment guide — symptoms, causes, and effective management. Explore inhalers, medications, and daily care tips to reduce attacks and maintain better respiratory health.
Наркологическая клиника применяет структурированные методы, включающие изучение анамнеза, оценку текущего состояния и определение возможных рисков. На основе полученной информации формируются индивидуальные схемы лечения, направленные на нормализацию внутренних процессов. Работа строится на многоуровневом наблюдении, включающем анализ лабораторных показателей и оценку функциональных систем организма. Такой формат позволяет поддерживать стабильную динамику изменений и избегать осложнений. В клинике создается согласованная модель вмешательств, позволяющая получать устойчивые результаты.
Изучить вопрос глубже – http://
Вывод из запоя — это не просто медицинская процедура, а важный шаг на пути восстановления организма и возвращения человека к нормальной жизни. В клинике «ВладТрезвие Центр» пациенты получают профессиональную помощь, основанную на современных методиках детоксикации и безопасном медикаментозном восстановлении. Каждый случай рассматривается индивидуально, а лечение подбирается с учётом возраста, состояния здоровья и продолжительности запоя. Наркологи центра выезжают на дом круглосуточно, обеспечивая помощь даже в экстренных ситуациях, когда время играет ключевую роль.
Исследовать вопрос подробнее – вывод из запоя дешево владивосток
Ниже представлена последовательная схема, определяющая общий ход клинического вмешательства.
Разобраться лучше – наркологический вывод из запоя ижевск
Продолжительный запой истощает организм, провоцируя нарушения работы сердца, печени и нервной системы. Без своевременной медицинской помощи состояние пациента может резко ухудшиться — от судорог и аритмии до алкогольного делирия. Врачи наркологической клиники «ДонМед Экстренная Наркология» проводят срочную детоксикацию и вывод из запоя в Ростове-на-Дону, обеспечивая круглосуточное наблюдение и контроль осложнений. Каждое вмешательство подбирается индивидуально, а лечение направлено не только на снятие интоксикации, но и на стабилизацию психоэмоционального состояния пациента.
Подробнее можно узнать тут – вывод из запоя
https://northaccessrx.com/otc-meds.html# canadian online drugstore
Курьер по Томску молодец.
заказать цветы томск
Районы с плотной застройкой, дворовые проезды, пиковые часы — всё учитывается при планировании визитов. Чем меньше холостых перемещений, тем быстрее начинается помощь и тем ниже вероятность внеплановых повторов «по тревоге».
Подробнее можно узнать тут – наркологическая клиника обратный звонок
Global India Pharmacy: Global India Pharmacy – Global India Pharmacy
https://pawtrustmeds.com/# Paw Trust Meds
india pharmacy mail order: india pharmacy mail order – best online pharmacy india
«НоваМед Центр» строит лечение как управляемую последовательность шагов, а не набор эпизодических процедур. На входе мы фиксируем исходные риски: длительность употребления, сопутствующие заболевания, принимаемые лекарства, анамнез кодирований и срывов, показатели давления, пульса, сатурации, уровень сна и тревоги. Это позволяет выбрать безопасную точку входа и задать логичную траекторию: от детокса к стабилизации, затем к поведенческим изменениям и поддержанию ремиссии. Такая структура особенно важна при высокой нагрузке и дефиците времени: когда пациент и семья понимают, что будет через час, сутки и неделю, снижается тревога и исчезают импульсивные «проверки себя», из-за которых обычно рушатся результаты. Мы придерживаемся принципа клинической достаточности: только те вмешательства, которые нужны по состоянию сегодня, без «украшений ради прайса». Чёткие правила на 48–72 часа, согласованные окна связи, понятные «красные флажки» для повторного контакта превращают лечение в прогнозируемый маршрут, а не в череду надежд и разочарований. В итоге человек быстрее возвращает контроль над самочувствием, а близкие получают опору вместо бесконечных ночных «дежурств».
Изучить вопрос глубже – narkologicheskaya-klinika-moskva
https://pawtrustmeds.shop/# canada pet meds
Первый контакт строится вокруг фактов «здесь и сейчас». Врач уточняет длительность употребления, принятые за последние 24–48 часов препараты, сопутствующие диагнозы и аллергии, фиксирует давление, пульс, сатурацию, температуру, оценивает выраженность тремора и уровень тревоги; при необходимости выполняется экспресс-ЭКГ и элементарный неврологический скрининг. Далее план объясняется простым языком: какие инфузии будут сегодня, чего ждать через 30–60 минут, как организовать вечер и когда состоится контрольная связь. Мы избегаем универсальных «сильных смесей» и «оглушающих» дозировок: они дают краткий «блеск» с вечерним откатом и повышают риск побочных эффектов. Вместо этого используется узкая, клинически достаточная схема: регидратация для восстановления объёма циркулирующей жидкости, коррекция электролитов, печёночная поддержка, противорвотные и гастропротекция при необходимости, мягкая анксиолитическая коррекция по показаниям. После процедуры врач повторно оценивает показатели, оставляет письменные рекомендации на 48–72 часа, согласует окно связи и обозначает «красные флажки» для немедленного контакта. Такой прозрачный маршрут убирает импровизации и делает поведение семьи предсказуемым, что особенно важно в «тёмные часы» вечера.
Получить дополнительную информацию – https://vyvod-iz-zapoya-himki9.ru/vyvod-iz-zapoya-na-domu-himki/
canadapharmacyonline legit: canadian pharmacy drugs online – canadadrugpharmacy com
Для формирования структурированного лечения используются методы, обеспечивающие анализ текущей клинической картины. Ниже представлены ключевые направления, задействованные при формировании терапевтических решений.
Исследовать вопрос подробнее – http://narkologicheskaya-klinika-vo-vladivostoke18.ru/narkolog-vladivostok-na-dom/
Вывод из запоя в клинике реализуется через поэтапное внедрение терапевтических решений, направленных на устранение токсической нагрузки и восстановление физиологической устойчивости. Важным элементом является определение клинического профиля пациента, включающего анализ анамнеза, текущего состояния и возможных сопутствующих факторов. На основе этих данных формируется индивидуальная программа помощи. Процедуры проводятся в условиях контролируемой безопасности, что снижает вероятность осложнений и позволяет достигать устойчивого терапевтического ответа. Последовательность действий формирует согласованную систему, удобную для мониторинга и анализа.
Подробнее тут – вывод из запоя в кемерове
Доставка цветов по Томску сработала даже быстрее заявленного времени, приятно.
https://dostavkacvetovtomsk6.ru
Детокс — важный этап лечения, который помогает очистить организм от токсинов и продуктов распада алкоголя или наркотиков. В клинике «ТомскМед Трезвость» используются современные капельницы и лекарственные комбинации, направленные на восстановление биохимических процессов в организме. Ниже представлена таблица с примерами капельниц, применяемых в детоксикационных программах.
Подробнее – https://narkologicheskaya-klinika-v-tomske18.ru/tomsk-narkologicheskij-dispanser
http://pawtrustmeds.com/# Paw Trust Meds
Диагностические данные формируют основу для дальнейших лечебных решений, от объёма инфузии до подбора поддерживающих препаратов.
Получить дополнительную информацию – срочный вывод из запоя
Домашний маршрут выбирают, когда показатели стабильны и нет признаков тяжёлой соматики или спутанности сознания. Преимущество в сочетании скорости, приватности и приверженности: знакомая среда снижает стресс, а отсутствие переездов экономит силы. Врач «МедТоники» приезжает без маркировки, привозит мониторинг и расходные материалы, подбирает инфузии по состоянию, помогает восстановить режим сна и гидратации, даёт рекомендации по питанию и правила на 48–72 часа. Отдельный блок — работа с тревогой и тремором: корректируется медикаментозная поддержка, обсуждаются простые поведенческие техники, чтобы снизить вероятность импульсивных решений вечером. Домашний формат не подменяет наблюдение: назначаются точки связи, врач объясняет, когда нужен повторный визит, а когда достаточно телефонной коррекции. Для Москвы такой сценарий удобен ещё и тем, что его проще встроить в плотный график, не выпадая из рабочих и семейных ролей и не провоцируя лишних вопросов у окружающих.
Подробнее тут – http://vyvod-iz-zapoya-moskva99.ru
Детоксикация является важнейшим этапом лечения. В «Ижевском Центре Трезвых Решений» применяются проверенные схемы инфузионной терапии, помогающие восстановить функции организма после интоксикации. Капельницы подбираются индивидуально в зависимости от состояния пациента и выраженности симптомов. Ниже приведена таблица с типами капельниц, применяемых в клинике.
Получить дополнительную информацию – запой наркологическая клиника в ижевске
В клинике «ПензаМед Трезвость» лечение проводится по индивидуальной схеме, которая формируется после первичного осмотра. Нарколог оценивает состояние пациента, уровень алкогольной интоксикации и наличие сопутствующих заболеваний. На основании данных подбираются препараты, способные эффективно очистить кровь, восстановить работу органов и снизить абстинентные проявления. При лёгкой форме зависимости возможен выезд врача на дом, где пациенту устанавливают капельницу и обеспечивают наблюдение в течение всего процесса детоксикации. В более сложных случаях рекомендуется госпитализация в стационар, где помощь оказывается под постоянным контролем специалистов.
Выяснить больше – вывод из запоя пенза
Вывод из запоя в клинике формируется на основе последовательных процедур, направленных на стабилизацию физиологических функций и устранение токсических влияний. Такой подход позволяет корректно регулировать состояние пациента и контролировать интенсивность симптомов. Рабочие алгоритмы включают оценку метаболических процессов, анализ соматических показателей и определение степени неврологических изменений. В результате создается структурированная модель помощи, ориентированная на восстановление адаптивных возможностей организма. Процессы выполняются под контролем специалистов, что обеспечивает прогнозируемый терапевтический эффект и снижает вероятность осложнений.
Получить дополнительные сведения – https://vyvod-iz-zapoya-kemerovo18.ru/vyvod-iz-zapoya-na-domu-kemerovo/
Global India Pharmacy: india pharmacy – top 10 pharmacies in india
Детокс — важный этап лечения, который помогает очистить организм от токсинов и продуктов распада алкоголя или наркотиков. В клинике «ТомскМед Трезвость» используются современные капельницы и лекарственные комбинации, направленные на восстановление биохимических процессов в организме. Ниже представлена таблица с примерами капельниц, применяемых в детоксикационных программах.
Получить дополнительную информацию – https://narkologicheskaya-klinika-v-tomske18.ru/chastnaya-narkologicheskaya-klinika-tomsk
Такое поэтапное лечение позволяет добиться устойчивого результата без стрессов и осложнений. Пациенты получают комплексную помощь, включающую как медицинские, так и психотерапевтические аспекты.
Изучить вопрос глубже – вывод наркологическая клиника кемерово
Доставка с голубями (белыми бумажными) – романтика в каждом жесте!
Наркологическая клиника опирается на комплексную модель оценки состояния, обеспечивающую последовательное восстановление функций организма. В клинике применяется система многоуровневого контроля, направленная на выявление нарушений и определение оптимальной тактики вмешательства. Такой подход позволяет поддерживать стабильность состояния даже в условиях выраженных клинических проявлений. Структурированная работа направлена на снижение токсической нагрузки, коррекцию метаболических процессов и восстановление адаптивных механизмов. Анализ проводится с учётом физиологических особенностей пациента и динамики изменений.
Получить дополнительную информацию – наркологическая клиника клиника помощь владивосток
Перечисленные меры обеспечивают структурированный подход к восстановлению, позволяя выстраивать лечение в соответствии с текущими изменениями. Такой формат способствует достижению устойчивой физиологической стабилизации и уменьшает выраженность симптомов. Для систематизации применяемых методов используется таблица, представленная ниже.
Узнать больше – http://vyvod-iz-zapoya-kemerovo18.ru
Такая схема лечения делает процесс последовательным и контролируемым. Врачи клиники сопровождают пациентов на всех стадиях, помогая преодолеть как физическую, так и психологическую зависимость. Особое внимание уделяется возвращению человека к активной и стабильной жизни без употребления алкоголя или наркотиков.
Углубиться в тему – наркологическая клиника вывод из запоя в ижевске
После выбора подходящей методики врач подробно рассказывает о сути процедуры, даёт письменные рекомендации, объясняет правила поведения и отвечает на вопросы пациента и семьи.
Углубиться в тему – https://kodirovanie-ot-alkogolizma-dolgoprudnyj6.ru/anonimnoe-kodirovanie-ot-alkogolizma-v-dolgoprudnom/
best online pharmacy india: reputable indian pharmacies – indian pharmacy paypal
В клинической практике используются следующие этапы лечения:
Подробнее можно узнать тут – платная наркологическая клиника ростов-на-дону
Главная задача специалистов — быстро стабилизировать состояние больного, восстановить нормальную работу органов и предотвратить развитие осложнений. Для этого применяются безопасные инфузионные растворы, препараты для защиты печени, витаминизация и корректировка уровня жидкости в организме. После снятия острых симптомов врач рекомендует план дальнейшего восстановления и профилактику повторных запоев.
Получить дополнительные сведения – вывод из запоя
Открываешь кейсы KC? промы изи дроп актуальные бонусы и скидки для пользователей. Получайте выгодные предложения, дополнительные возможности и экономьте при использовании сервиса. Все действующие промокоды в одном месте.
https://northaccessrx.shop/# canadian pharmacy mall
canadian world pharmacy: canadianpharmacyworld – onlinepharmaciescanada com
Тендерный специалист помогает разобраться в особенностях каждого закона, а также обеспечивает грамотное сопровождение всех процедур. Это особенно важно для компаний, которые только начинают участвовать в торгах и не имеют опыта работы с государственными контрактами.
Все тайны раскрыты – https://tendernoe-soprovozhdenie-rostov-na-donu.ru
Вывод из запоя в клинике реализуется через поэтапное внедрение терапевтических решений, направленных на устранение токсической нагрузки и восстановление физиологической устойчивости. Важным элементом является определение клинического профиля пациента, включающего анализ анамнеза, текущего состояния и возможных сопутствующих факторов. На основе этих данных формируется индивидуальная программа помощи. Процедуры проводятся в условиях контролируемой безопасности, что снижает вероятность осложнений и позволяет достигать устойчивого терапевтического ответа. Последовательность действий формирует согласованную систему, удобную для мониторинга и анализа.
Изучить вопрос глубже – vyvod-iz-zapoya-kemerovo18.ru/
Близкие — ключевой ресурс, если действуют согласованно. Мы просим сфокусироваться на среде и режиме: тише, темнее, теплее; вода и лёгкая еда «по часам»; отсутствие «разборов» и проверок «на прочность» в первые дни. Полезно заранее договориться о коротких нейтральных сигналах — как понять, что помощь нужна, а когда лучше не вмешиваться. Такие простые правила бесплатны, но они стабилизируют поведение и убирают потребность в экстренных визитах по ночам. Когда дом перестаёт быть источником шума, медицинская часть остаётся узкой, а результат — устойчивым.
Детальнее – врача капельницу от запоя
Paw Trust Meds: Paw Trust Meds – Paw Trust Meds
Наркологическая клиника использует методики, направленные на комплексную оценку состояния пациента. Работа строится на анализе анамнеза, исследовании соматических параметров и определении степени выраженности симптомов. Такой формат создаёт условия для точного подбора терапевтических мер. В клинике применяется непрерывный мониторинг, направленный на своевременное выявление отклонений и корректировку лечебных мероприятий. Благодаря этому достигается высокая стабильность клинического процесса и формируется благоприятная динамика восстановления.
Подробнее тут – http://narkologicheskaya-klinika-v-vdk18.ru
Наркологическая клиника использует методики, направленные на комплексную оценку состояния пациента. Работа строится на анализе анамнеза, исследовании соматических параметров и определении степени выраженности симптомов. Такой формат создаёт условия для точного подбора терапевтических мер. В клинике применяется непрерывный мониторинг, направленный на своевременное выявление отклонений и корректировку лечебных мероприятий. Благодаря этому достигается высокая стабильность клинического процесса и формируется благоприятная динамика восстановления.
Разобраться лучше – https://narkologicheskaya-klinika-v-vdk18.ru/chastnaya-narkologicheskaya-klinika-vladivostok/
Алкогольная зависимость — сложная и разрушающая болезнь, которая меняет личность, разрушает здоровье, отношения и карьеру. На определённом этапе становится понятно, что справиться с проблемой самостоятельно невозможно. Здесь требуется комплексный медицинский подход и профессиональная поддержка, позволяющая не только прервать запои, но и закрепить трезвое состояние на длительный срок. Одной из самых востребованных и эффективных процедур считается кодирование — и в наркологической клинике «АльтерМед» в Долгопрудном эта услуга реализуется с максимальным вниманием к деталям, анонимностью и заботой о каждом пациенте.
Подробнее – https://kodirovanie-ot-alkogolizma-dolgoprudnyj6.ru/anonimnoe-kodirovanie-ot-alkogolizma-v-dolgoprudnom/
Global India Pharmacy: Global India Pharmacy – top 10 pharmacies in india
https://pawtrustmeds.shop/# best pet rx
Структурированное наблюдение позволяет поддерживать согласованность лечебных мероприятий и своевременно реагировать на изменения. Такая система создаёт единый аналитический подход для оценки состояния и обеспечивает целостность терапевтического процесса.
Подробнее – http://www.domen.ru
Структурированное наблюдение позволяет поддерживать согласованность лечебных мероприятий и своевременно реагировать на изменения. Такая система создаёт единый аналитический подход для оценки состояния и обеспечивает целостность терапевтического процесса.
Изучить вопрос глубже – анонимная наркологическая клиника
Тендерный специалист помогает разобраться в особенностях каждого закона, а также обеспечивает грамотное сопровождение всех процедур. Это особенно важно для компаний, которые только начинают участвовать в торгах и не имеют опыта работы с государственными контрактами.
Получите экспертное мнение – тендерное сопровождение заказчиков
Каждый пациент в «НаркоМедцентре» в Балашихе с самого начала окружён вниманием и заботой. Сразу после обращения по телефону или через сайт медицинский персонал консультирует родственников, уточняет детали состояния, даёт рекомендации по первой помощи и при необходимости отправляет бригаду наркологов на дом. В случае тяжёлых абстинентных проявлений возможно экстренное транспортирование пациента в стационар.
Подробнее – https://vyvod-iz-zapoya-balashiha5.ru/vyvod-iz-zapoya-cena-v-balashihe
В основе работы клиники «ИжТрезвоМед Центр» лежит принцип персонализированной медицины. Это означает, что каждый пациент получает не шаблонное лечение, а тщательно подобранный комплекс процедур, учитывающий его состояние, историю заболевания, уровень мотивации и социальную ситуацию. Такой подход позволяет добиться стабильного результата даже в сложных случаях. Лечение проводится анонимно, без постановки на учёт и разглашения данных, что особенно важно для тех, кто ценит конфиденциальность.
Исследовать вопрос подробнее – https://narkologicheskaya-klinika-v-izhevske18.ru/
pet meds online: pet drugs online – pet med
Наркологическая клиника в клинике в Астрахани предоставляет помощь пациентам, сталкивающимся с различными формами зависимости — алкогольной, наркотической, лекарственной. Основой терапии является комплексный подход, включающий медицинскую детоксикацию, стабилизацию состояния, психотерапию и последующее наблюдение. Такой формат работы позволяет мягко купировать острые симптомы, восстановить физиологические функции и подготовить пациента к длительной реабилитации. Все процедуры проводятся анонимно, с использованием сертифицированных препаратов и с постоянным контролем врача.
Подробнее – http://narkologicheskaya-klinika-astrakhan18.ru/narkologiya-astrakhan-adres/https://narkologicheskaya-klinika-astrakhan18.ru
Пациенты, выбравшие «АльтерМед», могут рассчитывать на индивидуальный подход, деликатность и полную анонимность. Врачи клиники используют только официально одобренные Минздравом РФ методы кодирования, опираются на современные научные данные, а процедуры проходят в условиях максимального комфорта и безопасности.
Разобраться лучше – http://kodirovanie-ot-alkogolizma-dolgoprudnyj6.ru
Наркологическая клиника применяет структурированные методы, включающие изучение анамнеза, оценку текущего состояния и определение возможных рисков. На основе полученной информации формируются индивидуальные схемы лечения, направленные на нормализацию внутренних процессов. Работа строится на многоуровневом наблюдении, включающем анализ лабораторных показателей и оценку функциональных систем организма. Такой формат позволяет поддерживать стабильную динамику изменений и избегать осложнений. В клинике создается согласованная модель вмешательств, позволяющая получать устойчивые результаты.
Выяснить больше – лечение в наркологической клинике
Тендерный специалист помогает разобраться в особенностях каждого закона, а также обеспечивает грамотное сопровождение всех процедур. Это особенно важно для компаний, которые только начинают участвовать в торгах и не имеют опыта работы с государственными контрактами.
Разгадайте все загадки – https://tendernoe-soprovozhdenie-rostov-na-donu.ru
Процедура проводится под контролем врача. В случае необходимости специалист выезжает на дом с полным набором медикаментов и оборудования. Такой формат особенно востребован среди пациентов, которые предпочитают анонимное лечение без госпитализации. Все манипуляции проводятся стерильно, а препараты подбираются с учётом противопоказаний.
Подробнее – вывод из запоя дешево
Paw Trust Meds: Paw Trust Meds – Paw Trust Meds
Такой подход позволяет безопасно вывести пациента из состояния запоя и предотвратить развитие осложнений. Врачи контролируют давление, пульс, уровень сахара в крови и состояние нервной системы на протяжении всей процедуры.
Исследовать вопрос подробнее – скорая вывод из запоя
Клиника «ВладТрезвие Центр» работает в круглосуточном режиме и готова оказать помощь жителям Владивостока и прилегающих районов в любое время суток. Врачи-наркологи прибывают по вызову в течение часа, имеют при себе все необходимые препараты и оборудование для проведения детоксикации на дому. При необходимости пациента доставляют в стационар, где лечение проходит под постоянным контролем медицинского персонала.
Узнать больше – наркологический вывод из запоя
В клинической практике используются следующие этапы лечения:
Выяснить больше – http://narcologicheskaya-klinika-v-rnd19.ru
https://metallicheskiy-shtaketnik.ru/
Близкие — ключевой ресурс, если действуют согласованно. Мы просим сфокусироваться на среде и режиме: тише, темнее, теплее; вода и лёгкая еда «по часам»; отсутствие «разборов» и проверок «на прочность» в первые дни. Полезно заранее договориться о коротких нейтральных сигналах — как понять, что помощь нужна, а когда лучше не вмешиваться. Такие простые правила бесплатны, но они стабилизируют поведение и убирают потребность в экстренных визитах по ночам. Когда дом перестаёт быть источником шума, медицинская часть остаётся узкой, а результат — устойчивым.
Подробнее – http://kapelnica-ot-zapoya-podolsk9.ru/kapelnica-ot-zapoya-na-domu-klinika-v-podolske/
Открываешь кейсы KC? https://badgerboats.ru/themes/middle/?kak-ispolzovat-promokody-easydrop.html актуальные бонусы и скидки для пользователей. Получайте выгодные предложения, дополнительные возможности и экономьте при использовании сервиса. Все действующие промокоды в одном месте.
Ниже представлена последовательность этапов, формирующих общий цикл вмешательств.
Детальнее – https://narkologicheskaya-klinika-v-vdk18.ru/narkolog-vladivostok-na-dom/
Клиника «КаспийМед Альтернатива» построила систему оказания наркологической помощи на трёх принципах: индивидуальный подход, доказательная медицина и круглосуточная доступность. Каждый пациент проходит диагностический этап, где специалисты определяют уровень зависимости, физическое состояние и психоэмоциональные особенности. Далее формируется персональная программа лечения, включающая медицинские, психологические и социальные модули.
Разобраться лучше – наркологическая клиника вывод из запоя в астрахани
Процесс выведения из запоя в клинике основан на медицинских стандартах и многолетнем опыте врачей-наркологов. Каждый случай рассматривается индивидуально: перед началом лечения проводится оценка состояния пациента, определяется степень интоксикации и подбираются препараты, подходящие именно ему. Врачи центра работают круглосуточно, а выездная помощь доступна во всех районах Ростова-на-Дону и области. Это особенно важно, когда требуется немедленная помощь, а доставить пациента в стационар невозможно.
Узнать больше – http://vyvod-iz-zapoya-v-rnd19.ru
Каждое направление наблюдения играет важную роль в формировании терапевтической программы. Структурированный контроль помогает снижать уровень рисков и обеспечивает возможность оперативной адаптации. Для систематизации данных применяется таблица, отражающая ключевые параметры мониторинга.
Получить дополнительные сведения – вывод из запоя в стационаре ижевск
Наркологическая клиника базирует свою работу на системной оценке состояния пациента и последовательном проведении лечебных мероприятий. Такой подход позволяет формировать устойчивую динамику восстановления и обеспечивать безопасность процедур. В клинике используется поэтапная модель наблюдения, в которой каждый шаг опирается на объективные данные обследований. Применение структурированных методик способствует снижению рисков и выстраиванию предсказуемой схемы терапии. Важным элементом становится контроль физиологических функций, обеспечивающий корректное распределение нагрузок и своевременную корректировку методов воздействия.
Узнать больше – https://narkologicheskaya-klinika-v-vdk18.ru/narkolog-vladivostok-otzyvy/
Даже в условиях экстренного обращения лечение выстраивается последовательно, что позволяет избежать резких колебаний состояния и поддерживать физиологическую стабильность. Этапность формирует основу для дальнейшего восстановления.
Детальнее – наркологическая клиника в ростове-на-дону
Помимо медицинских процедур, клиника делает акцент на психологической поддержке и постлечебной адаптации. Пациентам помогают не только избавиться от физической зависимости, но и сформировать устойчивую мотивацию к трезвости, восстановить интерес к жизни и наладить отношения с близкими. Это достигается за счёт участия психологов, психотерапевтов и специалистов по социальной реабилитации.
Подробнее можно узнать тут – частная наркологическая клиника ижевск
india online pharmacy: Global India Pharmacy – top online pharmacy india
В основе работы клиники «ИжТрезвоМед Центр» лежит принцип персонализированной медицины. Это означает, что каждый пациент получает не шаблонное лечение, а тщательно подобранный комплекс процедур, учитывающий его состояние, историю заболевания, уровень мотивации и социальную ситуацию. Такой подход позволяет добиться стабильного результата даже в сложных случаях. Лечение проводится анонимно, без постановки на учёт и разглашения данных, что особенно важно для тех, кто ценит конфиденциальность.
Подробнее можно узнать тут – частная наркологическая клиника ижевск
Запой бьёт по организму не линейно: чем дольше затягивается ситуация, тем сильнее «скачут» давление и пульс, растёт тревога, рушится сон, усиливается тремор и обезвоживание. В городской среде к медицинским рискам добавляется логистика: пробки, необходимость объясняться на ресепшене, ожидание в общих очередях. Формат выезда «Трезвый Подольск» убирает эту инерцию — врач приезжает без маркировки, оценивает состояние на месте, запускает строго необходимую инфузионную терапию и сразу задаёт правила ближайших 48–72 часов. Такой маршрут снижает импульсивность и возвращает управляемость: пациент понимает, что будет через час, вечером и на следующее утро; семья перестаёт «гадать» и действует по согласованному плану. Домашняя капельница не про «чудо-смесь», а про клиническую последовательность: регидратация, коррекция электролитов, мягкая анксиолитическая поддержка при показаниях, гигиена сна и понятные «красные флажки» для связи. Когда каждое действие объяснено простым языком, тревога не подменяет факты, и эффект держится дольше, чем «косметическое облегчение на час».
Углубиться в тему – http://
Такая таблица позволяет систематизировать данные наблюдения и поддерживать единый подход к интерпретации результатов. Это повышает прозрачность процесса и делает оценку состояния объективной вне зависимости от длительности лечения.
Подробнее – наркологическая клиника пенза
Особенность работы специалистов заключается в сочетании современных медикаментозных методов и психологической поддержки. Это помогает не только устранить физическую зависимость, но и предотвратить возвращение к употреблению алкоголя после детоксикации. Ниже представлена таблица с этапами терапии и их клиническим значением.
Разобраться лучше – помощь вывод из запоя в ростове-на-дону
https://pawtrustmeds.com/# Paw Trust Meds
Наркологическая клиника выстраивает лечебные мероприятия в соответствии с алгоритмами, направленными на достижение стабильного состояния пациента. Важную роль играет последовательное выполнение процедур, включая оценку реакции организма и корректировку вмешательств. Формирование индивидуальной программы позволяет учитывать особенности каждого случая и поддерживать высокий уровень эффективности. Процесс наблюдения сопровождается непрерывным анализом, что делает терапию адаптивной и предсказуемой. В клинике соблюдается принцип многоуровневого контроля, обеспечивающий безопасность и стабильность лечения.
Подробнее тут – наркологическая клиника нарколог томск
Такая терапия не только устраняет последствия запоев, но и восстанавливает баланс организма, улучшая общее состояние. Пациенты отмечают, что уже через несколько часов после капельницы проходит тремор, снижается тревожность и появляется чувство ясности.
Подробнее тут – запой наркологическая клиника в ижевске
Мытищи дают плюсы домашнего формата: меньше логистики, приватнее, выше приверженность режиму. Если показатели устойчивы и нет признаков угрозы осложнений (упорной рвоты, высокой температуры, выраженной дезориентации, резких «качелей» АД/пульса, риска судорог), старт на дому или амбулаторно — рациональное решение. Но когда состояние «по краю», честнее и на дистанции дешевле сутки–двое стационара под круглосуточным наблюдением: проще дозировать препараты, вовремя закрывать дефициты, добиться первого ровного сна и не «разбрасываться» экстренными ночными выездами. Формат выбирается не «по желанию», а по безопасности здесь и сейчас; при этом конфиденциальность сохранена в любом сценарии — немаркированные визиты, разнесённые приёмы, доступ к данным по ролям.
Детальнее – заказать обратный звонок наркологическая клиника
Global India Pharmacy: Global India Pharmacy – top 10 online pharmacy in india
Клиника «ВладТрезвие Центр» работает в круглосуточном режиме и готова оказать помощь жителям Владивостока и прилегающих районов в любое время суток. Врачи-наркологи прибывают по вызову в течение часа, имеют при себе все необходимые препараты и оборудование для проведения детоксикации на дому. При необходимости пациента доставляют в стационар, где лечение проходит под постоянным контролем медицинского персонала.
Подробнее можно узнать тут – http://vyvodiz-zapoya-vladivostok18.ru/vyvod-iz-zapoya-gorod-vladivostok/
Запой — это не просто временная слабость, а критическое состояние, требующее экстренного медицинского вмешательства. Особенно опасно откладывать обращение за помощью, если у человека наблюдаются такие симптомы:
Получить дополнительную информацию – вывод из длительного запоя
Каждое из направлений обеспечивает высокий уровень контроля и помогает формировать индивидуальный план воздействия. Такая модель создаёт условия для прогнозируемого восстановления. Для наглядности процессов применяется таблица, отражающая ключевые параметры наблюдения.
Ознакомиться с деталями – https://narkologicheskaya-klinika-v-vdk18.ru/narkolog-vladivostok-na-dom
Представленная таблица отражает ключевые направления наблюдения, обеспечивая систематизацию данных. Такой подход позволяет поддерживать высокий уровень контроля и адаптировать программу лечения с учетом динамики состояния.
Узнать больше – частная наркологическая клиника томск
Подобная структура наблюдения облегчает анализ изменений и способствует формированию объективной картины состояния. Наличие унифицированной системы контроля помогает выстраивать терапию последовательно и точно.
Получить больше информации – https://narkologicheskaya-klinika-vo-vladivostoke18.ru/chastnaya-narkologicheskaya-klinika-vladivostok/
Лечение в «ИжТрезвоМед Центр» проходит поэтапно, с акцентом на безопасность и эффективность. Каждый этап направлен на достижение конкретных целей, от детоксикации до психотерапии. В таблице представлена структура лечебного процесса:
Получить дополнительную информацию – наркологическая клиника цены в ижевске
Основным инструментом при выведении из запоя является капельница. Её состав зависит от состояния пациента, продолжительности запоя и наличия хронических заболеваний. В клинике «ПензаМед Трезвость» используются только проверенные препараты с минимальной нагрузкой на организм. Ниже приведена таблица с примерами инфузионных растворов и их воздействием.
Углубиться в тему – вывод из запоя недорого
Вывод из запоя — это не просто медицинская процедура, а важный шаг на пути восстановления организма и возвращения человека к нормальной жизни. В клинике «ВладТрезвие Центр» пациенты получают профессиональную помощь, основанную на современных методиках детоксикации и безопасном медикаментозном восстановлении. Каждый случай рассматривается индивидуально, а лечение подбирается с учётом возраста, состояния здоровья и продолжительности запоя. Наркологи центра выезжают на дом круглосуточно, обеспечивая помощь даже в экстренных ситуациях, когда время играет ключевую роль.
Разобраться лучше – вывод из запоя капельница в владивостоке
Физическое облегчение — лишь половина задачи; вторая половина — эмоции и привычки. Индивидуальные сессии помогают распознать автоматические мысли, планировать «буферы» на вечерние часы, управлять стрессом и сонливостью, расставлять «сигнальные маяки» на привычных маршрутах, где чаще всего возникают соблазны. Семья получает ясные инструкции: меньше контроля — больше поддержки правил среды (тишина, затемнение, прохлада, вода и лёгкая еда «по часам»), отказ от «разборов причин» в первую неделю, короткие договорённости о связи со специалистом при тревожных признаках. Когда у всех одни и те же ориентиры, уровень конфликтов падает, а предсказуемость растёт — это напрямую укрепляет ремиссию. Мы не перегружаем психологический блок «теорией»: даём только те инструменты, которые человек готов выполнить сегодня и завтра, без рывков и самообвинений. Такая практичность приносит больше пользы, чем долгие разговоры «о мотивации», и отлично сочетается с медицинской частью плана.
Исследовать вопрос подробнее – http://narkologicheskaya-klinika-moskva999.ru
Запой — это не просто временная слабость, а критическое состояние, требующее экстренного медицинского вмешательства. Особенно опасно откладывать обращение за помощью, если у человека наблюдаются такие симптомы:
Получить больше информации – круглосуточный вывод из запоя балашиха
Вывод из запоя — это медицинская процедура, направленная на устранение интоксикации организма, вызванной длительным употреблением алкоголя. В клинике «ПензаМед Трезвость» помощь оказывается профессионально и конфиденциально: пациенты могут получить лечение как в стационаре, так и на дому. Процесс включает использование капельниц, медикаментозную терапию, психоэмоциональную поддержку и последующую реабилитацию. Врачи наркологического центра обладают большим опытом работы и обеспечивают круглосуточную помощь без постановки на учёт, что особенно важно для тех, кто хочет сохранить анонимность и быстро вернуться к нормальному состоянию.
Получить дополнительные сведения – вывод из запоя с выездом пенза
Наркологическая клиника опирается на комплексную модель оценки состояния, обеспечивающую последовательное восстановление функций организма. В клинике применяется система многоуровневого контроля, направленная на выявление нарушений и определение оптимальной тактики вмешательства. Такой подход позволяет поддерживать стабильность состояния даже в условиях выраженных клинических проявлений. Структурированная работа направлена на снижение токсической нагрузки, коррекцию метаболических процессов и восстановление адаптивных механизмов. Анализ проводится с учётом физиологических особенностей пациента и динамики изменений.
Изучить вопрос глубже – вывод наркологическая клиника владивосток
Помимо медицинских процедур, клиника делает акцент на психологической поддержке и постлечебной адаптации. Пациентам помогают не только избавиться от физической зависимости, но и сформировать устойчивую мотивацию к трезвости, восстановить интерес к жизни и наладить отношения с близкими. Это достигается за счёт участия психологов, психотерапевтов и специалистов по социальной реабилитации.
Подробнее можно узнать тут – наркологическая клиника наркологический центр ижевск
http://northaccessrx.com/# canadian pharmacies comparison
Такая комбинация препаратов обеспечивает комплексное воздействие на организм и способствует постепенному восстановлению физического и психологического состояния пациента.
Получить дополнительные сведения – http://narkologicheskaya-klinika-astrakhan18.ru/narkologiya-astrakhan-adres/
Финансовые инструменты позволяют заказчику убедиться в надежности участника и его готовности выполнить обязательства по контракту. При этом грамотное сопровождение снижает вероятность финансовых рисков и помогает правильно оформить документы для банка.
Все ответы на ваши вопросы – услуги тендерного сопровождения ростов на дону
Global India Pharmacy: world pharmacy india – Global India Pharmacy
Global India Pharmacy: Global India Pharmacy – Online medicine order
https://globalindiapharmacy.shop/# india pharmacy
Первая ровная ночь — поворотная точка. Без неё любая дневная инфузия работает коротко и «сгорает» к вечеру. Мы заранее настраиваем простые, но критичные условия: затемнение, тишина, прохладная комната, фиксированное время отбоя, минимум экранов и разговоров. При показаниях назначается щадящая седативная поддержка в дозах, которые стабилизируют, а не «выключают». Утром — короткий контроль и подстройка доз, чтобы другая ночь прошла ещё спокойнее. Такой «простой» протокол даёт самый устойчивый результат: исчезают панические волны, выравниваются показатели, снижается вероятность повторных экстренных обращений, а значит, бюджет остаётся предсказуемым.
Исследовать вопрос подробнее – вывод из запоя вызов на дом
Вывод из запоя — это медицинская процедура, направленная на устранение интоксикации организма, вызванной длительным употреблением алкоголя. В клинике «ПензаМед Трезвость» помощь оказывается профессионально и конфиденциально: пациенты могут получить лечение как в стационаре, так и на дому. Процесс включает использование капельниц, медикаментозную терапию, психоэмоциональную поддержку и последующую реабилитацию. Врачи наркологического центра обладают большим опытом работы и обеспечивают круглосуточную помощь без постановки на учёт, что особенно важно для тех, кто хочет сохранить анонимность и быстро вернуться к нормальному состоянию.
Подробнее можно узнать тут – нарколог вывод из запоя в пензе
Наркологическая клиника выстраивает лечебные мероприятия в соответствии с алгоритмами, направленными на достижение стабильного состояния пациента. Важную роль играет последовательное выполнение процедур, включая оценку реакции организма и корректировку вмешательств. Формирование индивидуальной программы позволяет учитывать особенности каждого случая и поддерживать высокий уровень эффективности. Процесс наблюдения сопровождается непрерывным анализом, что делает терапию адаптивной и предсказуемой. В клинике соблюдается принцип многоуровневого контроля, обеспечивающий безопасность и стабильность лечения.
Подробнее – http://narkologicheskaya-klinika-tomsk18.ru
Быстрые микрозаймы всем на https://credit-world.ru – это возможность получить деньги без лишних сложностей с минимальными требованиями к заемщику. У нас собрано более 50 МФО, где реально оформить займ даже при нестандартной ситуации. Вы можете сравнить предложения, выбрать оптимальные условия и подать заявку за несколько минут, получив решение практически сразу.
Процедура вывода из запоя проводится строго по медицинским стандартам. Применяются современные капельницы, витамины и препараты для нормализации функций сердца, печени, почек и нервной системы. После снятия интоксикации врачи назначают поддерживающее лечение, направленное на стабилизацию эмоционального состояния и снижение тяги к алкоголю.
Подробнее можно узнать тут – вывод из запоя вызов в владивостоке
Такой подход гарантирует постепенное и безопасное восстановление. Врачи контролируют динамику состояния, корректируют лечение при необходимости и помогают пациенту адаптироваться к трезвой жизни без стресса и давления.
Подробнее – http://
Вывод из запоя в клинике строится на основе алгоритмов, направленных на безопасное восстановление физиологических функций. Применяется стандартная система, включающая оценку состояния, подбор медикаментозных средств и постепенную адаптацию организма. Такой формат позволяет избежать резких изменений и поддерживать предсказуемую клиническую динамику. Важную роль играет наблюдение за реакцией организма, позволяющее корректировать тактику лечения в соответствии с выявленными изменениями. Последовательность действий обеспечивает структурированность процесса и повышает вероятность стабильного результата.
Подробнее – http://vyvodiz-zapoya-izhevsk18.ru
Такой подход обеспечивает комплексное восстановление — от физического состояния до эмоциональной стабильности. Пациент получает внимание врачей на всех этапах и поддержку после выписки.
Подробнее – наркологическая клиника лечение алкоголизма в кемерове
После прохождения курса капельниц пациенты отмечают улучшение сна, исчезновение головной боли, восстановление аппетита и общего самочувствия. При тяжёлых формах зависимости лечение дополняется физиотерапией и психологической помощью.
Получить больше информации – https://vyvod-iz-zapoya-penza18.ru/vyvedenie-iz-zapoya-na-domu-penza
Перед тем, как выбрать конкретный метод, проводится консультация и осмотр, чтобы исключить противопоказания и спрогнозировать результат.
Подробнее тут – kodirovanie-ot-alkogolizma-ceny
Вывод из запоя в клинике строится на основе алгоритмов, направленных на безопасное восстановление физиологических функций. Применяется стандартная система, включающая оценку состояния, подбор медикаментозных средств и постепенную адаптацию организма. Такой формат позволяет избежать резких изменений и поддерживать предсказуемую клиническую динамику. Важную роль играет наблюдение за реакцией организма, позволяющее корректировать тактику лечения в соответствии с выявленными изменениями. Последовательность действий обеспечивает структурированность процесса и повышает вероятность стабильного результата.
Подробнее – наркология вывод из запоя в ижевске
п»їdog medication online: Paw Trust Meds – Paw Trust Meds
В основе работы клиники «ИжТрезвоМед Центр» лежит принцип персонализированной медицины. Это означает, что каждый пациент получает не шаблонное лечение, а тщательно подобранный комплекс процедур, учитывающий его состояние, историю заболевания, уровень мотивации и социальную ситуацию. Такой подход позволяет добиться стабильного результата даже в сложных случаях. Лечение проводится анонимно, без постановки на учёт и разглашения данных, что особенно важно для тех, кто ценит конфиденциальность.
Узнать больше – наркологическая клиника лечение алкоголизма
https://northaccessrx.com/ed-meds-guide.html# canada drugs online review
Стоимость банкротства физических лиц зависит от сложности дела, суммы долгов и объема работы юриста. В цену обычно входят услуги по подготовке документов, сопровождение в суде и работа финансового управляющего. Переходите по запросу сколько стоят услуги арбитражного управляющего. Мы поможем оценить расходы заранее и предложим прозрачные условия без скрытых платежей, чтобы вы могли законно списать долги и начать с чистого листа.
Каждый из перечисленных элементов способствует формированию полной картины состояния пациента и позволяет корректно выстраивать терапевтические мероприятия. Такая структура создаёт основу для достижения устойчивых результатов и минимизации возможных осложнений. Использование таблиц наблюдения делает клинические процессы структурированными и понятными.
Выяснить больше – лечение в наркологической клинике томск
Ниже приведены ключевые элементы, которые отражают базовую структуру процессов, формирующих последовательность лечебных мероприятий. Они помогают подробно рассмотреть основные направления работы и понять роль каждого звена в общей терапевтической системе.
Получить больше информации – https://narkologicheskaya-klinika-penza18.ru/chastnaya-narkologicheskaya-klinika-penza
Клиника «КаспийМед Альтернатива» построила систему оказания наркологической помощи на трёх принципах: индивидуальный подход, доказательная медицина и круглосуточная доступность. Каждый пациент проходит диагностический этап, где специалисты определяют уровень зависимости, физическое состояние и психоэмоциональные особенности. Далее формируется персональная программа лечения, включающая медицинские, психологические и социальные модули.
Узнать больше – http://narkologicheskaya-klinica-v-astrakhani18.ru
Ниже представлена последовательность основных шагов терапевтического процесса.
Получить дополнительную информацию – https://narkologicheskaya-klinika-vo-vladivostoke18.ru/chastnaya-narkologicheskaya-klinika-vladivostok
Процедура вывода из запоя проводится строго по медицинским стандартам. Применяются современные капельницы, витамины и препараты для нормализации функций сердца, печени, почек и нервной системы. После снятия интоксикации врачи назначают поддерживающее лечение, направленное на стабилизацию эмоционального состояния и снижение тяги к алкоголю.
Подробнее можно узнать тут – https://vyvodiz-zapoya-vladivostok18.ru/vyvod-iz-zapoya-gorod-vladivostok
Такой подход обеспечивает комплексное восстановление — от физического состояния до эмоциональной стабильности. Пациент получает внимание врачей на всех этапах и поддержку после выписки.
Ознакомиться с деталями – наркологическая клиника лечение алкоголизма кемерово
Системная работа, которой характеризуется наркологическая клиника, предполагает последовательное исследование состояния пациента, анализ факторов риска и создание индивидуального терапевтического маршрута. Такой формат позволяет уточнять клиническую картину на ранних этапах и корректировать вмешательства по мере изменения состояния человека. Применение структурированных методик повышает предсказуемость результата и обеспечивает безопасность всех процедур. При этом выводы формируются на основании объективных данных наблюдения, лабораторных показателей и динамики симптомов. Оптимальная нагрузка распределяется на весь период лечения для достижения устойчивого эффекта без переутомления организма.
Подробнее – анонимная наркологическая клиника
Домашний визит — это медицинская логика без лишней логистики. В мегаполисе каждая задержка увеличивает риски: человек устаёт, растёт тревога, обостряются скачки давления и пульса, а бессонные ночи превращают любые «самодельные» схемы в опасный эксперимент. «Трезвый Стандарт» строит помощь как управляемую последовательность: дежурный врач собирает краткий анамнез (длительность употребления, лекарства, сопутствующие заболевания), уточняет текущие показатели и предлагает безопасную точку входа — выезд на дом или стационар на сутки-двое при высоких рисках. Дом даёт приватность и предсказуемость: знакомая среда снижает стресс, а врач привозит всё для мониторинга и инфузий по показаниям. Ключевой результат первых часов — контролируемый сон, понятный режим гидратации и питания «по силам», а также зафиксированные «красные флажки» для связи. Именно последовательность, а не «сильная капельница любой ценой», делает выездной формат эффективным и безопасным в реальном ритме Москвы.
Узнать больше – narkolog na dom kruglosutochno
Тендерный специалист помогает разобраться в особенностях каждого закона, а также обеспечивает грамотное сопровождение всех процедур. Это особенно важно для компаний, которые только начинают участвовать в торгах и не имеют опыта работы с государственными контрактами.
Откройте для себя новое – услуги тендерного сопровождения ростов на дону
Таблица позволяет поддерживать единую структуру наблюдения и фиксировать изменения состояния. Такая модель обеспечивает прозрачность процессов и повышает точность принимаемых решений.
Ознакомиться с деталями – помощь вывод из запоя ижевск
canada drugstore pharmacy rx: NorthAccess Rx – canadian pharmacy price checker
Современная наркологическая помощь — это не просто лечение зависимости, а система комплексных мер, направленных на восстановление здоровья, эмоционального равновесия и социальной адаптации пациента. В клинике «ИжТрезвоМед Центр» в Ижевске применяются передовые методики терапии, соответствующие международным стандартам. Здесь работают квалифицированные врачи-наркологи, психиатры и реабилитологи, которые разрабатывают индивидуальные программы лечения в зависимости от формы и стадии заболевания. Центр предлагает как амбулаторное, так и стационарное лечение, а также выезд специалистов на дом, что делает помощь доступной и оперативной.
Подробнее тут – https://narkologicheskaya-klinika-v-izhevske18.ru/chastnaya-narkologicheskaya-klinika-izhevsk/
canadian pharmacies online: NorthAccess Rx – canadian pharmacy 24 com
https://globalindiapharmacy.com/# best india pharmacy
На каждом этапе лечения нарколог контролирует витальные показатели, оценивает динамику восстановления и при необходимости корректирует терапию. Такой подход исключает резкие перепады давления, нарушения сердечного ритма и другие побочные эффекты, часто возникающие при попытках вывести пациента из запоя без медицинского участия.
Получить больше информации – наркология вывод из запоя ростов-на-дону
Терапия в клинике строится по индивидуальному протоколу. Каждому пациенту подбираются процедуры с учётом возраста, длительности болезни, сопутствующих нарушений и психоэмоционального состояния. Лечение проходит поэтапно, что позволяет исключить осложнения и достичь стабильной ремиссии. Ниже представлена таблица с ключевыми этапами терапии.
Ознакомиться с деталями – http://narkologicheskaya-klinika-v-izhevsk18.ru
cheap canadian pharmacy: trusted canadian pharmacy – canadian pharmacy 24h com
Наркологическая клиника применяет структурированные методы, включающие изучение анамнеза, оценку текущего состояния и определение возможных рисков. На основе полученной информации формируются индивидуальные схемы лечения, направленные на нормализацию внутренних процессов. Работа строится на многоуровневом наблюдении, включающем анализ лабораторных показателей и оценку функциональных систем организма. Такой формат позволяет поддерживать стабильную динамику изменений и избегать осложнений. В клинике создается согласованная модель вмешательств, позволяющая получать устойчивые результаты.
Углубиться в тему – лечение в наркологической клинике томск
На первом этапе проводится осмотр: врач измеряет давление, пульс, уровень кислорода, температуру тела, оценивает общее состояние, собирает анамнез и анализирует возможные сопутствующие заболевания. При необходимости пациент проходит экспресс-диагностику, включая лабораторные анализы, ЭКГ и консультации других специалистов (кардиолога, невролога).
Выяснить больше – вывод из запоя клиника
Первый шаг — короткое, но предметное интервью: длительность употребления, сопутствующие диагнозы, текущие препараты и аллергии. Врач фиксирует давление, пульс, сатурацию, при необходимости делает экспресс-ЭКГ и неврологический скрининг. Далее объясняет логику вмешательств: зачем именно такая инфузия, чего ожидать через 30–60 минут, какие ощущения нормальны и какие потребуют связи. Мы избегаем «оглушающих» седативов, чтобы не получить вечерний откат и побочные эффекты — дозировки подбираются узко, по реакции организма. После капельницы специалист ещё раз проверяет показатели, оставляет письменные рекомендации, договаривается об окне контроля и критериях повторного визита. Вечер строится вокруг сна: затемнение, тишина, ранний отбой, вода порциями, лёгкая еда «по силам», минимум экранов и разговорных конфликтов. На таком фоне исчезают «качели» между днём и ночью, а эффект инфузий не «сгорает» к следующему вечеру.
Подробнее – https://kapelnica-ot-zapoya-podolsk9.ru/
Структурированное наблюдение позволяет поддерживать согласованность лечебных мероприятий и своевременно реагировать на изменения. Такая система создаёт единый аналитический подход для оценки состояния и обеспечивает целостность терапевтического процесса.
Получить дополнительные сведения – https://narkologicheskaya-klinika-v-vdk18.ru/chastnaya-narkologicheskaya-klinika-vladivostok/
mail order pharmacy india: Global India Pharmacy – Global India Pharmacy
Клиника «ВладТрезвие Центр» работает в круглосуточном режиме и готова оказать помощь жителям Владивостока и прилегающих районов в любое время суток. Врачи-наркологи прибывают по вызову в течение часа, имеют при себе все необходимые препараты и оборудование для проведения детоксикации на дому. При необходимости пациента доставляют в стационар, где лечение проходит под постоянным контролем медицинского персонала.
Исследовать вопрос подробнее – наркологический вывод из запоя
Перед тем, как выбрать конкретный метод, проводится консультация и осмотр, чтобы исключить противопоказания и спрогнозировать результат.
Подробнее – кодирование от алкоголизма отзывы
Детокс — важный этап лечения, который помогает очистить организм от токсинов и продуктов распада алкоголя или наркотиков. В клинике «ТомскМед Трезвость» используются современные капельницы и лекарственные комбинации, направленные на восстановление биохимических процессов в организме. Ниже представлена таблица с примерами капельниц, применяемых в детоксикационных программах.
Получить больше информации – наркологические клиники алкоголизм в томске
Вывод из запоя требует комплексного контроля всех физиологических параметров. Ниже представлены основные направления наблюдения, формирующие структуру оценки состояния.
Получить дополнительную информацию – вывод из запоя капельница ижевск
Наркологическая помощь должна быть не только медицински точной, но и человечной, безопасной и анонимной. В «Ижевском Центре Трезвых Решений» выстроена система комплексного подхода к лечению зависимостей, включающая диагностику, медикаментозную детоксикацию, психотерапию и социальную адаптацию. Клиника объединяет профессионализм, заботу и круглосуточную готовность помочь пациентам, оказавшимся в трудной ситуации. Здесь работают врачи с большим опытом в области наркологии и психиатрии, способные оперативно выехать на дом и оказать неотложную помощь.
Узнать больше – https://narkologicheskaya-klinika-v-izhevsk18.ru/chastnaya-narkologicheskaya-klinika-izhevsk
https://pawtrustmeds.com/# canada pet meds
Работа строится на четкой структуре, определяющей порядок лечебных мероприятий. Ниже представлена последовательность основных этапов.
Получить дополнительную информацию – http://vyvod-iz-zapoya-kemerovo18.ru
Реализация этих задач позволяет наркологической клинике в Ростове-на-Дону обеспечивать контролируемость лечения в любое время суток.
Ознакомиться с деталями – наркологическая клиника вывод из запоя ростов-на-дону
«Ижевский Центр Трезвых Решений» — это частное медицинское учреждение, где проводится лечение всех форм алкогольной и наркотической зависимости. Программы терапии разработаны на основе международных рекомендаций и включают не только медикаментозное воздействие, но и психологическую поддержку. Все процедуры проходят анонимно, без постановки на учёт, что особенно важно для пациентов, желающих сохранить конфиденциальность.
Получить дополнительную информацию – https://narkologicheskaya-klinika-v-izhevsk18.ru/narkologicheskaya-klinika-izhevsk-otzyvy
reputable canadian pharmacy: canadian pharmacy no scripts – canada drugs online
Помимо медицинских процедур, клиника делает акцент на психологической поддержке и постлечебной адаптации. Пациентам помогают не только избавиться от физической зависимости, но и сформировать устойчивую мотивацию к трезвости, восстановить интерес к жизни и наладить отношения с близкими. Это достигается за счёт участия психологов, психотерапевтов и специалистов по социальной реабилитации.
Подробнее тут – лечение в наркологической клинике в ижевске
Современная наркологическая клиника — это не просто медицинское учреждение, где проводят лечение зависимостей. Это система комплексной поддержки, объединяющая врачей, психологов, терапевтов и специалистов по реабилитации. В клинике «ТомскМед Трезвость» созданы комфортные условия, где лечение проходит анонимно, бережно и с опорой на доказательную медицину. Каждое вмешательство назначается строго по показаниям, а терапия направлена не только на физическое очищение организма, но и на восстановление психоэмоционального баланса пациента.
Исследовать вопрос подробнее – http://narkologicheskaya-klinika-v-tomske18.ru/tomsk-narkologicheskij-dispanser/https://narkologicheskaya-klinika-v-tomske18.ru
Эти этапы формируют структуру комплексного лечения, позволяя добиться устойчивого результата и предотвращения повторных срывов.
Подробнее тут – https://narkologicheskaya-klinika-astrakhan18.ru/narkologiya-astrakhan-adres
Инфузионная терапия — не магический «коктейль», а последовательность узких шагов под клиническую задачу. Регидратация возвращает объём циркулирующей жидкости и улучшает перфузию тканей; коррекция электролитов стабилизирует нервно-мышечную передачу и сердечный ритм; печёночная поддержка снижает токсическую нагрузку; при тошноте подключаются противорвотные и гастропротекция; при выраженной тревоге — мягкая анксиолитическая коррекция по показаниям. Мы заранее проговариваем нормальные ощущения (умеренная слабость, сонливость, сухость во рту) и «красные флажки», требующие связи. Диагностика назначается тогда, когда её результат меняет тактику сегодня, — никакой «проверки на всякий случай». Такой минимально достаточный подход уменьшает побочные эффекты, делает бюджет предсказуемым и удерживает эффект не часами, а днями.
Углубиться в тему – http://www.domen.ru
What?s Happening i’m new to this, I stumbled upon this I’ve found It absolutely useful and it has aided me out loads. I hope to contribute & aid other users like its aided me. Great job.
Когда зависимость выходит из-под контроля, каждая задержка превращается в цепочку случайностей: рушится сон, «скачет» давление и пульс, усиливается тревога, дома нарастает напряжение. «МедСфера Мытищи» убирает хаос управляемым маршрутом: чёткий первичный осмотр, объяснённые назначения, понятные правила на 48–72 часа и прогнозируемые окна связи. Мы не лечим «пакетами ради прайса» — только клиническая достаточность на сегодня с учётом длительности употребления, сопутствующих диагнозов, принимаемых препаратов и исходных показателей. Такой подход снижает тревожность, возвращает ощущение контроля и быстрее приводит к первому ровному сну — именно он становится переломной точкой, после которой решения принимаются спокойно и по плану. Важная деталь — отсутствие общих очередей и «публичных» зон: приём разнесён по времени, входы приватны, а коммуникация ведётся через закрытые каналы. Когда понятно, что будет через час, вечером и завтра утром, исчезает потребность в импровизациях, и лечение действительно работает.
Детальнее – narkologicheskaya-klinika-obratnyj-zvonok
Маршрут выстроен прозрачно. Сначала идёт короткое предметное интервью — только то, что меняет тактику «сегодня»: длительность запоя, принятые лекарства (включая «самолечение»), аллергии, хронические диагнозы, количество ночей без сна. Затем — объективные показатели (АД/пульс/сатурация/температура), оценка тремора и уровня тревоги; при показаниях проводится экспресс-ЭКГ и базовый неврологический скрининг. После этого врач объясняет, какие компоненты войдут в инфузию и почему: регидратация для восстановления объёма циркулирующей жидкости, коррекция электролитов, печёночная поддержка, при необходимости — гастропротекция и противорвотные; мягкая анксиолитическая коррекция — строго по показаниям. Мы принципиально избегаем «универсальных сильных смесей» и «оглушающих» дозировок: они дают дневной «блеск», но почти всегда провоцируют вечерний откат, ухудшение сна и рост рисков. Во время процедуры пациент и семья получают понятные письменные правила на 48–72 часа: вода и лёгкая еда «по часам», затемнение и тишина вечером, фиксированное время отбоя, «красные флажки» для связи и согласованное утреннее окно контроля. Такой сценарий убирает импровизации, снижает уровень конфликтов и помогает нервной системе перейти из режима тревоги в режим восстановления.
Исследовать вопрос подробнее – http://kapelnica-ot-zapoya-lyubercy9.ru/kapelnica-ot-zapoya-na-domu-lyubercy/
Наркологическая клиника использует комплексный подход к оценке состояния пациента, что обеспечивает высокий уровень контроля на всех этапах лечения. Такой формат работы позволяет детально изучать динамику процессов и своевременно корректировать вмешательства. В клинике применяется принцип последовательного наблюдения, при котором особое внимание уделяется соматическим и неврологическим проявлениям. Выбор терапевтических мер основывается на анализе объективных данных, что повышает предсказуемость результата. Подход ориентирован на постепенное восстановление функций организма с учетом индивидуальных особенностей.
Разобраться лучше – http://narkologicheskaya-klinika-tomsk18.ru
canadian valley pharmacy: NorthAccess Rx – canadian drugstore online
Такая таблица позволяет систематизировать данные наблюдения и поддерживать единый подход к интерпретации результатов. Это повышает прозрачность процесса и делает оценку состояния объективной вне зависимости от длительности лечения.
Углубиться в тему – наркологическая клиника стационар
Когда зависимость выходит из-под контроля, каждая задержка превращается в цепочку случайностей: рушится сон, «скачет» давление и пульс, усиливается тревога, дома нарастает напряжение. «МедСфера Мытищи» убирает хаос управляемым маршрутом: чёткий первичный осмотр, объяснённые назначения, понятные правила на 48–72 часа и прогнозируемые окна связи. Мы не лечим «пакетами ради прайса» — только клиническая достаточность на сегодня с учётом длительности употребления, сопутствующих диагнозов, принимаемых препаратов и исходных показателей. Такой подход снижает тревожность, возвращает ощущение контроля и быстрее приводит к первому ровному сну — именно он становится переломной точкой, после которой решения принимаются спокойно и по плану. Важная деталь — отсутствие общих очередей и «публичных» зон: приём разнесён по времени, входы приватны, а коммуникация ведётся через закрытые каналы. Когда понятно, что будет через час, вечером и завтра утром, исчезает потребность в импровизациях, и лечение действительно работает.
Получить дополнительную информацию – бесплатная наркологическая клиника
Dealonomy
Global India Pharmacy: Global India Pharmacy – top online pharmacy india
canadian pharmacies online: NorthAccess Rx – vipps approved canadian online pharmacy
Клиника «ВладТрезвие Центр» работает в круглосуточном режиме и готова оказать помощь жителям Владивостока и прилегающих районов в любое время суток. Врачи-наркологи прибывают по вызову в течение часа, имеют при себе все необходимые препараты и оборудование для проведения детоксикации на дому. При необходимости пациента доставляют в стационар, где лечение проходит под постоянным контролем медицинского персонала.
Подробнее тут – http://vyvodiz-zapoya-vladivostok18.ru/vyvod-iz-zapoya-staczionar-vladivostok/
Office for rent https://rentofficetoday.com/en/ business premises in business centers and commercial buildings. Compare office for rent, private office space for rent, and offices to rent in prime locations. Find the best office rental solutions and rent office space that fits your business needs
Финансовые инструменты позволяют заказчику убедиться в надежности участника и его готовности выполнить обязательства по контракту. При этом грамотное сопровождение снижает вероятность финансовых рисков и помогает правильно оформить документы для банка.
Узнайте, как это работает – тендерное сопровождение закупок
Такой подход позволяет безопасно вывести пациента из состояния запоя и предотвратить развитие осложнений. Врачи контролируют давление, пульс, уровень сахара в крови и состояние нервной системы на протяжении всей процедуры.
Исследовать вопрос подробнее – срочный вывод из запоя
Медицинская команда контролирует состояние пациента на протяжении всего лечения. При малейших признаках осложнений проводится корректировка терапии. Такой подход позволяет не просто облегчить симптомы, а обеспечить полноценное восстановление организма.
Детальнее – вывод из запоя на дому недорого в ростове-на-дону
1win com
Состояние запоя представляет опасность не только для физического здоровья, но и для психики человека. Продолжительное употребление алкоголя приводит к тяжёлой интоксикации, нарушению обмена веществ и психоэмоциональной нестабильности. В таких случаях самостоятельный выход из запоя может быть опасен, а иногда и невозможен. Врачи «Южного Центра Медицинского Восстановления» оказывают квалифицированную помощь с выездом на дом и круглосуточным приёмом пациентов. Используя современные методы детоксикации и мониторинга состояния, специалисты обеспечивают безопасное восстановление организма и минимизируют риски осложнений.
Изучить вопрос глубже – http://vyvod-iz-zapoya-v-rnd19.ru
https://northaccessrx.com/otc-meds.html# my canadian pharmacy
Физическое облегчение — лишь половина задачи; вторая половина — эмоции и привычки. Индивидуальные сессии помогают распознать автоматические мысли, планировать «буферы» на вечерние часы, управлять стрессом и сонливостью, расставлять «сигнальные маяки» на привычных маршрутах, где чаще всего возникают соблазны. Семья получает ясные инструкции: меньше контроля — больше поддержки правил среды (тишина, затемнение, прохлада, вода и лёгкая еда «по часам»), отказ от «разборов причин» в первую неделю, короткие договорённости о связи со специалистом при тревожных признаках. Когда у всех одни и те же ориентиры, уровень конфликтов падает, а предсказуемость растёт — это напрямую укрепляет ремиссию. Мы не перегружаем психологический блок «теорией»: даём только те инструменты, которые человек готов выполнить сегодня и завтра, без рывков и самообвинений. Такая практичность приносит больше пользы, чем долгие разговоры «о мотивации», и отлично сочетается с медицинской частью плана.
Выяснить больше – наркологическая клиника москва
Каждая капельница подбирается индивидуально — учитываются возраст, вес, хронические заболевания и длительность запоя. После процедуры врач контролирует состояние пациента и при необходимости корректирует лечение. Такой подход делает терапию не только эффективной, но и безопасной.
Углубиться в тему – вывод из запоя капельница на дому в ростове-на-дону
Структурированное наблюдение позволяет поддерживать согласованность лечебных мероприятий и своевременно реагировать на изменения. Такая система создаёт единый аналитический подход для оценки состояния и обеспечивает целостность терапевтического процесса.
Получить дополнительную информацию – http://narkologicheskaya-klinika-v-vdk18.ru
Наркологическая клиника в клинике в Астрахани оказывает широкий спектр услуг, направленных на устранение интоксикации, стабилизацию психоэмоционального состояния и восстановление функций организма. Терапия подбирается персонально в зависимости от тяжести состояния и индивидуальных особенностей пациента.
Подробнее – http://
Каждое из направлений обеспечивает высокий уровень контроля и помогает формировать индивидуальный план воздействия. Такая модель создаёт условия для прогнозируемого восстановления. Для наглядности процессов применяется таблица, отражающая ключевые параметры наблюдения.
Выяснить больше – наркологическая клиника стационар владивосток
Особое внимание уделяется безопасности. Используются препараты нового поколения, снижающие нагрузку на печень, почки и сердечно-сосудистую систему. Процесс лечения проходит под постоянным наблюдением медперсонала, что позволяет быстро реагировать на любые изменения состояния пациента. Все данные о лечении строго конфиденциальны — информация не передаётся третьим лицам и не фиксируется в общедоступных базах.
Получить дополнительную информацию – наркологическая клиника цены
ordering drugs from canada: NorthAccess Rx – canadian pharmacy ltd
Первая ровная ночь — переломный момент. Мы настраиваем гигиену: затемнение, прохладная комната, фиксированное время отбоя, отсутствие ярких экранов и эмоциональных разговоров. При показаниях добавляем мягкую седативную поддержку в дозах, которые стабилизируют, а не «выключают». Утром — короткий контроль, подстройка дозировок и план активности «по силам», чтобы не сорваться к вечеру от усталости. Такой контур снижает импульсивность, убирает панические волны и делает эффект капельницы долгим.
Выяснить больше – капельница на дом в Подольске
Наркологическая клиника применяет структурированные методы, включающие изучение анамнеза, оценку текущего состояния и определение возможных рисков. На основе полученной информации формируются индивидуальные схемы лечения, направленные на нормализацию внутренних процессов. Работа строится на многоуровневом наблюдении, включающем анализ лабораторных показателей и оценку функциональных систем организма. Такой формат позволяет поддерживать стабильную динамику изменений и избегать осложнений. В клинике создается согласованная модель вмешательств, позволяющая получать устойчивые результаты.
Детальнее – запой наркологическая клиника в томске
Особое внимание уделяется безопасности. Используются препараты нового поколения, снижающие нагрузку на печень, почки и сердечно-сосудистую систему. Процесс лечения проходит под постоянным наблюдением медперсонала, что позволяет быстро реагировать на любые изменения состояния пациента. Все данные о лечении строго конфиденциальны — информация не передаётся третьим лицам и не фиксируется в общедоступных базах.
Изучить вопрос глубже – https://narkologicheskaya-klinika-v-tomske18.ru/narkologicheskaya-klinika-v-tomske-otzyvy
https://pawtrustmeds.shop/# pet rx
Первый контакт строится вокруг фактов «здесь и сейчас». Врач уточняет длительность употребления, принятые за последние 24–48 часов препараты, сопутствующие диагнозы и аллергии, фиксирует давление, пульс, сатурацию, температуру, оценивает выраженность тремора и уровень тревоги; при необходимости выполняется экспресс-ЭКГ и элементарный неврологический скрининг. Далее план объясняется простым языком: какие инфузии будут сегодня, чего ждать через 30–60 минут, как организовать вечер и когда состоится контрольная связь. Мы избегаем универсальных «сильных смесей» и «оглушающих» дозировок: они дают краткий «блеск» с вечерним откатом и повышают риск побочных эффектов. Вместо этого используется узкая, клинически достаточная схема: регидратация для восстановления объёма циркулирующей жидкости, коррекция электролитов, печёночная поддержка, противорвотные и гастропротекция при необходимости, мягкая анксиолитическая коррекция по показаниям. После процедуры врач повторно оценивает показатели, оставляет письменные рекомендации на 48–72 часа, согласует окно связи и обозначает «красные флажки» для немедленного контакта. Такой прозрачный маршрут убирает импровизации и делает поведение семьи предсказуемым, что особенно важно в «тёмные часы» вечера.
Выяснить больше – vyvod-iz-zapoya-himki-kruglosutochno
https://pawtrustmeds.shop/# Paw Trust Meds
Детоксикация — ключевой этап лечения, позволяющий безопасно очистить организм от этанола или наркотических веществ. В клинике используются современные инфузионные схемы, направленные на восстановление обмена веществ, работу печени и нервной системы. Ниже представлена таблица с основными видами капельниц и их назначением.
Получить больше информации – вывод наркологическая клиника астрахань
В Химках много дворовых проездов и часов пик, из-за которых легко потерять драгоценное время. Мы согласуем удобные окна, нейтральные входы и «тихие» маршруты, чтобы помощь начиналась без пауз и лишних взглядов. Чем меньше социальных контактов и хаоса, тем ниже тревога и выше приверженность режиму — это не «сервис ради сервиса», а клинический инструмент, который напрямую влияет на исход.
Разобраться лучше – narkolog-vyvod-iz-zapoya
Такая терапия не только устраняет последствия запоев, но и восстанавливает баланс организма, улучшая общее состояние. Пациенты отмечают, что уже через несколько часов после капельницы проходит тремор, снижается тревожность и появляется чувство ясности.
Получить дополнительные сведения – наркологическая клиника стационар в ижевске
cheapest online pharmacy india: india pharmacy – indian pharmacy paypal
Вывод из запоя требует комплексного контроля всех физиологических параметров. Ниже представлены основные направления наблюдения, формирующие структуру оценки состояния.
Выяснить больше – https://vyvodiz-zapoya-izhevsk18.ru/
Домашний визит — это медицинская логика без лишней логистики. В мегаполисе каждая задержка увеличивает риски: человек устаёт, растёт тревога, обостряются скачки давления и пульса, а бессонные ночи превращают любые «самодельные» схемы в опасный эксперимент. «Трезвый Стандарт» строит помощь как управляемую последовательность: дежурный врач собирает краткий анамнез (длительность употребления, лекарства, сопутствующие заболевания), уточняет текущие показатели и предлагает безопасную точку входа — выезд на дом или стационар на сутки-двое при высоких рисках. Дом даёт приватность и предсказуемость: знакомая среда снижает стресс, а врач привозит всё для мониторинга и инфузий по показаниям. Ключевой результат первых часов — контролируемый сон, понятный режим гидратации и питания «по силам», а также зафиксированные «красные флажки» для связи. Именно последовательность, а не «сильная капельница любой ценой», делает выездной формат эффективным и безопасным в реальном ритме Москвы.
Получить дополнительные сведения – narkolog na dom kruglosutochno
Лечение в клинике «Вектор Трезвости» основано на клинически обоснованных методах, адаптированных под формат круглосуточной работы. Наркологическая клиника в Ростове-на-Дону применяет комплексную диагностику, позволяющую учитывать тяжесть зависимости, длительность употребления и наличие сопутствующих заболеваний. Такой подход обеспечивает точность медицинских решений и снижает вероятность неблагоприятных реакций.
Подробнее можно узнать тут – наркологическая клиника
canadian drug: canadian pharmacy com – canadianpharmacymeds com
Такой подход позволяет устранить физические последствия запоя и снизить психологическую зависимость. Уже после первой процедуры пациенты отмечают улучшение самочувствия, появление аппетита и нормализацию сна. Важно не ограничиваться только экстренной помощью — специалисты рекомендуют пройти курс восстановления, чтобы предотвратить рецидивы.
Углубиться в тему – анонимный вывод из запоя владивосток
противопожарные двери https://dveri-ot-zavoda.ru с доставкой и профессиональной консультацией, посмотрите актуальные решения для разных типов помещений.
pharmacy website india: top 10 pharmacies in india – Global India Pharmacy
Вывод из запоя в клинике представляет собой последовательный комплекс процедур, направленных на устранение интоксикации и стабилизацию основных функций организма. В основе процесса лежит оценка физиологических параметров, определение уровня нарушений и корректировка тактики вмешательства. Такой подход обеспечивает постепенное восстановление адаптивных механизмов и снижает риск осложнений. На каждом этапе проводится анализ динамики, что позволяет оптимизировать терапевтические меры и поддерживать устойчивость состояния. Работа ориентирована на сохранение баланса внутренних систем и снижение нагрузки на жизненно важные органы.
Изучить вопрос глубже – вывод из запоя капельница
В этой публикации мы предлагаем подробные объяснения по актуальным вопросам, чтобы помочь читателям глубже понять их. Четкость и структурированность материала сделают его удобным для усвоения и применения в повседневной жизни.
Осуществить глубокий анализ – http://90plink.live/truc-tiep-tran-dau-heidenheimer-vs-borussia-monchengladbach-2413062
Эта публикация завернет вас в вихрь увлекательного контента, сбрасывая стереотипы и открывая двери к новым идеям. Каждый абзац станет для вас открытием, полным ярких примеров и впечатляющих достижений. Подготовьтесь быть вовлеченными и удивленными каждый раз, когда продолжите читать.
Изучить вопрос глубже – https://www.groupe-huillier.fr/2021/01/26/carrossier-peintre-vp-vul-sisteron
https://northaccessrx.com/# canadian pharmacy service
В этом обзорном материале представлены увлекательные детали, которые находят отражение в различных аспектах жизни. Мы исследуем непонятные и интересные моменты, позволяя читателю увидеть картину целиком. Погрузитесь в мир знаний и удивительных открытий!
Переходите по ссылке ниже – https://blog.cedupcriciuma.com.br/reciclagem
Представленная таблица отражает ключевые направления наблюдения, обеспечивая систематизацию данных. Такой подход позволяет поддерживать высокий уровень контроля и адаптировать программу лечения с учетом динамики состояния.
Выяснить больше – запой наркологическая клиника в томске
Paw Trust Meds: Paw Trust Meds – canada pet meds
В этой статье-обзоре мы соберем актуальную информацию и интересные факты, которые освещают важные темы. Читатели смогут ознакомиться с различными мнениями и подходами, что позволит им расширить кругозор и глубже понять обсуждаемые вопросы.
Интересует подробная информация – http://dobo.o.oo7.jp/cgi-bin/board/boardmain.cgi
В данной статье мы акцентируем внимание на важности поддержки в процессе выздоровления. Мы обсудим, как друзья, семья и профессионалы могут помочь тем, кто сталкивается с зависимостями. Читатели получат практические советы, как поддерживать близких на пути к новой жизни.
Изучить вопрос глубже – https://www.dpthemes.com/tyazhyolye-sostoyaniya-pri-kotoryx-nuzhen-vyzov-narkologa-na-dom
Каждый из перечисленных элементов способствует формированию полной картины состояния пациента и позволяет корректно выстраивать терапевтические мероприятия. Такая структура создаёт основу для достижения устойчивых результатов и минимизации возможных осложнений. Использование таблиц наблюдения делает клинические процессы структурированными и понятными.
Подробнее можно узнать тут – https://narkologicheskaya-klinika-tomsk18.ru/tomsk-narkologicheskij-dispanser
Коммерческий и государственный тендер — это конкурентная процедура выбора поставщика товаров или оказания услуг. Заказчик размещает требования, а компании подают заявки и участвуют в торгах.
Узнайте, как это работает – https://tendernoe-soprovozhdenie-rostov-na-donu.ru/
Этот информационный материал собраны данные, которые помогут лучше понять текущие тенденции и процессы в различных сферах жизни. Мы предоставляем четкий анализ, графики и примеры, чтобы информация была не только понятной, но и практичной для принятия решений.
Лучшее решение — прямо здесь – https://oncoscreen.health/2025/05/28/inside-oncoscreen-the-smart-architecture-behind-the-project
Для получения устойчивого результата наркологическая клиника использует методы, основанные на индивидуальной оценке. В работе учитываются соматические показатели, реакции нервной системы и данные лабораторных исследований. Такой формат лечения обеспечивает предсказуемое влияние на физиологические процессы и снижает вероятность осложнений. В клинике применяется непрерывный мониторинг, позволяющий своевременно корректировать лечебные меры. Работа направлена на нормализацию метаболизма, восстановление баланса внутренних систем и плавное уменьшение симптоматики.
Детальнее – http://narkologicheskaya-klinika-vo-vladivostoke18.ru/chastnaya-narkologicheskaya-klinika-vladivostok/
http://globalindiapharmacy.com/# Global India Pharmacy
Клиника «ВладТрезвие Центр» работает в круглосуточном режиме и готова оказать помощь жителям Владивостока и прилегающих районов в любое время суток. Врачи-наркологи прибывают по вызову в течение часа, имеют при себе все необходимые препараты и оборудование для проведения детоксикации на дому. При необходимости пациента доставляют в стационар, где лечение проходит под постоянным контролем медицинского персонала.
Получить больше информации – вывод из запоя недорого
Наркологическая клиника — это не просто медицинское учреждение, а пространство, где пациент получает всестороннюю поддержку: от снятия интоксикации и детоксикации до психотерапии и постлечебного сопровождения. В клинике «КемероваМед Трезвость» специалисты работают с любыми формами зависимостей — алкогольной, наркотической, медикаментозной. Принципы работы центра основаны на анонимности, профессионализме и индивидуальном подходе. Здесь создаются условия для полного восстановления здоровья и возвращения человека к стабильной трезвой жизни.
Выяснить больше – платная наркологическая клиника кемерово
Thanks , I’ve just been searching for info about this topic for a while and yours is the best I’ve discovered till now. But, what about the conclusion? Are you certain concerning the supply?
Thanks for your marvelous posting! I actually enjoyed reading it, you might be a great author.I will remember to bookmark your blog and will come back very soon. I want to encourage continue your great work, have a nice weekend!
Эта познавательная публикация погружает вас в море интересного контента, который быстро захватит ваше внимание. Мы рассмотрим важные аспекты темы и предоставим вам уникальные Insights и полезные сведения для дальнейшего изучения.
Не упусти шанс – https://foratata.com/contacto
В этом интересном тексте собраны обширные сведения, которые помогут вам понять различные аспекты обсуждаемой темы. Мы разбираем детали и факты, делая акцент на важности каждого элемента. Не упустите возможность расширить свои знания и взглянуть на мир по-новому!
Это ещё не всё… – https://blog.datagate.ee/5-pohjust-ise-arvuti-kokkupanekuks
Global India Pharmacy: Global India Pharmacy – pharmacy website india
Этот информационный материал собраны данные, которые помогут лучше понять текущие тенденции и процессы в различных сферах жизни. Мы предоставляем четкий анализ, графики и примеры, чтобы информация была не только понятной, но и практичной для принятия решений.
Лови подробности – https://ganconsultoria.es/blog/invertir-en-estancos-es-rentable
Эта статья предлагает уникальную подборку занимательных фактов и необычных историй, которые вы, возможно, не знали. Мы постараемся вдохновить ваше воображение и разнообразить ваш кругозор, погружая вас в мир, полный интересных открытий. Читайте и открывайте для себя новое!
Погрузиться в научную дискуссию – https://nhasachthudo247.net
https://globalindiapharmacy.com/# Global India Pharmacy
В обзорной статье вы найдете собрание важных фактов и аналитики по самым разнообразным темам. Мы рассматриваем как современные исследования, так и исторические контексты, чтобы вы могли получить полное представление о предмете. Погрузитесь в мир знаний и сделайте шаг к пониманию!
Открыть полностью – https://benzhiphop.com/?attachment_id=194
Мы собрали для вас самые захватывающие факты из мира науки и истории. От малознакомых деталей до грандиозных событий — эта статья расширит ваш кругозор и подарит новое понимание того, как устроен наш мир.
Как достичь результата? – https://dirigible.com.ng/product/infinix-note-12-4128gb-x663
Online medicine home delivery: Online medicine home delivery – Global India Pharmacy
legitimate online pharmacies india: Global India Pharmacy – india online pharmacy
I don’t know if it’s just me or if perhaps everybody else encountering issues with your blog. It looks like some of the text on your posts are running off the screen. Can someone else please comment and let me know if this is happening to them too? This might be a problem with my web browser because I’ve had this happen before. Thank you
Сломалась машина? служба эвакуации и помощи на дороге техпомощь на дорогах СПб и Ленобласти: эвакуация, подвоз топлива, запуск двигателя, вытаскивание авто — 24/7. Круглосуточная мобильная служба техпомощи в Санкт?Петербурге и Ленинградской области. Оказываем выездную помощь в любое время: эвакуируем авто, подвозим топливо, помогаем завести двигатель и вытаскиваем застрявшие машины.
buy canadian drugs: my canadian pharmacy reviews – canadian pharmacy no scripts
Hi my friend! I want to say that this post is awesome, nice written and include approximately all important infos. I?d like to see more posts like this.
buy prescription drugs from india: Global India Pharmacy – Global India Pharmacy
Есть ситуации, когда дальнейшее промедление может привести к необратимым последствиям:
Получить дополнительные сведения – лечение алкоголизма
Paw Trust Meds: Paw Trust Meds – pet drugs online
canadian pharmacy world: best canadian pharmacy online – canadian pharmacy no rx needed
best india pharmacy and buy prescription drugs from india india pharmacy
http://www.xr2.org/exit.php?url=http://globalindiapharmacy.com best india pharmacy or http://www.1gmoli.com/home.php?mod=space&uid=521666 reputable indian pharmacies
indian pharmacy paypal india pharmacy mail order or online shopping pharmacy india indian pharmacy paypal
Участие в государственных и коммерческих процедурах требует точной подготовки, понимания законодательства и внимательной работы с документами. Для многих компаний самостоятельная работа с закупками становится сложной задачей: необходимо отслеживать новые закупки, анализировать требования, оформлять документы и взаимодействовать с площадками.
Эксклюзивная информация для вас – тендер госзакупки
canadian pharmacy no scripts and canadapharmacyonline legit canada drugs online review
https://www.danielco.net/?URL=northaccessrx.shop:: reliable canadian online pharmacy and https://allchoicesmatter.org/user/zotolpjalu/?um_action=edit canadian pharmacy india
cross border pharmacy canada the canadian drugstore and buy prescription drugs from canada cheap 77 canadian pharmacy
Терапия в клинике проводится поэтапно: от снятия интоксикации до психологического восстановления. Все шаги выполняются под наблюдением специалистов, что исключает осложнения и повышает эффективность. Ниже представлена таблица, отражающая последовательность этапов и задачи каждого из них.
Выяснить больше – https://narkologicheskaya-klinica-v-astrakhani18.ru/astrakhanskaya-narkologiya/
Для получения устойчивого результата наркологическая клиника использует методы, основанные на индивидуальной оценке. В работе учитываются соматические показатели, реакции нервной системы и данные лабораторных исследований. Такой формат лечения обеспечивает предсказуемое влияние на физиологические процессы и снижает вероятность осложнений. В клинике применяется непрерывный мониторинг, позволяющий своевременно корректировать лечебные меры. Работа направлена на нормализацию метаболизма, восстановление баланса внутренних систем и плавное уменьшение симптоматики.
Подробнее можно узнать тут – наркологическая клиника вывод из запоя
Каждый из перечисленных элементов способствует формированию полной картины состояния пациента и позволяет корректно выстраивать терапевтические мероприятия. Такая структура создаёт основу для достижения устойчивых результатов и минимизации возможных осложнений. Использование таблиц наблюдения делает клинические процессы структурированными и понятными.
Детальнее – платная наркологическая клиника томск
«Ижевский Центр Трезвых Решений» — это частное медицинское учреждение, где проводится лечение всех форм алкогольной и наркотической зависимости. Программы терапии разработаны на основе международных рекомендаций и включают не только медикаментозное воздействие, но и психологическую поддержку. Все процедуры проходят анонимно, без постановки на учёт, что особенно важно для пациентов, желающих сохранить конфиденциальность.
Получить дополнительные сведения – наркологическая клиника наркологический центр в ижевске
Универсальный флагманский безбумажный регистратор jumo logoscreen 700 для контроля температуры, давления и других технологических параметров. Удобный интерфейс, точные измерения и возможность интеграции в системы мониторинга.
online vet pharmacy: Paw Trust Meds – pet rx
canada ed drugs or is canadian pharmacy legit vipps approved canadian online pharmacy
https://cse.google.com.ph/url?q=https://northaccessrx.com adderall canadian pharmacy or https://chinaexchangeonline.com/user/azlcjobfgl/?um_action=edit canadian online drugs
canada drugs 77 canadian pharmacy or buying drugs from canada canadian pharmacy tampa
Paw Trust Meds: Paw Trust Meds – Paw Trust Meds
Клиника «КаспийМед Альтернатива» построила систему оказания наркологической помощи на трёх принципах: индивидуальный подход, доказательная медицина и круглосуточная доступность. Каждый пациент проходит диагностический этап, где специалисты определяют уровень зависимости, физическое состояние и психоэмоциональные особенности. Далее формируется персональная программа лечения, включающая медицинские, психологические и социальные модули.
Ознакомиться с деталями – анонимная наркологическая клиника астрахань
Такой подход помогает подобрать правильную тактику лечения и избежать повторного запоя. Пациент находится под постоянным контролем медперсонала, что исключает риски для здоровья.
Детальнее – нарколог на дом вывод из запоя в краснодаре
Анонимность — один из ключевых принципов работы клиники «Северная Звезда». Все обращения регистрируются под кодовым номером, без упоминания фамилии и контактных данных в базе данных, доступ к которой имеют только прямые исполнители процедур. Круглосуточная линия позволяет связаться со специалистом в любой момент: ночью, в праздники или выходные. Вызов врача на дом возможен в любой час, без предварительной записи, а при необходимости пациент может быть госпитализирован в отдельное крыло клиники с минимальным контактом с другими посетителями.
Получить дополнительную информацию – http://lechenie-alkogolizma-arkhangelsk0.ru
Когда клиника далеко, время позднее или важна конфиденциальность, помощь на дому позволяет начать лечение немедленно и в комфортной обстановке. Ниже — типичные ситуации, когда визит нарколога на дом особенно уместен.
Детальнее – вызов врача нарколога на дом
Выбор наркологической клиники — ответственное решение, от которого зависит не только эффективность терапии, но и общее физическое и психоэмоциональное состояние пациента. Квалифицированная помощь должна быть своевременной, организованной и соответствующей медицинским стандартам. Как указывает Минздрав РФ, медицинские учреждения, предоставляющие помощь при зависимостях, обязаны иметь лицензию, профессиональный персонал и комплексный подход к лечению.
Детальнее – https://narkologicheskaya-klinika-murmansk0.ru/chastnaya-narkologicheskaya-klinika-marmansk/
https://northaccessrx.com/canadian-pharmacy-rating.html# pharmacy rx world canada
Лечение наркомании во Владимире представляет собой комплекс мероприятий, направленных на восстановление физического и психического здоровья пациентов с различными формами зависимости от психоактивных веществ. Современные методы терапии, используемые в наркологической клинике «Новая Эра», обеспечивают эффективное и безопасное избавление от зависимости с последующей социальной реабилитацией.
Получить дополнительные сведения – центр анонимного лечения наркомании в владимире
В клинике используются доказательные методики, эффективность которых подтверждена практикой. Они подбираются индивидуально и позволяют достичь устойчивых результатов.
Получить дополнительную информацию – принудительное лечение от алкоголизма в твери
После прохождения курса капельниц пациенты отмечают улучшение сна, исчезновение головной боли, восстановление аппетита и общего самочувствия. При тяжёлых формах зависимости лечение дополняется физиотерапией и психологической помощью.
Подробнее – наркологический вывод из запоя в пензе
Paw Trust Meds: Paw Trust Meds – canada pet meds
Вывод из запоя в клинике в Астрахани проводится в условиях контролируемой терапии, ориентированной на устранение интоксикации и восстановление функционирования основных систем организма. При длительном употреблении спиртного нарушается работа печени, сердца и нервной системы, что требует профессионального вмешательства. Специалисты оценивают степень интоксикации, подбирают препараты и контролируют динамику стабилизации пациента.
Изучить вопрос глубже – https://vyvod-iz-zapoya-v-astrakhani18.ru/vyvod-iz-zapoya-na-domu-astrakhan
Такая структурированная таблица позволяет обеспечивать единый стандарт наблюдения и облегчает оценку динамики. Она помогает быстро определять необходимость корректировок, что повышает точность применяемых вмешательств и уменьшает риск отрицательных реакций.
Выяснить больше – скорая вывод из запоя
Несмотря на выездной формат, лечение выстраивается поэтапно и соответствует медицинским стандартам. Это обеспечивает управляемость процесса и безопасность пациента.
Ознакомиться с деталями – нарколог на дом вывод в ростове-на-дону
Первое, с чего начинается успешное лечение — это команда. В клинике должны работать не только наркологи, но и психиатры, психотерапевты, консультанты по зависимостям. Без комплексного подхода устойчивый результат невозможен.
Углубиться в тему – https://lechenie-alkogolizma-yaroslavl0.ru/lechenie-khronicheskogo-alkogolizma-yaroslavl/
Профессиональные юридические услуги для физических и юридических лиц. Переходите по запросу бесплатные услуги юриста. Вас ждут консультации, подготовка документов, защита интересов в суде, сопровождение сделок и решение спорных ситуаций. Поможем разобраться в сложных правовых вопросах быстро и эффективно, предложим оптимальные решения и обеспечим надежную правовую поддержку.
В клинике «ПензаМед Трезвость» лечение проводится по индивидуальной схеме, которая формируется после первичного осмотра. Нарколог оценивает состояние пациента, уровень алкогольной интоксикации и наличие сопутствующих заболеваний. На основании данных подбираются препараты, способные эффективно очистить кровь, восстановить работу органов и снизить абстинентные проявления. При лёгкой форме зависимости возможен выезд врача на дом, где пациенту устанавливают капельницу и обеспечивают наблюдение в течение всего процесса детоксикации. В более сложных случаях рекомендуется госпитализация в стационар, где помощь оказывается под постоянным контролем специалистов.
Исследовать вопрос подробнее – вывод из запоя недорого в пензе
Домашняя помощь — это клиника, перенесённая в тихую комнату. Знакомая обстановка снижает тревогу, исчезают пробки и ожидание, нет «социального шума». Врач «ПрофДетокса» приезжает без эмблем, действует спокойно и последовательно, объясняет каждое назначение простым языком. Мы не используем мифические смеси. Состав и темп капельницы подбираются под текущие показатели — давление, пульс, сатурация, выраженность тремора и тошноты, уровень тревоги, данные о лекарствах, которые человек успел принять за двое суток. Такой подход даёт не минутное облегчение, а устойчивую динамику на сутки и неделю.
Детальнее – narkolog-v-ivanteevke
Каждая процедура проводится под контролем квалифицированного врача. При необходимости возможен экстренный выезд специалиста на дом, что позволяет оказать помощь пациенту в привычной и безопасной обстановке.
Подробнее – http://vyvod-iz-zapoya-odincovo6.ru
pet meds without vet prescription canada and canadian pharmacy no rx needed best online canadian pharmacy
http://images.google.mv/url?q=https://northaccessrx.com canadian pharmacy scam and https://allchoicesmatter.org/user/wmwyspeyvr/?um_action=edit best canadian online pharmacy
legitimate canadian pharmacy pharmacy canadian superstore or canadian pharmacy pharmacy in canada
«МедСфера» — это управляемый маршрут наркологической помощи в Ивантеевке: круглосуточный выезд врача без опознавательных знаков, аккуратный домашний детокс, стационар с наблюдением 24 часа в сутки и профессиональная подготовка к кодированию по показаниям. Мы работаем по принципу клинической достаточности: никакой «универсальной капельницы», никаких решений «наугад», только последовательные шаги, которые действительно влияют на исход. Каждое назначение объясняем простым языком, заранее согласуем смету, фиксируем правила на первые 24–48 часов и первую «тихую» неделю. Конфиденциальность встроена в процесс: нейтральная связь, выезд без эмблем, документы в сдержанной формулировке по запросу.
Подробнее – narkologicheskaya-klinika-na-dom
После поступления вызова диспетчер передаёт заявку на смартфон врача, который оперативно завершает подготовительные мероприятия и выезжает к пациенту. На дороге применяется GPS-маршрутизация для выбора оптимального пути и снижения времени в пути.
Подробнее тут – http://www.domen.ru
pet meds online and dog prescriptions online vet pharmacy online
https://maps.google.co.id/url?sa=t&url=https://pawtrustmeds.com pet meds online and https://vintage-car.eu/user/nqdjablxul/ pet prescriptions online
canada pet meds pet rx or vet pharmacy online vet pharmacy online
Наркологическая клиника базирует свою работу на системной оценке состояния пациента и последовательном проведении лечебных мероприятий. Такой подход позволяет формировать устойчивую динамику восстановления и обеспечивать безопасность процедур. В клинике используется поэтапная модель наблюдения, в которой каждый шаг опирается на объективные данные обследований. Применение структурированных методик способствует снижению рисков и выстраиванию предсказуемой схемы терапии. Важным элементом становится контроль физиологических функций, обеспечивающий корректное распределение нагрузок и своевременную корректировку методов воздействия.
Исследовать вопрос подробнее – http://
В основе работы клиники «ИжТрезвоМед Центр» лежит принцип персонализированной медицины. Это означает, что каждый пациент получает не шаблонное лечение, а тщательно подобранный комплекс процедур, учитывающий его состояние, историю заболевания, уровень мотивации и социальную ситуацию. Такой подход позволяет добиться стабильного результата даже в сложных случаях. Лечение проводится анонимно, без постановки на учёт и разглашения данных, что особенно важно для тех, кто ценит конфиденциальность.
Выяснить больше – лечение в наркологической клинике в ижевске
В этой статье мы рассмотрим ключевые признаки эффективной наркологической помощи в Ярославле — от состава команды до подходов в работе с мотивацией пациента.
Изучить вопрос глубже – лечение наркомании и алкоголизма ярославль
Перед таблицей отметим: это ориентиры по составу и назначению; конкретные решения принимает врач после осмотра и согласует с семьёй. Таблица нужна, чтобы одним взглядом понять логику вариантов и выбрать безопасный старт.
Получить дополнительные сведения – http://kapelnica-ot-zapoya-klin8.ru
dog prescriptions online: Paw Trust Meds – Paw Trust Meds
https://pawtrustmeds.com/# vet pharmacy online
Врачи клиники используют современные методики, сочетающие медикаментозную терапию, психотерапию и физиологическое восстановление. Основное внимание уделяется не только физическому очищению организма, но и устранению причин, провоцирующих зависимость. Благодаря постоянному мониторингу жизненных показателей и корректировке схемы лечения удаётся избежать осложнений и обеспечить безопасное восстановление.
Углубиться в тему – платная наркологическая клиника
Своевременное обращение к специалистам клиники «ВитаРеабилит» — это не только шанс на восстановление здоровья, но и гарантия безопасности пациента и его близких.
Детальнее – https://narkologicheskaya-klinika-podolsk5.ru
best online pharmacy india: reputable indian pharmacies – top online pharmacy india
Для наглядности представлена таблица с основными этапами лечения и их характеристиками:
Получить дополнительную информацию – наркологические клиники алкоголизм в ростове-на-дону
Работа в режиме 24/7 в клинике «Точка Опоры» обусловлена особенностями течения зависимостей, при которых ухудшение состояния может происходить внезапно и независимо от времени суток. Наркологическая клиника в Краснодаре обеспечивает постоянную готовность медицинского персонала к приёму пациентов и началу лечения без временных ограничений. Это снижает риск осложнений и повышает управляемость лечебного процесса.
Получить дополнительные сведения – https://narcologicheskaya-klinika-v-krd19.ru/narkologa-na-dom-krasnodar/
Лечение в режиме круглосуточного наблюдения выстраивается как непрерывный медицинский процесс. Даже при экстренном обращении терапия рассматривается как последовательность взаимосвязанных мероприятий с обязательным врачебным контролем.
Ознакомиться с деталями – платная наркологическая клиника в краснодаре
Перед кодированием важно снять острую интоксикацию и стабилизировать состояние. В «Орион-Клиник» пациенту проводят курс инфузионной терапии: капельницы с регидратационными растворами, гепатопротекторами и витаминно-минеральными комплексами. Это позволяет восстановить водно-электролитный баланс, поддержать функции печени и почек, нормализовать артериальное давление и работу сердца. Одновременно психолог проводит предварительные беседы для выяснения причин зависимости, уровня тревожности и мотивации. Подготовительный этап длится от одного до трёх дней в зависимости от тяжести состояния и поможет снизить риск побочных эффектов при введении кодирующего препарата.
Подробнее тут – http://kodirovanie-ot-alkogolizma-pushkino4.ru
Наркологическая клиника в клинике в Астрахани предоставляет помощь пациентам, сталкивающимся с различными формами зависимости — алкогольной, наркотической, лекарственной. Основой терапии является комплексный подход, включающий медицинскую детоксикацию, стабилизацию состояния, психотерапию и последующее наблюдение. Такой формат работы позволяет мягко купировать острые симптомы, восстановить физиологические функции и подготовить пациента к длительной реабилитации. Все процедуры проводятся анонимно, с использованием сертифицированных препаратов и с постоянным контролем врача.
Получить дополнительные сведения – https://narkologicheskaya-klinika-astrakhan18.ru/astrakhanskaya-narkologiya
Описание
Углубиться в тему – вывести из запоя одинцово
Важным инструментом контроля является таблица оценочных параметров, применяемых в ходе наблюдения. Она служит для систематизации данных и поддержания единых стандартов анализа. Ниже приведена таблица, отражающая основные направления наблюдения.
Исследовать вопрос подробнее – наркологическая клиника пенза
reputable indian pharmacies: Global India Pharmacy – Global India Pharmacy
Комплексный подход позволяет не просто стабилизировать физическое состояние пациента, но и обеспечить долговременный результат. Каждый этап лечения сопровождается медицинским наблюдением и корректируется по мере улучшения состояния.
Получить больше информации – https://narkologicheskaya-klinika-v-krd19.ru/narkolog-i-psikhiatr-v-krasnodare
pet med: Paw Trust Meds – Paw Trust Meds
trusted canadian pharmacy and canadian pharmacy no rx needed safe reliable canadian pharmacy
http://images.google.si/url?sa=t&url=https://northaccessrx.shop canadian drug and https://brueckrachdorf.de/user/bczokqgjkr/ canadianpharmacyworld com
reliable canadian pharmacy canadian pharmacy prices or canadian pharmacy review rate canadian pharmacies
Вывод из запоя — это не просто медицинская процедура, а важный шаг на пути восстановления организма и возвращения человека к нормальной жизни. В клинике «ВладТрезвие Центр» пациенты получают профессиональную помощь, основанную на современных методиках детоксикации и безопасном медикаментозном восстановлении. Каждый случай рассматривается индивидуально, а лечение подбирается с учётом возраста, состояния здоровья и продолжительности запоя. Наркологи центра выезжают на дом круглосуточно, обеспечивая помощь даже в экстренных ситуациях, когда время играет ключевую роль.
Ознакомиться с деталями – вывод из запоя в стационаре владивосток
Запой — это не просто затянувшийся прием алкоголя, а острое хроническое отравление организма, сопровождающееся тяжёлыми последствиями для сердца, печени, почек, мозга и нервной системы. Снятие абстинентного синдрома без врачебного контроля может привести к тяжёлым осложнениям: судорогам, делирию, инфаркту, внутренним кровотечениям, резкому скачку давления и даже летальному исходу. Только медицинский специалист способен грамотно оценить состояние пациента, купировать опасные проявления и обеспечить полноценное восстановление организма.
Ознакомиться с деталями – вывод из запоя
Наркологическая клиника «Южный МедКонтроль» объединяет современные медицинские технологии, опыт специалистов и уважительное отношение к каждому пациенту. Здесь создаются условия для безопасного и результативного лечения зависимостей любой сложности — от алкогольной до полинаркотической. Центр работает в круглосуточном режиме, предлагая выезд врачей на дом, детоксикацию, кодирование и длительные программы реабилитации. Основная цель специалистов — восстановление физического и психологического равновесия человека, возвращение способности к полноценной жизни без зависимости.
Подробнее – наркологическая клиника вывод из запоя
Мы не используем шаблон «на всех». Темп и сочетания зависят от давления, пульса, выраженности тошноты и тремора, уровня тревоги, сопутствующих диагнозов и лекарств, уже попавших в организм. Детокс — это система шагов: допуск к терапии, коррекция воды и электролитов, поддержка печени, вегетостабилизация, осторожная работа со сном по показаниям, профилактика осложнений. Любое назначение проговаривается простым языком: зачем, как подействует, что считать нормальной динамикой, а что — поводом связаться с врачом.
Подробнее можно узнать тут – kapelnica-ot-zapoya-na-domu-klinika
Вывод из запоя требует комплексного контроля всех физиологических параметров. Ниже представлены основные направления наблюдения, формирующие структуру оценки состояния.
Исследовать вопрос подробнее – вывод из запоя с выездом
В зависимости от тяжести состояния подбирается индивидуальная программа детоксикации. В неё входят: — Инфузионная терапия (капельницы) для очищения организма от токсинов; — Поддерживающие препараты для работы сердца, печени, нервной системы; — Симптоматическое лечение (устранение рвоты, судорог, бессонницы); — Витамины и средства для восстановления водно-солевого баланса.
Разобраться лучше – https://narkologicheskaya-klinika-podolsk5.ru/
В практике круглосуточного лечения применяются следующие этапы:
Получить дополнительные сведения – http://narcologicheskaya-klinika-v-krd19.ru/narkologa-na-dom-krasnodar/
Программы лечения в клинике «ДонМед Трезвость» направлены на полное восстановление человека — физическое, психологическое и социальное. Каждое направление терапии адаптируется под конкретного пациента, чтобы достичь максимально устойчивого результата. Врачи используют современные методы и препараты, снижающие риски побочных эффектов и ускоряющие процесс реабилитации.
Выяснить больше – лечение в наркологической клинике ростов-на-дону
В «Южном МедКонтроле» лечение зависимостей строится поэтапно, с постепенным восстановлением физиологических функций и эмоциональной устойчивости. Врачи используют современные методы детоксикации, фармакотерапию и психотерапию, которые действуют комплексно. Каждый этап направлен на достижение конкретного результата: очищение организма, снятие симптомов абстиненции, стабилизацию состояния и профилактику срывов.
Углубиться в тему – частная наркологическая клиника в ростове-на-дону
Лечение проходит поэтапно, чтобы пациент не испытывал стресса и перегрузок. Каждый шаг контролируется врачами, а терапия корректируется в зависимости от состояния. В таблице ниже представлена структура программы лечения в клинике «АстраМед Трезвость».
Детальнее – наркологическая клиника лечение алкоголизма
В Краснодаре клиника «ЮгМедТрезвость» принимает пациентов круглосуточно. Независимо от времени суток, можно вызвать врача на дом или пройти консультацию в стационаре. Анонимность гарантируется: все данные пациентов хранятся строго конфиденциально и не передаются в сторонние структуры. Такой подход помогает людям, которые опасаются осуждения или вмешательства извне, получить квалифицированную помощь без риска огласки.
Получить больше информации – https://narkologicheskaya-klinika-v-krd19.ru/narkolog-i-psikhiatr-v-krasnodare
Для оценки состояния используется расширенная диагностика: лабораторные анализы, ЭКГ, психологическое тестирование и биохимические маркеры. По результатам обследования составляется индивидуальный план, включающий детоксикацию, фармакотерапию и реабилитационные мероприятия. Ниже представлена таблица, описывающая структуру этапов лечения.
Исследовать вопрос подробнее – https://narcologicheskaya-clinika-v-rnd19.ru/
Работа в режиме 24/7 в клинике «Точка Опоры» обусловлена особенностями течения зависимостей, при которых ухудшение состояния может происходить внезапно и независимо от времени суток. Наркологическая клиника в Краснодаре обеспечивает постоянную готовность медицинского персонала к приёму пациентов и началу лечения без временных ограничений. Это снижает риск осложнений и повышает управляемость лечебного процесса.
Исследовать вопрос подробнее – наркологическая клиника краснодар
canadian pharmacy tampa: legal canadian pharmacy online – online canadian pharmacy review
Клиника «ВладТрезвие Центр» работает в круглосуточном режиме и готова оказать помощь жителям Владивостока и прилегающих районов в любое время суток. Врачи-наркологи прибывают по вызову в течение часа, имеют при себе все необходимые препараты и оборудование для проведения детоксикации на дому. При необходимости пациента доставляют в стационар, где лечение проходит под постоянным контролем медицинского персонала.
Подробнее можно узнать тут – http://vyvodiz-zapoya-vladivostok18.ru
Обращение в клинику начинается с подробной консультации, где пациент или его родственники могут задать любые вопросы о методах лечения, продолжительности курса и возможностях реабилитации. Первый этап — диагностика: анализы, осмотр врача-нарколога, оценка общего состояния и выявление сопутствующих заболеваний.
Подробнее тут – наркологическая клиника сайт
Перед таблицей отметим: это ориентиры по составу и назначению; конкретные решения принимает врач после осмотра и согласует с семьёй. Таблица нужна, чтобы одним взглядом понять логику вариантов и выбрать безопасный старт.
Подробнее – https://kapelnica-ot-zapoya-klin8.ru/kapelnica-ot-zapoya-v-klinu-s-vyezdom-na-dom
В практике круглосуточного лечения применяются следующие этапы:
Исследовать вопрос подробнее – наркологическая клиника клиника помощь ростов-на-дону
В клинике каждому пациенту уделяют особое внимание. Врачи знают: универсальных решений нет, за каждым случаем — своя история и свои причины. Первый контакт начинается с конфиденциальной консультации. Можно просто позвонить или написать онлайн — уже на этом этапе врач поможет оценить ситуацию, объяснит возможные этапы и даст рекомендации по подготовке к визиту.
Исследовать вопрос подробнее – лечение алкоголизма
Каждый из представленных элементов формирует устойчивую основу для дальнейшей работы и задаёт необходимый уровень контроля. Структура вмешательств адаптируется под особенности конкретного случая, что укрепляет эффективность процесса и создаёт благоприятные условия для стабилизации.
Подробнее тут – наркологическая клиника наркологический центр
Каждое направление наблюдения играет важную роль в формировании терапевтической программы. Структурированный контроль помогает снижать уровень рисков и обеспечивает возможность оперативной адаптации. Для систематизации данных применяется таблица, отражающая ключевые параметры мониторинга.
Подробнее тут – http://vyvodiz-zapoya-izhevsk18.ru/vyvod-iz-zapoya-na-domu-izhevsk/
Наркологическая клиника — это не просто медицинское учреждение, а пространство, где пациент получает всестороннюю поддержку: от снятия интоксикации и детоксикации до психотерапии и постлечебного сопровождения. В клинике «КемероваМед Трезвость» специалисты работают с любыми формами зависимостей — алкогольной, наркотической, медикаментозной. Принципы работы центра основаны на анонимности, профессионализме и индивидуальном подходе. Здесь создаются условия для полного восстановления здоровья и возвращения человека к стабильной трезвой жизни.
Узнать больше – http://narkologicheskaya-klinika-v-kemerovo18.ru/chastnaya-narkologicheskaya-klinika-kemerovo/
Клиника «ВладТрезвие Центр» работает в круглосуточном режиме и готова оказать помощь жителям Владивостока и прилегающих районов в любое время суток. Врачи-наркологи прибывают по вызову в течение часа, имеют при себе все необходимые препараты и оборудование для проведения детоксикации на дому. При необходимости пациента доставляют в стационар, где лечение проходит под постоянным контролем медицинского персонала.
Получить дополнительную информацию – http://vyvodiz-zapoya-vladivostok18.ru/vyvod-iz-zapoya-gorod-vladivostok/
Детоксикация — ключевой этап лечения, позволяющий безопасно очистить организм от этанола или наркотических веществ. В клинике используются современные инфузионные схемы, направленные на восстановление обмена веществ, работу печени и нервной системы. Ниже представлена таблица с основными видами капельниц и их назначением.
Ознакомиться с деталями – наркологические клиники алкоголизм
Таблица позволяет поддерживать единую структуру наблюдения и фиксировать изменения состояния. Такая модель обеспечивает прозрачность процессов и повышает точность принимаемых решений.
Получить дополнительные сведения – вывод из запоя клиника
Наркологическая клиника в клинике в Астрахани предоставляет помощь пациентам, сталкивающимся с различными формами зависимости — алкогольной, наркотической, лекарственной. Основой терапии является комплексный подход, включающий медицинскую детоксикацию, стабилизацию состояния, психотерапию и последующее наблюдение. Такой формат работы позволяет мягко купировать острые симптомы, восстановить физиологические функции и подготовить пациента к длительной реабилитации. Все процедуры проводятся анонимно, с использованием сертифицированных препаратов и с постоянным контролем врача.
Углубиться в тему – http://narkologicheskaya-klinika-astrakhan18.ru/narkologiya-astrakhan-adres/
Нужен промокод? easydrop codes актуальные бонусы, скидки и акции для пользователей. Используйте рабочие коды, получайте дополнительные преимущества и экономьте при использовании сервиса. Все свежие предложения в одном месте.
Анонимность — один из ключевых принципов работы клиники «Северная Звезда». Все обращения регистрируются под кодовым номером, без упоминания фамилии и контактных данных в базе данных, доступ к которой имеют только прямые исполнители процедур. Круглосуточная линия позволяет связаться со специалистом в любой момент: ночью, в праздники или выходные. Вызов врача на дом возможен в любой час, без предварительной записи, а при необходимости пациент может быть госпитализирован в отдельное крыло клиники с минимальным контактом с другими посетителями.
Разобраться лучше – анонимное лечение алкоголизма в архангельске
Paw Trust Meds: Paw Trust Meds – Paw Trust Meds
В практике лечения 24/7 применяются следующие этапы:
Узнать больше – лечение в наркологической клинике краснодар
Избавление от наркотической зависимости требует последовательной, профессиональной и комплексной помощи. В отличие от краткосрочной детоксикации, полноценное лечение наркомании в Мурманске включает медицинскую стабилизацию, психотерапевтическую коррекцию и этапы социальной адаптации. По данным Минздрава РФ, устойчивые результаты достигаются лишь в тех случаях, когда терапия проводится под наблюдением специалистов, использующих современные доказательные методы.
Выяснить больше – лечение наркомании и алкоголизма в мурманске
Применение подобных таблиц формирует прозрачность терапевтического процесса и помогает специалистам адаптировать стратегию лечения с учетом динамики. Это обеспечивает объективность и последовательность в клинической оценке каждого этапа.
Узнать больше – вывод наркологическая клиника пенза
Участие в государственных и коммерческих процедурах требует точной подготовки, понимания законодательства и внимательной работы с документами. Для многих компаний самостоятельная работа с закупками становится сложной задачей: необходимо отслеживать новые закупки, анализировать требования, оформлять документы и взаимодействовать с площадками.
Все тайны раскрыты – https://tendernoe-soprovozhdenie-rostov-na-donu.ru/
Особую роль на первом этапе играет диагностика: важно выявить не только тип наркотика, но и наличие сопутствующих расстройств, стадию зависимости, мотивационное состояние пациента. От этого зависит, будет ли выбрана амбулаторная или стационарная форма лечения, какие методы будут применяться.
Выяснить больше – https://lechenie-narkomanii-murmansk0.ru/
Перед началом лечения пациент проходит первичную диагностику, которая включает оценку физических показателей, сбор информации о длительности употребления, выявление сопутствующих заболеваний и оценку рисков. Наркологическая клиника в клинике в Астрахани использует стандартизированные методы обследования, что позволяет точно определить степень интоксикации и подобрать адекватный лечебный план.
Ознакомиться с деталями – наркологическая клиника в астрахани
pet pharmacy online and pet prescriptions online pet rx
https://cse.google.im/url?sa=t&url=https://pawtrustmeds.com discount pet meds or https://www.wearebusiness.org/user/feyomcoalg/?um_action=edit vet pharmacy online
best pet rx pet pharmacy and best pet rx best pet rx
Такой курс не только очищает организм от токсинов, но и помогает вернуть эмоциональное равновесие. После завершения терапии пациент чувствует себя отдохнувшим, восстанавливает аппетит и сон, уходит тревожность и раздражительность.
Разобраться лучше – http://vyvod-iz-zapoya-v-krasnodare19.ru
Проблемы зависимости требуют оперативного вмешательства. Чем раньше начато лечение, тем выше вероятность полного восстановления. Наркологическая помощь в Архангельске представлена как государственными, так и частными клиниками, каждая из которых предлагает свой уровень сервиса и спектр услуг. Однако для получения эффективной и безопасной помощи важно понимать, какие критерии определяют качество наркологической поддержки.
Исследовать вопрос подробнее – http://narkologicheskaya-pomoshh-arkhangelsk0.ru
Лечение в режиме круглосуточного наблюдения выстраивается как непрерывный медицинский процесс. Даже при экстренном обращении терапия рассматривается как последовательность взаимосвязанных мероприятий с обязательным врачебным контролем.
Подробнее можно узнать тут – анонимная наркологическая клиника в краснодаре
Выбор формата лечения определяется состоянием пациента, наличием хронических заболеваний и мотивацией к выздоровлению. При необходимости врач переводит пациента из амбулаторной формы в стационарную, обеспечивая непрерывность и безопасность терапии.
Изучить вопрос глубже – http://narkologicheskaya-clinika-v-rostove19.ru
Клиника создана как современное пространство для безопасного восстановления. Здесь пациенты получают комплексную помощь в комфортных условиях. Основные преимущества учреждения:
Получить больше информации – наркологическая клиника лечение алкоголизма ростов-на-дону
Особую роль на первом этапе играет диагностика: важно выявить не только тип наркотика, но и наличие сопутствующих расстройств, стадию зависимости, мотивационное состояние пациента. От этого зависит, будет ли выбрана амбулаторная или стационарная форма лечения, какие методы будут применяться.
Исследовать вопрос подробнее – лечение наркомании нарколог
Соблюдение конфиденциальности в клинике «Точка Опоры» является неотъемлемой частью лечебного процесса. Наркологическая клиника в Краснодаре обеспечивает закрытый формат приёма, хранения медицинских данных и взаимодействия с пациентом. Практика показывает, что анонимное обращение снижает уровень тревожности, способствует более открытому диалогу с врачом и повышает точность клинической диагностики.
Исследовать вопрос подробнее – наркологическая клиника нарколог
Такой подход обеспечивает комплексное восстановление — от физического состояния до эмоциональной стабильности. Пациент получает внимание врачей на всех этапах и поддержку после выписки.
Подробнее можно узнать тут – наркологическая клиника наркологический центр
Такая структура терапии обеспечивает контроль на всех стадиях и помогает добиться устойчивого результата без вреда для здоровья. Пациент получает не просто временное облегчение, а полное восстановление физического и эмоционального состояния.
Подробнее тут – http://narkologicheskaya-klinika-v-astrakhani18.ru
Вывод из запоя требует комплексного контроля всех физиологических параметров. Ниже представлены основные направления наблюдения, формирующие структуру оценки состояния.
Получить больше информации – нарколог вывод из запоя в ижевске
Наркологическая клиника — это не просто медицинское учреждение, а пространство, где человеку помогают вернуть здоровье, ясность мышления и контроль над жизнью. В клинике «КаспийМед Альтернатива» в Астрахани круглосуточно оказывается помощь людям, столкнувшимся с алкогольной, наркотической и смешанной зависимостью. Центр сочетает медицинскую строгость и человеческое участие, обеспечивая лечение в комфортных условиях с максимальной конфиденциальностью. Здесь разработаны программы детоксикации, восстановления и психотерапевтической поддержки, что делает терапию эффективной и безопасной.
Исследовать вопрос подробнее – наркологическая клиника лечение алкоголизма
Клиника «ВладТрезвие Центр» работает в круглосуточном режиме и готова оказать помощь жителям Владивостока и прилегающих районов в любое время суток. Врачи-наркологи прибывают по вызову в течение часа, имеют при себе все необходимые препараты и оборудование для проведения детоксикации на дому. При необходимости пациента доставляют в стационар, где лечение проходит под постоянным контролем медицинского персонала.
Получить дополнительные сведения – анонимный вывод из запоя
В рамках лечебного процесса наркологическая клиника задействует структурированные механизмы наблюдения, включающие анализ лабораторных показателей, оценку соматического тонуса и изучение активности нервной системы. Эти элементы обеспечивают комплексность работы и позволяют своевременно корректировать план лечения. Такая система предотвращает перегрузку организма и способствует поддержанию стабильности на фоне применения медикаментозных схем. Ниже представлены ключевые составляющие терапевтического процесса, формирующие основу для клинического восстановления.
Углубиться в тему – наркологическая клиника стационар пенза
Клиника создана как современное пространство для безопасного восстановления. Здесь пациенты получают комплексную помощь в комфортных условиях. Основные преимущества учреждения:
Получить больше информации – запой наркологическая клиника в ростове-на-дону
Наркологическая клиника — это не просто медицинское учреждение, а пространство, где пациент получает всестороннюю поддержку: от снятия интоксикации и детоксикации до психотерапии и постлечебного сопровождения. В клинике «КемероваМед Трезвость» специалисты работают с любыми формами зависимостей — алкогольной, наркотической, медикаментозной. Принципы работы центра основаны на анонимности, профессионализме и индивидуальном подходе. Здесь создаются условия для полного восстановления здоровья и возвращения человека к стабильной трезвой жизни.
Узнать больше – https://narkologicheskaya-klinika-v-kemerovo18.ru/narkologicheskaya-klinika-v-kemerovo-anonimno/
В зависимости от состояния пациента, помощь может быть оказана в домашних условиях или в стационаре. Вызов нарколога на дом особенно актуален при абстинентном синдроме или тяжелом алкогольном опьянении. Как отмечается в материалах НМИЦ психиатрии и наркологии, в таких ситуациях крайне важно избежать самолечения и довериться врачам, способным правильно подобрать препараты и дозировки.
Подробнее можно узнать тут – круглосуточная наркологическая помощь
Такая структура терапии обеспечивает контроль на всех стадиях и помогает добиться устойчивого результата без вреда для здоровья. Пациент получает не просто временное облегчение, а полное восстановление физического и эмоционального состояния.
Получить больше информации – https://narkologicheskaya-klinika-v-astrakhani18.ru/narkologi-astrakhan
Содержание процедуры
Детальнее – vyvod-iz-zapoya-shchelkovo
Кодирование основано на блокировке механизмов зависимости на биохимическом и поведенческом уровнях. Медикаментозные методы включают введение препаратов пролонгированного действия, которые нарушают метаболизм этанола: при попытке выпить даже небольшую дозу алкоголь вызывает выражённые неприятные реакции, что психологически отвращает от новой пробы спиртного. Психотерапевтические техники, такие как гипноз или метод Довженко, направлены на переустановку подсознательных программ, удаление эмоционального влечения к алкоголю и укрепление мотивации к здоровому образу жизни. Аппаратные методики (электроимпульсная стимуляция, транскраниальная микрополяризация) воздействуют на нейроны, участвующие в развитии зависимости, снижая их активность и уменьшая физиологический дискомфорт. В «Орион-Клиник» часто используют комбинированные программы: сначала проводится детоксикация организма, затем вводится медикаментозное средство, после чего реализуется психотерапевтический блок влияния на подсознание.
Подробнее тут – http://kodirovanie-ot-alkogolizma-pushkino4.ru
Основные услуги наркологической помощи
Выяснить больше – скорая наркологическая помощь домодедово
В рамках последовательного анализа состояния применяется также оценочная шкала, позволяющая фиксировать изменения и уточнять степень выраженности симптомов. Далее представлена таблица, демонстрирующая основные критерии наблюдения и их функциональное значение в клиническом процессе.
Ознакомиться с деталями – анонимная наркологическая клиника пенза
Paw Trust Meds: Paw Trust Meds – pet meds online
Следующий этап — реабилитация: индивидуальная и групповая психотерапия, восстановление эмоционального фона, обучение навыкам самоконтроля и профилактики рецидивов. При необходимости привлекаются дополнительные специалисты — психологи, психиатры, кардиологи. Важно, что в клинике «ВитаРеабилит» в Подольске большое внимание уделяется не только медицинской, но и психологической поддержке пациента и его семьи.
Получить дополнительную информацию – narkologicheskaya-klinika-narkologicheskij-centr
Процесс терапии в клинике построен по поэтапной схеме, включающей:
Детальнее – http://lechenie-alkogolizma-arkhangelsk0.ru/
Анонимность в клинике «Северный Вектор» является неотъемлемой частью лечебного процесса. Наркологическая клиника в Ростове-на-Дону обеспечивает конфиденциальность на всех этапах взаимодействия с пациентом, начиная с первичного обращения и заканчивая медицинским наблюдением. Клиническая практика показывает, что сохранение анонимности снижает уровень тревожности и повышает готовность пациента к полноценному лечению, что напрямую влияет на стабильность результатов.
Узнать больше – http://
Такой подход обеспечивает комплексное восстановление — от физического состояния до эмоциональной стабильности. Пациент получает внимание врачей на всех этапах и поддержку после выписки.
Ознакомиться с деталями – платная наркологическая клиника в кемерове
Такая схема лечения делает процесс последовательным и контролируемым. Врачи клиники сопровождают пациентов на всех стадиях, помогая преодолеть как физическую, так и психологическую зависимость. Особое внимание уделяется возвращению человека к активной и стабильной жизни без употребления алкоголя или наркотиков.
Выяснить больше – https://narkologicheskaya-klinika-v-izhevsk18.ru/narkologicheskaya-klinika-izhevsk-otzyvy/
Такой подход обеспечивает комплексное восстановление — от физического состояния до эмоциональной стабильности. Пациент получает внимание врачей на всех этапах и поддержку после выписки.
Получить дополнительную информацию – лечение в наркологической клинике
Каждый из представленных элементов формирует устойчивую основу для дальнейшей работы и задаёт необходимый уровень контроля. Структура вмешательств адаптируется под особенности конкретного случая, что укрепляет эффективность процесса и создаёт благоприятные условия для стабилизации.
Выяснить больше – наркологическая клиника нарколог пенза
Критерий
Получить дополнительные сведения – http://www.domen.ru
Анонимность в клинике «Северный Вектор» является неотъемлемой частью лечебного процесса. Наркологическая клиника в Ростове-на-Дону обеспечивает конфиденциальность на всех этапах взаимодействия с пациентом, начиная с первичного обращения и заканчивая медицинским наблюдением. Клиническая практика показывает, что сохранение анонимности снижает уровень тревожности и повышает готовность пациента к полноценному лечению, что напрямую влияет на стабильность результатов.
Подробнее можно узнать тут – наркологическая клиника стационар ростов-на-дону
Процесс лечения проходит поэтапно. Каждый шаг направлен на снятие интоксикации, стабилизацию состояния и нормализацию обменных процессов. В таблице приведены основные этапы и процедуры, применяемые в клинике «ПензаМед Трезвость».
Изучить вопрос глубже – вывод из запоя с выездом пенза
Программы лечения в клинике «ДонМед Трезвость» направлены на полное восстановление человека — физическое, психологическое и социальное. Каждое направление терапии адаптируется под конкретного пациента, чтобы достичь максимально устойчивого результата. Врачи используют современные методы и препараты, снижающие риски побочных эффектов и ускоряющие процесс реабилитации.
Получить больше информации – https://narcologicheskaya-klinika-v-rostove19.ru/narkologiya-rostov-kruglosutochno/
Для формирования структурированного лечения используются методы, обеспечивающие анализ текущей клинической картины. Ниже представлены ключевые направления, задействованные при формировании терапевтических решений.
Получить больше информации – http://narkologicheskaya-klinika-vo-vladivostoke18.ru/
После курса капельниц улучшается сон, аппетит и общее самочувствие. Пациенты отмечают, что уже через сутки после начала лечения исчезают тремор и тахикардия, а на второй день приходит чувство ясности и спокойствия.
Получить дополнительную информацию – https://narkologicheskaya-klinika-v-kemerovo18.ru/chastnaya-narkologicheskaya-klinika-kemerovo
Инфузионная терапия — это не просто «быстрый раствор витаминов». При запое страдает водно-электролитный баланс, «плавает» давление и пульс, нарастает тревога, нарушается сон, проявляются тошнота и тремор. Правильно собранная капельница в Клину помогает вернуть жидкость и электролиты, поддержать печень, снизить вегетативные проявления, мягко стабилизировать нервную систему и подготовить переход на пероральные схемы. Важно избегать избыточной седативной нагрузки и опасных сочетаний: то, что человеку «помогало раньше», может конфликтовать с его нынешними показателями. Поэтому каждое назначение мы увязываем с реальными цифрами осмотра и тем, что уже было принято за двое суток.
Разобраться лучше – https://kapelnica-ot-zapoya-klin8.ru/kapelnica-ot-zapoya-v-klinu-s-vyezdom-na-dom
Для пациентов, требующих круглосуточного наблюдения, клиника «Полярис» предлагает стационар VIP-класса. Здесь созданы все условия для быстрого восстановления: удобные палаты, индивидуальное меню, зоны отдыха и консультации профильных специалистов.
Выяснить больше – narkologicheskie kliniki alkogolizm arhangel’sk
Кодирование от алкоголизма в Пушкино — это современная и надёжная методика лечения, заключающаяся в создании устойчивого барьера к употреблению спиртного. В наркологической клинике «Орион-Клиник» применяется сочетание медицинских и психотерапевтических технологий, благодаря чему пациент получает не только химическое, но и психологическое подкрепление трезвости. Процедура проводится после полной диагностики, с учётом индивидуальных особенностей, анамнеза и текущего состояния организма.
Получить дополнительные сведения – https://kodirovanie-ot-alkogolizma-pushkino4.ru/kodirovanie-ot-alkogolizma-ceny-v-pushkino
pet pharmacy online: Paw Trust Meds – Paw Trust Meds
В Краснодаре клиника «ЮгМедТрезвость» принимает пациентов круглосуточно. Независимо от времени суток, можно вызвать врача на дом или пройти консультацию в стационаре. Анонимность гарантируется: все данные пациентов хранятся строго конфиденциально и не передаются в сторонние структуры. Такой подход помогает людям, которые опасаются осуждения или вмешательства извне, получить квалифицированную помощь без риска огласки.
Углубиться в тему – наркологическая клиника цены в краснодаре
Особую роль на первом этапе играет диагностика: важно выявить не только тип наркотика, но и наличие сопутствующих расстройств, стадию зависимости, мотивационное состояние пациента. От этого зависит, будет ли выбрана амбулаторная или стационарная форма лечения, какие методы будут применяться.
Ознакомиться с деталями – лечение наркомании мурманск
reliable canadian pharmacy: the canadian pharmacy – certified canadian pharmacy
Наркологическая клиника — это не просто медицинское учреждение, а пространство, где человеку помогают вернуть здоровье, ясность мышления и контроль над жизнью. В клинике «КаспийМед Альтернатива» в Астрахани круглосуточно оказывается помощь людям, столкнувшимся с алкогольной, наркотической и смешанной зависимостью. Центр сочетает медицинскую строгость и человеческое участие, обеспечивая лечение в комфортных условиях с максимальной конфиденциальностью. Здесь разработаны программы детоксикации, восстановления и психотерапевтической поддержки, что делает терапию эффективной и безопасной.
Выяснить больше – платная наркологическая клиника в астрахани
best canadian pharmacy online and canadian pharmacy meds ed drugs online from canada
https://maps.google.sn/url?sa=t&url=https://northaccessrx.shop canadian world pharmacy or http://lenhong.fr/user/mvkohhhvpl/ canada pharmacy online
legitimate canadian mail order pharmacy pharmacy canadian and legal canadian pharmacy online canadian pharmacy 365
Hello! This is my first comment here so I just wanted to give a quick shout out and say I really enjoy reading your articles. Can you suggest any other blogs/websites/forums that go over the same subjects? Thanks a ton!
Наркологическая клиника выстраивает лечебные мероприятия в соответствии с алгоритмами, направленными на достижение стабильного состояния пациента. Важную роль играет последовательное выполнение процедур, включая оценку реакции организма и корректировку вмешательств. Формирование индивидуальной программы позволяет учитывать особенности каждого случая и поддерживать высокий уровень эффективности. Процесс наблюдения сопровождается непрерывным анализом, что делает терапию адаптивной и предсказуемой. В клинике соблюдается принцип многоуровневого контроля, обеспечивающий безопасность и стабильность лечения.
Изучить вопрос глубже – http://narkologicheskaya-klinika-tomsk18.ru
Процедура вывода из запоя проводится опытными наркологами с применением современных протоколов и сертифицированных препаратов. Процесс включает несколько ключевых этапов:
Исследовать вопрос подробнее – vyvod-iz-zapoya-cena
Перед началом терапии проводится полная диагностика организма, включая лабораторные исследования и ЭКГ. Это позволяет оценить состояние пациента и подобрать оптимальный курс лечения. После стабилизации физического состояния начинается психотерапевтическая и реабилитационная работа. Такой подход помогает не только снять симптомы, но и устранить первопричины зависимости.
Узнать больше – http://narkologicheskaya-klinika-kemerovo18.ru/narkologicheskaya-klinika-v-kemerovo-anonimno/https://narkologicheskaya-klinika-kemerovo18.ru
Thank you for your sharing. I am worried that I lack creative ideas. It is your article that makes me full of hope. Thank you. But, I have a question, can you help me?
canadian pharmacy near me or safe online pharmacies in canada canada drugs online
https://maps.google.co.ck/url?q=https://northaccessrx.com canadian discount pharmacy and http://www.ktmoli.com/home.php?mod=space&uid=599256 canadian pharmacy online
canadadrugpharmacy com canadian pharmacy sarasota and canadian world pharmacy maple leaf pharmacy in canada
Основным инструментом при выведении из запоя является капельница. Её состав зависит от состояния пациента, продолжительности запоя и наличия хронических заболеваний. В клинике «ПензаМед Трезвость» используются только проверенные препараты с минимальной нагрузкой на организм. Ниже приведена таблица с примерами инфузионных растворов и их воздействием.
Углубиться в тему – http://vyvod-iz-zapoya-penza18.ru/vyvedenie-iz-zapoya-na-domu-penza/
— Растворы с глюкозой и витаминами для коррекции энергетического обмена. — Минеральные комплексы для нормализации электролитов. — Антиоксиданты и гепатопротекторы для защиты печени. — Спазмолитики для снятия болевого синдрома. — Противорвотные препараты при тошноте.
Углубиться в тему – наркологическая клиника нарколог архангельск
pet drugs online: online pet pharmacy – Paw Trust Meds
canada rx pharmacy world: legitimate canadian pharmacy online – canada drugs online review
Согласно информации, опубликованной на сайте Минздрава РФ, успешная наркологическая помощь невозможна без своевременной диагностики, комплексного подхода и участия квалифицированных специалистов. Именно такие параметры становятся решающими при выборе учреждения, куда обратится пациент или его родственники.
Получить больше информации – https://narkologicheskaya-pomoshh-arkhangelsk0.ru/neotlozhnaya-narkologicheskaya-pomoshh-arkhangelsk/
Главный принцип работы наркологической клиники — это последовательность, безопасность и уважение к каждому пациенту. Независимо от степени зависимости, лечение строится на тщательной диагностике, определении индивидуальных особенностей и поэтапном подходе. Медицинская помощь оказывается как в условиях стационара, так и на дому, где врачи могут провести детоксикацию, стабилизировать состояние и составить дальнейший план терапии.
Подробнее можно узнать тут – narcologicheskaya-klinika-v-rostove19.ru/
Для оценки состояния используется расширенная диагностика: лабораторные анализы, ЭКГ, психологическое тестирование и биохимические маркеры. По результатам обследования составляется индивидуальный план, включающий детоксикацию, фармакотерапию и реабилитационные мероприятия. Ниже представлена таблица, описывающая структуру этапов лечения.
Ознакомиться с деталями – наркологическая клиника цены в ростове-на-дону
Вывод из запоя в клинике в Астрахани проводится в условиях контролируемой терапии, ориентированной на устранение интоксикации и восстановление функционирования основных систем организма. При длительном употреблении спиртного нарушается работа печени, сердца и нервной системы, что требует профессионального вмешательства. Специалисты оценивают степень интоксикации, подбирают препараты и контролируют динамику стабилизации пациента.
Изучить вопрос глубже – https://vyvod-iz-zapoya-v-astrakhani18.ru/vyvod-iz-zapoya-v-staczionare-astrakhan
Терапия в клинике проводится поэтапно: от снятия интоксикации до психологического восстановления. Все шаги выполняются под наблюдением специалистов, что исключает осложнения и повышает эффективность. Ниже представлена таблица, отражающая последовательность этапов и задачи каждого из них.
Разобраться лучше – лечение в наркологической клинике астрахань
Нужна брендированная продукция? https://2ymedia.kz/category/vneshnie-akkumulyatory-power-bank/ ваш надежный партнер в сфере брендинга в Алматы. Мы специализируемся на производстве сувенирной продукции с нанесением логотипа и корпоративной полиграфии. В нашем каталоге вы найдете всё для продвижения бренда: бизнес-сувениры, промо-мерч, текстиль и полиграфическую продукцию. Мы принимаем заказы оптом от 50 единиц, что делает нас доступными как для крупного бизнеса, так и для небольших компаний.
Когда человек оказывается в состоянии алкогольного запоя, самостоятельное преодоление последствий становится практически невозможным. Безопасно выйти из запоя без риска для жизни и здоровья можно только под медицинским наблюдением. В наркологической клинике «Содружество» в Щёлково вывод из запоя проводится круглосуточно, с профессиональной поддержкой, выездом врача на дом и гарантией индивидуального подхода к каждому пациенту. Здесь обеспечивается не только эффективное медикаментозное лечение, но и психологическая поддержка семьи, а также планирование последующего восстановления.
Подробнее тут – http://vyvod-iz-zapoya-shchelkovo6.ru
Процесс лечения алкоголизма в Твери строится поэтапно, что позволяет пациентам постепенно проходить все стадии выздоровления.
Подробнее можно узнать тут – лечение алкоголизма и наркомании центр тверь
Психотерапия во Владимире в клинике «Новая Эра» проводится высококвалифицированными специалистами с большим опытом работы в сфере зависимостей.
Получить дополнительные сведения – https://lechenie-narkomanii-vladimir0.ru/lechenie-narkozavisimosti-vo-vladimire/
Вывод из запоя в клинике формируется на основе последовательных процедур, направленных на стабилизацию физиологических функций и устранение токсических влияний. Такой подход позволяет корректно регулировать состояние пациента и контролировать интенсивность симптомов. Рабочие алгоритмы включают оценку метаболических процессов, анализ соматических показателей и определение степени неврологических изменений. В результате создается структурированная модель помощи, ориентированная на восстановление адаптивных возможностей организма. Процессы выполняются под контролем специалистов, что обеспечивает прогнозируемый терапевтический эффект и снижает вероятность осложнений.
Углубиться в тему – вывод из запоя цена
Нарколог на дом в Ростове-на-Дону рассматривается как специализированная форма оказания медицинской помощи пациентам с зависимостями вне стационара. В клинике «Чистый Баланс» выезд врача организуется круглосуточно, что позволяет обеспечить своевременное вмешательство при ухудшении состояния в любое время суток. Нарколог на дом в Ростове-на-Дону востребован в ситуациях, когда пациент не готов или не может обратиться в медицинское учреждение, а промедление с лечением повышает риск осложнений. Такой формат помощи требует строгого соблюдения клинических протоколов и высокой квалификации специалистов.
Выяснить больше – нарколог на дом круглосуточно цены
Лечение проходит поэтапно, чтобы пациент не испытывал стресса и перегрузок. Каждый шаг контролируется врачами, а терапия корректируется в зависимости от состояния. В таблице ниже представлена структура программы лечения в клинике «АстраМед Трезвость».
Выяснить больше – https://narkologicheskaya-klinika-v-astrakhani18.ru/
«Ижевский Центр Трезвых Решений» — это частное медицинское учреждение, где проводится лечение всех форм алкогольной и наркотической зависимости. Программы терапии разработаны на основе международных рекомендаций и включают не только медикаментозное воздействие, но и психологическую поддержку. Все процедуры проходят анонимно, без постановки на учёт, что особенно важно для пациентов, желающих сохранить конфиденциальность.
Получить больше информации – частная наркологическая клиника ижевск
Кроме того, наличие медицинской базы с возможностью круглосуточного мониторинга состояния пациента является дополнительным преимуществом. Это особенно важно на этапе детоксикации, когда организм испытывает серьезные нагрузки.
Ознакомиться с деталями – https://lechenie-narkomanii-yaroslavl0.ru/lechenie-narkomanii-reabilitacziya-yaroslavl/
Основным инструментом при выведении из запоя является капельница. Её состав зависит от состояния пациента, продолжительности запоя и наличия хронических заболеваний. В клинике «ПензаМед Трезвость» используются только проверенные препараты с минимальной нагрузкой на организм. Ниже приведена таблица с примерами инфузионных растворов и их воздействием.
Разобраться лучше – вывод из запоя в пензе
Для жителей Ростова-на-Дону клиника «Южный МедКонтроль» предлагает два формата помощи: лечение в стационаре и амбулаторные визиты врача на дом. Стационар оборудован всем необходимым для круглосуточного медицинского наблюдения, проведения инфузионных процедур и лабораторной диагностики. Пациентам предоставляется комфортное размещение, спокойная обстановка и постоянный контроль состояния. При выезде на дом врачи действуют оперативно — приезжают в течение часа, проводят осмотр, устанавливают капельницы, купируют абстиненцию и дают рекомендации по дальнейшему лечению.
Выяснить больше – https://narkologicheskaya-clinika-v-rostove19.ru/narkolog-rostov-na-donu/
Наркологическая клиника — это не просто медицинское учреждение, а пространство, где пациент получает всестороннюю поддержку: от снятия интоксикации и детоксикации до психотерапии и постлечебного сопровождения. В клинике «КемероваМед Трезвость» специалисты работают с любыми формами зависимостей — алкогольной, наркотической, медикаментозной. Принципы работы центра основаны на анонимности, профессионализме и индивидуальном подходе. Здесь создаются условия для полного восстановления здоровья и возвращения человека к стабильной трезвой жизни.
Узнать больше – https://narkologicheskaya-klinika-v-kemerovo18.ru/narkologicheskaya-klinika-v-kemerovo-anonimno/
Наркологическая клиника — это не просто медицинское учреждение, а пространство, где человеку помогают вернуть здоровье, ясность мышления и контроль над жизнью. В клинике «КаспийМед Альтернатива» в Астрахани круглосуточно оказывается помощь людям, столкнувшимся с алкогольной, наркотической и смешанной зависимостью. Центр сочетает медицинскую строгость и человеческое участие, обеспечивая лечение в комфортных условиях с максимальной конфиденциальностью. Здесь разработаны программы детоксикации, восстановления и психотерапевтической поддержки, что делает терапию эффективной и безопасной.
Подробнее можно узнать тут – наркологическая клиника нарколог астрахань
Наркологическая клиника в Краснодаре рассматривается как специализированное медицинское учреждение, где лечение зависимостей организовано с приоритетом конфиденциальности и непрерывного доступа к помощи. В клинике «Точка Опоры» терапия выстраивается таким образом, чтобы пациент мог обратиться за медицинским вмешательством в любое время суток без риска разглашения личной информации. Анонимный формат особенно важен при острых состояниях, когда своевременность лечения напрямую влияет на безопасность и прогноз.
Узнать больше – http://narcologicheskaya-klinika-v-krd19.ru/narkologa-na-dom-krasnodar/
В практике круглосуточного лечения применяются следующие этапы:
Подробнее можно узнать тут – https://narkologicheskaya-klinika-v-rostove19.ru/narkologiya-rostov-kruglosutochno
Анонимность — один из ключевых принципов работы клиники «Северная Звезда». Все обращения регистрируются под кодовым номером, без упоминания фамилии и контактных данных в базе данных, доступ к которой имеют только прямые исполнители процедур. Круглосуточная линия позволяет связаться со специалистом в любой момент: ночью, в праздники или выходные. Вызов врача на дом возможен в любой час, без предварительной записи, а при необходимости пациент может быть госпитализирован в отдельное крыло клиники с минимальным контактом с другими посетителями.
Получить дополнительные сведения – лечение алкоголизма на дому
Запой — это не просто многодневное употребление алкоголя, а тяжёлое нарушение обмена веществ, работы сердца, нервной системы и внутренних органов. Без медицинской помощи резко возрастает риск развития осложнений: делирий, судороги, инсульт, сердечная недостаточность, тяжёлое обезвоживание и нарушения психики. Симптомы могут прогрессировать в любое время, причём угроза для жизни появляется внезапно.
Получить больше информации – https://vyvod-iz-zapoya-shchelkovo6.ru/skoryj-vyvod-iz-zapoya-v-shchelkovo/
После курса капельниц улучшается сон, аппетит и общее самочувствие. Пациенты отмечают, что уже через сутки после начала лечения исчезают тремор и тахикардия, а на второй день приходит чувство ясности и спокойствия.
Узнать больше – наркологическая клиника наркологический центр в кемерове
Каждый из представленных элементов формирует устойчивую основу для дальнейшей работы и задаёт необходимый уровень контроля. Структура вмешательств адаптируется под особенности конкретного случая, что укрепляет эффективность процесса и создаёт благоприятные условия для стабилизации.
Получить дополнительную информацию – наркологическая клиника
Ниже представлена последовательность основных шагов терапевтического процесса.
Получить дополнительные сведения – http://narkologicheskaya-klinika-vo-vladivostoke18.ru
Эти этапы формируют структуру комплексного лечения, позволяя добиться устойчивого результата и предотвращения повторных срывов.
Подробнее можно узнать тут – http://narkologicheskaya-klinika-astrakhan18.ru
77 canadian pharmacy or best mail order pharmacy canada canadianpharmacyworld com
https://www.google.co.za/url?q=https://northaccessrx.com cheap canadian pharmacy online and http://www.garmoniya.uglich.ru/user/nalkadxnpa/ best canadian online pharmacy
canadian pharmacy 24h com legitimate canadian online pharmacies or canadian online pharmacy reviews safe reliable canadian pharmacy
Кроме того, наличие медицинской базы с возможностью круглосуточного мониторинга состояния пациента является дополнительным преимуществом. Это особенно важно на этапе детоксикации, когда организм испытывает серьезные нагрузки.
Ознакомиться с деталями – http://lechenie-narkomanii-yaroslavl0.ru/lechenie-narkomanii-i-alkogolizma-yaroslavl/
pet meds official website or pet drugs online pet pharmacy online
https://images.google.ms/url?sa=t&url=https://pawtrustmeds.com pet meds for dogs and http://la-maison-des-amis.com/user/otjmyvfltw/ vet pharmacy
best pet rx online vet pharmacy and pet meds online best pet rx
Ниже представлена таблица, демонстрирующая основные направления деятельности клиники и их особенности:
Ознакомиться с деталями – http://narkologicheskaya-klinika-v-krd19.ru/krasnodar-narkologicheskij-czentr/
Если пациент находится в остром состоянии — начинается с детоксикации. Это не только капельницы для вывода токсинов и восстановления баланса в организме, но и поддержка работы сердца, печени, почек, купирование тревоги и бессонницы, снятие судорог, коррекция давления. Весь процесс проходит под наблюдением опытного нарколога, который учитывает хронические заболевания, особенности организма, степень интоксикации.
Изучить вопрос глубже – http://www.domen.ru
Проблемы с алкоголем и наркотиками — это не просто личные трудности, а серьёзное испытание для всей семьи и общества. Самостоятельные попытки справиться с зависимостью редко приводят к успеху и часто только усугубляют ситуацию. Оптимальное решение — обратиться за профессиональной помощью в специализированное учреждение. В наркологической клинике «ВитаРеабилит» в Подольске пациенты получают комплексное лечение под контролем опытных врачей, современные методики детоксикации и реабилитации, а также полную поддержку на всех этапах выздоровления.
Углубиться в тему – chastnye-narkologicheskie-kliniki-podolsk
Алкогольная зависимость — хроническое заболевание, требующее своевременного вмешательства специалистов. В условиях нашего города круглосуточная анонимная помощь позволяет начать лечение без откладываний и в привычной обстановке. Клиника «Северная Звезда» предлагает комплексный подход: вызов врача на дом или стационарное пребывание в условиях полной конфиденциальности. Профессиональная команда обеспечивает детоксикацию, психологическую реабилитацию и последующую поддержку, помогая пациенту сделать первый шаг к новой, свободной от алкоголя жизни.
Получить дополнительные сведения – http://lechenie-alkogolizma-arkhangelsk0.ru
Если пациент находится в остром состоянии — начинается с детоксикации. Это не только капельницы для вывода токсинов и восстановления баланса в организме, но и поддержка работы сердца, печени, почек, купирование тревоги и бессонницы, снятие судорог, коррекция давления. Весь процесс проходит под наблюдением опытного нарколога, который учитывает хронические заболевания, особенности организма, степень интоксикации.
Подробнее можно узнать тут – https://lechenie-alkogolizma-korolev5.ru/lechenie-alkogolizma-anonimno-v-koroleve/
legitimate canadian online pharmacies: NorthAccess Rx – canadian pharmacy uk delivery
Представленная таблица отражает ключевые направления наблюдения, обеспечивая систематизацию данных. Такой подход позволяет поддерживать высокий уровень контроля и адаптировать программу лечения с учетом динамики состояния.
Исследовать вопрос подробнее – вывод наркологическая клиника в томске
Соблюдение конфиденциальности в клинике «Формула Трезвости» рассматривается как значимый клинический фактор. Наркологическая клиника в Краснодаре выстраивает лечебный процесс без избыточных формальностей, что снижает уровень тревожности и повышает готовность пациента к сотрудничеству с врачом. Практика показывает, что анонимный формат способствует более точному сбору анамнеза и повышает управляемость лечебного процесса.
Изучить вопрос глубже – частная наркологическая клиника краснодар
Your article helped me a lot, is there any more related content? Thanks!
Online medicine home delivery or top online pharmacy india pharmacy website india
https://toolbarqueries.google.gg/url?q=http://globalindiapharmacy.com india online pharmacy and http://ragnarokneon.online/home.php?mod=space&uid=46742 top 10 online pharmacy in india
п»їlegitimate online pharmacies india top 10 online pharmacy in india or indian pharmacy online indian pharmacy paypal
Thanks for the tips you have shared here. Something else I would like to say is that laptop or computer memory requirements generally go up along with other improvements in the technological innovation. For instance, whenever new generations of cpus are brought to the market, there’s usually a similar increase in the size calls for of both the laptop memory plus hard drive space. This is because software program operated by way of these cpus will inevitably surge in power to benefit from the new technological innovation.
Применение подобных таблиц формирует прозрачность терапевтического процесса и помогает специалистам адаптировать стратегию лечения с учетом динамики. Это обеспечивает объективность и последовательность в клинической оценке каждого этапа.
Подробнее – https://narkologicheskaya-klinika-v-penze18.ru/
Профессиональная доставка букетов в Томске радует. Рекомендую!
cvety1tomsk70.ru
https://pawtrustmeds.shop/# Paw Trust Meds
Процедура вывода из запоя проводится опытными наркологами с применением современных протоколов и сертифицированных препаратов. Процесс включает несколько ключевых этапов:
Узнать больше – нарколог вывод из запоя
Такая комплексность делает процесс терапии результативным и снижает риск возврата к алкоголю.
Получить дополнительные сведения – https://lechenie-alkogolizma-tver0.ru/lechenie-alkogolizma-gipnozom-tver/
Наркологическая клиника использует методики, направленные на комплексную оценку состояния пациента. Работа строится на анализе анамнеза, исследовании соматических параметров и определении степени выраженности симптомов. Такой формат создаёт условия для точного подбора терапевтических мер. В клинике применяется непрерывный мониторинг, направленный на своевременное выявление отклонений и корректировку лечебных мероприятий. Благодаря этому достигается высокая стабильность клинического процесса и формируется благоприятная динамика восстановления.
Выяснить больше – http://narkologicheskaya-klinika-v-vdk18.ru
После прохождения курса капельниц пациенты отмечают улучшение сна, исчезновение головной боли, восстановление аппетита и общего самочувствия. При тяжёлых формах зависимости лечение дополняется физиотерапией и психологической помощью.
Изучить вопрос глубже – врач вывод из запоя в пензе
Терапия наркозависимости требует индивидуального подхода, включающего не только устранение физических симптомов, но и работу с психологическими аспектами болезни. В клинике «Новая Эра» во Владимире применяется мультидисциплинарный подход, сочетающий медикаментозную терапию, психотерапию и социальную поддержку.
Получить дополнительную информацию – лечение алкоголизма и наркомании центр в владимире
buy medicines online in india: indian pharmacy – Global India Pharmacy
Метод кодирования
Подробнее – https://kodirovanie-ot-alkogolizma-ehlektrostal6.ru/kodirovka-ot-alkogolya-v-ehlektrostali
В основе работы клиники «ИжТрезвоМед Центр» лежит принцип персонализированной медицины. Это означает, что каждый пациент получает не шаблонное лечение, а тщательно подобранный комплекс процедур, учитывающий его состояние, историю заболевания, уровень мотивации и социальную ситуацию. Такой подход позволяет добиться стабильного результата даже в сложных случаях. Лечение проводится анонимно, без постановки на учёт и разглашения данных, что особенно важно для тех, кто ценит конфиденциальность.
Изучить вопрос глубже – наркологическая клиника
Процедура вывода из запоя проводится только под медицинским наблюдением, так как самостоятельные попытки могут привести к осложнениям — аритмии, судорогам, резкому скачку давления. Именно поэтому наркологи центра уделяют особое внимание контролю жизненно важных показателей и плавному восстановлению организма.
Детальнее – http://vyvod-iz-zapoya-penza18.ru/
В таблице ниже представлены основные группы препаратов, применяемых при выведении из запоя:
Изучить вопрос глубже – вывод из запоя цена
northwest canadian pharmacy: buying drugs from canada – canadian pharmacy meds
world pharmacy india: cheapest online pharmacy india – india online pharmacy
После обращения по телефону или через сайт оператор уточняет адрес, состояние пациента и срочность выезда. Врач прибывает в течение 1–2 часов, а в экстренных случаях — в течение часа. На месте специалист проводит первичный осмотр: измеряет давление, пульс, сатурацию, температуру, уточняет длительность запоя, сопутствующие заболевания, особенности реакции на лекарства.
Исследовать вопрос подробнее – вывод из запоя химки
Современный темп жизни, постоянные стрессы и бытовые трудности всё чаще приводят к тому, что проблема зависимостей становится актуальной для самых разных людей — от молодых специалистов до взрослых, состоявшихся семейных людей. Наркологическая помощь в Домодедово в клинике «РеабилитейшнПро» — это возможность получить профессиональное лечение, консультации и поддержку в любой, даже самой сложной ситуации, без огласки и промедления.
Узнать больше – neotlozhnaya-narkologicheskaya-pomoshch
Такой курс не только очищает организм от токсинов, но и помогает вернуть эмоциональное равновесие. После завершения терапии пациент чувствует себя отдохнувшим, восстанавливает аппетит и сон, уходит тревожность и раздражительность.
Ознакомиться с деталями – вывод из запоя дешево
В «Южном МедКонтроле» лечение зависимостей строится поэтапно, с постепенным восстановлением физиологических функций и эмоциональной устойчивости. Врачи используют современные методы детоксикации, фармакотерапию и психотерапию, которые действуют комплексно. Каждый этап направлен на достижение конкретного результата: очищение организма, снятие симптомов абстиненции, стабилизацию состояния и профилактику срывов.
Выяснить больше – http://narkologicheskaya-clinika-v-rostove19.ru
В практике круглосуточного лечения применяются следующие этапы:
Изучить вопрос глубже – наркологическая клиника стационар краснодар
Медицинское кодирование действует не на симптомы, а на глубинные механизмы зависимости. Оно позволяет не просто временно отказаться от алкоголя, а формирует устойчивое отвращение и помогает преодолеть психологическую тягу. Такой подход снижает риск рецидива, улучшает мотивацию, способствует восстановлению здоровья и психологического баланса. В «Новом Пути» для каждого пациента подбирается индивидуальный метод с учётом анамнеза, возраста, сопутствующих болезней и личных особенностей.
Подробнее тут – https://kodirovanie-ot-alkogolizma-ehlektrostal6.ru/kodirovka-ot-alkogolya-v-ehlektrostali/
Клиника создана как современное пространство для безопасного восстановления. Здесь пациенты получают комплексную помощь в комфортных условиях. Основные преимущества учреждения:
Подробнее – http://narcologicheskaya-clinika-v-rnd19.ru/chastnaya-narkologicheskaya-klinika-rostov-na-donu/
pet drugs online: Paw Trust Meds – pet pharmacy
Наркологическая клиника использует методики, направленные на комплексную оценку состояния пациента. Работа строится на анализе анамнеза, исследовании соматических параметров и определении степени выраженности симптомов. Такой формат создаёт условия для точного подбора терапевтических мер. В клинике применяется непрерывный мониторинг, направленный на своевременное выявление отклонений и корректировку лечебных мероприятий. Благодаря этому достигается высокая стабильность клинического процесса и формируется благоприятная динамика восстановления.
Получить дополнительные сведения – наркологические клиники алкоголизм
Наркологическая клиника во Владимире специализируется на комплексном лечении различных видов зависимостей и обеспечении квалифицированной медицинской помощи пациентам с алкогольной, наркотической и другими видами зависимости. В условиях клиники «Пульс Здоровья» применяется индивидуальный подход, учитывающий особенности организма и психики каждого пациента, что позволяет достигать устойчивых результатов и предотвращать рецидивы.
Ознакомиться с деталями – наркологическая клиника клиника помощь
Детоксикация — ключевой этап лечения, позволяющий безопасно очистить организм от этанола или наркотических веществ. В клинике используются современные инфузионные схемы, направленные на восстановление обмена веществ, работу печени и нервной системы. Ниже представлена таблица с основными видами капельниц и их назначением.
Разобраться лучше – https://narkologicheskaya-klinica-v-astrakhani18.ru/
В основе работы клиники «ИжТрезвоМед Центр» лежит принцип персонализированной медицины. Это означает, что каждый пациент получает не шаблонное лечение, а тщательно подобранный комплекс процедур, учитывающий его состояние, историю заболевания, уровень мотивации и социальную ситуацию. Такой подход позволяет добиться стабильного результата даже в сложных случаях. Лечение проводится анонимно, без постановки на учёт и разглашения данных, что особенно важно для тех, кто ценит конфиденциальность.
Изучить вопрос глубже – https://narkologicheskaya-klinika-v-izhevske18.ru/narkologicheskaya-klinika-izhevsk-otzyvy/
Мы не используем шаблон «на всех». Темп и сочетания зависят от давления, пульса, выраженности тошноты и тремора, уровня тревоги, сопутствующих диагнозов и лекарств, уже попавших в организм. Детокс — это система шагов: допуск к терапии, коррекция воды и электролитов, поддержка печени, вегетостабилизация, осторожная работа со сном по показаниям, профилактика осложнений. Любое назначение проговаривается простым языком: зачем, как подействует, что считать нормальной динамикой, а что — поводом связаться с врачом.
Выяснить больше – капельница от запоя отзывы
Наркологическая клиника в клинике в Астрахани предоставляет помощь пациентам, сталкивающимся с различными формами зависимости — алкогольной, наркотической, лекарственной. Основой терапии является комплексный подход, включающий медицинскую детоксикацию, стабилизацию состояния, психотерапию и последующее наблюдение. Такой формат работы позволяет мягко купировать острые симптомы, восстановить физиологические функции и подготовить пациента к длительной реабилитации. Все процедуры проводятся анонимно, с использованием сертифицированных препаратов и с постоянным контролем врача.
Получить больше информации – наркологическая клиника нарколог
Круглосуточный режим работы в клинике «Северный Вектор» обусловлен спецификой течения зависимостей, при которых ухудшение состояния может происходить внезапно. Наркологическая клиника в Ростове-на-Дону обеспечивает постоянную готовность медицинского персонала к приёму пациентов, что позволяет сократить время между возникновением симптомов и началом лечения. Такой подход снижает риск осложнений и повышает клиническую безопасность.
Получить дополнительные сведения – https://narkologicheskaya-klinika-v-rostove19.ru/
Детоксикация является важнейшим этапом лечения. В «Ижевском Центре Трезвых Решений» применяются проверенные схемы инфузионной терапии, помогающие восстановить функции организма после интоксикации. Капельницы подбираются индивидуально в зависимости от состояния пациента и выраженности симптомов. Ниже приведена таблица с типами капельниц, применяемых в клинике.
Разобраться лучше – вывод наркологическая клиника
Наркологическая клиника — это не просто медицинское учреждение, а пространство, где пациент получает всестороннюю поддержку: от снятия интоксикации и детоксикации до психотерапии и постлечебного сопровождения. В клинике «КемероваМед Трезвость» специалисты работают с любыми формами зависимостей — алкогольной, наркотической, медикаментозной. Принципы работы центра основаны на анонимности, профессионализме и индивидуальном подходе. Здесь создаются условия для полного восстановления здоровья и возвращения человека к стабильной трезвой жизни.
Получить дополнительную информацию – наркологическая клиника стационар в кемерове
Такая структура терапии обеспечивает контроль на всех стадиях и помогает добиться устойчивого результата без вреда для здоровья. Пациент получает не просто временное облегчение, а полное восстановление физического и эмоционального состояния.
Получить больше информации – http://narkologicheskaya-klinika-v-astrakhani18.ru/narkologi-astrakhan/
Перед кодированием важно снять острую интоксикацию и стабилизировать состояние. В «Орион-Клиник» пациенту проводят курс инфузионной терапии: капельницы с регидратационными растворами, гепатопротекторами и витаминно-минеральными комплексами. Это позволяет восстановить водно-электролитный баланс, поддержать функции печени и почек, нормализовать артериальное давление и работу сердца. Одновременно психолог проводит предварительные беседы для выяснения причин зависимости, уровня тревожности и мотивации. Подготовительный этап длится от одного до трёх дней в зависимости от тяжести состояния и поможет снизить риск побочных эффектов при введении кодирующего препарата.
Разобраться лучше – anonimnoe kodirovanie ot alkogolizma
Содержание процедуры
Ознакомиться с деталями – https://vyvod-iz-zapoya-shchelkovo6.ru/vyvod-iz-zapoya-nedorogo-v-shchelkovo
Наркологическая клиника — это не просто медицинское учреждение, а пространство, где человеку помогают вернуть здоровье, ясность мышления и контроль над жизнью. В клинике «КаспийМед Альтернатива» в Астрахани круглосуточно оказывается помощь людям, столкнувшимся с алкогольной, наркотической и смешанной зависимостью. Центр сочетает медицинскую строгость и человеческое участие, обеспечивая лечение в комфортных условиях с максимальной конфиденциальностью. Здесь разработаны программы детоксикации, восстановления и психотерапевтической поддержки, что делает терапию эффективной и безопасной.
Получить дополнительную информацию – https://narkologicheskaya-klinica-v-astrakhani18.ru/narkologi-astrakhan
Проблемы с алкоголем и наркотиками — это не просто личные трудности, а серьёзное испытание для всей семьи и общества. Самостоятельные попытки справиться с зависимостью редко приводят к успеху и часто только усугубляют ситуацию. Оптимальное решение — обратиться за профессиональной помощью в специализированное учреждение. В наркологической клинике «ВитаРеабилит» в Подольске пациенты получают комплексное лечение под контролем опытных врачей, современные методики детоксикации и реабилитации, а также полную поддержку на всех этапах выздоровления.
Получить больше информации – наркологическая клиника телефон
Каждый из представленных элементов формирует устойчивую основу для дальнейшей работы и задаёт необходимый уровень контроля. Структура вмешательств адаптируется под особенности конкретного случая, что укрепляет эффективность процесса и создаёт благоприятные условия для стабилизации.
Изучить вопрос глубже – наркологическая клиника наркологический центр пенза
Наркологическая клиника применяет стандартизированные схемы, направленные на безопасное и постепенное восстановление. Каждый этап вмешательства согласуется с текущим состоянием пациента, что обеспечивает предсказуемый характер изменений. Модель работы включает оценку реакции организма, проверку устойчивости внутренних систем и уточнение динамики метаболических процессов. Последовательность действий формируется с учётом адаптационных возможностей и направлена на достижение стабильного результата.
Разобраться лучше – наркологическая клиника лечение алкоголизма
В рамках лечебного процесса наркологическая клиника задействует структурированные механизмы наблюдения, включающие анализ лабораторных показателей, оценку соматического тонуса и изучение активности нервной системы. Эти элементы обеспечивают комплексность работы и позволяют своевременно корректировать план лечения. Такая система предотвращает перегрузку организма и способствует поддержанию стабильности на фоне применения медикаментозных схем. Ниже представлены ключевые составляющие терапевтического процесса, формирующие основу для клинического восстановления.
Подробнее – наркологическая клиника лечение алкоголизма
В рамках анонимного лечения особое внимание уделяется следующим аспектам медицинской организации:
Получить больше информации – вывод наркологическая клиника краснодар
В клинике «РеабилитейшнПро» применяется комплексный и современный подход к оказанию наркологической помощи. Команда опытных врачей-наркологов, психотерапевтов и медицинских сестёр работает круглосуточно, чтобы оперативно реагировать на обращения пациентов, независимо от времени суток и сложности состояния. Каждый случай рассматривается индивидуально, что позволяет подобрать максимально эффективную схему терапии с учётом особенностей организма, стадии зависимости и сопутствующих заболеваний.
Углубиться в тему – http://narkologicheskaya-pomoshch-domodedovo6.ru
pharmacies in canada that ship to the us or canadian pharmacy king reviews canada ed drugs
https://maps.google.com.jm/url?q=https://northaccessrx.shop canadian pharmacy or http://www.zgbbs.org/space-uid-226337.html pharmacy canadian superstore
legitimate canadian mail order pharmacy safe reliable canadian pharmacy or canada pharmacy world canadian pharmacy victoza
Анонимность — один из ключевых принципов работы клиники «Северная Звезда». Все обращения регистрируются под кодовым номером, без упоминания фамилии и контактных данных в базе данных, доступ к которой имеют только прямые исполнители процедур. Круглосуточная линия позволяет связаться со специалистом в любой момент: ночью, в праздники или выходные. Вызов врача на дом возможен в любой час, без предварительной записи, а при необходимости пациент может быть госпитализирован в отдельное крыло клиники с минимальным контактом с другими посетителями.
Детальнее – http://lechenie-alkogolizma-arkhangelsk0.ru/lechenie-khronicheskogo-alkogolizma-arkhangelsk/
Вывод из запоя требует комплексного контроля всех физиологических параметров. Ниже представлены основные направления наблюдения, формирующие структуру оценки состояния.
Выяснить больше – наркология вывод из запоя в ижевске
Процесс лечения проходит поэтапно. Каждый шаг направлен на снятие интоксикации, стабилизацию состояния и нормализацию обменных процессов. В таблице приведены основные этапы и процедуры, применяемые в клинике «ПензаМед Трезвость».
Подробнее – вывод из запоя клиника в пензе
pet meds official website and online vet pharmacy pet drugs online
http://privatelink.de/?https://pawtrustmeds.com/ pet med and https://exhibitioncourthotel4.co.uk/user-2/pgndcqikel/?um_action=edit online vet pharmacy
pet meds official website pet prescriptions online and vet pharmacy online pet med
После прохождения курса капельниц пациенты отмечают улучшение сна, исчезновение головной боли, восстановление аппетита и общего самочувствия. При тяжёлых формах зависимости лечение дополняется физиотерапией и психологической помощью.
Ознакомиться с деталями – http://vyvod-iz-zapoya-penza18.ru/vyvedenie-iz-zapoya-na-domu-penza/
canadian compounding pharmacy: NorthAccess Rx – canada drugs online reviews
canadapharmacyonline legit: NorthAccess Rx – canadianpharmacyworld com
I truly appreciate this post. I have been looking everywhere for this! Thank goodness I found it on Bing. You have made my day! Thx again
Есть ситуации, когда дальнейшее промедление может привести к необратимым последствиям:
Подробнее можно узнать тут – клиника лечения алкоголизма
В клинике каждому пациенту уделяют особое внимание. Врачи знают: универсальных решений нет, за каждым случаем — своя история и свои причины. Первый контакт начинается с конфиденциальной консультации. Можно просто позвонить или написать онлайн — уже на этом этапе врач поможет оценить ситуацию, объяснит возможные этапы и даст рекомендации по подготовке к визиту.
Подробнее тут – медицинское лечение алкоголизма
Наркологическая клиника — это не только место оказания медицинской помощи, но и пространство для восстановления физического и психологического равновесия. В клинике «ЮгМедТрезвость» реализуется принцип анонимного, профессионального и безопасного лечения зависимостей. Каждый пациент получает индивидуальный подход: от выезда врача на дом до прохождения полноценного курса терапии в стационаре. Основная цель — стабилизировать состояние, снять интоксикацию и запустить процесс восстановления без стресса и давления.
Получить дополнительные сведения – http://narkologicheskaya-klinika-v-krd19.ru/narkolog-krasnodar-anonimno/
Часто предприниматели объединяют понятия тендер и госзакупки, так как обе процедуры связаны с конкурсным выбором поставщика. Однако между ними существуют определённые различия, которые важно понимать перед началом работы в этой сфере.
Все ответы на ваши вопросы – тендерное сопровождение под ключ
Процесс лечения алкоголизма в Твери строится поэтапно, что позволяет пациентам постепенно проходить все стадии выздоровления.
Углубиться в тему – лечение алкоголизма тверь
Эти этапы позволяют не только физически восстановиться, но и осознать важность трезвого образа жизни. Комбинация медицинских и психотерапевтических методов делает лечение устойчивым, предотвращая рецидивы даже при длительных формах зависимости.
Выяснить больше – наркологическая клиника наркологический центр
Такой подход обеспечивает не только устранение симптомов зависимости, но и глубокое восстановление личности. Пациенты получают поддержку врачей на каждом этапе, что делает процесс безопасным и контролируемым.
Подробнее можно узнать тут – наркологическая клиника нарколог
Лечение в круглосуточном режиме рассматривается как непрерывный медицинский процесс, а не как разовое вмешательство. Даже при экстренном обращении терапия выстраивается последовательно, с обязательным врачебным наблюдением и оценкой динамики состояния пациента.
Подробнее – http://narcologicheskaya-klinika-v-krd19.ru/narkolog-krasnodar-anonimno/
Психотерапия во Владимире в клинике «Новая Эра» проводится высококвалифицированными специалистами с большим опытом работы в сфере зависимостей.
Разобраться лучше – лечение наркомании на дому в владимире
Эта статья погружает вас в увлекательный мир знаний, где каждый факт становится открытием. Мы расскажем о ключевых исторических поворотных моментах и научных прорывах, которые изменили ход цивилизации. Поймите, как прошлое формирует настоящее и как его уроки могут помочь нам строить будущее.
Исследовать вопрос подробнее – https://projectojava.org/pt/noticias/item/pan-oeste
Вывод из запоя в клинике формируется на основе последовательных процедур, направленных на стабилизацию физиологических функций и устранение токсических влияний. Такой подход позволяет корректно регулировать состояние пациента и контролировать интенсивность симптомов. Рабочие алгоритмы включают оценку метаболических процессов, анализ соматических показателей и определение степени неврологических изменений. В результате создается структурированная модель помощи, ориентированная на восстановление адаптивных возможностей организма. Процессы выполняются под контролем специалистов, что обеспечивает прогнозируемый терапевтический эффект и снижает вероятность осложнений.
Получить дополнительные сведения – http://vyvod-iz-zapoya-kemerovo18.ru
reputable indian pharmacies: Global India Pharmacy – п»їlegitimate online pharmacies india
Вывод из запоя — это медицинская процедура, направленная на устранение интоксикации организма, вызванной длительным употреблением алкоголя. В клинике «ПензаМед Трезвость» помощь оказывается профессионально и конфиденциально: пациенты могут получить лечение как в стационаре, так и на дому. Процесс включает использование капельниц, медикаментозную терапию, психоэмоциональную поддержку и последующую реабилитацию. Врачи наркологического центра обладают большим опытом работы и обеспечивают круглосуточную помощь без постановки на учёт, что особенно важно для тех, кто хочет сохранить анонимность и быстро вернуться к нормальному состоянию.
Выяснить больше – https://vyvod-iz-zapoya-penza18.ru
canada pharmacy world: NorthAccess Rx – cheap canadian pharmacy
Программы лечения выстраиваются гибко: можно начать с домашнего вызова врача и продолжить терапию в клинике, либо пройти весь курс стационарно с круглосуточным наблюдением. Главный принцип — безопасность, эффективность и уважение к личности пациента.
Ознакомиться с деталями – http://www.domen.ru
Этот документ охватывает важные аспекты медицинской науки, сосредотачиваясь на ключевых вопросах, касающихся здоровья населения. Мы рассматриваем свежие исследования, клинические рекомендации и лучшие практики, которые помогут улучшить качество лечения и профилактики заболеваний. Читатели получат возможность углубиться в различные медицинские дисциплины.
Получить дополнительную информацию – https://owen.ru/forum/group.php?gmid=7697&do=discuss#gmessage7697
Вывод из запоя в клинике формируется на основе последовательных процедур, направленных на стабилизацию физиологических функций и устранение токсических влияний. Такой подход позволяет корректно регулировать состояние пациента и контролировать интенсивность симптомов. Рабочие алгоритмы включают оценку метаболических процессов, анализ соматических показателей и определение степени неврологических изменений. В результате создается структурированная модель помощи, ориентированная на восстановление адаптивных возможностей организма. Процессы выполняются под контролем специалистов, что обеспечивает прогнозируемый терапевтический эффект и снижает вероятность осложнений.
Исследовать вопрос подробнее – вывод из запоя цена в кемерове
В Краснодаре клиника «КубаньТрезвость» работает по принципу непрерывного наблюдения — помощь оказывается 24 часа в сутки. Независимо от степени тяжести запоя, нарколог оценивает состояние пациента, подбирает схему лечения и контролирует динамику восстановления. При лёгкой форме запоя допускается проведение детоксикации на дому, однако при выраженной интоксикации рекомендуется госпитализация. Врачи применяют безопасные препараты, позволяющие быстро стабилизировать давление, снять тревогу и улучшить сон.
Подробнее – вывод из запоя на дому цена
Этот обзор предлагает структурированное изложение информации по актуальным вопросам. Материал подан так, чтобы даже новичок мог быстро освоиться в теме и начать использовать полученные знания в практике.
Получить дополнительные сведения – https://www.zeno-watch.com/hello-world
«Чистая Гармония» — это выездная и стационарная наркологическая помощь в одном маршруте: оперативный приезд врача на дом по Клину и району, аккуратный детокс с контролем жизненно важных показателей, стационар с круглосуточным наблюдением и подготовка к кодированию. Мы придерживаемся принципа клинической достаточности: никаких лишних процедур ради «видимости лечения» и никаких задержек с тем, что влияет на исход. Каждое назначение объясняем простыми словами, заранее согласуем смету и оставляем понятный план на 24–48 часов и первую неделю. Анонимность — базовый стандарт: выезд без опознавательных знаков, нейтральные формулировки в документах по запросу, ограниченный доступ к данным.
Получить дополнительные сведения – narkologicheskaya-klinika-v-klinu
Таблица: Основные признаки надёжного центра лечения наркомании
Получить дополнительные сведения – лечение наркомании мурманск.
В Краснодаре клиника «КубаньТрезвость» работает по принципу непрерывного наблюдения — помощь оказывается 24 часа в сутки. Независимо от степени тяжести запоя, нарколог оценивает состояние пациента, подбирает схему лечения и контролирует динамику восстановления. При лёгкой форме запоя допускается проведение детоксикации на дому, однако при выраженной интоксикации рекомендуется госпитализация. Врачи применяют безопасные препараты, позволяющие быстро стабилизировать давление, снять тревогу и улучшить сон.
Разобраться лучше – вывод из запоя вызов на дом в краснодаре
canadian online drugstore: best rated canadian pharmacy – canadian pharmacy drugs online
Эта статья предлагает уникальную подборку занимательных фактов и необычных историй, которые вы, возможно, не знали. Мы постараемся вдохновить ваше воображение и разнообразить ваш кругозор, погружая вас в мир, полный интересных открытий. Читайте и открывайте для себя новое!
Углубить понимание вопроса – https://www.taylordentist.com/the-process-involved-in-sealing-teeth
Диагностические данные формируют основу для дальнейших лечебных решений, от объёма инфузии до подбора поддерживающих препаратов.
Подробнее можно узнать тут – вывод из запоя в стационаре в астрахани
Такой подход позволяет наркологической клинике в Ростове-на-Дону выстраивать лечение в безопасных и психологически комфортных условиях.
Получить дополнительные сведения – http://narkologicheskaya-klinika-v-rostove19.ru/chastnaya-narkologicheskaya-klinika-rostov-na-donu/
Мы собрали для вас самые захватывающие факты из мира науки и истории. От малознакомых деталей до грандиозных событий — эта статья расширит ваш кругозор и подарит новое понимание того, как устроен наш мир.
Подробности по ссылке – https://miniwanderlustteam.com/most-authentic-villages-in-andalusia
Наркологическая клиника — это не просто медицинское учреждение, а пространство, где человеку помогают вернуть здоровье, ясность мышления и контроль над жизнью. В клинике «КаспийМед Альтернатива» в Астрахани круглосуточно оказывается помощь людям, столкнувшимся с алкогольной, наркотической и смешанной зависимостью. Центр сочетает медицинскую строгость и человеческое участие, обеспечивая лечение в комфортных условиях с максимальной конфиденциальностью. Здесь разработаны программы детоксикации, восстановления и психотерапевтической поддержки, что делает терапию эффективной и безопасной.
Подробнее тут – http://narkologicheskaya-klinica-v-astrakhani18.ru/narkologi-astrakhan/
Алкоголизм — это не просто вредная привычка или “слабость характера”. Это тяжёлое хроническое заболевание, способное разрушить здоровье, психику, семью, карьеру. На первых порах зависимость подкрадывается незаметно: человек пьёт “по случаю”, для снятия усталости, ради компании. Но постепенно спиртное становится единственным способом отвлечься, расслабиться, уйти от тревог и проблем. Со временем самоконтроль ослабевает, периоды трезвости укорачиваются, а любые попытки “перестать пить” заканчиваются тяжёлым абстинентным синдромом, бессонницей, раздражительностью, головными болями и срывами. В такой ситуации никакие уговоры и угрозы не работают. Необходима профессиональная, комплексная медицинская помощь — именно такую поддержку с максимальной анонимностью и уважением к пациенту предлагает наркологическая клиника «Новая Точка» в Королёве.
Получить больше информации – http://lechenie-alkogolizma-korolev5.ru/
Понимание того, какие учреждения действительно способны помочь, позволяет избежать ошибок и не тратить время на неэффективные попытки лечения. Ключевыми признаками являются наличие медицинской лицензии, опытные специалисты, прозрачные условия и отзывы пациентов.
Углубиться в тему – http://narkologicheskaya-pomoshh-arkhangelsk0.ru
canadian pharmacy drugs online and canadian pharmacy 24h com safe canadian pharmacy prices
http://w.zuzuche.com/error.php?msg=192.168.0.22::+Read+timed+out+after+reading+0+bytes,+waited+for+30.000000+seconds&url=http://northaccessrx.com://northaccessrx.com canada pharmacy online legit and https://forum.expert-watch.com/index.php?action=profile;u=640439 legit canadian online pharmacy
recommended canadian pharmacies canada pharmacy online legit and vipps canadian pharmacy safe reliable canadian pharmacy
В клинике применяется широкий спектр методик, которые помогают воздействовать на проблему зависимости всесторонне.
Разобраться лучше – наркологическая клиника лечение алкоголизма
Критерий
Углубиться в тему – http://narkologicheskaya-klinika-murmansk0.ru
https://globalindiapharmacy.com/# Global India Pharmacy
Когда клиника далеко, время позднее или важна конфиденциальность, помощь на дому позволяет начать лечение немедленно и в комфортной обстановке. Ниже — типичные ситуации, когда визит нарколога на дом особенно уместен.
Получить дополнительную информацию – http://narkolog-na-dom-serpuhov6.ru/vyzov-narkologa-na-dom-v-serpuhove/https://narkolog-na-dom-serpuhov6.ru
Терапия наркозависимости требует индивидуального подхода, включающего не только устранение физических симптомов, но и работу с психологическими аспектами болезни. В клинике «Новая Эра» во Владимире применяется мультидисциплинарный подход, сочетающий медикаментозную терапию, психотерапию и социальную поддержку.
Изучить вопрос глубже – https://lechenie-narkomanii-vladimir0.ru/lechenie-narkozavisimosti-vo-vladimire/
Мы собрали для вас самые захватывающие факты из мира науки и истории. От малознакомых деталей до грандиозных событий — эта статья расширит ваш кругозор и подарит новое понимание того, как устроен наш мир.
Получить больше информации – https://clenta.com/top-reading-rooms-in-kochi
Мы собрали для вас самые захватывающие факты из мира науки и истории. От малознакомых деталей до грандиозных событий — эта статья расширит ваш кругозор и подарит новое понимание того, как устроен наш мир.
Хочешь знать всё? – https://www.boxinginsider.com/headlines/gervonta-davis-reportedly-set-to-fight-frank-martin
Коммерческий и государственный тендер — это конкурентная процедура выбора поставщика товаров или оказания услуг. Заказчик размещает требования, а компании подают заявки и участвуют в торгах.
Узнайте, как это работает – тендерное сопровождение закупок
Для жителей Ростова-на-Дону клиника «Южный МедКонтроль» предлагает два формата помощи: лечение в стационаре и амбулаторные визиты врача на дом. Стационар оборудован всем необходимым для круглосуточного медицинского наблюдения, проведения инфузионных процедур и лабораторной диагностики. Пациентам предоставляется комфортное размещение, спокойная обстановка и постоянный контроль состояния. При выезде на дом врачи действуют оперативно — приезжают в течение часа, проводят осмотр, устанавливают капельницы, купируют абстиненцию и дают рекомендации по дальнейшему лечению.
Получить дополнительную информацию – наркологическая клиника стационар
Описание
Получить дополнительную информацию – https://vyvod-iz-zapoya-odincovo6.ru/vyvod-iz-zapoya-na-domu-v-odincovo/
Такой курс не только очищает организм от токсинов, но и помогает вернуть эмоциональное равновесие. После завершения терапии пациент чувствует себя отдохнувшим, восстанавливает аппетит и сон, уходит тревожность и раздражительность.
Углубиться в тему – https://vyvod-iz-zapoya-v-krasnodare19.ru/vykhod-iz-zapoya-krasnodar
alpha dentalsolutions
Этот интересный отчет представляет собой сборник полезных фактов, касающихся актуальных тем. Мы проанализируем данные, чтобы вы могли сделать обоснованные выводы. Читайте, чтобы узнать больше о последних трендах и значимых событиях!
Уточнить детали – https://trekpulse.shop/luxury-cruise-ship-suites-lavish-accommodations-for-vip-guests
pet drugs online: pet meds online – Paw Trust Meds
Домашний формат подходит, когда обстановка позволяет лечиться в тишине, а клинические риски контролируемы. Врач «Чистой Гармонии» приезжает без опознавательных знаков, осматривает пациента, сверяет совместимости с уже принятыми препаратами, объясняет ожидаемую динамику. Инфузионная терапия строится без «универсальных коктейлей»: состав и темп зависят от давления, частоты пульса, выраженности тремора, тошноты, тревоги, сопутствующих диагнозов. В конце визита семья получает письменную памятку на 24–48 часов и прямой канал связи с дежурным специалистом. Такой подход убирает хаос из первых суток и помогает провести ночь спокойно, без «качелей».
Исследовать вопрос подробнее – круглосуточная наркологическая клиника
«Трезвый Компас» — выездная и стационарная наркологическая служба, которая проводит профессиональный детокс с капельницей от запоя в Клину и районе круглосуточно. Мы приезжаем анонимно, начинаем с очной оценки, согласуем допуск к терапии, подбираем состав инфузии без «универсальных коктейлей» и объясняем простым языком, чего ждать в ближайшие часы. Цель — снять интоксикацию и абстиненцию, поддержать сердце и нервную систему, аккуратно наладить сон по показаниям и дать семье понятный план на 24–48 часов. Если риски высокие или дома невозможно обеспечить безопасную ночь, предложим стационар с круглосуточным наблюдением.
Узнать больше – kapelnica-ot-zapoya-na-domu-klinika
В этом обзорном материале представлены увлекательные детали, которые находят отражение в различных аспектах жизни. Мы исследуем непонятные и интересные моменты, позволяя читателю увидеть картину целиком. Погрузитесь в мир знаний и удивительных открытий!
Детальнее – https://www.ikhouvanbeauty.nl/2020/10/25/de-trend-van-deze-herfst-parelkettingen
Запой — это не один симптом. Это сдвиг водно-электролитного баланса, скачки давления и пульса, тремор, тошнота, тревога, бессонница, нередко раздражение слизистой желудка и нагрузка на печень. Мы работаем последовательностью: допуск к терапии, инфузионная поддержка с коррекцией воды и электролитов, защита органов-мишеней, симптом-контроль, при необходимости аккуратная нормализация сна, переоценка и перевод на пероральные схемы, затем — поведенческий контур «тихих» дней и, при информированном согласии, подготовка к кодированию. Это не «коктейль на всех», а управляемый процесс, завязанный на объективные показатели и живую динамику.
Получить дополнительную информацию – https://narkologicheskaya-klinika-ivanteevka8.ru/
Кодирование основано на блокировке механизмов зависимости на биохимическом и поведенческом уровнях. Медикаментозные методы включают введение препаратов пролонгированного действия, которые нарушают метаболизм этанола: при попытке выпить даже небольшую дозу алкоголь вызывает выражённые неприятные реакции, что психологически отвращает от новой пробы спиртного. Психотерапевтические техники, такие как гипноз или метод Довженко, направлены на переустановку подсознательных программ, удаление эмоционального влечения к алкоголю и укрепление мотивации к здоровому образу жизни. Аппаратные методики (электроимпульсная стимуляция, транскраниальная микрополяризация) воздействуют на нейроны, участвующие в развитии зависимости, снижая их активность и уменьшая физиологический дискомфорт. В «Орион-Клиник» часто используют комбинированные программы: сначала проводится детоксикация организма, затем вводится медикаментозное средство, после чего реализуется психотерапевтический блок влияния на подсознание.
Углубиться в тему – https://kodirovanie-ot-alkogolizma-pushkino4.ru/kodirovanie-ot-alkogolizma-na-domu-v-pushkino
canadian pharmacy 24 com or canadian pharmacy 24 com prescription drugs canada buy online
https://secure.spicecash.com/hosted_sssh_galleries/3/imagepages/image9.htm?link=https://northaccessrx.com reputable canadian online pharmacy or https://4k-porn-video.com/user/yfsimkubfc/ online canadian pharmacy
canadian online pharmacy adderall canadian pharmacy and is canadian pharmacy legit canada drugs online reviews
Есть ситуации, когда дальнейшее промедление может привести к необратимым последствиям:
Исследовать вопрос подробнее – lechenie-alkogolizma-korolev5.ru/
Проблемы с алкоголем и наркотиками — это не просто личные трудности, а серьёзное испытание для всей семьи и общества. Самостоятельные попытки справиться с зависимостью редко приводят к успеху и часто только усугубляют ситуацию. Оптимальное решение — обратиться за профессиональной помощью в специализированное учреждение. В наркологической клинике «ВитаРеабилит» в Подольске пациенты получают комплексное лечение под контролем опытных врачей, современные методики детоксикации и реабилитации, а также полную поддержку на всех этапах выздоровления.
Изучить вопрос глубже – наркологическая клиника сайт
Global India Pharmacy: Global India Pharmacy – Global India Pharmacy
С первого звонка администратор бережно собирает фактуру: сколько длится эпизод, что человек уже принимал за последние двое суток, как прошла ночь, есть ли помощник на вечер и ночь, какие хронические заболевания и аллергии известны. Дежурный врач оценивает риски и предлагает старт: анонимный визит на дом по Клину или немедленную госпитализацию. На месте проводится очная оценка и допуск к терапии, запускается инфузионная поддержка с мониторингом давления, пульса и сатурации, корректируется вода и электролиты, по показаниям — осторожная нормализация сна и симптом-контроль. Если картина нестабильна, переводим в стационар — это короче путь к безопасности, чем многочасовые попытки «пересидеть» дома.
Получить дополнительные сведения – наркологическая клиника клинский район московская московская область
vet pharmacy or vet pharmacy online pet meds official website
http://pornorasskazy.com/forum/away.php?s=https://pawtrustmeds.com pet drugs online or http://fog.gain.tw/space.php?uid=192048 pet rx
dog medicine vet pharmacy online or pet rx pet meds official website
Такой курс не только очищает организм от токсинов, но и помогает вернуть эмоциональное равновесие. После завершения терапии пациент чувствует себя отдохнувшим, восстанавливает аппетит и сон, уходит тревожность и раздражительность.
Разобраться лучше – врач вывод из запоя
Процесс терапии в клинике построен по поэтапной схеме, включающей:
Получить дополнительные сведения – лечение алкоголизма архангельск
Врачи клиники используют современные методики, сочетающие медикаментозную терапию, психотерапию и физиологическое восстановление. Основное внимание уделяется не только физическому очищению организма, но и устранению причин, провоцирующих зависимость. Благодаря постоянному мониторингу жизненных показателей и корректировке схемы лечения удаётся избежать осложнений и обеспечить безопасное восстановление.
Подробнее тут – вывод наркологическая клиника в краснодаре
vet pharmacy: Paw Trust Meds – dog prescriptions online
pet meds online: best pet rx – dog prescriptions online
После поступления вызова диспетчер передаёт заявку на смартфон врача, который оперативно завершает подготовительные мероприятия и выезжает к пациенту. На дороге применяется GPS-маршрутизация для выбора оптимального пути и снижения времени в пути.
Исследовать вопрос подробнее – наркологическая клиника в архангельске
Как подчёркивает заведующий отделением наркологической помощи НМИЦ психиатрии и наркологии, результат лечения напрямую зависит от уровня подготовки персонала и умения работать в команде.
Подробнее можно узнать тут – частная наркологическая клиника в мурманске
https://globalindiapharmacy.shop/# top online pharmacy india
Гранитные памятники https://allgranit.ru от производителя в Москве: надёжность и красота на века. Компания Allgranit предлагает гранитные памятники напрямую от производителя — без посредников, переплат и долгих ожиданий. Мы создаём мемориалы, которые сохраняют память о дорогих людях на долгие годы.
В зависимости от тяжести состояния и наличия осложнений клиника «Спасение Плюс» предлагает:
Детальнее – anonimnyj-vyvod-iz-zapoya
Paw Trust Meds: pet pharmacy – Paw Trust Meds
Медицинское кодирование действует не на симптомы, а на глубинные механизмы зависимости. Оно позволяет не просто временно отказаться от алкоголя, а формирует устойчивое отвращение и помогает преодолеть психологическую тягу. Такой подход снижает риск рецидива, улучшает мотивацию, способствует восстановлению здоровья и психологического баланса. В «Новом Пути» для каждого пациента подбирается индивидуальный метод с учётом анамнеза, возраста, сопутствующих болезней и личных особенностей.
Подробнее можно узнать тут – https://kodirovanie-ot-alkogolizma-ehlektrostal6.ru/kodirovka-ot-alkogolya-v-ehlektrostali/
Такой подход позволяет наркологической клинике в Ростове-на-Дону выстраивать лечение в безопасных и психологически комфортных условиях.
Подробнее тут – наркологическая клиника клиника помощь ростов-на-дону
Online medicine order: best india pharmacy – Global India Pharmacy
— Растворы с глюкозой и витаминами для коррекции энергетического обмена. — Минеральные комплексы для нормализации электролитов. — Антиоксиданты и гепатопротекторы для защиты печени. — Спазмолитики для снятия болевого синдрома. — Противорвотные препараты при тошноте.
Исследовать вопрос подробнее – наркологическая клиника нарколог архангельск
reputable indian online pharmacy or buy medicines online in india best online pharmacy india
https://cse.google.iq/url?sa=t&url=https://globalindiapharmacy.com best online pharmacy india and http://jonnywalker.net/user/diktcdisbg/ indian pharmacy paypal
online pharmacy india п»їlegitimate online pharmacies india and indian pharmacy online india pharmacy
В зависимости от тяжести состояния подбирается индивидуальная программа детоксикации. В неё входят: — Инфузионная терапия (капельницы) для очищения организма от токсинов; — Поддерживающие препараты для работы сердца, печени, нервной системы; — Симптоматическое лечение (устранение рвоты, судорог, бессонницы); — Витамины и средства для восстановления водно-солевого баланса.
Углубиться в тему – наркологическая клиника врачи
Если пациент находится в остром состоянии — начинается с детоксикации. Это не только капельницы для вывода токсинов и восстановления баланса в организме, но и поддержка работы сердца, печени, почек, купирование тревоги и бессонницы, снятие судорог, коррекция давления. Весь процесс проходит под наблюдением опытного нарколога, который учитывает хронические заболевания, особенности организма, степень интоксикации.
Выяснить больше – https://lechenie-alkogolizma-korolev5.ru/centr-lecheniya-alkogolizma-v-koroleve/
Fantastic items from you, man. I’ve bear in mind your stuff previous to and you are simply too fantastic. I really like what you have got here, certainly like what you’re stating and the best way by which you assert it. You are making it enjoyable and you continue to take care of to keep it sensible. I cant wait to learn far more from you. That is actually a great web site.
Free consultation
https://northaccessrx.com/otc-meds.html# reliable canadian online pharmacy
Нужен ремонт? профессиональный ремонт жилья под ключ, быстро и качественно. Дизайн, отделка, электрика и сантехника. Гарантия на работы и прозрачная смета. Выполняем проекты любой сложности.
Такой курс не только очищает организм от токсинов, но и помогает вернуть эмоциональное равновесие. После завершения терапии пациент чувствует себя отдохнувшим, восстанавливает аппетит и сон, уходит тревожность и раздражительность.
Получить больше информации – скорая вывод из запоя
pharmacy website india: Global India Pharmacy – buy prescription drugs from india
Наркологическая клиника «Южный МедКонтроль» объединяет современные медицинские технологии, опыт специалистов и уважительное отношение к каждому пациенту. Здесь создаются условия для безопасного и результативного лечения зависимостей любой сложности — от алкогольной до полинаркотической. Центр работает в круглосуточном режиме, предлагая выезд врачей на дом, детоксикацию, кодирование и длительные программы реабилитации. Основная цель специалистов — восстановление физического и психологического равновесия человека, возвращение способности к полноценной жизни без зависимости.
Получить больше информации – наркологическая клиника лечение алкоголизма в ростове-на-дону
Описание
Узнать больше – vyvod-iz-zapoya-v-stacionare
Домашняя помощь эффективна, когда пациент контактный, сохранен, способен выполнять назначения и нет признаков высокой угрозы осложнений. Но удобство не должно подменять безопасность. Именно поэтому врач на выезде уточняет длительность употребления, время последнего приёма алкоголя или вещества, выраженность симптомов, хронические заболевания, лекарства, которые человек принимал самостоятельно, и возможные осложнения в прошлом.
Узнать больше – http://narkolog-na-dom-pushkino12.ru
Такая структура терапии обеспечивает контроль на всех стадиях и помогает добиться устойчивого результата без вреда для здоровья. Пациент получает не просто временное облегчение, а полное восстановление физического и эмоционального состояния.
Подробнее тут – https://narkologicheskaya-klinika-v-astrakhani18.ru/narkologiya-astrakhan-adres
Помимо медицинских процедур, клиника делает акцент на психологической поддержке и постлечебной адаптации. Пациентам помогают не только избавиться от физической зависимости, но и сформировать устойчивую мотивацию к трезвости, восстановить интерес к жизни и наладить отношения с близкими. Это достигается за счёт участия психологов, психотерапевтов и специалистов по социальной реабилитации.
Подробнее – http://narkologicheskaya-klinika-v-izhevske18.ru/narkologi-izhevsk-czeny/
Такая таблица позволяет систематизировать данные наблюдения и поддерживать единый подход к интерпретации результатов. Это повышает прозрачность процесса и делает оценку состояния объективной вне зависимости от длительности лечения.
Выяснить больше – частная наркологическая клиника в пензе
Наркологическая клиника — это не просто медицинское учреждение, а пространство, где пациент получает всестороннюю поддержку: от снятия интоксикации и детоксикации до психотерапии и постлечебного сопровождения. В клинике «КемероваМед Трезвость» специалисты работают с любыми формами зависимостей — алкогольной, наркотической, медикаментозной. Принципы работы центра основаны на анонимности, профессионализме и индивидуальном подходе. Здесь создаются условия для полного восстановления здоровья и возвращения человека к стабильной трезвой жизни.
Углубиться в тему – платная наркологическая клиника кемерово
Лечение зависимости строится поэтапно: диагностика, стабилизация, восстановление сна и эмоциональной устойчивости, работа с тягой и триггерами, профилактика рецидива, сопровождение. У одного человека ведущий фактор — хроническая тревога и бессонница, у другого — стресс и конфликты, у третьего — социальная среда, у четвёртого — сочетание нескольких причин. Поэтому программа должна учитывать реальную жизнь пациента: график работы, семейную ситуацию, уровень поддержки, типичные «точки срыва» и реакции на стресс.
Получить дополнительные сведения – chastnaya-narkologicheskaya-klinika
В клинике «ЮгМед Альянс» выстроена система непрерывного медицинского наблюдения. При поступлении проводится комплексная диагностика, назначается детоксикация и поддерживающая терапия, затем начинается стабилизация физического и эмоционального состояния. Благодаря круглосуточной работе бригад и возможности экстренного выезда на дом пациенты получают помощь без задержек. Конфиденциальность соблюдается на всех уровнях — от первичного звонка до выписки. Для удобства родственников организована система информирования: короткие апдейты по согласованным каналам связи и только в определённое время, чтобы не нарушать покой пациента.
Узнать больше – https://narkologicheskaya-klinika-stavropol0.ru/narkolog-psikholog-stavropol/
Такой подход обеспечивает не только устранение симптомов зависимости, но и глубокое восстановление личности. Пациенты получают поддержку врачей на каждом этапе, что делает процесс безопасным и контролируемым.
Ознакомиться с деталями – https://narcologicheskaya-klinika-v-rostove19.ru/narkologiya-rostov-kruglosutochno
cheapest viagra: CoreBlue Health – order viagra
Коммерческий и государственный тендер — это конкурентная процедура выбора поставщика товаров или оказания услуг. Заказчик размещает требования, а компании подают заявки и участвуют в торгах.
Не упустите важные детали – участие в тендерах госзакупок
https://veritascarepharm.com/# cialis for sale
buy cialis pill cialis for sale VeritasCare
В зависимости от тяжести состояния и наличия осложнений клиника «Спасение Плюс» предлагает:
Ознакомиться с деталями – https://vyvod-iz-zapoya-himki5.ru/anonimnyj-vyvod-iz-zapoya-v-himkah/
Такой подход позволяет наркологической клинике в Ростове-на-Дону выстраивать лечение в безопасных и психологически комфортных условиях.
Подробнее – https://narkologicheskaya-klinika-v-rostove19.ru/chastnaya-narkologicheskaya-klinika-rostov-na-donu/
order viagra: Order Viagra 50 mg online – CoreBlue Health
Наркологическая клиника «Южный МедКонтроль» объединяет современные медицинские технологии, опыт специалистов и уважительное отношение к каждому пациенту. Здесь создаются условия для безопасного и результативного лечения зависимостей любой сложности — от алкогольной до полинаркотической. Центр работает в круглосуточном режиме, предлагая выезд врачей на дом, детоксикацию, кодирование и длительные программы реабилитации. Основная цель специалистов — восстановление физического и психологического равновесия человека, возвращение способности к полноценной жизни без зависимости.
Исследовать вопрос подробнее – https://narkologicheskaya-clinika-v-rostove19.ru/chastnaya-narkologicheskaya-klinika-rostov-na-donu
Врачи клиники «КубаньТрезвость» применяют только безопасные, доказательно эффективные методы очищения организма. Каждый пациент получает персональную схему терапии, включающую капельницы, поддерживающие препараты и восстановительные процедуры. Детоксикация проводится под контролем нарколога, а дозировки медикаментов подбираются индивидуально.
Выяснить больше – вывод из запоя недорого краснодар
http://corebluehealth.com/# CoreBlue Health
step mom
Для жителей Ростова-на-Дону клиника «Южный МедКонтроль» предлагает два формата помощи: лечение в стационаре и амбулаторные визиты врача на дом. Стационар оборудован всем необходимым для круглосуточного медицинского наблюдения, проведения инфузионных процедур и лабораторной диагностики. Пациентам предоставляется комфортное размещение, спокойная обстановка и постоянный контроль состояния. При выезде на дом врачи действуют оперативно — приезжают в течение часа, проводят осмотр, устанавливают капельницы, купируют абстиненцию и дают рекомендации по дальнейшему лечению.
Изучить вопрос глубже – наркологическая клиника
international online pharmacy: CivicMeds – canadian pharmacy no prescription
cialis canada online pharmacy: my canadian pharmacy rx – best value pharmacy
Помощь начинается с первичной оценки. Врач уточняет длительность запоя, время последнего приёма алкоголя, ведущие симптомы, хронические заболевания, прошлые осложнения, аллергии, а также препараты, которые пациент уже принимал самостоятельно. Далее проводится осмотр: измеряются давление и пульс, оценивается дыхание, температура, признаки обезвоживания, уровень сознания, выраженность тремора и тревоги. На основании этой информации выбирается тактика и формат — на дому, амбулаторно или в стационаре, если риски высокие.
Подробнее тут – narkolog vyvod iz zapoya
Вывод из запоя в клинике формируется на основе последовательных процедур, направленных на стабилизацию физиологических функций и устранение токсических влияний. Такой подход позволяет корректно регулировать состояние пациента и контролировать интенсивность симптомов. Рабочие алгоритмы включают оценку метаболических процессов, анализ соматических показателей и определение степени неврологических изменений. В результате создается структурированная модель помощи, ориентированная на восстановление адаптивных возможностей организма. Процессы выполняются под контролем специалистов, что обеспечивает прогнозируемый терапевтический эффект и снижает вероятность осложнений.
Детальнее – вывод из запоя на дому недорого
Оценка клинической картины проводится поэтапно с учетом изменений во времени. Специалисты анализируют эффективность действий, корректируют терапевтические схемы и контролируют уровень безопасности. Такой подход позволяет избегать значительных колебаний в состоянии пациента и поддерживать физиологическую стабильность на протяжении всего курса. Важно, что наблюдение сопровождается применением инструментальных методов, повышающих точность диагностических данных. В результате создается полноценная модель восстановления, в которую включаются фармакологические, поддерживающие и мониторинговые действия. В клинике внимание уделяется не только коррекции нарушений, но и постепенному восстановлению адаптивных функций организма.
Детальнее – запой наркологическая клиника в пензе
Основным инструментом при выведении из запоя является капельница. Её состав зависит от состояния пациента, продолжительности запоя и наличия хронических заболеваний. В клинике «ПензаМед Трезвость» используются только проверенные препараты с минимальной нагрузкой на организм. Ниже приведена таблица с примерами инфузионных растворов и их воздействием.
Получить дополнительные сведения – http://vyvod-iz-zapoya-penza18.ru
Врачи «СтаврМед Центра» работают круглосуточно, обеспечивая выезд нарколога на дом в течение короткого времени. Пациент может получить помощь в привычных условиях, не подвергаясь стрессу, связанному с госпитализацией. Все процедуры проводятся анонимно, с сохранением врачебной тайны. Благодаря такому подходу, лечение становится не только эффективным, но и максимально комфортным для человека, который решил прекратить запой и начать восстановление.
Разобраться лучше – вывод из запоя круглосуточно ставрополь
Чем раньше стартует детокс, тем мягче идёт восстановление. Даже один визит способен перевести состояние из «кризисного» в управляемое, а затем подключается поддержка психолога или амбулаторные встречи для закрепления эффекта.
Получить дополнительную информацию – вызвать нарколога на дом срочно ставрополь
После стабилизации важно закрепить результат. В первые 1–3 дня сохраняются слабость, раздражительность, эмоциональные качели, нарушения сна. Без плана и поддержки многие срываются, потому что пугаются ухудшения вечером или ночью и пытаются снять дискомфорт алкоголем. Поэтому врач даёт рекомендации на ближайшие сутки и несколько дней: как организовать сон, питание, питьевой режим, что контролировать по давлению и пульсу, какие нагрузки исключить и по каким признакам нужно срочно обращаться повторно.
Исследовать вопрос подробнее – https://narkologicheskaya-klinika-zhukovskij12.ru/narkologicheskaya-klinika-otzyvy-v-zhukovskom
Процесс терапии в клинике построен по поэтапной схеме, включающей:
Исследовать вопрос подробнее – http://lechenie-alkogolizma-arkhangelsk0.ru/anonimnoe-lechenie-alkogolizma-arkhangelsk/
На данном этапе врач уточняет, сколько времени продолжается запой, какой тип алкоголя употребляется и имеются ли сопутствующие заболевания. Тщательный анализ этих данных позволяет подобрать оптимальные методы детоксикации и снизить риск осложнений.
Разобраться лучше – частный нарколог на дом в мариуполе
Состав капельниц всегда персонализирован. Мы избегаем полипрагмазии и ориентируемся на симптоматику, сопутствующие заболевания и домашние условия. Ниже — примерная сетка профилей, которую врач на месте адаптирует «под вас».
Разобраться лучше – https://vyvod-iz-zapoya-pervouralsk0.ru/vyvod-iz-zapoya-na-domu-pervouralsk
В этой статье мы рассмотрим ключевые признаки эффективной наркологической помощи в Ярославле — от состава команды до подходов в работе с мотивацией пациента.
Ознакомиться с деталями – http://lechenie-narkomanii-yaroslavl0.ru/czentr-lecheniya-narkomanii-yaroslavl/
Перед началом терапии проводится клиническая оценка, включающая измерение давления, осмотр кожи и глаз, проверку дыхания и анализ неврологического состояния. Вывод из запоя в клинике в Астрахани начинается только после сбора этих данных, поскольку подбор препаратов без диагностики может быть небезопасен.
Разобраться лучше – http://
viagra canada Cheap generic Viagra online viagra canada
Сопровождение банкротства физических лиц — это комплексная юридическая помощь при списании долгов. Переходите по запросу юрист по списанию долгов. Специалист проанализирует ситуацию, подготовит документы, взаимодействует с судом и кредиторами, проконтролирует каждый этап процедуры. Вы снижаете риски ошибок, экономите время и получаете законное освобождение от долгов с защитой своих прав и имущества.
Такой подход позволяет устранить физические последствия запоя и снизить психологическую зависимость. Уже после первой процедуры пациенты отмечают улучшение самочувствия, появление аппетита и нормализацию сна. Важно не ограничиваться только экстренной помощью — специалисты рекомендуют пройти курс восстановления, чтобы предотвратить рецидивы.
Подробнее можно узнать тут – скорая вывод из запоя в владивостоке
На первичном визите врач проводит клиническое интервью, оценивает витальные показатели (АД, ЧСС, SpO2, температура), при показаниях — выполняет портативный ЭКГ-скрининг и экспресс-диагностику. Вместе с пациентом формируется план ближайших 72 часов: режим гидратации, «вечерний ритуал» для сна, правила сенсорной разгрузки, безопасные фразы для общения с близкими, точечная фармакоподдержка и расписание коротких чек-инов.
Получить дополнительную информацию – наркологическая клиника цены петрозаводск
כעובדה שאפשר להמשיך ליהנות. זה היה קצת חלש הפעם, היה יותר כוח לפני זה? שמעתי את השאלה בלעג. נקרע לי דירות דיסקרטיות הוצאתי בפתאומיות את הזין מהכוס וכיוונתי את הראש לכיוון פי הטבעת. לא הבנתי מה אני עושה? כשהתקרב אליה, לא הצליח להוריד את מבטו מפיה הפתוח. והנה היא, מולי. הידיים שלי, בלי הצוות שלי, התחילו לפתוח את הזבוב, ולמשוך את הזין. הראש היה כל כך חם עד https://formebienetre.com/
Проблемы с алкоголем? официальный сайт клиники срочная помощь при алкогольной и наркотической интоксикации. Вывод из запоя, капельницы и поддержка 24/7. Анонимно, быстро и безопасно с выездом врача на дом.
Viagra online price: Viagra online price – CoreBlue Health
Такой подход позволяет устранить физические последствия запоя и снизить психологическую зависимость. Уже после первой процедуры пациенты отмечают улучшение самочувствия, появление аппетита и нормализацию сна. Важно не ограничиваться только экстренной помощью — специалисты рекомендуют пройти курс восстановления, чтобы предотвратить рецидивы.
Углубиться в тему – помощь вывод из запоя владивосток
http://civicmeds.com/# cheapest pharmacy for prescription drugs
northwest pharmacy canada uk pharmacy all med pharmacy
Наркологическая клиника «КаменМед Ренессанс» выстроена как единая система помощи, где медицинская точность, психологическая поддержка и продуманная логистика соединяются в устойчивый маршрут восстановления. Мы работаем с любыми формами химической зависимости — алкогольной, опиоидной, стимуляторной, полизависимостями — и не ограничиваемся «разовыми» процедурами. Наша задача — не просто снять острые симптомы, а наладить ритм сна, снизить реактивную тревогу, сформировать навыки отказа и вернуть управление повседневной жизнью. Для этого используются модульные программы: детокс, стабилизация, психотерапия, семейные мини-сессии, сопровождение и профилактика срывов. Каждый модуль имеет цель, чёткие критерии эффективности и срок переоценки, чтобы прогресс был ощутимым и измеримым.
Подробнее тут – https://narkologicheskaya-klinika-kamensk-uralskij0.ru/
CoreBlue Health: best price for viagra 100mg – CoreBlue Health
Такой подход позволяет устранить физические последствия запоя и снизить психологическую зависимость. Уже после первой процедуры пациенты отмечают улучшение самочувствия, появление аппетита и нормализацию сна. Важно не ограничиваться только экстренной помощью — специалисты рекомендуют пройти курс восстановления, чтобы предотвратить рецидивы.
Выяснить больше – https://vyvodiz-zapoya-vladivostok18.ru/vyvod-iz-zapoya-staczionar-vladivostok/
После поступления вызова диспетчер передаёт заявку на смартфон врача, который оперативно завершает подготовительные мероприятия и выезжает к пациенту. На дороге применяется GPS-маршрутизация для выбора оптимального пути и снижения времени в пути.
Разобраться лучше – http://narkologicheskaya-klinika-arkhangelsk0.ru
В наркологической клинике «Контур Здоровья» вывод из запоя рассматривают как клиническую задачу, а не как разовую услугу. Это означает, что врач сначала оценивает риски и особенности состояния, затем подбирает индивидуальную тактику детоксикации и поддержки, а после стабилизации формирует план на ближайшие часы и дни. Такой подход важен потому, что запой редко заканчивается в момент, когда стало легче после первых процедур. Часто именно вечером или ночью возникает «вторая волна» тревоги и бессонницы, и если у человека нет понятных ориентиров, он возвращается к алкоголю «чтобы отпустило». Поэтому грамотный вывод из запоя — это не только снятие симптомов, но и профилактика повторного витка в самые уязвимые часы.
Изучить вопрос глубже – vyvod-iz-zapoya-klinika
Как отмечает ведущий научный сотрудник ФГБУН «НМИЦ психиатрии и наркологии» Минздрава России, наличие междисциплинарной команды — один из основных факторов, определяющих успех терапии при зависимости.
Получить дополнительные сведения – https://lechenie-narkomanii-murmansk0.ru/lechenie-narkomanii-i-alkogolizma-marmansk
VeritasCare: Generic Tadalafil 20mg price – VeritasCare
Ниже — примерный «каркас» лечения. Он индивидуализируется по клинической картине, сопутствующим болезням, опыту прошлых попыток и бытовым ограничениям. Ключевой принцип — «одно вмешательство: одна цель — один маркер — одна дата проверки».
Узнать больше – наркологические клиники алкоголизм петрозаводск
Лучшее путешествие https://dzhip-tury-krym.ru горы, каньоны и побережье. Увлекательные маршруты, опытные гиды и яркие впечатления от путешествий по Крыму.
Do you trade cryptocurrencies? start trading with bitkelttrade automate your transactions and earn passive income. Smart algorithms analyze the market and help you make decisions. Increase your income and reduce risks with modern technology.
В запое нарушается водно-электролитный баланс, истощаются запасы витаминов и микроэлементов, повышается нагрузка на печень, сердце и сосуды. Нервная система работает в режиме гипервозбудимости: отсюда тремор, тревога, раздражительность, потливость, скачки давления и бессонница. Организм становится чувствительным к любому стрессу — даже обычный разговор или шум могут усиливать тревогу и раздражение. Именно поэтому в лечении важны не только капельницы, но и правильный режим, контроль динамики и снижение «провоцирующих факторов», которые делают состояние хуже.
Углубиться в тему – нарколог вывод из запоя
«Ижевский Центр Трезвых Решений» — это частное медицинское учреждение, где проводится лечение всех форм алкогольной и наркотической зависимости. Программы терапии разработаны на основе международных рекомендаций и включают не только медикаментозное воздействие, но и психологическую поддержку. Все процедуры проходят анонимно, без постановки на учёт, что особенно важно для пациентов, желающих сохранить конфиденциальность.
Подробнее – вывод наркологическая клиника
offshore pharmacy no prescription: CivicMeds – online pharmacy india
Когда запой начинает негативно влиять на здоровье, оперативное лечение становится залогом успешного выздоровления. В Архангельске, Архангельская область, квалифицированные наркологи предоставляют помощь на дому, позволяя быстро провести детоксикацию, восстановить нормальные обменные процессы и стабилизировать работу жизненно важных органов. Такой формат лечения обеспечивает индивидуальный подход, комфортную домашнюю обстановку и полную конфиденциальность, что особенно важно для пациентов, стремящихся к быстрому восстановлению без посещения стационара.
Подробнее можно узнать тут – сколько стоит капельница на дому от запоя в архангельске
Самостоятельные попытки обычно идут по двум сценариям: либо человек продолжает пить «понемногу, чтобы не трясло», либо резко прекращает и пытается «перетерпеть». В первом случае запой растягивается и истощение накапливается: ухудшается сон, растёт нагрузка на сердце и сосуды, усиливается обезвоживание, возрастает риск осложнений. Во втором сценарии симптоматика отмены может нарастать резко: тревога, паника, тремор, потливость, скачки давления, тахикардия, рвота, бессонница. И если рядом нет плана и медицинского контроля, человек пугается и снова начинает пить, потому что это кажется единственным быстрым способом облегчить состояние.
Узнать больше – врач нарколог вывод из запоя
Наркологическая помощь должна быть не только медицински точной, но и человечной, безопасной и анонимной. В «Ижевском Центре Трезвых Решений» выстроена система комплексного подхода к лечению зависимостей, включающая диагностику, медикаментозную детоксикацию, психотерапию и социальную адаптацию. Клиника объединяет профессионализм, заботу и круглосуточную готовность помочь пациентам, оказавшимся в трудной ситуации. Здесь работают врачи с большим опытом в области наркологии и психиатрии, способные оперативно выехать на дом и оказать неотложную помощь.
Разобраться лучше – http://narkologicheskaya-klinika-v-izhevsk18.ru
Для жителей Астрахани доступен выезд нарколога на дом — это востребованная услуга, позволяющая безопасно провести детоксикацию в привычной среде без госпитализации. При тяжёлых формах зависимости рекомендуется стационарное лечение: круглосуточное наблюдение врачей, капельницы, медикаментозная поддержка и консультации психотерапевта. Такой формат позволяет стабилизировать состояние в максимально короткие сроки.
Разобраться лучше – платная наркологическая клиника астрахань
Лечение нужно, чтобы пережить отмену безопасно, восстановить сон и снизить тревогу, а затем научиться обходиться без алкоголя в тех ситуациях, где он раньше «помогал»: стресс, усталость, конфликт, одиночество. Когда человеку дают понятные шаги и поддерживают первые дни, зависимость перестаёт выглядеть как безвыходный круг.
Подробнее можно узнать тут – lechenie-alkogolizma-profilaktika
Выезд врача на дом позволяет провести детоксикацию в спокойной обстановке. Врач привозит с собой препараты, капельницы, измерительное оборудование и проводит лечение в течение 1–2 часов. Такой формат подходит при стабильном состоянии и желании сохранить анонимность.
Узнать больше – вывод из запоя круглосуточно
Наркологическая помощь должна быть не только медицински точной, но и человечной, безопасной и анонимной. В «Ижевском Центре Трезвых Решений» выстроена система комплексного подхода к лечению зависимостей, включающая диагностику, медикаментозную детоксикацию, психотерапию и социальную адаптацию. Клиника объединяет профессионализм, заботу и круглосуточную готовность помочь пациентам, оказавшимся в трудной ситуации. Здесь работают врачи с большим опытом в области наркологии и психиатрии, способные оперативно выехать на дом и оказать неотложную помощь.
Получить больше информации – частная наркологическая клиника в ижевске
Процедура вывода из запоя проводится строго по медицинским стандартам. Применяются современные капельницы, витамины и препараты для нормализации функций сердца, печени, почек и нервной системы. После снятия интоксикации врачи назначают поддерживающее лечение, направленное на стабилизацию эмоционального состояния и снижение тяги к алкоголю.
Изучить вопрос глубже – https://vyvodiz-zapoya-vladivostok18.ru/vyvod-iz-zapoya-gorod-vladivostok
В рамках последовательного анализа состояния применяется также оценочная шкала, позволяющая фиксировать изменения и уточнять степень выраженности симптомов. Далее представлена таблица, демонстрирующая основные критерии наблюдения и их функциональное значение в клиническом процессе.
Получить дополнительную информацию – https://narkologicheskaya-klinika-penza18.ru/chastnaya-narkologicheskaya-klinika-penza
Главная задача — сделать состояние управляемым: уменьшить тошноту, тремор, потливость, головную боль, «туман» в голове, снизить тревогу, выровнять показатели, помочь восстановить сон. При этом важно сохранять реалистичные ожидания: после длительного запоя организм истощён, поэтому слабость и эмоциональная нестабильность могут сохраняться некоторое время. Ключевой показатель качества помощи — не обещание «идеально за час», а безопасная динамика и понятные ориентиры на первые сутки.
Получить дополнительные сведения – препараты для вывода из запоя
Наркологическая клиника — это не просто медицинское учреждение, а пространство, где человеку помогают вернуть здоровье, ясность мышления и контроль над жизнью. В клинике «КаспийМед Альтернатива» в Астрахани круглосуточно оказывается помощь людям, столкнувшимся с алкогольной, наркотической и смешанной зависимостью. Центр сочетает медицинскую строгость и человеческое участие, обеспечивая лечение в комфортных условиях с максимальной конфиденциальностью. Здесь разработаны программы детоксикации, восстановления и психотерапевтической поддержки, что делает терапию эффективной и безопасной.
Подробнее – наркологическая клиника нарколог в астрахани
В рамках лечебного процесса наркологическая клиника задействует структурированные механизмы наблюдения, включающие анализ лабораторных показателей, оценку соматического тонуса и изучение активности нервной системы. Эти элементы обеспечивают комплексность работы и позволяют своевременно корректировать план лечения. Такая система предотвращает перегрузку организма и способствует поддержанию стабильности на фоне применения медикаментозных схем. Ниже представлены ключевые составляющие терапевтического процесса, формирующие основу для клинического восстановления.
Получить дополнительные сведения – http://narkologicheskaya-klinika-v-penze18.ru/narkologicheskaya-pomoshh-penza/https://narkologicheskaya-klinika-v-penze18.ru
Врачебный состав клиники “Путь к выздоровлению” состоит из высококвалифицированных специалистов в области наркологии. Наши врачи-наркологи имеют обширный опыт работы с зависимыми пациентами и постоянно совершенствуют свои навыки.
Углубиться в тему – http://нарко-фильтр.рф
Для жителей Астрахани доступен выезд нарколога на дом — это востребованная услуга, позволяющая безопасно провести детоксикацию в привычной среде без госпитализации. При тяжёлых формах зависимости рекомендуется стационарное лечение: круглосуточное наблюдение врачей, капельницы, медикаментозная поддержка и консультации психотерапевта. Такой формат позволяет стабилизировать состояние в максимально короткие сроки.
Узнать больше – http://
CoreBlue Health Cheap generic Viagra CoreBlue Health
Наркологическая клиника «СтавропольМед Резонанс» — это круглосуточный центр доказательной медицины, где помощь строится вокруг безопасности, конфиденциальности и персонализации. Мы объединяем медицинскую детоксикацию, психотерапию, реабилитационные практики и постлечебное сопровождение в единую дорожную карту восстановления. Каждый шаг лечения закреплён измеримыми критериями эффективности, а решения принимаются командно — от дежурного нарколога и клинического психолога до психиатра и реабилитолога.
Исследовать вопрос подробнее – http://narcologicheskaya-klinika-stavropol0.ru/narkologicheskaya-klinika-stavropol-otzyvy/https://narcologicheskaya-klinika-stavropol0.ru
Оценка клинической картины проводится поэтапно с учетом изменений во времени. Специалисты анализируют эффективность действий, корректируют терапевтические схемы и контролируют уровень безопасности. Такой подход позволяет избегать значительных колебаний в состоянии пациента и поддерживать физиологическую стабильность на протяжении всего курса. Важно, что наблюдение сопровождается применением инструментальных методов, повышающих точность диагностических данных. В результате создается полноценная модель восстановления, в которую включаются фармакологические, поддерживающие и мониторинговые действия. В клинике внимание уделяется не только коррекции нарушений, но и постепенному восстановлению адаптивных функций организма.
Углубиться в тему – наркологическая клиника нарколог пенза
Согласно информации, опубликованной на сайте Минздрава РФ, успешная наркологическая помощь невозможна без своевременной диагностики, комплексного подхода и участия квалифицированных специалистов. Именно такие параметры становятся решающими при выборе учреждения, куда обратится пациент или его родственники.
Подробнее – https://narkologicheskaya-pomoshh-arkhangelsk0.ru/vyzov-narkologicheskoj-pomoshhi-arkhangelsk/
https://civicmeds.com/# canada drugs online review
Оформите заказ компрессорное масло купить на масло в бочках оптом и получите бесплатную доставку по Москве.
Многие думают, что если стало легче днём, значит, всё позади. Но часто к вечеру усиливается тревога, растёт внутреннее напряжение, сон не приходит, начинается паника, а тело снова «разгоняется» — тахикардия, потливость, тремор. Это связано с нестабильностью нервной системы и колебаниями вегетативных реакций после отмены. Если человек не понимает, что делать, он может сорваться, и запой продолжится. Поэтому правильный вывод из запоя всегда включает план на ночь: как организовать спокойную обстановку, что контролировать, какие симптомы допустимы, а какие опасны и требуют срочного обращения.
Изучить вопрос глубже – вывод из запоя телефон
Процесс лечения проходит поэтапно. Каждый шаг направлен на снятие интоксикации, стабилизацию состояния и нормализацию обменных процессов. В таблице приведены основные этапы и процедуры, применяемые в клинике «ПензаМед Трезвость».
Подробнее тут – вывод из запоя капельница пенза
Hi there! I know this is somewhat off topic but I was wondering if you knew where I could get a captcha plugin for my comment form? I’m using the same blog platform as yours and I’m having difficulty finding one? Thanks a lot!
Проблемы зависимости требуют оперативного вмешательства. Чем раньше начато лечение, тем выше вероятность полного восстановления. Наркологическая помощь в Архангельске представлена как государственными, так и частными клиниками, каждая из которых предлагает свой уровень сервиса и спектр услуг. Однако для получения эффективной и безопасной помощи важно понимать, какие критерии определяют качество наркологической поддержки.
Углубиться в тему – http://narkologicheskaya-pomoshh-arkhangelsk0.ru
На данном этапе врач уточняет длительность запоя, тип употребляемого алкоголя и наличие сопутствующих заболеваний. Тщательный анализ этих данных позволяет оперативно сформировать индивидуальный план лечения и выбрать оптимальные методы детоксикации.
Разобраться лучше – поставить капельницу от запоя на дому в архангельске
Лечебные мероприятия строятся на основе поэтапного внедрения терапевтических решений, которые опираются на индивидуальные характеристики пациента. Уточнение анамнеза, анализ данных обследований и выявление сопутствующих факторов позволяют создавать эффективные и прогнозируемые программы лечения. В клинике соблюдается строгая последовательность процедур, направленная на снижение рисков и обеспечение безопасности. На каждом этапе проводится проверка клинической реакции, что позволяет своевременно выявлять необходимость корректировки и адаптировать лечебные меры под текущую картину.
Получить больше информации – лечение в наркологической клинике в пензе
В Ставрополе мы выстроили так называемую «тихую логистику»: запись без послеобеденных «окон», экспресс-приём без ожидания, сопровождение от входа до палаты, а при необходимости — деликатная госпитализация через отдельный вход. При первичном обращении пациент получает пошаговый план на ближайшие 72 часа: стабилизация самочувствия, детоксикация по показаниям, психообразование, старт профилактики срыва. Такой регламент экономит время и снижает тревожность — вы понимаете, что и зачем делается, и видите прогноз по срокам.
Разобраться лучше – платная наркологическая клиника
https://veritascarepharm.com/# VeritasCare
pharmacy order online: CivicMeds – canada pharmacy not requiring prescription
В стационаре пациент получает круглосуточный контроль, расширенную диагностику и возможность подключения к аппаратуре мониторинга. Это особенно важно при тяжёлой интоксикации, нарушении сознания или судорожной активности.
Исследовать вопрос подробнее – помощь вывод из запоя
Понимание того, какие учреждения действительно способны помочь, позволяет избежать ошибок и не тратить время на неэффективные попытки лечения. Ключевыми признаками являются наличие медицинской лицензии, опытные специалисты, прозрачные условия и отзывы пациентов.
Подробнее тут – наркологическая помощь на дому
canadian pharmacy service CivicMeds northwest pharmacy canada
Терапия в клинике строится по индивидуальному протоколу. Каждому пациенту подбираются процедуры с учётом возраста, длительности болезни, сопутствующих нарушений и психоэмоционального состояния. Лечение проходит поэтапно, что позволяет исключить осложнения и достичь стабильной ремиссии. Ниже представлена таблица с ключевыми этапами терапии.
Подробнее – наркологическая клиника нарколог
Домашняя помощь эффективна, когда пациент контактный, сохранен, способен выполнять назначения и нет признаков высокой угрозы осложнений. Но удобство не должно подменять безопасность. Именно поэтому врач на выезде уточняет длительность употребления, время последнего приёма алкоголя или вещества, выраженность симптомов, хронические заболевания, лекарства, которые человек принимал самостоятельно, и возможные осложнения в прошлом.
Углубиться в тему – vyzov-narkologa-na-dom-vyvod
sildenafil online: CoreBlue Health – CoreBlue Health
Коммерческий и государственный тендер — это конкурентная процедура выбора поставщика товаров или оказания услуг. Заказчик размещает требования, а компании подают заявки и участвуют в торгах.
Не оставайтесь в неведении – тендерное сопровождение ип
Многих останавливает страх огласки и лишних последствий. В небольшом городе или в плотном окружении человеку важно сохранить личные границы: не «светиться», не объясняться на работе, не становиться объектом разговоров. Из-за этого помощь часто откладывают, а вместо неё выбирают рискованные компромиссы: «выйду сам», «попью понемногу», «усну на таблетках», «перетерплю ночь». На практике такие попытки часто усиливают проблему: запой затягивается, отмена переносится тяжелее, тревога растёт, сон разрушается, давление и пульс становятся нестабильными. Поэтому в наркологии важна возможность быстро начать лечение безопасно и без лишнего стресса — с понятными правилами, спокойной коммуникацией и медицинским контролем.
Разобраться лучше – https://narkologicheskaya-klinika-vidnoe12.ru/narkologicheskaya-klinika-otzyvy-v-vidnom/
На каждом этапе мы фиксируем объективные маркеры — от сатурации и вариабельности пульса до частоты «тяговых мыслей» в дневнике. Эти данные позволяют корректировать план не интуитивно, а по фактам.
Выяснить больше – частная наркологическая клиника
В стационаре пациент получает круглосуточный контроль, расширенную диагностику и возможность подключения к аппаратуре мониторинга. Это особенно важно при тяжёлой интоксикации, нарушении сознания или судорожной активности.
Выяснить больше – http://narko-zakodirovan.ru
Лечение проходит поэтапно, чтобы пациент не испытывал стресса и перегрузок. Каждый шаг контролируется врачами, а терапия корректируется в зависимости от состояния. В таблице ниже представлена структура программы лечения в клинике «АстраМед Трезвость».
Углубиться в тему – https://narkologicheskaya-klinika-v-astrakhani18.ru/
Каждая процедура проводится под контролем врача и сопровождается мониторингом давления, пульса и температуры. После курса капельниц пациент чувствует улучшение самочувствия, нормализуется сон, снижается раздражительность, появляется энергия и ясность сознания.
Подробнее тут – вывод наркологическая клиника астрахань
Метод капельничного лечения от запоя обладает рядом существенных преимуществ, благодаря которым пациенты получают качественную и оперативную помощь:
Узнать больше – врача капельницу от запоя
На данном этапе врач уточняет длительность запоя, тип употребляемого алкоголя и наличие сопутствующих заболеваний. Тщательный анализ этих данных позволяет оперативно сформировать индивидуальный план лечения и выбрать оптимальные методы детоксикации.
Подробнее тут – капельница от запоя клиника
Generic Cialis without a doctor prescription: Generic Cialis price – Cialis over the counter
Тендерный специалист помогает разобраться в особенностях каждого закона, а также обеспечивает грамотное сопровождение всех процедур. Это особенно важно для компаний, которые только начинают участвовать в торгах и не имеют опыта работы с государственными контрактами.
Полный разбор — только здесь – участие в тендерах госзакупок ростов на дону
Клиника «КаспийМед Альтернатива» построила систему оказания наркологической помощи на трёх принципах: индивидуальный подход, доказательная медицина и круглосуточная доступность. Каждый пациент проходит диагностический этап, где специалисты определяют уровень зависимости, физическое состояние и психоэмоциональные особенности. Далее формируется персональная программа лечения, включающая медицинские, психологические и социальные модули.
Ознакомиться с деталями – https://narkologicheskaya-klinica-v-astrakhani18.ru/narkologi-astrakhan/
Выездная бригада «Трезвого Севера» укомплектована портативным оборудованием (контроль АД, ЧСС, SpO2, температурный мониторинг; по показаниям — экспресс-диагностика), а медикаментозная часть всегда собирается индивидуально: учитываем длительность эпизода, сопутствующие заболевания, текущие жалобы, переносимость препаратов и прошлый опыт помощи. Рядом с медициной идёт психообразование: объясняем, что делать вечером, как «снимать газ» нервной системе, как отслеживать собственные маркеры и когда давать сигнал врачу.
Подробнее – вывод из запоя капельница на дому
Капельница — не «универсальная смесь», а адресный баланс жидкости, электролитов и поддерживающих компонентов под текущие симптомы. Ниже — ориентир, который индивидуализируется на месте осмотра. Мы тщательно сопоставляем пользу и допустимую нагрузку, чтобы не перегружать организм.
Детальнее – https://narkolog-na-dom-petrozavodsk0.ru/
Tadalafil Tablet: Generic Cialis price – VeritasCare
Каждый из представленных элементов формирует устойчивую основу для дальнейшей работы и задаёт необходимый уровень контроля. Структура вмешательств адаптируется под особенности конкретного случая, что укрепляет эффективность процесса и создаёт благоприятные условия для стабилизации.
Ознакомиться с деталями – наркологическая клиника нарколог в пензе
https://civicmeds.shop/# canadian pharmacy oxycodone
Критерии оценки профессионального уровня сотрудников:
Разобраться лучше – https://lechenie-alkogolizma-yaroslavl0.ru/
В зависимости от состояния пациента, помощь может быть оказана в домашних условиях или в стационаре. Вызов нарколога на дом особенно актуален при абстинентном синдроме или тяжелом алкогольном опьянении. Как отмечается в материалах НМИЦ психиатрии и наркологии, в таких ситуациях крайне важно избежать самолечения и довериться врачам, способным правильно подобрать препараты и дозировки.
Подробнее тут – анонимная наркологическая помощь в архангельске
Клиника «КемероваМед Трезвость» предоставляет круглосуточную помощь пациентам, столкнувшимся с последствиями запоев и зависимостей. Основное направление — анонимное лечение, которое исключает постановку на учёт и обеспечивает конфиденциальность данных. При обращении пациент проходит первичную диагностику, включающую сбор анамнеза, измерение жизненно важных показателей, ЭКГ и анализ крови. После этого врач составляет персональный план лечения, который может включать детоксикацию, медикаментозную терапию, капельницы, консультации психотерапевта и реабилитационные программы.
Разобраться лучше – наркологическая клиника лечение алкоголизма кемерово
В основе работы клиники «ИжТрезвоМед Центр» лежит принцип персонализированной медицины. Это означает, что каждый пациент получает не шаблонное лечение, а тщательно подобранный комплекс процедур, учитывающий его состояние, историю заболевания, уровень мотивации и социальную ситуацию. Такой подход позволяет добиться стабильного результата даже в сложных случаях. Лечение проводится анонимно, без постановки на учёт и разглашения данных, что особенно важно для тех, кто ценит конфиденциальность.
Выяснить больше – анонимная наркологическая клиника ижевск
Выездная бригада «Трезвого Севера» укомплектована портативным оборудованием (контроль АД, ЧСС, SpO2, температурный мониторинг; по показаниям — экспресс-диагностика), а медикаментозная часть всегда собирается индивидуально: учитываем длительность эпизода, сопутствующие заболевания, текущие жалобы, переносимость препаратов и прошлый опыт помощи. Рядом с медициной идёт психообразование: объясняем, что делать вечером, как «снимать газ» нервной системе, как отслеживать собственные маркеры и когда давать сигнал врачу.
Выяснить больше – врач вывод из запоя петрозаводск
Мы верим, что каждый человек, столкнувшийся с проблемой зависимости, заслуживает шанса на новую жизнь. Наша миссия — предоставить необходимые инструменты и поддержку, чтобы помочь пациентам в их стремлении к здоровой и свободной от зависимостей жизни.
Узнать больше – https://нарко-фильтр.рф
Срочный выезд — не «гонка на скорость», а хорошо отлаженный алгоритм. Врач заранее знает минимально необходимую информацию о состоянии, рисках и удобном адресе входа; семья получает короткую памятку по подготовке помещения, доступу к воде и розетке. Такой микроплан исключает суету и позволяет сразу перейти к делу — оценке витальных показателей, осмотру и старту инфузионной терапии при наличии показаний.
Исследовать вопрос подробнее – врач нарколог на дом
Указанные элементы задают логическую основу для всего терапевтического процесса, создавая структурированную модель работы с пациентом. При необходимости схема вмешательств дополняется дополнительными мерами, направленными на стабилизацию состояния. Такой формат позволяет поддерживать предсказуемость результата даже в сложных клинических ситуациях.
Получить дополнительную информацию – https://narkologicheskaya-klinika-v-penze18.ru/narkologicheskaya-pomoshh-penza
Критерии оценки профессионального уровня сотрудников:
Углубиться в тему – клиника лечения алкоголизма в ярославле
Основным инструментом при выведении из запоя является капельница. Её состав зависит от состояния пациента, продолжительности запоя и наличия хронических заболеваний. В клинике «ПензаМед Трезвость» используются только проверенные препараты с минимальной нагрузкой на организм. Ниже приведена таблица с примерами инфузионных растворов и их воздействием.
Разобраться лучше – вывод из запоя дешево в пензе
На первом контакте координатор задаёт несколько точных вопросов: длительность эпизода, наличие рвоты/тремора/бессонницы, приём лекарств, хронические заболевания. Эти данные нужны не «для галочки»: по ним заранее выстраивается протокол инфузии, рассчитывается скорость, подбираются уколы до капельницы и объём наблюдения после. Врач приезжает уже с персональным планом и поправляет его по факту осмотра.
Ознакомиться с деталями – вывод из запоя круглосуточно в петрозаводске
Домашний протокол разбит на понятные шаги. В каждом шаге есть цель, действия, что именно мы измеряем и когда сверяем прогресс. Это делает процесс прозрачным и даёт семье чувство контроля: видно, почему назначено именно это и когда ждать облегчения.
Углубиться в тему – платный нарколог на дом
Современная наркологическая клиника «ЮгМед Альянс» в Ставрополе объединяет медицинскую точность и психологическую чуткость. Здесь лечение зависимостей выстроено по принципу системной логики: одно вмешательство — одна цель — один критерий оценки. Такой подход делает процесс предсказуемым и снижает нагрузку на организм. Мы не просто устраняем симптомы, а ищем причину, формируем новые устойчивые модели поведения и помогаем пациенту вернуть контроль над жизнью. Наша команда работает круглосуточно, обеспечивая поддержку и безопасное сопровождение на каждом этапе — от детоксикации до реабилитации.
Выяснить больше – лечение в наркологической клинике ставрополь
https://veritascarepharm.com/# cialis generic
Многие семьи сталкиваются с вопросом: куда обратиться, чтобы получить реальную помощь? В городе работают как государственные, так и частные наркологические учреждения, но не все из них предлагают действительно результативные программы. Чтобы избежать ошибок, важно знать ключевые аспекты, на которые следует опираться при выборе клиники.
Изучить вопрос глубже – https://lechenie-alkogolizma-yaroslavl0.ru/lechenie-khronicheskogo-alkogolizma-yaroslavl/
На каждом этапе мы фиксируем объективные маркеры — от сатурации и вариабельности пульса до частоты «тяговых мыслей» в дневнике. Эти данные позволяют корректировать план не интуитивно, а по фактам.
Узнать больше – наркологическая клиника стационар в ставрополе
После прохождения курса капельниц пациенты отмечают улучшение сна, исчезновение головной боли, восстановление аппетита и общего самочувствия. При тяжёлых формах зависимости лечение дополняется физиотерапией и психологической помощью.
Подробнее – вывод из запоя на дому цена пенза
Мы заранее объясняем, какие шаги последуют, чтобы пациент и близкие понимали логику вмешательств и не тревожились по поводу непредвиденных «сюрпризов». Карта ниже — ориентир; конкретные параметры врач уточнит после осмотра.
Узнать больше – вывод из запоя дешево
https://starcasino-au.com/
Для повышения эффективности лечения наркологическая клиника применяет стандартизированные методы, включающие мониторинг жизненно важных параметров, корректировку фармакотерапии и оценку неврологических показателей. Совокупность таких мер делает процесс более предсказуемым и снижает вероятность осложнений. Кроме того, практическая часть работы включает регулярную проверку метаболических функций, что способствует точному дозированию препаратов и своевременному изменению схем. Это позволяет поддерживать физиологическую устойчивость организма даже при интенсивной нагрузке и сохранять стабильность состояния на протяжении всего периода терапии.
Получить дополнительную информацию – наркологическая клиника вывод из запоя
canadian pharmacy scam CivicMeds canada online pharmacy
Ниже приведены ключевые элементы, которые отражают базовую структуру процессов, формирующих последовательность лечебных мероприятий. Они помогают подробно рассмотреть основные направления работы и понять роль каждого звена в общей терапевтической системе.
Ознакомиться с деталями – наркологическая клиника нарколог
В клинике «Ресурс Трезвости» помощь строится по принципу маршрута. Сначала решают острые вопросы — интоксикация, абстиненция, нарушения сна, нестабильность давления и пульса, выраженная тревога. Затем — формируют план на 24–72 часа, потому что именно в первые дни чаще всего происходят повторные срывы: вечером усиливается тревога, ночь проходит без сна, и человек возвращается к алкоголю или веществам «чтобы отпустило». После стабилизации клиника помогает перейти к следующему этапу — лечению зависимости и профилактике рецидива, чтобы результат не ограничивался кратким облегчением.
Детальнее – http://narkologicheskaya-klinika-orekhovo-zuevo12.ru/narkologicheskaya-klinika-sajt-v-orekhovo-zuevo/
Домашняя помощь эффективна, когда пациент контактный, сохранен, способен выполнять назначения и нет признаков высокой угрозы осложнений. Но удобство не должно подменять безопасность. Именно поэтому врач на выезде уточняет длительность употребления, время последнего приёма алкоголя или вещества, выраженность симптомов, хронические заболевания, лекарства, которые человек принимал самостоятельно, и возможные осложнения в прошлом.
Ознакомиться с деталями – zapoj-narkolog-na-dom
Процедура детоксикации может проводиться двумя способами: выездом врача на дом или госпитализацией. Окончательное решение принимает нарколог после оценки состояния пациента. На ранней стадии запоя достаточно домашней терапии, но при наличии рисков рекомендуется стационар.
Ознакомиться с деталями – вывод из запоя вызов
Наши наркологи придерживаются принципов уважительного и внимательного отношения к пациентам, создавая атмосферу доверия. Они проводят детальное обследование, выявляют коренные причины зависимости и разрабатывают индивидуальные стратегии лечения. Профессионализм и компетентность врачей являются ключевыми факторами успешного восстановления пациентов.
Ознакомиться с деталями – http://нарко-фильтр.рф/
Лечение зависимости строится поэтапно: диагностика, стабилизация, восстановление сна и эмоциональной устойчивости, работа с тягой и триггерами, профилактика рецидива, сопровождение. У одного человека ведущий фактор — хроническая тревога и бессонница, у другого — стресс и конфликты, у третьего — социальная среда, у четвёртого — сочетание нескольких причин. Поэтому программа должна учитывать реальную жизнь пациента: график работы, семейную ситуацию, уровень поддержки, типичные «точки срыва» и реакции на стресс.
Изучить вопрос глубже – http://narkologicheskaya-klinika-vidnoe12.ru/
На этом этапе специалист уточняет продолжительность запоя, тип употребляемого алкоголя и наличие сопутствующих заболеваний, что позволяет разработать персонализированный план терапии и оперативно выбрать методы детоксикации.
Подробнее – https://kapelnica-ot-zapoya-arkhangelsk0.ru/kapelnicza-ot-zapoya-na-domu-arkhangelsk/
Каждая процедура проводится под контролем врача и сопровождается мониторингом давления, пульса и температуры. После курса капельниц пациент чувствует улучшение самочувствия, нормализуется сон, снижается раздражительность, появляется энергия и ясность сознания.
Ознакомиться с деталями – частная наркологическая клиника в астрахани
Процесс лечения капельничным методом от запоя организован по четко структурированной схеме, позволяющей обеспечить оперативное и безопасное восстановление организма.
Исследовать вопрос подробнее – https://kapelnica-ot-zapoya-arkhangelsk0.ru/kapelnicza-ot-zapoya-czena-arkhangelsk/
VeritasCare Cheap Cialis Generic Cialis without a doctor prescription
the canadian pharmacy: italian pharmacy online – us online pharmacy
Зависимость редко выглядит одинаково у разных людей. У кого-то всё начинается с «пару дней выпал из графика», у кого-то — с регулярного употребления «для сна» и снятия напряжения, у кого-то — с эпизодов, которые постепенно превращаются в систему: запои, провалы в работе, конфликты дома, долги, скрытность и постоянная усталость. Общий признак один: человек теряет возможность управлять ситуацией, а любые попытки резко прекратить употребление приводят к тяжёлому состоянию — тревоге, бессоннице, тремору, скачкам давления, тошноте, раздражительности. В Орехово-Зуево многие откладывают обращение из-за стыда и желания «разобраться самим», но зависимость устроена так, что без медицинской помощи чаще всего возвращает человека к прежнему сценарию. Наркологическая клиника нужна, чтобы перевести проблему из хаоса и импульсивных решений в управляемый медицинский процесс: оценка состояния, безопасная стабилизация, восстановление базовых функций и лечение зависимости как долгосрочной задачи.
Получить дополнительную информацию – http://
VeritasCare: VeritasCare – VeritasCare
Алкогольная зависимость — хроническое заболевание, требующее своевременного вмешательства специалистов. В условиях нашего города круглосуточная анонимная помощь позволяет начать лечение без откладываний и в привычной обстановке. Клиника «Северная Звезда» предлагает комплексный подход: вызов врача на дом или стационарное пребывание в условиях полной конфиденциальности. Профессиональная команда обеспечивает детоксикацию, психологическую реабилитацию и последующую поддержку, помогая пациенту сделать первый шаг к новой, свободной от алкоголя жизни.
Разобраться лучше – https://lechenie-alkogolizma-arkhangelsk0.ru/lechenie-khronicheskogo-alkogolizma-arkhangelsk/
Наркологическая клиника — это место, где человек получает не просто медицинскую помощь, а возможность начать жизнь заново. В клинике «АстраМед Трезвость» в Астрахани создана система комплексного лечения алкогольной и наркотической зависимости, включающая диагностику, детоксикацию, медикаментозную терапию и психотерапию. Пациент получает поддержку на каждом этапе: от вывода из запоя до социальной адаптации после реабилитации. Лечение проводится круглосуточно, в комфортных условиях и с соблюдением полной конфиденциальности.
Узнать больше – запой наркологическая клиника астрахань
I’m impressed, I have to say. Really rarely do I encounter a weblog that’s each educative and entertaining, and let me inform you, you’ve hit the nail on the head. Your thought is outstanding; the issue is one thing that not enough persons are speaking intelligently about. I’m very blissful that I stumbled throughout this in my seek for something referring to this.
Если к «окну оценки» улучшение ниже ожидаемого, меняем один параметр — скорость/состав инфузии, время приёма препаратов или порядок модулей — и назначаем новое окно. Так видно реальный вклад каждого шага и не возникает «снежный ком» вмешательств.
Подробнее – https://vyvod-iz-zapoya-petrozavodsk0.ru/vyvod-iz-zapoya-kruglosutochno-petrozavodsk
Запой — это состояние, в котором алкоголь перестаёт быть «причиной расслабления» и становится механизмом удержания человека в замкнутом круге. Выпил — полегчало на короткое время — через несколько часов снова плохо — снова выпил. Чем дольше длится запой, тем сильнее истощается организм: разрушается сон, растёт тревога, усиливается тремор, потливость, скачет давление, учащается пульс, появляются тошнота и рвота, слабость и раздражительность. В Орехово-Зуево многие пытаются «дотянуть до утра» или «выйти сами», но именно в такие моменты состояние часто ухудшается вечером и ночью, и человек принимает рискованные решения — снова пьёт или смешивает алкоголь со снотворными, лишь бы уснуть. Медицинский вывод из запоя нужен, чтобы разорвать этот сценарий безопасно: снизить интоксикацию, стабилизировать жизненно важные показатели и помочь пережить первые сутки без возврата к алкоголю.
Выяснить больше – вывода из запоя орехово
canadian drug pharmacy: CivicMeds – bitcoin pharmacy online
Наркологическая клиника — это не просто медицинское учреждение, а пространство, где пациент получает всестороннюю поддержку: от снятия интоксикации и детоксикации до психотерапии и постлечебного сопровождения. В клинике «КемероваМед Трезвость» специалисты работают с любыми формами зависимостей — алкогольной, наркотической, медикаментозной. Принципы работы центра основаны на анонимности, профессионализме и индивидуальном подходе. Здесь создаются условия для полного восстановления здоровья и возвращения человека к стабильной трезвой жизни.
Подробнее – платная наркологическая клиника
Если к намеченному окну улучшение слабее ожидаемого, врач меняет один параметр — время приёма, скорость инфузии, приоритет модуля — и назначает новую сверку. Мы избегаем «снежного кома» назначений, сохраняя предсказуемость и бережность.
Подробнее тут – http://narkolog-na-dom-petrozavodsk0.ru/vyvod-iz-zapoya-narkolog-na-dom-petrozavodsk-uslugi/
Наркологическое лечение начинается с диагностики и оценки рисков. Важно понять, как давно начались эпизоды употребления, как организм переносит отмену, какие симптомы наиболее выражены, есть ли хронические заболевания и были ли осложнения в прошлом. У одного пациента главная проблема — затяжные запои и тяжёлая абстиненция, у другого — тревога и бессонница, у третьего — повторяющиеся срывы на фоне стресса, у четвёртого — наркотическая интоксикация с непредсказуемыми проявлениями. Поэтому лечение не может быть «одинаковым для всех»: тактика подбирается индивидуально.
Детальнее – наркологическая клиника
Проблема алкоголизма в Ярославле, как и в других регионах России, остаётся одной из самых актуальных. По данным Минздрава РФ, количество людей, нуждающихся в медицинской помощи из-за злоупотребления спиртным, ежегодно растёт. При этом эффективное лечение возможно лишь при комплексном подходе, включающем как медицинскую, так и психологическую поддержку.
Получить дополнительные сведения – https://lechenie-alkogolizma-yaroslavl0.ru/lechenie-khronicheskogo-alkogolizma-yaroslavl
Своевременная маршрутизация снижает риск делирия, электролитных сдвигов и осложнений со стороны сердечно-сосудистой системы, а также ускоряет стабилизацию состояния.
Узнать больше – https://vyvod-iz-zapoya-lugansk0.ru/lnr-vyvod-iz-zapoya-na-domu/
Когда проблемы с алкоголизмом достигают критической точки, оперативное вмешательство становится жизненно необходимым. В Мариуполе квалифицированные наркологи оказывают помощь на дому, обеспечивая оперативную детоксикацию организма, стабилизацию жизненно важных показателей и психологическую поддержку. Такой формат лечения позволяет пациенту получить качественную медицинскую помощь в привычной домашней обстановке, сохраняя конфиденциальность и минимизируя стресс, связанный с посещением стационара.
Разобраться лучше – нарколог на дом срочно мариуполь
Уже при первичном звонке мы собираем ключевую информацию: длительность употребления, типы веществ, сопутствующие заболевания, прошлые реакции на лекарства, эпизоды судорог и психозов, недавние значения АД/ЧСС. Это позволяет подготовить персональный стартовый протокол ещё до визита: поставить цель на первые 72 часа, определить метрики (сон, «тяга», дневная энергия), запланировать вечерний ритуал и расписать дистанционные чек-ины. Прозрачность шагов снижает тревогу у пациента и семьи и повышает соблюдаемость — фундамент устойчивого результата.
Получить дополнительную информацию – https://narkologicheskaya-klinika-kamensk-uralskij0.ru/kamensk-uralskij-narkologicheskij-dispanser
Лечение в клинике проводится последовательно, что позволяет контролировать процесс выздоровления и обеспечивать пациенту максимальную безопасность.
Получить дополнительную информацию – http://narkologicheskaya-klinika-v-doneczke0.ru
В клинике используются доказательные методики, эффективность которых подтверждена практикой. Они подбираются индивидуально и позволяют достичь устойчивых результатов.
Подробнее – лечение алкоголизма в стационаре в твери
Пошаговая структура помогает удерживать стабильную динамику, своевременно оценивать прогресс и гибко корректировать тактику.
Изучить вопрос глубже – наркологическая клиника стационар
Помимо медицинских процедур, клиника делает акцент на психологической поддержке и постлечебной адаптации. Пациентам помогают не только избавиться от физической зависимости, но и сформировать устойчивую мотивацию к трезвости, восстановить интерес к жизни и наладить отношения с близкими. Это достигается за счёт участия психологов, психотерапевтов и специалистов по социальной реабилитации.
Подробнее – наркологическая клиника наркологический центр в ижевске
Вывод из запоя в клинике формируется на основе последовательных процедур, направленных на стабилизацию физиологических функций и устранение токсических влияний. Такой подход позволяет корректно регулировать состояние пациента и контролировать интенсивность симптомов. Рабочие алгоритмы включают оценку метаболических процессов, анализ соматических показателей и определение степени неврологических изменений. В результате создается структурированная модель помощи, ориентированная на восстановление адаптивных возможностей организма. Процессы выполняются под контролем специалистов, что обеспечивает прогнозируемый терапевтический эффект и снижает вероятность осложнений.
Детальнее – нарколог вывод из запоя в кемерове
VeritasCare: VeritasCare – VeritasCare
С первого контакта координатор уточняет: длительность запоя, виды алкоголя, аллергии, список текущих лекарств, эпизоды судорог или психозов в анамнезе, сердечно-сосудистые жалобы. На основании ответов команда подбирает безопасную схему старта и резервный план на случай усиления симптомов. Врач привозит портативный монитор для контроля АД/ЧСС/SpO2, глюкометр, набор инфузионных линий и расходников, а также средства для экспресс-коррекции тревоги по показаниям.
Получить дополнительную информацию – вывод из запоя вызов на дом первоуральск
Применение подобных таблиц формирует прозрачность терапевтического процесса и помогает специалистам адаптировать стратегию лечения с учетом динамики. Это обеспечивает объективность и последовательность в клинической оценке каждого этапа.
Ознакомиться с деталями – наркологическая клиника лечение алкоголизма
В этой статье мы рассмотрим ключевые признаки эффективной наркологической помощи в Ярославле — от состава команды до подходов в работе с мотивацией пациента.
Получить больше информации – наркологическое лечение наркомания ярославль
В Ставрополе вызов организуется круглосуточно. Координатор уточняет адрес, противопоказания, сопутствующие заболевания и ориентировочно рассчитывает маршрут. Бригада выезжает на нейтральном транспорте, а в подъезде и дворе соблюдает «тихий протокол» — никакой внешней символики. На месте врач быстро оценивает состояние: давление, пульс, сатурацию, температуру, при необходимости — экспресс-глюкометрию и ЭКГ-скрининг переносным аппаратом. Результаты помогают составить инфузионную схему и определить скорость введения растворов, чтобы процедура проходила комфортно и безопасно.
Получить дополнительные сведения – https://narkolog-na-dom-stavropol0.ru/vyzov-narkologa-na-dom-stavropol/
На данном этапе врач уточняет длительность запоя, тип употребляемого алкоголя и наличие сопутствующих заболеваний. Тщательный анализ этих данных позволяет оперативно сформировать индивидуальный план лечения и выбрать оптимальные методы детоксикации.
Ознакомиться с деталями – https://kapelnica-ot-zapoya-arkhangelsk00.ru/kapelnicza-ot-zapoya-klinika-arkhangelsk/
Днём человек ещё как-то держится, а к вечеру нарастает усталость, тревога усиливается, сон не приходит, и появляется ощущение, что «так не выдержать». Это один из главных триггеров повторного употребления. Нормальная задача врача — не только снять симптомы, но и объяснить, как пережить ночь: чего ожидать, как организовать спокойную обстановку, что контролировать, какие признаки опасны и требуют срочной оценки.
Детальнее – https://vyvod-iz-zapoya-orekhovo-zuevo12.ru/
http://corebluehealth.com/# CoreBlue Health
Мы не «перелечиваем» пациента процедурами. Любая мера начинается как проверяемая гипотеза с измеримыми маркерами. Ниже — опорная карта лечения. В реальности она персонализируется в зависимости от клинической картины, возраста, сопутствующих заболеваний и бытового графика.
Углубиться в тему – https://narkologicheskaya-klinika-kamensk-uralskij0.ru/kamensk-uralskij-narkologicheskij-dispanser
Вывод из запоя — это не просто медицинская процедура, а важный шаг на пути восстановления организма и возвращения человека к нормальной жизни. В клинике «ВладТрезвие Центр» пациенты получают профессиональную помощь, основанную на современных методиках детоксикации и безопасном медикаментозном восстановлении. Каждый случай рассматривается индивидуально, а лечение подбирается с учётом возраста, состояния здоровья и продолжительности запоя. Наркологи центра выезжают на дом круглосуточно, обеспечивая помощь даже в экстренных ситуациях, когда время играет ключевую роль.
Детальнее – http://vyvodiz-zapoya-vladivostok18.ru
Лечение проходит поэтапно, чтобы пациент не испытывал стресса и перегрузок. Каждый шаг контролируется врачами, а терапия корректируется в зависимости от состояния. В таблице ниже представлена структура программы лечения в клинике «АстраМед Трезвость».
Получить дополнительную информацию – https://narkologicheskaya-klinika-v-astrakhani18.ru/narkologiya-astrakhan-adres/
Каждый этап лечения в наркологической клинике «ЮгМед Альянс» имеет свою цель, временные рамки и объективные критерии эффективности. Ниже приведена структура терапевтического цикла, применяемая для большинства пациентов после поступления в отделение.
Выяснить больше – narkologicheskaya-klinika-stavropol0.ru/
Вывод из запоя в клинике формируется на основе последовательных процедур, направленных на стабилизацию физиологических функций и устранение токсических влияний. Такой подход позволяет корректно регулировать состояние пациента и контролировать интенсивность симптомов. Рабочие алгоритмы включают оценку метаболических процессов, анализ соматических показателей и определение степени неврологических изменений. В результате создается структурированная модель помощи, ориентированная на восстановление адаптивных возможностей организма. Процессы выполняются под контролем специалистов, что обеспечивает прогнозируемый терапевтический эффект и снижает вероятность осложнений.
Разобраться лучше – вывод из запоя с выездом кемерово
Зависимость редко начинается как очевидная беда. Чаще это выглядит как «снять напряжение», «уснуть», «успокоиться», «пережить стресс». Постепенно организм привыкает, дозы растут, трезвость становится тяжёлой, а попытки остановиться приводят к отмене: бессоннице, тревоге, внутренней дрожи, потливости, тошноте, скачкам давления и раздражительности. В какой-то момент алкоголь или вещества перестают быть выбором и превращаются в способ избежать ухудшения. Наркологическая клиника в Ногинске нужна, чтобы в этой точке не оставаться один на один с хаотичными решениями и самолечением, а получить помощь по медицинской логике: оценка состояния, безопасная стабилизация, затем лечение зависимости и профилактика рецидива.
Получить дополнительные сведения – адреса наркологических клиник
Процедура вывода из запоя проводится только под медицинским наблюдением, так как самостоятельные попытки могут привести к осложнениям — аритмии, судорогам, резкому скачку давления. Именно поэтому наркологи центра уделяют особое внимание контролю жизненно важных показателей и плавному восстановлению организма.
Получить больше информации – вывод из запоя капельница в пензе
Системная работа, которой характеризуется наркологическая клиника, предполагает последовательное исследование состояния пациента, анализ факторов риска и создание индивидуального терапевтического маршрута. Такой формат позволяет уточнять клиническую картину на ранних этапах и корректировать вмешательства по мере изменения состояния человека. Применение структурированных методик повышает предсказуемость результата и обеспечивает безопасность всех процедур. При этом выводы формируются на основании объективных данных наблюдения, лабораторных показателей и динамики симптомов. Оптимальная нагрузка распределяется на весь период лечения для достижения устойчивого эффекта без переутомления организма.
Получить дополнительную информацию – http://narkologicheskaya-klinika-penza18.ru
VeritasCare Cialis 20mg price cialis for sale
Нарколог на дом — это не «капельница по заказу». Запой и отмена алкоголя/веществ влияют на сердце, сосуды, дыхание, нервную систему, водно-электролитный баланс. Ошибка в тактике часто происходит именно тогда, когда пытаются действовать без оценки состояния: ставят капельницу без измерения давления, не учитывают уже принятые препараты, не спрашивают о судорогах и проблемах с сердцем. На выезде врач измеряет давление и пульс, оценивает дыхание, температуру, уровень сознания, признаки обезвоживания, выраженность тремора и тревоги. После этого выбирается безопасная схема помощи и объясняется ожидаемая динамика.
Узнать больше – narkolog-na-dom-pushkino12.ru/
Процедура проводится поэтапно, чтобы организм смог безопасно перейти из состояния алкогольной интоксикации к нормальному функционированию. Ниже приведена таблица с описанием этапов терапии и действий специалистов.
Выяснить больше – анонимный вывод из запоя в ставрополе
Финансовые инструменты позволяют заказчику убедиться в надежности участника и его готовности выполнить обязательства по контракту. При этом грамотное сопровождение снижает вероятность финансовых рисков и помогает правильно оформить документы для банка.
Все тайны раскрыты – https://tendernoe-soprovozhdenie-rostov-na-donu.ru
После диагностики начинается активная фаза медикаментозного вмешательства. Современные препараты вводятся капельничным методом для быстрого снижения уровня токсинов в крови, восстановления обменных процессов и нормализации работы внутренних органов, таких как печень, почки и сердце.
Изучить вопрос глубже – https://kapelnica-ot-zapoya-arkhangelsk0.ru/kapelnicza-ot-zapoya-czena-arkhangelsk/
Процесс лечения строится поэтапно, что позволяет пациенту проходить все стадии восстановления в безопасном и контролируемом режиме.
Выяснить больше – нарколог лечение алкоголизма в донце
После стабилизации фокус смещается на поддерживающие схемы, снижающие влечение и улучшающие переносимость повседневной нагрузки. Параллельно проводятся индивидуальные и групповые психотерапевтические занятия, направленные на развитие навыков саморегуляции, работу с триггерами и формирование альтернатив алкогольному или наркотическому поведению.
Подробнее можно узнать тут – https://narkologicheskaya-klinika-v-luganske0.ru/narkologicheskij-dispanser-lugansk
Вывод из запоя — это медицинская процедура, направленная на устранение интоксикации организма, вызванной длительным употреблением алкоголя. В клинике «ПензаМед Трезвость» помощь оказывается профессионально и конфиденциально: пациенты могут получить лечение как в стационаре, так и на дому. Процесс включает использование капельниц, медикаментозную терапию, психоэмоциональную поддержку и последующую реабилитацию. Врачи наркологического центра обладают большим опытом работы и обеспечивают круглосуточную помощь без постановки на учёт, что особенно важно для тех, кто хочет сохранить анонимность и быстро вернуться к нормальному состоянию.
Подробнее тут – вывод из запоя круглосуточно в пензе
Финансовые инструменты позволяют заказчику убедиться в надежности участника и его готовности выполнить обязательства по контракту. При этом грамотное сопровождение снижает вероятность финансовых рисков и помогает правильно оформить документы для банка.
Разберитесь досконально – комплексное тендерное сопровождение в ростове на дону
В стационаре пациент получает круглосуточный контроль, расширенную диагностику и возможность подключения к аппаратуре мониторинга. Это особенно важно при тяжёлой интоксикации, нарушении сознания или судорожной активности.
Получить дополнительную информацию – https://narko-zakodirovan.ru/vyvod-iz-zapoya-kapelnicza-spb
Процесс терапии в клинике построен по поэтапной схеме, включающей:
Подробнее можно узнать тут – анонимное лечение алкоголизма в архангельске
На практике обращения обычно связаны с двумя группами ситуаций: острые состояния и плановое лечение. Острые — это запой, тяжёлая абстиненция, выраженная интоксикация, тревога и бессонница, когда человеку плохо здесь и сейчас. Плановые — когда человек понимает, что зависимость стала системной: срывы повторяются, тяга усиливается, растёт раздражительность, меняется настроение, ухудшается работа и отношения. И в том и в другом случае важен первый шаг — медицинская оценка. Без неё легко ошибиться с форматом помощи и получить кратковременное облегчение без устойчивого результата.
Получить больше информации – https://narkologicheskaya-klinika-zhukovskij12.ru/
CoreBlue Health CoreBlue Health CoreBlue Health
Клиника «Полярис» предлагает круглосуточную наркологическую помощь в Архангельске и области. Главные преимущества — выезд врача на дом в течение 30 минут и условия VIP-уровня в стационаре. Здесь используются передовые методы детоксикации, индивидуальный подход и комплексная психотерапевтическая поддержка, что позволяет пациенту максимально быстро и безопасно справиться с алкогольной зависимостью.
Ознакомиться с деталями – наркологическая клиника нарколог архангельск
canada online pharmacy no prescription: CivicMeds – best online pharmacy
В клинике «Вектор Стабильности» помощь строится от безопасности к устойчивости. Сначала — оценка состояния, исключение опасных признаков, стабилизация. Затем — работа с тягой и триггерами, потому что после прекращения употребления именно бессонница, тревога и психическое истощение чаще всего толкают к срыву. Когда у пациента есть понятный план на уязвимые часы и поддержка по динамике, трезвость становится более управляемой.
Ознакомиться с деталями – https://narkologicheskaya-klinika-noginsk12.ru/
canadian pharmacies compare: best online pharmacy – express scripts pharmacy
Особую роль на первом этапе играет диагностика: важно выявить не только тип наркотика, но и наличие сопутствующих расстройств, стадию зависимости, мотивационное состояние пациента. От этого зависит, будет ли выбрана амбулаторная или стационарная форма лечения, какие методы будут применяться.
Разобраться лучше – центр лечения наркомании мурманск
Наркологическая помощь обычно делится на две большие части: экстренная стабилизация и лечение зависимости как долгосрочной задачи. Экстренная помощь нужна при запое, абстиненции, интоксикации, сильной тревоге и бессоннице, когда человеку плохо прямо сейчас. Долгосрочное лечение — когда запои повторяются, тяга усиливается, появляются срывы, а жизнь постепенно строится вокруг употребления.
Получить дополнительные сведения – chastnaya-narkologicheskaya-klinika
Медицинский процесс в клинике проводится поэтапно, что позволяет стабилизировать состояние пациента и избежать резких нагрузок на организм.
Выяснить больше – http://vyvod-iz-zapoya-tver0.ru/vyvesti-iz-zapoya-v-tveri/
Your point of view caught my eye and was very interesting. Thanks. I have a question for you.
Врачи «СтаврМед Центра» работают круглосуточно, обеспечивая выезд нарколога на дом в течение короткого времени. Пациент может получить помощь в привычных условиях, не подвергаясь стрессу, связанному с госпитализацией. Все процедуры проводятся анонимно, с сохранением врачебной тайны. Благодаря такому подходу, лечение становится не только эффективным, но и максимально комфортным для человека, который решил прекратить запой и начать восстановление.
Узнать больше – нарколог на дом вывод из запоя
Такая структура терапии обеспечивает контроль на всех стадиях и помогает добиться устойчивого результата без вреда для здоровья. Пациент получает не просто временное облегчение, а полное восстановление физического и эмоционального состояния.
Подробнее – http://narkologicheskaya-klinika-v-astrakhani18.ru/narkologiya-astrakhan-adres/
Viagra generic over the counter: CoreBlue Health – sildenafil 50 mg price
После оценки состояния проводится детоксикация и медикаментозная стабилизация. Цель — снизить интоксикацию, уменьшить проявления абстиненции, поддержать сердечно-сосудистую систему, восстановить баланс жидкости и электролитов, снизить тревогу и помочь со сном. Состав и объём помощи подбираются индивидуально: нет «универсальной капельницы», которая подходит всем. По итогу врач даёт рекомендации на ближайшие сутки и несколько дней: как контролировать давление, что пить и есть, какие нагрузки исключить, как организовать сон и какие признаки требуют повторной медицинской оценки.
Получить дополнительную информацию – вызвать нарколога на дом
Такой подход позволяет безопасно вывести пациента из состояния запоя и предотвратить развитие осложнений. Врачи контролируют давление, пульс, уровень сахара в крови и состояние нервной системы на протяжении всей процедуры.
Детальнее – http://vyvod-iz-zapoya-penza18.ru/vyvedenie-iz-zapoya-na-domu-penza/
Наркологическое лечение начинается с диагностики и оценки рисков. Важно понять, как давно начались эпизоды употребления, как организм переносит отмену, какие симптомы наиболее выражены, есть ли хронические заболевания и были ли осложнения в прошлом. У одного пациента главная проблема — затяжные запои и тяжёлая абстиненция, у другого — тревога и бессонница, у третьего — повторяющиеся срывы на фоне стресса, у четвёртого — наркотическая интоксикация с непредсказуемыми проявлениями. Поэтому лечение не может быть «одинаковым для всех»: тактика подбирается индивидуально.
Подробнее тут – narkologicheskie-kliniki-v-oblasti
Лучшее путешествие https://dzhip-tury-krym.ru горы, каньоны и побережье. Увлекательные маршруты, опытные гиды и яркие впечатления от путешествий по Крыму.
Часто предприниматели объединяют понятия тендер и госзакупки, так как обе процедуры связаны с конкурсным выбором поставщика. Однако между ними существуют определённые различия, которые важно понимать перед началом работы в этой сфере.
Получите экспертное мнение – https://tendernoe-soprovozhdenie-rostov-na-donu.ru/
Do you trade cryptocurrencies? explore bitkelttrade automate your transactions and earn passive income. Smart algorithms analyze the market and help you make decisions. Increase your income and reduce risks with modern technology.
Наши наркологи придерживаются принципов уважительного и внимательного отношения к пациентам, создавая атмосферу доверия. Они проводят детальное обследование, выявляют коренные причины зависимости и разрабатывают индивидуальные стратегии лечения. Профессионализм и компетентность врачей являются ключевыми факторами успешного восстановления пациентов.
Детальнее – https://нарко-фильтр.рф/vivod-iz-zapoya-na-domu-v-rostove-na-donu/
После поступления вызова диспетчер передаёт заявку на смартфон врача, который оперативно завершает подготовительные мероприятия и выезжает к пациенту. На дороге применяется GPS-маршрутизация для выбора оптимального пути и снижения времени в пути.
Углубиться в тему – наркологическая клиника цены в архангельске
Отдельный риск — самолечение препаратами. Часто пытаются «уснуть» с помощью снотворных или седативных, принимают лекарства от давления без контроля цифр, смешивают алкоголь с успокоительными. Такие комбинации могут влиять на дыхание, сердечный ритм и уровень сознания. В итоге состояние становится менее предсказуемым, а риск осложнений — выше. Медицинский вывод из запоя начинается с того, что врач собирает информацию о том, что уже принималось, и оценивает состояние, чтобы не допустить опасных сочетаний и ошибок в тактике.
Узнать больше – https://vyvod-iz-zapoya-zhukovskij12.ru/vyvod-iz-zapoya-kapelnica-v-zhukovskom/
При употреблении психоактивных веществ риск осложнений часто выше и непредсказуемее: неизвестный состав, сочетания, влияние на сердечный ритм, дыхание и психическое состояние. Поэтому детоксикация при наркотической зависимости строится особенно аккуратно: врач оценивает состояние, собирает информацию о симптомах, возможных сочетаниях и прошлых осложнениях, а затем выбирает тактику стабилизации. Важно, что в таких случаях «сделать быстро и без вопросов» — самый опасный подход.
Получить дополнительную информацию – http://
https://corebluehealth.com/# generic sildenafil
low cost online pharmacy: CivicMeds – canadian pharmacy cialis 20mg
Многие сталкиваются с трудностями при выборе клиники или центра: предлагаемые услуги различаются по качеству, подходам, стоимости и длительности. Некоторые организации ограничиваются только медикаментозной поддержкой, не работая с глубинными причинами зависимости. Поэтому важно заранее понимать, какие параметры отличают действительно надёжное учреждение, способное обеспечить долгосрочные результаты.
Выяснить больше – https://lechenie-narkomanii-murmansk0.ru/
В клинике «Вектор Стабильности» помощь строится от безопасности к устойчивости. Сначала — оценка состояния, исключение опасных признаков, стабилизация. Затем — работа с тягой и триггерами, потому что после прекращения употребления именно бессонница, тревога и психическое истощение чаще всего толкают к срыву. Когда у пациента есть понятный план на уязвимые часы и поддержка по динамике, трезвость становится более управляемой.
Получить дополнительные сведения – наркологическая клиника ногинск
В этой статье мы рассмотрим ключевые признаки эффективной наркологической помощи в Ярославле — от состава команды до подходов в работе с мотивацией пациента.
Получить больше информации – лечение наркомании реабилитация
https://corebluehealth.shop/# sildenafil over the counter
Наркологическая клиника — это не просто медицинское учреждение, а пространство, где пациент получает всестороннюю поддержку: от снятия интоксикации и детоксикации до психотерапии и постлечебного сопровождения. В клинике «КемероваМед Трезвость» специалисты работают с любыми формами зависимостей — алкогольной, наркотической, медикаментозной. Принципы работы центра основаны на анонимности, профессионализме и индивидуальном подходе. Здесь создаются условия для полного восстановления здоровья и возвращения человека к стабильной трезвой жизни.
Выяснить больше – наркологическая клиника в кемерове
В «МедЛинии Ставрополь» домашний протокол — это последовательность действий, выверенная до минут. Таблица ниже поможет понять, как именно строится визит и какие результаты фиксируются по итогам.
Разобраться лучше – http://narkolog-na-dom-stavropol0.ru/
Участие в государственных и коммерческих процедурах требует точной подготовки, понимания законодательства и внимательной работы с документами. Для многих компаний самостоятельная работа с закупками становится сложной задачей: необходимо отслеживать новые закупки, анализировать требования, оформлять документы и взаимодействовать с площадками.
Не оставайтесь в неведении – http://tendernoe-soprovozhdenie-rostov-na-donu.ru
На данном этапе врач уточняет длительность запоя, тип употребляемого алкоголя и наличие сопутствующих заболеваний. Тщательный анализ этих данных позволяет оперативно сформировать индивидуальный план лечения и выбрать оптимальные методы детоксикации.
Исследовать вопрос подробнее – врача капельницу от запоя в архангельске
Каждый из представленных элементов формирует устойчивую основу для дальнейшей работы и задаёт необходимый уровень контроля. Структура вмешательств адаптируется под особенности конкретного случая, что укрепляет эффективность процесса и создаёт благоприятные условия для стабилизации.
Подробнее тут – https://narkologicheskaya-klinika-penza18.ru/
Терапевтическая стратегия выстраивается вокруг понятных клинических ориентиров, что делает процесс предсказуемым и повышает приверженность пациента к лечению.
Получить больше информации – http://lechenie-alkogolizma-lugansk0.ru
Наркологическая помощь обычно делится на две большие части: экстренная стабилизация и лечение зависимости как долгосрочной задачи. Экстренная помощь нужна при запое, абстиненции, интоксикации, сильной тревоге и бессоннице, когда человеку плохо прямо сейчас. Долгосрочное лечение — когда запои повторяются, тяга усиливается, появляются срывы, а жизнь постепенно строится вокруг употребления.
Углубиться в тему – http://narkologicheskaya-klinika-vidnoe12.ru/narkologicheskaya-klinika-v-oblasti-v-vidnom/
С первого контакта координатор уточняет: длительность запоя, виды алкоголя, аллергии, список текущих лекарств, эпизоды судорог или психозов в анамнезе, сердечно-сосудистые жалобы. На основании ответов команда подбирает безопасную схему старта и резервный план на случай усиления симптомов. Врач привозит портативный монитор для контроля АД/ЧСС/SpO2, глюкометр, набор инфузионных линий и расходников, а также средства для экспресс-коррекции тревоги по показаниям.
Ознакомиться с деталями – помощь вывод из запоя в первоуральске
Лечение в «ИжТрезвоМед Центр» проходит поэтапно, с акцентом на безопасность и эффективность. Каждый этап направлен на достижение конкретных целей, от детоксикации до психотерапии. В таблице представлена структура лечебного процесса:
Получить дополнительную информацию – http://narkologicheskaya-klinika-v-izhevske18.ru/narkologicheskaya-klinika-izhevsk-otzyvy/
Терапевтическая стратегия выстраивается вокруг понятных клинических ориентиров, что делает процесс предсказуемым и повышает приверженность пациента к лечению.
Изучить вопрос глубже – принудительное лечение от алкоголизма луганск
В процессе терапии специалисты используют только сертифицированные препараты и современные методики, рекомендованные Минздравом РФ. Это позволяет безопасно очищать организм, устранять симптомы абстиненции и снижать риск рецидивов. Принцип клиники — работать не с последствиями зависимости, а с её причиной.
Выяснить больше – https://narkologicheskaya-klinika-v-astrakhani18.ru/astrakhanskaya-narkologiya/
ez pharmacy hq pharmacy online 365 rate online pharmacies
Нередко пациенту требуется не только медикаментозная поддержка, но и психологическое сопровождение. Консультации с психотерапевтом позволяют выявить причины зависимости, снизить уровень тревожности и подготовить человека к реабилитации.
Изучить вопрос глубже – http://narkologicheskaya-pomoshh-arkhangelsk0.ru
Лечение алкоголизма в Луганске организуется по принципам доказательной медицины и включает медицинскую, психотерапевтическую и социальную компоненты. Цель — безопасно снять острые проявления заболевания, стабилизировать соматическое состояние, снизить тягу и закрепить новые модели поведения. Индивидуальные планы формируются с учётом стадии расстройства, сопутствующих заболеваний, предшествующего опыта лечения и уровня семейной поддержки.
Подробнее – http://lechenie-alkogolizma-lugansk0.ru/kodirovka-v-luganske-czeny/
http://civicmeds.com/# reliable rx pharmacy
Такой поэтапный подход обеспечивает контролируемый «выход» и минимизацию рисков, а также формирует мост к долгосрочной терапии зависимости после стабилизации.
Получить дополнительные сведения – vyvod-iz-zapoya-doneczk0.ru/
«Ижевский Центр Трезвых Решений» — это частное медицинское учреждение, где проводится лечение всех форм алкогольной и наркотической зависимости. Программы терапии разработаны на основе международных рекомендаций и включают не только медикаментозное воздействие, но и психологическую поддержку. Все процедуры проходят анонимно, без постановки на учёт, что особенно важно для пациентов, желающих сохранить конфиденциальность.
Разобраться лучше – http://narkologicheskaya-klinika-v-izhevsk18.ru/narkologicheskaya-klinika-izhevsk-otzyvy/https://narkologicheskaya-klinika-v-izhevsk18.ru
В стационаре пациент получает круглосуточный контроль, расширенную диагностику и возможность подключения к аппаратуре мониторинга. Это особенно важно при тяжёлой интоксикации, нарушении сознания или судорожной активности.
Изучить вопрос глубже – вывод из запоя круглосуточно в санкт-петербурге
Особенность клиники — возможность выезда нарколога на дом. Это особенно важно, если пациенту трудно самостоятельно добраться до центра или он хочет избежать публичности. Врач приезжает с полным набором медикаментов и оборудования, проводит обследование и ставит капельницу, контролируя состояние пациента на протяжении всей процедуры. Такой формат позволяет начать лечение незамедлительно и без стресса.
Ознакомиться с деталями – http://narkologicheskaya-klinika-v-kemerovo18.ru/narkologicheskaya-klinika-v-kemerovo-anonimno/
Тактика подбирается индивидуально и зависит от тяжести состояния, сопутствующих заболеваний и переносимости препаратов. Ниже представлены базовые компоненты, которые часто включаются в схемы лечения при запойных состояниях.
Детальнее – вывод из запоя дешево
VeritasCare cheapest cialis buy cialis pill
Тендерный специалист помогает разобраться в особенностях каждого закона, а также обеспечивает грамотное сопровождение всех процедур. Это особенно важно для компаний, которые только начинают участвовать в торгах и не имеют опыта работы с государственными контрактами.
Разберитесь досконально – https://tendernoe-soprovozhdenie-rostov-na-donu.ru
Первичная цель процедуры — безопасно устранить токсическую нагрузку и восстановить физиологические показатели без осложнений. Лечение подбирается индивидуально, что обеспечивает прогнозируемый результат и минимизирует риски.
Подробнее можно узнать тут – помощь вывод из запоя в астрахани
Sildenafil Citrate Tablets 100mg: CoreBlue Health – Cheap Sildenafil 100mg
canadian valley pharmacy: CivicMeds – canadian pharmacy prices
Комплексность этих направлений делает процесс терапии более результативным и надёжным.
Подробнее можно узнать тут – наркологическая клиника наркологический центр
Мы заранее объясняем, какие шаги последуют, чтобы пациент и близкие понимали логику вмешательств и не тревожились по поводу непредвиденных «сюрпризов». Карта ниже — ориентир; конкретные параметры врач уточнит после осмотра.
Углубиться в тему – вывод из запоя дешево первоуральск
Своевременная медицинская помощь уменьшает вероятность тяжелых осложнений и сокращает период восстановления. При следующих признаках требуется неотложная оценка состояния и начало терапии под наблюдением специалистов:
Исследовать вопрос подробнее – https://vyvod-iz-zapoya-doneczk0.ru/vyvedenie-iz-zapoya-dnr
http://veritascarepharm.com/# VeritasCare
pharmacy com: CivicMeds – best value pharmacy
В клинике используется модульная система лечения, включающая медицинские, психологические и социальные компоненты. В зависимости от состояния человека акценты могут смещаться — например, у одних пациентов приоритетом становится физиологическое восстановление, у других — коррекция эмоционального фона и когнитивных паттернов.
Разобраться лучше – лечение в наркологической клинике в ставрополе
Такая терапия не только устраняет последствия запоев, но и восстанавливает баланс организма, улучшая общее состояние. Пациенты отмечают, что уже через несколько часов после капельницы проходит тремор, снижается тревожность и появляется чувство ясности.
Получить дополнительные сведения – наркологическая клиника стационар ижевск
В наркологической клинике в Донецке применяются современные и доказательные методики. Они безопасны, эффективны и соответствуют международным медицинским стандартам.
Узнать больше – частная наркологическая клиника
Переход между этапами определяется клиническими критериями эффективности и переносимости, а также динамикой поведения в повседневной среде.
Изучить вопрос глубже – лечение алкоголизма кодирование луганск
Процесс лечения проходит поэтапно. Каждый шаг направлен на снятие интоксикации, стабилизацию состояния и нормализацию обменных процессов. В таблице приведены основные этапы и процедуры, применяемые в клинике «ПензаМед Трезвость».
Узнать больше – врач вывод из запоя
Метод капельничного лечения от запоя обладает рядом существенных преимуществ, благодаря которым пациенты получают качественную и оперативную помощь:
Детальнее – капельница от запоя стоимость архангельск
Каждый из представленных элементов формирует устойчивую основу для дальнейшей работы и задаёт необходимый уровень контроля. Структура вмешательств адаптируется под особенности конкретного случая, что укрепляет эффективность процесса и создаёт благоприятные условия для стабилизации.
Ознакомиться с деталями – http://www.domen.ru
Эта структура терапии помогает достигать устойчивой ремиссии и снижать вероятность возврата к употреблению.
Изучить вопрос глубже – http://
Резкое прекращение употребления алкоголя часто сопровождается выраженными симптомами абстиненции: тремор, тахикардия, повышенное давление, беспокойство. В клинике «Северная Звезда» для детоксикации применяется инфузионная терапия с балансированными растворами, содержащими:
Получить больше информации – анонимное лечение алкоголизма архангельск
Cialis over the counter: VeritasCare – Tadalafil Tablet
Наркологическая клиника “Путь к выздоровлению” — специализированное медицинское учреждение, предназначенное для оказания помощи лицам, страдающим от алкогольной и наркотической зависимости. Наша основная задача — предоставить эффективные методы лечения и поддержку, чтобы помочь пациентам преодолеть пагубное пристрастие и вернуть их к здоровой и полноценной жизни.
Изучить вопрос глубже – https://нарко-фильтр.рф/vivod-iz-zapoya-anonimno-v-rostove-na-donu
Инфузионная терапия — центральный элемент стабилизации. Она помогает восстановить баланс жидкости, вывести токсические метаболиты и защитить органы. Вывод из запоя в клинике в Астрахани проводится с использованием препаратов, направленных на поддержку нервной системы, печени и сердечно-сосудистой функции.
Получить дополнительную информацию – вывод из запоя на дому недорого астрахань
Наркологическая клиника — это не просто медицинское учреждение, а пространство, где человеку помогают вернуть здоровье, ясность мышления и контроль над жизнью. В клинике «КаспийМед Альтернатива» в Астрахани круглосуточно оказывается помощь людям, столкнувшимся с алкогольной, наркотической и смешанной зависимостью. Центр сочетает медицинскую строгость и человеческое участие, обеспечивая лечение в комфортных условиях с максимальной конфиденциальностью. Здесь разработаны программы детоксикации, восстановления и психотерапевтической поддержки, что делает терапию эффективной и безопасной.
Углубиться в тему – вывод наркологическая клиника в астрахани
Даже при умеренной симптоматике самостоятельные попытки «перетерпеть» часто приводят к усугублению дегидратации, электролитным нарушениям и риску делирия. Медицинский контроль позволяет корректировать состояние по объективным показателям и предотвращать декомпенсацию.
Подробнее – вывод из запоя на дому переулок панфилова, 36
При ряде клинических признаков требуется ускоренное подключение специалистов и проведение детоксикации под контролем.
Подробнее – срочный вывод из запоя луганск
Buy Cialis online or cialis for sale Buy Tadalafil 5mg
http://www.google.co.ve/url?q=https://veritascarepharm.shop Buy Tadalafil 5mg and http://georgiantheatre.ge/user/ufkotvldgg/ buy cialis pill
Buy Tadalafil 20mg Buy Tadalafil 20mg or Buy Cialis online buy cialis pill
Когда проблемы с алкоголизмом достигают критической точки, оперативное вмешательство становится жизненно необходимым. В Мариуполе квалифицированные наркологи оказывают помощь на дому, обеспечивая оперативную детоксикацию организма, стабилизацию жизненно важных показателей и психологическую поддержку. Такой формат лечения позволяет пациенту получить качественную медицинскую помощь в привычной домашней обстановке, сохраняя конфиденциальность и минимизируя стресс, связанный с посещением стационара.
Подробнее тут – помощь нарколога на дому мариуполь
canada drugs coupon code CivicMeds pharmacy in canada
Основная задача стационарного лечения — не просто вывести человека из кризисного состояния, а вернуть ясность мышления и устойчивость физиологических функций. Поэтому врачи клиники используют современные методы детоксикации, витаминотерапии, ноотропные препараты, психотерапевтические практики короткого действия и физиотерапевтические модули, направленные на восстановление сна, памяти и концентрации.
Получить дополнительную информацию – http://narkologicheskaya-klinika-stavropol0.ru
Нарколог на дом — это не «капельница по заказу». Запой и отмена алкоголя/веществ влияют на сердце, сосуды, дыхание, нервную систему, водно-электролитный баланс. Ошибка в тактике часто происходит именно тогда, когда пытаются действовать без оценки состояния: ставят капельницу без измерения давления, не учитывают уже принятые препараты, не спрашивают о судорогах и проблемах с сердцем. На выезде врач измеряет давление и пульс, оценивает дыхание, температуру, уровень сознания, признаки обезвоживания, выраженность тремора и тревоги. После этого выбирается безопасная схема помощи и объясняется ожидаемая динамика.
Выяснить больше – запой нарколог на дом
Каждый из представленных элементов формирует устойчивую основу для дальнейшей работы и задаёт необходимый уровень контроля. Структура вмешательств адаптируется под особенности конкретного случая, что укрепляет эффективность процесса и создаёт благоприятные условия для стабилизации.
Получить больше информации – https://narkologicheskaya-klinika-penza18.ru/narkologicheskaya-poliklinika-penza
Лечение в клинике проводится последовательно, что позволяет контролировать процесс выздоровления и обеспечивать пациенту максимальную безопасность.
Подробнее тут – запой наркологическая клиника донецк
Как поясняет врач-нарколог НМИЦ психиатрии и наркологии, «наличие оборудованного стационара с возможностью контроля осложнений — обязательное условие безопасного лечения наркомании».
Узнать больше – принудительное лечение наркомании в ярославле
Лечение зависимости проходит поэтапно. Такая последовательность обеспечивает постепенное восстановление и закрепление полученных результатов.
Получить больше информации – http://narkologicheskaya-klinika-doneczk0.ru/
Когда проблемы с алкоголизмом достигают критической точки, оперативное вмешательство становится жизненно необходимым. В Мариуполе квалифицированные наркологи оказывают помощь на дому, обеспечивая оперативную детоксикацию организма, стабилизацию жизненно важных показателей и психологическую поддержку. Такой формат лечения позволяет пациенту получить качественную медицинскую помощь в привычной домашней обстановке, сохраняя конфиденциальность и минимизируя стресс, связанный с посещением стационара.
Получить дополнительные сведения – врач нарколог выезд на дом в мариуполе
Резкое прекращение употребления алкоголя часто сопровождается выраженными симптомами абстиненции: тремор, тахикардия, повышенное давление, беспокойство. В клинике «Северная Звезда» для детоксикации применяется инфузионная терапия с балансированными растворами, содержащими:
Ознакомиться с деталями – https://lechenie-alkogolizma-arkhangelsk0.ru/anonimnoe-lechenie-alkogolizma-arkhangelsk
Каждая процедура проводится под контролем врача и сопровождается мониторингом давления, пульса и температуры. После курса капельниц пациент чувствует улучшение самочувствия, нормализуется сон, снижается раздражительность, появляется энергия и ясность сознания.
Получить больше информации – наркологическая клиника цены астрахань
В «МедЛинии Ставрополь» домашний протокол — это последовательность действий, выверенная до минут. Таблица ниже поможет понять, как именно строится визит и какие результаты фиксируются по итогам.
Подробнее – нарколог на дом срочно
Такой подход позволяет устранить физические последствия запоя и снизить психологическую зависимость. Уже после первой процедуры пациенты отмечают улучшение самочувствия, появление аппетита и нормализацию сна. Важно не ограничиваться только экстренной помощью — специалисты рекомендуют пройти курс восстановления, чтобы предотвратить рецидивы.
Углубиться в тему – вывод из запоя капельница в владивостоке
Каждый из представленных элементов формирует устойчивую основу для дальнейшей работы и задаёт необходимый уровень контроля. Структура вмешательств адаптируется под особенности конкретного случая, что укрепляет эффективность процесса и создаёт благоприятные условия для стабилизации.
Углубиться в тему – наркологическая клиника нарколог в пензе
international pharmacy no prescription and international online pharmacy overseas pharmacy no prescription
https://www.google.com.cu/url?q=https://civicmeds.com cheap viagra canadian pharmacy or http://jonnywalker.net/user/obxnwslgrk/ usa pharmacy
legal online pharmacy legit canadian pharmacy online and online pharmacy no prescription canadian pharmacy com
В рамках лечебного процесса наркологическая клиника задействует структурированные механизмы наблюдения, включающие анализ лабораторных показателей, оценку соматического тонуса и изучение активности нервной системы. Эти элементы обеспечивают комплексность работы и позволяют своевременно корректировать план лечения. Такая система предотвращает перегрузку организма и способствует поддержанию стабильности на фоне применения медикаментозных схем. Ниже представлены ключевые составляющие терапевтического процесса, формирующие основу для клинического восстановления.
Ознакомиться с деталями – https://narkologicheskaya-klinika-v-penze18.ru/narkologicheskaya-pomoshh-penza/
В клинике «Вектор Стабильности» помощь строится от безопасности к устойчивости. Сначала — оценка состояния, исключение опасных признаков, стабилизация. Затем — работа с тягой и триггерами, потому что после прекращения употребления именно бессонница, тревога и психическое истощение чаще всего толкают к срыву. Когда у пациента есть понятный план на уязвимые часы и поддержка по динамике, трезвость становится более управляемой.
Узнать больше – http://narkologicheskaya-klinika-noginsk12.ru
Финансовые инструменты позволяют заказчику убедиться в надежности участника и его готовности выполнить обязательства по контракту. При этом грамотное сопровождение снижает вероятность финансовых рисков и помогает правильно оформить документы для банка.
Все ответы на ваши вопросы – https://tendernoe-soprovozhdenie-rostov-na-donu.ru/
http://civicmeds.com/# cheapest pharmacy for prescriptions
В стационаре пациент получает круглосуточный контроль, расширенную диагностику и возможность подключения к аппаратуре мониторинга. Это особенно важно при тяжёлой интоксикации, нарушении сознания или судорожной активности.
Подробнее можно узнать тут – помощь вывод из запоя
cheapest pharmacy canadian online pharmacy no prescription what’s the best online pharmacy
В рамках лечебного процесса наркологическая клиника задействует структурированные механизмы наблюдения, включающие анализ лабораторных показателей, оценку соматического тонуса и изучение активности нервной системы. Эти элементы обеспечивают комплексность работы и позволяют своевременно корректировать план лечения. Такая система предотвращает перегрузку организма и способствует поддержанию стабильности на фоне применения медикаментозных схем. Ниже представлены ключевые составляющие терапевтического процесса, формирующие основу для клинического восстановления.
Изучить вопрос глубже – наркологическая клиника нарколог в пензе
canada pharmacy online: CivicMeds – pharmacy in canada for viagra
В Ставрополе мы выстроили так называемую «тихую логистику»: запись без послеобеденных «окон», экспресс-приём без ожидания, сопровождение от входа до палаты, а при необходимости — деликатная госпитализация через отдельный вход. При первичном обращении пациент получает пошаговый план на ближайшие 72 часа: стабилизация самочувствия, детоксикация по показаниям, психообразование, старт профилактики срыва. Такой регламент экономит время и снижает тревожность — вы понимаете, что и зачем делается, и видите прогноз по срокам.
Изучить вопрос глубже – лечение в наркологической клинике
Cialis 20mg price: VeritasCare – Generic Cialis without a doctor prescription
Наркологическая клиника в Луганске предоставляет комплексную медицинскую помощь людям с алкогольной, наркотической и смешанной зависимостью. Работа выстроена по междисциплинарному принципу: врачи-наркологи, психотерапевты, клинические психологи и профильные специалисты координируют действия, чтобы устранить острые симптомы, стабилизировать состояние и сформировать устойчивые поведенческие изменения. Индивидуальные планы учитывают стадию заболевания, соматический фон, уровень мотивации и доступные семейные ресурсы.
Изучить вопрос глубже – наркологическая клиника стационар
Незамедлительно после поступления вызова нарколог приезжает на дом для проведения тщательного осмотра. Специалист измеряет жизненно важные показатели, такие как пульс, артериальное давление и температура, и собирает анамнез для оценки степени алкогольной интоксикации.
Подробнее – врач на дом капельница от запоя
Наркотическая зависимость отличается непредсказуемостью симптомов. На картину влияет состав вещества, сочетания, частота употребления, истощение, нарушения сна и психики. Иногда состояние выглядит относительно «ровным», а затем резко ухудшается: скачет давление, появляется выраженная тревога, панические реакции, агрессия или сильная подавленность. Поэтому здесь особенно важно не ориентироваться на «советы из интернета», а получить медицинскую оценку и безопасный маршрут.
Разобраться лучше – наркологическая клиника телефон
Thanks for your article. One other thing is when you are advertising your property yourself, one of the challenges you need to be aware about upfront is when to deal with household inspection reviews. As a FSBO home owner, the key to successfully moving your property in addition to saving money on real estate agent profits is information. The more you understand, the simpler your home sales effort might be. One area that this is particularly significant is information about home inspections.
В рамках лечебного процесса наркологическая клиника задействует структурированные механизмы наблюдения, включающие анализ лабораторных показателей, оценку соматического тонуса и изучение активности нервной системы. Эти элементы обеспечивают комплексность работы и позволяют своевременно корректировать план лечения. Такая система предотвращает перегрузку организма и способствует поддержанию стабильности на фоне применения медикаментозных схем. Ниже представлены ключевые составляющие терапевтического процесса, формирующие основу для клинического восстановления.
Углубиться в тему – наркологическая клиника стационар в пензе
Далее назначается инфузионная терапия (капельницы) — специально подобранные растворы и препараты для безопасного выведения токсинов, коррекции водно-солевого баланса, поддержки сердца, нервной системы и печени, нормализации сна и снятия тревожности. Капельница длится от 2 до 4 часов, врач наблюдает за состоянием пациента и, при необходимости, корректирует дозировки, вводит дополнительные средства для купирования судорог, снятия боли, коррекции психоэмоционального состояния.
Получить дополнительную информацию – https://vyvod-iz-zapoya-himki5.ru/vyvod-iz-zapoya-cena-v-himkah/
canadian pharmacy online cialis and canadadrugpharmacy com online pharmacy delivery usa
https://images.google.ci/url?sa=t&url=https://civicmeds.shop thecanadianpharmacy and https://bold-kw.com/user/cxkljwylfz/?um_action=edit reddit canadian pharmacy
pharmacy online shopping usa canadian prescription pharmacy and canadian pharmacy levitra uk pharmacy
canadian pharmacy generic cialis: CivicMeds – online pharmacy quick delivery
Если к «окну оценки» улучшение ниже ожидаемого, меняем один параметр — скорость/состав инфузии, время приёма препаратов или порядок модулей — и назначаем новое окно. Так видно реальный вклад каждого шага и не возникает «снежный ком» вмешательств.
Детальнее – вывод из запоя с выездом петрозаводск
Вывод из запоя в Луганске рассматривается как последовательное медицинское вмешательство, направленное на снижение интоксикации, стабилизацию витальных показателей и профилактику острых осложнений. На фоне длительного употребления алкоголя у пациента формируются нарушения водно-электролитного баланса, колебания артериального давления, тахикардия, расстройства сна и повышенная тревожность. Коррекция этих состояний требует наблюдаемого формата помощи, применения стандартизированных протоколов и междисциплинарного взаимодействия.
Подробнее – https://vyvod-iz-zapoya-lugansk0.ru/vyvedenie-iz-zapoya-v-luganske
Проблема алкоголизма в Ярославле, как и в других регионах России, остаётся одной из самых актуальных. По данным Минздрава РФ, количество людей, нуждающихся в медицинской помощи из-за злоупотребления спиртным, ежегодно растёт. При этом эффективное лечение возможно лишь при комплексном подходе, включающем как медицинскую, так и психологическую поддержку.
Разобраться лучше – анонимное лечение алкоголизма
Как распознать легальный центр:
Получить дополнительную информацию – анонимное лечение наркомании
Купить 3D-принтеры https://reporter63.ru/content/view/786013/zagolovok-razvitie-3dpechati-kak-novaya-tehnologiya-menyaet-nash-mir в Минске — продажа оборудования для печати пластиком и фотополимером. Подбор, консультации и гарантия. Найдите идеальный 3D-принтер для ваших задач.
Домашний протокол разбит на понятные шаги. В каждом шаге есть цель, действия, что именно мы измеряем и когда сверяем прогресс. Это делает процесс прозрачным и даёт семье чувство контроля: видно, почему назначено именно это и когда ждать облегчения.
Разобраться лучше – нарколог на дом круглосуточно цены
Такая структура терапии обеспечивает контроль на всех стадиях и помогает добиться устойчивого результата без вреда для здоровья. Пациент получает не просто временное облегчение, а полное восстановление физического и эмоционального состояния.
Получить дополнительную информацию – http://narkologicheskaya-klinika-v-astrakhani18.ru
Чем раньше стартует детокс, тем мягче идёт восстановление. Даже один визит способен перевести состояние из «кризисного» в управляемое, а затем подключается поддержка психолога или амбулаторные встречи для закрепления эффекта.
Подробнее – нарколог на дом недорого в ставрополе
Продажа 3D-принтеров http://reporter63.ru/content/view/786012/zagolovok-3dprinter-revolyuciya-v-proizvodstve-i-tvorchestve Минск — FDM, SLA и другие технологии печати. Широкий ассортимент, выгодные цены и профессиональные консультации. Подберите устройство под свои задачи.
Лечение зависимости строится поэтапно: диагностика, стабилизация, восстановление сна и эмоциональной устойчивости, работа с тягой и триггерами, профилактика рецидива, сопровождение. У одного человека ведущий фактор — хроническая тревога и бессонница, у другого — стресс и конфликты, у третьего — социальная среда, у четвёртого — сочетание нескольких причин. Поэтому программа должна учитывать реальную жизнь пациента: график работы, семейную ситуацию, уровень поддержки, типичные «точки срыва» и реакции на стресс.
Изучить вопрос глубже – наркологическая клиника отзывы
Наркологическая клиника в Донецке оказывает профессиональную помощь людям, страдающим алкогольной и наркотической зависимостью. Лечение в таких учреждениях направлено на комплексное восстановление здоровья, включающее медицинскую детоксикацию, психотерапевтическую поддержку и социальную адаптацию. Важным принципом является индивидуальный подход к каждому пациенту, что позволяет добиться устойчивых результатов и снизить риск рецидива.
Узнать больше – http://www.domen.ru
CoreBlue Health: cheapest viagra – CoreBlue Health
После прохождения курса капельниц пациенты отмечают улучшение сна, исчезновение головной боли, восстановление аппетита и общего самочувствия. При тяжёлых формах зависимости лечение дополняется физиотерапией и психологической помощью.
Получить дополнительные сведения – вывод из запоя цена
Финансовые инструменты позволяют заказчику убедиться в надежности участника и его готовности выполнить обязательства по контракту. При этом грамотное сопровождение снижает вероятность финансовых рисков и помогает правильно оформить документы для банка.
Не оставайтесь в неведении – тендерное сопровождение под ключ в ростове на дону
Метод капельничного лечения от запоя обладает рядом существенных преимуществ, благодаря которым пациенты получают качественную и оперативную помощь:
Получить дополнительные сведения – капельница от запоя круглосуточно
С первого контакта координатор уточняет: длительность запоя, виды алкоголя, аллергии, список текущих лекарств, эпизоды судорог или психозов в анамнезе, сердечно-сосудистые жалобы. На основании ответов команда подбирает безопасную схему старта и резервный план на случай усиления симптомов. Врач привозит портативный монитор для контроля АД/ЧСС/SpO2, глюкометр, набор инфузионных линий и расходников, а также средства для экспресс-коррекции тревоги по показаниям.
Изучить вопрос глубже – наркология вывод из запоя в первоуральске
Все лучшее здесь: https://l-parfum.ru/products/Bourjois-Healthy-mix/
Эти методы применяются комплексно, что повышает их эффективность и помогает пациентам быстрее возвращаться к полноценной жизни.
Детальнее – реабилитационный центр лечение алкоголизма
online pharmacy for sale and cheap viagra canadian pharmacy canadian pharmacy price checker
https://images.google.com.br/url?sa=t&url=https://civicmeds.shop prescription free canadian pharmacy and https://raygunmvp.com/user/iudpdateal-iudpdateal/?um_action=edit reputable canadian pharmacy
safe canadian pharmacy canada drugs online reviews or canada drugs online best rogue online pharmacy
В стационаре пациент получает круглосуточный контроль, расширенную диагностику и возможность подключения к аппаратуре мониторинга. Это особенно важно при тяжёлой интоксикации, нарушении сознания или судорожной активности.
Подробнее – вывод из запоя в санкт-петербурге
После стабилизации фокус смещается на поддерживающие схемы, снижающие влечение и улучшающие переносимость повседневной нагрузки. Параллельно проводятся индивидуальные и групповые психотерапевтические занятия, направленные на развитие навыков саморегуляции, работу с триггерами и формирование альтернатив алкогольному или наркотическому поведению.
Разобраться лучше – анонимная наркологическая клиника луганск
После курса капельниц улучшается сон, аппетит и общее самочувствие. Пациенты отмечают, что уже через сутки после начала лечения исчезают тремор и тахикардия, а на второй день приходит чувство ясности и спокойствия.
Разобраться лучше – наркологическая клиника лечение алкоголизма кемерово
Процесс лечения алкоголизма в Твери строится поэтапно, что позволяет пациентам постепенно проходить все стадии выздоровления.
Подробнее можно узнать тут – https://lechenie-alkogolizma-tver0.ru/lechenie-alkogolizma-gipnozom-tver
Часто предприниматели объединяют понятия тендер и госзакупки, так как обе процедуры связаны с конкурсным выбором поставщика. Однако между ними существуют определённые различия, которые важно понимать перед началом работы в этой сфере.
Не оставайтесь в неведении – услуги тендерного сопровождения в ростове на дону
https://corebluehealth.com/# CoreBlue Health
canadien pharmacies CivicMeds world pharmacy india
Процесс лечения строится поэтапно, что позволяет пациенту проходить все стадии восстановления в безопасном и контролируемом режиме.
Изучить вопрос глубже – лечение пивного алкоголизма донецк
Buy Tadalafil 10mg and Buy Tadalafil 10mg Generic Cialis price
https://27.glawandius.com/index/d2?diff=0&source=og&campaign=13142&content=&clickid=y0vzpup0zwsnl3yj&aurl=https://veritascarepharm.shop cheapest cialis and https://bold-kw.com/user/bjcrkcghbb/?um_action=edit Buy Tadalafil 10mg
Cialis 20mg price Cialis over the counter or Tadalafil price Buy Tadalafil 20mg
Диагностический блок включает сбор анамнеза, оценку витальных показателей, скрининговые шкалы по тревоге, депрессии и патологическому влечению, лабораторные тесты по показаниям. На основании полученных данных выбирается формат помощи и составляется медикаментозная схема с учётом взаимодействий препаратов и вероятных рисков.
Подробнее тут – https://narkologicheskaya-klinika-v-luganske0.ru/narkologicheskij-dispanser-lugansk
Комбинирование методов позволяет одновременно решать задачи стабилизации, профилактики и возвращения к повседневной активности.
Подробнее – http://narkologicheskaya-klinika-lugansk0.ru/narkologiya-lugansk-lnr/https://narkologicheskaya-klinika-lugansk0.ru
Now I am going to do my breakfast, later than having my breakfast coming again to read other news.
Лечение алкоголизма в Сергиевом Посаде важно рассматривать не как разовую «чистку» или временный перерыв, а как последовательный маршрут. Самый уязвимый период — первые 24–72 часа после прекращения употребления: днём может стать легче, но к вечеру и ночью волной возвращаются тревога и бессонница, усиливается внутреннее напряжение, появляются телесные симптомы. В этот момент человек чаще всего срывается, потому что ему кажется, что «иначе не выдержу». Поэтому качественная помощь строится так, чтобы пациент прошёл вечер и ночь безопасно, с понятными ориентирами и медицинской поддержкой, а затем перешёл к восстановлению и профилактике рецидива.
Подробнее тут – abstinentnyj-sindrom-pri-alkogolizme-lechenie-doma
В основе работы клиники «ИжТрезвоМед Центр» лежит принцип персонализированной медицины. Это означает, что каждый пациент получает не шаблонное лечение, а тщательно подобранный комплекс процедур, учитывающий его состояние, историю заболевания, уровень мотивации и социальную ситуацию. Такой подход позволяет добиться стабильного результата даже в сложных случаях. Лечение проводится анонимно, без постановки на учёт и разглашения данных, что особенно важно для тех, кто ценит конфиденциальность.
Получить дополнительную информацию – https://narkologicheskaya-klinika-v-izhevske18.ru/chastnaya-narkologicheskaya-klinika-izhevsk
http://veritascarepharm.com/# VeritasCare
discount pharmacy CivicMeds canadian pharmacy without prescription
Уже при первичном звонке мы собираем ключевую информацию: длительность употребления, типы веществ, сопутствующие заболевания, прошлые реакции на лекарства, эпизоды судорог и психозов, недавние значения АД/ЧСС. Это позволяет подготовить персональный стартовый протокол ещё до визита: поставить цель на первые 72 часа, определить метрики (сон, «тяга», дневная энергия), запланировать вечерний ритуал и расписать дистанционные чек-ины. Прозрачность шагов снижает тревогу у пациента и семьи и повышает соблюдаемость — фундамент устойчивого результата.
Ознакомиться с деталями – http://narkologicheskaya-klinika-kamensk-uralskij0.ru
Вывод из запоя направлен не только на снятие острых симптомов, но и на комплексное восстановление организма. Работа специалистов позволяет стабилизировать состояние и создать условия для дальнейшего лечения зависимости.
Выяснить больше – нарколог вывод из запоя в твери
Buy Tadalafil 5mg: VeritasCare – VeritasCare
VeritasCare: VeritasCare – Cialis over the counter
Детоксикация при запое — это не «универсальная капельница», а медицинская стабилизация по состоянию. Сначала оцениваются риски: давление, пульс, дыхание, признаки обезвоживания, выраженность интоксикации и отмены, наличие хронических заболеваний, препараты, которые человек уже принимал. Затем подбирается поддержка, направленная на снижение интоксикации и восстановление функций организма.
Получить больше информации – домашний вывод из запоя
Переход между этапами определяется клиническими критериями эффективности и переносимости, а также динамикой поведения в повседневной среде.
Подробнее можно узнать тут – https://lechenie-alkogolizma-lugansk0.ru/gde-mozhno-zakodirovatsya-v-luganske/
legit canadian online pharmacy and hq pharmacy online 365 wholesale pharmacy
https://www.google.com.tr/url?sa=t&url=http://civicmeds.com canadian pharmacies online or https://bbsdump.com/home.php?mod=space&uid=44911 australia online pharmacy free shipping
the pharmacy brazilian pharmacy online and canadian pharmacy world discount pharmacy card
Лечение вывода из запоя в Архангельске проводится по четко структурированной схеме, которая позволяет оперативно стабилизировать состояние пациента и начать процесс восстановления.
Узнать больше – https://kapelnica-ot-zapoya-arkhangelsk00.ru/kapelnicza-ot-zapoya-na-domu-arkhangelsk/
При ряде клинических признаков требуется ускоренное подключение специалистов и проведение детоксикации под контролем.
Разобраться лучше – вывод из запоя капельница луганск
Клиника «ВладТрезвие Центр» работает в круглосуточном режиме и готова оказать помощь жителям Владивостока и прилегающих районов в любое время суток. Врачи-наркологи прибывают по вызову в течение часа, имеют при себе все необходимые препараты и оборудование для проведения детоксикации на дому. При необходимости пациента доставляют в стационар, где лечение проходит под постоянным контролем медицинского персонала.
Углубиться в тему – помощь вывод из запоя
На данном этапе врач уточняет, сколько времени продолжается запой, какой тип алкоголя употребляется и имеются ли сопутствующие заболевания. Тщательный анализ этих данных позволяет подобрать оптимальные методы детоксикации и снизить риск осложнений.
Исследовать вопрос подробнее – нарколог на дом вывод мариуполь
economy pharmacy: canadian pharmacy near me – walmart pharmacy online
Лечение проходит поэтапно, чтобы пациент не испытывал стресса и перегрузок. Каждый шаг контролируется врачами, а терапия корректируется в зависимости от состояния. В таблице ниже представлена структура программы лечения в клинике «АстраМед Трезвость».
Изучить вопрос глубже – наркологическая клиника лечение алкоголизма астрахань
Алкогольная зависимость часто держится на страхе отмены. Человек заранее боится ночи: что не уснёт, начнётся паника, поднимется давление, появится дрожь и сильная слабость. Поэтому лечение начинается с оценки состояния: сколько длится употребление, как проходит отмена, были ли осложнения, какие заболевания есть у человека и какие препараты он уже принимал. Это позволяет выбрать безопасную тактику и понять, нужен ли стационар или можно начать амбулаторно.
Узнать больше – https://narkologicheskaya-klinika-klin12.ru/chastnaya-narkologicheskaya-klinika-v-klinu
В стационаре пациент получает круглосуточный контроль, расширенную диагностику и возможность подключения к аппаратуре мониторинга. Это особенно важно при тяжёлой интоксикации, нарушении сознания или судорожной активности.
Подробнее – http://narko-zakodirovan.ru
В зависимости от состояния пациента, помощь может быть оказана в домашних условиях или в стационаре. Вызов нарколога на дом особенно актуален при абстинентном синдроме или тяжелом алкогольном опьянении. Как отмечается в материалах НМИЦ психиатрии и наркологии, в таких ситуациях крайне важно избежать самолечения и довериться врачам, способным правильно подобрать препараты и дозировки.
Выяснить больше – вызов наркологической помощи
На данном этапе врач уточняет, сколько времени продолжается запой, какой тип алкоголя употребляется и имеются ли сопутствующие заболевания. Тщательный анализ этих данных позволяет подобрать оптимальные методы детоксикации и снизить риск осложнений.
Выяснить больше – помощь нарколога на дому в мариуполе
В наркологической клинике «Контур Здоровья» вывод из запоя рассматривают как клиническую задачу, а не как разовую услугу. Это означает, что врач сначала оценивает риски и особенности состояния, затем подбирает индивидуальную тактику детоксикации и поддержки, а после стабилизации формирует план на ближайшие часы и дни. Такой подход важен потому, что запой редко заканчивается в момент, когда стало легче после первых процедур. Часто именно вечером или ночью возникает «вторая волна» тревоги и бессонницы, и если у человека нет понятных ориентиров, он возвращается к алкоголю «чтобы отпустило». Поэтому грамотный вывод из запоя — это не только снятие симптомов, но и профилактика повторного витка в самые уязвимые часы.
Узнать больше – http://vyvod-iz-zapoya-zhukovskij12.ru/vyvod-iz-zapoya-na-domu-v-zhukovskom/https://vyvod-iz-zapoya-zhukovskij12.ru
Такая схема позволяет последовательно и безопасно восстановить силы организма и стабилизировать психическое состояние пациента.
Исследовать вопрос подробнее – вывод из запоя капельница на дому тверь
Врачебный состав клиники “Путь к выздоровлению” состоит из высококвалифицированных специалистов в области наркологии. Наши врачи-наркологи имеют обширный опыт работы с зависимыми пациентами и постоянно совершенствуют свои навыки.
Подробнее – https://нарко-фильтр.рф/vivod-iz-zapoya-na-domu-v-rostove-na-donu/
Алкогольная зависимость — хроническое заболевание, требующее своевременного вмешательства специалистов. В условиях нашего города круглосуточная анонимная помощь позволяет начать лечение без откладываний и в привычной обстановке. Клиника «Северная Звезда» предлагает комплексный подход: вызов врача на дом или стационарное пребывание в условиях полной конфиденциальности. Профессиональная команда обеспечивает детоксикацию, психологическую реабилитацию и последующую поддержку, помогая пациенту сделать первый шаг к новой, свободной от алкоголя жизни.
Подробнее тут – лечение алкоголизма на дому
Клиника «ВладТрезвие Центр» работает в круглосуточном режиме и готова оказать помощь жителям Владивостока и прилегающих районов в любое время суток. Врачи-наркологи прибывают по вызову в течение часа, имеют при себе все необходимые препараты и оборудование для проведения детоксикации на дому. При необходимости пациента доставляют в стационар, где лечение проходит под постоянным контролем медицинского персонала.
Изучить вопрос глубже – https://vyvodiz-zapoya-vladivostok18.ru/vyvod-iz-zapoya-staczionar-vladivostok
Лечение в клинике проводится последовательно, что позволяет контролировать процесс выздоровления и обеспечивать пациенту максимальную безопасность.
Узнать больше – частная наркологическая клиника в донце
Дистанционное банкротство физического лица — это удобный способ списать долги без личных визитов в суд и офисы. Переходите по запросу юристы по дистанционному банкротству в Москве. Все этапы проходят онлайн: от консультации до подачи документов и сопровождения дела. Вы экономите время, снижаете стресс и получаете профессиональную поддержку юриста на каждом этапе. Поможем законно избавиться от долгов и начать финансовую жизнь с чистого листа.
canadian pharmacy world coupons: safe online pharmacies – canada pharmacy coupon
Зависимость меняет работу нервной системы: алкоголь начинает выполнять функцию регулятора — сна, тревоги, настроения и даже физического самочувствия. Когда человек прекращает пить, организм реагирует отменой, и именно она подталкивает вернуться к употреблению. Сила воли в этой точке часто проигрывает физиологии: тревога растёт, сон исчезает, сердце бьётся чаще, давление «скачет», появляется ощущение угрозы.
Разобраться лучше – алкоголь лечение алкоголизма
Уже при первичном звонке мы собираем ключевую информацию: длительность употребления, типы веществ, сопутствующие заболевания, прошлые реакции на лекарства, эпизоды судорог и психозов, недавние значения АД/ЧСС. Это позволяет подготовить персональный стартовый протокол ещё до визита: поставить цель на первые 72 часа, определить метрики (сон, «тяга», дневная энергия), запланировать вечерний ритуал и расписать дистанционные чек-ины. Прозрачность шагов снижает тревогу у пациента и семьи и повышает соблюдаемость — фундамент устойчивого результата.
Подробнее можно узнать тут – вывод наркологическая клиника каменск-уральск
Обычно всё начинается с короткого сбора информации: сколько дней длится употребление, когда был последний приём, какие симптомы сейчас самые сильные, есть ли хронические заболевания и аллергии, какие препараты принимались самостоятельно, были ли судороги, галлюцинации, сильные скачки давления. Затем врач проводит осмотр на месте и определяет тактику: какие меры нужны сейчас, какой объём поддержки безопасен, нужно ли наблюдение в стационаре или можно работать дома.
Углубиться в тему – http://narkolog-na-dom-pushkino12.ru
В клинике используется модульная система лечения, включающая медицинские, психологические и социальные компоненты. В зависимости от состояния человека акценты могут смещаться — например, у одних пациентов приоритетом становится физиологическое восстановление, у других — коррекция эмоционального фона и когнитивных паттернов.
Подробнее тут – наркологическая клиника стационар в ставрополе
https://corebluehealth.shop/# CoreBlue Health
Детоксикация при запое — это не «универсальная капельница», а медицинская стабилизация по состоянию. Сначала оцениваются риски: давление, пульс, дыхание, признаки обезвоживания, выраженность интоксикации и отмены, наличие хронических заболеваний, препараты, которые человек уже принимал. Затем подбирается поддержка, направленная на снижение интоксикации и восстановление функций организма.
Изучить вопрос глубже – https://vyvod-iz-zapoya-klin12.ru/vyvod-iz-zapoya-na-domu-v-klinu
При ряде клинических признаков требуется ускоренное подключение специалистов и проведение детоксикации под контролем.
Изучить вопрос глубже – вывод из запоя луганск
Для повышения эффективности лечения наркологическая клиника применяет стандартизированные методы, включающие мониторинг жизненно важных параметров, корректировку фармакотерапии и оценку неврологических показателей. Совокупность таких мер делает процесс более предсказуемым и снижает вероятность осложнений. Кроме того, практическая часть работы включает регулярную проверку метаболических функций, что способствует точному дозированию препаратов и своевременному изменению схем. Это позволяет поддерживать физиологическую устойчивость организма даже при интенсивной нагрузке и сохранять стабильность состояния на протяжении всего периода терапии.
Выяснить больше – наркологическая клиника стационар в пензе
Системная работа, которой характеризуется наркологическая клиника, предполагает последовательное исследование состояния пациента, анализ факторов риска и создание индивидуального терапевтического маршрута. Такой формат позволяет уточнять клиническую картину на ранних этапах и корректировать вмешательства по мере изменения состояния человека. Применение структурированных методик повышает предсказуемость результата и обеспечивает безопасность всех процедур. При этом выводы формируются на основании объективных данных наблюдения, лабораторных показателей и динамики симптомов. Оптимальная нагрузка распределяется на весь период лечения для достижения устойчивого эффекта без переутомления организма.
Подробнее – https://narkologicheskaya-klinika-penza18.ru/chastnaya-narkologicheskaya-klinika-penza
ГНБ бурение https://stroytex.su современный способ прокладки инженерных сетей без раскопок. Подходит для дорог, рек и плотной застройки. Точная технология, сокращение сроков и минимальные затраты.
Вывод из запоя — это не просто медицинская процедура, а важный шаг на пути восстановления организма и возвращения человека к нормальной жизни. В клинике «ВладТрезвие Центр» пациенты получают профессиональную помощь, основанную на современных методиках детоксикации и безопасном медикаментозном восстановлении. Каждый случай рассматривается индивидуально, а лечение подбирается с учётом возраста, состояния здоровья и продолжительности запоя. Наркологи центра выезжают на дом круглосуточно, обеспечивая помощь даже в экстренных ситуациях, когда время играет ключевую роль.
Подробнее тут – http://vyvodiz-zapoya-vladivostok18.ru
После прохождения курса капельниц пациенты отмечают улучшение сна, исчезновение головной боли, восстановление аппетита и общего самочувствия. При тяжёлых формах зависимости лечение дополняется физиотерапией и психологической помощью.
Подробнее можно узнать тут – срочный вывод из запоя
В рамках лечебного процесса наркологическая клиника задействует структурированные механизмы наблюдения, включающие анализ лабораторных показателей, оценку соматического тонуса и изучение активности нервной системы. Эти элементы обеспечивают комплексность работы и позволяют своевременно корректировать план лечения. Такая система предотвращает перегрузку организма и способствует поддержанию стабильности на фоне применения медикаментозных схем. Ниже представлены ключевые составляющие терапевтического процесса, формирующие основу для клинического восстановления.
Разобраться лучше – наркологическая клиника нарколог пенза
over the counter sildenafil Cheap generic Viagra online CoreBlue Health
Процесс лечения алкоголизма в Твери строится поэтапно, что позволяет пациентам постепенно проходить все стадии выздоровления.
Подробнее тут – здоровье лечение алкоголизма
Когда проблемы с алкоголизмом достигают критической точки, оперативное вмешательство становится жизненно необходимым. В Мариуполе квалифицированные наркологи оказывают помощь на дому, обеспечивая оперативную детоксикацию организма, стабилизацию жизненно важных показателей и психологическую поддержку. Такой формат лечения позволяет пациенту получить качественную медицинскую помощь в привычной домашней обстановке, сохраняя конфиденциальность и минимизируя стресс, связанный с посещением стационара.
Разобраться лучше – https://narcolog-na-dom-mariupol0.ru/narkolog-na-dom-kruglosutochno-mariupol
Каждое из этих направлений играет важную роль и в совокупности формирует основу для восстановления и возвращения пациента к полноценной жизни.
Получить дополнительные сведения – http://narkologicheskaya-klinika-v-doneczke0.ru/narkologiya-doneczk-dnr/
Важным инструментом контроля является таблица оценочных параметров, применяемых в ходе наблюдения. Она служит для систематизации данных и поддержания единых стандартов анализа. Ниже приведена таблица, отражающая основные направления наблюдения.
Подробнее – лечение в наркологической клинике
I was wondering if you ever thought of changing the structure of your website? Its very well written; I love what youve got to say. But maybe you could a little more in the way of content so people could connect with it better. Youve got an awful lot of text for only having one or 2 images. Maybe you could space it out better?
Такая схема лечения делает процесс последовательным и контролируемым. Врачи клиники сопровождают пациентов на всех стадиях, помогая преодолеть как физическую, так и психологическую зависимость. Особое внимание уделяется возвращению человека к активной и стабильной жизни без употребления алкоголя или наркотиков.
Подробнее – лечение в наркологической клинике ижевск
Buy Tadalafil 10mg or Buy Tadalafil 20mg Buy Tadalafil 10mg
https://myspace.com/veritascarepharm.shop Tadalafil Tablet and https://rightcoachforme.com/author/vkwnzsxioi/ Cialis over the counter
Generic Cialis without a doctor prescription Cialis 20mg price and Cialis over the counter Tadalafil Tablet
Ключевая задача первичного этапа — безопасно купировать абстинентный синдром и обеспечить постепенный метаболический «выход» без резких колебаний давления и частоты сердечных сокращений. Дополнительно оцениваются когнитивные и аффективные проявления, нарушения сна, уровень тревоги и наличие сопутствующих воспалительных процессов. По результатам обследования формируется индивидуальный план лечения с учетом предшествующего анамнеза, толерантности к препаратам и возможной полипрагмазии.
Детальнее – вывод из запоя на дому недорого в переулок панфилова, 36
Услуга капельничного лечения от запоя на дому в Архангельске предусматривает комплексный подход, направленный на оперативное восстановление организма. Сразу после вызова нарколог прибывает на дом, проводит детальный осмотр, собирает анамнез и измеряет жизненно важные показатели. На основе этих данных разрабатывается персональный план терапии, который включает введение современных медикаментов с использованием автоматизированных систем дозирования, а также психологическую поддержку для создания условий долгосрочной ремиссии.
Узнать больше – http://kapelnica-ot-zapoya-arkhangelsk0.ru/kapelnicza-ot-zapoya-klinika-arkhangelsk/
С первого контакта координатор уточняет: длительность запоя, виды алкоголя, аллергии, список текущих лекарств, эпизоды судорог или психозов в анамнезе, сердечно-сосудистые жалобы. На основании ответов команда подбирает безопасную схему старта и резервный план на случай усиления симптомов. Врач привозит портативный монитор для контроля АД/ЧСС/SpO2, глюкометр, набор инфузионных линий и расходников, а также средства для экспресс-коррекции тревоги по показаниям.
Изучить вопрос глубже – вывод из запоя с выездом первоуральск
В этой статье мы рассмотрим ключевые признаки эффективной наркологической помощи в Ярославле — от состава команды до подходов в работе с мотивацией пациента.
Изучить вопрос глубже – http://lechenie-narkomanii-yaroslavl0.ru
canadianpharmacyworld CivicMeds austria pharmacy online
Методическая база клиники опирается на доказательные подходы и стандартизированные протоколы. Комбинация инструментов подбирается индивидуально с учётом переносимости и клинической целесообразности.
Подробнее тут – наркологическая клиника луганск
Каждая процедура проводится под контролем врача и сопровождается мониторингом давления, пульса и температуры. После курса капельниц пациент чувствует улучшение самочувствия, нормализуется сон, снижается раздражительность, появляется энергия и ясность сознания.
Получить больше информации – наркологическая клиника
Помощь начинается с первичной оценки. Врач уточняет длительность запоя, время последнего приёма алкоголя, ведущие симптомы, хронические заболевания, прошлые осложнения, аллергии, а также препараты, которые пациент уже принимал самостоятельно. Далее проводится осмотр: измеряются давление и пульс, оценивается дыхание, температура, признаки обезвоживания, уровень сознания, выраженность тремора и тревоги. На основании этой информации выбирается тактика и формат — на дому, амбулаторно или в стационаре, если риски высокие.
Подробнее можно узнать тут – вывод из запоя недорого
Работа строится на четкой структуре, определяющей порядок лечебных мероприятий. Ниже представлена последовательность основных этапов.
Исследовать вопрос подробнее – вывод из запоя дешево в кемерове
Cialis 20mg price in USA: VeritasCare – Cialis 20mg price
legal online pharmacies in the us or canada discount pharmacy best canadian pharmacy to buy from
http://forums.spacewars.com/proxy.php?link=https://civicmeds.com cialis online pharmacy and https://psicologiasaludable.es/user/swzlvvgtyz/?um_action=edit online canadian pharmacy review
viagra from canadian pharmacy big pharmacy online or online pharmacy no prescription no prescription required pharmacy
pharmacy online 365: CivicMeds – family pharmacy
Чем раньше стартует детокс, тем мягче идёт восстановление. Даже один визит способен перевести состояние из «кризисного» в управляемое, а затем подключается поддержка психолога или амбулаторные встречи для закрепления эффекта.
Исследовать вопрос подробнее – https://narkolog-na-dom-stavropol0.ru/
Cheap Viagra 100mg or Cheap Viagra 100mg viagra without prescription
http://rvnetlinx.com/wpframetop.php?id=2063&url=corebluehealth.shop buy viagra here and http://bbs.51pinzhi.cn/home.php?mod=space&uid=7813547 Viagra Tablet price
generic sildenafil sildenafil over the counter or generic sildenafil Cheap generic Viagra
На данном этапе врач уточняет, сколько времени продолжается запой, какой тип алкоголя употребляется и имеются ли сопутствующие заболевания. Тщательный анализ этих данных позволяет подобрать оптимальные методы детоксикации и снизить риск осложнений.
Изучить вопрос глубже – http://narcolog-na-dom-mariupol0.ru
Наркологическая клиника в Донецке оказывает специализированную помощь пациентам, страдающим от алкогольной и наркотической зависимости. Работа специалистов направлена на комплексное восстановление здоровья, включающее медицинское лечение, психотерапевтическую поддержку и социальную адаптацию. Такой подход позволяет не только купировать симптомы, но и устранить причины, лежащие в основе заболевания.
Получить дополнительные сведения – наркологическая клиника нарколог
CoreBlue Health: Viagra tablet online – sildenafil 50 mg price
http://veritascarepharm.com/# Tadalafil price
safe online pharmacy and canadian world pharmacy all in one pharmacy
http://vk-manga.ru/forum/away.php?s=https://civicmeds.shop best canadian pharmacy to buy from or https://chinaexchangeonline.com/user/iivenhomcb/?um_action=edit economy pharmacy
canadian pharmacy discount code pharmacy rx or online pharmacy 365 pills legal online pharmacies in the us
Применение подобных таблиц формирует прозрачность терапевтического процесса и помогает специалистам адаптировать стратегию лечения с учетом динамики. Это обеспечивает объективность и последовательность в клинической оценке каждого этапа.
Получить дополнительную информацию – наркологическая клиника цены пенза
Профессиональная помощь при запое необходима, если:
Получить дополнительную информацию – https://narko-zakodirovan.ru/vyvod-iz-zapoya-na-domu-spb
Выезд врача на дом позволяет провести детоксикацию в спокойной обстановке. Врач привозит с собой препараты, капельницы, измерительное оборудование и проводит лечение в течение 1–2 часов. Такой формат подходит при стабильном состоянии и желании сохранить анонимность.
Выяснить больше – вывод из запоя
Медицинская детоксикация помогает снизить интоксикацию и сделать состояние управляемым. Обычно уменьшается выраженность тремора и потливости, давление и пульс становятся ровнее, снижается тошнота, тревога перестаёт быть пиковым состоянием, появляется шанс на восстановление сна. Но детоксикация не «отменяет зависимость». Она создаёт условия, при которых человек может трезво принять решение о дальнейшем лечении и пережить первые сутки без возврата к алкоголю или веществам «для облегчения».
Подробнее тут – http://narkologicheskaya-klinika-vidnoe12.ru/
online pharmacy australia paypal: CivicMeds – best canadian pharmacy to buy from
— Растворы с глюкозой и витаминами для коррекции энергетического обмена. — Минеральные комплексы для нормализации электролитов. — Антиоксиданты и гепатопротекторы для защиты печени. — Спазмолитики для снятия болевого синдрома. — Противорвотные препараты при тошноте.
Подробнее тут – частная наркологическая клиника архангельск
Комбинирование методов позволяет одновременно решать задачи стабилизации, профилактики и возвращения к повседневной активности.
Исследовать вопрос подробнее – наркологическая клиника вывод из запоя
Таблица: Основные признаки надёжного центра лечения наркомании
Узнать больше – https://lechenie-narkomanii-murmansk0.ru/lechenie-narkomanii-i-alkogolizma-marmansk/
Такой подход обеспечивает комплексное восстановление — от физического состояния до эмоциональной стабильности. Пациент получает внимание врачей на всех этапах и поддержку после выписки.
Подробнее – запой наркологическая клиника кемерово
После прохождения курса капельниц пациенты отмечают улучшение сна, исчезновение головной боли, восстановление аппетита и общего самочувствия. При тяжёлых формах зависимости лечение дополняется физиотерапией и психологической помощью.
Подробнее можно узнать тут – анонимный вывод из запоя
Die Sicherheit fokussiert sich auf Verschlusselung, Audits und KYC-Prozesse, damit Nutzerdaten geschutzt bleiben.
solana kurs euro https://solanagxy.com/
В зависимости от состояния пациента, помощь может быть оказана в домашних условиях или в стационаре. Вызов нарколога на дом особенно актуален при абстинентном синдроме или тяжелом алкогольном опьянении. Как отмечается в материалах НМИЦ психиатрии и наркологии, в таких ситуациях крайне важно избежать самолечения и довериться врачам, способным правильно подобрать препараты и дозировки.
Детальнее – https://narkologicheskaya-pomoshh-arkhangelsk0.ru
Процедура вывода из запоя проводится строго по медицинским стандартам. Применяются современные капельницы, витамины и препараты для нормализации функций сердца, печени, почек и нервной системы. После снятия интоксикации врачи назначают поддерживающее лечение, направленное на стабилизацию эмоционального состояния и снижение тяги к алкоголю.
Детальнее – наркологический вывод из запоя
Самостоятельные попытки обычно идут по двум типичным маршрутам. Первый — «пить понемногу, чтобы не трясло». На практике это продлевает запой и усиливает истощение: сон остаётся поверхностным, тревога нарастает, давление и пульс становятся нестабильными, организм не успевает восстанавливаться. Второй маршрут — резко прекратить и «перетерпеть». Тогда симптомы отмены могут нарастать резко: паника, сильный тремор, потливость, тахикардия, скачки давления, тошнота, рвота, бессонница. Испугавшись ухудшения, человек снова возвращается к алкоголю, потому что это кажется единственным быстрым способом облегчить состояние.
Углубиться в тему – вызвать вывод из запоя
Вывод из запоя в клинике формируется на основе последовательных процедур, направленных на стабилизацию физиологических функций и устранение токсических влияний. Такой подход позволяет корректно регулировать состояние пациента и контролировать интенсивность симптомов. Рабочие алгоритмы включают оценку метаболических процессов, анализ соматических показателей и определение степени неврологических изменений. В результате создается структурированная модель помощи, ориентированная на восстановление адаптивных возможностей организма. Процессы выполняются под контролем специалистов, что обеспечивает прогнозируемый терапевтический эффект и снижает вероятность осложнений.
Углубиться в тему – вывод из запоя дешево
online otc pharmacy or mexican pharmacy canadianpharmacymeds com
https://www.google.co.ug/url?sa=t&url=https://civicmeds.shop canada pharmacy online or http://mbuild.store/user/vnzcicjpht/?um_action=edit canada drug pharmacy
indianpharmacy com legal canadian pharmacy online and online pharmacy reddit reputable online pharmacy
В наркологической клинике «Контур Здоровья» вывод из запоя рассматривают как клиническую задачу, а не как разовую услугу. Это означает, что врач сначала оценивает риски и особенности состояния, затем подбирает индивидуальную тактику детоксикации и поддержки, а после стабилизации формирует план на ближайшие часы и дни. Такой подход важен потому, что запой редко заканчивается в момент, когда стало легче после первых процедур. Часто именно вечером или ночью возникает «вторая волна» тревоги и бессонницы, и если у человека нет понятных ориентиров, он возвращается к алкоголю «чтобы отпустило». Поэтому грамотный вывод из запоя — это не только снятие симптомов, но и профилактика повторного витка в самые уязвимые часы.
Углубиться в тему – вывод из запоя недорого
legitimate canadian mail order pharmacy CivicMeds australia online pharmacy free shipping
Проблемы зависимости требуют оперативного вмешательства. Чем раньше начато лечение, тем выше вероятность полного восстановления. Наркологическая помощь в Архангельске представлена как государственными, так и частными клиниками, каждая из которых предлагает свой уровень сервиса и спектр услуг. Однако для получения эффективной и безопасной помощи важно понимать, какие критерии определяют качество наркологической поддержки.
Узнать больше – http://narkologicheskaya-pomoshh-arkhangelsk0.ru/anonimnaya-narkologicheskaya-pomoshh-arkhangelsk/
Мы не используем универсальные «коктейли»: алгоритм строится из коротких проверяемых шагов. На старте фиксируем цель (например, уменьшить тремор и тошноту, стабилизировать пульс и давление, вернуть полноценный ночной сон), выбираем минимально достаточные средства для её достижения и заранее назначаем «окно оценки» — момент, когда команда сверяет эффект и при необходимости корректирует один параметр. Такой подход защищает от полипрагмазии, экономит силы пациента и делает прогресс читаемым для всей семьи.
Получить дополнительные сведения – нарколог вывод из запоя каменск-уральск
Детоксикация — это медицинская стабилизация при интоксикации и тяжёлой отмене. Она помогает снизить нагрузку на организм, скорректировать обезвоживание и водно-электролитные нарушения, уменьшить выраженность тремора, потливости, тошноты, стабилизировать давление и пульс, снизить тревогу и восстановить сон. Но важно понимать границы результата: после длительного запоя организм не восстанавливается мгновенно, слабость и эмоциональная неустойчивость могут сохраняться в первые сутки.
Получить дополнительную информацию – http://www.domen.ru
Наркологическая клиника — это не просто медицинское учреждение, а пространство, где человеку помогают вернуть здоровье, ясность мышления и контроль над жизнью. В клинике «КаспийМед Альтернатива» в Астрахани круглосуточно оказывается помощь людям, столкнувшимся с алкогольной, наркотической и смешанной зависимостью. Центр сочетает медицинскую строгость и человеческое участие, обеспечивая лечение в комфортных условиях с максимальной конфиденциальностью. Здесь разработаны программы детоксикации, восстановления и психотерапевтической поддержки, что делает терапию эффективной и безопасной.
Изучить вопрос глубже – http://narkologicheskaya-klinica-v-astrakhani18.ru
В рамках лечебного процесса наркологическая клиника задействует структурированные механизмы наблюдения, включающие анализ лабораторных показателей, оценку соматического тонуса и изучение активности нервной системы. Эти элементы обеспечивают комплексность работы и позволяют своевременно корректировать план лечения. Такая система предотвращает перегрузку организма и способствует поддержанию стабильности на фоне применения медикаментозных схем. Ниже представлены ключевые составляющие терапевтического процесса, формирующие основу для клинического восстановления.
Исследовать вопрос подробнее – http://narkologicheskaya-klinika-v-penze18.ru/
Метод капельничного лечения от запоя обладает рядом существенных преимуществ, благодаря которым пациенты получают качественную и оперативную помощь:
Изучить вопрос глубже – https://kapelnica-ot-zapoya-arkhangelsk0.ru/kapelnicza-ot-zapoya-na-domu-arkhangelsk
Многие думают, что если стало легче днём, значит, всё позади. Но часто к вечеру усиливается тревога, растёт внутреннее напряжение, сон не приходит, начинается паника, а тело снова «разгоняется» — тахикардия, потливость, тремор. Это связано с нестабильностью нервной системы и колебаниями вегетативных реакций после отмены. Если человек не понимает, что делать, он может сорваться, и запой продолжится. Поэтому правильный вывод из запоя всегда включает план на ночь: как организовать спокойную обстановку, что контролировать, какие симптомы допустимы, а какие опасны и требуют срочного обращения.
Подробнее можно узнать тут – срочный вывод из запоя
Наркологическая клиника “Путь к выздоровлению” расположена по адресу: г. Ростов-на-Дону, ул. Петровская, д. 19. Клиника работает ежедневно с 8:00 до 20:00, без выходных. Наши специалисты готовы предоставить консультацию и ответить на все вопросы, связанные с лечением зависимостей. Мы гарантируем конфиденциальность и индивидуальный подход к каждому пациенту.
Подробнее – https://нарко-фильтр.рф/vivod-iz-zapoya-na-domu-v-rostove-na-donu
п»їcialis generic or buy cialis pill Generic Cialis price
http://www.google.tk/url?q=https://veritascarepharm.shop Tadalafil Tablet and https://bbs.9uv5.com/home.php?mod=space&uid=31793 Cialis 20mg price in USA
cialis for sale Buy Tadalafil 5mg or Buy Cialis online п»їcialis generic
Generic Viagra for sale CoreBlue Health Order Viagra 50 mg online
Своевременная маршрутизация снижает риск делирия, электролитных сдвигов и осложнений со стороны сердечно-сосудистой системы, а также ускоряет стабилизацию состояния.
Углубиться в тему – https://vyvod-iz-zapoya-lugansk0.ru/vyvedenie-iz-zapoya-v-luganske
Услуга вывода из запоя на дому в Архангельске разработана для оперативного снижения токсической нагрузки при тяжелых формах алкогольной интоксикации. Сразу после вызова нарколог проводит подробный осмотр, измеряет жизненно важные показатели и собирает анамнез, что позволяет точно определить степень интоксикации. На основе полученной информации формируется индивидуальный план лечения, включающий капельничное введение современных медикаментов с использованием автоматизированных инфузионных систем и сопровождение в виде психологической поддержки.
Получить дополнительные сведения – вызов на дом капельницы от запоя архангельск
Лечение в «ИжТрезвоМед Центр» проходит поэтапно, с акцентом на безопасность и эффективность. Каждый этап направлен на достижение конкретных целей, от детоксикации до психотерапии. В таблице представлена структура лечебного процесса:
Узнать больше – http://narkologicheskaya-klinika-v-izhevske18.ru/chastnaya-narkologicheskaya-klinika-izhevsk/
Критерий
Узнать больше – http://narkologicheskaya-pomoshh-arkhangelsk0.ru/
Для пациентов, требующих круглосуточного наблюдения, клиника «Полярис» предлагает стационар VIP-класса. Здесь созданы все условия для быстрого восстановления: удобные палаты, индивидуальное меню, зоны отдыха и консультации профильных специалистов.
Детальнее – бесплатная наркологическая клиника архангельск
Таблица: Основные признаки надёжного центра лечения наркомании
Исследовать вопрос подробнее – лечение наркомании в мурманске
https://corebluehealth.com/# sildenafil 50 mg price
Такая последовательность шагов позволяет врачу действовать точно и эффективно. Благодаря комплексному подходу пациент чувствует облегчение уже через 1–2 часа после начала терапии, а полное восстановление наступает в течение суток.
Исследовать вопрос подробнее – https://vyvod-iz-zapoya-stavropol0.ru/stavropol-lechenie-alkogolizma
canada discount pharmacy: CivicMeds – online pharmacy australia
Мы не «перелечиваем» пациента процедурами. Любая мера начинается как проверяемая гипотеза с измеримыми маркерами. Ниже — опорная карта лечения. В реальности она персонализируется в зависимости от клинической картины, возраста, сопутствующих заболеваний и бытового графика.
Подробнее тут – http://narkologicheskaya-klinika-kamensk-uralskij0.ru/narkologiya-kamensk-uralskij/
canadian pharmacy online cialis: pharmacy in canada for viagra – super pharmacy
Процесс терапии в клинике построен по поэтапной схеме, включающей:
Исследовать вопрос подробнее – анонимное лечение алкоголизма архангельск
Обращение за помощью к наркологу на дому имеет ряд преимуществ, особенно в экстренных ситуациях:
Углубиться в тему – врач нарколог выезд на дом мариуполь
Ниже приведены ключевые элементы, которые отражают базовую структуру процессов, формирующих последовательность лечебных мероприятий. Они помогают подробно рассмотреть основные направления работы и понять роль каждого звена в общей терапевтической системе.
Выяснить больше – https://narkologicheskaya-klinika-penza18.ru/narkologicheskaya-pomoshh-penza/
Каждое из этих направлений играет важную роль и в совокупности формирует основу для восстановления и возвращения пациента к полноценной жизни.
Получить дополнительную информацию – http://narkologicheskaya-klinika-v-doneczke0.ru/
В клинике используются доказательные методики, эффективность которых подтверждена практикой. Они подбираются индивидуально и позволяют достичь устойчивых результатов.
Разобраться лучше – лечение пивного алкоголизма тверь
Отдельный риск — самолечение препаратами. Часто пытаются «уснуть» с помощью снотворных или седативных, принимают лекарства от давления без контроля цифр, смешивают алкоголь с успокоительными. Такие комбинации могут влиять на дыхание, сердечный ритм и уровень сознания. В итоге состояние становится менее предсказуемым, а риск осложнений — выше. Медицинский вывод из запоя начинается с того, что врач собирает информацию о том, что уже принималось, и оценивает состояние, чтобы не допустить опасных сочетаний и ошибок в тактике.
Изучить вопрос глубже – вывод из запоя вызов нарколога
В клинике «ПензаМед Трезвость» лечение проводится по индивидуальной схеме, которая формируется после первичного осмотра. Нарколог оценивает состояние пациента, уровень алкогольной интоксикации и наличие сопутствующих заболеваний. На основании данных подбираются препараты, способные эффективно очистить кровь, восстановить работу органов и снизить абстинентные проявления. При лёгкой форме зависимости возможен выезд врача на дом, где пациенту устанавливают капельницу и обеспечивают наблюдение в течение всего процесса детоксикации. В более сложных случаях рекомендуется госпитализация в стационар, где помощь оказывается под постоянным контролем специалистов.
Подробнее тут – скорая вывод из запоя в пензе
Очень радует стабильное качество!
розы томск
CoreBlue Health: buy Viagra online – CoreBlue Health
world pharmacy india and us pharmacy no prescription top 10 pharmacy websites
https://www.google.dz/url?q=https://civicmeds.com cheap canadian pharmacy or http://fog.gain.tw/space.php?uid=194031 online pharmacy ordering
online pharmacy uk top 10 pharmacies in india and canadian pharmacy generic cialis canada online pharmacy
Наркологическая клиника «КаменМед Ренессанс» выстроена как единая система помощи, где медицинская точность, психологическая поддержка и продуманная логистика соединяются в устойчивый маршрут восстановления. Мы работаем с любыми формами химической зависимости — алкогольной, опиоидной, стимуляторной, полизависимостями — и не ограничиваемся «разовыми» процедурами. Наша задача — не просто снять острые симптомы, а наладить ритм сна, снизить реактивную тревогу, сформировать навыки отказа и вернуть управление повседневной жизнью. Для этого используются модульные программы: детокс, стабилизация, психотерапия, семейные мини-сессии, сопровождение и профилактика срывов. Каждый модуль имеет цель, чёткие критерии эффективности и срок переоценки, чтобы прогресс был ощутимым и измеримым.
Разобраться лучше – http://narkologicheskaya-klinika-kamensk-uralskij0.ru
Лечебные мероприятия строятся на основе поэтапного внедрения терапевтических решений, которые опираются на индивидуальные характеристики пациента. Уточнение анамнеза, анализ данных обследований и выявление сопутствующих факторов позволяют создавать эффективные и прогнозируемые программы лечения. В клинике соблюдается строгая последовательность процедур, направленная на снижение рисков и обеспечение безопасности. На каждом этапе проводится проверка клинической реакции, что позволяет своевременно выявлять необходимость корректировки и адаптировать лечебные меры под текущую картину.
Получить больше информации – наркологическая клиника клиника помощь
«Ижевский Центр Трезвых Решений» — это частное медицинское учреждение, где проводится лечение всех форм алкогольной и наркотической зависимости. Программы терапии разработаны на основе международных рекомендаций и включают не только медикаментозное воздействие, но и психологическую поддержку. Все процедуры проходят анонимно, без постановки на учёт, что особенно важно для пациентов, желающих сохранить конфиденциальность.
Углубиться в тему – narkologicheskaya-klinika-v-izhevsk18.ru/
VeritasCare: VeritasCare – VeritasCare
Выездная бригада «Трезвого Севера» укомплектована портативным оборудованием (контроль АД, ЧСС, SpO2, температурный мониторинг; по показаниям — экспресс-диагностика), а медикаментозная часть всегда собирается индивидуально: учитываем длительность эпизода, сопутствующие заболевания, текущие жалобы, переносимость препаратов и прошлый опыт помощи. Рядом с медициной идёт психообразование: объясняем, что делать вечером, как «снимать газ» нервной системе, как отслеживать собственные маркеры и когда давать сигнал врачу.
Подробнее тут – http://vyvod-iz-zapoya-petrozavodsk0.ru
В клинике используется модульная система лечения, включающая медицинские, психологические и социальные компоненты. В зависимости от состояния человека акценты могут смещаться — например, у одних пациентов приоритетом становится физиологическое восстановление, у других — коррекция эмоционального фона и когнитивных паттернов.
Подробнее можно узнать тут – платная наркологическая клиника в ставрополе
Основным инструментом при выведении из запоя является капельница. Её состав зависит от состояния пациента, продолжительности запоя и наличия хронических заболеваний. В клинике «ПензаМед Трезвость» используются только проверенные препараты с минимальной нагрузкой на организм. Ниже приведена таблица с примерами инфузионных растворов и их воздействием.
Изучить вопрос глубже – нарколог на дом вывод из запоя пенза
Переход между этапами определяется клиническими критериями эффективности и переносимости, а также динамикой поведения в повседневной среде.
Исследовать вопрос подробнее – https://lechenie-alkogolizma-lugansk0.ru/lugansk-kodirovka-ot-alkogolya/
В этом материале мы разберём 7 основ лечения алкоголизма и расскажем, как в Ярославле получить помощь, соответствующую современным стандартам терапии.
Подробнее тут – https://lechenie-alkogolizma-yaroslavl0.ru/anonimnoe-lechenie-alkogolizma-yaroslavl/
«Ижевский Центр Трезвых Решений» — это частное медицинское учреждение, где проводится лечение всех форм алкогольной и наркотической зависимости. Программы терапии разработаны на основе международных рекомендаций и включают не только медикаментозное воздействие, но и психологическую поддержку. Все процедуры проходят анонимно, без постановки на учёт, что особенно важно для пациентов, желающих сохранить конфиденциальность.
Ознакомиться с деталями – http://narkologicheskaya-klinika-v-izhevsk18.ru
https://civicmeds.com/# buying from canadian pharmacies
В Ставрополе мы выстроили так называемую «тихую логистику»: запись без послеобеденных «окон», экспресс-приём без ожидания, сопровождение от входа до палаты, а при необходимости — деликатная госпитализация через отдельный вход. При первичном обращении пациент получает пошаговый план на ближайшие 72 часа: стабилизация самочувствия, детоксикация по показаниям, психообразование, старт профилактики срыва. Такой регламент экономит время и снижает тревожность — вы понимаете, что и зачем делается, и видите прогноз по срокам.
Получить дополнительные сведения – запой наркологическая клиника ставрополь
Your article helped me a lot, is there any more related content? Thanks!
Домашний протокол разбит на понятные шаги. В каждом шаге есть цель, действия, что именно мы измеряем и когда сверяем прогресс. Это делает процесс прозрачным и даёт семье чувство контроля: видно, почему назначено именно это и когда ждать облегчения.
Подробнее можно узнать тут – http://narkolog-na-dom-petrozavodsk0.ru/vyvod-iz-zapoya-narkolog-na-dom-petrozavodsk-uslugi/
Вывод из запоя в Ставрополе проводится с использованием сертифицированных препаратов, которые действуют мягко, не вызывая резких перепадов давления или побочных эффектов. Перед началом лечения врач проводит диагностику — измеряет пульс, артериальное давление, уровень насыщения крови кислородом, оценивает состояние печени и почек. Только после этого подбирается схема терапии. Такой подход снижает риски осложнений и гарантирует безопасное восстановление.
Получить больше информации – https://vyvod-iz-zapoya-stavropol0.ru/vyvod-iz-zapoya-na-domu-stavropol
cheapest pharmacy CivicMeds best canadian pharmacy
Hi! I could have sworn I’ve been to this website before but after browsing through some of the post I realized it’s new to me. Nonetheless, I’m definitely glad I found it and I’ll be book-marking and checking back frequently!
На данном этапе врач уточняет, сколько времени продолжается запой, какой тип алкоголя употребляется и имеются ли сопутствующие заболевания. Тщательный анализ этих данных позволяет подобрать оптимальные методы детоксикации и снизить риск осложнений.
Детальнее – https://narcolog-na-dom-mariupol0.ru/narkolog-na-dom-czena-mariupol/
Для повышения эффективности лечения наркологическая клиника применяет стандартизированные методы, включающие мониторинг жизненно важных параметров, корректировку фармакотерапии и оценку неврологических показателей. Совокупность таких мер делает процесс более предсказуемым и снижает вероятность осложнений. Кроме того, практическая часть работы включает регулярную проверку метаболических функций, что способствует точному дозированию препаратов и своевременному изменению схем. Это позволяет поддерживать физиологическую устойчивость организма даже при интенсивной нагрузке и сохранять стабильность состояния на протяжении всего периода терапии.
Исследовать вопрос подробнее – https://narkologicheskaya-klinika-penza18.ru/
Незамедлительно после поступления вызова нарколог приезжает на дом для проведения тщательного осмотра. Специалист измеряет жизненно важные показатели, такие как пульс, артериальное давление и температура, и собирает анамнез для оценки степени алкогольной интоксикации.
Получить дополнительные сведения – врач на дом капельница от запоя архангельск
На этом этапе специалист уточняет продолжительность запоя, тип употребляемого алкоголя и наличие сопутствующих заболеваний, что позволяет разработать персонализированный план терапии и оперативно выбрать методы детоксикации.
Углубиться в тему – http://kapelnica-ot-zapoya-arkhangelsk0.ru/kapelnicza-ot-zapoya-na-domu-arkhangelsk/https://kapelnica-ot-zapoya-arkhangelsk0.ru
Highly descriptive article, I loved that bit. Will there be a part 2?
В клинике используются доказательные методики, эффективность которых подтверждена практикой. Они подбираются индивидуально и позволяют достичь устойчивых результатов.
Выяснить больше – https://lechenie-alkogolizma-tver0.ru/lechenie-ot-alkogolizma-tver/
Отдельная причина, по которой люди тянут до последнего, — страх огласки и лишних последствий. В небольших городах это особенно чувствуется: «все друг друга знают», страшно, что увидят знакомые, начнутся разговоры. Из-за этого человек часто выбирает опасный компромисс: продолжает пить «чтобы не ломало», смешивает алкоголь со снотворными или успокоительными, пытается пережить бессонные ночи и панические качели. Но зависимость не ждёт, пока станет удобно. Поэтому важно, чтобы клиника могла организовать помощь быстро и без лишнего стресса, при этом сохраняя медицинскую точность и безопасность.
Ознакомиться с деталями – наркологическая клиника телефон
https://civicmeds.shop/# canadian pharmacy price checker
Такая структура терапии обеспечивает контроль на всех стадиях и помогает добиться устойчивого результата без вреда для здоровья. Пациент получает не просто временное облегчение, а полное восстановление физического и эмоционального состояния.
Выяснить больше – анонимная наркологическая клиника
Процесс лечения проходит поэтапно. Каждый шаг направлен на снятие интоксикации, стабилизацию состояния и нормализацию обменных процессов. В таблице приведены основные этапы и процедуры, применяемые в клинике «ПензаМед Трезвость».
Детальнее – вывод из запоя вызов
Понимание того, какие учреждения действительно способны помочь, позволяет избежать ошибок и не тратить время на неэффективные попытки лечения. Ключевыми признаками являются наличие медицинской лицензии, опытные специалисты, прозрачные условия и отзывы пациентов.
Подробнее можно узнать тут – платная наркологическая помощь архангельск
Оценка клинической картины проводится поэтапно с учетом изменений во времени. Специалисты анализируют эффективность действий, корректируют терапевтические схемы и контролируют уровень безопасности. Такой подход позволяет избегать значительных колебаний в состоянии пациента и поддерживать физиологическую стабильность на протяжении всего курса. Важно, что наблюдение сопровождается применением инструментальных методов, повышающих точность диагностических данных. В результате создается полноценная модель восстановления, в которую включаются фармакологические, поддерживающие и мониторинговые действия. В клинике внимание уделяется не только коррекции нарушений, но и постепенному восстановлению адаптивных функций организма.
Подробнее – наркологическая клиника цены в пензе
В стационаре пациент получает круглосуточный контроль, расширенную диагностику и возможность подключения к аппаратуре мониторинга. Это особенно важно при тяжёлой интоксикации, нарушении сознания или судорожной активности.
Изучить вопрос глубже – https://narko-zakodirovan.ru/vyvod-iz-zapoya-czena-spb/
Домашние попытки обычно идут по двум сценариям. Первый — «пить понемногу, чтобы не трясло», что продлевает запой и усиливает истощение. Второй — резко прекратить и «терпеть», после чего симптомы отмены усиливаются волной, особенно ночью, и человек снова пьёт из страха. Врач помогает избежать этих крайностей: стабилизировать состояние и дать план, который делает первые сутки предсказуемыми и безопасными.
Ознакомиться с деталями – narkologicheskaya-klinicheskaya-bolnica
Детоксикация является важнейшим этапом лечения. В «Ижевском Центре Трезвых Решений» применяются проверенные схемы инфузионной терапии, помогающие восстановить функции организма после интоксикации. Капельницы подбираются индивидуально в зависимости от состояния пациента и выраженности симптомов. Ниже приведена таблица с типами капельниц, применяемых в клинике.
Детальнее – платная наркологическая клиника ижевск
Прежде всего необходимо убедиться, что учреждение официально зарегистрировано и обладает соответствующей лицензией на медицинскую деятельность. Этот документ выдается Минздравом и подтверждает соответствие установленным нормам.
Исследовать вопрос подробнее – центр лечения наркомании в ярославле
Алкогольная зависимость часто держится не на «желании выпить», а на страхе отмены. Человек пьёт, чтобы не столкнуться с тремором, потливостью, тошнотой, скачками давления, паникой и бессонницей. Поэтому помощь начинается с медицинской оценки: насколько состояние безопасно для прекращения, какие есть сопутствующие болезни, что усиливает риски и какой формат лечения нужен именно сейчас.
Углубиться в тему – https://narkologicheskaya-klinika-orekhovo-zuevo2-12.ru/horoshaya-narkologicheskaya-klinika-v-orekhovo-zuevo
Order Viagra 50 mg online generic sildenafil Cheap Viagra 100mg
Уже при первичном звонке мы собираем ключевую информацию: длительность употребления, типы веществ, сопутствующие заболевания, прошлые реакции на лекарства, эпизоды судорог и психозов, недавние значения АД/ЧСС. Это позволяет подготовить персональный стартовый протокол ещё до визита: поставить цель на первые 72 часа, определить метрики (сон, «тяга», дневная энергия), запланировать вечерний ритуал и расписать дистанционные чек-ины. Прозрачность шагов снижает тревогу у пациента и семьи и повышает соблюдаемость — фундамент устойчивого результата.
Получить больше информации – наркологическая клиника
Cialis over the counter or cialis for sale Tadalafil price
https://maps.google.co.vi/url?sa=t&url=https://veritascarepharm.shop Cialis over the counter or https://bold-kw.com/user/ltkxgeuwtq/?um_action=edit Buy Tadalafil 10mg
Cialis without a doctor prescription Cheap Cialis and Tadalafil Tablet Buy Tadalafil 10mg
Такой подход позволяет устранить физические последствия запоя и снизить психологическую зависимость. Уже после первой процедуры пациенты отмечают улучшение самочувствия, появление аппетита и нормализацию сна. Важно не ограничиваться только экстренной помощью — специалисты рекомендуют пройти курс восстановления, чтобы предотвратить рецидивы.
Изучить вопрос глубже – вывод из запоя вызов город
https://civicmeds.shop/# vipps approved canadian online pharmacy
Вывод из запоя — это не просто медицинская процедура, а важный шаг на пути восстановления организма и возвращения человека к нормальной жизни. В клинике «ВладТрезвие Центр» пациенты получают профессиональную помощь, основанную на современных методиках детоксикации и безопасном медикаментозном восстановлении. Каждый случай рассматривается индивидуально, а лечение подбирается с учётом возраста, состояния здоровья и продолжительности запоя. Наркологи центра выезжают на дом круглосуточно, обеспечивая помощь даже в экстренных ситуациях, когда время играет ключевую роль.
Получить дополнительную информацию – http://vyvodiz-zapoya-vladivostok18.ru/czentr-kodirovaniya-alkogolizma-vyvod-iz-zapoya-vladivostok/
VeritasCare: VeritasCare – VeritasCare
VeritasCare: VeritasCare – Cheap Cialis
Домашний визит уместен не только при тяжёлой абстиненции. Он эффективен и на этапе нарастающих симптомов, когда важно предотвратить обострение. Ниже — ориентиры, помогающие принять решение.
Исследовать вопрос подробнее – выезд нарколога на дом ставрополь
https://mhp.ooo/ru/products/derobin-ointment
Услуги финансового управляющего — ключевой элемент процедуры банкротства физических лиц. Переходите по запросу сайт финансовых управляющих. Специалист сопровождает процесс на всех этапах: анализирует финансовое положение, взаимодействует с кредиторами, контролирует имущество и обеспечивает соблюдение закона. Профессиональная помощь помогает снизить риски, защитить интересы должника и пройти процедуру максимально эффективно.
Лечение начинается с оценки состояния. Врач уточняет длительность запоя, время последнего приёма алкоголя, выраженность симптомов, наличие хронических заболеваний, историю осложнений, препараты, которые пациент уже принимал, и возможные аллергии. Далее проводится осмотр: измеряется давление и пульс, оценивается дыхание, температура, признаки обезвоживания, уровень сознания, выраженность тремора и тревоги. Это позволяет определить риски и выбрать формат помощи — на дому или в стационаре.
Получить больше информации – https://vyvod-iz-zapoya-zhukovskij12.ru/vyvod-iz-zapoya-na-domu-v-zhukovskom/
Мы не используем универсальные «коктейли»: алгоритм строится из коротких проверяемых шагов. На старте фиксируем цель (например, уменьшить тремор и тошноту, стабилизировать пульс и давление, вернуть полноценный ночной сон), выбираем минимально достаточные средства для её достижения и заранее назначаем «окно оценки» — момент, когда команда сверяет эффект и при необходимости корректирует один параметр. Такой подход защищает от полипрагмазии, экономит силы пациента и делает прогресс читаемым для всей семьи.
Подробнее – нарколог на дом вывод из запоя
pharmacy no prescription required or best rx pharmacy online onlinepharmaciescanada com
https://images.google.lu/url?sa=t&url=https://civicmeds.com cost less pharmacy or https://lifnest.site/user/mpobdrpgowmpobdrpgow/?um_action=edit canadian pharmacies compare
mexican pharmacy online canadian pharmacy viagra 50 mg and canada rx pharmacy tops pharmacy
Комбинирование методов позволяет одновременно решать задачи стабилизации, профилактики и возвращения к повседневной активности.
Получить больше информации – https://narkologicheskaya-klinika-lugansk0.ru/narkologicheskij-dispanser-lugansk/
VeritasCare: Generic Tadalafil 20mg price – Buy Tadalafil 20mg
Когда требуется нарколог на дом, обычно речь идёт не о «консультации на будущее», а о ситуации, которая уже мешает жить здесь и сейчас: затяжной запой, тяжёлая абстиненция, сильная тревога и бессонница, тремор, скачки давления, рвота, выраженная слабость, паника или состояние, при котором человек не готов ехать в клинику. В Пушкино выездная помощь востребована ещё и потому, что многим важно сохранить приватность и не вовлекать лишних людей: дома проще согласиться на осмотр, не тратить силы на дорогу и избежать стрессовой смены обстановки. В наркологической клинике «Стабильный Выбор» выезд врача строится по принципу «быстро, но безопасно»: сначала оценка состояния и рисков, затем индивидуальная тактика стабилизации и понятный план на ближайшие часы и сутки.
Подробнее тут – вызов нарколога на дом
Вывод из запоя в клинике представляет собой последовательный комплекс процедур, направленных на устранение интоксикации и стабилизацию основных функций организма. В основе процесса лежит оценка физиологических параметров, определение уровня нарушений и корректировка тактики вмешательства. Такой подход обеспечивает постепенное восстановление адаптивных механизмов и снижает риск осложнений. На каждом этапе проводится анализ динамики, что позволяет оптимизировать терапевтические меры и поддерживать устойчивость состояния. Работа ориентирована на сохранение баланса внутренних систем и снижение нагрузки на жизненно важные органы.
Детальнее – http://vyvodiz-zapoya-izhevsk18.ru/vyvod-iz-zapoya-na-domu-izhevsk/
Такой подход позволяет устранить физические последствия запоя и снизить психологическую зависимость. Уже после первой процедуры пациенты отмечают улучшение самочувствия, появление аппетита и нормализацию сна. Важно не ограничиваться только экстренной помощью — специалисты рекомендуют пройти курс восстановления, чтобы предотвратить рецидивы.
Получить больше информации – нарколог на дом вывод из запоя
online pharmacy non prescription drugs and canadian drug stores escrow pharmacy online
https://images.google.com.br/url?sa=t&url=http://civicmeds.shop specialty pharmacy or https://mantiseye.com/community/vjamltvirf certified canadian pharmacy
is canadian pharmacy legit walmart pharmacy online and all med pharmacy pharmacy shop
cheapest cialis: VeritasCare – Cialis without a doctor prescription
После оценки состояния проводится детоксикация и медикаментозная стабилизация. Цель — снизить интоксикацию, уменьшить проявления абстиненции, поддержать сердечно-сосудистую систему, восстановить баланс жидкости и электролитов, снизить тревогу и помочь со сном. Состав и объём помощи подбираются индивидуально: нет «универсальной капельницы», которая подходит всем. По итогу врач даёт рекомендации на ближайшие сутки и несколько дней: как контролировать давление, что пить и есть, какие нагрузки исключить, как организовать сон и какие признаки требуют повторной медицинской оценки.
Разобраться лучше – http://narkolog-na-dom-pushkino12.ru
При употреблении психоактивных веществ риск осложнений часто выше и непредсказуемее: неизвестный состав, сочетания, влияние на сердечный ритм, дыхание и психическое состояние. Поэтому детоксикация при наркотической зависимости строится особенно аккуратно: врач оценивает состояние, собирает информацию о симптомах, возможных сочетаниях и прошлых осложнениях, а затем выбирает тактику стабилизации. Важно, что в таких случаях «сделать быстро и без вопросов» — самый опасный подход.
Ознакомиться с деталями – http://narkologicheskaya-klinika-zhukovskij12.ru/
Вывод из запоя — это не просто медицинская процедура, а важный шаг на пути восстановления организма и возвращения человека к нормальной жизни. В клинике «ВладТрезвие Центр» пациенты получают профессиональную помощь, основанную на современных методиках детоксикации и безопасном медикаментозном восстановлении. Каждый случай рассматривается индивидуально, а лечение подбирается с учётом возраста, состояния здоровья и продолжительности запоя. Наркологи центра выезжают на дом круглосуточно, обеспечивая помощь даже в экстренных ситуациях, когда время играет ключевую роль.
Подробнее тут – скорая вывод из запоя в владивостоке
В рамках лечебного процесса наркологическая клиника задействует структурированные механизмы наблюдения, включающие анализ лабораторных показателей, оценку соматического тонуса и изучение активности нервной системы. Эти элементы обеспечивают комплексность работы и позволяют своевременно корректировать план лечения. Такая система предотвращает перегрузку организма и способствует поддержанию стабильности на фоне применения медикаментозных схем. Ниже представлены ключевые составляющие терапевтического процесса, формирующие основу для клинического восстановления.
Исследовать вопрос подробнее – narkologicheskaya-klinika-v-penze18.ru/
Клиника «ВладТрезвие Центр» работает в круглосуточном режиме и готова оказать помощь жителям Владивостока и прилегающих районов в любое время суток. Врачи-наркологи прибывают по вызову в течение часа, имеют при себе все необходимые препараты и оборудование для проведения детоксикации на дому. При необходимости пациента доставляют в стационар, где лечение проходит под постоянным контролем медицинского персонала.
Углубиться в тему – http://vyvodiz-zapoya-vladivostok18.ru
Эти методы применяются комплексно, что повышает их эффективность и помогает пациентам быстрее возвращаться к полноценной жизни.
Получить больше информации – http://lechenie-alkogolizma-doneczk0.ru
Наркологическая клиника — это не просто медицинское учреждение, а пространство, где человеку помогают вернуть здоровье, ясность мышления и контроль над жизнью. В клинике «КаспийМед Альтернатива» в Астрахани круглосуточно оказывается помощь людям, столкнувшимся с алкогольной, наркотической и смешанной зависимостью. Центр сочетает медицинскую строгость и человеческое участие, обеспечивая лечение в комфортных условиях с максимальной конфиденциальностью. Здесь разработаны программы детоксикации, восстановления и психотерапевтической поддержки, что делает терапию эффективной и безопасной.
Получить больше информации – платная наркологическая клиника
Мы заранее объясняем, какие шаги последуют, чтобы пациент и близкие понимали логику вмешательств и не тревожились по поводу непредвиденных «сюрпризов». Карта ниже — ориентир; конкретные параметры врач уточнит после осмотра.
Углубиться в тему – http://vyvod-iz-zapoya-pervouralsk0.ru
Диагностический блок включает сбор анамнеза, оценку витальных показателей, скрининговые шкалы по тревоге, депрессии и патологическому влечению, лабораторные тесты по показаниям. На основании полученных данных выбирается формат помощи и составляется медикаментозная схема с учётом взаимодействий препаратов и вероятных рисков.
Изучить вопрос глубже – наркологическая клиника цены
https://corebluehealth.com/# cheap viagra
Самостоятельные попытки обычно идут по двум типичным маршрутам. Первый — «пить понемногу, чтобы не трясло». На практике это продлевает запой и усиливает истощение: сон остаётся поверхностным, тревога нарастает, давление и пульс становятся нестабильными, организм не успевает восстанавливаться. Второй маршрут — резко прекратить и «перетерпеть». Тогда симптомы отмены могут нарастать резко: паника, сильный тремор, потливость, тахикардия, скачки давления, тошнота, рвота, бессонница. Испугавшись ухудшения, человек снова возвращается к алкоголю, потому что это кажется единственным быстрым способом облегчить состояние.
Ознакомиться с деталями – vyvoda iz zapoya orekhovo
Алгоритм в клинической практике выстроен поэтапно: от первичной оценки до планирования реабилитационного маршрута. Последовательность вмешательств обеспечивает предсказуемую динамику и прозрачную коммуникацию с пациентом и его близкими.
Изучить вопрос глубже – нарколог на дом вывод из запоя
buy viagra here or viagra canada best price for viagra 100mg
https://cse.google.dj/url?sa=t&url=https://corebluehealth.shop buy Viagra over the counter and https://www.trendyxxx.com/user/fuccxgubpw/videos buy Viagra over the counter
cheapest viagra generic sildenafil or Buy generic 100mg Viagra online cheapest viagra
Услуга вывода из запоя на дому в Архангельске разработана для оперативного снижения токсической нагрузки при тяжелых формах алкогольной интоксикации. Сразу после вызова нарколог проводит подробный осмотр, измеряет жизненно важные показатели и собирает анамнез, что позволяет точно определить степень интоксикации. На основе полученной информации формируется индивидуальный план лечения, включающий капельничное введение современных медикаментов с использованием автоматизированных инфузионных систем и сопровождение в виде психологической поддержки.
Исследовать вопрос подробнее – https://kapelnica-ot-zapoya-arkhangelsk00.ru/kapelnicza-ot-zapoya-klinika-arkhangelsk
Вывод из запоя в клинике формируется на основе последовательных процедур, направленных на стабилизацию физиологических функций и устранение токсических влияний. Такой подход позволяет корректно регулировать состояние пациента и контролировать интенсивность симптомов. Рабочие алгоритмы включают оценку метаболических процессов, анализ соматических показателей и определение степени неврологических изменений. В результате создается структурированная модель помощи, ориентированная на восстановление адаптивных возможностей организма. Процессы выполняются под контролем специалистов, что обеспечивает прогнозируемый терапевтический эффект и снижает вероятность осложнений.
Изучить вопрос глубже – нарколог на дом вывод из запоя
Обычно всё начинается с короткого сбора информации: сколько дней длится употребление, когда был последний приём, какие симптомы сейчас самые сильные, есть ли хронические заболевания и аллергии, какие препараты принимались самостоятельно, были ли судороги, галлюцинации, сильные скачки давления. Затем врач проводит осмотр на месте и определяет тактику: какие меры нужны сейчас, какой объём поддержки безопасен, нужно ли наблюдение в стационаре или можно работать дома.
Исследовать вопрос подробнее – нарколог на дому капельница цена пушкино
С первого контакта координатор уточняет: длительность запоя, виды алкоголя, аллергии, список текущих лекарств, эпизоды судорог или психозов в анамнезе, сердечно-сосудистые жалобы. На основании ответов команда подбирает безопасную схему старта и резервный план на случай усиления симптомов. Врач привозит портативный монитор для контроля АД/ЧСС/SpO2, глюкометр, набор инфузионных линий и расходников, а также средства для экспресс-коррекции тревоги по показаниям.
Получить больше информации – вывод из запоя капельница на дому
Для жителей Астрахани доступен выезд нарколога на дом — это востребованная услуга, позволяющая безопасно провести детоксикацию в привычной среде без госпитализации. При тяжёлых формах зависимости рекомендуется стационарное лечение: круглосуточное наблюдение врачей, капельницы, медикаментозная поддержка и консультации психотерапевта. Такой формат позволяет стабилизировать состояние в максимально короткие сроки.
Получить дополнительную информацию – http://www.domen.ru
canadian pharmacy phone number and reliable canadian pharmacy canadian drug stores
http://vipdecorating.com.au/?URL=http://civicmeds.shop canadian pharmacy phone number and http://lenhong.fr/user/fnirjflgpn/ canadian pharmacy no prescription
canadian online pharmacy cheapest pharmacy prescription drugs and northwest canadian pharmacy canadian pharmacy no prescription
Согласование целей на старте курса помогает распределить задачи по этапам и своевременно корректировать тактику при изменении клинической картины.
Подробнее тут – реабилитационный центр лечение алкоголизма луганск
Днём человек ещё как-то держится, а к вечеру нарастает усталость, тревога усиливается, сон не приходит, и появляется ощущение, что «так не выдержать». Это один из главных триггеров повторного употребления. Нормальная задача врача — не только снять симптомы, но и объяснить, как пережить ночь: чего ожидать, как организовать спокойную обстановку, что контролировать, какие признаки опасны и требуют срочной оценки.
Углубиться в тему – vyzvat’ vyvod iz zapoya
Наркологическая клиника в Донецке оказывает профессиональную помощь людям, страдающим алкогольной и наркотической зависимостью. Лечение в таких учреждениях направлено на комплексное восстановление здоровья, включающее медицинскую детоксикацию, психотерапевтическую поддержку и социальную адаптацию. Важным принципом является индивидуальный подход к каждому пациенту, что позволяет добиться устойчивых результатов и снизить риск рецидива.
Получить больше информации – наркологическая клиника в донце
На данном этапе врач уточняет длительность запоя, тип употребляемого алкоголя и наличие сопутствующих заболеваний. Тщательный анализ этих данных позволяет оперативно сформировать индивидуальный план лечения и выбрать оптимальные методы детоксикации.
Узнать больше – капельница от запоя круглосуточно в архангельске
Такой подход позволяет безопасно вывести пациента из состояния запоя и предотвратить развитие осложнений. Врачи контролируют давление, пульс, уровень сахара в крови и состояние нервной системы на протяжении всей процедуры.
Получить больше информации – вывод из запоя цена пенза
Вывод из запоя — это медицинская процедура, направленная на устранение интоксикации организма, вызванной длительным употреблением алкоголя. В клинике «ПензаМед Трезвость» помощь оказывается профессионально и конфиденциально: пациенты могут получить лечение как в стационаре, так и на дому. Процесс включает использование капельниц, медикаментозную терапию, психоэмоциональную поддержку и последующую реабилитацию. Врачи наркологического центра обладают большим опытом работы и обеспечивают круглосуточную помощь без постановки на учёт, что особенно важно для тех, кто хочет сохранить анонимность и быстро вернуться к нормальному состоянию.
Исследовать вопрос подробнее – https://vyvod-iz-zapoya-penza18.ru/vyvedenie-iz-zapoya-na-domu-penza
Наркологическая помощь должна быть не только медицински точной, но и человечной, безопасной и анонимной. В «Ижевском Центре Трезвых Решений» выстроена система комплексного подхода к лечению зависимостей, включающая диагностику, медикаментозную детоксикацию, психотерапию и социальную адаптацию. Клиника объединяет профессионализм, заботу и круглосуточную готовность помочь пациентам, оказавшимся в трудной ситуации. Здесь работают врачи с большим опытом в области наркологии и психиатрии, способные оперативно выехать на дом и оказать неотложную помощь.
Выяснить больше – https://narkologicheskaya-klinika-v-izhevsk18.ru/narkologi-izhevsk-czeny
Услуга вывода из запоя на дому в Архангельске разработана для оперативного снижения токсической нагрузки при тяжелых формах алкогольной интоксикации. Сразу после вызова нарколог проводит подробный осмотр, измеряет жизненно важные показатели и собирает анамнез, что позволяет точно определить степень интоксикации. На основе полученной информации формируется индивидуальный план лечения, включающий капельничное введение современных медикаментов с использованием автоматизированных инфузионных систем и сопровождение в виде психологической поддержки.
Подробнее тут – капельница от запоя анонимно в архангельске
п»їcialis generic buy cialis pill VeritasCare
Вывод из запоя в клинике формируется на основе последовательных процедур, направленных на стабилизацию физиологических функций и устранение токсических влияний. Такой подход позволяет корректно регулировать состояние пациента и контролировать интенсивность симптомов. Рабочие алгоритмы включают оценку метаболических процессов, анализ соматических показателей и определение степени неврологических изменений. В результате создается структурированная модель помощи, ориентированная на восстановление адаптивных возможностей организма. Процессы выполняются под контролем специалистов, что обеспечивает прогнозируемый терапевтический эффект и снижает вероятность осложнений.
Получить больше информации – вывод из запоя капельница в кемерове
Лечение алкоголизма в Луганске организуется по принципам доказательной медицины и включает медицинскую, психотерапевтическую и социальную компоненты. Цель — безопасно снять острые проявления заболевания, стабилизировать соматическое состояние, снизить тягу и закрепить новые модели поведения. Индивидуальные планы формируются с учётом стадии расстройства, сопутствующих заболеваний, предшествующего опыта лечения и уровня семейной поддержки.
Узнать больше – лечение алкоголизма и наркомании центр
Незамедлительно после поступления вызова нарколог приезжает на дом для проведения тщательного осмотра. Специалист измеряет жизненно важные показатели, такие как пульс, артериальное давление и температура, и собирает анамнез для оценки степени алкогольной интоксикации.
Детальнее – врач на дом капельница от запоя в архангельске
Наркологическая клиника — это место, где человек получает не просто медицинскую помощь, а возможность начать жизнь заново. В клинике «АстраМед Трезвость» в Астрахани создана система комплексного лечения алкогольной и наркотической зависимости, включающая диагностику, детоксикацию, медикаментозную терапию и психотерапию. Пациент получает поддержку на каждом этапе: от вывода из запоя до социальной адаптации после реабилитации. Лечение проводится круглосуточно, в комфортных условиях и с соблюдением полной конфиденциальности.
Подробнее тут – анонимная наркологическая клиника
Каждый этап имеет ключевое значение и обеспечивает устойчивость результата.
Получить дополнительную информацию – лечение алкоголизма
Мы верим, что каждый человек, столкнувшийся с проблемой зависимости, заслуживает шанса на новую жизнь. Наша миссия — предоставить необходимые инструменты и поддержку, чтобы помочь пациентам в их стремлении к здоровой и свободной от зависимостей жизни.
Узнать больше – http://нарко-фильтр.рф/vivod-iz-zapoya-v-stacionare-v-rostove-na-donu/https://нарко-фильтр.рф
После поступления вызова диспетчер передаёт заявку на смартфон врача, который оперативно завершает подготовительные мероприятия и выезжает к пациенту. На дороге применяется GPS-маршрутизация для выбора оптимального пути и снижения времени в пути.
Ознакомиться с деталями – http://
Многие сталкиваются с трудностями при выборе клиники или центра: предлагаемые услуги различаются по качеству, подходам, стоимости и длительности. Некоторые организации ограничиваются только медикаментозной поддержкой, не работая с глубинными причинами зависимости. Поэтому важно заранее понимать, какие параметры отличают действительно надёжное учреждение, способное обеспечить долгосрочные результаты.
Получить больше информации – лечение наркомании и алкоголизма
Buy Cialis online or Cialis over the counter buy cialis pill
https://maps.google.bi/url?q=https://veritascarepharm.shop Generic Tadalafil 20mg price or http://nosugar.co.uk/profile.php?uid=226800 buy cialis pill
Cialis without a doctor prescription Cialis without a doctor prescription and Buy Tadalafil 20mg Buy Cialis online
После диагностики начинается активная фаза медикаментозного вмешательства. Современные препараты вводятся капельничным методом для быстрого снижения уровня токсинов в крови, восстановления обменных процессов и нормализации работы внутренних органов, таких как печень, почки и сердце.
Узнать больше – https://kapelnica-ot-zapoya-arkhangelsk0.ru/kapelnicza-ot-zapoya-na-domu-arkhangelsk/
Процесс лечения капельничным методом от запоя организован по четко структурированной схеме, позволяющей обеспечить оперативное и безопасное восстановление организма.
Детальнее – капельница от запоя недорого архангельск
viagra canada: CoreBlue Health – CoreBlue Health
После стабилизации фокус смещается на поддерживающие схемы, снижающие влечение и улучшающие переносимость повседневной нагрузки. Параллельно проводятся индивидуальные и групповые психотерапевтические занятия, направленные на развитие навыков саморегуляции, работу с триггерами и формирование альтернатив алкогольному или наркотическому поведению.
Получить дополнительные сведения – narkologicheskaya-klinika-v-luganske0.ru/
Outstanding post however I was wanting to know if you could write a litte more on this subject? I’d be very grateful if you could elaborate a little bit further. Appreciate it!
В команде — врачи-наркологи, психиатры-консультанты, клинические психологи и выездные медсёстры. Все работают по единому алгоритму: короткий скрининг, стартовая стабилизация, настройка «вечернего протокола» для нормализации сна и план на 72 часа. Цель — восстановить биоритмы, мягко убрать соматические проявления абстиненции и снизить реактивную тревогу, чтобы человек быстрее вернулся к привычным ролям дома и на работе.
Подробнее – вывод из запоя вызов
Такой подход обеспечивает комплексное восстановление: медицинское, эмоциональное и социальное. Врачи ведут пациента на всех этапах, помогая пройти путь от очищения организма до формирования устойчивой трезвости.
Ознакомиться с деталями – наркологическая клиника наркологический центр в астрахани
buy Viagra over the counter: CoreBlue Health – Cheap Viagra 100mg
Указанные элементы задают логическую основу для всего терапевтического процесса, создавая структурированную модель работы с пациентом. При необходимости схема вмешательств дополняется дополнительными мерами, направленными на стабилизацию состояния. Такой формат позволяет поддерживать предсказуемость результата даже в сложных клинических ситуациях.
Выяснить больше – http://narkologicheskaya-klinika-v-penze18.ru
Алкогольная зависимость часто держится на страхе отмены. Человек заранее боится вечера: что не уснёт, начнётся паника, поднимется давление, появится дрожь и ощущение «внутреннего разгона». Из-за этого запой поддерживается не удовольствием, а попыткой избежать ухудшения. В клинике лечение начинается с оценки риска осложнений и тяжести отмены. Это позволяет определить, нужен ли стационар, или можно начинать лечение без госпитализации с медицинским контролем и ясным планом на ночь.
Узнать больше – https://narkologicheskaya-klinika-sergiev-posad12.ru/telefon-narkologicheskoj-kliniki-v-sergievom-posade
В наркологической клинике в Донецке применяются современные и доказательные методики. Они безопасны, эффективны и соответствуют международным медицинским стандартам.
Узнать больше – https://narkologicheskaya-klinika-doneczk0.ru/
Выездная бригада «Трезвого Севера» укомплектована портативным оборудованием (контроль АД, ЧСС, SpO2, температурный мониторинг; по показаниям — экспресс-диагностика), а медикаментозная часть всегда собирается индивидуально: учитываем длительность эпизода, сопутствующие заболевания, текущие жалобы, переносимость препаратов и прошлый опыт помощи. Рядом с медициной идёт психообразование: объясняем, что делать вечером, как «снимать газ» нервной системе, как отслеживать собственные маркеры и когда давать сигнал врачу.
Получить дополнительные сведения – вывод из запоя вызов
Такая структура терапии обеспечивает контроль на всех стадиях и помогает добиться устойчивого результата без вреда для здоровья. Пациент получает не просто временное облегчение, а полное восстановление физического и эмоционального состояния.
Разобраться лучше – https://narkologicheskaya-klinika-v-astrakhani18.ru/
Лечение вывода из запоя в Архангельске проводится по четко структурированной схеме, которая позволяет оперативно стабилизировать состояние пациента и начать процесс восстановления.
Подробнее – капельница от запоя стоимость в архангельске
Комбинация методов позволяет добиться синергетического эффекта: быстрее снять острые проявления, а затем закрепить результат в естественных условиях жизни.
Получить больше информации – принудительное лечение от алкоголизма
После поступления вызова диспетчер передаёт заявку на смартфон врача, который оперативно завершает подготовительные мероприятия и выезжает к пациенту. На дороге применяется GPS-маршрутизация для выбора оптимального пути и снижения времени в пути.
Изучить вопрос глубже – частная наркологическая клиника в архангельске
Как отмечает ведущий научный сотрудник ФГБУН «НМИЦ психиатрии и наркологии» Минздрава России, наличие междисциплинарной команды — один из основных факторов, определяющих успех терапии при зависимости.
Углубиться в тему – http://lechenie-narkomanii-murmansk0.ru
Первое, с чего начинается успешное лечение — это команда. В клинике должны работать не только наркологи, но и психиатры, психотерапевты, консультанты по зависимостям. Без комплексного подхода устойчивый результат невозможен.
Подробнее можно узнать тут – https://lechenie-alkogolizma-yaroslavl0.ru/anonimnoe-lechenie-alkogolizma-yaroslavl
Если к «окну сверки» цель не достигнута, мы меняем только один компонент — время ритуала, скорость инфузии, плотность сессий. Такой микрошаг даёт чистый сигнал: понятно, что сработало, а что нет, и пациент не чувствует «экспериментов» над собой.
Разобраться лучше – http://narkologicheskaya-klinika-kamensk-uralskij0.ru
Процедура вывода из запоя проводится строго по медицинским стандартам. Применяются современные капельницы, витамины и препараты для нормализации функций сердца, печени, почек и нервной системы. После снятия интоксикации врачи назначают поддерживающее лечение, направленное на стабилизацию эмоционального состояния и снижение тяги к алкоголю.
Подробнее тут – наркология вывод из запоя
CoreBlue Health: Order Viagra 50 mg online – CoreBlue Health
На данном этапе врач уточняет, сколько времени продолжается запой, какой тип алкоголя употребляется и имеются ли сопутствующие заболевания. Тщательный анализ этих данных позволяет подобрать оптимальные методы детоксикации и снизить риск осложнений.
Подробнее можно узнать тут – нарколог капельница на дом мариуполь
http://corebluehealth.com/# CoreBlue Health
Особенность клиники — возможность выезда нарколога на дом. Это особенно важно, если пациенту трудно самостоятельно добраться до центра или он хочет избежать публичности. Врач приезжает с полным набором медикаментов и оборудования, проводит обследование и ставит капельницу, контролируя состояние пациента на протяжении всей процедуры. Такой формат позволяет начать лечение незамедлительно и без стресса.
Подробнее тут – наркологическая клиника наркологический центр
pharmacy online 365 or canadian pharmacies that deliver to the us online pharmacy in turkey
https://www.google.pl/url?sa=t&url=https://civicmeds.com precription drugs from canada or https://www.ixxxnxx.com/user/zokolxhmtd/videos pharmacy prices
best online pharmacy reddit pharmacy website and international online pharmacy online pharmacy prescription
Лечебные мероприятия строятся на основе поэтапного внедрения терапевтических решений, которые опираются на индивидуальные характеристики пациента. Уточнение анамнеза, анализ данных обследований и выявление сопутствующих факторов позволяют создавать эффективные и прогнозируемые программы лечения. В клинике соблюдается строгая последовательность процедур, направленная на снижение рисков и обеспечение безопасности. На каждом этапе проводится проверка клинической реакции, что позволяет своевременно выявлять необходимость корректировки и адаптировать лечебные меры под текущую картину.
Ознакомиться с деталями – запой наркологическая клиника пенза
На каждом этапе мы фиксируем объективные маркеры — от сатурации и вариабельности пульса до частоты «тяговых мыслей» в дневнике. Эти данные позволяют корректировать план не интуитивно, а по фактам.
Получить дополнительную информацию – наркологические клиники алкоголизм в ставрополе
Современные клиники предоставляют широкий спектр услуг, начиная с первичной консультации и заканчивая долгосрочной поддержкой после прохождения курса лечения. Ключевым этапом является детоксикация — процедура, направленная на выведение токсинов и стабилизацию физического состояния пациента.
Выяснить больше – наркологическая помощь в архангельске
VeritasCare: VeritasCare – Cialis over the counter
На первом контакте координатор задаёт несколько точных вопросов: длительность эпизода, наличие рвоты/тремора/бессонницы, приём лекарств, хронические заболевания. Эти данные нужны не «для галочки»: по ним заранее выстраивается протокол инфузии, рассчитывается скорость, подбираются уколы до капельницы и объём наблюдения после. Врач приезжает уже с персональным планом и поправляет его по факту осмотра.
Подробнее – вывод из запоя на дому недорого
Домашний протокол разбит на понятные шаги. В каждом шаге есть цель, действия, что именно мы измеряем и когда сверяем прогресс. Это делает процесс прозрачным и даёт семье чувство контроля: видно, почему назначено именно это и когда ждать облегчения.
Получить дополнительную информацию – http://www.domen.ru
В зависимости от состояния пациента, помощь может быть оказана в домашних условиях или в стационаре. Вызов нарколога на дом особенно актуален при абстинентном синдроме или тяжелом алкогольном опьянении. Как отмечается в материалах НМИЦ психиатрии и наркологии, в таких ситуациях крайне важно избежать самолечения и довериться врачам, способным правильно подобрать препараты и дозировки.
Подробнее – неотложная наркологическая помощь в архангельске
Многих останавливает страх огласки и лишних последствий. В небольшом городе или в плотном окружении человеку важно сохранить личные границы: не «светиться», не объясняться на работе, не становиться объектом разговоров. Из-за этого помощь часто откладывают, а вместо неё выбирают рискованные компромиссы: «выйду сам», «попью понемногу», «усну на таблетках», «перетерплю ночь». На практике такие попытки часто усиливают проблему: запой затягивается, отмена переносится тяжелее, тревога растёт, сон разрушается, давление и пульс становятся нестабильными. Поэтому в наркологии важна возможность быстро начать лечение безопасно и без лишнего стресса — с понятными правилами, спокойной коммуникацией и медицинским контролем.
Получить больше информации – https://narkologicheskaya-klinika-vidnoe12.ru/narkologicheskaya-klinika-v-oblasti-v-vidnom/
Критерии оценки профессионального уровня сотрудников:
Детальнее – лечение алкоголизма ярославль.
В клинике «Вектор Стабильности» помощь строится как понятный маршрут. Сначала врач оценивает риски и состояние, потому что одинаковых случаев не бывает: у одного на первый план выходит давление и сосуды, у другого — паника и бессонница, у третьего — выраженная интоксикация и обезвоживание, у четвёртого — срывы на фоне стресса и истощения. Затем выбирается формат лечения: стационар, амбулаторная программа или помощь на дому, если это безопасно. После первичного облегчения обязательно формируется план на первые 24–72 часа — это период, когда чаще всего происходит повторное ухудшение вечером и ночью, и без ориентиров человек легко возвращается к употреблению «чтобы отпустило».
Исследовать вопрос подробнее – https://narkologicheskaya-klinika-noginsk12.ru/chastnaya-narkologicheskaya-klinika-v-noginske
Мы не «перелечиваем» пациента процедурами. Любая мера начинается как проверяемая гипотеза с измеримыми маркерами. Ниже — опорная карта лечения. В реальности она персонализируется в зависимости от клинической картины, возраста, сопутствующих заболеваний и бытового графика.
Детальнее – наркологическая клиника клиника помощь
Клиника «КемероваМед Трезвость» предоставляет круглосуточную помощь пациентам, столкнувшимся с последствиями запоев и зависимостей. Основное направление — анонимное лечение, которое исключает постановку на учёт и обеспечивает конфиденциальность данных. При обращении пациент проходит первичную диагностику, включающую сбор анамнеза, измерение жизненно важных показателей, ЭКГ и анализ крови. После этого врач составляет персональный план лечения, который может включать детоксикацию, медикаментозную терапию, капельницы, консультации психотерапевта и реабилитационные программы.
Подробнее тут – наркологическая клиника
Такая структура терапии обеспечивает контроль на всех стадиях и помогает добиться устойчивого результата без вреда для здоровья. Пациент получает не просто временное облегчение, а полное восстановление физического и эмоционального состояния.
Исследовать вопрос подробнее – наркологическая клиника цены астрахань
Вывод из запоя направлен не только на снятие острых симптомов, но и на комплексное восстановление организма. Работа специалистов позволяет стабилизировать состояние и создать условия для дальнейшего лечения зависимости.
Узнать больше – vyvod-iz-zapoya-tver0.ru/
Дальше задача — восстановить управляемость состояния. Это включает снижение интоксикации, коррекцию обезвоживания, выравнивание показателей, уменьшение тревоги и нормализацию сна. Но чтобы результат закрепился, необходим второй слой: работа с триггерами (стресс, конфликт, усталость, одиночество), профилактика «вечернего отката», поддержка режима и понимание, какие симптомы допустимы, а какие требуют повторной оценки. Именно это отличает лечение зависимости от разовой попытки «стало легче — дальше как-нибудь».
Ознакомиться с деталями – https://narkologicheskaya-klinika-sergiev-posad12.ru/chastnaya-narkologicheskaya-klinika-v-sergievom-posade
canadian pharmacy viagra 100mg canadian pharmacy in canada discount pharmacy
Ниже приведены ключевые элементы, которые отражают базовую структуру процессов, формирующих последовательность лечебных мероприятий. Они помогают подробно рассмотреть основные направления работы и понять роль каждого звена в общей терапевтической системе.
Разобраться лучше – https://narkologicheskaya-klinika-penza18.ru/chastnaya-narkologicheskaya-klinika-penza/
Мы одинаково внимательно относимся и к амбулаторным, и к стационарным маршрутам. Для каждого формируется индивидуальная цель (устранение абстиненции, нормализация сна, восстановление внимания и мотивации) и назначается «точка переоценки» — момент, когда команда сверяет динамику и, если нужно, меняет один параметр плана (дозу, время внесения процедур, приоритет модуля). Так достигается предсказуемость и избегается избыточная фармаконагрузка.
Детальнее – https://narcologicheskaya-klinika-stavropol0.ru/chastnaya-narkologicheskaya-klinika-stavropol/
Домашний протокол разбит на понятные шаги. В каждом шаге есть цель, действия, что именно мы измеряем и когда сверяем прогресс. Это делает процесс прозрачным и даёт семье чувство контроля: видно, почему назначено именно это и когда ждать облегчения.
Исследовать вопрос подробнее – http://narkolog-na-dom-petrozavodsk0.ru
Зависимость редко начинается «внезапно». Обычно всё складывается постепенно: человек чаще снимает напряжение алкоголем, потом замечает, что без него хуже спится и труднее успокоиться, затем появляются запои или регулярные эпизоды употребления, меняется настроение и характер, нарастает тревога, раздражительность, ухудшаются отношения в семье и продуктивность на работе. В какой-то момент становится очевидно, что проблема уже не в силе воли: организм и нервная система перестраиваются так, что трезвость даётся всё тяжелее, а любое прекращение употребления сопровождается дискомфортом, из-за которого хочется «быстро облегчить состояние». Наркологическая клиника в Видном — это помощь, которая возвращает ситуацию в медицински управляемое русло: сначала оценка рисков и стабилизация, затем восстановление базовых функций и лечение зависимости как процесса, а не разовой «процедуры для облегчения». В клинике «МедАльтернатива» маршрут подбирают под конкретное состояние: кому-то требуется срочная детоксикация, кому-то — стационарное наблюдение, кому-то — выезд врача на дом, а кому-то — плановое лечение с фокусом на профилактику рецидива.
Ознакомиться с деталями – https://narkologicheskaya-klinika-vidnoe12.ru/narkologicheskaya-klinika-v-oblasti-v-vidnom/
Запой — это состояние, в котором алкоголь перестаёт быть «причиной расслабления» и становится механизмом удержания человека в замкнутом круге. Выпил — полегчало на короткое время — через несколько часов снова плохо — снова выпил. Чем дольше длится запой, тем сильнее истощается организм: разрушается сон, растёт тревога, усиливается тремор, потливость, скачет давление, учащается пульс, появляются тошнота и рвота, слабость и раздражительность. В Орехово-Зуево многие пытаются «дотянуть до утра» или «выйти сами», но именно в такие моменты состояние часто ухудшается вечером и ночью, и человек принимает рискованные решения — снова пьёт или смешивает алкоголь со снотворными, лишь бы уснуть. Медицинский вывод из запоя нужен, чтобы разорвать этот сценарий безопасно: снизить интоксикацию, стабилизировать жизненно важные показатели и помочь пережить первые сутки без возврата к алкоголю.
Выяснить больше – http://vyvod-iz-zapoya-orekhovo-zuevo12.ru/vyvod-iz-zapoya-vyzov-v-orekhovo-zuevo/
Уже при первичном звонке мы собираем ключевую информацию: длительность употребления, типы веществ, сопутствующие заболевания, прошлые реакции на лекарства, эпизоды судорог и психозов, недавние значения АД/ЧСС. Это позволяет подготовить персональный стартовый протокол ещё до визита: поставить цель на первые 72 часа, определить метрики (сон, «тяга», дневная энергия), запланировать вечерний ритуал и расписать дистанционные чек-ины. Прозрачность шагов снижает тревогу у пациента и семьи и повышает соблюдаемость — фундамент устойчивого результата.
Получить дополнительную информацию – наркологическая клиника клиника помощь каменск-уральск
Hello! I’m at work browsing your blog from my new iphone 4! Just wanted to say I love reading your blog and look forward to all your posts! Carry on the outstanding work!
Вывод из запоя — это не просто медицинская процедура, а важный шаг на пути восстановления организма и возвращения человека к нормальной жизни. В клинике «ВладТрезвие Центр» пациенты получают профессиональную помощь, основанную на современных методиках детоксикации и безопасном медикаментозном восстановлении. Каждый случай рассматривается индивидуально, а лечение подбирается с учётом возраста, состояния здоровья и продолжительности запоя. Наркологи центра выезжают на дом круглосуточно, обеспечивая помощь даже в экстренных ситуациях, когда время играет ключевую роль.
Подробнее можно узнать тут – срочный вывод из запоя в владивостоке
Лечебные мероприятия строятся на основе поэтапного внедрения терапевтических решений, которые опираются на индивидуальные характеристики пациента. Уточнение анамнеза, анализ данных обследований и выявление сопутствующих факторов позволяют создавать эффективные и прогнозируемые программы лечения. В клинике соблюдается строгая последовательность процедур, направленная на снижение рисков и обеспечение безопасности. На каждом этапе проводится проверка клинической реакции, что позволяет своевременно выявлять необходимость корректировки и адаптировать лечебные меры под текущую картину.
Подробнее можно узнать тут – http://www.domen.ru
На первом контакте координатор задаёт несколько точных вопросов: длительность эпизода, наличие рвоты/тремора/бессонницы, приём лекарств, хронические заболевания. Эти данные нужны не «для галочки»: по ним заранее выстраивается протокол инфузии, рассчитывается скорость, подбираются уколы до капельницы и объём наблюдения после. Врач приезжает уже с персональным планом и поправляет его по факту осмотра.
Ознакомиться с деталями – скорая вывод из запоя в петрозаводске
Вывод из запоя в клинике формируется на основе последовательных процедур, направленных на стабилизацию физиологических функций и устранение токсических влияний. Такой подход позволяет корректно регулировать состояние пациента и контролировать интенсивность симптомов. Рабочие алгоритмы включают оценку метаболических процессов, анализ соматических показателей и определение степени неврологических изменений. В результате создается структурированная модель помощи, ориентированная на восстановление адаптивных возможностей организма. Процессы выполняются под контролем специалистов, что обеспечивает прогнозируемый терапевтический эффект и снижает вероятность осложнений.
Разобраться лучше – наркология вывод из запоя в кемерове
Лечение проходит поэтапно, чтобы пациент не испытывал стресса и перегрузок. Каждый шаг контролируется врачами, а терапия корректируется в зависимости от состояния. В таблице ниже представлена структура программы лечения в клинике «АстраМед Трезвость».
Подробнее можно узнать тут – наркологическая клиника вывод из запоя астрахань
https://veritascarepharm.shop/# VeritasCare
Многие думают, что если стало легче днём, значит, всё позади. Но часто к вечеру усиливается тревога, растёт внутреннее напряжение, сон не приходит, начинается паника, а тело снова «разгоняется» — тахикардия, потливость, тремор. Это связано с нестабильностью нервной системы и колебаниями вегетативных реакций после отмены. Если человек не понимает, что делать, он может сорваться, и запой продолжится. Поэтому правильный вывод из запоя всегда включает план на ночь: как организовать спокойную обстановку, что контролировать, какие симптомы допустимы, а какие опасны и требуют срочного обращения.
Исследовать вопрос подробнее – http://vyvod-iz-zapoya-zhukovskij12.ru
Процесс лечения алкоголизма в Твери строится поэтапно, что позволяет пациентам постепенно проходить все стадии выздоровления.
Получить больше информации – лечение пивного алкоголизма тверь
Generic Viagra for sale CoreBlue Health over the counter sildenafil
Проблема алкоголизма в Ярославле, как и в других регионах России, остаётся одной из самых актуальных. По данным Минздрава РФ, количество людей, нуждающихся в медицинской помощи из-за злоупотребления спиртным, ежегодно растёт. При этом эффективное лечение возможно лишь при комплексном подходе, включающем как медицинскую, так и психологическую поддержку.
Изучить вопрос глубже – http://
Многие думают, что если стало легче днём, значит, всё позади. Но часто к вечеру усиливается тревога, растёт внутреннее напряжение, сон не приходит, начинается паника, а тело снова «разгоняется» — тахикардия, потливость, тремор. Это связано с нестабильностью нервной системы и колебаниями вегетативных реакций после отмены. Если человек не понимает, что делать, он может сорваться, и запой продолжится. Поэтому правильный вывод из запоя всегда включает план на ночь: как организовать спокойную обстановку, что контролировать, какие симптомы допустимы, а какие опасны и требуют срочного обращения.
Подробнее можно узнать тут – https://vyvod-iz-zapoya-zhukovskij12.ru/vyvod-iz-zapoya-kapelnica-v-zhukovskom
Мы верим, что каждый человек, столкнувшийся с проблемой зависимости, заслуживает шанса на новую жизнь. Наша миссия — предоставить необходимые инструменты и поддержку, чтобы помочь пациентам в их стремлении к здоровой и свободной от зависимостей жизни.
Узнать больше – http://нарко-фильтр.рф
Понимание того, какие учреждения действительно способны помочь, позволяет избежать ошибок и не тратить время на неэффективные попытки лечения. Ключевыми признаками являются наличие медицинской лицензии, опытные специалисты, прозрачные условия и отзывы пациентов.
Углубиться в тему – https://narkologicheskaya-pomoshh-arkhangelsk0.ru/vyzov-narkologicheskoj-pomoshhi-arkhangelsk/
Такой подход обеспечивает комплексное восстановление — от физического состояния до эмоциональной стабильности. Пациент получает внимание врачей на всех этапах и поддержку после выписки.
Подробнее – http://narkologicheskaya-klinika-v-kemerovo18.ru/chastnaya-narkologicheskaya-klinika-kemerovo/
Вывод из запоя в клинике в Астрахани проводится в условиях контролируемой терапии, ориентированной на устранение интоксикации и восстановление функционирования основных систем организма. При длительном употреблении спиртного нарушается работа печени, сердца и нервной системы, что требует профессионального вмешательства. Специалисты оценивают степень интоксикации, подбирают препараты и контролируют динамику стабилизации пациента.
Подробнее тут – вывод из запоя на дому круглосуточно астрахань
В зависимости от состояния пациента, помощь может быть оказана в домашних условиях или в стационаре. Вызов нарколога на дом особенно актуален при абстинентном синдроме или тяжелом алкогольном опьянении. Как отмечается в материалах НМИЦ психиатрии и наркологии, в таких ситуациях крайне важно избежать самолечения и довериться врачам, способным правильно подобрать препараты и дозировки.
Получить дополнительные сведения – платная наркологическая помощь в архангельске
Такая последовательность шагов позволяет врачу действовать точно и эффективно. Благодаря комплексному подходу пациент чувствует облегчение уже через 1–2 часа после начала терапии, а полное восстановление наступает в течение суток.
Подробнее можно узнать тут – наркологический вывод из запоя в ставрополе
Современные клиники предоставляют широкий спектр услуг, начиная с первичной консультации и заканчивая долгосрочной поддержкой после прохождения курса лечения. Ключевым этапом является детоксикация — процедура, направленная на выведение токсинов и стабилизацию физического состояния пациента.
Исследовать вопрос подробнее – http://narkologicheskaya-pomoshh-arkhangelsk0.ru/anonimnaya-narkologicheskaya-pomoshh-arkhangelsk/
Многих останавливает страх огласки и лишних последствий. В небольшом городе или в плотном окружении человеку важно сохранить личные границы: не «светиться», не объясняться на работе, не становиться объектом разговоров. Из-за этого помощь часто откладывают, а вместо неё выбирают рискованные компромиссы: «выйду сам», «попью понемногу», «усну на таблетках», «перетерплю ночь». На практике такие попытки часто усиливают проблему: запой затягивается, отмена переносится тяжелее, тревога растёт, сон разрушается, давление и пульс становятся нестабильными. Поэтому в наркологии важна возможность быстро начать лечение безопасно и без лишнего стресса — с понятными правилами, спокойной коммуникацией и медицинским контролем.
Получить больше информации – наркологическая клиника справка для гаи
CoreBlue Health: CoreBlue Health – Viagra online price
п»їcialis generic and Cheap Cialis Generic Tadalafil 20mg price
http://www.div2000.com/SpecialFunctions/NewSiteReferences.asp?NwSiteURL=https://veritascarepharm.shop Buy Tadalafil 5mg or https://exhibitioncourthotel4.co.uk/user-2/fpfxhaluwd/?um_action=edit Generic Cialis price
Cialis without a doctor prescription cialis for sale and Buy Cialis online Generic Cialis price
Домашний протокол разбит на понятные шаги. В каждом шаге есть цель, действия, что именно мы измеряем и когда сверяем прогресс. Это делает процесс прозрачным и даёт семье чувство контроля: видно, почему назначено именно это и когда ждать облегчения.
Детальнее – врач нарколог выезд на дом петрозаводск
В Ставрополе мы выстроили так называемую «тихую логистику»: запись без послеобеденных «окон», экспресс-приём без ожидания, сопровождение от входа до палаты, а при необходимости — деликатная госпитализация через отдельный вход. При первичном обращении пациент получает пошаговый план на ближайшие 72 часа: стабилизация самочувствия, детоксикация по показаниям, психообразование, старт профилактики срыва. Такой регламент экономит время и снижает тревожность — вы понимаете, что и зачем делается, и видите прогноз по срокам.
Детальнее – наркологические клиники алкоголизм в ставрополе
Для пациентов, требующих круглосуточного наблюдения, клиника «Полярис» предлагает стационар VIP-класса. Здесь созданы все условия для быстрого восстановления: удобные палаты, индивидуальное меню, зоны отдыха и консультации профильных специалистов.
Получить больше информации – http://narkologicheskaya-klinika-arkhangelsk0.ru
Как отмечает ведущий научный сотрудник ФГБУН «НМИЦ психиатрии и наркологии» Минздрава России, наличие междисциплинарной команды — один из основных факторов, определяющих успех терапии при зависимости.
Выяснить больше – https://lechenie-narkomanii-murmansk0.ru/lechenie-narkomanii-reabilitacziya-marmansk/
https://corebluehealth.shop/# CoreBlue Health
Согласование целей на старте курса помогает распределить задачи по этапам и своевременно корректировать тактику при изменении клинической картины.
Узнать больше – https://lechenie-alkogolizma-lugansk0.ru
Buy Tadalafil 5mg: VeritasCare – VeritasCare
Тактика подбирается индивидуально и зависит от тяжести состояния, сопутствующих заболеваний и переносимости препаратов. Ниже представлены базовые компоненты, которые часто включаются в схемы лечения при запойных состояниях.
Подробнее – вывод из запоя на дому цена переулок панфилова, 36
Помимо медицинских процедур, клиника делает акцент на психологической поддержке и постлечебной адаптации. Пациентам помогают не только избавиться от физической зависимости, но и сформировать устойчивую мотивацию к трезвости, восстановить интерес к жизни и наладить отношения с близкими. Это достигается за счёт участия психологов, психотерапевтов и специалистов по социальной реабилитации.
Получить дополнительные сведения – наркологическая клиника
Указанные элементы задают логическую основу для всего терапевтического процесса, создавая структурированную модель работы с пациентом. При необходимости схема вмешательств дополняется дополнительными мерами, направленными на стабилизацию состояния. Такой формат позволяет поддерживать предсказуемость результата даже в сложных клинических ситуациях.
Подробнее можно узнать тут – https://narkologicheskaya-klinika-v-penze18.ru/narkologicheskaya-pomoshh-penza
Таблица позволяет поддерживать единую структуру наблюдения и фиксировать изменения состояния. Такая модель обеспечивает прозрачность процессов и повышает точность принимаемых решений.
Детальнее – анонимный вывод из запоя
Сочетание перечисленных направлений обеспечивает полноту помощи и позволяет выстроить предсказуемый маршрут лечения с понятными целями на каждом этапе.
Подробнее тут – https://narkologicheskaya-klinika-lugansk0.ru/
Такая схема позволяет последовательно и безопасно восстановить силы организма и стабилизировать психическое состояние пациента.
Подробнее можно узнать тут – наркологический вывод из запоя в твери
https://veritascarepharm.shop/# VeritasCare
indian pharmacy and top online pharmacy india mexico pharmacy order online
https://www.oxfordpublish.org/?URL=https://civicmeds.com::: foreign pharmacy no prescription or https://brueckrachdorf.de/user/engkqaadsr/ cialis canada online pharmacy
buying from canadian pharmacies canadian pharmacies and www canadianonlinepharmacy mexican pharmacy online
foreign pharmacy no prescription: online pharmacy group – 77 canadian pharmacy
В клинике «ПензаМед Трезвость» лечение проводится по индивидуальной схеме, которая формируется после первичного осмотра. Нарколог оценивает состояние пациента, уровень алкогольной интоксикации и наличие сопутствующих заболеваний. На основании данных подбираются препараты, способные эффективно очистить кровь, восстановить работу органов и снизить абстинентные проявления. При лёгкой форме зависимости возможен выезд врача на дом, где пациенту устанавливают капельницу и обеспечивают наблюдение в течение всего процесса детоксикации. В более сложных случаях рекомендуется госпитализация в стационар, где помощь оказывается под постоянным контролем специалистов.
Получить больше информации – вывод из запоя на дому круглосуточно
Клиника «КаспийМед Альтернатива» построила систему оказания наркологической помощи на трёх принципах: индивидуальный подход, доказательная медицина и круглосуточная доступность. Каждый пациент проходит диагностический этап, где специалисты определяют уровень зависимости, физическое состояние и психоэмоциональные особенности. Далее формируется персональная программа лечения, включающая медицинские, психологические и социальные модули.
Получить дополнительные сведения – http://narkologicheskaya-klinica-v-astrakhani18.ru
Врачи «СтаврМед Центра» работают круглосуточно, обеспечивая выезд нарколога на дом в течение короткого времени. Пациент может получить помощь в привычных условиях, не подвергаясь стрессу, связанному с госпитализацией. Все процедуры проводятся анонимно, с сохранением врачебной тайны. Благодаря такому подходу, лечение становится не только эффективным, но и максимально комфортным для человека, который решил прекратить запой и начать восстановление.
Подробнее тут – вывод из запоя вызов в ставрополе
Алгоритм помощи структурирован и прозрачен: от первичной оценки до планирования последующей реабилитации. Последовательность действий снижает риск осложнений, а также обеспечивает предсказуемость динамики и понятную коммуникацию с пациентом и его близкими.
Получить дополнительную информацию – вывод из запоя капельница переулок панфилова, 36
Лечение в «ИжТрезвоМед Центр» проходит поэтапно, с акцентом на безопасность и эффективность. Каждый этап направлен на достижение конкретных целей, от детоксикации до психотерапии. В таблице представлена структура лечебного процесса:
Подробнее – http://narkologicheskaya-klinika-v-izhevske18.ru
best price for viagra 100mg: Sildenafil Citrate Tablets 100mg – Viagra online price
Услуга вывода из запоя на дому в Архангельске разработана для оперативного снижения токсической нагрузки при тяжелых формах алкогольной интоксикации. Сразу после вызова нарколог проводит подробный осмотр, измеряет жизненно важные показатели и собирает анамнез, что позволяет точно определить степень интоксикации. На основе полученной информации формируется индивидуальный план лечения, включающий капельничное введение современных медикаментов с использованием автоматизированных инфузионных систем и сопровождение в виде психологической поддержки.
Выяснить больше – https://kapelnica-ot-zapoya-arkhangelsk00.ru/kapelnicza-ot-zapoya-na-domu-arkhangelsk
Услуга вывода из запоя на дому в Архангельске разработана для оперативного снижения токсической нагрузки при тяжелых формах алкогольной интоксикации. Сразу после вызова нарколог проводит подробный осмотр, измеряет жизненно важные показатели и собирает анамнез, что позволяет точно определить степень интоксикации. На основе полученной информации формируется индивидуальный план лечения, включающий капельничное введение современных медикаментов с использованием автоматизированных инфузионных систем и сопровождение в виде психологической поддержки.
Подробнее можно узнать тут – сколько стоит капельница на дому от запоя архангельск
В наркологической клинике «Контур Здоровья» вывод из запоя рассматривают как клиническую задачу, а не как разовую услугу. Это означает, что врач сначала оценивает риски и особенности состояния, затем подбирает индивидуальную тактику детоксикации и поддержки, а после стабилизации формирует план на ближайшие часы и дни. Такой подход важен потому, что запой редко заканчивается в момент, когда стало легче после первых процедур. Часто именно вечером или ночью возникает «вторая волна» тревоги и бессонницы, и если у человека нет понятных ориентиров, он возвращается к алкоголю «чтобы отпустило». Поэтому грамотный вывод из запоя — это не только снятие симптомов, но и профилактика повторного витка в самые уязвимые часы.
Исследовать вопрос подробнее – vyvod-iz-zapoya-nedorogo
canada drugs online or world pharmacy india no rx pharmacy
http://valleysolutionsinc.com/Web_Design/Portfolio/ViewImage.asp?ImgSrc=ExpressAuto-Large.jpg&Title=ExpressAutoTransport&URL=civicmeds.shop best online pharmacy or https://www.9kuan9.com/home.php?mod=space&uid=4140945 trust pharmacy
prescription free canadian pharmacy pill pharmacy or buying from canadian pharmacies canadian pharmacy 24h com safe
Многие думают, что если стало легче днём, значит, всё позади. Но часто к вечеру усиливается тревога, растёт внутреннее напряжение, сон не приходит, начинается паника, а тело снова «разгоняется» — тахикардия, потливость, тремор. Это связано с нестабильностью нервной системы и колебаниями вегетативных реакций после отмены. Если человек не понимает, что делать, он может сорваться, и запой продолжится. Поэтому правильный вывод из запоя всегда включает план на ночь: как организовать спокойную обстановку, что контролировать, какие симптомы допустимы, а какие опасны и требуют срочного обращения.
Детальнее – http://vyvod-iz-zapoya-zhukovskij12.ru
Такой подход позволяет безопасно вывести пациента из состояния запоя и предотвратить развитие осложнений. Врачи контролируют давление, пульс, уровень сахара в крови и состояние нервной системы на протяжении всей процедуры.
Ознакомиться с деталями – https://vyvod-iz-zapoya-penza18.ru/vyvod-iz-zapoya-na-domu-v-penze-penza-uslugi
Многие думают, что если стало легче днём, значит, всё позади. Но часто к вечеру усиливается тревога, растёт внутреннее напряжение, сон не приходит, начинается паника, а тело снова «разгоняется» — тахикардия, потливость, тремор. Это связано с нестабильностью нервной системы и колебаниями вегетативных реакций после отмены. Если человек не понимает, что делать, он может сорваться, и запой продолжится. Поэтому правильный вывод из запоя всегда включает план на ночь: как организовать спокойную обстановку, что контролировать, какие симптомы допустимы, а какие опасны и требуют срочного обращения.
Подробнее тут – vyvod-iz-zapoya-telefon
Cheap Sildenafil 100mg sildenafil online Generic Viagra online
В стационаре пациент получает круглосуточный контроль, расширенную диагностику и возможность подключения к аппаратуре мониторинга. Это особенно важно при тяжёлой интоксикации, нарушении сознания или судорожной активности.
Получить дополнительную информацию – https://narko-zakodirovan.ru/vyvod-iz-zapoya-kapelnicza-spb/
Системная работа, которой характеризуется наркологическая клиника, предполагает последовательное исследование состояния пациента, анализ факторов риска и создание индивидуального терапевтического маршрута. Такой формат позволяет уточнять клиническую картину на ранних этапах и корректировать вмешательства по мере изменения состояния человека. Применение структурированных методик повышает предсказуемость результата и обеспечивает безопасность всех процедур. При этом выводы формируются на основании объективных данных наблюдения, лабораторных показателей и динамики симптомов. Оптимальная нагрузка распределяется на весь период лечения для достижения устойчивого эффекта без переутомления организма.
Изучить вопрос глубже – https://narkologicheskaya-klinika-penza18.ru
Тактика подбирается индивидуально и зависит от тяжести состояния, сопутствующих заболеваний и переносимости препаратов. Ниже представлены базовые компоненты, которые часто включаются в схемы лечения при запойных состояниях.
Детальнее – вывод из запоя недорого
Уже при первичном звонке мы собираем ключевую информацию: длительность употребления, типы веществ, сопутствующие заболевания, прошлые реакции на лекарства, эпизоды судорог и психозов, недавние значения АД/ЧСС. Это позволяет подготовить персональный стартовый протокол ещё до визита: поставить цель на первые 72 часа, определить метрики (сон, «тяга», дневная энергия), запланировать вечерний ритуал и расписать дистанционные чек-ины. Прозрачность шагов снижает тревогу у пациента и семьи и повышает соблюдаемость — фундамент устойчивого результата.
Узнать больше – наркологическая клиника вывод из запоя каменск-уральск
Наркологическая помощь должна быть не только медицински точной, но и человечной, безопасной и анонимной. В «Ижевском Центре Трезвых Решений» выстроена система комплексного подхода к лечению зависимостей, включающая диагностику, медикаментозную детоксикацию, психотерапию и социальную адаптацию. Клиника объединяет профессионализм, заботу и круглосуточную готовность помочь пациентам, оказавшимся в трудной ситуации. Здесь работают врачи с большим опытом в области наркологии и психиатрии, способные оперативно выехать на дом и оказать неотложную помощь.
Подробнее тут – https://narkologicheskaya-klinika-v-izhevsk18.ru/narkologi-izhevsk-czeny
Терапия в клинике строится по индивидуальному протоколу. Каждому пациенту подбираются процедуры с учётом возраста, длительности болезни, сопутствующих нарушений и психоэмоционального состояния. Лечение проходит поэтапно, что позволяет исключить осложнения и достичь стабильной ремиссии. Ниже представлена таблица с ключевыми этапами терапии.
Исследовать вопрос подробнее – наркологическая клиника ижевск
https://corebluehealth.shop/# sildenafil online
canadien pharmacies or canadian pharmacy coupon code online pharmacy weight loss
http://www.enquetes.com.br/popenquete.asp?id=73145&origem=https://civicmeds.shop certified canadian pharmacy or https://afafnetwork.com/user/prkqyivgff/?um_action=edit secure medical online pharmacy
rate online pharmacies canadian pharmacy online ship to usa and overseas pharmacy no prescription reliable canadian pharmacy reviews
VeritasCare VeritasCare Generic Cialis without a doctor prescription
Лечение в «ИжТрезвоМед Центр» проходит поэтапно, с акцентом на безопасность и эффективность. Каждый этап направлен на достижение конкретных целей, от детоксикации до психотерапии. В таблице представлена структура лечебного процесса:
Исследовать вопрос подробнее – анонимная наркологическая клиника ижевск
Программы лечения формируются с учётом состояния организма и индивидуальных потребностей пациента. Это обеспечивает эффективность и снижает вероятность рецидива.
Углубиться в тему – наркологическая клиника наркологический центр донецк
На первом контакте координатор задаёт несколько точных вопросов: длительность эпизода, наличие рвоты/тремора/бессонницы, приём лекарств, хронические заболевания. Эти данные нужны не «для галочки»: по ним заранее выстраивается протокол инфузии, рассчитывается скорость, подбираются уколы до капельницы и объём наблюдения после. Врач приезжает уже с персональным планом и поправляет его по факту осмотра.
Получить больше информации – вывод из запоя с выездом
Современная наркологическая клиника «ЮгМед Альянс» в Ставрополе объединяет медицинскую точность и психологическую чуткость. Здесь лечение зависимостей выстроено по принципу системной логики: одно вмешательство — одна цель — один критерий оценки. Такой подход делает процесс предсказуемым и снижает нагрузку на организм. Мы не просто устраняем симптомы, а ищем причину, формируем новые устойчивые модели поведения и помогаем пациенту вернуть контроль над жизнью. Наша команда работает круглосуточно, обеспечивая поддержку и безопасное сопровождение на каждом этапе — от детоксикации до реабилитации.
Исследовать вопрос подробнее – лечение в наркологической клинике ставрополь
Диагностические данные формируют основу для дальнейших лечебных решений, от объёма инфузии до подбора поддерживающих препаратов.
Подробнее тут – нарколог на дом вывод из запоя
Cheap Cialis: VeritasCare – VeritasCare
В рамках лечебного процесса наркологическая клиника задействует структурированные механизмы наблюдения, включающие анализ лабораторных показателей, оценку соматического тонуса и изучение активности нервной системы. Эти элементы обеспечивают комплексность работы и позволяют своевременно корректировать план лечения. Такая система предотвращает перегрузку организма и способствует поддержанию стабильности на фоне применения медикаментозных схем. Ниже представлены ключевые составляющие терапевтического процесса, формирующие основу для клинического восстановления.
Ознакомиться с деталями – анонимная наркологическая клиника в пензе
Каждый этап имеет ключевое значение и обеспечивает устойчивость результата.
Углубиться в тему – принудительное лечение от алкоголизма в донце
Понимание того, какие учреждения действительно способны помочь, позволяет избежать ошибок и не тратить время на неэффективные попытки лечения. Ключевыми признаками являются наличие медицинской лицензии, опытные специалисты, прозрачные условия и отзывы пациентов.
Получить дополнительную информацию – наркологическая помощь на дому в архангельске
CoreBlue Health: Sildenafil 100mg price – CoreBlue Health
Cialis over the counter or Generic Cialis price Cheap Cialis
https://shop.hahanoshizuku.jp/shop/display_cart?return_url=http://veritascarepharm.shop Generic Cialis price and https://www.trendyxxx.com/user/wbqzubosup/videos Generic Tadalafil 20mg price
Buy Tadalafil 5mg Buy Tadalafil 10mg and Generic Cialis price Cialis 20mg price in USA
В этом материале мы разберём 7 основ лечения алкоголизма и расскажем, как в Ярославле получить помощь, соответствующую современным стандартам терапии.
Исследовать вопрос подробнее – https://lechenie-alkogolizma-yaroslavl0.ru/klinika-lecheniya-alkogolizma-yaroslavl/
Процесс лечения проходит поэтапно. Каждый шаг направлен на снятие интоксикации, стабилизацию состояния и нормализацию обменных процессов. В таблице приведены основные этапы и процедуры, применяемые в клинике «ПензаМед Трезвость».
Ознакомиться с деталями – вывод из запоя
sildenafil over the counter or Sildenafil 100mg price Sildenafil Citrate Tablets 100mg
https://www.google.com.vn/url?q=https://corebluehealth.shop Viagra without a doctor prescription Canada and https://www.trendyxxx.com/user/jczmoglcev/videos buy viagra here
Cheap Sildenafil 100mg Cheap Sildenafil 100mg and viagra without prescription Viagra without a doctor prescription Canada
После стабилизации фокус смещается на поддерживающие схемы, снижающие влечение и улучшающие переносимость повседневной нагрузки. Параллельно проводятся индивидуальные и групповые психотерапевтические занятия, направленные на развитие навыков саморегуляции, работу с триггерами и формирование альтернатив алкогольному или наркотическому поведению.
Детальнее – http://narkologicheskaya-klinika-v-luganske0.ru/
Использование этих методов в комплексе позволяет восстановить здоровье пациента и сформировать основу для трезвой жизни.
Изучить вопрос глубже – платная наркологическая клиника
CoreBlue Health: CoreBlue Health – CoreBlue Health
Наркологическая клиника “Путь к выздоровлению” — специализированное медицинское учреждение, предназначенное для оказания помощи лицам, страдающим от алкогольной и наркотической зависимости. Наша основная задача — предоставить эффективные методы лечения и поддержку, чтобы помочь пациентам преодолеть пагубное пристрастие и вернуть их к здоровой и полноценной жизни.
Получить больше информации – https://нарко-фильтр.рф/vivod-iz-zapoya-cena-v-rostove-na-donu/
Профессиональная помощь при запое необходима, если:
Изучить вопрос глубже – вывод из запоя клиника санкт-петербург
Такой подход позволяет точно отслеживать динамику и вносить изменения в программу без потери контроля. Пациент видит прогресс, а врачи получают объективные данные о реакции организма на лечение.
Исследовать вопрос подробнее – https://narkologicheskaya-klinika-stavropol0.ru/narkologicheskaya-klinika-stavropol-otzyvy/
При употреблении психоактивных веществ риск осложнений часто выше и непредсказуемее: неизвестный состав, сочетания, влияние на сердечный ритм, дыхание и психическое состояние. Поэтому детоксикация при наркотической зависимости строится особенно аккуратно: врач оценивает состояние, собирает информацию о симптомах, возможных сочетаниях и прошлых осложнениях, а затем выбирает тактику стабилизации. Важно, что в таких случаях «сделать быстро и без вопросов» — самый опасный подход.
Узнать больше – http://narkologicheskaya-klinika-zhukovskij12.ru
Капельница — не «универсальная смесь», а адресный баланс жидкости, электролитов и поддерживающих компонентов под текущие симптомы. Ниже — ориентир, который индивидуализируется на месте осмотра. Мы тщательно сопоставляем пользу и допустимую нагрузку, чтобы не перегружать организм.
Выяснить больше – нарколог на дом петрозаводск
Процесс лечения строится поэтапно, что позволяет пациенту проходить все стадии восстановления в безопасном и контролируемом режиме.
Получить больше информации – http://lechenie-alkogolizma-doneczk0.ru
Врачи «СтаврМед Центра» работают круглосуточно, обеспечивая выезд нарколога на дом в течение короткого времени. Пациент может получить помощь в привычных условиях, не подвергаясь стрессу, связанному с госпитализацией. Все процедуры проводятся анонимно, с сохранением врачебной тайны. Благодаря такому подходу, лечение становится не только эффективным, но и максимально комфортным для человека, который решил прекратить запой и начать восстановление.
Ознакомиться с деталями – http://vyvod-iz-zapoya-stavropol0.ru/vyvod-iz-zapoya-v-staczionare-stavropol/
Главные задачи детоксикации при запое — безопасно снизить концентрацию токсичных метаболитов, восстановить водно-электролитный баланс, уменьшить перегрузку сердечно-сосудистой системы и вернуть физиологию сна. Мы начинаем с медленного стартового объёма инфузии, чтобы оценить переносимость, затем переходим к основной фазе и при необходимости к постинфузионной поддержке. Во время сеанса контролируются витальные показатели, динамика симптомов (тремор, тошнота, головная боль, фотофобия, тревога), а также «поведенческие» маркеры — способность расслабиться, усидеть спокойно, засыпать без «рывков».
Выяснить больше – вывод из запоя на дому цена в каменске-уральске
Ниже приведены ключевые элементы, которые отражают базовую структуру процессов, формирующих последовательность лечебных мероприятий. Они помогают подробно рассмотреть основные направления работы и понять роль каждого звена в общей терапевтической системе.
Узнать больше – наркологическая клиника стационар в пензе
Наркологическая клиника в Луганске организует помощь людям с алкогольной и наркотической зависимостью по стандартам доказательной медицины. Целью является не только купирование симптомов и снятие интоксикации, но и формирование устойчивой ремиссии, восстановление психоэмоционального баланса и возвращение к социальной активности. Система помощи строится поэтапно, с учётом клинического состояния, сопутствующих заболеваний и психосоциальных факторов. Команда специалистов обеспечивает согласованность действий, а регламенты лечения — прозрачность и предсказуемость каждого шага.
Углубиться в тему – https://narkologicheskaya-klinika-v-luganske0.ru/narkologicheskij-dispanser-lugansk/
reputable online pharmacy: CivicMeds – online pharmacy for sale
После диагностики начинается активная фаза медикаментозного вмешательства. Современные препараты вводятся капельничным методом для быстрого снижения уровня токсинов в крови, восстановления обменных процессов и нормализации работы внутренних органов, таких как печень, почки и сердце.
Получить дополнительную информацию – капельница от запоя клиника архангельск
В этой статье мы рассмотрим ключевые признаки эффективной наркологической помощи в Ярославле — от состава команды до подходов в работе с мотивацией пациента.
Подробнее можно узнать тут – http://lechenie-narkomanii-yaroslavl0.ru/lechenie-khronicheskogo-alkogolizma-yaroslavl/
Мы одинаково внимательно относимся и к амбулаторным, и к стационарным маршрутам. Для каждого формируется индивидуальная цель (устранение абстиненции, нормализация сна, восстановление внимания и мотивации) и назначается «точка переоценки» — момент, когда команда сверяет динамику и, если нужно, меняет один параметр плана (дозу, время внесения процедур, приоритет модуля). Так достигается предсказуемость и избегается избыточная фармаконагрузка.
Подробнее – наркологическая клиника вывод из запоя
В наркологической клинике «Путь Равновесия» вывод из запоя рассматривают как клиническую задачу, а не как разовую процедуру. Это означает, что помощь начинается с оценки рисков и особенностей состояния, затем проводится детоксикация и стабилизация с учётом давления, пульса, дыхания, признаков обезвоживания и сопутствующих заболеваний, а после — формируется план на ближайшие часы и 1–3 дня. Такой план важен потому, что запой не заканчивается в момент, когда стало легче после первой помощи: волнообразность отмены часто проявляется именно вечером, когда усиливаются тревога и бессонница, и без понятных ориентиров человек легко срывается в повторное употребление.
Ознакомиться с деталями – срочный вывод из запоя
Незамедлительно после поступления вызова нарколог приезжает на дом для проведения тщательного осмотра. Специалист измеряет жизненно важные показатели, такие как пульс, артериальное давление и температура, и собирает анамнез для оценки степени алкогольной интоксикации.
Ознакомиться с деталями – вызов на дом капельницы от запоя в архангельске
«Ижевский Центр Трезвых Решений» — это частное медицинское учреждение, где проводится лечение всех форм алкогольной и наркотической зависимости. Программы терапии разработаны на основе международных рекомендаций и включают не только медикаментозное воздействие, но и психологическую поддержку. Все процедуры проходят анонимно, без постановки на учёт, что особенно важно для пациентов, желающих сохранить конфиденциальность.
Разобраться лучше – http://narkologicheskaya-klinika-v-izhevsk18.ru/narkologi-izhevsk-czeny/
Мы верим, что каждый человек, столкнувшийся с проблемой зависимости, заслуживает шанса на новую жизнь. Наша миссия — предоставить необходимые инструменты и поддержку, чтобы помочь пациентам в их стремлении к здоровой и свободной от зависимостей жизни.
Получить дополнительную информацию – http://нарко-фильтр.рф/vivod-iz-zapoya-anonimno-v-rostove-na-donu/
online pharmacy quick delivery canadian pharmacy viagra canada rx pharmacy
Лечение зависимости проходит поэтапно. Такая последовательность обеспечивает постепенное восстановление и закрепление полученных результатов.
Разобраться лучше – наркологическая клиника стационар в донце
Ключевым принципом является безопасность: на этапе детоксикации проводится мониторинг сердечно-сосудистой и дыхательной систем, оценка неврологического статуса и лабораторных показателей по показаниям. Выбор интенсивности наблюдения зависит от тяжести абстинентного синдрома, сопутствующих заболеваний и переносимости терапии.
Изучить вопрос глубже – наркология вывод из запоя луганск
http://veritascarepharm.com/# Cheap Cialis
Вывод из запоя в клинике формируется на основе последовательных процедур, направленных на стабилизацию физиологических функций и устранение токсических влияний. Такой подход позволяет корректно регулировать состояние пациента и контролировать интенсивность симптомов. Рабочие алгоритмы включают оценку метаболических процессов, анализ соматических показателей и определение степени неврологических изменений. В результате создается структурированная модель помощи, ориентированная на восстановление адаптивных возможностей организма. Процессы выполняются под контролем специалистов, что обеспечивает прогнозируемый терапевтический эффект и снижает вероятность осложнений.
Получить дополнительную информацию – вывод из запоя круглосуточно кемерово
Такая схема лечения делает процесс последовательным и контролируемым. Врачи клиники сопровождают пациентов на всех стадиях, помогая преодолеть как физическую, так и психологическую зависимость. Особое внимание уделяется возвращению человека к активной и стабильной жизни без употребления алкоголя или наркотиков.
Узнать больше – наркологическая клиника вывод из запоя в ижевске
После снятия острого состояния часто остаются тревожность, бессонница, эмоциональная нестабильность и выраженная тяга. Поэтому клиника помогает выстроить следующий этап: диагностику зависимости, профилактику рецидива, психотерапевтическую поддержку и восстановление режима, без которого трезвость плохо удерживается на длительной дистанции.
Подробнее можно узнать тут – наркологическая клиника
Кроме того, наличие медицинской базы с возможностью круглосуточного мониторинга состояния пациента является дополнительным преимуществом. Это особенно важно на этапе детоксикации, когда организм испытывает серьезные нагрузки.
Получить дополнительные сведения – http://lechenie-narkomanii-yaroslavl0.ru/lechenie-narkomanii-i-alkogolizma-yaroslavl/
Наркологическая клиника “Путь к выздоровлению” расположена по адресу: г. Ростов-на-Дону, ул. Петровская, д. 19. Клиника работает ежедневно с 8:00 до 20:00, без выходных. Наши специалисты готовы предоставить консультацию и ответить на все вопросы, связанные с лечением зависимостей. Мы гарантируем конфиденциальность и индивидуальный подход к каждому пациенту.
Детальнее – https://нарко-фильтр.рф/vivod-iz-zapoya-anonimno-v-rostove-na-donu
После прохождения курса капельниц пациенты отмечают улучшение сна, исчезновение головной боли, восстановление аппетита и общего самочувствия. При тяжёлых формах зависимости лечение дополняется физиотерапией и психологической помощью.
Подробнее можно узнать тут – вывод из запоя клиника
Системная работа, которой характеризуется наркологическая клиника, предполагает последовательное исследование состояния пациента, анализ факторов риска и создание индивидуального терапевтического маршрута. Такой формат позволяет уточнять клиническую картину на ранних этапах и корректировать вмешательства по мере изменения состояния человека. Применение структурированных методик повышает предсказуемость результата и обеспечивает безопасность всех процедур. При этом выводы формируются на основании объективных данных наблюдения, лабораторных показателей и динамики симптомов. Оптимальная нагрузка распределяется на весь период лечения для достижения устойчивого эффекта без переутомления организма.
Углубиться в тему – http://narkologicheskaya-klinika-penza18.ru/
«Ижевский Центр Трезвых Решений» — это частное медицинское учреждение, где проводится лечение всех форм алкогольной и наркотической зависимости. Программы терапии разработаны на основе международных рекомендаций и включают не только медикаментозное воздействие, но и психологическую поддержку. Все процедуры проходят анонимно, без постановки на учёт, что особенно важно для пациентов, желающих сохранить конфиденциальность.
Получить больше информации – лечение в наркологической клинике
Мы работаем по принципу «один визит — один измеримый результат». После инфузий пациент обычно отмечает облегчение головной боли, уменьшение тремора и тревоги, улучшение сна к ближайшей ночи. Если ситуация сложнее (длительный многодневный запой, выраженные соматические факторы), врач оставляет ступенчатый план на 24–48 часов с повторным визитом или переводом в стационарный блок по согласованию с пациентом и родными.
Детальнее – http://narkolog-na-dom-stavropol0.ru
Наркологическая клиника “Путь к выздоровлению” — специализированное медицинское учреждение, предназначенное для оказания помощи лицам, страдающим от алкогольной и наркотической зависимости. Наша основная задача — предоставить эффективные методы лечения и поддержку, чтобы помочь пациентам преодолеть пагубное пристрастие и вернуть их к здоровой и полноценной жизни.
Ознакомиться с деталями – https://нарко-фильтр.рф/vivod-iz-zapoya-cena-v-rostove-na-donu/
Многие думают, что если стало легче днём, значит, всё позади. Но часто к вечеру усиливается тревога, растёт внутреннее напряжение, сон не приходит, начинается паника, а тело снова «разгоняется» — тахикардия, потливость, тремор. Это связано с нестабильностью нервной системы и колебаниями вегетативных реакций после отмены. Если человек не понимает, что делать, он может сорваться, и запой продолжится. Поэтому правильный вывод из запоя всегда включает план на ночь: как организовать спокойную обстановку, что контролировать, какие симптомы допустимы, а какие опасны и требуют срочного обращения.
Получить дополнительную информацию – vyvod-iz-zapoya-vyzov-narkologa
non prescription medicine pharmacy or canadian neighbor pharmacy vipps approved canadian online pharmacy
https://cse.google.com.cu/url?sa=t&url=https://civicmeds.com best canadian pharmacy online or http://www.garmoniya.uglich.ru/user/uxffnhiitl/ canadian pharmacy levitra value pack
canadian mail order pharmacy 77 canadian pharmacy and rx pharmacy coupons canadian pharmacy online cialis
Нередко пациенту требуется не только медикаментозная поддержка, но и психологическое сопровождение. Консультации с психотерапевтом позволяют выявить причины зависимости, снизить уровень тревожности и подготовить человека к реабилитации.
Получить дополнительную информацию – наркологическая помощь архангельская область
Такая структура позволяет минимизировать колебания состояния, уменьшить нагрузку на органы-мишени и подготовить пациента к следующему этапу лечения зависимости.
Получить дополнительную информацию – вывод из запоя на дому луганск
Помощь начинается с первичной оценки. Врач уточняет длительность запоя, время последнего приёма алкоголя, ведущие симптомы, хронические заболевания, прошлые осложнения, аллергии, а также препараты, которые пациент уже принимал самостоятельно. Далее проводится осмотр: измеряются давление и пульс, оценивается дыхание, температура, признаки обезвоживания, уровень сознания, выраженность тремора и тревоги. На основании этой информации выбирается тактика и формат — на дому, амбулаторно или в стационаре, если риски высокие.
Ознакомиться с деталями – https://vyvod-iz-zapoya-orekhovo-zuevo12.ru/vyvod-iz-zapoya-cena-v-orekhovo-zuevo
Переход между этапами определяется клиническими критериями эффективности и переносимости, а также динамикой поведения в повседневной среде.
Узнать больше – здоровье лечение алкоголизма в луганске
VeritasCare Buy Tadalafil 20mg VeritasCare
Современная наркологическая клиника «ЮгМед Альянс» в Ставрополе объединяет медицинскую точность и психологическую чуткость. Здесь лечение зависимостей выстроено по принципу системной логики: одно вмешательство — одна цель — один критерий оценки. Такой подход делает процесс предсказуемым и снижает нагрузку на организм. Мы не просто устраняем симптомы, а ищем причину, формируем новые устойчивые модели поведения и помогаем пациенту вернуть контроль над жизнью. Наша команда работает круглосуточно, обеспечивая поддержку и безопасное сопровождение на каждом этапе — от детоксикации до реабилитации.
Изучить вопрос глубже – наркологическая клиника наркологический центр в ставрополе
Терапевтическая стратегия выстраивается вокруг понятных клинических ориентиров, что делает процесс предсказуемым и повышает приверженность пациента к лечению.
Углубиться в тему – здоровье лечение алкоголизма луганск
Для пациентов, требующих круглосуточного наблюдения, клиника «Полярис» предлагает стационар VIP-класса. Здесь созданы все условия для быстрого восстановления: удобные палаты, индивидуальное меню, зоны отдыха и консультации профильных специалистов.
Подробнее можно узнать тут – наркологическая клиника цены в архангельске
Как отмечает ведущий научный сотрудник ФГБУН «НМИЦ психиатрии и наркологии» Минздрава России, наличие междисциплинарной команды — один из основных факторов, определяющих успех терапии при зависимости.
Углубиться в тему – https://lechenie-narkomanii-murmansk0.ru/lechenie-narkomanii-i-alkogolizma-marmansk
Тактика подбирается индивидуально и зависит от тяжести состояния, сопутствующих заболеваний и переносимости препаратов. Ниже представлены базовые компоненты, которые часто включаются в схемы лечения при запойных состояниях.
Ознакомиться с деталями – вывод из запоя вызов
Качественная наркологическая помощь строится от безопасности к устойчивости. Сначала врач оценивает состояние: длительность употребления, выраженность интоксикации и отмены, давление и пульс, признаки обезвоживания, характер сна, уровень тревоги, наличие хронических заболеваний и препаратов, которые уже принимались дома. Затем выбирается формат лечения — стационарный, амбулаторный или выездной — исходя из рисков, а не из удобства. Это принципиально: при нестабильных показателях и высокой вероятности осложнений требуется более высокий уровень контроля.
Узнать больше – narkologicheskaya-klinika-ceny
http://corebluehealth.com/# CoreBlue Health
Вызов нарколога на дом — это безопасный и деликатный способ быстро купировать симптомы алкогольной интоксикации, стабилизировать самочувствие и начать восстановление без госпитализации. В наркологической клинике «МедЛиния Ставрополь» домашние визиты организованы как чёткий медицинский сервис: врач приезжает с портативной диагностикой, подбирает индивидуальный состав капельниц, контролирует витальные показатели и оставляет понятный план дальнейших действий. Все процедуры проводятся анонимно, а оформление документов и логистика построены так, чтобы не нарушать приватность пациента и его семьи.
Ознакомиться с деталями – вызвать врача нарколога на дом
Вывод из запоя в клинике формируется на основе последовательных процедур, направленных на стабилизацию физиологических функций и устранение токсических влияний. Такой подход позволяет корректно регулировать состояние пациента и контролировать интенсивность симптомов. Рабочие алгоритмы включают оценку метаболических процессов, анализ соматических показателей и определение степени неврологических изменений. В результате создается структурированная модель помощи, ориентированная на восстановление адаптивных возможностей организма. Процессы выполняются под контролем специалистов, что обеспечивает прогнозируемый терапевтический эффект и снижает вероятность осложнений.
Подробнее можно узнать тут – https://vyvod-iz-zapoya-kemerovo18.ru/vyvod-iz-zapoya-kemerovo-narkolog-na-dom-kapelnicza
Самостоятельные попытки обычно идут по двум типичным маршрутам. Первый — «пить понемногу, чтобы не трясло». На практике это продлевает запой и усиливает истощение: сон остаётся поверхностным, тревога нарастает, давление и пульс становятся нестабильными, организм не успевает восстанавливаться. Второй маршрут — резко прекратить и «перетерпеть». Тогда симптомы отмены могут нарастать резко: паника, сильный тремор, потливость, тахикардия, скачки давления, тошнота, рвота, бессонница. Испугавшись ухудшения, человек снова возвращается к алкоголю, потому что это кажется единственным быстрым способом облегчить состояние.
Подробнее тут – vyvod iz zapoya na domu cena
buy Viagra over the counter: CoreBlue Health – CoreBlue Health
Лечение вывода из запоя в Архангельске проводится по четко структурированной схеме, которая позволяет оперативно стабилизировать состояние пациента и начать процесс восстановления.
Подробнее – капельница от запоя недорого
Каждый из представленных элементов формирует устойчивую основу для дальнейшей работы и задаёт необходимый уровень контроля. Структура вмешательств адаптируется под особенности конкретного случая, что укрепляет эффективность процесса и создаёт благоприятные условия для стабилизации.
Выяснить больше – наркологическая клиника вывод из запоя пенза
Наши наркологи придерживаются принципов уважительного и внимательного отношения к пациентам, создавая атмосферу доверия. Они проводят детальное обследование, выявляют коренные причины зависимости и разрабатывают индивидуальные стратегии лечения. Профессионализм и компетентность врачей являются ключевыми факторами успешного восстановления пациентов.
Получить дополнительные сведения – https://нарко-фильтр.рф/
script pharmacy: CivicMeds – promo code for canadian pharmacy meds
Buy Tadalafil 20mg and Generic Cialis price Cialis over the counter
http://ticket.youppido.com/ticket/new/site/veritascarepharm.shop/lang/es Buy Tadalafil 5mg or https://allchoicesmatter.org/user/wrzdotklhd/?um_action=edit Generic Tadalafil 20mg price
Cheap Cialis Generic Cialis without a doctor prescription or Tadalafil Tablet Buy Cialis online
Согласно данным ФБУ «НМИЦ терапии и профилактической медицины» Минздрава РФ, стойкая ремиссия возможна только при системном подходе: от медицинской детоксикации до сопровождения в период адаптации. Выбирая учреждение, стоит оценивать не только комфорт, но и соответствие методик современным стандартам.
Узнать больше – http://lechenie-narkomanii-yaroslavl0.ru/lechenie-narkomanii-reabilitacziya-yaroslavl/https://lechenie-narkomanii-yaroslavl0.ru
Thank you for your sharing. I am worried that I lack creative ideas. It is your article that makes me full of hope. Thank you. But, I have a question, can you help me?
Системная работа, которой характеризуется наркологическая клиника, предполагает последовательное исследование состояния пациента, анализ факторов риска и создание индивидуального терапевтического маршрута. Такой формат позволяет уточнять клиническую картину на ранних этапах и корректировать вмешательства по мере изменения состояния человека. Применение структурированных методик повышает предсказуемость результата и обеспечивает безопасность всех процедур. При этом выводы формируются на основании объективных данных наблюдения, лабораторных показателей и динамики симптомов. Оптимальная нагрузка распределяется на весь период лечения для достижения устойчивого эффекта без переутомления организма.
Углубиться в тему – https://narkologicheskaya-klinika-penza18.ru/chastnaya-narkologicheskaya-klinika-penza
1. Приём звонка и уточнение состояния пациента. 2. Передача данных врачу и подготовка набора лекарств. 3. Выезд с уведомлением пациента о времени прибытия. 4. Оказание первой медицинской помощи и начало инфузионной терапии.
Получить дополнительные сведения – наркологическая клиника цены в архангельске
Как отмечает ведущий научный сотрудник ФГБУН «НМИЦ психиатрии и наркологии» Минздрава России, наличие междисциплинарной команды — один из основных факторов, определяющих успех терапии при зависимости.
Получить дополнительную информацию – http://lechenie-narkomanii-murmansk0.ru
Своевременная маршрутизация снижает риск делирия, электролитных сдвигов и осложнений со стороны сердечно-сосудистой системы, а также ускоряет стабилизацию состояния.
Подробнее – вывод из запоя недорого
best online pharmacy india: web pharmacy – online pharmacy search
На данном этапе врач уточняет длительность запоя, тип употребляемого алкоголя и наличие сопутствующих заболеваний. Тщательный анализ этих данных позволяет оперативно сформировать индивидуальный план лечения и выбрать оптимальные методы детоксикации.
Подробнее можно узнать тут – капельницы от запоя на дому цена
Вывод из запоя в клинике формируется на основе последовательных процедур, направленных на стабилизацию физиологических функций и устранение токсических влияний. Такой подход позволяет корректно регулировать состояние пациента и контролировать интенсивность симптомов. Рабочие алгоритмы включают оценку метаболических процессов, анализ соматических показателей и определение степени неврологических изменений. В результате создается структурированная модель помощи, ориентированная на восстановление адаптивных возможностей организма. Процессы выполняются под контролем специалистов, что обеспечивает прогнозируемый терапевтический эффект и снижает вероятность осложнений.
Получить дополнительную информацию – http://vyvod-iz-zapoya-kemerovo18.ru
После стабилизации фокус смещается на поддерживающие схемы, снижающие влечение и улучшающие переносимость повседневной нагрузки. Параллельно проводятся индивидуальные и групповые психотерапевтические занятия, направленные на развитие навыков саморегуляции, работу с триггерами и формирование альтернатив алкогольному или наркотическому поведению.
Подробнее можно узнать тут – наркологическая клиника клиника помощь
В клинике применяются методы, позволяющие воздействовать на все аспекты зависимости. Это обеспечивает комплексное и устойчивое восстановление.
Разобраться лучше – наркологическое лечение алкоголизма донецк
http://veritascarepharm.com/# Tadalafil Tablet
Системная работа, которой характеризуется наркологическая клиника, предполагает последовательное исследование состояния пациента, анализ факторов риска и создание индивидуального терапевтического маршрута. Такой формат позволяет уточнять клиническую картину на ранних этапах и корректировать вмешательства по мере изменения состояния человека. Применение структурированных методик повышает предсказуемость результата и обеспечивает безопасность всех процедур. При этом выводы формируются на основании объективных данных наблюдения, лабораторных показателей и динамики симптомов. Оптимальная нагрузка распределяется на весь период лечения для достижения устойчивого эффекта без переутомления организма.
Исследовать вопрос подробнее – платная наркологическая клиника в пензе
https://veritascarepharm.shop/# buy cialis pill
canada drug pharmacy: canadian pharmacy meds – canadian pharmacy online ship to usa
Переход между этапами определяется клиническими критериями эффективности и переносимости, а также динамикой поведения в повседневной среде.
Исследовать вопрос подробнее – лечение алкоголизма анонимно в луганске
Системная работа, которой характеризуется наркологическая клиника, предполагает последовательное исследование состояния пациента, анализ факторов риска и создание индивидуального терапевтического маршрута. Такой формат позволяет уточнять клиническую картину на ранних этапах и корректировать вмешательства по мере изменения состояния человека. Применение структурированных методик повышает предсказуемость результата и обеспечивает безопасность всех процедур. При этом выводы формируются на основании объективных данных наблюдения, лабораторных показателей и динамики симптомов. Оптимальная нагрузка распределяется на весь период лечения для достижения устойчивого эффекта без переутомления организма.
Углубиться в тему – наркологическая клиника нарколог в пензе
Самостоятельные попытки обычно идут по двум сценариям: либо человек продолжает пить «понемногу, чтобы не трясло», либо резко прекращает и пытается «перетерпеть». В первом случае запой растягивается и истощение накапливается: ухудшается сон, растёт нагрузка на сердце и сосуды, усиливается обезвоживание, возрастает риск осложнений. Во втором сценарии симптоматика отмены может нарастать резко: тревога, паника, тремор, потливость, скачки давления, тахикардия, рвота, бессонница. И если рядом нет плана и медицинского контроля, человек пугается и снова начинает пить, потому что это кажется единственным быстрым способом облегчить состояние.
Исследовать вопрос подробнее – narkolog-vyvod-iz-zapoya-nedorogo
Особую роль на первом этапе играет диагностика: важно выявить не только тип наркотика, но и наличие сопутствующих расстройств, стадию зависимости, мотивационное состояние пациента. От этого зависит, будет ли выбрана амбулаторная или стационарная форма лечения, какие методы будут применяться.
Углубиться в тему – лечение наркомании и алкоголизма мурманск.
После поступления вызова диспетчер передаёт заявку на смартфон врача, который оперативно завершает подготовительные мероприятия и выезжает к пациенту. На дороге применяется GPS-маршрутизация для выбора оптимального пути и снижения времени в пути.
Подробнее тут – https://narkologicheskaya-klinika-arkhangelsk0.ru/
Незамедлительно после поступления вызова нарколог приезжает на дом для проведения тщательного осмотра. Специалист измеряет жизненно важные показатели, такие как пульс, артериальное давление и температура, и собирает анамнез для оценки степени алкогольной интоксикации.
Подробнее тут – http://
Вывод из запоя — это не просто медицинская процедура, а важный шаг на пути восстановления организма и возвращения человека к нормальной жизни. В клинике «ВладТрезвие Центр» пациенты получают профессиональную помощь, основанную на современных методиках детоксикации и безопасном медикаментозном восстановлении. Каждый случай рассматривается индивидуально, а лечение подбирается с учётом возраста, состояния здоровья и продолжительности запоя. Наркологи центра выезжают на дом круглосуточно, обеспечивая помощь даже в экстренных ситуациях, когда время играет ключевую роль.
Подробнее можно узнать тут – https://vyvodiz-zapoya-vladivostok18.ru/
В рамках последовательного анализа состояния применяется также оценочная шкала, позволяющая фиксировать изменения и уточнять степень выраженности симптомов. Далее представлена таблица, демонстрирующая основные критерии наблюдения и их функциональное значение в клиническом процессе.
Получить дополнительную информацию – http://narkologicheskaya-klinika-penza18.ru
northwest canadian pharmacy or walmart pharmacy online foreign pharmacy online
https://www.kitchenknifefora.com/proxy.php?link=https://civicmeds.shop usa pharmacy and https://lifnest.site/user/kdnaleulldkdnaleulld/?um_action=edit mail order pharmacy no prescription
online shopping pharmacy india best european online pharmacy or list of online pharmacies best european online pharmacy
Комбинация методов позволяет добиться синергетического эффекта: быстрее снять острые проявления, а затем закрепить результат в естественных условиях жизни.
Получить дополнительные сведения – принудительное лечение от алкоголизма
Такой подход обеспечивает комплексное восстановление: медицинское, эмоциональное и социальное. Врачи ведут пациента на всех этапах, помогая пройти путь от очищения организма до формирования устойчивой трезвости.
Подробнее – наркологическая клиника вывод из запоя астрахань
В Ставрополе вызов организуется круглосуточно. Координатор уточняет адрес, противопоказания, сопутствующие заболевания и ориентировочно рассчитывает маршрут. Бригада выезжает на нейтральном транспорте, а в подъезде и дворе соблюдает «тихий протокол» — никакой внешней символики. На месте врач быстро оценивает состояние: давление, пульс, сатурацию, температуру, при необходимости — экспресс-глюкометрию и ЭКГ-скрининг переносным аппаратом. Результаты помогают составить инфузионную схему и определить скорость введения растворов, чтобы процедура проходила комфортно и безопасно.
Детальнее – нарколог на дом срочно
VeritasCare cialis for sale Cialis over the counter
Выезд врача на дом позволяет провести детоксикацию в спокойной обстановке. Врач привозит с собой препараты, капельницы, измерительное оборудование и проводит лечение в течение 1–2 часов. Такой формат подходит при стабильном состоянии и желании сохранить анонимность.
Получить дополнительную информацию – http://narko-zakodirovan.ru/vyvod-iz-zapoya-czena-spb/
Терапевтическая стратегия выстраивается вокруг понятных клинических ориентиров, что делает процесс предсказуемым и повышает приверженность пациента к лечению.
Подробнее тут – лечение алкоголизма цена луганск
Каждый инструмент имеет чёткие показания и ограничение: мы объясняем, какую гипотезу проверяем, по каким признакам поймём, что она верна, и когда перестанем использовать метод, если вклад невелик. Это снижает тревогу и формирует доверие к плану.
Подробнее можно узнать тут – платная наркологическая клиника петрозаводск
Терапия в клинике проводится поэтапно: от снятия интоксикации до психологического восстановления. Все шаги выполняются под наблюдением специалистов, что исключает осложнения и повышает эффективность. Ниже представлена таблица, отражающая последовательность этапов и задачи каждого из них.
Получить дополнительную информацию – наркологическая клиника вывод из запоя в астрахани
Процесс лечения алкоголизма в Твери строится поэтапно, что позволяет пациентам постепенно проходить все стадии выздоровления.
Ознакомиться с деталями – лечение женского алкоголизма
Комплексное использование этих методов позволяет не только устранить физические проявления запоя, но и подготовить пациента к дальнейшему лечению зависимости.
Подробнее можно узнать тут – вывод из запоя в стационаре в твери
Tadalafil Tablet VeritasCare Cheap Cialis
На практике обращения обычно связаны с двумя группами ситуаций: острые состояния и плановое лечение. Острые — это запой, тяжёлая абстиненция, выраженная интоксикация, тревога и бессонница, когда человеку плохо здесь и сейчас. Плановые — когда человек понимает, что зависимость стала системной: срывы повторяются, тяга усиливается, растёт раздражительность, меняется настроение, ухудшается работа и отношения. И в том и в другом случае важен первый шаг — медицинская оценка. Без неё легко ошибиться с форматом помощи и получить кратковременное облегчение без устойчивого результата.
Разобраться лучше – наркологическая клиника в московской области
После диагностики начинается активная фаза медикаментозного вмешательства. Современные препараты вводятся капельничным методом, что позволяет быстро снизить уровень токсинов в крови, восстановить нормальные обменные процессы и стабилизировать работу внутренних органов, таких как печень, почки и сердце.
Получить дополнительную информацию – частный нарколог на дом в мариуполе
Системная работа, которой характеризуется наркологическая клиника, предполагает последовательное исследование состояния пациента, анализ факторов риска и создание индивидуального терапевтического маршрута. Такой формат позволяет уточнять клиническую картину на ранних этапах и корректировать вмешательства по мере изменения состояния человека. Применение структурированных методик повышает предсказуемость результата и обеспечивает безопасность всех процедур. При этом выводы формируются на основании объективных данных наблюдения, лабораторных показателей и динамики симптомов. Оптимальная нагрузка распределяется на весь период лечения для достижения устойчивого эффекта без переутомления организма.
Узнать больше – наркологическая клиника нарколог пенза
best online pet pharmacy and canadian pharmacy service online pharmacy
https://www.google.mn/url?q=https://civicmeds.shop pharmaceuticals online australia and https://virtualchemicalsales.ca/user/qnfldbhjpo/?um_action=edit rx pharmacy no prescription
canadian pharmacy best rated canadian pharmacy or reddit canadian pharmacy 24 hour pharmacy near me
Вывод из запоя в Твери осуществляется в специализированных медицинских учреждениях, где пациентам предоставляется круглосуточная помощь и полное медицинское сопровождение. Длительное употребление алкоголя вызывает тяжелую интоксикацию, истощение организма и психоэмоциональные нарушения. Самостоятельные попытки выйти из запоя могут привести к серьезным осложнениям, поэтому обращение к специалистам становится наиболее безопасным и результативным решением.
Подробнее тут – вывод из запоя капельница на дому
walmart pharmacy online: medication canadian pharmacy – canadian prescription pharmacy
Многие откладывают лечение годами, потому что периодами удаётся «держаться». Но зависимость редко исчезает сама. Обычно она меняет форму: запои становятся длиннее, алкоголь начинает использоваться как «лекарство» от тревоги и бессонницы, утренние дозы превращаются в способ «прийти в себя», а трезвость воспринимается как постоянное напряжение.
Получить дополнительные сведения – http://lechenie-alkogolizma-sergiev-posad12.ru/prinuditelnoe-lechenie-ot-alkogolizma-v-sergievom-posade/
VeritasCare: Cialis without a doctor prescription – Cheap Cialis
http://civicmeds.com/# canadian neighbor pharmacy
Обращение за помощью нарколога на дому в Архангельске имеет множество преимуществ, среди которых:
Разобраться лучше – вызвать капельницу от запоя на дому архангельск
Buy Cialis online or Buy Tadalafil 20mg Tadalafil Tablet
https://images.google.com.pg/url?q=https://veritascarepharm.shop Cialis over the counter and http://asresin.cn/home.php?mod=space&uid=720599 Buy Tadalafil 10mg
Tadalafil price Buy Tadalafil 20mg and Generic Tadalafil 20mg price cialis for sale
Наркологическая клиника «КаменМед Ренессанс» выстроена как единая система помощи, где медицинская точность, психологическая поддержка и продуманная логистика соединяются в устойчивый маршрут восстановления. Мы работаем с любыми формами химической зависимости — алкогольной, опиоидной, стимуляторной, полизависимостями — и не ограничиваемся «разовыми» процедурами. Наша задача — не просто снять острые симптомы, а наладить ритм сна, снизить реактивную тревогу, сформировать навыки отказа и вернуть управление повседневной жизнью. Для этого используются модульные программы: детокс, стабилизация, психотерапия, семейные мини-сессии, сопровождение и профилактика срывов. Каждый модуль имеет цель, чёткие критерии эффективности и срок переоценки, чтобы прогресс был ощутимым и измеримым.
Исследовать вопрос подробнее – https://narkologicheskaya-klinika-kamensk-uralskij0.ru/narkologiya-kamensk-uralskij
Домашняя помощь эффективна, когда пациент контактный, сохранен, способен выполнять назначения и нет признаков высокой угрозы осложнений. Но удобство не должно подменять безопасность. Именно поэтому врач на выезде уточняет длительность употребления, время последнего приёма алкоголя или вещества, выраженность симптомов, хронические заболевания, лекарства, которые человек принимал самостоятельно, и возможные осложнения в прошлом.
Получить дополнительную информацию – нарколог на дом недорого
sildenafil 50 mg price and buy viagra here Sildenafil Citrate Tablets 100mg
https://images.google.com.ai/url?sa=t&url=https://corebluehealth.shop viagra canada or https://vintage-car.eu/user/bkxkekyfap/ viagra without prescription
Generic Viagra for sale viagra without prescription or Sildenafil 100mg price over the counter sildenafil
Sildenafil Citrate Tablets 100mg: best price for viagra 100mg – cheap viagra
Такой подход позволяет устранить физические последствия запоя и снизить психологическую зависимость. Уже после первой процедуры пациенты отмечают улучшение самочувствия, появление аппетита и нормализацию сна. Важно не ограничиваться только экстренной помощью — специалисты рекомендуют пройти курс восстановления, чтобы предотвратить рецидивы.
Подробнее – вывод из запоя вызов
Выездная бригада «Трезвого Севера» укомплектована портативным оборудованием (контроль АД, ЧСС, SpO2, температурный мониторинг; по показаниям — экспресс-диагностика), а медикаментозная часть всегда собирается индивидуально: учитываем длительность эпизода, сопутствующие заболевания, текущие жалобы, переносимость препаратов и прошлый опыт помощи. Рядом с медициной идёт психообразование: объясняем, что делать вечером, как «снимать газ» нервной системе, как отслеживать собственные маркеры и когда давать сигнал врачу.
Углубиться в тему – вывод из запоя капельница на дому
Клиника «КаспийМед Альтернатива» построила систему оказания наркологической помощи на трёх принципах: индивидуальный подход, доказательная медицина и круглосуточная доступность. Каждый пациент проходит диагностический этап, где специалисты определяют уровень зависимости, физическое состояние и психоэмоциональные особенности. Далее формируется персональная программа лечения, включающая медицинские, психологические и социальные модули.
Исследовать вопрос подробнее – наркологическая клиника в астрахани
Ниже — рабочий каркас выездного протокола. Он индивидуализируется под переносимость, вегетативные реакции и бытовые ограничения пациента. В таблице отражены и медицинские, и организационные шаги: видна связка «что делаем — что проверяем — как понимаем, что пора к следующему этапу».
Узнать больше – вывод из запоя цена петрозаводск
Критерии оценки профессионального уровня сотрудников:
Получить дополнительные сведения – наркологическое лечение алкоголизма
canadian pharmacy checker: CivicMeds – canadian pharmacies
Процедура проводится поэтапно, чтобы организм смог безопасно перейти из состояния алкогольной интоксикации к нормальному функционированию. Ниже приведена таблица с описанием этапов терапии и действий специалистов.
Детальнее – вывод из запоя цена в ставрополе
Детоксикация — ключевой этап в лечении зависимости. Она направлена на очищение организма от токсинов и нормализацию обмена веществ. В клинике «АстраМед Трезвость» капельницы подбираются индивидуально, с учётом возраста, массы тела и хронических заболеваний пациента. Ниже представлена таблица с основными видами инфузий и их назначением.
Подробнее тут – https://narkologicheskaya-klinika-v-astrakhani18.ru/astrakhanskaya-narkologiya
Уже при первичном звонке мы собираем ключевую информацию: длительность употребления, типы веществ, сопутствующие заболевания, прошлые реакции на лекарства, эпизоды судорог и психозов, недавние значения АД/ЧСС. Это позволяет подготовить персональный стартовый протокол ещё до визита: поставить цель на первые 72 часа, определить метрики (сон, «тяга», дневная энергия), запланировать вечерний ритуал и расписать дистанционные чек-ины. Прозрачность шагов снижает тревогу у пациента и семьи и повышает соблюдаемость — фундамент устойчивого результата.
Детальнее – наркологическая клиника клиника помощь
В этом материале мы разберём 7 основ лечения алкоголизма и расскажем, как в Ярославле получить помощь, соответствующую современным стандартам терапии.
Подробнее – https://lechenie-alkogolizma-yaroslavl0.ru/klinika-lecheniya-alkogolizma-yaroslavl
Наркологическая клиника — это не просто медицинское учреждение, а пространство, где человеку помогают вернуть здоровье, ясность мышления и контроль над жизнью. В клинике «КаспийМед Альтернатива» в Астрахани круглосуточно оказывается помощь людям, столкнувшимся с алкогольной, наркотической и смешанной зависимостью. Центр сочетает медицинскую строгость и человеческое участие, обеспечивая лечение в комфортных условиях с максимальной конфиденциальностью. Здесь разработаны программы детоксикации, восстановления и психотерапевтической поддержки, что делает терапию эффективной и безопасной.
Разобраться лучше – narkologicheskaya-klinica-v-astrakhani18.ru/
В рамках лечебного процесса наркологическая клиника задействует структурированные механизмы наблюдения, включающие анализ лабораторных показателей, оценку соматического тонуса и изучение активности нервной системы. Эти элементы обеспечивают комплексность работы и позволяют своевременно корректировать план лечения. Такая система предотвращает перегрузку организма и способствует поддержанию стабильности на фоне применения медикаментозных схем. Ниже представлены ключевые составляющие терапевтического процесса, формирующие основу для клинического восстановления.
Получить дополнительную информацию – https://narkologicheskaya-klinika-v-penze18.ru/narkologicheskaya-pomoshh-penza
Наркологическая клиника — это не просто медицинское учреждение, а пространство, где человеку помогают вернуть здоровье, ясность мышления и контроль над жизнью. В клинике «КаспийМед Альтернатива» в Астрахани круглосуточно оказывается помощь людям, столкнувшимся с алкогольной, наркотической и смешанной зависимостью. Центр сочетает медицинскую строгость и человеческое участие, обеспечивая лечение в комфортных условиях с максимальной конфиденциальностью. Здесь разработаны программы детоксикации, восстановления и психотерапевтической поддержки, что делает терапию эффективной и безопасной.
Узнать больше – наркологическая клиника клиника помощь астрахань
Домашняя помощь эффективна, когда пациент контактный, сохранен, способен выполнять назначения и нет признаков высокой угрозы осложнений. Но удобство не должно подменять безопасность. Именно поэтому врач на выезде уточняет длительность употребления, время последнего приёма алкоголя или вещества, выраженность симптомов, хронические заболевания, лекарства, которые человек принимал самостоятельно, и возможные осложнения в прошлом.
Подробнее тут – нарколог на дом недорого
В рамках лечебного процесса наркологическая клиника задействует структурированные механизмы наблюдения, включающие анализ лабораторных показателей, оценку соматического тонуса и изучение активности нервной системы. Эти элементы обеспечивают комплексность работы и позволяют своевременно корректировать план лечения. Такая система предотвращает перегрузку организма и способствует поддержанию стабильности на фоне применения медикаментозных схем. Ниже представлены ключевые составляющие терапевтического процесса, формирующие основу для клинического восстановления.
Исследовать вопрос подробнее – наркологическая клиника вывод из запоя в пензе
Вывод из запоя — это не просто медицинская процедура, а важный шаг на пути восстановления организма и возвращения человека к нормальной жизни. В клинике «ВладТрезвие Центр» пациенты получают профессиональную помощь, основанную на современных методиках детоксикации и безопасном медикаментозном восстановлении. Каждый случай рассматривается индивидуально, а лечение подбирается с учётом возраста, состояния здоровья и продолжительности запоя. Наркологи центра выезжают на дом круглосуточно, обеспечивая помощь даже в экстренных ситуациях, когда время играет ключевую роль.
Подробнее – вывод из запоя капельница
VeritasCare Generic Cialis without a doctor prescription VeritasCare
Вывод из запоя в клинике реализуется через поэтапное внедрение терапевтических решений, направленных на устранение токсической нагрузки и восстановление физиологической устойчивости. Важным элементом является определение клинического профиля пациента, включающего анализ анамнеза, текущего состояния и возможных сопутствующих факторов. На основе этих данных формируется индивидуальная программа помощи. Процедуры проводятся в условиях контролируемой безопасности, что снижает вероятность осложнений и позволяет достигать устойчивого терапевтического ответа. Последовательность действий формирует согласованную систему, удобную для мониторинга и анализа.
Углубиться в тему – https://vyvod-iz-zapoya-kemerovo18.ru/vyvod-iz-zapoya-na-domu-kemerovo
Наркологическая помощь должна быть не только медицински точной, но и человечной, безопасной и анонимной. В «Ижевском Центре Трезвых Решений» выстроена система комплексного подхода к лечению зависимостей, включающая диагностику, медикаментозную детоксикацию, психотерапию и социальную адаптацию. Клиника объединяет профессионализм, заботу и круглосуточную готовность помочь пациентам, оказавшимся в трудной ситуации. Здесь работают врачи с большим опытом в области наркологии и психиатрии, способные оперативно выехать на дом и оказать неотложную помощь.
Углубиться в тему – частная наркологическая клиника ижевск
Капельница — не «универсальная смесь», а адресный баланс жидкости, электролитов и поддерживающих компонентов под текущие симптомы. Ниже — ориентир, который индивидуализируется на месте осмотра. Мы тщательно сопоставляем пользу и допустимую нагрузку, чтобы не перегружать организм.
Получить дополнительные сведения – http://narkolog-na-dom-petrozavodsk0.ru/vyvod-iz-zapoya-narkolog-na-dom-petrozavodsk-uslugi/
С первого контакта координатор уточняет: длительность запоя, виды алкоголя, аллергии, список текущих лекарств, эпизоды судорог или психозов в анамнезе, сердечно-сосудистые жалобы. На основании ответов команда подбирает безопасную схему старта и резервный план на случай усиления симптомов. Врач привозит портативный монитор для контроля АД/ЧСС/SpO2, глюкометр, набор инфузионных линий и расходников, а также средства для экспресс-коррекции тревоги по показаниям.
Подробнее – вывод из запоя на дому
После прохождения курса капельниц пациенты отмечают улучшение сна, исчезновение головной боли, восстановление аппетита и общего самочувствия. При тяжёлых формах зависимости лечение дополняется физиотерапией и психологической помощью.
Исследовать вопрос подробнее – http://vyvod-iz-zapoya-penza18.ru
CoreBlue Health Order Viagra 50 mg online CoreBlue Health
Процедура проводится поэтапно, чтобы организм смог безопасно перейти из состояния алкогольной интоксикации к нормальному функционированию. Ниже приведена таблица с описанием этапов терапии и действий специалистов.
Углубиться в тему – срочный вывод из запоя
Врач самостоятельно оценивает тяжесть интоксикации и назначает необходимый курс инфузий, физиопроцедур и приём препаратов. Варианты терапии включают детокс-комплекс, коррекцию водно-электролитного баланса и витаминотерапию.
Получить больше информации – narkologicheskaya-klinika-arkhangelsk0.ru/
Особую роль на первом этапе играет диагностика: важно выявить не только тип наркотика, но и наличие сопутствующих расстройств, стадию зависимости, мотивационное состояние пациента. От этого зависит, будет ли выбрана амбулаторная или стационарная форма лечения, какие методы будут применяться.
Исследовать вопрос подробнее – http://lechenie-narkomanii-murmansk0.ru/
Наркологическая клиника «СтавропольМед Резонанс» — это круглосуточный центр доказательной медицины, где помощь строится вокруг безопасности, конфиденциальности и персонализации. Мы объединяем медицинскую детоксикацию, психотерапию, реабилитационные практики и постлечебное сопровождение в единую дорожную карту восстановления. Каждый шаг лечения закреплён измеримыми критериями эффективности, а решения принимаются командно — от дежурного нарколога и клинического психолога до психиатра и реабилитолога.
Подробнее можно узнать тут – наркологические клиники алкоголизм ставрополь
canadian pharmacy cialis 20mg and walgreens online pharmacy canada pharmacy reviews
https://terraguitar.net/index.php?name=Info&url=civicmeds.com online pharmacy bc and http://nosugar.co.uk/profile.php?uid=227088 us pharmacy
my canadian pharmacy online pharmacy australia free delivery and 24 hour pharmacy near me best canadian pharmacy
Мы работаем без пауз и очередей, принимая пациентов в любое время суток. В распоряжении бригад — немаркированный транспорт для выезда на дом, портативная диагностика (ЭКГ, пульсоксиметрия, экспресс-анализаторы), а в стационаре — палаты с регулируемым микроклиматом и круглосуточный мониторинг жизненных показателей. Вся документация оформляется в нейтральной терминологии, доступ к данным разграничен по ролям, что защищает вашу анонимность.
Ознакомиться с деталями – http://
Комбинирование методов позволяет одновременно решать задачи стабилизации, профилактики и возвращения к повседневной активности.
Подробнее можно узнать тут – наркологическая клиника клиника помощь в луганске
Для жителей Петрозаводска организован приём без очередей и «тихий» маршрут: короткий телефонный скрининг, согласованное окно приезда, приватная регистрация и старт терапии в тот же день. Вход — отдельный, кабинеты — изолированные, регистратура работает без громких объявлений. Документы составляются в нейтральной терминологии, доступ к карте пациента разграничен по ролям. Такой формат снижает тревогу и позволяет начать лечение именно тогда, когда мотивация хрупка и опоры особой важности — вечером, в выходные и праздничные дни.
Подробнее тут – https://narcologicheskaya-klinika-petrozavodsk0.ru/chastnaya-narkologicheskaya-klinika-petrozavodsk/
Ключевая задача первичного этапа — безопасно купировать абстинентный синдром и обеспечить постепенный метаболический «выход» без резких колебаний давления и частоты сердечных сокращений. Дополнительно оцениваются когнитивные и аффективные проявления, нарушения сна, уровень тревоги и наличие сопутствующих воспалительных процессов. По результатам обследования формируется индивидуальный план лечения с учетом предшествующего анамнеза, толерантности к препаратам и возможной полипрагмазии.
Углубиться в тему – http://vyvod-iz-zapoya-doneczk0.ru
Процедура детоксикации может проводиться двумя способами: выездом врача на дом или госпитализацией. Окончательное решение принимает нарколог после оценки состояния пациента. На ранней стадии запоя достаточно домашней терапии, но при наличии рисков рекомендуется стационар.
Детальнее – нарколог на дом вывод из запоя
Каждый этап имеет ключевое значение и обеспечивает устойчивость результата.
Ознакомиться с деталями – http://www.domen.ru
Сочетание методов подбирается индивидуально, чтобы охватить соматические, психологические и социальные компоненты зависимости. Ниже приведены основные направления, используемые в клинической практике.
Подробнее тут – наркологическая клиника нарколог луганск
Такая последовательность шагов позволяет врачу действовать точно и эффективно. Благодаря комплексному подходу пациент чувствует облегчение уже через 1–2 часа после начала терапии, а полное восстановление наступает в течение суток.
Углубиться в тему – наркологический вывод из запоя в ставрополе
Ниже — рабочий каркас выездного протокола. Он индивидуализируется под переносимость, вегетативные реакции и бытовые ограничения пациента. В таблице отражены и медицинские, и организационные шаги: видна связка «что делаем — что проверяем — как понимаем, что пора к следующему этапу».
Получить больше информации – наркология вывод из запоя
Sildenafil Citrate Tablets 100mg: generic sildenafil – Buy Viagra online cheap
Применение подобных таблиц формирует прозрачность терапевтического процесса и помогает специалистам адаптировать стратегию лечения с учетом динамики. Это обеспечивает объективность и последовательность в клинической оценке каждого этапа.
Разобраться лучше – наркологическая клиника стационар
http://veritascarepharm.com/# Tadalafil price
canadian pharmacy viagra 50 mg: no rx needed pharmacy – internet pharmacy mexico
Профессиональная помощь при запое необходима, если:
Подробнее тут – вывод из запоя капельница санкт-петербург
Вывод из запоя — это медицинская процедура, направленная на устранение интоксикации организма, вызванной длительным употреблением алкоголя. В клинике «ПензаМед Трезвость» помощь оказывается профессионально и конфиденциально: пациенты могут получить лечение как в стационаре, так и на дому. Процесс включает использование капельниц, медикаментозную терапию, психоэмоциональную поддержку и последующую реабилитацию. Врачи наркологического центра обладают большим опытом работы и обеспечивают круглосуточную помощь без постановки на учёт, что особенно важно для тех, кто хочет сохранить анонимность и быстро вернуться к нормальному состоянию.
Подробнее можно узнать тут – вывод из запоя
В команде — врачи-наркологи, психиатры-консультанты, клинические психологи и выездные медсёстры. Все работают по единому алгоритму: короткий скрининг, стартовая стабилизация, настройка «вечернего протокола» для нормализации сна и план на 72 часа. Цель — восстановить биоритмы, мягко убрать соматические проявления абстиненции и снизить реактивную тревогу, чтобы человек быстрее вернулся к привычным ролям дома и на работе.
Исследовать вопрос подробнее – вывод из запоя капельница на дому
Проблема алкоголизма в Ярославле, как и в других регионах России, остаётся одной из самых актуальных. По данным Минздрава РФ, количество людей, нуждающихся в медицинской помощи из-за злоупотребления спиртным, ежегодно растёт. При этом эффективное лечение возможно лишь при комплексном подходе, включающем как медицинскую, так и психологическую поддержку.
Подробнее можно узнать тут – https://lechenie-alkogolizma-yaroslavl0.ru/anonimnoe-lechenie-alkogolizma-yaroslavl
Сочетание перечисленных направлений обеспечивает полноту помощи и позволяет выстроить предсказуемый маршрут лечения с понятными целями на каждом этапе.
Подробнее тут – http://narkologicheskaya-klinika-lugansk0.ru
Cialis over the counter or Cheap Cialis Cialis 20mg price in USA
https://www.ahewar.org/links/dform.asp?url=https://veritascarepharm.shop Buy Tadalafil 5mg and http://fog.gain.tw/space.php?uid=193792 Tadalafil Tablet
Cialis over the counter Buy Tadalafil 20mg and Cialis over the counter Generic Cialis price
Наркологическая клиника «Трезвый Север» организует быстрый и безопасный вывод из запоя с круглосуточным выездом врача, индивидуальными капельницами и бережной психоподдержкой. Мы работаем по принципу «одно вмешательство — одна цель — один маркер результата»: так пациент видит логику лечения, а команда гибко подстраивает тактику под реальную динамику — без избыточных назначений и суеты. В основе — деликатная логистика, анонимность и пошаговое восстановление сна, гидратации, электролитного баланса и нервной регуляции.
Получить больше информации – наркологический вывод из запоя петрозаводск
CoreBlue Health: CoreBlue Health – CoreBlue Health
Уже при первичном звонке мы собираем ключевую информацию: длительность употребления, типы веществ, сопутствующие заболевания, прошлые реакции на лекарства, эпизоды судорог и психозов, недавние значения АД/ЧСС. Это позволяет подготовить персональный стартовый протокол ещё до визита: поставить цель на первые 72 часа, определить метрики (сон, «тяга», дневная энергия), запланировать вечерний ритуал и расписать дистанционные чек-ины. Прозрачность шагов снижает тревогу у пациента и семьи и повышает соблюдаемость — фундамент устойчивого результата.
Изучить вопрос глубже – наркологическая клиника в каменске-уральске
Проблема алкоголизма в Ярославле, как и в других регионах России, остаётся одной из самых актуальных. По данным Минздрава РФ, количество людей, нуждающихся в медицинской помощи из-за злоупотребления спиртным, ежегодно растёт. При этом эффективное лечение возможно лишь при комплексном подходе, включающем как медицинскую, так и психологическую поддержку.
Подробнее тут – lechenie alkogolizma jaroslavl’
Домашние попытки обычно идут по двум сценариям. Первый — «пить понемногу, чтобы не трясло», что продлевает запой и усиливает истощение. Второй — резко прекратить и «терпеть», после чего симптомы отмены усиливаются волной, особенно ночью, и человек снова пьёт из страха. Врач помогает избежать этих крайностей: стабилизировать состояние и дать план, который делает первые сутки предсказуемыми и безопасными.
Узнать больше – https://narkologicheskaya-klinika-klin12.ru/platnaya-narkologicheskaya-klinika-v-klinu
Переход между этапами определяется клиническими критериями эффективности и переносимости, а также динамикой поведения в повседневной среде.
Получить дополнительные сведения – lechenie-alkogolizma-lugansk0.ru/
В этом материале мы разберём 7 основ лечения алкоголизма и расскажем, как в Ярославле получить помощь, соответствующую современным стандартам терапии.
Подробнее – https://lechenie-alkogolizma-yaroslavl0.ru/lechenie-khronicheskogo-alkogolizma-yaroslavl
Наркологическая клиника нужна, чтобы разорвать этот сценарий безопасно и без хаотичных решений. В клинике «Баланс Плюс» лечение выстраивается по этапам: оценка состояния и рисков, стабилизация (в том числе детоксикация при показаниях), подбор формата — стационар, амбулаторно или помощь на дому — и обязательно план на первые 24–72 часа. Эти дни критичны: именно в этот период чаще всего усиливаются тревога и бессонница, и без понятных ориентиров человек легко возвращается к алкоголю или веществам «чтобы отпустило».
Выяснить больше – https://narkologicheskaya-klinika-orekhovo-zuevo2-12.ru/horoshaya-narkologicheskaya-klinika-v-orekhovo-zuevo/
Процесс лечения проходит поэтапно. Каждый шаг направлен на снятие интоксикации, стабилизацию состояния и нормализацию обменных процессов. В таблице приведены основные этапы и процедуры, применяемые в клинике «ПензаМед Трезвость».
Получить дополнительные сведения – нарколог на дом вывод из запоя
Buy Tadalafil 10mg: VeritasCare – Buy Cialis online
Важным инструментом контроля является таблица оценочных параметров, применяемых в ходе наблюдения. Она служит для систематизации данных и поддержания единых стандартов анализа. Ниже приведена таблица, отражающая основные направления наблюдения.
Получить дополнительные сведения – платная наркологическая клиника
Для жителей Петрозаводска настроен оперативный маршрут: короткий телефонный скрининг, подтверждение окна прибытия, деликатный выезд без маркировки, нейтральные формулировки в документах. Мы не просто «обещаем анонимность» — мы обеспечиваем её процедурами: разграничение доступа к карте пациента, отдельные каналы связи, журналирование обращений, нейтральные названия в сопроводительных документах. Это важно в моменты, когда мотивация хрупка, а любая огласка способна оттолкнуть от лечения.
Узнать больше – помощь нарколога на дому
http://civicmeds.com/# canada rx pharmacy world
Важным инструментом контроля является таблица оценочных параметров, применяемых в ходе наблюдения. Она служит для систематизации данных и поддержания единых стандартов анализа. Ниже приведена таблица, отражающая основные направления наблюдения.
Узнать больше – http://
express scripts pharmacy CivicMeds online pharmacy 365
Системная работа, которой характеризуется наркологическая клиника, предполагает последовательное исследование состояния пациента, анализ факторов риска и создание индивидуального терапевтического маршрута. Такой формат позволяет уточнять клиническую картину на ранних этапах и корректировать вмешательства по мере изменения состояния человека. Применение структурированных методик повышает предсказуемость результата и обеспечивает безопасность всех процедур. При этом выводы формируются на основании объективных данных наблюдения, лабораторных показателей и динамики симптомов. Оптимальная нагрузка распределяется на весь период лечения для достижения устойчивого эффекта без переутомления организма.
Выяснить больше – https://narkologicheskaya-klinika-penza18.ru/narkologicheskaya-poliklinika-penza
Многих останавливает страх огласки и лишних последствий. В небольшом городе или в плотном окружении человеку важно сохранить личные границы: не «светиться», не объясняться на работе, не становиться объектом разговоров. Из-за этого помощь часто откладывают, а вместо неё выбирают рискованные компромиссы: «выйду сам», «попью понемногу», «усну на таблетках», «перетерплю ночь». На практике такие попытки часто усиливают проблему: запой затягивается, отмена переносится тяжелее, тревога растёт, сон разрушается, давление и пульс становятся нестабильными. Поэтому в наркологии важна возможность быстро начать лечение безопасно и без лишнего стресса — с понятными правилами, спокойной коммуникацией и медицинским контролем.
Углубиться в тему – http://narkologicheskaya-klinika-vidnoe12.ru
Своевременная медицинская помощь уменьшает вероятность тяжелых осложнений и сокращает период восстановления. При следующих признаках требуется неотложная оценка состояния и начало терапии под наблюдением специалистов:
Получить больше информации – наркология вывод из запоя переулок панфилова, 36
Капельница — не «универсальная смесь», а адресный баланс жидкости, электролитов и поддерживающих компонентов под текущие симптомы. Ниже — ориентир, который индивидуализируется на месте осмотра. Мы тщательно сопоставляем пользу и допустимую нагрузку, чтобы не перегружать организм.
Получить дополнительные сведения – нарколог на дом вывод из запоя в петрозаводске
Системная работа, которой характеризуется наркологическая клиника, предполагает последовательное исследование состояния пациента, анализ факторов риска и создание индивидуального терапевтического маршрута. Такой формат позволяет уточнять клиническую картину на ранних этапах и корректировать вмешательства по мере изменения состояния человека. Применение структурированных методик повышает предсказуемость результата и обеспечивает безопасность всех процедур. При этом выводы формируются на основании объективных данных наблюдения, лабораторных показателей и динамики симптомов. Оптимальная нагрузка распределяется на весь период лечения для достижения устойчивого эффекта без переутомления организма.
Получить дополнительные сведения – наркологические клиники алкоголизм в пензе
cheap canadian pharmacy or canadian pharmacy ltd express scripts pharmacy
https://toolbarqueries.google.com.tr/url?q=https://civicmeds.shop pill pharmacy or https://www.ixxxnxx.com/user/ijdrapecic/videos california pharmacy
trusted canadian pharmacy top online pharmacy or escrow pharmacy online canadian pharmacy world reviews
Процесс лечения строится поэтапно, что позволяет пациенту проходить все стадии восстановления в безопасном и контролируемом режиме.
Выяснить больше – наркологическое лечение алкоголизма в донце
Сочетание методов подбирается индивидуально, чтобы охватить соматические, психологические и социальные компоненты зависимости. Ниже приведены основные направления, используемые в клинической практике.
Детальнее – https://narkologicheskaya-klinika-v-luganske0.ru/narkologicheskij-dispanser-lugansk
Капельница — не «универсальная смесь», а адресный баланс жидкости, электролитов и поддерживающих компонентов под текущие симптомы. Ниже — ориентир, который индивидуализируется на месте осмотра. Мы тщательно сопоставляем пользу и допустимую нагрузку, чтобы не перегружать организм.
Получить дополнительные сведения – нарколог на дом анонимно петрозаводск
В этой публикации мы предлагаем подробные объяснения по актуальным вопросам, чтобы помочь читателям глубже понять их. Четкость и структурированность материала сделают его удобным для усвоения и применения в повседневной жизни.
Всё самое вкусное внутри – http://obovsem.myqip.ru/?1-13-0-00000454-000-0-0-1759832441
В Ставрополе мы выстроили так называемую «тихую логистику»: запись без послеобеденных «окон», экспресс-приём без ожидания, сопровождение от входа до палаты, а при необходимости — деликатная госпитализация через отдельный вход. При первичном обращении пациент получает пошаговый план на ближайшие 72 часа: стабилизация самочувствия, детоксикация по показаниям, психообразование, старт профилактики срыва. Такой регламент экономит время и снижает тревожность — вы понимаете, что и зачем делается, и видите прогноз по срокам.
Подробнее – наркологическая клиника наркологический центр ставрополь
В Ставрополе мы выстроили так называемую «тихую логистику»: запись без послеобеденных «окон», экспресс-приём без ожидания, сопровождение от входа до палаты, а при необходимости — деликатная госпитализация через отдельный вход. При первичном обращении пациент получает пошаговый план на ближайшие 72 часа: стабилизация самочувствия, детоксикация по показаниям, психообразование, старт профилактики срыва. Такой регламент экономит время и снижает тревожность — вы понимаете, что и зачем делается, и видите прогноз по срокам.
Подробнее можно узнать тут – наркологическая клиника наркологический центр ставрополь
Детоксикация — ключевой этап лечения, позволяющий безопасно очистить организм от этанола или наркотических веществ. В клинике используются современные инфузионные схемы, направленные на восстановление обмена веществ, работу печени и нервной системы. Ниже представлена таблица с основными видами капельниц и их назначением.
Получить больше информации – лечение в наркологической клинике
Мы работаем без пауз и очередей, принимая пациентов в любое время суток. В распоряжении бригад — немаркированный транспорт для выезда на дом, портативная диагностика (ЭКГ, пульсоксиметрия, экспресс-анализаторы), а в стационаре — палаты с регулируемым микроклиматом и круглосуточный мониторинг жизненных показателей. Вся документация оформляется в нейтральной терминологии, доступ к данным разграничен по ролям, что защищает вашу анонимность.
Разобраться лучше – лечение в наркологической клинике
Детоксикация — ключевой этап в лечении зависимости. Она направлена на очищение организма от токсинов и нормализацию обмена веществ. В клинике «АстраМед Трезвость» капельницы подбираются индивидуально, с учётом возраста, массы тела и хронических заболеваний пациента. Ниже представлена таблица с основными видами инфузий и их назначением.
Подробнее тут – наркологическая клиника клиника помощь
После детокса важны рекомендации на 24–72 часа. Именно в это время чаще всего случаются срывы: к вечеру усиливается тревога и бессонница, человек пугается ухудшения и снова употребляет. Поэтому медицинская помощь должна включать план на вечер и ночь, ориентиры по динамике и критерии, когда нужна повторная оценка.
Получить дополнительные сведения – narkologicheskaya-klinika-vidnoe
Такой подход обеспечивает комплексное восстановление — от физического состояния до эмоциональной стабильности. Пациент получает внимание врачей на всех этапах и поддержку после выписки.
Получить дополнительные сведения – http://narkologicheskaya-klinika-v-kemerovo18.ru/narkolog-kemerovo-na-dom/
Этот информационный материал собраны данные, которые помогут лучше понять текущие тенденции и процессы в различных сферах жизни. Мы предоставляем четкий анализ, графики и примеры, чтобы информация была не только понятной, но и практичной для принятия решений.
Это стоит прочитать полностью – https://wanep.org/wanep/concurso-para-recrutamento-de-gestor-de-noticias-na-wanep-cv-2023
В этой статье представлен занимательный и актуальный контент, который заставит вас задуматься. Мы обсуждаем насущные вопросы и проблемы, а также освещаем истории, которые вдохновляют на действия и изменения. Узнайте, что стоит за событиями нашего времени!
Читать дальше – https://fisip.upnvj.ac.id/download/pob-prosedur-ujian-skripsi
«Чистая Гармония» — это выездная и стационарная наркологическая помощь в одном маршруте: оперативный приезд врача на дом по Клину и району, аккуратный детокс с контролем жизненно важных показателей, стационар с круглосуточным наблюдением и подготовка к кодированию. Мы придерживаемся принципа клинической достаточности: никаких лишних процедур ради «видимости лечения» и никаких задержек с тем, что влияет на исход. Каждое назначение объясняем простыми словами, заранее согласуем смету и оставляем понятный план на 24–48 часов и первую неделю. Анонимность — базовый стандарт: выезд без опознавательных знаков, нейтральные формулировки в документах по запросу, ограниченный доступ к данным.
Узнать больше – narkologicheskaya-klinika-klinskij-rajon-moskovskaya-oblast
CoreBlue Health: CoreBlue Health – best price for viagra 100mg
Эта информационная заметка содержит увлекательные сведения, которые могут вас удивить! Мы собрали интересные факты, которые сделают вашу жизнь ярче и полнее. Узнайте нечто новое о привычных аспектах повседневности и откройте для себя удивительный мир информации.
Хочешь знать всё? – https://full-ott.com/liptv-en-2025
Этот информационный материал собраны данные, которые помогут лучше понять текущие тенденции и процессы в различных сферах жизни. Мы предоставляем четкий анализ, графики и примеры, чтобы информация была не только понятной, но и практичной для принятия решений.
Узнать больше – https://vlog.virtual-glossary.com/playstation-vr2-bestgame
В Ставрополе мы выстроили так называемую «тихую логистику»: запись без послеобеденных «окон», экспресс-приём без ожидания, сопровождение от входа до палаты, а при необходимости — деликатная госпитализация через отдельный вход. При первичном обращении пациент получает пошаговый план на ближайшие 72 часа: стабилизация самочувствия, детоксикация по показаниям, психообразование, старт профилактики срыва. Такой регламент экономит время и снижает тревожность — вы понимаете, что и зачем делается, и видите прогноз по срокам.
Получить больше информации – http://narcologicheskaya-klinika-stavropol0.ru/
Если к «окну оценки» динамика плато, мы корректируем один элемент — скорость/последовательность инфузии, вечерний ритуал или плотность сессий. Это защищает от полипрагмазии и делает вклад каждого шага читаемым.
Подробнее тут – платная наркологическая клиника нижний тагил
VeritasCare: buy cialis pill – VeritasCare
Этот информационный материал собраны данные, которые помогут лучше понять текущие тенденции и процессы в различных сферах жизни. Мы предоставляем четкий анализ, графики и примеры, чтобы информация была не только понятной, но и практичной для принятия решений.
Познакомиться с результатами исследований – https://whitelotusgroup.in/anora
There’s noticeably a bundle to learn about this. I assume you made certain good factors in options also.
Эта публикация погружает вас в мир увлекательных фактов и удивительных открытий. Мы расскажем о ключевых событиях, которые изменили ход истории, и приоткроем завесу над научными достижениями, которые вдохновили миллионы. Узнайте, чему может научить нас прошлое и как применить эти знания в будущем.
Расширить кругозор по теме – https://theserialbinger.com/anime/uncensored-anime
VeritasCare Tadalafil price VeritasCare
Играй и почувствуй как растет интерес – бонус playfortuna-casino
sildenafil 50 mg price and Buy Viagra online cheap Buy generic 100mg Viagra online
http://chillicothechristian.com/System/Login.asp?id=55378&Referer=http://corebluehealth.shop Order Viagra 50 mg online or http://orbita-3.ru/forum/index.php?PAGE_NAME=profile_view&UID=105389 Buy Viagra online cheap
Cheap Viagra 100mg Sildenafil Citrate Tablets 100mg or Cheap Sildenafil 100mg Viagra without a doctor prescription Canada
pharmacy mall us pharmacy canadian pharmacy
Как отмечает ведущий научный сотрудник ФГБУН «НМИЦ психиатрии и наркологии» Минздрава России, наличие междисциплинарной команды — один из основных факторов, определяющих успех терапии при зависимости.
Получить дополнительные сведения – анонимное лечение наркомании
<a href=" http://ns.km1003.keymachine.de/php.php?a=cialis+without+doctor+prescription “>canadian pharmacy online ship to usa and canadianpharmacymeds com best canadian pharmacy online
http://alt1.toolbarqueries.google.mn/url?q=https://civicmeds.com usa pharmacy and http://erooups.com/user/dwwzvlyhoh/ best online pharmacy
online shopping pharmacy india canadian pharmacy meds or mexican online mail order pharmacy legit pharmacy websites
Buy Tadalafil 20mg: VeritasCare – VeritasCare
wholesale pharmacy: CivicMeds – good online mexican pharmacy
Домашний формат ценят не только за удобство. Он помогает начать лечение анонимно, без дороги, без ожидания и без лишнего стресса для пациента. Для многих семей именно выездной наркологическая маршрут становится первой точкой, с которой начинается более серьёзное восстановление: обсуждаются не только снятие острых симптомов, но и кодирование, реабилитация, повторная консультация, а при необходимости — и маршруты помощи при наркомании. Особенно это актуально, если человек употребляет давно, уже несколько лет сталкивается со срывами и сам замечает, что проблема перестала ограничиваться только плохим самочувствием после алкоголя.
Углубиться в тему – нарколог на дом вывод
В Нижнем Тагиле выездные бригады дежурят 24/7. Координатор уже при первичном звонке собирает ключевые сведения: аллергии, хронические заболевания, список постоянных препаратов, эпизоды судорог или алкогольных психозов в прошлом, последние значения давления и пульса, возможность обеспечить тишину на 2–3 часа, доступ к питьевой воде, особенности подъезда. Вся эта информация помогает врачу подготовить стартовую схему — от выбора профиля инфузии до темпа введения. По запросу организуем немаркированный визит и сдержанные формулировки в документах, чтобы не создавать лишнего внимания со стороны соседей и коллег.
Исследовать вопрос подробнее – нарколог вывод из запоя
Лечение зависимости проходит поэтапно. Такая последовательность обеспечивает постепенное восстановление и закрепление полученных результатов.
Получить дополнительную информацию – платная наркологическая клиника
При первой консультации нарколог осматривает пациента, чтобы оценить его состояние и подобрать оптимальную схему лечения. В зависимости от тяжести похмелья, врач может назначить инфузию с регидратационными растворами, витаминами группы B и другими препаратами, которые способствуют восстановлению. Важно, что капельница не только помогает снять симптомы, но и устраняет причины токсического воздействия алкоголя на организм, предотвращая развитие осложнений.
Ознакомиться с деталями – капельница от похмелья на дому
Нарколог на дом в Воронеже с круглосуточным вызовом врача, стабилизацией состояния и лечением в наркологической клинике «Частный медик 24»
Подробнее можно узнать тут – нарколог на дом в воронеже
Наши врачи приезжают в удобное для пациента время и проводят полный осмотр. В зависимости от состояния пациента, они подбирают необходимое лечение: капельницы для снятия токсинов, медикаментозные препараты для стабилизации состояния, а также дают рекомендации по дальнейшему восстановлению. Важно, что лечение на дому позволяет избежать медицинской огласки и лишнего стресса, а также гарантирует полную конфиденциальность.
Подробнее можно узнать тут – нарколог на дом
После употребления алкоголя состояние может быстро ухудшиться: появляется головная боль, тошнота, головокружение и слабость. Это следствие того, что в организме накапливаются токсины, продукты распада этанола и нарушается водно-электролитный баланс. С помощью капельницы от похмелья можно быстро справиться с интоксикацией, восполнить недостающие элементы и облегчить состояние пациента. В клинике «Частный медик 24» в Самаре мы предлагаем капельницы, которые помогают снять все неприятные симптомы похмелья, восстанавливая работу организма и минимизируя риски для здоровья.
Углубиться в тему – капельница от похмелья на дому в самаре
Buy Cialis online: Generic Tadalafil 20mg price – Generic Cialis without a doctor prescription
Процедура проводится опытными наркологами, которые подбирают необходимое лечение на основе индивидуальных особенностей пациента. В клинике «Частный медик 24» применяются только эффективные и безопасные препараты, которые помогают организму восстановиться и избавиться от токсинов. Важно помнить, что капельница от похмелья — это не просто временное облегчение, а важный шаг к долгосрочному восстановлению организма и профилактике алкоголизма.
Выяснить больше – http://www.domen.ru
После инфузии врач повторно измеряет показатели, оставляет письменные инструкции, назначает окно связи и определяет условия, при которых разумно перейти к стационару: нет нужды держаться «на силе воли», когда безопаснее сменить формат.
Исследовать вопрос подробнее – vyvod-iz-zapoya-moskva-ceny
Выезд нарколога на дом позволяет быстро устранить эти симптомы, нормализовать состояние пациента и предотвратить дальнейшее ухудшение здоровья.
Выяснить больше – капельница от похмелья цена
Городская среда Петрозаводска со сменой ветров с Онежского озера, короткими сумерками и сезонными перепадами влажности может усиливать тревожность в вечерние часы. Мы учитываем это с момента первого контакта: согласованная парковка, отдельный вход без вывесок, короткая регистрация без «толстых анкет», приглушённый тёплый свет в зоне ожидания и отсутствие громких объявлений. Родственникам предоставляются «тихие окна» связи — лаконичные апдейты в фиксированное время, чтобы не перегружать пациента и не дёргать команду в критические окна наблюдения. Такой «мягкий» контур снижает сенсорную нагрузку, стабилизирует вариабельность ЧСС к сумеркам и сокращает число импульсивных просьб «усилить на ночь».
Ознакомиться с деталями – наркологическая клиника нарколог
https://civicmeds.com/# medical mall pharmacy
Наркологическая помощь в Воронеже: профессиональное лечение зависимостей, выезд врача, анонимная помощь в наркологической клинике «Клиника Плюс».
Исследовать вопрос подробнее – клиника наркологической помощи в воронеже
Многие пациенты и их родственники выбирают выезд врача на дом, когда пациент не в состоянии самостоятельно приехать в клинику. Домашняя помощь подходит в ситуациях, когда состояние пациента резко ухудшается, и важно начать лечение как можно быстрее.
Выяснить больше – клиника наркологической помощи
Капельница от похмелья в Самаре используется для устранения симптомов алкогольной интоксикации, которые могут включать головную боль, тошноту, слабость, рвоту и обезвоживание. Это достигается за счет введения специальных растворов, которые помогают организму восстановиться и очиститься от токсинов.
Получить больше информации – капельница от похмелья на дому в самаре
Наркологическая клиника в Хабаровске решает несколько ключевых клинических задач, начиная от диагностики и заканчивая длительным наблюдением. В клинике «Северный Путь» акцент делается на точную оценку состояния пациента при поступлении, что позволяет корректно определить тактику терапии и прогноз восстановления.
Узнать больше – https://narkologicheskaya-klinika-khabarovsk0.ru/khabarovsk-narkologicheskaya-pomoshh
reputable indian pharmacies: my canadian pharmacy – reliable canadian pharmacy
canadian pharmacy prices CivicMeds peoples pharmacy
Такая система позволяет пройти все этапы восстановления безопасно, без перегрузки организма. Пациент получает медицинскую и психологическую помощь, что делает результат не временным, а устойчивым. Контроль состояния осуществляется непрерывно, что исключает риск осложнений и рецидивов.
Подробнее можно узнать тут – http://narkologicheskaya-klinika-v-khabarovske0.ru/
Как отмечает ведущий научный сотрудник ФГБУН «НМИЦ психиатрии и наркологии» Минздрава России, наличие междисциплинарной команды — один из основных факторов, определяющих успех терапии при зависимости.
Получить больше информации – лечение наркомании нарколог
Не каждый человек с зависимостью от алкоголя готов признать свою проблему и обратиться за помощью. Однако, когда зависимость достигает тяжелых форм, требуется профессиональное вмешательство, и комплексная реабилитация в наркологическом доме становится важнейшим этапом восстановления, при этом в некоторых случаях помощь может предоставляться бесплатно, а сама программа рассчитана на длительный срок — до нескольких лет. Признаки того, что нужна реабилитация, могут включать невозможность прекратить пить даже при наличии серьезных последствий для здоровья, социальной жизни и межличностных отношений.
Исследовать вопрос подробнее – реабилитация алкоголиков стоимость
Первый контакт строится вокруг фактов «здесь и сейчас». Врач уточняет длительность употребления, принятые за последние 24–48 часов препараты, сопутствующие диагнозы и аллергии, фиксирует давление, пульс, сатурацию, температуру, оценивает выраженность тремора и уровень тревоги; при необходимости выполняется экспресс-ЭКГ и элементарный неврологический скрининг. Далее план объясняется простым языком: какие инфузии будут сегодня, чего ждать через 30–60 минут, как организовать вечер и когда состоится контрольная связь. Мы избегаем универсальных «сильных смесей» и «оглушающих» дозировок: они дают краткий «блеск» с вечерним откатом и повышают риск побочных эффектов. Вместо этого используется узкая, клинически достаточная схема: регидратация для восстановления объёма циркулирующей жидкости, коррекция электролитов, печёночная поддержка, противорвотные и гастропротекция при необходимости, мягкая анксиолитическая коррекция по показаниям. После процедуры врач повторно оценивает показатели, оставляет письменные рекомендации на 48–72 часа, согласует окно связи и обозначает «красные флажки» для немедленного контакта. Такой прозрачный маршрут убирает импровизации и делает поведение семьи предсказуемым, что особенно важно в «тёмные часы» вечера.
Узнать больше – narkolog-vyvod-iz-zapoya
Капельница от похмелья с медицинским контролем представляет собой комплексную терапию, которая включает в себя различные препараты, направленные на быстрое восстановление организма. Каждый элемент процедуры подобран с учётом состояния пациента, что позволяет обеспечить максимальную эффективность лечения и минимизировать возможные риски.
Подробнее можно узнать тут – капельница от похмелья анонимно
legit online pharmacy or online pharmacy pain medicine mexican pharmacy online
https://images.google.com.sg/url?q=https://civicmeds.shop script pharmacy and https://alphafocusir.com/user/savgfxtshe/?um_action=edit tops pharmacy
legit online pharmacy canadapharmacyonline legit and legit canadian pharmacy online pharmacy
Запой — это не один симптом. Это сдвиг водно-электролитного баланса, скачки давления и пульса, тремор, тошнота, тревога, бессонница, нередко раздражение слизистой желудка и нагрузка на печень. Мы работаем последовательностью: допуск к терапии, инфузионная поддержка с коррекцией воды и электролитов, защита органов-мишеней, симптом-контроль, при необходимости аккуратная нормализация сна, переоценка и перевод на пероральные схемы, затем — поведенческий контур «тихих» дней и, при информированном согласии, подготовка к кодированию. Это не «коктейль на всех», а управляемый процесс, завязанный на объективные показатели и живую динамику.
Выяснить больше – http://narkologicheskaya-klinika-ivanteevka8.ru/narkologicheskie-kliniki-pomoshch-v-ivanteevke/https://narkologicheskaya-klinika-ivanteevka8.ru
pharmacy canadian CivicMeds canadian pharmacy com
https://civicmeds.com/# trusted online pharmacy
Нарколог на дом — это срочная врачебная помощь, которая нужна в тот момент, когда больного уже сложно везти в клинику, а ждать улучшения без осмотра опасно. Домашний формат особенно актуален при запое, выраженной интоксикации, повторной рвоте, скачках давления, сильном треморе, бессоннице и тревоге. В такой ситуации важно не просто заказать выезд и получить капельницу, а сразу запустить понятный медицинский маршрут: осмотр, консультация, оценка рисков, подбор терапии и решение, можно ли безопасно оставаться дома. Именно поэтому услуга «нарколог на дом» воспринимается не как разовая процедура, а как полноценная наркологическая помощь, где каждое действие связано с текущим состоянием пациента и его безопасностью.
Узнать больше – вызов нарколога на дом в воронеже
Уходит тошнота, тремор становится переносимее, пульс и давление перестают «скакать», снижается внутренняя дрожь. Появляется возможность уснуть без паники. Для закрепления эффекта важны простые условия: прохладная затемнённая комната, минимум разговоров и экранов, вода малыми порциями, отсутствие «самопроверок» активностью.
Подробнее – kakie-lekarstva-vhodyat-v-kapelnicu-ot-zapoya
Программы лечения формируются с учётом состояния организма и индивидуальных потребностей пациента. Это обеспечивает эффективность и снижает вероятность рецидива.
Получить дополнительную информацию – запой наркологическая клиника донецк
Избавление от наркотической зависимости требует последовательной, профессиональной и комплексной помощи. В отличие от краткосрочной детоксикации, полноценное лечение наркомании в Мурманске включает медицинскую стабилизацию, психотерапевтическую коррекцию и этапы социальной адаптации. По данным Минздрава РФ, устойчивые результаты достигаются лишь в тех случаях, когда терапия проводится под наблюдением специалистов, использующих современные доказательные методы.
Получить дополнительную информацию – https://lechenie-narkomanii-murmansk0.ru/lechenie-narkomanii-reabilitacziya-marmansk
В Нижнем Тагиле выездные бригады дежурят 24/7. Координатор уже при первичном звонке собирает ключевые сведения: аллергии, хронические заболевания, список постоянных препаратов, эпизоды судорог или алкогольных психозов в прошлом, последние значения давления и пульса, возможность обеспечить тишину на 2–3 часа, доступ к питьевой воде, особенности подъезда. Вся эта информация помогает врачу подготовить стартовую схему — от выбора профиля инфузии до темпа введения. По запросу организуем немаркированный визит и сдержанные формулировки в документах, чтобы не создавать лишнего внимания со стороны соседей и коллег.
Разобраться лучше – срочный вывод из запоя нижний тагил
Городская среда Петрозаводска со сменой ветров с Онежского озера, короткими сумерками и сезонными перепадами влажности может усиливать тревожность в вечерние часы. Мы учитываем это с момента первого контакта: согласованная парковка, отдельный вход без вывесок, короткая регистрация без «толстых анкет», приглушённый тёплый свет в зоне ожидания и отсутствие громких объявлений. Родственникам предоставляются «тихие окна» связи — лаконичные апдейты в фиксированное время, чтобы не перегружать пациента и не дёргать команду в критические окна наблюдения. Такой «мягкий» контур снижает сенсорную нагрузку, стабилизирует вариабельность ЧСС к сумеркам и сокращает число импульсивных просьб «усилить на ночь».
Получить дополнительную информацию – наркологическая клиника в петрозаводске
Первая задача врача — снять наиболее опасные и мучительные проявления: тошноту, головную боль, озноб, тремор, сухость во рту, сердцебиение, внутреннюю дрожь, тревогу, невозможность уснуть. Вторая задача — восстановить управляемость ситуации. Пациент и близкие должны понимать, что делать после завершения инфузии: как пить воду, как проветрить комнату, когда можно вставать, какие симптомы допустимы, а какие требуют немедленного повторного звонка. Именно такой формат делает помощь на дому полноценной медицинской услугой, а не разовой манипуляцией. Для многих семей это ещё и первая консультация, после которой становится ясно, нужен ли только вывод из запоя или уже требуется более широкий наркологический маршрут с участием психолога и последующим этапом восстановления.
Выяснить больше – нарколог на дом цена воронеж
Первичный этап включает сбор анамнеза, лабораторные исследования и оценку неврологического статуса. На основании полученных данных формируется план лечения, который может корректироваться в процессе наблюдения.
Получить больше информации – наркологическая клиника вывод из запоя в хабаровске
Нарколог на дом в Воронеже с конфиденциальным выездом, капельницами и поддержкой пациента в наркологической клинике «Частный медик 24»
Подробнее можно узнать тут – врач нарколог на дом воронеж
Стационарные и амбулаторные блоки клиники работают как единый маршрут. Мы начинаем с короткого «языка фактов»: сколько минут до засыпания, сколько пробуждений ночью, какой объём воды переносится малыми глотками, как меняется пульс в сумерки. Эти маркеры дополняют витальные показатели и помогают точнее выбирать инфузионные модули, контролировать темп и вовремя «облегчать» схему, не теряя устойчивости. Параллельно мы внедряем поведенческие опоры — тёплую подсветку, дыхательный паттерн 4–6, «цифровую тишину», дробное тёплое питание — они уменьшают потребность в ночных «усилениях» и повышают переносимость лечения.
Получить дополнительные сведения – платная наркологическая клиника петрозаводск
Когда такие симптомы становятся ярко выраженными, важно не затягивать с лечением и вызвать нарколога на дом. Это позволит своевременно устранить токсические вещества из организма и предотвратить серьёзные проблемы с органами. Важно, чтобы лечение началось как можно быстрее, что возможно только через экстренный выезд специалиста на дом.
Получить дополнительные сведения – капельница от похмелья анонимно
canadian pharmacy sarasota and cialis canada online pharmacy my canadian pharmacy review
https://images.google.nr/url?sa=t&url=https://civicmeds.com mexican online mail order pharmacy and https://www.liveviolet.net/user/qhyhponntk/videos canadian online pharmacy
pharmacy order online online pharmacy without scripts or cheapest pharmacy pharmaceutical online ordering
В Хабаровске востребован системный подход к терапии зависимостей, так как клиническая картина часто осложняется сопутствующими заболеваниями, нарушениями обмена веществ и расстройствами нервной системы. Медицинская помощь организуется с учётом тяжести состояния и индивидуальных факторов риска.
Детальнее – наркологическая клиника вывод из запоя в хабаровске
Выезд нарколога на дом в Самаре организован так, чтобы пациент получил помощь без ожидания и без лишней нагрузки на организм. После обращения специалист приезжает по указанному адресу, проводит первичный осмотр, оценивает общее состояние, уровень интоксикации, показатели давления, пульса, дыхания и собирает краткий анамнез. На основании этой оценки врач определяет, можно ли безопасно оказывать помощь на дому, и подбирает подходящую схему лечения, включая возможное кодирование или вывод из алкоголизма. Такой формат позволяет начать медицинские мероприятия сразу после осмотра и быстро перейти к стабилизации состояния.
Получить дополнительные сведения – врач нарколог на дом в самаре
medstore online pharmacy: online pharmacy ordering – my canadian pharmacy rx
viagra canadian pharmacy vipps approved and mexican pharmacy what to buy all in one pharmacy
http://valleysolutionsinc.com/Web_Design/Portfolio/ViewImage.asp?ImgSrc=ExpressAuto-Large.jpg&Title=ExpressAutoTransport&URL=civicmeds.shop legit non prescription pharmacies or https://alphafocusir.com/user/xoufwlktbk/?um_action=edit canadian online pharmacy cialis
overseas pharmacy no prescription india pharmacy mail order or online pharmacy no prescription online pharmacy fungal nail
Особое внимание мы уделяем психологической составляющей. Наркологическая помощь в Воронеже в «Клиника Плюс» — это не только физическое очищение, но и работа с мотивацией, разрушение психологических триггеров зависимости. Родственники получают отдельную поддержку: консультации психолога помогают правильно выстроить общение с зависимым человеком и мотивировать его на дальнейшее лечение. Реабилитация может проходить амбулаторно или в стационаре партнёрских центров с комфортабельными условиями, где пациенты находятся под круглосуточным наблюдением.
Подробнее тут – вызов наркологической помощи
Лечение зависимости проходит поэтапно. Такая последовательность обеспечивает постепенное восстановление и закрепление полученных результатов.
Разобраться лучше – http://narkologicheskaya-klinika-doneczk0.ru/narkologiya-doneczk-dnr/
Капельница от похмелья применяется, когда симптомы интоксикации становятся выраженными и мешают нормальной жизнедеятельности пациента. Основные показания для использования капельницы включают:
Исследовать вопрос подробнее – http://kapelnicza-ot-pokhmelya-samara-1.ru/
Специалисты клиники контролируют состояние пациентов 24/7: фиксируют динамику показателей, корректируют дозы препаратов и обеспечивают безопасность на всех этапах лечения. Такой формат позволяет избежать осложнений, связанных с самостоятельным выходом из запоя или несанкционированным приёмом медикаментов. Врачи клиники помогают пациентам пройти через этапы очищения, стабилизации и восстановления организма максимально комфортно.
Узнать больше – наркологическая клиника клиника помощь в хабаровске
canadian pharmacy reviews: pharmacy online shopping usa – viagra canadian pharmacy
Если дома действительно шумно (ремонт, маленькие дети, вечерние гости) или состояние нестабильно, предложим короткое наблюдение в клинике: отдельный вход, «тихий коридор», камерные посты, затем — возвращение домой и продолжение амбулаторного маршрута. Важен не формат, а предсказуемый результат: степень облегчения должна соответствовать целям этапа, а не множеству случайных факторов среды.
Углубиться в тему – наркологический вывод из запоя в нижнем тагиле
Процесс капельницы включает внутривенное введение различных растворов, которые помогают нейтрализовать эффекты алкогольной интоксикации, включая последствия запоя и алкоголизма. Наиболее часто в составе капельницы используются солевые и глюкозные растворы, витамины группы B, а также препараты для детоксикации организма. Эти компоненты помогают быстро восстановить водно-электролитный баланс, улучшить обмен веществ и ускорить выведение продуктов распада алкоголя.
Изучить вопрос глубже – капельница от похмелья
Для семьи это тоже имеет большое значение. Пока врач в пути, родственники часто совершают одни и те же ошибки: пытаются «отпаивать» человека через силу, смешивают несовместимые медикаменты, дают советы, которые только повышают тревогу, спорят или требуют немедленно взять себя в руки. Профессиональный выезд снимает эту хаотичность. После осмотра врач объясняет, какие симптомы связаны с алкогольной интоксикацией, какие могут указывать на осложнения, что допустимо дома, а что требует перевода в стационар. В этом и состоит ценность выезда: он возвращает контроль над ситуацией и позволяет начать лечение без лишних задержек.
Подробнее тут – нарколог на дом вывод
Капельница от похмелья в Самаре: быстрое улучшение самочувствия и помощь при интоксикации под контролем специалистов в наркологической клинике «Детокс»
Разобраться лучше – https://kapelnicza-ot-pokhmelya-samara-15.ru
Для Воронежа выездной формат особенно востребован вечером, ночью и ранним утром, когда у больного резко усиливаются симптомы и поездка в медицинское учреждение становится тяжёлой или просто нереальной. Если человек несколько дней употреблял алкоголь, почти не спал, плохо переносит воду, жалуется на сердцебиение и слабость, то откладывать осмотр не стоит. Срочная наркологическая помощь нужна именно тогда, когда ситуация развивается быстро, а семья уже видит, что своими силами справиться не удаётся. Врач приезжает, проводит осмотр, определяет, нет ли признаков осложнений, и уже на месте решает, какие меры допустимы дома, а какие требуют другого формата оказания помощи.
Выяснить больше – https://narkolog-na-dom-voronezh-3.ru/
Наркологическая помощь в Воронеже становится необходимой в тот момент, когда эпизоды употребления перерастают в клиническую картину алкоголизма или наркомании, а бытовые трудности сменяются устойчивыми симптомами наркозависимости. Для одних семей поводом для обращения становится затяжной запой, сопровождающийся физическим истощением и обезвоживанием. Для других — выраженная тревожность, тремор, скачки артериального давления, агрессия или повторяющиеся срывы после попыток сократить дозировку самостоятельно. Во всех этих случаях важна не разовая процедура, а медицински обоснованная помощь, которая учитывает текущее состояние пациента, минимизирует риски осложнений и определяет дальнейший маршрут восстановления. Когда близкие начинают искать специалиста, они, как правило, хотят решить комплекс задач: стабилизировать самочувствие, понять, достаточно ли домашнего формата или нужна госпитализация, оценить степень сформированной зависимости и выстроить план действий, который не вернет человека в кризис через несколько дней. Именно поэтому профессиональная наркология рассматривается как последовательная система вмешательств — от осмотра и первичной стабилизации до работы с мотивацией, психотерапии и профилактики рецидивов.
Углубиться в тему – круглосуточная наркологическая помощь воронеж
Наркологическая клиника — это медицинское учреждение, где лечение зависимости выстроено системно: от купирования острых симптомов до длительного сопровождения пациента. В клинике «ДальМедБаланс» терапия проводится под круглосуточным врачебным контролем, а ключевыми принципами являются безопасность, анонимность и индивидуальный подход. Каждый пациент проходит путь восстановления под наблюдением специалистов, которые учитывают физиологическое состояние, психоэмоциональные особенности и социальный контекст. Лечение направлено не только на избавление от физической зависимости, но и на возвращение мотивации к здоровой жизни.
Выяснить больше – https://narkologicheskaya-klinika-v-khabarovske0.ru/khabarovsk-narkologicheskaya-pomoshh/
Для жителей Екатеринбурга наркологическая клиника «Частный медик 24» предлагает платную услугу выезда врача на дом для проведения капельницы от похмелья. Когда человек переживает сильные симптомы похмелья, такие как головная боль, тошнота, слабость, важно не тянуть с лечением и начать восстановление как можно скорее. Капельница от похмелья помогает хорошо облегчить самочувствие пациента, снять головную боль и улучшить общее состояние, восстановив водно-электролитный баланс в организме.
Ознакомиться с деталями – http://www.domen.ru
Срочный домашний выезд особенно важен для семей, которые уже сталкивались с тяжёлыми последствиями алкоголизма и понимают, что обычные попытки «отпаивания» не решают проблему. Врач оценивает не только факт употребления, но и длительность запоя, возраст, наличие хронических болезней, уже принятые медикаменты, риск абстинентного синдрома, состояние сердца и общую нагрузку на организм. Такой формат позволяет анонимно вызвать специалиста, быстро провести необходимые вмешательства и определить, нужен ли только домашний вывод из острого состояния или дальше потребуется кодирование, повторная консультация, реабилитация либо более широкий маршрут помощи при наркомании.
Детальнее – вызов нарколога на дом воронеж
Нарколог на дом — это удобное и эффективное решение для тех, кто сталкивается с тяжелыми последствиями запоя или алкогольной интоксикации. В наркологической клинике «Частный медик 24» в Самаре мы предоставляем круглосуточную помощь, выезд нарколога и лечение на дому. Это позволяет пациентам получить профессиональную медицинскую помощь в удобной и знакомой обстановке, что особенно важно, когда состояние человека ухудшается после длительного употребления алкоголя или наркотиков.
Подробнее тут – http://www.domen.ru
Viagra generic over the counter: Generic Viagra for sale – CoreBlue Health
После употребления алкоголя у человека может наблюдаться ряд неприятных симптомов: головная боль, слабость, тошнота, головокружение, сухость во рту и тремор. Эти признаки являются следствием алкогольной интоксикации, и в такой ситуации крайне важно вовремя принять меры. В клинике «Частный медик 24» в Самаре мы предоставляем капельную терапию, которая помогает снять токсическую нагрузку с организма, восстановить водно-электролитный баланс и облегчить общее самочувствие пациента. Капельница от похмелья помогает снять симптомы абстиненции и улучшить физическое состояние пациента, возвращая его к нормальной жизни.
Ознакомиться с деталями – капельница от похмелья на дому самара
Каждый элемент программы направлен на создание комплексного подхода к лечению зависимости, обеспечивая помощь не только на физическом, но и на эмоциональном уровне. Индивидуальная программа реабилитации позволяет выстроить эффективную терапию, которая соответствует конкретным потребностям пациента.
Подробнее тут – реабилитация алкоголиков стоимость москва
В Воронеже услуга «нарколог на дом» востребована прежде всего тогда, когда состояние развивается быстро, а запас сил у пациента почти исчерпан. После нескольких дней употребления человеку бывает трудно даже выйти из квартиры: сохраняются слабость, дрожь, бессонница, тошнота, скачки давления, потливость, раздражительность и ощущение, что без новой дозы алкоголя легче уже не станет. Именно в этот момент домашний выезд специалиста помогает разорвать опасный цикл. Наркологическая помощь начинается там, где человек находится, а не там, куда он в идеале должен был бы доехать.
Узнать больше – вызвать нарколога на дом воронеж
Капельница от похмелья — это не просто средство для снятия симптомов, но и эффективный способ быстрого восстановления организма после алкогольной интоксикации. В наркологической клинике «Частный медик 24» в Екатеринбурге мы предоставляем услугу выезда нарколога на дом, что позволяет пациентам получить необходимую медицинскую помощь, не покидая комфорт своей обстановки. Это особенно важно в случае, если состояние пациента серьёзно ухудшилось, и он не может поехать в клинику самостоятельно.
Разобраться лучше – капельница от похмелья цена в екатеринбурге
После инфузии врач повторно измеряет показатели, оставляет письменные инструкции, назначает окно связи и определяет условия, при которых разумно перейти к стационару: нет нужды держаться «на силе воли», когда безопаснее сменить формат.
Узнать больше – vyvod-iz-zapoya-moskva-vyzov-narkologa-kapelnica
VeritasCare: Generic Tadalafil 20mg price – Tadalafil price
Капельница от похмелья в Самаре: быстрое снятие симптомов, детоксикация и восстановление организма под контролем специалистов в наркологической клинике «Детокс»
Подробнее можно узнать тут – капельница от похмелья анонимно в самаре
Капельница от запоя в Нижнем Новгороде: снятие интоксикации, восстановление организма и помощь при запое под контролем специалистов в наркологической клинике «Похмельная служба»
Узнать больше – капельница от запоя на дому нижний новгород
Такие симптомы важны не только сами по себе. Они показывают, что организму уже трудно поддерживать стабильность без медицинского вмешательства. Чем дольше в этот момент ждать, тем выше вероятность, что потребуется более жёсткий формат оказания помощи. Поэтому экстренное обращение в некоторых случаях не просто облегчает состояние, а предотвращает дальнейшее ухудшение здоровья.
Подробнее – запой нарколог на дом
Детоксикация в основном фокусируется на печени и почках, помогая этим органам быстрее справляться с продуктами распада алкоголя. Такой подход гарантирует не только улучшение самочувствия, но и восстановление работы внутренних органов, которые пострадали в процессе злоупотребления алкоголем.
Подробнее – капельница от похмелья вызов на дом самара
Нарколог на дом в Воронеже с лечением без очередей, выездом врача и анонимной помощью в наркологической клинике «Частный медик 24»
Разобраться лучше – http://www.domen.ru
Срочный домашний выезд особенно важен для семей, которые уже сталкивались с тяжёлыми последствиями алкоголизма и понимают, что обычные попытки «отпаивания» не решают проблему. Врач оценивает не только факт употребления, но и длительность запоя, возраст, наличие хронических болезней, уже принятые медикаменты, риск абстинентного синдрома, состояние сердца и общую нагрузку на организм. Такой формат позволяет анонимно вызвать специалиста, быстро провести необходимые вмешательства и определить, нужен ли только домашний вывод из острого состояния или дальше потребуется кодирование, повторная консультация, реабилитация либо более широкий маршрут помощи при наркомании.
Детальнее – http://www.domen.ru
Капельница от похмелья с контролем врача в Самаре является одной из самых популярных и эффективных услуг для тех, кто сталкивается с выраженными симптомами похмельного синдрома. Похмелье может проявляться не только головной болью и усталостью, но и более серьезными проблемами, такими как тошнота, рвота, учащенное сердцебиение и повышение давления. Когда симптомы становятся особенно острыми, капельница помогает организму справиться с токсинами, восстановить водно-электролитный баланс и нормализовать состояние пациента, в том числе при запое. Важно, что контроль врача на протяжении всей процедуры обеспечивает безопасность и эффективность, при этом помощь может оказываться как на дому, так и в клинике при лечении алкоголизма.
Получить больше информации – капельница от похмелья цена самара
Капельница от похмелья в Самаре с устранением симптомов интоксикации и контролем состояния в наркологической клинике «Частный медик 24»
Исследовать вопрос подробнее – https://kapelnicza-ot-pokhmelya-samara-2.ru/
После введения растворов активные вещества быстро распределяются по организму. Это способствует выведению продуктов распада алкоголя, улучшению работы нервной системы и восстановлению энергетического баланса. Уже в процессе инфузии уменьшаются головная боль, тошнота и слабость.
Исследовать вопрос подробнее – капельница от похмелья цена самара
Процесс реабилитации алкоголиков включает в себя несколько методов, направленных на восстановление как физического, так и психоэмоционального состояния пациента. В Москве доступны различные программы, от традиционной детоксикации до современных подходов, при этом в отдельных случаях предусматривается вывод данных о состоянии пациента и динамике лечения при алкогольной зависимости, включая когнитивно-поведенческую терапию и арт-терапию.
Исследовать вопрос подробнее – центр реабилитации алкоголиков город
VeritasCare VeritasCare Cialis 20mg price in USA
Когда такие симптомы становятся ярко выраженными, важно не затягивать с лечением и вызвать нарколога на дом. Это позволит своевременно устранить токсические вещества из организма и предотвратить серьёзные проблемы с органами. Важно, чтобы лечение началось как можно быстрее, что возможно только через экстренный выезд специалиста на дом.
Изучить вопрос глубже – http://kapelnicza-ot-pokhmelya-ekaterinburg-6.ru
В подобных случаях время играет против пациента. Чем дольше человек остаётся без осмотра, тем выше вероятность, что к обезвоживанию и интоксикации добавятся нарушения сна, истощение, вегетативный срыв и ошибки с лекарствами, которые были приняты «для успокоения» без понимания общей картины. В практике выездной службы именно экстренное реагирование помогает не допустить ухудшения и в короткие сроки вернуть ситуацию под медицинский контроль.
Подробнее – http://www.domen.ru
Особое внимание мы уделяем психологической составляющей. Наркологическая помощь в Воронеже в «Клиника Плюс» — это не только физическое очищение, но и работа с мотивацией, разрушение психологических триггеров зависимости. Родственники получают отдельную поддержку: консультации психолога помогают правильно выстроить общение с зависимым человеком и мотивировать его на дальнейшее лечение. Реабилитация может проходить амбулаторно или в стационаре партнёрских центров с комфортабельными условиями, где пациенты находятся под круглосуточным наблюдением.
Разобраться лучше – http://narkologicheskaya-pomoshh-voronezh-1.ru/
Такие симптомы важны не только сами по себе. Они показывают, что организму уже трудно поддерживать стабильность без медицинского вмешательства. Чем дольше в этот момент ждать, тем выше вероятность, что потребуется более жёсткий формат оказания помощи. Поэтому экстренное обращение в некоторых случаях не просто облегчает состояние, а предотвращает дальнейшее ухудшение здоровья.
Подробнее тут – https://narkolog-na-dom-voronezh-1.ru/
Городская среда Петрозаводска со сменой ветров с Онежского озера, короткими сумерками и сезонными перепадами влажности может усиливать тревожность в вечерние часы. Мы учитываем это с момента первого контакта: согласованная парковка, отдельный вход без вывесок, короткая регистрация без «толстых анкет», приглушённый тёплый свет в зоне ожидания и отсутствие громких объявлений. Родственникам предоставляются «тихие окна» связи — лаконичные апдейты в фиксированное время, чтобы не перегружать пациента и не дёргать команду в критические окна наблюдения. Такой «мягкий» контур снижает сенсорную нагрузку, стабилизирует вариабельность ЧСС к сумеркам и сокращает число импульсивных просьб «усилить на ночь».
Подробнее можно узнать тут – наркологическая клиника клиника помощь петрозаводск
Каждый выезд нарколога включает в себя не только инфузионную терапию, но и полноценную оценку состояния пациента, анализ рисков, а также консультацию по дальнейшему лечению. Врач может назначить дополнительные препараты для снятия симптомов ломки, восстановления водно-электролитного баланса и улучшения общего состояния пациента. Также важно, что консультация включает рекомендации по реабилитации, психологической поддержке и кодированию, если это необходимо для пациента, страдающего хроническим алкоголизмом или наркоманией.
Получить дополнительные сведения – нарколог на дом в воронеже
Когда такие симптомы становятся ярко выраженными, важно не затягивать с лечением и вызвать нарколога на дом. Это позволит своевременно устранить токсические вещества из организма и предотвратить серьёзные проблемы с органами. Важно, чтобы лечение началось как можно быстрее, что возможно только через экстренный выезд специалиста на дом.
Получить дополнительную информацию – капельница от похмелья вызов на дом
Капельница от похмелья в Екатеринбурге с устранением слабости, тошноты и последствий интоксикации в наркологической клинике «Частный медик 24»
Подробнее можно узнать тут – http://kapelnicza-ot-pokhmelya-ekaterinburg-4.ru/
Капельница от похмелья в Самаре становится все более популярным методом, благодаря своим преимуществам в восстановлении организма после алкогольного отравления. В отличие от традиционных методов лечения, таких как прием таблеток или напитков, капельница действует гораздо быстрее и более эффективно, особенно в случае тяжелого похмелья. Врачебные центры в Самаре предлагают услуги капельниц, которые могут быть настроены под конкретные нужды пациента, что увеличивает эффективность лечения.
Выяснить больше – капельница от похмелья анонимно в самаре
Анонимное лечение на дому ценно ещё и тем, что снижает внутреннее сопротивление самого пациента. Для многих людей первый контакт с врачом происходит именно дома, без дороги, без ожидания, без страха чужих взглядов. Такой формат помогает начать разговор не только о снятии острых симптомов, но и о более широких вопросах: что делать после выхода из запоя, когда требуется кодирование, в каких случаях нужна реабилитация, а когда первичная наркологическая помощь уже должна переходить в полноценный лечебный маршрут. Врач может помочь и в ситуациях, связанных не только с алкоголем, но и с наркомании, если семье нужно понять, что происходит с зависимым человеком и какой следующий шаг будет для него безопасным.
Углубиться в тему – нарколог на дом вывод в воронеже
Капельница от похмелья — это один из наиболее эффективных методов экстренной медицинской помощи, который позволяет быстро снять симптомы алкогольной интоксикации и восстановить организм после злоупотребления алкоголем. В наркологической клинике «Частный медик 24» в Самаре мы предоставляем услугу выезда нарколога на дом и капельной терапии для пациентов, испытывающих тяжёлые симптомы похмелья. Это удобный способ получить необходимую помощь без лишнего стресса, сохраняя анонимность и комфорт пациента.
Выяснить больше – капельница от похмелья на дом в самаре
В Хабаровске востребован системный подход к терапии зависимостей, так как клиническая картина часто осложняется сопутствующими заболеваниями, нарушениями обмена веществ и расстройствами нервной системы. Медицинская помощь организуется с учётом тяжести состояния и индивидуальных факторов риска.
Подробнее тут – платная наркологическая клиника хабаровск
«СтавропольМед Резонанс» — мультидисциплинарная команда. Нарколог отвечает за медицинскую безопасность, психиатр — за коморбидные состояния (депрессия, тревога), клинический психолог — за поведенческую перестройку, реабилитолог — за возвращение к активной жизни. Назначения проходят «двойную верификацию»: первичное — лечащим врачом, вторичное — коротким консилиумом на смене. Все препараты закупаются у официальных поставщиков, температурные режимы хранения контролируются, а побочные реакции документируются с привязкой ко времени и обстоятельствам.
Получить дополнительную информацию – запой наркологическая клиника ставрополь
cheapest cialis VeritasCare Cialis 20mg price in USA
Есть состояния, при которых откладывать вызов врача рискованно. Домашний выезд нужен не только при «тяжёлом похмелье», но и тогда, когда самочувствие становится нестабильным, а попытки справиться своими силами уже не работают. Ниже перечислены ситуации, при которых обращение за помощью оправдано именно в ближайшее время, а не «если не станет легче к вечеру».
Подробнее – http://www.domen.ru
Откладывание помощи создает иллюзию управления ситуацией, тогда как нейробиологические процессы продолжают развиваться в неблагоприятном направлении. Регулярная интоксикация перестраивает дофаминовую и ГАМК-ергическую системы, снижает естественную выработку нейромедиаторов и формирует условные рефлексы, связывающие употребление с любым стрессовым триггером. При развитии абстинентного синдрома появляются характерные признаки: выраженная слабость, тошнота, ломки, нарушения сна, тахикардия. В результате каждый последующий кризис переносится тяжелее, требует более длительной стабилизации и несет повышенные риски для печени, сердца и центральной нервной системы. Кроме того, затягивание снижает мотивацию пациента к лечению, так как период «ремиссии» между срывами создает ложное ощущение восстановления. Профессиональная наркология работает с этой динамикой, предлагая помощь на том этапе, когда вмешательство еще эффективно и не требует реанимационных мер.
Получить дополнительные сведения – клиника наркологической помощи воронеж
Снижается тремор, уменьшается тошнота, пульс и давление перестают «скакать», появляется возможность уснуть без паники. Важно не перегружать этот эффект разговорами «по душам», яркими экранами и проверками «на прочность»: когда среда тихая и затемнённая, организм закрепляет улучшение, а не теряет его к полуночи.
Изучить вопрос глубже – вывод из запоя недорого
Капельница от похмелья в Екатеринбурге с устранением слабости, тошноты и последствий интоксикации в наркологической клинике «Частный медик 24»
Изучить вопрос глубже – капельница от похмелья анонимно
Когда человек или его родственники понимают, что нужна наркологическая помощь в Воронеже, время становится решающим фактором. Запой, ломка, тяжёлая интоксикация — в таких ситуациях промедление может привести к необратимым последствиям для здоровья и жизни. Наша клиника создана именно для того, чтобы оказывать эффективную наркологическую помощь в Воронеже в самых сложных случаях. Мы не заставляем ждать в очередях государственных учреждений, не ставим на учёт и не разглашаем информацию. Всё происходит конфиденциально, на дому или в комфортных условиях нашей партнёрской клиники. Пациенты из Воронежа, Воронежской области, а также соседних регионов уже более 12 лет выбирают «Клиника Плюс» благодаря сочетанию скорости, профессионализма и доказанной результативности.
Детальнее – наркологическая помощь на дому
Для жителей Воронежа выездной формат особенно востребован в ситуациях, когда состояние уже заметно ухудшилось, а на поездку в клинику нет ресурса ни физически, ни эмоционально. Круглосуточный вызов врача позволяет начать лечение без ожидания утра, без дороги и без дополнительной нагрузки на сердечно-сосудистую систему. После приезда нарколог не ограничивается одной процедурой. Он оценивает, насколько безопасно оставлять пациента дома, есть ли признаки тяжёлой абстиненции, присутствует ли риск делирия, обезвоживания, аритмии или резкого скачка давления. Если домашний формат допустим, запускается пошаговая схема стабилизации, где важен не только состав капельницы, но и последующее наблюдение в ближайшие часы.
Получить больше информации – нарколог на дом вывод воронеж
Срочный домашний выезд особенно важен для семей, которые уже сталкивались с тяжёлыми последствиями алкоголизма и понимают, что обычные попытки «отпаивания» не решают проблему. Врач оценивает не только факт употребления, но и длительность запоя, возраст, наличие хронических болезней, уже принятые медикаменты, риск абстинентного синдрома, состояние сердца и общую нагрузку на организм. Такой формат позволяет анонимно вызвать специалиста, быстро провести необходимые вмешательства и определить, нужен ли только домашний вывод из острого состояния или дальше потребуется кодирование, повторная консультация, реабилитация либо более широкий маршрут помощи при наркомании.
Подробнее можно узнать тут – нарколог на дом цена
Постановка капельницы — это не просто средство для снятия головной боли или тошноты, а комплексное восстановление организма. Состав раствора подбирается в зависимости от симптомов и состояния пациента. Врач-нарколог оценивает общее состояние пациента и выбирает наиболее подходящий состав, который будет наиболее эффективен для него. При необходимости может быть предложена дополнительная помощь, включая кодирование от алкогольной зависимости.
Изучить вопрос глубже – http://www.domen.ru
Капельница от похмелья применяется, когда симптомы интоксикации становятся выраженными и мешают нормальной жизнедеятельности пациента. Основные показания для использования капельницы включают:
Подробнее можно узнать тут – капельница от похмелья в самаре
В Екатеринбурге выезд нарколога на дом становится необходимостью, когда симптомы похмелья слишком выражены и пациент не может справиться с ними самостоятельно. Алкогольная интоксикация может привести к ряду проблем, таких как головная боль, слабость, тошнота и рвота, а иногда даже к более серьёзным состояниям, таким как аритмия или психоз. Выезд нарколога на дом позволяет быстро начать лечение, не тратя время на дорогу, что особенно важно в экстренных ситуациях.
Подробнее тут – капельница от похмелья на дом екатеринбург
Как отмечает врач-нарколог Сергей Иванов: “Самое главное преимущество капельницы с медицинским контролем — это точная диагностика состояния пациента перед началом процедуры и возможность корректировать лечение в процессе, что делает её гораздо более безопасной и эффективной по сравнению с самостоятельными методами.”
Узнать больше – капельница от похмелья на дом в нижнем новгороде
Реабилитация алкоголиков с индивидуальной программой — это комплексный подход, включающий медицинскую, психотерапевтическую и социальную поддержку, направленный на восстановление человека после длительного злоупотребления алкоголем. Программа подбирается с учетом всех особенностей пациента, его состояния, сопутствующих заболеваний и эмоциональных проблем. Реабилитация не ограничивается только детоксикацией, но включает также работу с психологом и социальную адаптацию. В некоторых случаях может быть рекомендован выезд на дом для проведения лечения, а также кодирование, чтобы помочь пациенту справиться с зависимостью на всех этапах восстановления. Наркоманическая зависимость может требовать дополнительной терапии и профессиональной помощи для успешного преодоления всех трудностей.
Выяснить больше – реабилитация алкоголиков город
Основной задачей капельницы от похмелья является очищение организма от токсинов, которые остаются после метаболизма алкоголя, обеспечивая быстрый вывод вредных веществ. Алкоголь в значительной степени нарушает водно-электролитный баланс, а его продукты распада могут вызывать неприятные симптомы, такие как головная боль, тошнота, слабость, головокружение и сухость во рту. Капельница помогает устранить эти симптомы, улучшить самочувствие и ускорить процесс восстановления организма, при этом при необходимости возможен вызов врача, анонимное лечение, а также дальнейшая реабилитация и помощь при наркомании.
Получить больше информации – капельница от похмелья анонимно
В Воронеже услуга «нарколог на дом» востребована прежде всего тогда, когда состояние развивается быстро, а запас сил у пациента почти исчерпан. После нескольких дней употребления человеку бывает трудно даже выйти из квартиры: сохраняются слабость, дрожь, бессонница, тошнота, скачки давления, потливость, раздражительность и ощущение, что без новой дозы алкоголя легче уже не станет. Именно в этот момент домашний выезд специалиста помогает разорвать опасный цикл. Наркологическая помощь начинается там, где человек находится, а не там, куда он в идеале должен был бы доехать.
Ознакомиться с деталями – нарколог на дом цена воронеж
Капельница от похмелья с детоксикацией и восстановлением представляет собой медицинскую процедуру, во время которой пациент получает инфузии препаратов, направленных на очищение организма от токсинов и восстановление нормальной работы внутренних органов. Применение таких капельниц помогает быстро устранить симптомы похмелья — головную боль, тошноту, слабость и другие неприятные ощущения — и значительно улучшить самочувствие, что особенно важно при тяжелых состояниях, связанных с наркоманией и алкоголем. При этом может проводиться наркологическая терапия, возможен вызов врача на дом, а также учитываются цены услуг и длительность лечения, которая в отдельных случаях может составлять несколько лет.
Подробнее тут – kapelnicza-ot-pokhmelya-samara-16.ru/
Выезд нарколога на дом — это медицинская услуга, которая подразумевает не только экстренную помощь, но и полноценное обследование пациента в комфортных для него условиях. В наркологической клинике «Частный медик 24» мы обеспечиваем профессиональное лечение на дому, которое включает в себя несколько важных этапов, чтобы стабилизировать состояние пациента, улучшить его самочувствие и снизить риски дальнейших осложнений.
Детальнее – нарколог на дом анонимно самара
Наша клиника предлагает полный цикл услуг — от экстренной круглосуточной помощи до долгосрочной реабилитации. Каждый этап разрабатывается индивидуально с учётом возраста, стажа зависимости и сопутствующих заболеваний. Современные протоколы 2026 года позволяют проводить анонимное лечение алкоголизма и наркомании максимально комфортно и эффективно, минимизируя болезненные симптомы и снижая риск срывов.
Получить дополнительную информацию – клиника наркологической помощи в воронеже
Капельница от похмелья в Самаре: эффективное восстановление, снятие интоксикации и помощь специалистов в наркологической клинике «Детокс»
Узнать больше – капельница от похмелья в самаре
Капельница от похмелья применяется, когда симптомы интоксикации становятся выраженными и мешают нормальной жизнедеятельности пациента. Основные показания для использования капельницы включают:
Углубиться в тему – https://kapelnicza-ot-pokhmelya-samara-1.ru/
Реабилитация алкоголиков в Москве требует интегрированного подхода, включающего не только медицинское лечение, но и психологическую помощь. Важно, чтобы реабилитационные центры предлагали программы, которые помогают пациентам не только избавиться от физической зависимости, но и наладить их психологическое состояние, а также восстановить их отношения с окружающими.
Углубиться в тему – реабилитация алкоголиков в москве
При выезде нарколога на дом в Самаре мы проводим диагностику состояния пациента, чтобы понять, какие препараты и процедуры необходимы для стабилизации. Это может включать регидратацию, витамины группы B, антиеметики и другие препараты для снятия симптомов похмелья. Все препараты подбираются индивидуально в зависимости от состояния пациента и его нужд. Это позволяет значительно сократить время на восстановление и быстро вернуться к нормальному состоянию.
Получить дополнительные сведения – http://kapelnicza-ot-pokhmelya-samara-1.ru
Каждый метод выбирается строго по показаниям. При необходимости врачи комбинируют медикаментозное лечение с психотерапией, физиопроцедурами и восстановительными программами. Это обеспечивает максимальную эффективность и безопасность терапии.
Исследовать вопрос подробнее – наркологическая клиника лечение алкоголизма в хабаровске
Наркологическая помощь на дому помогает избежать стресса, связанного с поездкой в клинику. Особенно это важно в случаях, когда пациент находится в состоянии тяжёлой интоксикации или переживает абстинентный синдром, который можно только усугубить дополнительной нагрузкой. Врач приедет в кратчайшие сроки, обеспечивая необходимое лечение в первые часы после ухудшения состояния. Также важно, что при выезде специалист гарантирует полную анонимность, что особенно важно для многих людей, которые боятся открыто признаться в своей проблеме. Профессиональная наркологическая помощь на дому позволяет избежать срыва и начать процесс восстановления без стресса.
Ознакомиться с деталями – http://www.domen.ru
Капельница от похмелья в Самаре с устранением симптомов интоксикации и контролем состояния в наркологической клинике «Частный медик 24»
Детальнее – капельница от похмелья вызов на дом
Капельница от похмелья — это не просто средство для снятия симптомов, но и эффективный способ быстрого восстановления организма после алкогольной интоксикации. В наркологической клинике «Частный медик 24» в Екатеринбурге мы предоставляем услугу выезда нарколога на дом, что позволяет пациентам получить необходимую медицинскую помощь, не покидая комфорт своей обстановки. Это особенно важно в случае, если состояние пациента серьёзно ухудшилось, и он не может поехать в клинику самостоятельно.
Подробнее тут – капельница от похмелья
Многие сталкиваются с трудностями при выборе клиники или центра: предлагаемые услуги различаются по качеству, подходам, стоимости и длительности. Некоторые организации ограничиваются только медикаментозной поддержкой, не работая с глубинными причинами зависимости. Поэтому важно заранее понимать, какие параметры отличают действительно надёжное учреждение, способное обеспечить долгосрочные результаты.
Разобраться лучше – http://lechenie-narkomanii-murmansk0.ru
Зависимость редко манифестирует резко. Обычно она развивается постепенно, маскируясь под усталость, стресс или временные трудности. Однако существует ряд клинических маркеров, указывающих на переход от эпизодического употребления к патологическому процессу. К ним относятся: увеличение толерантности к веществу, невозможность остановиться после первой дозы, провалы в памяти после употребления, пренебрежение обязанностями, социальная изоляция, раздражительность при попытках близких обсудить проблему. На ранних стадиях алкогольной зависимости пациенты часто отрицают наличие болезни, но физиологические изменения уже запущены. Появление двух-трех из этих признаков в течение нескольких месяцев — прямое показание для консультации со специалистом. Раннее обращение позволяет скорректировать поведение до формирования тяжелой физиологической зависимости.
Разобраться лучше – наркологическая помощь в воронеже
Детоксикация в основном фокусируется на печени и почках, помогая этим органам быстрее справляться с продуктами распада алкоголя. Такой подход гарантирует не только улучшение самочувствия, но и восстановление работы внутренних органов, которые пострадали в процессе злоупотребления алкоголем.
Разобраться лучше – капельница от похмелья на дом
Процедура капельницы от похмелья с контролем врача в Самаре начинается с первичной консультации, на которой врач осматривает пациента, измеряет его основные показатели (давление, пульс, температуру) и оценивает общее состояние. На основе этих данных выбирается оптимальный состав капельницы, которая может включать в себя различные компоненты, такие как солевые растворы, витамины, антиоксиданты и медикаменты для снятия симптомов похмелья.
Подробнее можно узнать тут – капельница от похмелья на дому
п»їcialis generic: Cheap Cialis – Buy Tadalafil 5mg
Процесс восстановления с помощью капельницы с мягким восстановлением происходит в несколько этапов. Вначале происходит нормализация водно-солевого баланса, что помогает предотвратить обезвоживание и улучшить состояние кожи. Затем происходит восстановление энергетических запасов организма, что помогает уменьшить усталость и слабость, что также важно при лечении наркомании. Витамины и антиоксиданты восстанавливают функции клеток и органов, что способствует более быстрому очищению организма от продуктов распада алкоголя, при этом пациентам может быть доступна анонимное консультация и дальнейшая реабилитация.
Исследовать вопрос подробнее – капельница от похмелья вызов на дом в самаре
Каждый выезд нарколога включает в себя не только инфузионную терапию, но и полноценную оценку состояния пациента, анализ рисков, а также консультацию по дальнейшему лечению. Врач может назначить дополнительные препараты для снятия симптомов ломки, восстановления водно-электролитного баланса и улучшения общего состояния пациента. Также важно, что консультация включает рекомендации по реабилитации, психологической поддержке и кодированию, если это необходимо для пациента, страдающего хроническим алкоголизмом или наркоманией.
Исследовать вопрос подробнее – врач нарколог на дом в воронеже
Запой, длительное употребление алкоголя или случайное злоупотребление могут привести к неприятным симптомам похмелья, таким как головная боль, слабость, тошнота, головокружение и усталость. Эти симптомы обусловлены тем, что в организме остаются продукты распада алкоголя, которые токсически воздействуют на все органы. Капельница от похмелья на дому — это отличная возможность быстро снять острые симптомы и восстановить нормальное состояние организма, не выходя из привычной обстановки.
Исследовать вопрос подробнее – капельница от похмелья анонимно в самаре
Срочный домашний выезд особенно важен для семей, которые уже сталкивались с тяжёлыми последствиями алкоголизма и понимают, что обычные попытки «отпаивания» не решают проблему. Врач оценивает не только факт употребления, но и длительность запоя, возраст, наличие хронических болезней, уже принятые медикаменты, риск абстинентного синдрома, состояние сердца и общую нагрузку на организм. Такой формат позволяет анонимно вызвать специалиста, быстро провести необходимые вмешательства и определить, нужен ли только домашний вывод из острого состояния или дальше потребуется кодирование, повторная консультация, реабилитация либо более широкий маршрут помощи при наркомании.
Узнать больше – вызвать нарколога на дом
VeritasCare: VeritasCare – VeritasCare
canadian drugs pharmacy or best canadian online pharmacy reviews best online foreign pharmacy
http://brlic.ru/bitrix/redirect.php?event1=&event2=&event3=&goto=http://civicmeds.com/ canadian pharmacy levitra value pack or https://virtualchemicalsales.ca/user/pmkwjcanlu/?um_action=edit canadian pharmacy tampa
vipps approved canadian online pharmacy which pharmacy is cheaper or pharmacy open near me the canadian pharmacy
Buy Viagra online cheap or Cheapest Sildenafil online cheapest viagra
http://aldana.jp/m/index.cgi?id=1&mode=redirect&no=5&ref_eid=19&url=http://corebluehealth.shop buy Viagra online and https://blog.techshopbd.com/user-profile/pqfpchpxdo/?um_action=edit over the counter sildenafil
=buy+generic+viagra;+corebluehealth.shop,]Buy Viagra online cheap Buy generic 100mg Viagra online or Viagra online price Viagra Tablet price
Каждый элемент программы направлен на создание комплексного подхода к лечению зависимости, обеспечивая помощь не только на физическом, но и на эмоциональном уровне. Индивидуальная программа реабилитации позволяет выстроить эффективную терапию, которая соответствует конкретным потребностям пациента.
Выяснить больше – [url=https://reabilitacziya-alkogolikov-moskva.ru/]алкоголик реабилитация наркоманов в москве[/url]
Комплексный подход, включающий эти методы, значительно повышает шансы на успешное и долговременное восстановление. Современные реабилитационные центры в Москве предлагают целый ряд программ, которые способствуют полному возвращению пациента к здоровой и активной жизни.
Получить дополнительную информацию – алкоголик реабилитация наркоманов город
Острые состояния могут проявляться по-разному: от выраженной слабости, тошноты, тремора и бессонницы до мучительной ломки, резкой тревоги, скачков артериального давления, учащенного сердцебиения, раздражительности и спутанности сознания. У пациентов с хроническими заболеваниями, в пожилом возрасте или после длительного употребления риски возрастают еще сильнее. Особенно опасно ориентироваться только на внешнее впечатление, потому что даже в тех случаях, когда человек находится дома и формально «в сознании», его состояние уже может требовать медицинского вмешательства.
Получить больше информации – наркологическая помощь анонимно воронеж
Во всех этих случаях важен не только сам факт выезда, но и то, что врач умеет быстро определить границы домашнего лечения. Нарколог на дом нужен не для того, чтобы любой ценой оставить пациента в квартире, а для того, чтобы выбрать безопасный путь: домашняя стабилизация, повторный визит, амбулаторное продолжение или перевод в стационар.
Изучить вопрос глубже – запой нарколог на дом в воронеже
Выезд нарколога на дом — это медицинская услуга, которая подразумевает не только экстренную помощь, но и полноценное обследование пациента в комфортных для него условиях. В наркологической клинике «Частный медик 24» мы обеспечиваем профессиональное лечение на дому, которое включает в себя несколько важных этапов, чтобы стабилизировать состояние пациента, улучшить его самочувствие и снизить риски дальнейших осложнений.
Ознакомиться с деталями – нарколог на дом в самаре
Первая ровная ночь — поворотная точка. Без неё любая дневная инфузия работает коротко и «сгорает» к вечеру. Мы заранее настраиваем простые, но критичные условия: затемнение, тишина, прохладная комната, фиксированное время отбоя, минимум экранов и разговоров. При показаниях назначается щадящая седативная поддержка в дозах, которые стабилизируют, а не «выключают». Утром — короткий контроль и подстройка доз, чтобы другая ночь прошла ещё спокойнее. Такой «простой» протокол даёт самый устойчивый результат: исчезают панические волны, выравниваются показатели, снижается вероятность повторных экстренных обращений, а значит, бюджет остаётся предсказуемым.
Углубиться в тему – анонимный вывод из запоя
Нарколог на дом в Воронеже с конфиденциальным выездом, капельницами и поддержкой пациента в наркологической клинике «Частный медик 24»
Подробнее можно узнать тут – вызов нарколога на дом
Cheap Sildenafil 100mg: sildenafil online – buy Viagra over the counter
Капельница от похмелья — это эффективный способ снятия симптомов алкогольной интоксикации, который позволяет быстро восстановить организм после длительного употребления алкоголя. В наркологической клинике «Частный медик 24» в Екатеринбурге мы предлагаем капельную терапию, которая включает в себя комплекс препаратов для восстановления водно-электролитного баланса, выведения токсинов и нормализации состояния пациента. Процедура проводится в удобной обстановке, и мы обеспечиваем полное наблюдение врача на протяжении всего процесса лечения.
Узнать больше – http://kapelnicza-ot-pokhmelya-ekaterinburg-5.ru/
Каждый выезд нарколога включает в себя не только инфузионную терапию, но и полноценную оценку состояния пациента, анализ рисков, а также консультацию по дальнейшему лечению. Врач может назначить дополнительные препараты для снятия симптомов ломки, восстановления водно-электролитного баланса и улучшения общего состояния пациента. Также важно, что консультация включает рекомендации по реабилитации, психологической поддержке и кодированию, если это необходимо для пациента, страдающего хроническим алкоголизмом или наркоманией.
Выяснить больше – вызвать нарколога на дом в воронеже
Эти компоненты вводятся в организме пациента постепенно, что позволяет обеспечить мягкое восстановление без резких скачков состояния. В отличие от интенсивных процедур, такой подход гарантирует, что организм восстанавливается более комфортно, не подвергаясь излишнему стрессу.
Разобраться лучше – капельница от похмелья на дом
Капельница от похмелья в Екатеринбурге с устранением слабости, тошноты и последствий интоксикации в наркологической клинике «Частный медик 24»
Выяснить больше – капельница от похмелья на дом в екатеринбурге
Generic Viagra for sale: CoreBlue Health – Cheapest Sildenafil online
После употребления алкоголя состояние может быстро ухудшиться: появляется головная боль, тошнота, головокружение и слабость. Это следствие того, что в организме накапливаются токсины, продукты распада этанола и нарушается водно-электролитный баланс. С помощью капельницы от похмелья можно быстро справиться с интоксикацией, восполнить недостающие элементы и облегчить состояние пациента. В клинике «Частный медик 24» в Самаре мы предлагаем капельницы, которые помогают снять все неприятные симптомы похмелья, восстанавливая работу организма и минимизируя риски для здоровья.
Подробнее – капельница от похмелья на дом самара
Order Viagra 50 mg online CoreBlue Health over the counter sildenafil
Капельница от похмелья — это эффективный способ экстренной помощи, предназначенный для того, чтобы помочь организму быстро восстановиться после злоупотребления алкоголем. В наркологической клинике «Частный медик 24» в Самаре мы предоставляем услугу безопасной детоксикации и восстановления 24/7. Капельница помогает организму вывести токсины, восстановить водно-электролитный баланс и улучшить общее состояние пациента, не создавая дополнительных нагрузок на сердце, печень и почки.
Исследовать вопрос подробнее – http://kapelnicza-ot-pokhmelya-samara-2.ru/
Нарколог на дом в Самаре с выездом специалиста, детоксикацией и анонимной медицинской помощью в наркологической клинике «Частный медик 24»
Исследовать вопрос подробнее – вызов нарколога на дом
Срочный домашний выезд особенно важен для семей, которые уже сталкивались с тяжёлыми последствиями алкоголизма и понимают, что обычные попытки «отпаивания» не решают проблему. Врач оценивает не только факт употребления, но и длительность запоя, возраст, наличие хронических болезней, уже принятые медикаменты, риск абстинентного синдрома, состояние сердца и общую нагрузку на организм. Такой формат позволяет анонимно вызвать специалиста, быстро провести необходимые вмешательства и определить, нужен ли только домашний вывод из острого состояния или дальше потребуется кодирование, повторная консультация, реабилитация либо более широкий маршрут помощи при наркомании.
Разобраться лучше – http://www.domen.ru
Смысл экстренной помощи — не в «сильной капельнице любой ценой», а в последовательности. Бригада приезжает в согласованное окно, проводит экспресс-осмотр, фиксирует давление, пульс, сатурацию, оценивает неврологический статус, при необходимости снимает ЭКГ. Далее подбирается инфузионная терапия по показаниям, корректируется водно-электролитный баланс, снижаются тремор и тревога, выравнивается сон. Важно объяснить семье и самому пациенту, чего ожидать: какие ощущения нормальны, какие — повод для связи, зачем назначены те или иные растворы и поддерживающие препараты. Параллельно формируется краткий план «сложных часов» на вечер и ночь: что делать, если накрывает волну беспокойства, как распределить жидкость и питание, какие бытовые действия лучше отложить. В московском ритме особенно критично не растягивать решения на «завтра»: від организованного визита до ощутимого облегчения обычно проходит один-два часа, и именно этот отрезок задаёт тон всей последующей стабилизации.
Получить дополнительную информацию – https://vyvod-iz-zapoya-moskva99.ru/vyvod-iz-zapoya-v-klinike-v-moskve
Нарколог на дом — это не просто возможность получить медицинскую помощь в удобное время, но и решение важнейших задач по стабилизации состояния пациента, избавлению от острых симптомов абстиненции и восстановлению его здоровья. В случае с алкоголизмом и наркоманией выезд врача на дом в Воронеже — это важный шаг к восстановлению, который начинается там, где пациент находится, в удобной и привычной обстановке. Клиника «Частный медик 24» предлагает круглосуточные выезды нарколога, предоставляя экстренную помощь при запоях, наркозависимости, а также консультации по дальнейшему лечению и реабилитации. Врач приедет по указанному адресу и проведёт все необходимые процедуры, включая капельницы для стабилизации состояния пациента.
Исследовать вопрос подробнее – вызов нарколога на дом воронеж
Эта структура терапии помогает достигать устойчивой ремиссии и снижать вероятность возврата к употреблению.
Подробнее тут – частная наркологическая клиника донецк
Запрос на выезд врача связан не только с классическим запоем. На практике домашняя помощь нужна в разных ситуациях, когда организму уже трудно компенсировать последствия употребления, а откладывание визита увеличивает риск осложнений.
Подробнее – http://narkolog-na-dom-voronezh-2.ru/
Реабилитация алкоголиков в Москве с комплексным подходом — это многогранный процесс, включающий в себя не только медицинские процедуры, но и психологическую поддержку, физическую реабилитацию и помощь в социальной адаптации. Профессиональный реабилитационный центр обеспечивает индивидуальный подход к каждому пациенту, включая такие методы, как кодирование и своевременное лечение запоя. Важно отметить, что успешное лечение алкоголизма требует учета множества факторов, таких как степень зависимости, психоэмоциональное состояние пациента, а также его физическое здоровье. Комплексный подход помогает эффективно устранить все составляющие проблемы, минимизируя риски рецидивов.
Разобраться лучше – http://reabilitacziya-alkogolikov-moskva-2.ru
Наркологическая клиника «ТагилМед Реал» — это круглосуточная команда врачей, психологов и координаторов, которая берёт на себя полный цикл помощи при алкогольной и наркотической зависимости: от экстренной стабилизации и капельниц на дому до амбулаторного сопровождения, кодирования и длительной психотерапевтической поддержки. Мы работаем без выходных, используем портативное оборудование, придерживаемся принципов доказательной медицины и внимательно относимся к конфиденциальности: нейтральные формулировки в документах, немаркированный транспорт, разграниченный доступ к медицинским данным и единый доверенный контакт для семьи.
Получить больше информации – наркологическая клиника наркологический центр
Услуги нарколога на дому в Самаре включают не только экстренный осмотр, но и комплекс медицинских мероприятий, направленных на снижение интоксикации, облегчение тяжелых симптомов и общее восстановление состояния пациента. Объем помощи зависит от клинической картины, длительности употребления алкоголя или других психоактивных веществ, возраста, хронических заболеваний и текущих рисков. Врач подбирает схему индивидуально, исходя из того, какие задачи необходимо решить в конкретный момент — снять острые проявления, стабилизировать самочувствие или подготовить пациента к дальнейшему лечению зависимости.
Изучить вопрос глубже – нарколог на дом в самаре
Наркологическая помощь в Воронеже сегодня — это не просто медицинская услуга, а реальный шанс быстро и безопасно вернуть контроль над жизнью себе или своему близкому человеку. В крупном городе Центрального Черноземья, где ритм жизни высокий, а стресс и доступность веществ создают серьёзные риски, тысячи жителей ежегодно сталкиваются с проблемой зависимости. Алкоголь, синтетические наркотики, соли, спайсы — всё это требует немедленного профессионального вмешательства. Клиника «Клиника Плюс» предоставляет полную наркологическую помощь в Воронеже 24 часа в сутки, 7 дней в неделю. Мы гарантируем анонимное лечение алкоголизма и наркомании, срочный выезд нарколога на дом в течение 30–60 минут, полную конфиденциальность и современные протоколы лечения 2026 года, которые позволяют купировать острое состояние уже в первые часы.
Подробнее тут – наркологическая помощь анонимно
Многие пациенты и их родственники выбирают выезд врача на дом, когда пациент не в состоянии самостоятельно приехать в клинику. Домашняя помощь подходит в ситуациях, когда состояние пациента резко ухудшается, и важно начать лечение как можно быстрее.
Выяснить больше – клиника наркологической помощи
Капельница от похмелья с контролем врача в Самаре является одной из самых популярных и эффективных услуг для тех, кто сталкивается с выраженными симптомами похмельного синдрома. Похмелье может проявляться не только головной болью и усталостью, но и более серьезными проблемами, такими как тошнота, рвота, учащенное сердцебиение и повышение давления. Когда симптомы становятся особенно острыми, капельница помогает организму справиться с токсинами, восстановить водно-электролитный баланс и нормализовать состояние пациента, в том числе при запое. Важно, что контроль врача на протяжении всей процедуры обеспечивает безопасность и эффективность, при этом помощь может оказываться как на дому, так и в клинике при лечении алкоголизма.
Получить дополнительную информацию – капельница от похмелья на дом самара
canadian pharmacy 24h com canadian pharmacy uk delivery foreign pharmacy no prescription
Капельница от похмелья применяется, когда симптомы интоксикации становятся выраженными и мешают нормальной жизнедеятельности пациента. Основные показания для использования капельницы включают:
Исследовать вопрос подробнее – капельница от похмелья на дом в самаре
Эта процедура помогает избежать агрессивных методов лечения, таких как медикаментозные таблетки, и оказывает мягкое, но эффективное влияние на организм.
Получить дополнительную информацию – капельница от похмелья на дому в самаре
Капельница от похмелья в Самаре используется для устранения симптомов алкогольной интоксикации, которые могут включать головную боль, тошноту, слабость, рвоту и обезвоживание. Это достигается за счет введения специальных растворов, которые помогают организму восстановиться и очиститься от токсинов.
Подробнее тут – капельница от похмелья на дом
Реабилитация включает несколько ключевых этапов, каждый из которых направлен на решение определённых проблем пациента. Важно, чтобы все этапы были комплексными и последовательными, чтобы достичь наиболее эффективного результата.
Углубиться в тему – центр реабилитации алкоголиков
В Нижнем Тагиле выездные бригады дежурят 24/7. Координатор уже при первичном звонке собирает ключевые сведения: аллергии, хронические заболевания, список постоянных препаратов, эпизоды судорог или алкогольных психозов в прошлом, последние значения давления и пульса, возможность обеспечить тишину на 2–3 часа, доступ к питьевой воде, особенности подъезда. Вся эта информация помогает врачу подготовить стартовую схему — от выбора профиля инфузии до темпа введения. По запросу организуем немаркированный визит и сдержанные формулировки в документах, чтобы не создавать лишнего внимания со стороны соседей и коллег.
Получить дополнительные сведения – вывод из запоя клиника
Капельница от похмелья — это не просто средство для снятия симптомов, но и эффективный способ быстрого восстановления организма после алкогольной интоксикации. В наркологической клинике «Частный медик 24» в Екатеринбурге мы предоставляем услугу выезда нарколога на дом, что позволяет пациентам получить необходимую медицинскую помощь, не покидая комфорт своей обстановки. Это особенно важно в случае, если состояние пациента серьёзно ухудшилось, и он не может поехать в клинику самостоятельно.
Ознакомиться с деталями – капельница от похмелья екатеринбург
Наркологическая помощь в Воронеже сегодня — это не просто медицинская услуга, а реальный шанс быстро и безопасно вернуть контроль над жизнью себе или своему близкому человеку. В крупном городе Центрального Черноземья, где ритм жизни высокий, а стресс и доступность веществ создают серьёзные риски, тысячи жителей ежегодно сталкиваются с проблемой зависимости. Алкоголь, синтетические наркотики, соли, спайсы — всё это требует немедленного профессионального вмешательства. Клиника «Клиника Плюс» предоставляет полную наркологическую помощь в Воронеже 24 часа в сутки, 7 дней в неделю. Мы гарантируем анонимное лечение алкоголизма и наркомании, срочный выезд нарколога на дом в течение 30–60 минут, полную конфиденциальность и современные протоколы лечения 2026 года, которые позволяют купировать острое состояние уже в первые часы.
Разобраться лучше – http://narkologicheskaya-pomoshh-voronezh-2.ru
Когда человек сталкивается с симптомами похмелья, такие как головная боль, тошнота, слабость, головокружение, важно быстро принять меры, чтобы предотвратить развитие более серьёзных проблем. Капельница от похмелья помогает в этом, выводя токсины из организма, восстанавливая нормальное функционирование внутренних органов и возвращая пациента к нормальной жизни. Важно, что мы обеспечиваем полную анонимность на всех этапах лечения, что особенно важно для тех, кто не хочет, чтобы его зависимость стала известна.
Детальнее – капельница от похмелья вызов на дом екатеринбург
online otc pharmacy and canadian pharmacy review canadian family pharmacy
http://electronix.ru/redirect.php?http://civicmeds.shop canadian pharmacy meds reviews or https://radiationsafe.co.za/user/fygfvlrpid/?um_action=edit pharmacy discount card
legit canadian pharmacy online pharmacy prescription or internet pharmacy mexico online pharmacy search
Медицина выравнивает физиологию, но устойчивость дают простые действия. Мы вместе составляем карту триггеров: вечерние «тёмные часы», задержки без еды, конфликты, привычные маршруты с «точками соблазна», недосып. На каждый триггер — короткий «буфер» на 20–40 минут: спокойная прогулка близко к дому, тёплый душ, лёгкая еда по расписанию, дыхательная практика, созвон с «своим» человеком. Эти шаги бесплатны и выполнимы, но именно они уменьшают импульсивность и количество «проверок себя». Отдельный акцент — на ночной сон: ранний отбой, минимум экранов, затемнение, никаких энергичных разговоров и «разборов». Когда поведенческая рамка задана в первый же день, эффект инфузий не «сгорает» к вечеру, а переводит состояние в предсказуемую стабилизацию, на базе которой уже можно обсуждать кодирование и реабилитационные шаги.
Получить дополнительные сведения – https://narkolog-na-dom-moskva999.ru/
Стационарные и амбулаторные блоки клиники работают как единый маршрут. Мы начинаем с короткого «языка фактов»: сколько минут до засыпания, сколько пробуждений ночью, какой объём воды переносится малыми глотками, как меняется пульс в сумерки. Эти маркеры дополняют витальные показатели и помогают точнее выбирать инфузионные модули, контролировать темп и вовремя «облегчать» схему, не теряя устойчивости. Параллельно мы внедряем поведенческие опоры — тёплую подсветку, дыхательный паттерн 4–6, «цифровую тишину», дробное тёплое питание — они уменьшают потребность в ночных «усилениях» и повышают переносимость лечения.
Получить дополнительную информацию – лечение в наркологической клинике в петрозаводске
Нарколог на дом в Воронеже с оперативным приездом специалиста, детоксикацией и медицинским наблюдением в наркологической клинике «Частный медик 24»
Подробнее можно узнать тут – https://narkolog-na-dom-voronezh.ru/
Юрист по правам отца поможет защитить ваши интересы в спорах о детях, алиментах и порядке общения. Переходите по запросу адвокат по защите прав отца за неуплату алиментов. Окажем квалифицированную поддержку при разводе, определении места жительства ребенка и восстановлении родительских прав. Подготовим документы, представим ваши интересы в суде и добьемся справедливого решения в сложной ситуации.
Есть состояния, при которых откладывать обращение не стоит. Ниже перечислены признаки, при которых вызывать врача на дом разумно именно в ближайшее время, а не после очередной неудачной попытки «перележать» тяжёлый период самостоятельно.
Получить больше информации – запой нарколог на дом воронеж
https://veritascarepharm.shop/# VeritasCare
Реабилитация алкоголиков в Москве с поддержкой специалистов направлена не только на избавление от зависимости, но и на восстановление полноценной жизни пациента. В процессе реабилитации особое внимание уделяется не только медицинским методам, но и психологической поддержке, что помогает пациенту разобраться в причинах своей зависимости, научиться справляться с трудными ситуациями и адаптироваться к социальной жизни без алкоголя.
Выяснить больше – реабилитация алкоголиков в москве
Наркологическая помощь на дому помогает избежать стресса, связанного с поездкой в клинику. Особенно это важно в случаях, когда пациент находится в состоянии тяжёлой интоксикации или переживает абстинентный синдром, который можно только усугубить дополнительной нагрузкой. Врач приедет в кратчайшие сроки, обеспечивая необходимое лечение в первые часы после ухудшения состояния. Также важно, что при выезде специалист гарантирует полную анонимность, что особенно важно для многих людей, которые боятся открыто признаться в своей проблеме. Профессиональная наркологическая помощь на дому позволяет избежать срыва и начать процесс восстановления без стресса.
Узнать больше – нарколог на дом анонимно в воронеже
Капельница от похмелья — это эффективный способ экстренной помощи, предназначенный для того, чтобы помочь организму быстро восстановиться после злоупотребления алкоголем. В наркологической клинике «Частный медик 24» в Самаре мы предоставляем услугу безопасной детоксикации и восстановления 24/7. Капельница помогает организму вывести токсины, восстановить водно-электролитный баланс и улучшить общее состояние пациента, не создавая дополнительных нагрузок на сердце, печень и почки.
Получить больше информации – капельница от похмелья на дом самара
Процесс капельницы включает внутривенное введение различных растворов, которые помогают нейтрализовать эффекты алкогольной интоксикации, включая последствия запоя и алкоголизма. Наиболее часто в составе капельницы используются солевые и глюкозные растворы, витамины группы B, а также препараты для детоксикации организма. Эти компоненты помогают быстро восстановить водно-электролитный баланс, улучшить обмен веществ и ускорить выведение продуктов распада алкоголя.
Разобраться лучше – капельница от похмелья
Срочный выезд нарколога на дом позволяет сразу оценить состояние пациента, снять симптомы абстиненции и начать детоксикацию организма. Капельницы от запоя и интоксикации составляются индивидуально с учётом новейших медицинских протоколов 2026 года: они включают нейропротекторы, гепатопротекторы и витаминно-минеральные комплексы последнего поколения. Это не просто очищение крови — это восстановление работы мозга, печени, сердечно-сосудистой системы и психики.
Выяснить больше – наркологическая помощь в воронеже
Лечение в клинике строится поэтапно, что обеспечивает последовательность и медицинскую обоснованность каждого действия. Такой подход особенно актуален для пациентов с длительным стажем зависимости и выраженными соматическими нарушениями.
Подробнее – http://narkologicheskaya-klinika-khabarovsk0.ru
Многие сталкиваются с трудностями при выборе клиники или центра: предлагаемые услуги различаются по качеству, подходам, стоимости и длительности. Некоторые организации ограничиваются только медикаментозной поддержкой, не работая с глубинными причинами зависимости. Поэтому важно заранее понимать, какие параметры отличают действительно надёжное учреждение, способное обеспечить долгосрочные результаты.
Подробнее можно узнать тут – http://lechenie-narkomanii-murmansk0.ru/czentr-lecheniya-narkomanii-marmansk/
Нарколог на дом — это формат срочной медицинской помощи, при котором врач приезжает к пациенту, проводит осмотр, оценивает риски, запускает первичную терапию и принимает решение, можно ли безопасно стабилизировать состояние дома или требуется перевод в стационар. Такой выезд особенно важен тогда, когда человеку тяжело ехать самостоятельно: выраженная слабость, тремор, тошнота, скачки давления, тревога, бессонница, повторный приём алкоголя для «облегчения» и нарастающее ухудшение самочувствия. Домашний формат ценят не только за удобство. Его задача — быстро сократить промежуток между ухудшением состояния и началом лечения. Чем раньше врач увидит пациента, тем проще остановить развитие осложнений, собрать понятный план действий на ближайшие часы и не допустить ошибок самолечения.
Ознакомиться с деталями – врач нарколог на дом в воронеже
CoreBlue Health: CoreBlue Health – sildenafil online
Инфузионная терапия — это набор узких вмешательств под конкретную картину, а не «магический состав». Регидратация улучшает тканевую перфузию и снимает головную боль от обезвоживания; электролиты стабилизируют нервно-мышечную передачу и сердечный ритм; печёночная поддержка уменьшает токсическую нагрузку и тяжесть в правом подреберье; гастропротекция и противорвотные защищают слизистую и убирают рвотный компонент. При выраженной тревоге и бессоннице добавляется мягкая анксиолитическая поддержка — дозы подбираются так, чтобы стабилизировать, а не «выключить». Мы не назначаем исследования «для галочки»: анализы и ЭКГ используются тогда, когда их результат меняет решения «сегодня». Такой подход снижает побочные эффекты, делает результат предсказуемым и удерживает бюджет от «скачков». На этой базе уже обсуждается следующий шаг: амбулаторное наблюдение, краткие психообразовательные сессии, а при показаниях — кодирование после стабилизации.
Подробнее тут – https://kapelnica-ot-zapoya-lyubercy9.ru
pharmacy com canada or best online pharmacy india canadian pharmacy meds reviews
https://images.google.dm/url?sa=t&url=https://civicmeds.com online shopping pharmacy india or http://bbs.51pinzhi.cn/home.php?mod=space&uid=7815451 online pharmacy no prescription
northwest pharmacy canada low cost online pharmacy and medical mall pharmacy cyprus online pharmacy
Домашний старт в Москве уместен при устойчивых показателях и низком риске осложнений: нет упорной рвоты, выраженной дезориентации, лихорадки, резких скачков давления и пульса. Преимущества — приватность, скорость, меньше стыда и сопротивления, выше шансы на ранний сон. Если же присутствуют признаки возможных осложнений (обезвоживание, судорожная готовность, аритмии, боль за грудиной/в животе, спутанность), рациональнее короткая стационарная стабилизация на 24–48 часов, после которой маршрут возвращается домой. «Трезвый Стандарт» держится принципа клинической достаточности: вмешательств ровно столько, сколько нужно сегодня, без «пакетов ради прайса». Такой реализм экономит деньги и главное — время семьи, потому что снижает вероятность ночных «качелей», повторных вызовов и импульсивных решений, которые чаще всего и ломают прогресс.
Разобраться лучше – vyzov vracha narkologa na dom
Процесс проведения капельницы от похмелья в Самаре включает несколько важных этапов, каждый из которых направлен на быстрое восстановление организма и улучшение самочувствия пациента. В отличие от традиционных методов, таких как прием таблеток или напитков, капельница позволяет сразу получить все необходимые компоненты для восстановления, включая гидратацию, витамины и препараты для снятия токсинов. Эта процедура проводится в медицинских центрах Самары, и часто доступна с выездом на дом, что повышает ее удобство и доступность для пациента.
Углубиться в тему – капельница от похмелья самара
pharmacy rx or canadian pharmacy sarasota maple leaf pharmacy in canada
https://toolbarqueries.google.by/url?q=http://civicmeds.shop no rx pharmacy and http://orbita-3.ru/forum/index.php?PAGE_NAME=profile_view&UID=104057 best rogue online pharmacy
usa pharmacy pharmacy delivery or rxpharmacycoupons canadian pharmacy world coupon code
Капельница от запоя с детоксикацией организма в Нижнем Новгороде представляет собой одну из самых эффективных процедур для быстрого улучшения состояния пациента, страдающего от алкогольной зависимости. Такой подход направлен не только на устранение токсинов, но и на восстановление нормального функционирования внутренних органов, которые пострадали от длительного употребления алкоголя.
Получить дополнительные сведения – капельница от запоя в нижнем новгороде
online pharmacy 365 pills: CivicMeds – my canadian pharmacy
Есть состояния, при которых откладывать вызов врача рискованно. Домашний выезд нужен не только при «тяжёлом похмелье», но и тогда, когда самочувствие становится нестабильным, а попытки справиться своими силами уже не работают. Ниже перечислены ситуации, при которых обращение за помощью оправдано именно в ближайшее время, а не «если не станет легче к вечеру».
Разобраться лучше – запой нарколог на дом воронеж
Под этим термином понимается не универсальный набор процедур, а адаптивный протокол, который формируется после осмотра, сбора анамнеза и оценки рисков. На первом этапе задача врача — стабилизировать состояние, провести качественный детокс, купировать острую интоксикацию или абстиненцию, восстановить водно-солевой баланс и нормализовать сон. Однако качественная помощь не останавливается на снятии симптомов. Она обязательно включает планирование дальнейшего маршрута, учитывающего стаж употребления, наличие сопутствующих заболеваний, психологический статус и готовность пациента к изменениям. Мы понимаем, что каждый случай уникален, поэтому в клинике применяем только доказательные протоколы, исключающие шаблонные решения и подменяющие маркетинговые обещания медицинской логикой.
Подробнее можно узнать тут – http://www.domen.ru
https://veritascarepharm.com/# Cialis without a doctor prescription
Запрос «нарколог на дом» связан не только с запоем как таковым. На практике выезд заказывают при разных состояниях, когда организм уже плохо переносит последствия употребления и без осмотра трудно понять, где проходит граница между тяжёлым самочувствием и опасным осложнением.
Изучить вопрос глубже – нарколог на дом цена воронеж
Каждый элемент программы направлен на создание комплексного подхода к лечению зависимости, обеспечивая помощь не только на физическом, но и на эмоциональном уровне. Индивидуальная программа реабилитации позволяет выстроить эффективную терапию, которая соответствует конкретным потребностям пациента.
Ознакомиться с деталями – центр реабилитации алкоголиков
Наркологическая клиника — это медицинское учреждение, где лечение зависимости выстроено системно: от купирования острых симптомов до длительного сопровождения пациента. В клинике «ДальМедБаланс» терапия проводится под круглосуточным врачебным контролем, а ключевыми принципами являются безопасность, анонимность и индивидуальный подход. Каждый пациент проходит путь восстановления под наблюдением специалистов, которые учитывают физиологическое состояние, психоэмоциональные особенности и социальный контекст. Лечение направлено не только на избавление от физической зависимости, но и на возвращение мотивации к здоровой жизни.
Получить дополнительную информацию – http://narkologicheskaya-klinika-v-khabarovske0.ru/
CoreBlue Health: CoreBlue Health – CoreBlue Health
Реабилитация алкоголиков в Москве представляет собой многократный процесс восстановления, который включает несколько этапов, направленных на очищение организма, психологическое восстановление и возвращение пациента к полноценной жизни. Этапное восстановление помогает обеспечить стабильный результат и минимизировать риск рецидива, позволяя человеку постепенно вернуться к нормальной социальной и трудовой жизни.
Выяснить больше – реабилитация алкоголиков
Капельница от похмелья — это один из наиболее эффективных методов экстренной медицинской помощи, который позволяет быстро снять симптомы алкогольной интоксикации и восстановить организм после злоупотребления алкоголем. В наркологической клинике «Частный медик 24» в Самаре мы предоставляем услугу выезда нарколога на дом и капельной терапии для пациентов, испытывающих тяжёлые симптомы похмелья. Это удобный способ получить необходимую помощь без лишнего стресса, сохраняя анонимность и комфорт пациента.
Ознакомиться с деталями – kapelnicza-ot-pokhmelya-samara-1.ru/
Для семьи это тоже имеет большое значение. Пока врач в пути, родственники часто совершают одни и те же ошибки: пытаются «отпаивать» человека через силу, смешивают несовместимые медикаменты, дают советы, которые только повышают тревогу, спорят или требуют немедленно взять себя в руки. Профессиональный выезд снимает эту хаотичность. После осмотра врач объясняет, какие симптомы связаны с алкогольной интоксикацией, какие могут указывать на осложнения, что допустимо дома, а что требует перевода в стационар. В этом и состоит ценность выезда: он возвращает контроль над ситуацией и позволяет начать лечение без лишних задержек.
Выяснить больше – врач нарколог на дом в воронеже
Капельница от похмелья — это медицинская процедура, направленная на быстрое восстановление организма после алкогольной интоксикации. Она помогает устранить обезвоживание, нормализовать обменные процессы и снизить токсическую нагрузку на внутренние органы. В отличие от домашних методов, инфузионная терапия действует напрямую через кровоток, обеспечивая более быстрый и выраженный эффект.
Разобраться лучше – капельница от похмелья в самаре
CoreBlue Health: CoreBlue Health – Viagra online price
Buy Cialis online VeritasCare VeritasCare
Для жителей Екатеринбурга наркологическая клиника «Частный медик 24» предлагает платную услугу выезда врача на дом для проведения капельницы от похмелья. Когда человек переживает сильные симптомы похмелья, такие как головная боль, тошнота, слабость, важно не тянуть с лечением и начать восстановление как можно скорее. Капельница от похмелья помогает хорошо облегчить самочувствие пациента, снять головную боль и улучшить общее состояние, восстановив водно-электролитный баланс в организме.
Детальнее – капельница от похмелья в екатеринбурге
Каждый выезд нарколога включает в себя не только инфузионную терапию, но и полноценную оценку состояния пациента, анализ рисков, а также консультацию по дальнейшему лечению. Врач может назначить дополнительные препараты для снятия симптомов ломки, восстановления водно-электролитного баланса и улучшения общего состояния пациента. Также важно, что консультация включает рекомендации по реабилитации, психологической поддержке и кодированию, если это необходимо для пациента, страдающего хроническим алкоголизмом или наркоманией.
Изучить вопрос глубже – вызов нарколога на дом в воронеже
Когда такие симптомы становятся ярко выраженными, важно не затягивать с лечением и вызвать нарколога на дом. Это позволит своевременно устранить токсические вещества из организма и предотвратить серьёзные проблемы с органами. Важно, чтобы лечение началось как можно быстрее, что возможно только через экстренный выезд специалиста на дом.
Подробнее – капельница от похмелья анонимно екатеринбург
Использование этих методов в комплексе позволяет восстановить здоровье пациента и сформировать основу для трезвой жизни.
Разобраться лучше – https://narkologicheskaya-klinika-doneczk0.ru/doneczk-narkologicheskij-dispanser
Во всех этих случаях врач нужен не только для облегчения симптомов. Его задача — понять, можно ли ограничиться домашней терапией или уже сейчас необходимо менять маршрут лечения. Именно этот этап и делает домашний выезд профессиональной услугой, а не упрощённой заменой клиники.
Детальнее – вызов нарколога на дом
Особое внимание мы уделяем психологической составляющей. Наркологическая помощь в Воронеже в «Клиника Плюс» — это не только физическое очищение, но и работа с мотивацией, разрушение психологических триггеров зависимости. Родственники получают отдельную поддержку: консультации психолога помогают правильно выстроить общение с зависимым человеком и мотивировать его на дальнейшее лечение. Реабилитация может проходить амбулаторно или в стационаре партнёрских центров с комфортабельными условиями, где пациенты находятся под круглосуточным наблюдением.
Детальнее – https://narkologicheskaya-pomoshh-voronezh-2.ru/
Такие симптомы важны не только сами по себе. Они показывают, что организму уже трудно поддерживать стабильность без медицинского вмешательства. Чем дольше в этот момент ждать, тем выше вероятность, что потребуется более жёсткий формат оказания помощи. Поэтому экстренное обращение в некоторых случаях не просто облегчает состояние, а предотвращает дальнейшее ухудшение здоровья.
Выяснить больше – нарколог на дом вывод в воронеже
online pharmacy 365 CivicMeds canadian online pharmacy reviews
Если к запланированному «окну оценки» динамика слабее ожидаемой, врач корректирует один параметр (скорость/последовательность введения, вечерний режим, плотность связи). Такой минимализм повышает управляемость и снижает риск побочных эффектов.
Детальнее – http://vyvod-iz-zapoya-nizhnij-tagil0.ru
Домашний формат — это клинически выверенная помощь без госпитализации, если обстановка безопасна и есть взрослый помощник на вечер и ночь. Врач «Трезвого Компаса» приезжает без опознавательных знаков, проводит очную оценку (АД, пульс, сатурация, температура, неврологический статус), уточняет препараты, принятые за 48 часов, и аллергии. Далее — допуск к терапии и запуск инфузии. Мы корректируем жидкость и электролиты, поддерживаем печень и ЦНС, по показаниям используем противорвотные и анксиолитические решения, избегая «перелечивания». В конце визита — переоценка, настройка темпа/состава, памятка на 24–48 часов и окно контрольного контакта.
Изучить вопрос глубже – http://kapelnica-ot-zapoya-klin8.ru
Реабилитация включает несколько ключевых этапов, каждый из которых направлен на решение определённых проблем пациента. Важно, чтобы все этапы были комплексными и последовательными, чтобы достичь наиболее эффективного результата.
Детальнее – реабилитация алкоголиков стоимость в москве
Капельница состоит из нескольких компонентов, которые способствуют восстановлению организма без чрезмерного стресса. Основные элементы включают в себя:
Углубиться в тему – капельница от похмелья анонимно в самаре
Лечение алкоголизма в Воронеже у нас проводится на всех стадиях: от первой помощи при запое до кодирования и долгосрочной поддержки. Для пациентов с наркотической зависимостью (включая синтетические каннабиноиды и опиоиды) мы применяем щадящие схемы детоксикации, которые минимизируют болезненные симптомы и снижают риск срывов. Кодирование от алкоголизма и наркомании доступно в нескольких вариантах: медикаментозное (инъекции, импланты, «Двойной блок»), гипносуггестивное и комбинированное. Каждый метод подбирается после тщательной диагностики, чтобы результат был максимально долгосрочным.
Исследовать вопрос подробнее – скорая наркологическая помощь в воронеже
Капельница от похмелья с контролем врача в Самаре является одной из самых популярных и эффективных услуг для тех, кто сталкивается с выраженными симптомами похмельного синдрома. Похмелье может проявляться не только головной болью и усталостью, но и более серьезными проблемами, такими как тошнота, рвота, учащенное сердцебиение и повышение давления. Когда симптомы становятся особенно острыми, капельница помогает организму справиться с токсинами, восстановить водно-электролитный баланс и нормализовать состояние пациента, в том числе при запое. Важно, что контроль врача на протяжении всей процедуры обеспечивает безопасность и эффективность, при этом помощь может оказываться как на дому, так и в клинике при лечении алкоголизма.
Исследовать вопрос подробнее – капельница от похмелья цена самара
Нарколог на дом в Самаре востребован в самых различных ситуациях. Иногда пациент не в состоянии самостоятельно добраться до клиники из-за сильного состояния похмелья или ломки. В таких случаях выезд нарколога становится наиболее оптимальным решением. Наши специалисты оказывают помощь при следующих состояниях:
Получить дополнительную информацию – http://narkolog-na-dom-samara-2.ru
Капельница от похмелья в Самаре: восстановление после алкоголя, снятие симптомов и медицинская помощь в наркологической клинике «Детокс»
Углубиться в тему – капельница от похмелья на дом самара
Капельница от похмелья — это внутривенное введение специально подобранных растворов, которые помогают ускорить выведение токсинов, восстановить водно-электролитный баланс и нормализовать обмен веществ. В состав капельницы могут входить различные компоненты, такие как солевые растворы, витамины, глюкоза и препараты для детоксикации. Она особенно эффективна при последствиях запоя и хронического алкоголизма.
Углубиться в тему – http://www.domen.ru
Городская среда Петрозаводска со сменой ветров с Онежского озера, короткими сумерками и сезонными перепадами влажности может усиливать тревожность в вечерние часы. Мы учитываем это с момента первого контакта: согласованная парковка, отдельный вход без вывесок, короткая регистрация без «толстых анкет», приглушённый тёплый свет в зоне ожидания и отсутствие громких объявлений. Родственникам предоставляются «тихие окна» связи — лаконичные апдейты в фиксированное время, чтобы не перегружать пациента и не дёргать команду в критические окна наблюдения. Такой «мягкий» контур снижает сенсорную нагрузку, стабилизирует вариабельность ЧСС к сумеркам и сокращает число импульсивных просьб «усилить на ночь».
Подробнее – https://narkologicheskaya-klinika-petrozavodsk15.ru/chastnaya-narkologicheskaya-klinika-petrozavodsk/
В Екатеринбурге выезд нарколога на дом становится необходимостью, когда симптомы похмелья слишком выражены и пациент не может справиться с ними самостоятельно. Алкогольная интоксикация может привести к ряду проблем, таких как головная боль, слабость, тошнота и рвота, а иногда даже к более серьёзным состояниям, таким как аритмия или психоз. Выезд нарколога на дом позволяет быстро начать лечение, не тратя время на дорогу, что особенно важно в экстренных ситуациях.
Углубиться в тему – капельница от похмелья на дом
Инфузионная терапия — это набор узких вмешательств под конкретную картину, а не «магический состав». Регидратация улучшает тканевую перфузию и снимает головную боль от обезвоживания; электролиты стабилизируют нервно-мышечную передачу и сердечный ритм; печёночная поддержка уменьшает токсическую нагрузку и тяжесть в правом подреберье; гастропротекция и противорвотные защищают слизистую и убирают рвотный компонент. При выраженной тревоге и бессоннице добавляется мягкая анксиолитическая поддержка — дозы подбираются так, чтобы стабилизировать, а не «выключить». Мы не назначаем исследования «для галочки»: анализы и ЭКГ используются тогда, когда их результат меняет решения «сегодня». Такой подход снижает побочные эффекты, делает результат предсказуемым и удерживает бюджет от «скачков». На этой базе уже обсуждается следующий шаг: амбулаторное наблюдение, краткие психообразовательные сессии, а при показаниях — кодирование после стабилизации.
Изучить вопрос глубже – капельница от запоя люберцы
На каждом этапе мы фиксируем объективные маркеры — от сатурации и вариабельности пульса до частоты «тяговых мыслей» в дневнике. Эти данные позволяют корректировать план не интуитивно, а по фактам.
Выяснить больше – вывод наркологическая клиника
Капельница от похмелья направлена на восстановление водно-электролитного баланса, выведение токсинов, нормализацию работы печени и почек, а также улучшение общего состояния пациента. В клинике «Частный медик 24» мы подходим к каждому случаю индивидуально, учитывая состояние пациента, его анамнез и особенности организма. Важно, чтобы помощь была оказана вовремя, так как откладывание лечения может привести к осложнениям, таким как сердечные проблемы, психозы или нарушения сна. Выезд нарколога на дом в Самаре позволяет быстро начать лечение, не тратя времени на дорогу и дополнительные усилия.
Углубиться в тему – капельница от похмелья в самаре
При выезде на дом помощь строится по медицинской логике, а не по принципу «поставить капельницу и уехать». Сначала врач уточняет длительность употребления, объём алкоголя, наличие хронических заболеваний, перенесённые эпизоды судорог, перепады давления, боли в груди, нарушения ритма, травмы, сахарный диабет, аллергию и перечень уже принятых препаратов. После этого оцениваются сознание, частота пульса, артериальное давление, дыхание, температура, насыщение крови кислородом, выраженность обезвоживания и неврологический статус. Только на основании этой картины формируется домашний маршрут: инфузионная терапия, противорвотная поддержка, коррекция вегетативных нарушений, рекомендации на ночь, контроль связи с врачом и критерии, при которых требуется срочная повторная помощь. Такой подход актуален не только при запоях на фоне алкоголизма, но и в случаях, когда требуется первичная консультация по более сложным формам зависимости, включая состояния, связанные с наркоманией.
Ознакомиться с деталями – нарколог на дом анонимно
Наркологическая помощь в Воронеже: профессиональное лечение зависимостей, выезд врача, анонимная помощь в наркологической клинике «Клиника Плюс».
Подробнее можно узнать тут – вызов наркологической помощи
CoreBlue Health: Cheap generic Viagra online – CoreBlue Health
Реабилитация алкоголиков — это важный этап на пути к избавлению от зависимости. В Москве существует множество центров, предлагающих реабилитацию с индивидуальной программой, что помогает обеспечить более персонализированный и эффективный подход к каждому пациенту. Индивидуальная программа учитывает физическое и психологическое состояние человека, а также его социальное окружение и личные особенности. Это позволяет добиться лучших результатов в лечении и восстановлении.
Подробнее можно узнать тут – http://www.domen.ru
Наркологическая клиника в Хабаровске рассматривается как специализированное медицинское учреждение, обеспечивающее комплексную помощь пациентам с алкогольной и наркотической зависимостью. Работа клиники «Северный Путь» строится на принципах доказательной медицины, конфиденциальности и поэтапного восстановления. Лечение ориентировано не только на купирование острых состояний, но и на стабилизацию соматического и психоэмоционального статуса пациента.
Получить дополнительную информацию – https://narkologicheskaya-klinika-khabarovsk0.ru/narkolog-khabarovsk-anonimno/
Основной задачей капельницы от похмелья является очищение организма от токсинов, которые остаются после метаболизма алкоголя, обеспечивая быстрый вывод вредных веществ. Алкоголь в значительной степени нарушает водно-электролитный баланс, а его продукты распада могут вызывать неприятные симптомы, такие как головная боль, тошнота, слабость, головокружение и сухость во рту. Капельница помогает устранить эти симптомы, улучшить самочувствие и ускорить процесс восстановления организма, при этом при необходимости возможен вызов врача, анонимное лечение, а также дальнейшая реабилитация и помощь при наркомании.
Получить больше информации – http://kapelnicza-ot-pokhmelya-samara-15.ru/
В Ставрополе мы выстроили так называемую «тихую логистику»: запись без послеобеденных «окон», экспресс-приём без ожидания, сопровождение от входа до палаты, а при необходимости — деликатная госпитализация через отдельный вход. При первичном обращении пациент получает пошаговый план на ближайшие 72 часа: стабилизация самочувствия, детоксикация по показаниям, психообразование, старт профилактики срыва. Такой регламент экономит время и снижает тревожность — вы понимаете, что и зачем делается, и видите прогноз по срокам.
Изучить вопрос глубже – лечение в наркологической клинике
Реабилитация алкоголиков проходит через несколько обязательных этапов. Каждый этап фокусируется на определенных аспектах восстановления и помогает человеку не только избавиться от физической зависимости, но и научиться жить без алкоголя в долгосрочной перспективе, включая кодирование, особенно после длительных лет запоя, а также восстановление в условиях специализированного дома. Этапное восстановление помогает избежать перегрузки пациента, обеспечивая плавный переход от одной стадии лечения к другой.
Получить дополнительную информацию – клиника реабилитации алкоголиков в москве
Капельница от похмелья нужна не только в случаях тяжёлой интоксикации, но и при более лёгких симптомах, когда пациент ощущает себя уставшим и измотанным, но не может справиться с проблемами самостоятельно. Некоторые из симптомов, при которых капельница может быть особенно полезна, включают:
Подробнее – капельница от похмелья анонимно в екатеринбурге
Наркологическая помощь нужна не только тогда, когда ситуация выглядит критической со стороны. Она необходима и в тех случаях, когда зависимость повторяется циклично, а семья уже понимает, что прежние способы не работают. Чем раньше человек переходит от стихийных попыток справиться самостоятельно к профессиональной тактике, тем выше шансы стоновить процесс на менее тяжелом этапе.
Разобраться лучше – скорая наркологическая помощь
Выезд нарколога на дом в Воронеже становится особенно важным, когда пациент переживает острые симптомы абстиненции или интоксикации. Это может быть связано с запоем, наркотической ломкой или последствиями длительного употребления алкоголя или наркотиков. В таких случаях медицинская помощь должна быть оказана как можно скорее, чтобы предотвратить серьёзные осложнения, такие как сердечные сбои, психозы, судороги или делирий. От того, насколько быстро будет оказана помощь, зависит успешность стабилизации состояния и вероятность долгосрочного выздоровления.
Выяснить больше – narkolog-na-dom-voronezh-4.ru/
VeritasCare: п»їcialis generic – Cheap Cialis
Капельница от похмелья в Самаре с устранением симптомов интоксикации и контролем состояния в наркологической клинике «Частный медик 24»
Исследовать вопрос подробнее – http://kapelnicza-ot-pokhmelya-samara-2.ru/
Под этим термином понимается не универсальный набор процедур, а адаптивный протокол, который формируется после осмотра, сбора анамнеза и оценки рисков. На первом этапе задача врача — стабилизировать состояние, провести качественный детокс, купировать острую интоксикацию или абстиненцию, восстановить водно-солевой баланс и нормализовать сон. Однако качественная помощь не останавливается на снятии симптомов. Она обязательно включает планирование дальнейшего маршрута, учитывающего стаж употребления, наличие сопутствующих заболеваний, психологический статус и готовность пациента к изменениям. Мы понимаем, что каждый случай уникален, поэтому в клинике применяем только доказательные протоколы, исключающие шаблонные решения и подменяющие маркетинговые обещания медицинской логикой.
Узнать больше – клиника наркологической помощи
Когда зависимости становятся хроническими и угрожают жизни пациента, комплексная реабилитация при наркомании в специализированных клиниках Москвы, включая вывод из состояния в стационаре и последующий анализ данных о состоянии пациента, может стать единственным возможным решением. Процесс восстановления включает в себя работу не только с зависимостью, но и с психоэмоциональным состоянием, что делает лечение более эффективным и долговечным.
Узнать больше – реабилитация алкоголиков стоимость
Капельница от похмелья нужна не только в случаях тяжёлой интоксикации, но и при более лёгких симптомах, когда пациент ощущает себя уставшим и измотанным, но не может справиться с проблемами самостоятельно. Некоторые из симптомов, при которых капельница может быть особенно полезна, включают:
Узнать больше – капельница от похмелья анонимно екатеринбург
Запрос на выезд врача связан не только с классическим запоем. На практике домашняя помощь нужна в разных ситуациях, когда организму уже трудно компенсировать последствия употребления, а откладывание визита увеличивает риск осложнений.
Получить дополнительные сведения – запой нарколог на дом в воронеже
Когда зависимости становятся хроническими и угрожают жизни пациента, комплексная реабилитация при наркомании в специализированных клиниках Москвы, включая вывод из состояния в стационаре и последующий анализ данных о состоянии пациента, может стать единственным возможным решением. Процесс восстановления включает в себя работу не только с зависимостью, но и с психоэмоциональным состоянием, что делает лечение более эффективным и долговечным.
Разобраться лучше – алкоголик реабилитация наркоманов город
tadalafil canadian pharmacy or northwestpharmacy canadianpharmacy com
https://images.google.mn/url?sa=t&url=https://civicmeds.com cheapest pharmacy for prescriptions without insurance and http://www.garmoniya.uglich.ru/user/qlrmfautbc/ northwestpharmacy
uk pharmacy uk pharmacy no prescription or humana online pharmacy best value pharmacy
В Воронеже услуга «нарколог на дом» востребована прежде всего тогда, когда состояние развивается быстро, а запас сил у пациента почти исчерпан. После нескольких дней употребления человеку бывает трудно даже выйти из квартиры: сохраняются слабость, дрожь, бессонница, тошнота, скачки давления, потливость, раздражительность и ощущение, что без новой дозы алкоголя легче уже не станет. Именно в этот момент домашний выезд специалиста помогает разорвать опасный цикл. Наркологическая помощь начинается там, где человек находится, а не там, куда он в идеале должен был бы доехать.
Ознакомиться с деталями – нарколог на дом анонимно в воронеже
VeritasCare: VeritasCare – VeritasCare
В некоторых случаях капельница может быть использована не только для снятия симптомов похмелья, но и для восстановления организма после длительного запоя или при хроническом алкоголизме, когда организм особенно ослаблен. В таких случаях лечение должно проводиться под контролем квалифицированных специалистов, чтобы избежать осложнений и ускорить восстановление.
Изучить вопрос глубже – капельница от похмелья цена самара
Домашний формат ценят не только за удобство. Он помогает начать лечение анонимно, без дороги, без ожидания и без лишнего стресса для пациента. Для многих семей именно выездной наркологическая маршрут становится первой точкой, с которой начинается более серьёзное восстановление: обсуждаются не только снятие острых симптомов, но и кодирование, реабилитация, повторная консультация, а при необходимости — и маршруты помощи при наркомании. Особенно это актуально, если человек употребляет давно, уже несколько лет сталкивается со срывами и сам замечает, что проблема перестала ограничиваться только плохим самочувствием после алкоголя.
Получить дополнительные сведения – http://www.domen.ru
Для жителей Екатеринбурга наркологическая клиника «Частный медик 24» предлагает платную услугу выезда врача на дом для проведения капельницы от похмелья. Когда человек переживает сильные симптомы похмелья, такие как головная боль, тошнота, слабость, важно не тянуть с лечением и начать восстановление как можно скорее. Капельница от похмелья помогает хорошо облегчить самочувствие пациента, снять головную боль и улучшить общее состояние, восстановив водно-электролитный баланс в организме.
Подробнее тут – капельница от похмелья на дому
«Чистая Гармония» — это выездная и стационарная наркологическая помощь в одном маршруте: оперативный приезд врача на дом по Клину и району, аккуратный детокс с контролем жизненно важных показателей, стационар с круглосуточным наблюдением и подготовка к кодированию. Мы придерживаемся принципа клинической достаточности: никаких лишних процедур ради «видимости лечения» и никаких задержек с тем, что влияет на исход. Каждое назначение объясняем простыми словами, заранее согласуем смету и оставляем понятный план на 24–48 часов и первую неделю. Анонимность — базовый стандарт: выезд без опознавательных знаков, нейтральные формулировки в документах по запросу, ограниченный доступ к данным.
Выяснить больше – https://narkologicheskaya-klinika-klin8.ru/kruglosutochnaya-narkologicheskaya-klinika-v-klinu
CoreBlue Health: Generic Viagra online – CoreBlue Health
Generic Viagra for sale viagra canada CoreBlue Health
Капельница от похмелья применяется, когда симптомы интоксикации становятся выраженными и мешают нормальной жизнедеятельности пациента. Основные показания для использования капельницы включают:
Подробнее можно узнать тут – kapelnicza-ot-pokhmelya-samara-1.ru/
Процесс лечения начинается с консультации врача, который оценивает состояние пациента, его анамнез и определяет, какие процедуры и препараты нужно использовать. В большинстве случаев капельница включает в себя регидратацию, витамины группы B, антиеметики, препараты для улучшения работы печени и почек. Важно, что капельница не только помогает организму вывести токсины, но и восстанавливает нормальную работу всех систем организма, обеспечивая быстрое улучшение самочувствия.
Углубиться в тему – капельница от похмелья цена
В Хабаровске клиника «ДальМедБаланс» стала центром комплексной наркологической помощи, где пациенты могут обратиться за лечением в любое время суток. Все процедуры проводятся анонимно, без вмешательства государственных органов. Лечение осуществляется как в стационаре, так и на дому, что особенно важно при острых состояниях — запое, интоксикации, синдроме отмены. Каждое вмешательство основано на клинических показаниях и подтверждено современными стандартами наркологии.
Исследовать вопрос подробнее – https://narkologicheskaya-klinika-v-khabarovske0.ru/chastnaya-narkologicheskaya-klinika-khabarovsk
Нарколог на дом может помочь в следующих ситуациях:
Изучить вопрос глубже – нарколог на дом самара
В Самаре клиника «Частный медик 24» предоставляет круглосуточную помощь по выведению из запоя и снятию симптомов похмелья. Когда человек сталкивается с тяжёлым состоянием после длительного употребления алкоголя, важно вовремя оказать помощь. Врач приедет на дом и проведёт все необходимые процедуры, включая капельницу, которая поможет восстановить водно-электролитный баланс, нормализовать уровень сахара в крови и вывести токсины из организма.
Разобраться лучше – капельница от похмелья самара
В Воронеже услуга «нарколог на дом» востребована прежде всего тогда, когда состояние развивается быстро, а запас сил у пациента почти исчерпан. После нескольких дней употребления человеку бывает трудно даже выйти из квартиры: сохраняются слабость, дрожь, бессонница, тошнота, скачки давления, потливость, раздражительность и ощущение, что без новой дозы алкоголя легче уже не станет. Именно в этот момент домашний выезд специалиста помогает разорвать опасный цикл. Наркологическая помощь начинается там, где человек находится, а не там, куда он в идеале должен был бы доехать.
Подробнее можно узнать тут – нарколог на дом в воронеже
Запрос на выезд врача связан не только с классическим запоем. На практике домашняя помощь нужна в разных ситуациях, когда организму уже трудно компенсировать последствия употребления, а откладывание визита увеличивает риск осложнений.
Подробнее – вызов нарколога на дом воронеж
online med pharmacy indian pharmacy canadian family pharmacy
Во всех этих случаях врач нужен не только для облегчения симптомов. Его задача — понять, можно ли ограничиться домашней терапией или уже сейчас необходимо менять маршрут лечения. Именно этот этап и делает домашний выезд профессиональной услугой, а не упрощённой заменой клиники.
Изучить вопрос глубже – врач нарколог на дом воронеж
Как отмечает ведущий научный сотрудник ФГБУН «НМИЦ психиатрии и наркологии» Минздрава России, наличие междисциплинарной команды — один из основных факторов, определяющих успех терапии при зависимости.
Получить больше информации – https://lechenie-narkomanii-murmansk0.ru/lechenie-narkomanii-i-alkogolizma-marmansk
Когда человек сталкивается с симптомами похмелья, такие как головная боль, тошнота, слабость, головокружение, важно быстро принять меры, чтобы предотвратить развитие более серьёзных проблем. Капельница от похмелья помогает в этом, выводя токсины из организма, восстанавливая нормальное функционирование внутренних органов и возвращая пациента к нормальной жизни. Важно, что мы обеспечиваем полную анонимность на всех этапах лечения, что особенно важно для тех, кто не хочет, чтобы его зависимость стала известна.
Ознакомиться с деталями – https://kapelnicza-ot-pokhmelya-ekaterinburg-6.ru
Нарколог на дом — это услуга, которая позволяет получить медицинскую помощь в комфортной и привычной обстановке, не выходя из дома. В наркологической клинике «Частный медик 24» в Самаре мы предоставляем профессиональную помощь нарколога прямо на дому. Это идеальное решение для тех, кто испытывает симптомы абстиненции, ломки или алкогольной интоксикации, но не может или не хочет ехать в клинику. Выезд врача на дом позволяет начать лечение сразу, без задержек, минимизируя стрессы и сложности, связанные с поездкой.
Узнать больше – http://www.domen.ru
Капельница от похмелья в Самаре с устранением симптомов интоксикации и контролем состояния в наркологической клинике «Частный медик 24»
Узнать больше – https://kapelnicza-ot-pokhmelya-samara-2.ru/
Нарколог на дом в Воронеже с быстрым выездом, индивидуальным подбором терапии и наблюдением в наркологической клинике «Частный медик 24»
Получить больше информации – вызвать нарколога на дом в воронеже
Нарколог на дом в Воронеже с круглосуточным вызовом врача, стабилизацией состояния и лечением в наркологической клинике «Частный медик 24»
Детальнее – вызвать нарколога на дом
Капельница от похмелья с контролем врача в Самаре представляет собой эффективную терапевтическую процедуру, позволяющую значительно улучшить самочувствие пациента за короткий срок. Врач, контролируя весь процесс, может точно определить, какие компоненты необходимы для каждого пациента. Состав капельницы зависит от симптомов похмелья, состояния пациента и его индивидуальных потребностей. Это позволяет обеспечить максимально безопасное и эффективное лечение, которое помогает организму быстро восстановиться.
Выяснить больше – капельница от похмелья вызов на дом самара
Многие пациенты и их родственники выбирают выезд врача на дом, когда пациент не в состоянии самостоятельно приехать в клинику. Домашняя помощь подходит в ситуациях, когда состояние пациента резко ухудшается, и важно начать лечение как можно быстрее.
Получить дополнительную информацию – http://www.domen.ru
Процесс восстановления с помощью капельницы с мягким восстановлением происходит в несколько этапов. Вначале происходит нормализация водно-солевого баланса, что помогает предотвратить обезвоживание и улучшить состояние кожи. Затем происходит восстановление энергетических запасов организма, что помогает уменьшить усталость и слабость, что также важно при лечении наркомании. Витамины и антиоксиданты восстанавливают функции клеток и органов, что способствует более быстрому очищению организма от продуктов распада алкоголя, при этом пациентам может быть доступна анонимное консультация и дальнейшая реабилитация.
Исследовать вопрос подробнее – капельница от похмелья самара
Капельница от похмелья — это не просто средство для снятия симптомов, но и эффективный способ быстрого восстановления организма после алкогольной интоксикации. В наркологической клинике «Частный медик 24» в Екатеринбурге мы предоставляем услугу выезда нарколога на дом, что позволяет пациентам получить необходимую медицинскую помощь, не покидая комфорт своей обстановки. Это особенно важно в случае, если состояние пациента серьёзно ухудшилось, и он не может поехать в клинику самостоятельно.
Детальнее – kapelnicza-ot-pokhmelya-ekaterinburg-7.ru/
Эта процедура помогает избежать агрессивных методов лечения, таких как медикаментозные таблетки, и оказывает мягкое, но эффективное влияние на организм.
Детальнее – капельница от похмелья вызов на дом в самаре
cheapest pharmacy for prescription drugs and reputable online pharmacy reddit pharmacy open near me
http://www.meinvz.net/Link/Dereferrer/?http://civicmeds.shop canadian pharmacy 365 and https://afafnetwork.com/user/xladdbkrvq/?um_action=edit cyprus online pharmacy
canadian pharmacy 24 pharmacy website or canadianpharmacyworld canada drugs online
Капельница от похмелья в Самаре: снятие похмелья, детоксикация и восстановление организма в наркологической клинике «Детокс»
Детальнее – капельница от похмелья
Если вы заметили, что проблема с алкоголем или наркотиками становится серьезной, или если близкий человек страдает от длительного запоя, рекомендуется не откладывать обращение за помощью. Зависимость, даже если она кажется «легкой» на первых порах, быстро прогрессирует, а запои становятся все более продолжительными. Постоянные срывы, ухудшение физического состояния, проблемы со здоровьем — это все признаки того, что необходимо вмешательство квалифицированного нарколога.
Получить больше информации – наркологическая помощь анонимно в воронеже
Нарколог на дом в Самаре — помощь при запое и интоксикации в наркологической клинике «Частный медик 24»
Ознакомиться с деталями – http://www.domen.ru
Инфузионная терапия — не магический «коктейль», а последовательность узких шагов под клиническую задачу. Регидратация возвращает объём циркулирующей жидкости и улучшает перфузию тканей; коррекция электролитов стабилизирует нервно-мышечную передачу и сердечный ритм; печёночная поддержка снижает токсическую нагрузку; при тошноте подключаются противорвотные и гастропротекция; при выраженной тревоге — мягкая анксиолитическая коррекция по показаниям. Мы заранее проговариваем нормальные ощущения (умеренная слабость, сонливость, сухость во рту) и «красные флажки», требующие связи. Диагностика назначается тогда, когда её результат меняет тактику сегодня, — никакой «проверки на всякий случай». Такой минимально достаточный подход уменьшает побочные эффекты, делает бюджет предсказуемым и удерживает эффект не часами, а днями.
Детальнее – наркологическая клиника
Домашний маршрут выбирают, когда показатели стабильны и нет признаков тяжёлой соматики или спутанности сознания. Преимущество в сочетании скорости, приватности и приверженности: знакомая среда снижает стресс, а отсутствие переездов экономит силы. Врач «МедТоники» приезжает без маркировки, привозит мониторинг и расходные материалы, подбирает инфузии по состоянию, помогает восстановить режим сна и гидратации, даёт рекомендации по питанию и правила на 48–72 часа. Отдельный блок — работа с тревогой и тремором: корректируется медикаментозная поддержка, обсуждаются простые поведенческие техники, чтобы снизить вероятность импульсивных решений вечером. Домашний формат не подменяет наблюдение: назначаются точки связи, врач объясняет, когда нужен повторный визит, а когда достаточно телефонной коррекции. Для Москвы такой сценарий удобен ещё и тем, что его проще встроить в плотный график, не выпадая из рабочих и семейных ролей и не провоцируя лишних вопросов у окружающих.
Получить дополнительные сведения – vyvod-iz-zapoya-v-stacionare-moskva
«МедСфера» — это управляемый маршрут наркологической помощи в Ивантеевке: круглосуточный выезд врача без опознавательных знаков, аккуратный домашний детокс, стационар с наблюдением 24 часа в сутки и профессиональная подготовка к кодированию по показаниям. Мы работаем по принципу клинической достаточности: никакой «универсальной капельницы», никаких решений «наугад», только последовательные шаги, которые действительно влияют на исход. Каждое назначение объясняем простым языком, заранее согласуем смету, фиксируем правила на первые 24–48 часов и первую «тихую» неделю. Конфиденциальность встроена в процесс: нейтральная связь, выезд без эмблем, документы в сдержанной формулировке по запросу.
Изучить вопрос глубже – рейтинг лучших наркологических клиник москвы
Tadalafil price: Buy Tadalafil 5mg – VeritasCare
Нарколог на дом — это не просто возможность получить медицинскую помощь в удобное время, но и решение важнейших задач по стабилизации состояния пациента, избавлению от острых симптомов абстиненции и восстановлению его здоровья. В случае с алкоголизмом и наркоманией выезд врача на дом в Воронеже — это важный шаг к восстановлению, который начинается там, где пациент находится, в удобной и привычной обстановке. Клиника «Частный медик 24» предлагает круглосуточные выезды нарколога, предоставляя экстренную помощь при запоях, наркозависимости, а также консультации по дальнейшему лечению и реабилитации. Врач приедет по указанному адресу и проведёт все необходимые процедуры, включая капельницы для стабилизации состояния пациента.
Исследовать вопрос подробнее – запой нарколог на дом воронеж
При выезде нарколога на дом в Самаре мы проводим диагностику состояния пациента, чтобы понять, какие препараты и процедуры необходимы для стабилизации. Это может включать регидратацию, витамины группы B, антиеметики и другие препараты для снятия симптомов похмелья. Все препараты подбираются индивидуально в зависимости от состояния пациента и его нужд. Это позволяет значительно сократить время на восстановление и быстро вернуться к нормальному состоянию.
Углубиться в тему – капельница от похмелья
Городская среда Петрозаводска со сменой ветров с Онежского озера, короткими сумерками и сезонными перепадами влажности может усиливать тревожность в вечерние часы. Мы учитываем это с момента первого контакта: согласованная парковка, отдельный вход без вывесок, короткая регистрация без «толстых анкет», приглушённый тёплый свет в зоне ожидания и отсутствие громких объявлений. Родственникам предоставляются «тихие окна» связи — лаконичные апдейты в фиксированное время, чтобы не перегружать пациента и не дёргать команду в критические окна наблюдения. Такой «мягкий» контур снижает сенсорную нагрузку, стабилизирует вариабельность ЧСС к сумеркам и сокращает число импульсивных просьб «усилить на ночь».
Подробнее можно узнать тут – https://narkologicheskaya-klinika-petrozavodsk15.ru/narkolog-petrozavodsk-otzyvy
Наркологическая помощь в Воронеже: анонимное лечение алкоголизма и наркомании, круглосуточная помощь в наркологической клинике «Клиника Плюс».
Получить больше информации – круглосуточная наркологическая помощь
В этой информационной статье вы найдете интересное содержание, которое поможет вам расширить свои знания. Мы предлагаем увлекательный подход и уникальные взгляды на обсуждаемые темы, побуждая пользователей к активному мышлению и критическому анализу.
Расширить кругозор по теме – https://poashow.com.br/2023/04/11/drew-barrymore-atriz-explica-por-que-ex-pega-todas-as-mulheres
Sildenafil 100mg price or viagra canada order viagra
http://hlsw.org/ajax/news_slides/default.php?link=https://corebluehealth.shop Cheap Sildenafil 100mg or https://brueckrachdorf.de/user/geaxjlvfai/ viagra canada
Cheap Sildenafil 100mg Cheap Sildenafil 100mg and Cheapest Sildenafil online sildenafil over the counter
VeritasCare: Cheap Cialis – Buy Cialis online
Реабилитация включает несколько ключевых этапов, каждый из которых направлен на решение определённых проблем пациента. Важно, чтобы все этапы были комплексными и последовательными, чтобы достичь наиболее эффективного результата.
Изучить вопрос глубже – реабилитация алкоголиков
legitimate online pharmacy or canada pharmacy online legit canada pharmacy online
http://www.qqfuzhi.com/portal/play.php?url=http://civicmeds.shop polish pharmacy online uk and https://bold-kw.com/user/zkbfiijyna/?um_action=edit foreign online pharmacy
reputable indian online pharmacy foreign pharmacy online or viagra from canadian pharmacy buying drugs from canada
foreign pharmacy no prescription or canadian pharmacy cialis 20mg canadian pharmacy meds
https://maps.google.se/url?sa=t&url=https://civicmeds.com best online pharmacy reddit or https://lifnest.site/user/gucwvubzfrgucwvubzfr/?um_action=edit canadian online pharmacy
canadian pharmacy 24 trustworthy canadian pharmacy or canadian world pharmacy online pharmacy australia
Есть состояния, при которых откладывать обращение не стоит. Ниже перечислены признаки, при которых вызывать врача на дом разумно именно в ближайшее время, а не после очередной неудачной попытки «перележать» тяжёлый период самостоятельно.
Получить дополнительную информацию – вызов нарколога на дом воронеж
Медицинский портал https://med-portal-24.ru актуальная информация о здоровье, заболеваниях и методах лечения. Симптомы, диагностика, профилактика и советы специалистов для поддержания здоровья.
В этой статье-обзоре мы соберем актуальную информацию и интересные факты, которые освещают важные темы. Читатели смогут ознакомиться с различными мнениями и подходами, что позволит им расширить кругозор и глубже понять обсуждаемые вопросы.
Познакомиться с результатами исследований – https://www.resolutionrigging.com.au/liebherr-100-lc
Срочный выезд нарколога на дом позволяет сразу оценить состояние пациента, снять симптомы абстиненции и начать детоксикацию организма. Капельницы от запоя и интоксикации составляются индивидуально с учётом новейших медицинских протоколов 2026 года: они включают нейропротекторы, гепатопротекторы и витаминно-минеральные комплексы последнего поколения. Это не просто очищение крови — это восстановление работы мозга, печени, сердечно-сосудистой системы и психики.
Подробнее можно узнать тут – наркологическая помощь на дому
CoreBlue Health: viagra without prescription – generic sildenafil
Sildenafil Citrate Tablets 100mg sildenafil online generic sildenafil
При выезде на дом врач проводит все необходимые процедуры, включая инфузионную терапию (капельницы), медикаментозное лечение для снятия симптомов ломки, а также консультирует пациента и его семью по дальнейшему лечению. Важно, что после стабилизации состояния нарколог может дать рекомендации по дальнейшей реабилитации, возможному кодированию, а также предложить программу для восстановления здоровья на длительный срок.
Подробнее – нарколог на дом анонимно в воронеже
https://corebluehealth.com/# CoreBlue Health
Наркологическая клиника в Хабаровске рассматривается как специализированное медицинское учреждение, обеспечивающее комплексную помощь пациентам с алкогольной и наркотической зависимостью. Работа клиники «Северный Путь» строится на принципах доказательной медицины, конфиденциальности и поэтапного восстановления. Лечение ориентировано не только на купирование острых состояний, но и на стабилизацию соматического и психоэмоционального статуса пациента.
Ознакомиться с деталями – http://narkologicheskaya-klinika-khabarovsk0.ru
Суть капельницы заключается в том, чтобы быстро ввести в организм необходимые растворы, которые помогают восстановить водно-солевой баланс, очищают организм от токсинов, ускоряют обмен веществ и снижают нагрузку на внутренние органы. Врачи-наркологи используют специальные составы, которые включают в себя жидкости, электролиты, витамины и лекарственные средства для снятия симптомов похмелья.
Получить больше информации – капельница от похмелья на дом нижний новгород
Нарколог на дом в Воронеже с оперативным приездом специалиста, детоксикацией и медицинским наблюдением в наркологической клинике «Частный медик 24»
Углубиться в тему – вызов нарколога на дом
Капельница от похмелья — это эффективный способ экстренной помощи, предназначенный для того, чтобы помочь организму быстро восстановиться после злоупотребления алкоголем. В наркологической клинике «Частный медик 24» в Самаре мы предоставляем услугу безопасной детоксикации и восстановления 24/7. Капельница помогает организму вывести токсины, восстановить водно-электролитный баланс и улучшить общее состояние пациента, не создавая дополнительных нагрузок на сердце, печень и почки.
Выяснить больше – капельница от похмелья самара
Мир Labubu https://labubu-world.ru коллекционные фигурки, персонажи и новинки популярной серии. Узнайте о героях, редких выпусках и особенностях коллекции. Погружайтесь в атмосферу Labubu и следите за обновлениями.
Нарколог на дом в Воронеже с конфиденциальным выездом, капельницами и поддержкой пациента в наркологической клинике «Частный медик 24»
Подробнее можно узнать тут – http://narkolog-na-dom-voronezh-1.ru
Реабилитация алкоголиков — это важный этап на пути к избавлению от зависимости. В Москве существует множество центров, предлагающих реабилитацию с индивидуальной программой, что помогает обеспечить более персонализированный и эффективный подход к каждому пациенту. Индивидуальная программа учитывает физическое и психологическое состояние человека, а также его социальное окружение и личные особенности. Это позволяет добиться лучших результатов в лечении и восстановлении.
Узнать больше – центр реабилитации алкоголиков в москве
Игнорирование выраженных симптомов может привести к развитию таких опасных состояний, как алкогольный делирий, острые психозы, инфаркт или инсульт. Вызов нарколога на дом круглосуточно позволяет оперативно стабилизировать состояние пациента в привычной для него обстановке, минимизируя стресс и риски, связанные с транспортировкой в стационар. Анонимный формат обращения обеспечивает конфиденциальность и делает помощь доступной даже для тех, кто опасается огласки.
Углубиться в тему – нарколог на дом анонимно самара
Если дома действительно шумно (ремонт, маленькие дети, вечерние гости) или состояние нестабильно, предложим короткое наблюдение в клинике: отдельный вход, «тихий коридор», камерные посты, затем — возвращение домой и продолжение амбулаторного маршрута. Важен не формат, а предсказуемый результат: степень облегчения должна соответствовать целям этапа, а не множеству случайных факторов среды.
Узнать больше – наркологический вывод из запоя нижний тагил
https://corebluehealth.shop/# CoreBlue Health
Реабилитация алкоголиков в Москве: эффективные программы восстановления и медицинская помощь в наркологической клинике «Похмельная служба»
Изучить вопрос глубже – реабилитация алкоголиков стоимость москва
online canadian pharmacy coupon pharmacy mall cheapest online pharmacy india
Особую роль на первом этапе играет диагностика: важно выявить не только тип наркотика, но и наличие сопутствующих расстройств, стадию зависимости, мотивационное состояние пациента. От этого зависит, будет ли выбрана амбулаторная или стационарная форма лечения, какие методы будут применяться.
Изучить вопрос глубже – http://lechenie-narkomanii-murmansk0.ru
Доска объявлений https://oren-i.ru удобный сервис для размещения и поиска объявлений. Продажа, покупка, услуги и работа. Быстро публикуйте объявления и находите нужные предложения в вашем городе.
Когда зависимости становятся хроническими и угрожают жизни пациента, комплексная реабилитация при наркомании в специализированных клиниках Москвы, включая вывод из состояния в стационаре и последующий анализ данных о состоянии пациента, может стать единственным возможным решением. Процесс восстановления включает в себя работу не только с зависимостью, но и с психоэмоциональным состоянием, что делает лечение более эффективным и долговечным.
Углубиться в тему – реабилитация алкоголиков стоимость москва
Лечение зависимости проходит поэтапно. Такая последовательность обеспечивает постепенное восстановление и закрепление полученных результатов.
Получить дополнительные сведения – наркологическая клиника лечение алкоголизма донецк
Статья знакомит с важнейшими моментами, которые сформировали наше общество. От великих изобретений до культурных переворотов — вы узнаете, как прошлое влияет на наше мышление, технологии и образ жизни.
Как это работает — подробно – https://aki-s.de/2021/01/13/getrankelieferant-fur-hochzeiten-in-stuttgart
Наркологическая клиника «ТагилМед Реал» — это круглосуточная команда врачей, психологов и координаторов, которая берёт на себя полный цикл помощи при алкогольной и наркотической зависимости: от экстренной стабилизации и капельниц на дому до амбулаторного сопровождения, кодирования и длительной психотерапевтической поддержки. Мы работаем без выходных, используем портативное оборудование, придерживаемся принципов доказательной медицины и внимательно относимся к конфиденциальности: нейтральные формулировки в документах, немаркированный транспорт, разграниченный доступ к медицинским данным и единый доверенный контакт для семьи.
Исследовать вопрос подробнее – https://narkologicheskaya-klinika-nizhnij-tagil0.ru/
На каждом этапе мы фиксируем объективные маркеры — от сатурации и вариабельности пульса до частоты «тяговых мыслей» в дневнике. Эти данные позволяют корректировать план не интуитивно, а по фактам.
Ознакомиться с деталями – https://narcologicheskaya-klinika-stavropol0.ru/chastnaya-narkologicheskaya-klinika-stavropol
Состав капельницы может варьироваться, однако в большинстве случаев включает базовые группы препаратов, направленные на устранение последствий интоксикации:
Получить больше информации – http://www.domen.ru
Эта статья погружает вас в увлекательный мир знаний, где каждый факт становится открытием. Мы расскажем о ключевых исторических поворотных моментах и научных прорывах, которые изменили ход цивилизации. Поймите, как прошлое формирует настоящее и как его уроки могут помочь нам строить будущее.
Связаться за уточнением – https://martinezlawgroupllc.com/meet-carlos-martinez-a-dedicated-litigation-attorney-at-martinez-law-group-llc-2
Реабилитация алкоголиков в Москве требует интегрированного подхода, включающего не только медицинское лечение, но и психологическую помощь. Важно, чтобы реабилитационные центры предлагали программы, которые помогают пациентам не только избавиться от физической зависимости, но и наладить их психологическое состояние, а также восстановить их отношения с окружающими.
Получить дополнительную информацию – http://reabilitacziya-alkogolikov-moskva-3.ru
Для семьи это тоже большое облегчение. Вместо хаотичных советов, споров и попыток «собрать человека волей» появляется понятная схема действий. Врач объясняет, какие симптомы относятся к алкогольной интоксикации, какие говорят о риске абстинентного синдрома, какие показатели требуют особого внимания и что делать после процедуры. Такой формат особенно полезен тогда, когда близкие уже пытались помочь сами, но получили только ещё больше тревоги, вопросов и неопределённости.
Углубиться в тему – запой нарколог на дом в воронеже
https://civicmeds.com/# reddit canadian pharmacy
Нарколог на дом в Воронеже с оперативным приездом специалиста, детоксикацией и медицинским наблюдением в наркологической клинике «Частный медик 24»
Получить больше информации – вызов нарколога на дом воронеж
На каждом этапе мы фиксируем объективные маркеры — от сатурации и вариабельности пульса до частоты «тяговых мыслей» в дневнике. Эти данные позволяют корректировать план не интуитивно, а по фактам.
Углубиться в тему – запой наркологическая клиника ставрополь
Инженерные изыскания https://sever-geo.com для строительства в Твери — геология, геодезия и экология участка. Комплексные исследования для проектирования и строительства. Точные данные, соблюдение норм и оперативные сроки выполнения.
Инфузионная терапия в «ТагилМед Реал» — это точный инструмент под конкретный запрос: обезвоживание, вегетативная нестабильность, нарушения сна, «утренний туман». Состав и дозировки подбирает врач с учётом возраста, коморбидности и лекарственных взаимодействий. Важно понимать: больше компонентов не значит лучше; главная ценность — фокус и безопасность.
Исследовать вопрос подробнее – https://narkologicheskaya-klinika-nizhnij-tagil0.ru/vyvod-iz-zapoya-na-domu-otzyvy-kamensk-uralskij/
Домашний формат ценят не только за удобство. Он помогает начать лечение анонимно, без дороги, без ожидания и без лишнего стресса для пациента. Для многих семей именно выездной наркологическая маршрут становится первой точкой, с которой начинается более серьёзное восстановление: обсуждаются не только снятие острых симптомов, но и кодирование, реабилитация, повторная консультация, а при необходимости — и маршруты помощи при наркомании. Особенно это актуально, если человек употребляет давно, уже несколько лет сталкивается со срывами и сам замечает, что проблема перестала ограничиваться только плохим самочувствием после алкоголя.
Детальнее – запой нарколог на дом воронеж
Наркологическая клиника — это медицинское учреждение, где лечение зависимости выстроено системно: от купирования острых симптомов до длительного сопровождения пациента. В клинике «ДальМедБаланс» терапия проводится под круглосуточным врачебным контролем, а ключевыми принципами являются безопасность, анонимность и индивидуальный подход. Каждый пациент проходит путь восстановления под наблюдением специалистов, которые учитывают физиологическое состояние, психоэмоциональные особенности и социальный контекст. Лечение направлено не только на избавление от физической зависимости, но и на возвращение мотивации к здоровой жизни.
Ознакомиться с деталями – наркологическая клиника вывод из запоя
Этот информативный текст отличается привлекательным содержанием и актуальными данными. Мы предлагаем читателям взглянуть на привычные вещи под новым углом, предоставляя интересный и доступный материал. Получите удовольствие от чтения и расширьте кругозор!
Уникальные данные только сегодня – https://alfaazbyvaani.com/mere-alfaaz/spread-happiness-please
Городская среда Петрозаводска со сменой ветров с Онежского озера, короткими сумерками и сезонными перепадами влажности может усиливать тревожность в вечерние часы. Мы учитываем это с момента первого контакта: согласованная парковка, отдельный вход без вывесок, короткая регистрация без «толстых анкет», приглушённый тёплый свет в зоне ожидания и отсутствие громких объявлений. Родственникам предоставляются «тихие окна» связи — лаконичные апдейты в фиксированное время, чтобы не перегружать пациента и не дёргать команду в критические окна наблюдения. Такой «мягкий» контур снижает сенсорную нагрузку, стабилизирует вариабельность ЧСС к сумеркам и сокращает число импульсивных просьб «усилить на ночь».
Ознакомиться с деталями – наркологическая клиника цены
В этой информационной статье вы найдете интересное содержание, которое поможет вам расширить свои знания. Мы предлагаем увлекательный подход и уникальные взгляды на обсуждаемые темы, побуждая пользователей к активному мышлению и критическому анализу.
Погрузиться в детали – https://rw-cct.de/events/categories/webinar
В Воронеже услуга «нарколог на дом» востребована прежде всего тогда, когда состояние развивается быстро, а запас сил у пациента почти исчерпан. После нескольких дней употребления человеку бывает трудно даже выйти из квартиры: сохраняются слабость, дрожь, бессонница, тошнота, скачки давления, потливость, раздражительность и ощущение, что без новой дозы алкоголя легче уже не станет. Именно в этот момент домашний выезд специалиста помогает разорвать опасный цикл. Наркологическая помощь начинается там, где человек находится, а не там, куда он в идеале должен был бы доехать.
Узнать больше – вызвать нарколога на дом воронеж
Главное преимущество такого выезда в том, что лечение начинается сразу. Не нужно ждать утра, искать транспорт, уговаривать человека ехать в тяжёлом состоянии или рисковать, пока он снова тянется к алкоголю, чтобы временно заглушить симптомы. Домашний визит даёт возможность быстро стабилизировать ситуацию и убрать хаотичность, которая часто возникает в семье в острый момент.
Выяснить больше – http://narkolog-na-dom-voronezh-3.ru
CoreBlue Health: CoreBlue Health – CoreBlue Health
Разработка сайтов https://domenanet.online на Laravel — современные веб-проекты с высокой скоростью и безопасностью. Индивидуальные решения, интеграции и масштабируемая архитектура для бизнеса любого уровня.
Многие сталкиваются с трудностями при выборе клиники или центра: предлагаемые услуги различаются по качеству, подходам, стоимости и длительности. Некоторые организации ограничиваются только медикаментозной поддержкой, не работая с глубинными причинами зависимости. Поэтому важно заранее понимать, какие параметры отличают действительно надёжное учреждение, способное обеспечить долгосрочные результаты.
Получить дополнительную информацию – https://lechenie-narkomanii-murmansk0.ru/lechenie-narkomanii-i-alkogolizma-marmansk
Эта публикация дает возможность задействовать различные источники информации и представить их в удобной форме. Читатели смогут быстро найти нужные данные и получить ответы на интересующие их вопросы. Мы стремимся к четкости и доступности материала для всех!
Подробнее тут – https://thenews21.com/understanding-us-inheritance-law-sam-pitrodas-comment-triggers-political-controversy-in-india
buy cialis pill: buy cialis pill – VeritasCare
legit pharmacy websites CivicMeds no prescription pharmacy paypal
В Хабаровске востребован системный подход к терапии зависимостей, так как клиническая картина часто осложняется сопутствующими заболеваниями, нарушениями обмена веществ и расстройствами нервной системы. Медицинская помощь организуется с учётом тяжести состояния и индивидуальных факторов риска.
Ознакомиться с деталями – http://
Капельница от запоя — это эффективное медицинское вмешательство, направленное на быстрое восстановление организма после длительного злоупотребления алкоголем. Процесс лечения с использованием капельницы способствует быстрому выводу токсинов, восстановлению водно-электролитного баланса и нормализации общего состояния пациента. Капельница оказывает комплексное воздействие на организм, улучшая его самочувствие уже в течение первых часов после процедуры.
Получить дополнительные сведения – капельница от запоя нижний новгород
Капельница от похмелья — это эффективный способ экстренной помощи, предназначенный для того, чтобы помочь организму быстро восстановиться после злоупотребления алкоголем. В наркологической клинике «Частный медик 24» в Самаре мы предоставляем услугу безопасной детоксикации и восстановления 24/7. Капельница помогает организму вывести токсины, восстановить водно-электролитный баланс и улучшить общее состояние пациента, не создавая дополнительных нагрузок на сердце, печень и почки.
Подробнее тут – https://kapelnicza-ot-pokhmelya-samara-2.ru/
best canadian pharmacy CivicMeds cheapest pharmacy for prescriptions
В Самаре клиника «Частный медик 24» предоставляет круглосуточную помощь по выведению из запоя и снятию симптомов похмелья. Когда человек сталкивается с тяжёлым состоянием после длительного употребления алкоголя, важно вовремя оказать помощь. Врач приедет на дом и проведёт все необходимые процедуры, включая капельницу, которая поможет восстановить водно-электролитный баланс, нормализовать уровень сахара в крови и вывести токсины из организма.
Разобраться лучше – http://www.domen.ru
Мы применяем модульный подход: медицинские и психологические интервенции настраиваются как «кубики», а последовательность их включения зависит от состояния пациента. Схема гибко масштабируется — от краткого курса стабилизации до расширенной реабилитации с семейной поддержкой. Ниже — каркас маршрута, которым мы руководствуемся чаще всего.
Углубиться в тему – http://narcologicheskaya-klinika-stavropol0.ru/narkologicheskaya-klinika-stavropol-otzyvy/
Реабилитация алкоголиков в Москве: эффективные программы восстановления и медицинская помощь в наркологической клинике «Похмельная служба»
Детальнее – реабилитация алкоголиков в москве
Капельница от похмелья в Самаре с выездом на дом, восстановлением водного баланса и медицинской помощью в наркологической клинике «Частный медик 24»
Узнать больше – http://kapelnicza-ot-pokhmelya-samara-1.ru
Капельница от похмелья — это медицинская процедура, направленная на быстрое восстановление организма после алкогольной интоксикации. Она помогает устранить обезвоживание, нормализовать обменные процессы и снизить токсическую нагрузку на внутренние органы. В отличие от домашних методов, инфузионная терапия действует напрямую через кровоток, обеспечивая более быстрый и выраженный эффект.
Выяснить больше – капельница от похмелья цена
Солянка Парк https://tzstroy.su жилой комплекс с современными квартирами и удобной инфраструктурой. Отличный выбор для жизни с комфортом и доступом ко всем необходимым объектам.
indian trail pharmacy or reputable online pharmacy reddit best canadian pharmacy for viagra
https://www.google.ba/url?sa=t&url=https://civicmeds.shop which online pharmacy is the best or http://orbita-3.ru/forum/index.php?PAGE_NAME=profile_view&UID=104431 indian pharmacies safe
good pharmacy canada pharmacy world or online pharmacy without scripts best online pet pharmacy
https://corebluehealth.shop/# Viagra without a doctor prescription Canada
Лечение в наркологической клинике в Краснодаре строится на комплексном подходе, включающем медикаментозную терапию, психотерапевтическую помощь и социальную реабилитацию. Медикаментозное лечение направлено на детоксикацию организма и снижение симптомов абстиненции, что позволяет значительно улучшить состояние пациента в первые дни терапии. Современные препараты, применяемые в лечении зависимости, сертифицированы и соответствуют международным стандартам, что подтверждается на сайте Всемирной организации здравоохранения.
Ознакомиться с деталями – http://narkologicheskaya-klinika-krasnodar0.ru/platnaya-narkologicheskaya-klinika-krasnodar/https://narkologicheskaya-klinika-krasnodar0.ru
Online football match statistics soccer stand live scores, events, and live broadcasts. Follow games in real time, analyze teams, and never miss a beat.
Каждый выезд нарколога включает в себя не только инфузионную терапию, но и полноценную оценку состояния пациента, анализ рисков, а также консультацию по дальнейшему лечению. Врач может назначить дополнительные препараты для снятия симптомов ломки, восстановления водно-электролитного баланса и улучшения общего состояния пациента. Также важно, что консультация включает рекомендации по реабилитации, психологической поддержке и кодированию, если это необходимо для пациента, страдающего хроническим алкоголизмом или наркоманией.
Подробнее можно узнать тут – врач нарколог на дом
Нарколог на дом в Самаре — помощь при запое и интоксикации в наркологической клинике «Частный медик 24»
Подробнее тут – narkolog-na-dom-samara-2.ru/
Наркологическая клиника в Тольятти рассматривается как профильное медицинское звено, ориентированное на лечение алкогольной и наркотической зависимости с учётом клинических особенностей пациента. В клинике «Гармония Волги» медицинская помощь выстраивается на основе диагностики, поэтапной терапии и врачебного наблюдения, что позволяет контролировать состояние пациента на всех этапах лечения.
Получить дополнительные сведения – наркологические клиники алкоголизм в тольятти
Медицинский подход к выводу из запоя предполагает не только устранение внешних симптомов, но и стабилизацию внутренних процессов организма, что особенно важно при повторяющихся или затяжных эпизодах.
Получить дополнительную информацию – вывод из запоя клиника тольятти
world pharmacy india and cialis canada online pharmacy canadian pharmacy sildenafil
http://shumali.net/aki/modules/wordpress/wp-ktai.php?view=redir&url=http://civicmeds.shop online pharmacy delivery dubai and https://armandohart.com/user/hvmfeavvxa/?um_action=edit discount pharmacy mexico
canadian mail order pharmacy canadian online pharmacy cialis and low cost online pharmacy no script pharmacy
canada cloud pharmacy CivicMeds mexican online mail order pharmacy
При первой консультации нарколог осматривает пациента, чтобы оценить его состояние и подобрать оптимальную схему лечения. В зависимости от тяжести похмелья, врач может назначить инфузию с регидратационными растворами, витаминами группы B и другими препаратами, которые способствуют восстановлению. Важно, что капельница не только помогает снять симптомы, но и устраняет причины токсического воздействия алкоголя на организм, предотвращая развитие осложнений.
Изучить вопрос глубже – капельница от похмелья на дом
Домашний формат ценят не только за удобство. Он помогает начать лечение анонимно, без дороги, без ожидания и без лишнего стресса для пациента. Для многих семей именно выездной наркологическая маршрут становится первой точкой, с которой начинается более серьёзное восстановление: обсуждаются не только снятие острых симптомов, но и кодирование, реабилитация, повторная консультация, а при необходимости — и маршруты помощи при наркомании. Особенно это актуально, если человек употребляет давно, уже несколько лет сталкивается со срывами и сам замечает, что проблема перестала ограничиваться только плохим самочувствием после алкоголя.
Исследовать вопрос подробнее – вызов нарколога на дом в воронеже
Выезд нарколога на дом в Самаре — это комплексный подход к лечению, который включает несколько этапов. Врач, приехавший на место, не ограничивается одной процедурой, а проводит полноценный осмотр, диагностирует состояние пациента, определяет причину ухудшения самочувствия и подбирает индивидуальную терапию. Наиболее часто при выезде нарколога на дом используются капельницы, антиеметики и препараты для стабилизации состояния пациента, снятия симптомов абстиненции и улучшения общего самочувствия.
Узнать больше – вызов нарколога на дом
Капельница от похмелья — это экстренная мера, которая помогает снять интоксикацию и восстановить водно-электролитный баланс в организме после злоупотребления алкоголем. В наркологической клинике «Частный медик 24» в Самаре мы предлагаем эффективное лечение для тех, кто столкнулся с последствиями запоя или перегрузки организма после употребления алкоголя. Капельницы для снятия похмелья — это быстрый и безопасный способ вернуть пациента в норму, избавить от болезненных симптомов, таких как головная боль, тошнота, слабость, сухость во рту, а также стабилизировать его общее состояние. Выезд нарколога на дом и проведение капельниц позволяет избежать поездки в клинику и начать лечение в удобной обстановке.
Узнать больше – капельница от похмелья вызов на дом в самаре
safe canadian pharmacy CivicMeds secure medical online pharmacy
Когда такие симптомы становятся ярко выраженными, важно не затягивать с лечением и вызвать нарколога на дом. Это позволит своевременно устранить токсические вещества из организма и предотвратить серьёзные проблемы с органами. Важно, чтобы лечение началось как можно быстрее, что возможно только через экстренный выезд специалиста на дом.
Получить больше информации – капельница от похмелья вызов на дом екатеринбург
Процесс капельницы включает внутривенное введение различных растворов, которые помогают нейтрализовать эффекты алкогольной интоксикации, включая последствия запоя и алкоголизма. Наиболее часто в составе капельницы используются солевые и глюкозные растворы, витамины группы B, а также препараты для детоксикации организма. Эти компоненты помогают быстро восстановить водно-электролитный баланс, улучшить обмен веществ и ускорить выведение продуктов распада алкоголя.
Подробнее можно узнать тут – kapelnicza-ot-pokhmelya-samara-6.ru/
Есть состояния, при которых откладывать вызов врача рискованно. Домашний выезд нужен не только при «тяжёлом похмелье», но и тогда, когда самочувствие становится нестабильным, а попытки справиться своими силами уже не работают. Ниже перечислены ситуации, при которых обращение за помощью оправдано именно в ближайшее время, а не «если не станет легче к вечеру».
Получить больше информации – запой нарколог на дом в воронеже
Основной этап, направленный на очищение организма от продуктов распада алкоголя и нормализацию функций внутренних органов. Применяются современные препараты с антиоксидантным и гепатопротекторным эффектом.
Изучить вопрос глубже – лечение алкоголизма краснодар
Реабилитация алкоголиков с анонимной поддержкой — это важный процесс, который помогает людям справиться с зависимостью в условиях конфиденциальности и безопасности. Многие пациенты опасаются обращаться за помощью из-за стереотипов и страха осуждения. Анонимность в реабилитации становится важным фактором для обеспечения доверия и максимальной эффективности лечения, при этом в ряде случаев доступны такие услуги, как кодирование и консультации наркологической помощи бесплатно, особенно при обращении после запоя. В Москве существует множество центров, которые предлагают реабилитацию алкоголиков с анонимной поддержкой, что позволяет пациентам пройти лечение, не раскрывая своей личности и не беспокоясь о социальном осуждении.
Подробнее можно узнать тут – http://reabilitacziya-alkogolikov-moskva-4.ru
Каждый элемент программы направлен на создание комплексного подхода к лечению зависимости, обеспечивая помощь не только на физическом, но и на эмоциональном уровне. Индивидуальная программа реабилитации позволяет выстроить эффективную терапию, которая соответствует конкретным потребностям пациента.
Разобраться лучше – клиника реабилитации алкоголиков город
Капельница от похмелья — это один из наиболее эффективных методов экстренной медицинской помощи, который позволяет быстро снять симптомы алкогольной интоксикации и восстановить организм после злоупотребления алкоголем. В наркологической клинике «Частный медик 24» в Самаре мы предоставляем услугу выезда нарколога на дом и капельной терапии для пациентов, испытывающих тяжёлые симптомы похмелья. Это удобный способ получить необходимую помощь без лишнего стресса, сохраняя анонимность и комфорт пациента.
Получить дополнительную информацию – капельница от похмелья анонимно в самаре
Медицинская помощь начинается с детального осмотра и сбора анамнестических данных. Врач оценивает длительность запоя, объем употребляемого алкоголя, наличие хронических заболеваний и ранее перенесенных осложнений. Эти сведения необходимы для выбора корректной тактики лечения и исключения потенциальных рисков.
Получить дополнительную информацию – анонимный вывод из запоя хабаровск
Капельница от похмелья в Самаре с устранением симптомов интоксикации и контролем состояния в наркологической клинике «Частный медик 24»
Подробнее – kapelnicza-ot-pokhmelya-samara-2.ru/
https://civicmeds.com/# silkroad online pharmacy
Услуга
Получить дополнительные сведения – https://narkolog-na-dom-ramenskoe4.ru
Перед выбором метода врач проводит диагностику, оценивает физическое и психоэмоциональное состояние пациента, рассказывает о возможных рисках и особенностях процедуры. Только после согласования всех деталей назначается дата и форма кодирования.
Исследовать вопрос подробнее – http://kodirovanie-ot-alkogolizma-ehlektrostal6.ru
Капельница от похмелья применяется в тех случаях, когда человек ощущает сильное недомогание после употребления алкоголя. Основные симптомы, при которых рекомендуется лечение капельницей, включают:
Узнать больше – капельница от похмелья на дом самара
Generic Viagra online or viagra without prescription Cheap generic Viagra
http://images.google.mv/url?q=https://corebluehealth.shop order viagra or https://raygunmvp.com/user/fjdhhplrwq-fjdhhplrwq/?um_action=edit Cheap generic Viagra online
best price for viagra 100mg Viagra tablet online or best price for viagra 100mg Order Viagra 50 mg online
В зависимости от тяжести состояния подбирается индивидуальная программа детоксикации. В неё входят: — Инфузионная терапия (капельницы) для очищения организма от токсинов; — Поддерживающие препараты для работы сердца, печени, нервной системы; — Симптоматическое лечение (устранение рвоты, судорог, бессонницы); — Витамины и средства для восстановления водно-солевого баланса.
Детальнее – narkologicheskie-kliniki-v-oblasti
На практике выезд врача позволяет оперативно стабилизировать состояние пациента и снизить риск осложнений, связанных с отсрочкой медицинской помощи.
Подробнее можно узнать тут – http://narkolog-na-dom-khabarovsk0.ru
Cheap Sildenafil 100mg Cheap generic Viagra online CoreBlue Health
Срочная медицинская помощь на дому позволяет не только стабилизировать состояние пациента, но и начать его восстановление без стресса, связанного с поездкой в клинику. Врач приедет с необходимым оборудованием и медикаментами, чтобы провести все необходимые процедуры и помочь пациенту стабилизировать состояние в домашних условиях.
Ознакомиться с деталями – http://www.domen.ru
Каждый этап процедуры направлен на последовательное восстановление организма и предотвращение осложнений. Ниже представлена таблица, отражающая основные стадии и их особенности.
Изучить вопрос глубже – вывод из запоя недорого в хабаровске
В Тольятти клиника «АвтоГрад МедСтаб» предлагает круглосуточный вывод из запоя для пациентов любой степени тяжести состояния. Лечение проводится как в стационаре, так и с выездом нарколога на дом. При поступлении пациента специалисты оценивают жизненные показатели, уровень интоксикации, наличие сопутствующих заболеваний и составляют персональную схему терапии. Основная цель — стабилизация состояния, устранение последствий алкогольной интоксикации и предотвращение осложнений со стороны сердца, печени и мозга.
Подробнее тут – вывод из запоя тольятти
Нарколог на дом в Воронеже с оперативным приездом специалиста, детоксикацией и медицинским наблюдением в наркологической клинике «Частный медик 24»
Подробнее тут – нарколог на дом вывод в воронеже
Капельницы помогают не только справиться с симптомами похмелья, но и с выводом токсинов из организма, что способствует его быстрому восстановлению. Этот метод позволяет минимизировать последствия, такие как головная боль, нарушение давления и общее недомогание.
Изучить вопрос глубже – https://kapelnicza-ot-pokhmelya-samara-1.ru/
Каждый пациент уникален — именно поэтому мы не применяем «типовых» решений. После первичной консультации и диагностики специалисты «КубаньМед» разрабатывают персональную программу, учитывающую состояние здоровья, психологические особенности и социальные обстоятельства пациента.
Детальнее – https://lechenie-alkogolizma-krasnodar0.ru/lechenie-alkogolizma-anonimno-krasnodar/
professional pharmacy canadian pharmacy ltd reputable online pharmacy uk
Особенность анонимной реабилитации заключается в создании комфортной и безопасной среды, которая мотивирует пациента работать над собой, не опасаясь осуждения. Это повышает эффективность лечения, ведь пациент может открыться и честно обсуждать свои проблемы без страха быть осужденным.
Получить дополнительную информацию – центр реабилитации алкоголиков
Нарколог на дом — это формат срочной медицинской помощи, при котором врач приезжает к пациенту, проводит осмотр, оценивает риски, запускает первичную терапию и принимает решение, можно ли безопасно стабилизировать состояние дома или требуется перевод в стационар. Такой выезд особенно важен тогда, когда человеку тяжело ехать самостоятельно: выраженная слабость, тремор, тошнота, скачки давления, тревога, бессонница, повторный приём алкоголя для «облегчения» и нарастающее ухудшение самочувствия. Домашний формат ценят не только за удобство. Его задача — быстро сократить промежуток между ухудшением состояния и началом лечения. Чем раньше врач увидит пациента, тем проще остановить развитие осложнений, собрать понятный план действий на ближайшие часы и не допустить ошибок самолечения.
Подробнее – https://narkolog-na-dom-voronezh.ru/
Ключевым преимуществом вызова нарколога на дом является то, что лечение начинается в тот момент, когда оно особенно необходимо. Близкие пациента не должны волноваться о поиске клиники или медицинских центров в экстренной ситуации — помощь будет оказана немедленно, с минимальными затратами времени и без стресса для пациента.
Разобраться лучше – https://narkolog-na-dom-samara-1.ru/
Запрос «нарколог на дом» связан не только с запоем как таковым. На практике выезд заказывают при разных состояниях, когда организм уже плохо переносит последствия употребления и без осмотра трудно понять, где проходит граница между тяжёлым самочувствием и опасным осложнением.
Подробнее тут – нарколог на дом цена в воронеже
https://civicmeds.shop/# mexican pharmacy
При выезде на дом помощь строится по медицинской логике, а не по принципу «поставить капельницу и уехать». Сначала врач уточняет длительность употребления, объём алкоголя, наличие хронических заболеваний, перенесённые эпизоды судорог, перепады давления, боли в груди, нарушения ритма, травмы, сахарный диабет, аллергию и перечень уже принятых препаратов. После этого оцениваются сознание, частота пульса, артериальное давление, дыхание, температура, насыщение крови кислородом, выраженность обезвоживания и неврологический статус. Только на основании этой картины формируется домашний маршрут: инфузионная терапия, противорвотная поддержка, коррекция вегетативных нарушений, рекомендации на ночь, контроль связи с врачом и критерии, при которых требуется срочная повторная помощь. Такой подход актуален не только при запоях на фоне алкоголизма, но и в случаях, когда требуется первичная консультация по более сложным формам зависимости, включая состояния, связанные с наркоманией.
Узнать больше – вызвать нарколога на дом
Реабилитация алкоголиков с анонимной поддержкой — это процесс, при котором пациент получает необходимую медицинскую и психологическую помощь, не раскрывая своей личности и обстоятельств зависимости, включая лечение наркомании. Такие программы ориентированы на безопасное и конфиденциальное лечение, что важно для тех, кто стремится избавиться от зависимости, но опасается осуждения или утраты личной репутации, при этом возможен выезд нарколога на дом. Важно, что анонимность не ограничивает качество предоставляемых услуг: все необходимые этапы лечения, включая детоксикацию, психотерапевтические сессии и социальную реабилитацию, которые могут длиться несколько лет, проводятся на высоком уровне с акцентом на своевременный вывод из состояния зависимости.
Узнать больше – http://reabilitacziya-alkogolikov-moskva-4.ru/
Нарколог на дом — это не просто возможность получить медицинскую помощь в удобное время, но и решение важнейших задач по стабилизации состояния пациента, избавлению от острых симптомов абстиненции и восстановлению его здоровья. В случае с алкоголизмом и наркоманией выезд врача на дом в Воронеже — это важный шаг к восстановлению, который начинается там, где пациент находится, в удобной и привычной обстановке. Клиника «Частный медик 24» предлагает круглосуточные выезды нарколога, предоставляя экстренную помощь при запоях, наркозависимости, а также консультации по дальнейшему лечению и реабилитации. Врач приедет по указанному адресу и проведёт все необходимые процедуры, включая капельницы для стабилизации состояния пациента.
Исследовать вопрос подробнее – нарколог на дом цена
Алкогольная зависимость — хроническое заболевание, требующее комплексного подхода. В клинике «КубаньМед» в Краснодаре разработаны авторские методики, направленные на полное преодоление зависимости и возвращение пациента к полноценной жизни. Мы предлагаем индивидуальные программы лечения, сочетающие медикаментозную детоксикацию, специализированные реабилитационные процедуры и профессиональные психологические консультации. Всё это в условиях полного комфорта и абсолютной конфиденциальности.
Получить больше информации – https://lechenie-alkogolizma-krasnodar0.ru/
В клинике применяются современные медицинские технологии, направленные на восстановление организма и стабилизацию психоэмоционального состояния. Ниже представлена таблица с описанием основных методов и их терапевтического значения.
Детальнее – https://narkologicheskaya-klinika-tolyatti0.ru/narkologicheskaya-bolnicza-tolyatti/
Капельница от похмелья — это эффективный способ снятия симптомов алкогольной интоксикации, который позволяет быстро восстановить организм после длительного употребления алкоголя. В наркологической клинике «Частный медик 24» в Екатеринбурге мы предлагаем капельную терапию, которая включает в себя комплекс препаратов для восстановления водно-электролитного баланса, выведения токсинов и нормализации состояния пациента. Процедура проводится в удобной обстановке, и мы обеспечиваем полное наблюдение врача на протяжении всего процесса лечения.
Выяснить больше – капельница от похмелья анонимно в екатеринбурге
Каждое из перечисленных направлений реализуется в рамках единого лечебного процесса и находится под постоянным наблюдением медицинского персонала.
Ознакомиться с деталями – анонимный вывод из запоя
online pharmacies that use paypal and canadian pharmacy no prescription top online pharmacy
http://cse.google.com.et/url?sa=t&url=http://civicmeds.shop legitimate online pharmacy or https://rightcoachforme.com/author/jlraurfjyw/ best online pharmacy for viagra
canadian drug pharmacy northern pharmacy or cheapest pharmacy prescription drugs canada drugs coupon code
Во всех этих случаях врач нужен не только для облегчения симптомов. Его задача — понять, можно ли ограничиться домашней терапией или уже сейчас необходимо менять маршрут лечения. Именно этот этап и делает домашний выезд профессиональной услугой, а не упрощённой заменой клиники.
Ознакомиться с деталями – нарколог на дом в воронеже
При необходимости врач может расширить состав капельницы, ориентируясь на жалобы пациента и клиническую картину:
Узнать больше – капельница от похмелья на дом самара
Юрист по делам несовершеннолетних оказывает квалифицированную правовую помощь детям и их законным представителям. Переходите по запросу юрист для несовершеннолетних и защите их прав. Специалист защитит права ребёнка в судах и государственных органах, решит вопросы опеки, споры в семейных и уголовных делах. Консультации помогают быстро разобраться в ситуации и выбрать правильную стратегию защиты интересов несовершеннолетнего.
Нарколог на дом — это удобное и эффективное решение для тех, кто сталкивается с тяжелыми последствиями запоя или алкогольной интоксикации. В наркологической клинике «Частный медик 24» в Самаре мы предоставляем круглосуточную помощь, выезд нарколога и лечение на дому. Это позволяет пациентам получить профессиональную медицинскую помощь в удобной и знакомой обстановке, что особенно важно, когда состояние человека ухудшается после длительного употребления алкоголя или наркотиков.
Углубиться в тему – нарколог на дом анонимно
Реабилитация алкоголиков с анонимной поддержкой — это процесс, при котором пациент получает необходимую медицинскую и психологическую помощь, не раскрывая своей личности и обстоятельств зависимости, включая лечение наркомании. Такие программы ориентированы на безопасное и конфиденциальное лечение, что важно для тех, кто стремится избавиться от зависимости, но опасается осуждения или утраты личной репутации, при этом возможен выезд нарколога на дом. Важно, что анонимность не ограничивает качество предоставляемых услуг: все необходимые этапы лечения, включая детоксикацию, психотерапевтические сессии и социальную реабилитацию, которые могут длиться несколько лет, проводятся на высоком уровне с акцентом на своевременный вывод из состояния зависимости.
Подробнее можно узнать тут – реабилитация алкоголиков стоимость в москве
Когда пациент вызвал нарколога, специалист приезжает с необходимым оборудованием и препаратами, чтобы провести диагностику, назначить капельницу и другие процедуры, направленные на восстановление водно-электролитного баланса, выведение токсинов и улучшение общего состояния. Врач также проводит консультацию по дальнейшему лечению и профилактике повторных срывов.
Получить больше информации – капельница от похмелья анонимно в екатеринбурге
Каждый этап процедуры направлен на последовательное восстановление организма и предотвращение осложнений. Ниже представлена таблица, отражающая основные стадии и их особенности.
Исследовать вопрос подробнее – вывод из запоя с выездом
Анонимное лечение на дому ценно ещё и тем, что снижает внутреннее сопротивление самого пациента. Для многих людей первый контакт с врачом происходит именно дома, без дороги, без ожидания, без страха чужих взглядов. Такой формат помогает начать разговор не только о снятии острых симптомов, но и о более широких вопросах: что делать после выхода из запоя, когда требуется кодирование, в каких случаях нужна реабилитация, а когда первичная наркологическая помощь уже должна переходить в полноценный лечебный маршрут. Врач может помочь и в ситуациях, связанных не только с алкоголем, но и с наркомании, если семье нужно понять, что происходит с зависимым человеком и какой следующий шаг будет для него безопасным.
Выяснить больше – вызов нарколога на дом в воронеже
Врач уточняет длительность запоя, тип употребляемого алкоголя и наличие сопутствующих заболеваний. Тщательный анализ этой информации позволяет оперативно определить степень интоксикации и подобрать наиболее эффективные методы терапии, минимизируя риск осложнений.
Подробнее можно узнать тут – вывод из запоя цена ярославль.
Процесс лечения начинается с консультации врача, который оценивает состояние пациента, его анамнез и определяет, какие процедуры и препараты нужно использовать. В большинстве случаев капельница включает в себя регидратацию, витамины группы B, антиеметики, препараты для улучшения работы печени и почек. Важно, что капельница не только помогает организму вывести токсины, но и восстанавливает нормальную работу всех систем организма, обеспечивая быстрое улучшение самочувствия.
Узнать больше – капельница от похмелья цена
Помощь 24/7 означает, что нарколог на дом в Хабаровске может быть направлен в любое время суток, включая ночные часы и выходные дни. В клинике «Ясный Вектор» выездная служба функционирует с учётом логистики города, что позволяет минимизировать время ожидания врача.
Получить дополнительные сведения – вызов нарколога на дом
Для жителей Екатеринбурга наркологическая клиника «Частный медик 24» предлагает услуги выезда нарколога на дом для проведения капельницы от похмелья. Это удобный и эффективный способ лечения, особенно если пациент испытывает тяжёлые симптомы похмелья и не может поехать в клинику. Выезд нарколога на дом позволяет начать лечение сразу, не тратя время на поездку и ожидания в клинике. Врач приезжает с необходимыми препаратами и оборудованием, проводит осмотр и назначает необходимую терапию.
Исследовать вопрос подробнее – капельница от похмелья цена
Клиника «АмурМед Контур» в Хабаровске предлагает комплексную детоксикацию организма, которая включает инфузионную терапию, стабилизацию жизненно важных показателей и коррекцию эмоционального состояния. Каждому пациенту подбирается индивидуальная схема капельниц с учётом возраста, массы тела, стажа употребления алкоголя и хронических заболеваний. Процедуры проводятся в условиях полной конфиденциальности и под постоянным наблюдением специалистов. Медицинская команда контролирует артериальное давление, уровень сатурации, частоту пульса и показатели крови на протяжении всего периода восстановления.
Углубиться в тему – врач вывод из запоя в хабаровске
В клинике «АвтоГрад МедСтаб» применяется комплексное лечение, направленное не только на выведение этанола, но и на восстановление функций всех систем организма. В таблице представлены ключевые терапевтические методы и их результаты.
Получить дополнительные сведения – вывод из запоя в стационаре в тольятти
https://civicmeds.shop/# mail order pharmacy india
canadian pharmacy 24 com or best online canadian pharmacy top 10 pharmacies in india
http://www.24subaru.ru/photo-20322.html?ReturnPath=https://civicmeds.shop walmart online pharmacy or https://shockingbritain.com/user/mhtgipzizx/ mexican pharmacy online
online pharmacy 365 canadianpharmacymeds or best pharmacy canadian pharmacy world coupon code
Buy Tadalafil 5mg Cialis 20mg price in USA VeritasCare
Каждое из перечисленных направлений реализуется в рамках единого лечебного процесса и находится под постоянным наблюдением медицинского персонала.
Исследовать вопрос подробнее – вывод из запоя капельница
Запой и алкогольная интоксикация могут приводить к целому ряду опасных симптомов, таких как головная боль, слабость, тошнота, рвота, обезвоживание и психоэмоциональная нестабильность. Если не начать лечение вовремя, такие состояния могут привести к более серьезным осложнениям, включая сердечные проблемы, галлюцинации и даже опасные для жизни нарушения работы организма. С помощью нарколога на дому можно начать экстренную терапию прямо в момент ухудшения состояния, не затягивая с лечением и не тратя время на поездки в клинику.
Подробнее тут – https://narkolog-na-dom-samara-2.ru
Капельница от похмелья — это эффективный способ экстренной помощи, предназначенный для того, чтобы помочь организму быстро восстановиться после злоупотребления алкоголем. В наркологической клинике «Частный медик 24» в Самаре мы предоставляем услугу безопасной детоксикации и восстановления 24/7. Капельница помогает организму вывести токсины, восстановить водно-электролитный баланс и улучшить общее состояние пациента, не создавая дополнительных нагрузок на сердце, печень и почки.
Подробнее можно узнать тут – капельница от похмелья на дом
При выезде нарколога на дом в Самаре мы проводим диагностику состояния пациента, чтобы понять, какие препараты и процедуры необходимы для стабилизации. Это может включать регидратацию, витамины группы B, антиеметики и другие препараты для снятия симптомов похмелья. Все препараты подбираются индивидуально в зависимости от состояния пациента и его нужд. Это позволяет значительно сократить время на восстановление и быстро вернуться к нормальному состоянию.
Углубиться в тему – капельница от похмелья анонимно
Кодирование основано на блокировке механизмов зависимости на биохимическом и поведенческом уровнях. Медикаментозные методы включают введение препаратов пролонгированного действия, которые нарушают метаболизм этанола: при попытке выпить даже небольшую дозу алкоголь вызывает выражённые неприятные реакции, что психологически отвращает от новой пробы спиртного. Психотерапевтические техники, такие как гипноз или метод Довженко, направлены на переустановку подсознательных программ, удаление эмоционального влечения к алкоголю и укрепление мотивации к здоровому образу жизни. Аппаратные методики (электроимпульсная стимуляция, транскраниальная микрополяризация) воздействуют на нейроны, участвующие в развитии зависимости, снижая их активность и уменьшая физиологический дискомфорт. В «Орион-Клиник» часто используют комбинированные программы: сначала проводится детоксикация организма, затем вводится медикаментозное средство, после чего реализуется психотерапевтический блок влияния на подсознание.
Детальнее – кодирование от алкоголизма на дому
Реабилитация алкоголиков проходит через несколько обязательных этапов. Каждый этап фокусируется на определенных аспектах восстановления и помогает человеку не только избавиться от физической зависимости, но и научиться жить без алкоголя в долгосрочной перспективе, включая кодирование, особенно после длительных лет запоя, а также восстановление в условиях специализированного дома. Этапное восстановление помогает избежать перегрузки пациента, обеспечивая плавный переход от одной стадии лечения к другой.
Подробнее тут – реабилитация алкоголиков стоимость в москве
Каждый пациент в «НаркоМедцентре» в Балашихе с самого начала окружён вниманием и заботой. Сразу после обращения по телефону или через сайт медицинский персонал консультирует родственников, уточняет детали состояния, даёт рекомендации по первой помощи и при необходимости отправляет бригаду наркологов на дом. В случае тяжёлых абстинентных проявлений возможно экстренное транспортирование пациента в стационар.
Детальнее – vyvod-iz-zapoya-cena
Капельница от похмелья в Екатеринбурге с выездом специалиста, подбором терапии и восстановлением состояния в наркологической клинике «Частный медик 24»
Подробнее можно узнать тут – капельница от похмелья анонимно екатеринбург
Нарколог на дом — это не просто возможность получить медицинскую помощь в удобное время, но и решение важнейших задач по стабилизации состояния пациента, избавлению от острых симптомов абстиненции и восстановлению его здоровья. В случае с алкоголизмом и наркоманией выезд врача на дом в Воронеже — это важный шаг к восстановлению, который начинается там, где пациент находится, в удобной и привычной обстановке. Клиника «Частный медик 24» предлагает круглосуточные выезды нарколога, предоставляя экстренную помощь при запоях, наркозависимости, а также консультации по дальнейшему лечению и реабилитации. Врач приедет по указанному адресу и проведёт все необходимые процедуры, включая капельницы для стабилизации состояния пациента.
Изучить вопрос глубже – нарколог на дом цена в воронеже
Нарколог на дом может помочь в следующих ситуациях:
Получить дополнительную информацию – вызвать нарколога на дом в самаре
Капельница от похмелья в Самаре с выездом на дом, восстановлением водного баланса и медицинской помощью в наркологической клинике «Частный медик 24»
Исследовать вопрос подробнее – капельница от похмелья на дому самара
После употребления алкоголя состояние может быстро ухудшиться: появляется головная боль, тошнота, головокружение и слабость. Это следствие того, что в организме накапливаются токсины, продукты распада этанола и нарушается водно-электролитный баланс. С помощью капельницы от похмелья можно быстро справиться с интоксикацией, восполнить недостающие элементы и облегчить состояние пациента. В клинике «Частный медик 24» в Самаре мы предлагаем капельницы, которые помогают снять все неприятные симптомы похмелья, восстанавливая работу организма и минимизируя риски для здоровья.
Выяснить больше – капельница от похмелья на дому в самаре
Продолжительность процедуры капельницы от похмелья зависит от степени интоксикации, общего состояния пациента и состава вводимых препаратов. В среднем инфузионная терапия занимает от 40 минут до 1,5 часов. Уже во время введения растворов многие пациенты отмечают постепенное улучшение самочувствия.
Подробнее – капельница от похмелья вызов на дом
Капельница от похмелья в Екатеринбурге с выездом специалиста, подбором терапии и восстановлением состояния в наркологической клинике «Частный медик 24»
Изучить вопрос глубже – капельница от похмелья на дом
indianpharmacy com best online pharmacy no prescription northern pharmacy canada
Помощь 24/7 означает, что нарколог на дом в Хабаровске может быть направлен в любое время суток, включая ночные часы и выходные дни. В клинике «Ясный Вектор» выездная служба функционирует с учётом логистики города, что позволяет минимизировать время ожидания врача.
Подробнее – http://narkolog-na-dom-khabarovsk0.ru/
Нарколог на дом — это не просто возможность получить медицинскую помощь в удобное время, но и решение важнейших задач по стабилизации состояния пациента, избавлению от острых симптомов абстиненции и восстановлению его здоровья. В случае с алкоголизмом и наркоманией выезд врача на дом в Воронеже — это важный шаг к восстановлению, который начинается там, где пациент находится, в удобной и привычной обстановке. Клиника «Частный медик 24» предлагает круглосуточные выезды нарколога, предоставляя экстренную помощь при запоях, наркозависимости, а также консультации по дальнейшему лечению и реабилитации. Врач приедет по указанному адресу и проведёт все необходимые процедуры, включая капельницы для стабилизации состояния пациента.
Детальнее – нарколог на дом в воронеже
Нарколог на дом может помочь в следующих ситуациях:
Углубиться в тему – врач нарколог на дом
Для Воронежа выездной формат особенно востребован вечером, ночью и ранним утром, когда у больного резко усиливаются симптомы и поездка в медицинское учреждение становится тяжёлой или просто нереальной. Если человек несколько дней употреблял алкоголь, почти не спал, плохо переносит воду, жалуется на сердцебиение и слабость, то откладывать осмотр не стоит. Срочная наркологическая помощь нужна именно тогда, когда ситуация развивается быстро, а семья уже видит, что своими силами справиться не удаётся. Врач приезжает, проводит осмотр, определяет, нет ли признаков осложнений, и уже на месте решает, какие меры допустимы дома, а какие требуют другого формата оказания помощи.
Подробнее можно узнать тут – нарколог на дом анонимно
Первая задача врача — снять наиболее опасные и мучительные проявления: тошноту, головную боль, озноб, тремор, сухость во рту, сердцебиение, внутреннюю дрожь, тревогу, невозможность уснуть. Вторая задача — восстановить управляемость ситуации. Пациент и близкие должны понимать, что делать после завершения инфузии: как пить воду, как проветрить комнату, когда можно вставать, какие симптомы допустимы, а какие требуют немедленного повторного звонка. Именно такой формат делает помощь на дому полноценной медицинской услугой, а не разовой манипуляцией. Для многих семей это ещё и первая консультация, после которой становится ясно, нужен ли только вывод из запоя или уже требуется более широкий наркологический маршрут с участием психолога и последующим этапом восстановления.
Углубиться в тему – нарколог на дом цена
Все методики подбираются строго индивидуально. Комбинация физиологической и психотерапевтической поддержки помогает восстановить здоровье и устойчивость пациента. Такой подход снижает вероятность рецидивов и способствует длительному сохранению трезвости.
Получить больше информации – наркологическая клиника наркологический центр в тольятти
http://corebluehealth.com/# cheapest viagra
Вывод из запоя — это комплексная медицинская процедура, направленная на устранение интоксикации, стабилизацию состояния и восстановление нормальной работы организма. В клинике «АвтоГрад МедСтаб» в Тольятти данная помощь оказывается в условиях круглосуточного наблюдения и индивидуального подхода. Врачи-наркологи применяют сертифицированные препараты и безопасные методы дезинтоксикации, что позволяет быстро снять абстинентные симптомы, восстановить водно-солевой баланс и нормализовать работу нервной системы. Все процедуры проводятся анонимно, без постановки на учёт, с соблюдением медицинской этики и конфиденциальности.
Узнать больше – нарколог вывод из запоя тольятти
Капельница от похмелья — это один из наиболее эффективных методов экстренной медицинской помощи, который позволяет быстро снять симптомы алкогольной интоксикации и восстановить организм после злоупотребления алкоголем. В наркологической клинике «Частный медик 24» в Самаре мы предоставляем услугу выезда нарколога на дом и капельной терапии для пациентов, испытывающих тяжёлые симптомы похмелья. Это удобный способ получить необходимую помощь без лишнего стресса, сохраняя анонимность и комфорт пациента.
Получить дополнительные сведения – капельница от похмелья анонимно в самаре
Анонимность позволяет пациентам сосоточиться на процессе лечения алкогольной зависимости, не переживая о последствиях для своей репутации или безопасности. Важно, чтобы каждый этап был подробно обсужден с пациентом, что помогает снизить уровень стресса и тревожности, связанные с лечением зависимых, включая терапию в стационаре.
Ознакомиться с деталями – клиника реабилитации алкоголиков город
Каждый выезд нарколога включает в себя не только инфузионную терапию, но и полноценную оценку состояния пациента, анализ рисков, а также консультацию по дальнейшему лечению. Врач может назначить дополнительные препараты для снятия симптомов ломки, восстановления водно-электролитного баланса и улучшения общего состояния пациента. Также важно, что консультация включает рекомендации по реабилитации, психологической поддержке и кодированию, если это необходимо для пациента, страдающего хроническим алкоголизмом или наркоманией.
Получить дополнительные сведения – вызвать нарколога на дом воронеж
Наркологическая клиника — это пространство профессиональной помощи, где пациент получает комплексное лечение зависимости, медицинский контроль и психологическую поддержку. В клинике «ВолгаМед Баланс» в Тольятти лечение основано на принципах доказательной медицины и конфиденциальности. Каждая терапевтическая программа выстраивается индивидуально, с учётом физического состояния пациента, стадии заболевания и его мотивации к выздоровлению. Врачи клиники обеспечивают непрерывный контроль за состоянием, применяя современные методы дезинтоксикации, психотерапии и медикаментозной стабилизации.
Подробнее можно узнать тут – наркологическая клиника наркологический центр в тольятти
Капельница от похмелья в Самаре с устранением симптомов интоксикации и контролем состояния в наркологической клинике «Частный медик 24»
Получить больше информации – капельница от похмелья вызов на дом самара
Выезд нарколога на дом позволяет быстро устранить эти симптомы, нормализовать состояние пациента и предотвратить дальнейшее ухудшение здоровья.
Получить дополнительную информацию – капельница от похмелья
Капельница от похмелья применяется в тех случаях, когда человек ощущает сильное недомогание после употребления алкоголя. Основные симптомы, при которых рекомендуется лечение капельницей, включают:
Разобраться лучше – капельница от похмелья на дому в самаре
https://corebluehealth.com/# CoreBlue Health
Состав капельницы может варьироваться, однако в большинстве случаев включает базовые группы препаратов, направленные на устранение последствий интоксикации:
Изучить вопрос глубже – капельница от похмелья в самаре
Такие симптомы важны не только сами по себе. Они показывают, что организму уже трудно поддерживать стабильность без медицинского вмешательства. Чем дольше в этот момент ждать, тем выше вероятность, что потребуется более жёсткий формат оказания помощи. Поэтому экстренное обращение в некоторых случаях не просто облегчает состояние, а предотвращает дальнейшее ухудшение здоровья.
Получить больше информации – нарколог на дом цена
Капельница от похмелья может быть необходима в самых разных ситуациях, когда симптомы становятся слишком выраженными и мешают нормальному функционированию пациента. Если вы или ваши близкие сталкиваетесь с такими признаками, как сильная головная боль, рвота, слабость и головокружение, то немедленный вызов нарколога на дом станет необходимостью. Важно не откладывать помощь, так как интоксикация может усугубить состояние пациента и привести к осложнениям, таким как обезвоживание или нарушения работы сердца.
Подробнее тут – http://kapelnicza-ot-pokhmelya-ekaterinburg-8.ru
Капельница от похмелья — это эффективное средство для быстрого снятия симптомов алкогольной интоксикации и восстановления организма после злоупотребления алкоголем. В наркологической клинике «Частный медик 24» в Екатеринбурге мы предоставляем услуги по экстренной помощи и детоксикации на дому, включая установку капельниц, которые позволяют улучшить состояние пациента за короткое время. Процедура включает в себя введение специальных растворов, которые восстанавливают водно-электролитный баланс, выводят токсины и устраняют основные симптомы похмелья, такие как головная боль, слабость, тошнота и головокружение.
Получить больше информации – капельница от похмелья анонимно в екатеринбурге
Нарколог на дом в Воронеже с быстрым выездом, индивидуальным подбором терапии и наблюдением в наркологической клинике «Частный медик 24»
Получить больше информации – http://www.domen.ru
Первая задача врача — снять наиболее опасные и мучительные проявления: тошноту, головную боль, озноб, тремор, сухость во рту, сердцебиение, внутреннюю дрожь, тревогу, невозможность уснуть. Вторая задача — восстановить управляемость ситуации. Пациент и близкие должны понимать, что делать после завершения инфузии: как пить воду, как проветрить комнату, когда можно вставать, какие симптомы допустимы, а какие требуют немедленного повторного звонка. Именно такой формат делает помощь на дому полноценной медицинской услугой, а не разовой манипуляцией. Для многих семей это ещё и первая консультация, после которой становится ясно, нужен ли только вывод из запоя или уже требуется более широкий наркологический маршрут с участием психолога и последующим этапом восстановления.
Исследовать вопрос подробнее – нарколог на дом анонимно воронеж
Наши врачи приезжают в удобное для пациента время и проводят полный осмотр. В зависимости от состояния пациента, они подбирают необходимое лечение: капельницы для снятия токсинов, медикаментозные препараты для стабилизации состояния, а также дают рекомендации по дальнейшему восстановлению. Важно, что лечение на дому позволяет избежать медицинской огласки и лишнего стресса, а также гарантирует полную конфиденциальность.
Разобраться лучше – вызвать нарколога на дом самара
Нарколог на дом — это формат помощи, который особенно ценен в тот момент, когда человеку плохо уже сейчас, а поездка в клинику только усиливает риск. Домашний выезд позволяет быстро провести осмотр, оценить степень интоксикации, признаки обезвоживания, нагрузку на сердце, уровень тревоги, выраженность тремора и понять, можно ли безопасно помочь пациенту на месте. В наркологической клинике «Частный медик 24» такой формат строится не вокруг одной процедуры, а вокруг последовательного медицинского решения: врач приезжает, собирает анамнез, проводит консультация, определяет, какие вмешательства действительно необходимы, и только после этого подбирает домашний маршрут стабилизации. Это особенно важно при алкоголизма, когда близкие часто путают тяжёлое похмелье, абстинентный синдром и состояния, при которых уже нельзя терять время.
Детальнее – вызов нарколога на дом
Капельница от похмелья — это не просто средство для снятия симптомов, но и эффективный способ быстрого восстановления организма после алкогольной интоксикации. В наркологической клинике «Частный медик 24» в Екатеринбурге мы предоставляем услугу выезда нарколога на дом, что позволяет пациентам получить необходимую медицинскую помощь, не покидая комфорт своей обстановки. Это особенно важно в случае, если состояние пациента серьёзно ухудшилось, и он не может поехать в клинику самостоятельно.
Разобраться лучше – капельница от похмелья на дом
Когда такие симптомы становятся ярко выраженными, важно не откладывать вызов нарколога. В противном случае токсическое воздействие алкоголя может повлиять на другие органы, такие как печень, почки и сердце, что приведёт к более серьёзным последствиям. Врач на дому проведет экстренную помощь, обеспечит безопасность и поможет избежать ухудшения состояния.
Подробнее тут – капельница от похмелья вызов на дом
Первая задача врача — снять наиболее опасные и мучительные проявления: тошноту, головную боль, озноб, тремор, сухость во рту, сердцебиение, внутреннюю дрожь, тревогу, невозможность уснуть. Вторая задача — восстановить управляемость ситуации. Пациент и близкие должны понимать, что делать после завершения инфузии: как пить воду, как проветрить комнату, когда можно вставать, какие симптомы допустимы, а какие требуют немедленного повторного звонка. Именно такой формат делает помощь на дому полноценной медицинской услугой, а не разовой манипуляцией. Для многих семей это ещё и первая консультация, после которой становится ясно, нужен ли только вывод из запоя или уже требуется более широкий наркологический маршрут с участием психолога и последующим этапом восстановления.
Получить дополнительную информацию – запой нарколог на дом
Перед кодированием важно снять острую интоксикацию и стабилизировать состояние. В «Орион-Клиник» пациенту проводят курс инфузионной терапии: капельницы с регидратационными растворами, гепатопротекторами и витаминно-минеральными комплексами. Это позволяет восстановить водно-электролитный баланс, поддержать функции печени и почек, нормализовать артериальное давление и работу сердца. Одновременно психолог проводит предварительные беседы для выяснения причин зависимости, уровня тревожности и мотивации. Подготовительный этап длится от одного до трёх дней в зависимости от тяжести состояния и поможет снизить риск побочных эффектов при введении кодирующего препарата.
Подробнее – prinuditelnoe kodirovanie ot alkogolizma
Для жителей Екатеринбурга клиника «Частный медик 24» предлагает услуги по проведению капельниц на дому. Когда после запоя или большого количества выпитого алкоголя появляются характерные симптомы похмелья, такие как головная боль, тошнота, слабость, капельница становится первым шагом к восстановлению организма. Это быстрый способ не только снять симптомы, но и предотвратить возможные осложнения, такие как проблемы с сердцем, психоэмоциональные расстройства и другие негативные последствия.
Узнать больше – капельница от похмелья в екатеринбурге
Главная цель — не просто снять симптомы абстиненции, а безопасно восстановить работу организма. Для этого применяются современные препараты и сбалансированные растворы, которые выводят токсины, поддерживают функции печени и нормализуют обмен веществ. Дополнительно пациент получает витаминотерапию и легкую психокоррекционную поддержку.
Разобраться лучше – нарколог на дом вывод из запоя
Cheap generic Viagra Viagra Tablet price CoreBlue Health
Далее, когда физическое состояние стабилизировано, совместно с врачом выбирается стратегия дальнейшего лечения. В «Новая Точка» доступны современные методы кодирования (уколы, таблетки, вшивание препаратов, гипнотерапия), но решение всегда принимается осознанно, с объяснением плюсов, рисков и индивидуальным подбором метода.
Исследовать вопрос подробнее – http://
Запрос «нарколог на дом» связан не только с запоем как таковым. На практике выезд заказывают при разных состояниях, когда организм уже плохо переносит последствия употребления и без осмотра трудно понять, где проходит граница между тяжёлым самочувствием и опасным осложнением.
Углубиться в тему – http://www.domen.ru
Запой — это не просто временная слабость, а критическое состояние, требующее экстренного медицинского вмешательства. Особенно опасно откладывать обращение за помощью, если у человека наблюдаются такие симптомы:
Детальнее – vyvod-iz-alkogolnogo-zapoya
Каждый элемент программы направлен на создание комплексного подхода к лечению зависимости, обеспечивая помощь не только на физическом, но и на эмоциональном уровне. Индивидуальная программа реабилитации позволяет выстроить эффективную терапию, которая соответствует конкретным потребностям пациента.
Углубиться в тему – клиника реабилитации алкоголиков город
При необходимости врач может расширить состав капельницы, ориентируясь на жалобы пациента и клиническую картину:
Подробнее можно узнать тут – капельница от похмелья цена самара
Вывод из запоя в Тольятти рассматривается как комплексное медицинское вмешательство, направленное на купирование острого состояния, связанного с длительным употреблением алкоголя. Запойное состояние сопровождается выраженной интоксикацией, нарушениями работы сердечно-сосудистой и нервной систем, а также высоким риском осложнений. В клинике «Чистый Горизонт» лечение строится на основе клинической оценки состояния пациента и применения поэтапной терапии.
Получить дополнительные сведения – вывод из запоя на дому цена в тольятти
Мы стремимся обеспечить пациентам максимальный уровень доверия и результативности лечения, сочетая передовые технологии и многолетний опыт специалистов:
Подробнее – http://lechenie-alkogolizma-krasnodar0.ru/metody-lecheniya-alkogolizma-krasnodar/
Запой, длительное употребление алкоголя или случайное злоупотребление могут привести к неприятным симптомам похмелья, таким как головная боль, слабость, тошнота, головокружение и усталость. Эти симптомы обусловлены тем, что в организме остаются продукты распада алкоголя, которые токсически воздействуют на все органы. Капельница от похмелья на дому — это отличная возможность быстро снять острые симптомы и восстановить нормальное состояние организма, не выходя из привычной обстановки.
Выяснить больше – капельница от похмелья вызов на дом самара
Запой и алкогольная интоксикация могут приводить к целому ряду опасных симптомов, таких как головная боль, слабость, тошнота, рвота, обезвоживание и психоэмоциональная нестабильность. Если не начать лечение вовремя, такие состояния могут привести к более серьезным осложнениям, включая сердечные проблемы, галлюцинации и даже опасные для жизни нарушения работы организма. С помощью нарколога на дому можно начать экстренную терапию прямо в момент ухудшения состояния, не затягивая с лечением и не тратя время на поездки в клинику.
Получить больше информации – https://narkolog-na-dom-samara-2.ru
Обращение за помощью нарколога на дому имеет ряд преимуществ, способствующих быстрому и эффективному лечению:
Подробнее можно узнать тут – https://vyvod-iz-zapoya-yaroslavl00.ru/vyvod-iz-zapoya-czena-yaroslavl
Продолжительность процедуры капельницы от похмелья зависит от степени интоксикации, общего состояния пациента и состава вводимых препаратов. В среднем инфузионная терапия занимает от 40 минут до 1,5 часов. Уже во время введения растворов многие пациенты отмечают постепенное улучшение самочувствия.
Узнать больше – капельница от похмелья на дом
Запрос на выезд врача связан не только с классическим запоем. На практике домашняя помощь нужна в разных ситуациях, когда организму уже трудно компенсировать последствия употребления, а откладывание визита увеличивает риск осложнений.
Ознакомиться с деталями – нарколог на дом цена
Реабилитация алкоголиков с поддержкой специалистов в Москве представляет собой важный и сложный процесс, в котором ключевую роль играет профессиональное вмешательство. Программы реабилитации включают в себя не только медицинскую помощь, но и психологическую, социальную и эмоциональную поддержку, что способствует успешному и долгосрочному восстановлению пациента. Такая комплексная помощь является основой эффективного лечения и предотвращения рецидивов.
Подробнее – алкоголик реабилитация наркоманов город
В некоторых случаях капельница может быть использована не только для снятия симптомов похмелья, но и для восстановления организма после длительного запоя или при хроническом алкоголизме, когда организм особенно ослаблен. В таких случаях лечение должно проводиться под контролем квалифицированных специалистов, чтобы избежать осложнений и ускорить восстановление.
Подробнее можно узнать тут – капельница от похмелья анонимно самара
Капельница от похмелья — это не просто средство для снятия симптомов, но и эффективный способ быстрого восстановления организма после алкогольной интоксикации. В наркологической клинике «Частный медик 24» в Екатеринбурге мы предоставляем услугу выезда нарколога на дом, что позволяет пациентам получить необходимую медицинскую помощь, не покидая комфорт своей обстановки. Это особенно важно в случае, если состояние пациента серьёзно ухудшилось, и он не может поехать в клинику самостоятельно.
Получить дополнительную информацию – капельница от похмелья вызов на дом екатеринбург
В подобных случаях вывод из запоя в домашних условиях без врачебного контроля крайне опасен и может привести к тяжёлым последствиям. Лучше сразу вызвать нарколога или привезти пациента в клинику — это поможет избежать критических осложнений.
Подробнее можно узнать тут – vyvod-iz-zapoya-deshevo
При первой консультации нарколог осматривает пациента, чтобы оценить его состояние и подобрать оптимальную схему лечения. В зависимости от тяжести похмелья, врач может назначить инфузию с регидратационными растворами, витаминами группы B и другими препаратами, которые способствуют восстановлению. Важно, что капельница не только помогает снять симптомы, но и устраняет причины токсического воздействия алкоголя на организм, предотвращая развитие осложнений.
Узнать больше – капельница от похмелья самара
В общем, капельница является отличным решением для быстрого снятия похмельных симптомов, и её использование помогает вернуться к нормальной жизни уже в течение нескольких часов после процедуры. В некоторых случаях может потребоваться дополнительная наркологическая реабилитация для полного восстановления организма, особенно при признаках наркомании.
Исследовать вопрос подробнее – капельница от похмелья цена
Реабилитация алкоголиков с анонимной поддержкой — это процесс, при котором пациент получает необходимую медицинскую и психологическую помощь, не раскрывая своей личности и обстоятельств зависимости, включая лечение наркомании. Такие программы ориентированы на безопасное и конфиденциальное лечение, что важно для тех, кто стремится избавиться от зависимости, но опасается осуждения или утраты личной репутации, при этом возможен выезд нарколога на дом. Важно, что анонимность не ограничивает качество предоставляемых услуг: все необходимые этапы лечения, включая детоксикацию, психотерапевтические сессии и социальную реабилитацию, которые могут длиться несколько лет, проводятся на высоком уровне с акцентом на своевременный вывод из состояния зависимости.
Углубиться в тему – центр реабилитации алкоголиков город
Запой и алкогольная интоксикация могут приводить к целому ряду опасных симптомов, таких как головная боль, слабость, тошнота, рвота, обезвоживание и психоэмоциональная нестабильность. Если не начать лечение вовремя, такие состояния могут привести к более серьезным осложнениям, включая сердечные проблемы, галлюцинации и даже опасные для жизни нарушения работы организма. С помощью нарколога на дому можно начать экстренную терапию прямо в момент ухудшения состояния, не затягивая с лечением и не тратя время на поездки в клинику.
Исследовать вопрос подробнее – запой нарколог на дом
Процесс лечения в «ВолгаМед Баланс» выстроен логично и последовательно. Каждый этап направлен на достижение конкретных медицинских и психологических целей. Ниже приведена таблица, описывающая ключевые стадии терапии.
Ознакомиться с деталями – наркологическая клиника лечение алкоголизма в тольятти
Для жителей Екатеринбурга наркологическая клиника «Частный медик 24» предлагает услуги выезда нарколога на дом для проведения капельницы от похмелья. Это удобный и эффективный способ лечения, особенно если пациент испытывает тяжёлые симптомы похмелья и не может поехать в клинику. Выезд нарколога на дом позволяет начать лечение сразу, не тратя время на поездку и ожидания в клинике. Врач приезжает с необходимыми препаратами и оборудованием, проводит осмотр и назначает необходимую терапию.
Углубиться в тему – https://kapelnicza-ot-pokhmelya-ekaterinburg-8.ru
Выбор наркологической клиники — ответственное решение, от которого зависит не только эффективность терапии, но и общее физическое и психоэмоциональное состояние пациента. Квалифицированная помощь должна быть своевременной, организованной и соответствующей медицинским стандартам. Как указывает Минздрав РФ, медицинские учреждения, предоставляющие помощь при зависимостях, обязаны иметь лицензию, профессиональный персонал и комплексный подход к лечению.
Детальнее – http://narkologicheskaya-klinika-murmansk0.ru/narkologicheskaya-klinika-otzyvy-marmansk/
Следующий этап — реабилитация: индивидуальная и групповая психотерапия, восстановление эмоционального фона, обучение навыкам самоконтроля и профилактики рецидивов. При необходимости привлекаются дополнительные специалисты — психологи, психиатры, кардиологи. Важно, что в клинике «ВитаРеабилит» в Подольске большое внимание уделяется не только медицинской, но и психологической поддержке пациента и его семьи.
Детальнее – https://narkologicheskaya-klinika-podolsk5.r
Есть состояния, при которых откладывать вызов врача рискованно. Домашний выезд нужен не только при «тяжёлом похмелье», но и тогда, когда самочувствие становится нестабильным, а попытки справиться своими силами уже не работают. Ниже перечислены ситуации, при которых обращение за помощью оправдано именно в ближайшее время, а не «если не станет легче к вечеру».
Подробнее можно узнать тут – http://www.domen.ru
Такие симптомы важны не только сами по себе. Они показывают, что организму уже трудно поддерживать стабильность без медицинского вмешательства. Чем дольше в этот момент ждать, тем выше вероятность, что потребуется более жёсткий формат оказания помощи. Поэтому экстренное обращение в некоторых случаях не просто облегчает состояние, а предотвращает дальнейшее ухудшение здоровья.
Углубиться в тему – врач нарколог на дом
buy cialis pill VeritasCare cheapest cialis
Медицинская помощь начинается с детального осмотра и сбора анамнестических данных. Врач оценивает длительность запоя, объем употребляемого алкоголя, наличие хронических заболеваний и ранее перенесенных осложнений. Эти сведения необходимы для выбора корректной тактики лечения и исключения потенциальных рисков.
Получить больше информации – вывод из запоя недорого
Неотъемлемой частью программы становится психотерапия — работа с мотивацией, психологической поддержкой, поиском и устранением “триггеров” зависимости, проработка самооценки, стрессоустойчивости. К работе обязательно подключаются близкие: совместные консультации помогают восстановить доверие, снизить уровень конфликтов, научиться поддерживать без контроля и упрёков.
Детальнее – лечение алкоголизма королев
Анонимность позволяет пациентам сосоточиться на процессе лечения алкогольной зависимости, не переживая о последствиях для своей репутации или безопасности. Важно, чтобы каждый этап был подробно обсужден с пациентом, что помогает снизить уровень стресса и тревожности, связанные с лечением зависимых, включая терапию в стационаре.
Углубиться в тему – реабилитация алкоголиков стоимость москва
Капельница от похмелья — это эффективный способ снятия симптомов алкогольной интоксикации, который позволяет быстро восстановить организм после длительного употребления алкоголя. В наркологической клинике «Частный медик 24» в Екатеринбурге мы предлагаем капельную терапию, которая включает в себя комплекс препаратов для восстановления водно-электролитного баланса, выведения токсинов и нормализации состояния пациента. Процедура проводится в удобной обстановке, и мы обеспечиваем полное наблюдение врача на протяжении всего процесса лечения.
Детальнее – капельница от похмелья анонимно екатеринбург
http://civicmeds.com/# canadian pharmacy victoza
В Воронеже услуга «нарколог на дом» востребована прежде всего тогда, когда состояние развивается быстро, а запас сил у пациента почти исчерпан. После нескольких дней употребления человеку бывает трудно даже выйти из квартиры: сохраняются слабость, дрожь, бессонница, тошнота, скачки давления, потливость, раздражительность и ощущение, что без новой дозы алкоголя легче уже не станет. Именно в этот момент домашний выезд специалиста помогает разорвать опасный цикл. Наркологическая помощь начинается там, где человек находится, а не там, куда он в идеале должен был бы доехать.
Выяснить больше – нарколог на дом анонимно воронеж
В клинике каждому пациенту уделяют особое внимание. Врачи знают: универсальных решений нет, за каждым случаем — своя история и свои причины. Первый контакт начинается с конфиденциальной консультации. Можно просто позвонить или написать онлайн — уже на этом этапе врач поможет оценить ситуацию, объяснит возможные этапы и даст рекомендации по подготовке к визиту.
Узнать больше – лечение алкоголизма в королеве
Вызов нарколога на дом в Хабаровске осуществляется при наличии клинических показаний, при которых выездная помощь является обоснованной и безопасной. В клинике «Ясный Вектор» решение о формате вмешательства принимается с учётом жалоб, анамнеза и предполагаемой тяжести состояния.
Разобраться лучше – частный нарколог на дом хабаровск
Viagra Tablet price CoreBlue Health Cheap Viagra 100mg
После употребления алкоголя организм подвергается сильной нагрузке, и для его нормализации требуется вмешательство профессионалов. Капельница от похмелья помогает организму быстро избавиться от токсинов, восстанавливая его естественные функции. Важно, что капельницы для снятия похмелья не только устраняют симптомы, но и помогают избежать более серьёзных последствий, таких как хроническая интоксикация и проблемы с работой внутренних органов.
Подробнее можно узнать тут – https://kapelnicza-ot-pokhmelya-ekaterinburg-4.ru/
Процесс лечения начинается с консультации врача, который оценивает состояние пациента, его анамнез и определяет, какие процедуры и препараты нужно использовать. В большинстве случаев капельница включает в себя регидратацию, витамины группы B, антиеметики, препараты для улучшения работы печени и почек. Важно, что капельница не только помогает организму вывести токсины, но и восстанавливает нормальную работу всех систем организма, обеспечивая быстрое улучшение самочувствия.
Подробнее тут – капельница от похмелья анонимно
Капельница от похмелья применяется, когда симптомы интоксикации становятся выраженными и мешают нормальной жизнедеятельности пациента. Основные показания для использования капельницы включают:
Ознакомиться с деталями – капельница от похмелья на дом самара
Основной этап, направленный на очищение организма от продуктов распада алкоголя и нормализацию функций внутренних органов. Применяются современные препараты с антиоксидантным и гепатопротекторным эффектом.
Ознакомиться с деталями – http://lechenie-alkogolizma-krasnodar0.ru
http://civicmeds.com/# canadian world pharmacy
В подобных случаях время играет против пациента. Чем дольше человек остаётся без осмотра, тем выше вероятность, что к обезвоживанию и интоксикации добавятся нарушения сна, истощение, вегетативный срыв и ошибки с лекарствами, которые были приняты «для успокоения» без понимания общей картины. В практике выездной службы именно экстренное реагирование помогает не допустить ухудшения и в короткие сроки вернуть ситуацию под медицинский контроль.
Разобраться лучше – вызов нарколога на дом в воронеже
Таблетки и народные методы требуют времени для усвоения и часто дают ограниченный результат. Капельница же позволяет обойти желудочно-кишечный тракт и сразу доставить необходимые вещества в кровь, что особенно важно при выраженном похмельном синдроме.
Разобраться лучше – капельница от похмелья анонимно в самаре
Комплексная терапия проводится в течение 1–3 суток в зависимости от состояния пациента. В особо тяжёлых случаях врачи расширяют курс лечения, включив контрольные анализы и консультации смежных специалистов.
Узнать больше – вывод из запоя на дому цена
Запой, длительное употребление алкоголя или случайное злоупотребление могут привести к неприятным симптомам похмелья, таким как головная боль, слабость, тошнота, головокружение и усталость. Эти симптомы обусловлены тем, что в организме остаются продукты распада алкоголя, которые токсически воздействуют на все органы. Капельница от похмелья на дому — это отличная возможность быстро снять острые симптомы и восстановить нормальное состояние организма, не выходя из привычной обстановки.
Узнать больше – капельница от похмелья вызов на дом
Домашняя помощь — это клиника, перенесённая в тихую комнату. Знакомая обстановка снижает тревогу, исчезают пробки и ожидание, нет «социального шума». Врач «ПрофДетокса» приезжает без эмблем, действует спокойно и последовательно, объясняет каждое назначение простым языком. Мы не используем мифические смеси. Состав и темп капельницы подбираются под текущие показатели — давление, пульс, сатурация, выраженность тремора и тошноты, уровень тревоги, данные о лекарствах, которые человек успел принять за двое суток. Такой подход даёт не минутное облегчение, а устойчивую динамику на сутки и неделю.
Получить дополнительные сведения – http://narkolog-na-dom-ivanteevka8.ru
Капельница от похмелья — это один из наиболее эффективных методов экстренной медицинской помощи, который позволяет быстро снять симптомы алкогольной интоксикации и восстановить организм после злоупотребления алкоголем. В наркологической клинике «Частный медик 24» в Самаре мы предоставляем услугу выезда нарколога на дом и капельной терапии для пациентов, испытывающих тяжёлые симптомы похмелья. Это удобный способ получить необходимую помощь без лишнего стресса, сохраняя анонимность и комфорт пациента.
Получить дополнительные сведения – капельница от похмелья вызов на дом
Капельница от похмелья в Самаре с выездом на дом, восстановлением водного баланса и медицинской помощью в наркологической клинике «Частный медик 24»
Узнать больше – kapelnicza-ot-pokhmelya-samara-1.ru/
Главная цель — не просто снять симптомы абстиненции, а безопасно восстановить работу организма. Для этого применяются современные препараты и сбалансированные растворы, которые выводят токсины, поддерживают функции печени и нормализуют обмен веществ. Дополнительно пациент получает витаминотерапию и легкую психокоррекционную поддержку.
Подробнее тут – https://vyvod-iz-zapoya-v-khabarovske0.ru/vyvod-iz-zapoya-kruglosutochno-khabarovsk
Нарколог на дом — это срочная врачебная помощь, которая нужна в тот момент, когда больного уже сложно везти в клинику, а ждать улучшения без осмотра опасно. Домашний формат особенно актуален при запое, выраженной интоксикации, повторной рвоте, скачках давления, сильном треморе, бессоннице и тревоге. В такой ситуации важно не просто заказать выезд и получить капельницу, а сразу запустить понятный медицинский маршрут: осмотр, консультация, оценка рисков, подбор терапии и решение, можно ли безопасно оставаться дома. Именно поэтому услуга «нарколог на дом» воспринимается не как разовая процедура, а как полноценная наркологическая помощь, где каждое действие связано с текущим состоянием пациента и его безопасностью.
Выяснить больше – нарколог на дом цена в воронеже
Очень качественная работа, видно профессионалов.
заказать цветы с доставкой в томске
Для жителей Екатеринбурга наркологическая клиника «Частный медик 24» предлагает платную услугу выезда врача на дом для проведения капельницы от похмелья. Когда человек переживает сильные симптомы похмелья, такие как головная боль, тошнота, слабость, важно не тянуть с лечением и начать восстановление как можно скорее. Капельница от похмелья помогает хорошо облегчить самочувствие пациента, снять головную боль и улучшить общее состояние, восстановив водно-электролитный баланс в организме.
Детальнее – https://kapelnicza-ot-pokhmelya-ekaterinburg-4.ru/
Нарколог на дом в Самаре — помощь при запое и интоксикации в наркологической клинике «Частный медик 24»
Узнать больше – вызвать нарколога на дом самара
Нарколог на дом — это не просто возможность получить медицинскую помощь в удобное время, но и решение важнейших задач по стабилизации состояния пациента, избавлению от острых симптомов абстиненции и восстановлению его здоровья. В случае с алкоголизмом и наркоманией выезд врача на дом в Воронеже — это важный шаг к восстановлению, который начинается там, где пациент находится, в удобной и привычной обстановке. Клиника «Частный медик 24» предлагает круглосуточные выезды нарколога, предоставляя экстренную помощь при запоях, наркозависимости, а также консультации по дальнейшему лечению и реабилитации. Врач приедет по указанному адресу и проведёт все необходимые процедуры, включая капельницы для стабилизации состояния пациента.
Получить дополнительные сведения – нарколог на дом цена
Комплексная реабилитация алкоголиков в Москве помогает пациентам не только избавиться от зависимости, но и вернуться к полноценной жизни. Процесс восстановления включает в себя не только лечение алкоголизма как физического заболевания, но и работу с психологическими, социальными и эмоциональными аспектами, которые могут стать причиной или следствием зависимости. Такое подходное лечение, как правило, требует усилий со стороны как специалистов, так и самого пациента.
Выяснить больше – http://reabilitacziya-alkogolikov-moskva-2.ru/
Generic Cialis price buy cialis pill buy cialis pill
После употребления алкоголя состояние может быстро ухудшиться: появляется головная боль, тошнота, головокружение и слабость. Это следствие того, что в организме накапливаются токсины, продукты распада этанола и нарушается водно-электролитный баланс. С помощью капельницы от похмелья можно быстро справиться с интоксикацией, восполнить недостающие элементы и облегчить состояние пациента. В клинике «Частный медик 24» в Самаре мы предлагаем капельницы, которые помогают снять все неприятные симптомы похмелья, восстанавливая работу организма и минимизируя риски для здоровья.
Исследовать вопрос подробнее – капельница от похмелья вызов на дом
Запрос «нарколог на дом» связан не только с запоем как таковым. На практике выезд заказывают при разных состояниях, когда организм уже плохо переносит последствия употребления и без осмотра трудно понять, где проходит граница между тяжёлым самочувствием и опасным осложнением.
Подробнее тут – нарколог на дом анонимно
Процесс реабилитации алкоголиков включает в себя несколько методов, направленных на восстановление как физического, так и психоэмоционального состояния пациента. В Москве доступны различные программы, от традиционной детоксикации до современных подходов, при этом в отдельных случаях предусматривается вывод данных о состоянии пациента и динамике лечения при алкогольной зависимости, включая когнитивно-поведенческую терапию и арт-терапию.
Получить больше информации – алкоголик реабилитация наркоманов в москве
Срочный домашний выезд особенно важен для семей, которые уже сталкивались с тяжёлыми последствиями алкоголизма и понимают, что обычные попытки «отпаивания» не решают проблему. Врач оценивает не только факт употребления, но и длительность запоя, возраст, наличие хронических болезней, уже принятые медикаменты, риск абстинентного синдрома, состояние сердца и общую нагрузку на организм. Такой формат позволяет анонимно вызвать специалиста, быстро провести необходимые вмешательства и определить, нужен ли только домашний вывод из острого состояния или дальше потребуется кодирование, повторная консультация, реабилитация либо более широкий маршрут помощи при наркомании.
Получить больше информации – врач нарколог на дом в воронеже
В подобных случаях время играет против пациента. Чем дольше человек остаётся без осмотра, тем выше вероятность, что к обезвоживанию и интоксикации добавятся нарушения сна, истощение, вегетативный срыв и ошибки с лекарствами, которые были приняты «для успокоения» без понимания общей картины. В практике выездной службы именно экстренное реагирование помогает не допустить ухудшения и в короткие сроки вернуть ситуацию под медицинский контроль.
Подробнее тут – врач нарколог на дом воронеж
Капельница от похмелья нужна не только в случаях тяжёлой интоксикации, но и при более лёгких симптомах, когда пациент ощущает себя уставшим и измотанным, но не может справиться с проблемами самостоятельно. Некоторые из симптомов, при которых капельница может быть особенно полезна, включают:
Разобраться лучше – капельница от похмелья в екатеринбурге
Далее начинается этап детоксикации — это основа безопасного и эффективного вывода из запоя. Используются капельницы с современными очищающими и поддерживающими препаратами, комплекс витаминов, препараты для поддержки печени, почек и сердечно-сосудистой системы. При необходимости назначаются средства для стабилизации психоэмоционального состояния, купирования судорог, нормализации сна и снижения тревожности.
Изучить вопрос глубже – вывод из запоя недорого балашиха
Нарколог рекомендует кодирование при наличии следующих признаков:
Получить дополнительные сведения – http://kodirovanie-ot-alkogolizma-pushkino4.ru/kodirovanie-ot-alkogolizma-na-domu-v-pushkino/https://kodirovanie-ot-alkogolizma-pushkino4.ru
http://civicmeds.com/# online canadian pharmacy coupon
Капельница от похмелья — это медицинская процедура, направленная на быстрое восстановление организма после алкогольной интоксикации. Ее состав подбирается индивидуально с учетом состояния пациента, степени обезвоживания, выраженности симптомов и наличия сопутствующих заболеваний. В отличие от самостоятельных попыток «отпиться» или принять таблетки, внутривенное введение растворов позволяет действующим веществам сразу поступать в кровь, минуя желудочно-кишечный тракт, что обеспечивает более быстрый и выраженный эффект.
Узнать больше – капельница от похмелья вызов на дом в самаре
Капельница от похмелья — это не просто средство для снятия симптомов, но и эффективный способ быстрого восстановления организма после алкогольной интоксикации. В наркологической клинике «Частный медик 24» в Екатеринбурге мы предоставляем услугу выезда нарколога на дом, что позволяет пациентам получить необходимую медицинскую помощь, не покидая комфорт своей обстановки. Это особенно важно в случае, если состояние пациента серьёзно ухудшилось, и он не может поехать в клинику самостоятельно.
Углубиться в тему – капельница от похмелья цена в екатеринбурге
Для Воронежа выездной формат особенно востребован вечером, ночью и ранним утром, когда у больного резко усиливаются симптомы и поездка в медицинское учреждение становится тяжёлой или просто нереальной. Если человек несколько дней употреблял алкоголь, почти не спал, плохо переносит воду, жалуется на сердцебиение и слабость, то откладывать осмотр не стоит. Срочная наркологическая помощь нужна именно тогда, когда ситуация развивается быстро, а семья уже видит, что своими силами справиться не удаётся. Врач приезжает, проводит осмотр, определяет, нет ли признаков осложнений, и уже на месте решает, какие меры допустимы дома, а какие требуют другого формата оказания помощи.
Подробнее можно узнать тут – нарколог на дом анонимно
Особенность анонимной реабилитации заключается в создании комфортной и безопасной среды, которая мотивирует пациента работать над собой, не опасаясь осуждения. Это повышает эффективность лечения, ведь пациент может открыться и честно обсуждать свои проблемы без страха быть осужденным.
Подробнее можно узнать тут – клиника реабилитации алкоголиков в москве
canada pharmacy world express scripts com pharmacies canadian online pharmacy no prescription
Нарколог на дом — это срочная врачебная помощь, которая нужна в тот момент, когда больного уже сложно везти в клинику, а ждать улучшения без осмотра опасно. Домашний формат особенно актуален при запое, выраженной интоксикации, повторной рвоте, скачках давления, сильном треморе, бессоннице и тревоге. В такой ситуации важно не просто заказать выезд и получить капельницу, а сразу запустить понятный медицинский маршрут: осмотр, консультация, оценка рисков, подбор терапии и решение, можно ли безопасно оставаться дома. Именно поэтому услуга «нарколог на дом» воспринимается не как разовая процедура, а как полноценная наркологическая помощь, где каждое действие связано с текущим состоянием пациента и его безопасностью.
Углубиться в тему – нарколог на дом анонимно
Наркологическая помощь на дому помогает избежать стресса, связанного с поездкой в клинику. Особенно это важно в случаях, когда пациент находится в состоянии тяжёлой интоксикации или переживает абстинентный синдром, который можно только усугубить дополнительной нагрузкой. Врач приедет в кратчайшие сроки, обеспечивая необходимое лечение в первые часы после ухудшения состояния. Также важно, что при выезде специалист гарантирует полную анонимность, что особенно важно для многих людей, которые боятся открыто признаться в своей проблеме. Профессиональная наркологическая помощь на дому позволяет избежать срыва и начать процесс восстановления без стресса.
Выяснить больше – нарколог на дом цена воронеж
Ключевым преимуществом вызова нарколога на дом является то, что лечение начинается в тот момент, когда оно особенно необходимо. Близкие пациента не должны волноваться о поиске клиники или медицинских центров в экстренной ситуации — помощь будет оказана немедленно, с минимальными затратами времени и без стресса для пациента.
Углубиться в тему – нарколог на дом цена
generic sildenafil and buy Viagra over the counter viagra without prescription
https://image.google.ki/url?q=https://corebluehealth.shop buy viagra here and https://gikar.it/user/rlvrggxkzl/ Cheap Sildenafil 100mg
cheapest viagra Viagra online price and Buy generic 100mg Viagra online sildenafil online
Запой, длительное употребление алкоголя или случайное злоупотребление могут привести к неприятным симптомам похмелья, таким как головная боль, слабость, тошнота, головокружение и усталость. Эти симптомы обусловлены тем, что в организме остаются продукты распада алкоголя, которые токсически воздействуют на все органы. Капельница от похмелья на дому — это отличная возможность быстро снять острые симптомы и восстановить нормальное состояние организма, не выходя из привычной обстановки.
Подробнее – капельница от похмелья на дом
Нарколог на дом — это не просто возможность получить медицинскую помощь в удобное время, но и решение важнейших задач по стабилизации состояния пациента, избавлению от острых симптомов абстиненции и восстановлению его здоровья. В случае с алкоголизмом и наркоманией выезд врача на дом в Воронеже — это важный шаг к восстановлению, который начинается там, где пациент находится, в удобной и привычной обстановке. Клиника «Частный медик 24» предлагает круглосуточные выезды нарколога, предоставляя экстренную помощь при запоях, наркозависимости, а также консультации по дальнейшему лечению и реабилитации. Врач приедет по указанному адресу и проведёт все необходимые процедуры, включая капельницы для стабилизации состояния пациента.
Углубиться в тему – врач нарколог на дом
Медицинская помощь начинается с детального осмотра и сбора анамнестических данных. Врач оценивает длительность запоя, объем употребляемого алкоголя, наличие хронических заболеваний и ранее перенесенных осложнений. Эти сведения необходимы для выбора корректной тактики лечения и исключения потенциальных рисков.
Исследовать вопрос подробнее – вывод из запоя хабаровск
Капельница от похмелья может быть необходима в самых разных ситуациях, когда симптомы становятся слишком выраженными и мешают нормальному функционированию пациента. Если вы или ваши близкие сталкиваетесь с такими признаками, как сильная головная боль, рвота, слабость и головокружение, то немедленный вызов нарколога на дом станет необходимостью. Важно не откладывать помощь, так как интоксикация может усугубить состояние пациента и привести к осложнениям, таким как обезвоживание или нарушения работы сердца.
Подробнее тут – капельница от похмелья екатеринбург
Далее, когда физическое состояние стабилизировано, совместно с врачом выбирается стратегия дальнейшего лечения. В «Новая Точка» доступны современные методы кодирования (уколы, таблетки, вшивание препаратов, гипнотерапия), но решение всегда принимается осознанно, с объяснением плюсов, рисков и индивидуальным подбором метода.
Выяснить больше – клиника лечение алкоголизма цены
Реабилитация алкоголиков с поддержкой специалистов в Москве представляет собой важный и сложный процесс, в котором ключевую роль играет профессиональное вмешательство. Программы реабилитации включают в себя не только медицинскую помощь, но и психологическую, социальную и эмоциональную поддержку, что способствует успешному и долгосрочному восстановлению пациента. Такая комплексная помощь является основой эффективного лечения и предотвращения рецидивов.
Изучить вопрос глубже – реабилитация алкоголиков город
Нарколог на дом — это услуга, которая позволяет получить медицинскую помощь в комфортной и привычной обстановке, не выходя из дома. В наркологической клинике «Частный медик 24» в Самаре мы предоставляем профессиональную помощь нарколога прямо на дому. Это идеальное решение для тех, кто испытывает симптомы абстиненции, ломки или алкогольной интоксикации, но не может или не хочет ехать в клинику. Выезд врача на дом позволяет начать лечение сразу, без задержек, минимизируя стрессы и сложности, связанные с поездкой.
Узнать больше – нарколог на дом анонимно самара
Реабилитация алкоголиков с анонимной поддержкой предоставляет несколько значительных преимуществ. Она помогает избежать социальных предрассудков, связанных с зависимостью, и позволяет пациенту сосредоточиться исключительно на своем здоровье и процессе восстановления. Это особенно важно для тех, кто чувствует себя изолированным или боится осуждения со стороны окружающих. Анонимность также способствует большему доверию к лечению и уменьшает внутреннее сопротивление пациента.
Исследовать вопрос подробнее – реабилитация алкоголиков стоимость москва
Капельница от похмелья направлена на восстановление водно-электролитного баланса, выведение токсинов, нормализацию работы печени и почек, а также улучшение общего состояния пациента. В клинике «Частный медик 24» мы подходим к каждому случаю индивидуально, учитывая состояние пациента, его анамнез и особенности организма. Важно, чтобы помощь была оказана вовремя, так как откладывание лечения может привести к осложнениям, таким как сердечные проблемы, психозы или нарушения сна. Выезд нарколога на дом в Самаре позволяет быстро начать лечение, не тратя времени на дорогу и дополнительные усилия.
Углубиться в тему – капельница от похмелья цена
Во всех этих случаях врач нужен не только для облегчения симптомов. Его задача — понять, можно ли ограничиться домашней терапией или уже сейчас необходимо менять маршрут лечения. Именно этот этап и делает домашний выезд профессиональной услугой, а не упрощённой заменой клиники.
Выяснить больше – запой нарколог на дом в воронеже
Выезд нарколога на дом в Самаре — это комплексный подход к лечению, который включает несколько этапов. Врач, приехавший на место, не ограничивается одной процедурой, а проводит полноценный осмотр, диагностирует состояние пациента, определяет причину ухудшения самочувствия и подбирает индивидуальную терапию. Наиболее часто при выезде нарколога на дом используются капельницы, антиеметики и препараты для стабилизации состояния пациента, снятия симптомов абстиненции и улучшения общего самочувствия.
Получить дополнительную информацию – нарколог на дом вывод самара
https://veritascarepharm.shop/# Buy Tadalafil 10mg
В клинике применяются современные медицинские технологии, направленные на восстановление организма и стабилизацию психоэмоционального состояния. Ниже представлена таблица с описанием основных методов и их терапевтического значения.
Детальнее – наркологическая клиника нарколог
http://corebluehealth.com/# CoreBlue Health
Помощь 24/7 означает, что нарколог на дом в Хабаровске может быть направлен в любое время суток, включая ночные часы и выходные дни. В клинике «Ясный Вектор» выездная служба функционирует с учётом логистики города, что позволяет минимизировать время ожидания врача.
Ознакомиться с деталями – врач нарколог на дом хабаровск
Капельница от похмелья в Самаре с подбором препаратов, улучшением самочувствия и наблюдением в наркологической клинике «Частный медик 24»
Подробнее – капельница от похмелья на дом
Для семьи это тоже имеет большое значение. Пока врач в пути, родственники часто совершают одни и те же ошибки: пытаются «отпаивать» человека через силу, смешивают несовместимые медикаменты, дают советы, которые только повышают тревогу, спорят или требуют немедленно взять себя в руки. Профессиональный выезд снимает эту хаотичность. После осмотра врач объясняет, какие симптомы связаны с алкогольной интоксикацией, какие могут указывать на осложнения, что допустимо дома, а что требует перевода в стационар. В этом и состоит ценность выезда: он возвращает контроль над ситуацией и позволяет начать лечение без лишних задержек.
Разобраться лучше – врач нарколог на дом
Нарколог на дом в Самаре с выездом специалиста, детоксикацией и анонимной медицинской помощью в наркологической клинике «Частный медик 24»
Детальнее – врач нарколог на дом самара
Cheap Sildenafil 100mg cheapest viagra Sildenafil 100mg price
http://corebluehealth.com/# CoreBlue Health
Нарколог на дом в Воронеже с оперативным приездом специалиста, детоксикацией и медицинским наблюдением в наркологической клинике «Частный медик 24»
Исследовать вопрос подробнее – вызвать нарколога на дом в воронеже
Комплексная терапия проводится в течение 1–3 суток в зависимости от состояния пациента. В особо тяжёлых случаях врачи расширяют курс лечения, включив контрольные анализы и консультации смежных специалистов.
Подробнее – http://vyvod-iz-zapoya-tolyatti0.ru
Запрос на выезд врача связан не только с классическим запоем. На практике домашняя помощь нужна в разных ситуациях, когда организму уже трудно компенсировать последствия употребления, а откладывание визита увеличивает риск осложнений.
Получить дополнительную информацию – нарколог на дом
Реабилитация алкоголиков в Москве: лечение зависимости, восстановление и поддержка под контролем специалистов в наркологической клинике «Похмельная служба»
Подробнее тут – центр реабилитации алкоголиков город
Процесс реабилитации алкоголиков включает в себя несколько методов, направленных на восстановление как физического, так и психоэмоционального состояния пациента. В Москве доступны различные программы, от традиционной детоксикации до современных подходов, при этом в отдельных случаях предусматривается вывод данных о состоянии пациента и динамике лечения при алкогольной зависимости, включая когнитивно-поведенческую терапию и арт-терапию.
Получить дополнительную информацию – клиника реабилитации алкоголиков
Медицинский подход к выводу из запоя предполагает не только устранение внешних симптомов, но и стабилизацию внутренних процессов организма, что особенно важно при повторяющихся или затяжных эпизодах.
Подробнее можно узнать тут – вывод из запоя цена в тольятти
CoreBlue Health CoreBlue Health CoreBlue Health
Капельница от похмелья в Екатеринбурге с выездом специалиста, подбором терапии и восстановлением состояния в наркологической клинике «Частный медик 24»
Подробнее можно узнать тут – капельница от похмелья екатеринбург
Запой и алкогольная интоксикация могут приводить к целому ряду опасных симптомов, таких как головная боль, слабость, тошнота, рвота, обезвоживание и психоэмоциональная нестабильность. Если не начать лечение вовремя, такие состояния могут привести к более серьезным осложнениям, включая сердечные проблемы, галлюцинации и даже опасные для жизни нарушения работы организма. С помощью нарколога на дому можно начать экстренную терапию прямо в момент ухудшения состояния, не затягивая с лечением и не тратя время на поездки в клинику.
Узнать больше – нарколог на дом анонимно в самаре
Каждый этап процедуры направлен на последовательное восстановление организма и предотвращение осложнений. Ниже представлена таблица, отражающая основные стадии и их особенности.
Детальнее – вывод из запоя с выездом хабаровск
Лечение в наркологической клинике в Краснодаре строится на комплексном подходе, включающем медикаментозную терапию, психотерапевтическую помощь и социальную реабилитацию. Медикаментозное лечение направлено на детоксикацию организма и снижение симптомов абстиненции, что позволяет значительно улучшить состояние пациента в первые дни терапии. Современные препараты, применяемые в лечении зависимости, сертифицированы и соответствуют международным стандартам, что подтверждается на сайте Всемирной организации здравоохранения.
Детальнее – http://narkologicheskaya-klinika-krasnodar0.ru/
Медикаментозное вмешательство подбирается индивидуально, что позволяет снизить нагрузку на органы и системы и обеспечить безопасность лечения.
Получить дополнительные сведения – нарколог на дом вывод из запоя в тольятти
Запой — это не просто временная слабость, а критическое состояние, требующее экстренного медицинского вмешательства. Особенно опасно откладывать обращение за помощью, если у человека наблюдаются такие симптомы:
Подробнее можно узнать тут – вывод из алкогольного запоя
Своевременное обращение к специалистам клиники «ВитаРеабилит» — это не только шанс на восстановление здоровья, но и гарантия безопасности пациента и его близких.
Получить дополнительную информацию – бесплатная наркологическая клиника
Нарколог на дом в Самаре востребован в самых различных ситуациях. Иногда пациент не в состоянии самостоятельно добраться до клиники из-за сильного состояния похмелья или ломки. В таких случаях выезд нарколога становится наиболее оптимальным решением. Наши специалисты оказывают помощь при следующих состояниях:
Ознакомиться с деталями – нарколог на дом анонимно в самаре
Капельница от похмелья — это эффективный и быстрый способ снятия симптомов алкогольной интоксикации и восстановления организма после злоупотребления алкоголем. В наркологической клинике «Частный медик 24» в Екатеринбурге мы предлагаем анонимное лечение на дому, которое позволяет пациентам без лишнего стресса и беспокойства начать процесс восстановления прямо в удобной для них обстановке. Мы обеспечиваем профессиональную помощь при похмелье, устраняем токсикоз, восстанавливаем водно-электролитный баланс и помогаем вернуть здоровье после употребления алкоголя.
Узнать больше – капельница от похмелья в екатеринбурге
После завершения основного курса лечения в наркологической клинике в Краснодаре пациентам предлагаются программы социальной реабилитации. Они направлены на восстановление социальных навыков, адаптацию в обществе и предотвращение рецидивов. Ключевым элементом здесь является поддержка со стороны профессиональных социальных работников и участие в группах взаимопомощи.
Детальнее – наркологические клиники алкоголизм краснодарский край
Перед кодированием важно снять острую интоксикацию и стабилизировать состояние. В «Орион-Клиник» пациенту проводят курс инфузионной терапии: капельницы с регидратационными растворами, гепатопротекторами и витаминно-минеральными комплексами. Это позволяет восстановить водно-электролитный баланс, поддержать функции печени и почек, нормализовать артериальное давление и работу сердца. Одновременно психолог проводит предварительные беседы для выяснения причин зависимости, уровня тревожности и мотивации. Подготовительный этап длится от одного до трёх дней в зависимости от тяжести состояния и поможет снизить риск побочных эффектов при введении кодирующего препарата.
Получить дополнительные сведения – http://kodirovanie-ot-alkogolizma-pushkino4.ru/kodirovanie-ot-alkogolizma-na-domu-v-pushkino/
Эта публикация завернет вас в вихрь увлекательного контента, сбрасывая стереотипы и открывая двери к новым идеям. Каждый абзац станет для вас открытием, полным ярких примеров и впечатляющих достижений. Подготовьтесь быть вовлеченными и удивленными каждый раз, когда продолжите читать.
Углубить понимание вопроса – https://kouichi.wpxblog.jp/sblog
В зависимости от тяжести состояния подбирается индивидуальная программа детоксикации. В неё входят: — Инфузионная терапия (капельницы) для очищения организма от токсинов; — Поддерживающие препараты для работы сердца, печени, нервной системы; — Симптоматическое лечение (устранение рвоты, судорог, бессонницы); — Витамины и средства для восстановления водно-солевого баланса.
Получить дополнительные сведения – narkologicheskaya-klinika-v-podolske
Первые положительные изменения обычно появляются уже через 15–20 минут после начала капельницы. Уменьшается головная боль, снижается чувство тошноты, стабилизируется давление и пульс. К концу процедуры большинство симптомов становится значительно менее выраженными.
Получить дополнительные сведения – капельница от похмелья цена самара
Капельница от похмелья в Самаре с устранением симптомов интоксикации и контролем состояния в наркологической клинике «Частный медик 24»
Ознакомиться с деталями – капельница от похмелья вызов на дом
После снятия острой интоксикации переходим к физическому и психическому восстановлению — комплекс лечебной гимнастики, массажи, физиопроцедуры и сеансы ароматерапии для снятия стресса и повышения общего тонуса.
Разобраться лучше – лечение наркомании и алкоголизма
Мы собрали для вас самые захватывающие факты из мира науки и истории. От малознакомых деталей до грандиозных событий — эта статья расширит ваш кругозор и подарит новое понимание того, как устроен наш мир.
А что дальше? – https://www.giannideiuliis.it/la-comunicazione-dopo-la-comunicazione
Капельница от похмелья в Екатеринбурге с инфузионной терапией и быстрым облегчением симптомов в наркологической клинике «Частный медик 24»
Получить больше информации – капельница от похмелья цена
Когда такие симптомы становятся ярко выраженными, важно не затягивать с лечением и вызвать нарколога на дом. Это позволит своевременно устранить токсические вещества из организма и предотвратить серьёзные проблемы с органами. Важно, чтобы лечение началось как можно быстрее, что возможно только через экстренный выезд специалиста на дом.
Узнать больше – https://kapelnicza-ot-pokhmelya-ekaterinburg-6.ru
На территории Мурманска работает множество клиник с разным уровнем сервиса и направленностью. Однако не каждая из них может обеспечить надёжную и безопасную помощь. Многие пациенты сталкиваются с формальным лечением, не включающим индивидуальный подход или постреабилитационную поддержку. Поэтому крайне важно заранее ознакомиться с основными признаками хорошей клиники и задать правильные вопросы при первичном обращении.
Узнать больше – http://
Перед выбором метода врач проводит диагностику, оценивает физическое и психоэмоциональное состояние пациента, рассказывает о возможных рисках и особенностях процедуры. Только после согласования всех деталей назначается дата и форма кодирования.
Подробнее можно узнать тут – анонимное кодирование от алкоголизма
Состав капельницы может варьироваться, однако в большинстве случаев включает базовые группы препаратов, направленные на устранение последствий интоксикации:
Узнать больше – капельница от похмелья на дом
Первичный этап лечения в наркологической клинике в Тольятти имеет диагностическое значение и определяет дальнейшую тактику медицинского вмешательства. В клинике «Гармония Волги» обследование включает клиническую оценку состояния пациента, анализ жалоб и выявление факторов риска.
Получить больше информации – http://narkologicheskaya-klinika-v-tolyatti0.ru/
Процесс капельницы включает внутривенное введение различных растворов, которые помогают нейтрализовать эффекты алкогольной интоксикации, включая последствия запоя и алкоголизма. Наиболее часто в составе капельницы используются солевые и глюкозные растворы, витамины группы B, а также препараты для детоксикации организма. Эти компоненты помогают быстро восстановить водно-электролитный баланс, улучшить обмен веществ и ускорить выведение продуктов распада алкоголя.
Получить больше информации – https://kapelnicza-ot-pokhmelya-samara-6.ru
buying from canadian pharmacies CivicMeds online pharmacy delivery usa
Алкогольная интоксикация оказывает серьёзное влияние на организм, вызывая головную боль, тошноту, слабость и головокружение. Капельница помогает организму быстро избавиться от продуктов распада алкоголя, восстановить нормальное функционирование органов и минимизировать последствия для здоровья. Важно, что мы обеспечиваем полное наблюдение врача на протяжении всей процедуры, что помогает гарантировать безопасность пациента и максимальную эффективность лечения.
Выяснить больше – капельница от похмелья цена
Капельница от похмелья — это эффективный способ снятия симптомов алкогольной интоксикации, который позволяет быстро восстановить организм после длительного употребления алкоголя. В наркологической клинике «Частный медик 24» в Екатеринбурге мы предлагаем капельную терапию, которая включает в себя комплекс препаратов для восстановления водно-электролитного баланса, выведения токсинов и нормализации состояния пациента. Процедура проводится в удобной обстановке, и мы обеспечиваем полное наблюдение врача на протяжении всего процесса лечения.
Подробнее – капельница от похмелья на дом в екатеринбурге
Выезд нарколога на дом в Самаре — это комплексный подход к лечению, который включает несколько этапов. Врач, приехавший на место, не ограничивается одной процедурой, а проводит полноценный осмотр, диагностирует состояние пациента, определяет причину ухудшения самочувствия и подбирает индивидуальную терапию. Наиболее часто при выезде нарколога на дом используются капельницы, антиеметики и препараты для стабилизации состояния пациента, снятия симптомов абстиненции и улучшения общего самочувствия.
Подробнее тут – http://narkolog-na-dom-samara-1.ru/
Капельница рекомендуется в тех случаях, когда симптомы похмелья становятся настолько выраженными, что человек не в состоянии справиться с ними самостоятельно, и необходима квалифицированная помощь, например, в стационаре. Это может быть сильная головная боль, многократная рвота, головокружение, слабость, а также другие признаки алкогольной интоксикации. Капельница быстро помогает снять эти симптомы, восстановив нормальное состояние организма.
Получить дополнительные сведения – капельница от похмелья анонимно в самаре
Наркологическая клиника в Тольятти рассматривается как профильное медицинское звено, ориентированное на лечение алкогольной и наркотической зависимости с учётом клинических особенностей пациента. В клинике «Гармония Волги» медицинская помощь выстраивается на основе диагностики, поэтапной терапии и врачебного наблюдения, что позволяет контролировать состояние пациента на всех этапах лечения.
Детальнее – https://narkologicheskaya-klinika-v-tolyatti0.ru/tolyatti-narkologicheskij-dispanser/
Viagra generic over the counter CoreBlue Health Viagra without a doctor prescription Canada
Для семьи это тоже имеет большое значение. Пока врач в пути, родственники часто совершают одни и те же ошибки: пытаются «отпаивать» человека через силу, смешивают несовместимые медикаменты, дают советы, которые только повышают тревогу, спорят или требуют немедленно взять себя в руки. Профессиональный выезд снимает эту хаотичность. После осмотра врач объясняет, какие симптомы связаны с алкогольной интоксикацией, какие могут указывать на осложнения, что допустимо дома, а что требует перевода в стационар. В этом и состоит ценность выезда: он возвращает контроль над ситуацией и позволяет начать лечение без лишних задержек.
Углубиться в тему – нарколог на дом вывод в воронеже
Особенность анонимной реабилитации заключается в создании комфортной и безопасной среды, которая мотивирует пациента работать над собой, не опасаясь осуждения. Это повышает эффективность лечения, ведь пациент может открыться и честно обсуждать свои проблемы без страха быть осужденным.
Получить дополнительную информацию – http://www.domen.ru
Есть состояния, при которых откладывать вызов врача рискованно. Домашний выезд нужен не только при «тяжёлом похмелье», но и тогда, когда самочувствие становится нестабильным, а попытки справиться своими силами уже не работают. Ниже перечислены ситуации, при которых обращение за помощью оправдано именно в ближайшее время, а не «если не станет легче к вечеру».
Детальнее – запой нарколог на дом в воронеже
http://civicmeds.com/# no prescription required pharmacy
Выезд нарколога на дом в Воронеже становится особенно важным, когда пациент переживает острые симптомы абстиненции или интоксикации. Это может быть связано с запоем, наркотической ломкой или последствиями длительного употребления алкоголя или наркотиков. В таких случаях медицинская помощь должна быть оказана как можно скорее, чтобы предотвратить серьёзные осложнения, такие как сердечные сбои, психозы, судороги или делирий. От того, насколько быстро будет оказана помощь, зависит успешность стабилизации состояния и вероятность долгосрочного выздоровления.
Получить дополнительные сведения – нарколог на дом анонимно
Каждый выезд нарколога включает в себя не только инфузионную терапию, но и полноценную оценку состояния пациента, анализ рисков, а также консультацию по дальнейшему лечению. Врач может назначить дополнительные препараты для снятия симптомов ломки, восстановления водно-электролитного баланса и улучшения общего состояния пациента. Также важно, что консультация включает рекомендации по реабилитации, психологической поддержке и кодированию, если это необходимо для пациента, страдающего хроническим алкоголизмом или наркоманией.
Узнать больше – нарколог на дом анонимно воронеж
Такой подход позволяет врачу контролировать каждый шаг процесса, фиксировать динамику и при необходимости корректировать терапию. Постоянное наблюдение и своевременная поддержка делают лечение эффективным и безопасным для пациента.
Подробнее тут – наркологическая клиника стационар в тольятти
https://civicmeds.shop/# pharmacy com canada
Нарколог на дом в Воронеже с оперативным приездом специалиста, детоксикацией и медицинским наблюдением в наркологической клинике «Частный медик 24»
Исследовать вопрос подробнее – вызвать нарколога на дом воронеж
Нарколог на дом в Москве — это формат медицинской помощи, который рассматривают при состояниях после употребления алкоголя, когда больному требуется осмотр врача без поездки в клинику. Чаще всего обращение связано с запоем, выраженным похмельным синдромом, нарушением сна, тревогой, слабостью, тремором, обезвоживанием, скачками давления, сердцебиением и общим ухудшением самочувствия. Дальнейшая тактика зависит от состояния больного на момент осмотра, продолжительности употребления алкоголя, возраста и сопутствующих заболеваний.
Изучить вопрос глубже – вызвать нарколога на дом в москве
Выезд начинается с очной оценки. Врач уточняет историю эпизода, смотрит давление и пульс, сатурацию, температуру, оценивает неврологический статус и уровень тревоги, внимательно проверяет совместимость с уже принятыми средствами. Допуск к терапии — стартовая точка. Затем запускается инфузионная поддержка с аккуратной коррекцией воды и электролитов, защитой органов мишеней, симптом контролем тошноты и головокружения. При необходимости настраивается сон, но без избыточной седативной нагрузки, которая могла бы замаскировать риски. По завершении основного блока — переоценка, перевод на пероральные схемы, подробная памятка на 24–48 часов и заранее согласованное окно контрольного контакта.
Подробнее тут – https://narkolog-na-dom-ivanteevka8.ru/narkolog-na-dom-srochno-v-ivanteevke
Реабилитация алкоголиков с анонимной поддержкой предоставляет несколько значительных преимуществ. Она помогает избежать социальных предрассудков, связанных с зависимостью, и позволяет пациенту сосредоточиться исключительно на своем здоровье и процессе восстановления. Это особенно важно для тех, кто чувствует себя изолированным или боится осуждения со стороны окружающих. Анонимность также способствует большему доверию к лечению и уменьшает внутреннее сопротивление пациента.
Выяснить больше – реабилитация алкоголиков в москве
Нарколог на дом в Воронеже с быстрым выездом, индивидуальным подбором терапии и наблюдением в наркологической клинике «Частный медик 24»
Получить больше информации – вызвать нарколога на дом в воронеже
Нарколог на дом — это срочная врачебная помощь, которая нужна в тот момент, когда больного уже сложно везти в клинику, а ждать улучшения без осмотра опасно. Домашний формат особенно актуален при запое, выраженной интоксикации, повторной рвоте, скачках давления, сильном треморе, бессоннице и тревоге. В такой ситуации важно не просто заказать выезд и получить капельницу, а сразу запустить понятный медицинский маршрут: осмотр, консультация, оценка рисков, подбор терапии и решение, можно ли безопасно оставаться дома. Именно поэтому услуга «нарколог на дом» воспринимается не как разовая процедура, а как полноценная наркологическая помощь, где каждое действие связано с текущим состоянием пациента и его безопасностью.
Получить дополнительные сведения – врач нарколог на дом
Авто портал https://tvregion.com.ua новости, обзоры и тест-драйвы автомобилей. Актуальная информация о новых моделях, технологиях и рынке. Узнавайте все о машинах и выбирайте авто с удобным сервисом.
CoreBlue Health CoreBlue Health sildenafil 50 mg price
Авто портал https://autoguide.kyiv.ua свежие новости, обзоры и тест-драйвы. Рейтинги автомобилей, советы по выбору и актуальные предложения. Все о мире авто в одном месте.
Публикация предлагает читателю не просто информацию, а инструменты для анализа и саморазвития. Мы стимулируем критическое мышление, предлагая различные точки зрения и призывая к самостоятельному поиску решений.
Получить дополнительную информацию – https://mdcatpk.info/antonyms-quiz-1
п»їcialis generic: Buy Tadalafil 10mg – VeritasCare
Tadalafil Tablet: VeritasCare – VeritasCare
Каждый выезд нарколога включает в себя не только инфузионную терапию, но и полноценную оценку состояния пациента, анализ рисков, а также консультацию по дальнейшему лечению. Врач может назначить дополнительные препараты для снятия симптомов ломки, восстановления водно-электролитного баланса и улучшения общего состояния пациента. Также важно, что консультация включает рекомендации по реабилитации, психологической поддержке и кодированию, если это необходимо для пациента, страдающего хроническим алкоголизмом или наркоманией.
Исследовать вопрос подробнее – запой нарколог на дом в воронеже
order viagra Cheap generic Viagra online Order Viagra 50 mg online
Капельница от похмелья применяется, когда симптомы интоксикации становятся выраженными и мешают нормальной жизнедеятельности пациента. Основные показания для использования капельницы включают:
Получить больше информации – капельница от похмелья вызов на дом самара
Эта публикация погружает вас в мир увлекательных фактов и удивительных открытий. Мы расскажем о ключевых событиях, которые изменили ход истории, и приоткроем завесу над научными достижениями, которые вдохновили миллионы. Узнайте, чему может научить нас прошлое и как применить эти знания в будущем.
Заходи — там интересно – https://ballhead.com/rich-steel-review-of-the-flexshooter-extreme
В этой статье представлен занимательный и актуальный контент, который заставит вас задуматься. Мы обсуждаем насущные вопросы и проблемы, а также освещаем истории, которые вдохновляют на действия и изменения. Узнайте, что стоит за событиями нашего времени!
Подробности по ссылке – https://www.quintaparete.org/slegati-15-16-aprile-2016
Капельницы помогают не только справиться с симптомами похмелья, но и с выводом токсинов из организма, что способствует его быстрому восстановлению. Этот метод позволяет минимизировать последствия, такие как головная боль, нарушение давления и общее недомогание.
Подробнее тут – капельница от похмелья самара
Авто журнал https://psncodegeneratormiu.org новости, обзоры и тест-драйвы автомобилей. Узнавайте о новых моделях, технологиях и рынке. Полезные советы, рейтинги и аналитика для автолюбителей.
Основной этап, направленный на очищение организма от продуктов распада алкоголя и нормализацию функций внутренних органов. Применяются современные препараты с антиоксидантным и гепатопротекторным эффектом.
Разобраться лучше – http://lechenie-alkogolizma-krasnodar0.ru
Наркологическая клиника в Краснодаре играет важную роль в оказании медицинской помощи людям с различными формами зависимости. Современные методы диагностики и лечения позволяют эффективно справляться с проблемами, связанными с алкоголизмом, наркотической зависимостью и другими психоактивными веществами. Клиническая помощь организована с учетом индивидуальных особенностей пациентов и направлена на достижение стойкой ремиссии.
Получить дополнительную информацию – https://narkologicheskaya-klinika-krasnodar0.ru/chastnaya-narkologicheskaya-klinika-v-krasnodare
Помощь 24/7 означает, что нарколог на дом в Хабаровске может быть направлен в любое время суток, включая ночные часы и выходные дни. В клинике «Ясный Вектор» выездная служба функционирует с учётом логистики города, что позволяет минимизировать время ожидания врача.
Разобраться лучше – https://narkolog-na-dom-khabarovsk0.ru/khabarovsk-narkologicheskaya-pomoshh
Каждый элемент программы направлен на создание комплексного подхода к лечению зависимости, обеспечивая помощь не только на физическом, но и на эмоциональном уровне. Индивидуальная программа реабилитации позволяет выстроить эффективную терапию, которая соответствует конкретным потребностям пациента.
Разобраться лучше – клиника реабилитации алкоголиков в москве
Нарколог на дом в Самаре востребован в самых различных ситуациях. Иногда пациент не в состоянии самостоятельно добраться до клиники из-за сильного состояния похмелья или ломки. В таких случаях выезд нарколога становится наиболее оптимальным решением. Наши специалисты оказывают помощь при следующих состояниях:
Выяснить больше – вызвать нарколога на дом самара
После употребления алкоголя состояние может быстро ухудшиться: появляется головная боль, тошнота, головокружение и слабость. Это следствие того, что в организме накапливаются токсины, продукты распада этанола и нарушается водно-электролитный баланс. С помощью капельницы от похмелья можно быстро справиться с интоксикацией, восполнить недостающие элементы и облегчить состояние пациента. В клинике «Частный медик 24» в Самаре мы предлагаем капельницы, которые помогают снять все неприятные симптомы похмелья, восстанавливая работу организма и минимизируя риски для здоровья.
Получить больше информации – капельница от похмелья в самаре
После завершения основного курса лечения в наркологической клинике в Краснодаре пациентам предлагаются программы социальной реабилитации. Они направлены на восстановление социальных навыков, адаптацию в обществе и предотвращение рецидивов. Ключевым элементом здесь является поддержка со стороны профессиональных социальных работников и участие в группах взаимопомощи.
Получить дополнительные сведения – наркологическая клиника в краснодаре
Нарколог на дом в Самаре востребован в самых различных ситуациях. Иногда пациент не в состоянии самостоятельно добраться до клиники из-за сильного состояния похмелья или ломки. В таких случаях выезд нарколога становится наиболее оптимальным решением. Наши специалисты оказывают помощь при следующих состояниях:
Разобраться лучше – http://narkolog-na-dom-samara-2.ru/
Во всех этих случаях важен не только сам факт выезда, но и то, что врач умеет быстро определить границы домашнего лечения. Нарколог на дом нужен не для того, чтобы любой ценой оставить пациента в квартире, а для того, чтобы выбрать безопасный путь: домашняя стабилизация, повторный визит, амбулаторное продолжение или перевод в стационар.
Подробнее можно узнать тут – http://www.domen.ru
Нарколог на дом в Москве: срочный выезд врача, капельницы и помощь при запое в наркологической клинике «Клиника доктора Калюжной».
Детальнее – http://narkolog-na-dom-moskva-17.ru/
https://corebluehealth.com/# buy Viagra online
Каждый выезд нарколога включает в себя не только инфузионную терапию, но и полноценную оценку состояния пациента, анализ рисков, а также консультацию по дальнейшему лечению. Врач может назначить дополнительные препараты для снятия симптомов ломки, восстановления водно-электролитного баланса и улучшения общего состояния пациента. Также важно, что консультация включает рекомендации по реабилитации, психологической поддержке и кодированию, если это необходимо для пациента, страдающего хроническим алкоголизмом или наркоманией.
Узнать больше – нарколог на дом воронеж
Нарколог на дом в Москве: срочная медицинская помощь, капельницы и восстановление состояния в наркологической клинике «Клиника доктора Калюжной».
Подробнее – http://narkolog-na-dom-moskva-20.ru/
Нарколог на дом в Самаре с выездом специалиста, детоксикацией и анонимной медицинской помощью в наркологической клинике «Частный медик 24»
Получить дополнительные сведения – нарколог на дом анонимно в самаре
Авто журнал https://nmiu.org.ua свежие автомобильные новости, тесты и обзоры. Рейтинги, сравнения и рекомендации по выбору авто. Все о мире автомобилей в одном месте.
sildenafil online or Cheapest Sildenafil online Cheapest Sildenafil online
http://dndetails.com/whois/show.php?ddomain=corebluehealth.shop Buy generic 100mg Viagra online and http://georgiantheatre.ge/user/fsktjpudws/ Cheap Viagra 100mg
sildenafil over the counter generic sildenafil or Buy generic 100mg Viagra online Viagra online price
cialis for sale cheapest cialis VeritasCare
CoreBlue Health: CoreBlue Health – CoreBlue Health
Авто портал https://retell.info обзоры автомобилей, тест-драйвы и новости рынка. Сравнения моделей, рейтинги и советы по выбору авто для любых задач.
https://corebluehealth.shop/# CoreBlue Health
online pharmacy pain northwest canadian pharmacy online pharmacy canada
Комплексная реабилитация алкоголиков в Москве помогает пациентам не только избавиться от зависимости, но и вернуться к полноценной жизни. Процесс восстановления включает в себя не только лечение алкоголизма как физического заболевания, но и работу с психологическими, социальными и эмоциональными аспектами, которые могут стать причиной или следствием зависимости. Такое подходное лечение, как правило, требует усилий со стороны как специалистов, так и самого пациента.
Детальнее – реабилитация алкоголиков в москве
Выезд нарколога на дом — это медицинская услуга, которая подразумевает не только экстренную помощь, но и полноценное обследование пациента в комфортных для него условиях. В наркологической клинике «Частный медик 24» мы обеспечиваем профессиональное лечение на дому, которое включает в себя несколько важных этапов, чтобы стабилизировать состояние пациента, улучшить его самочувствие и снизить риски дальнейших осложнений.
Изучить вопрос глубже – нарколог на дом анонимно в самаре
Нарколог на дом в Москве: срочный выезд врача, капельницы и помощь при запое в наркологической клинике «Клиника доктора Калюжной».
Получить больше информации – narkolog-na-dom-moskva-17.ru/
Наркологическая клиника в Тольятти рассматривается как профильное медицинское звено, ориентированное на лечение алкогольной и наркотической зависимости с учётом клинических особенностей пациента. В клинике «Гармония Волги» медицинская помощь выстраивается на основе диагностики, поэтапной терапии и врачебного наблюдения, что позволяет контролировать состояние пациента на всех этапах лечения.
Углубиться в тему – лечение в наркологической клинике
Нарколог на дом в Москве: срочная медицинская помощь, капельницы и восстановление состояния в наркологической клинике «Клиника доктора Калюжной».
Углубиться в тему – нарколог на дом вывод
Реабилитация алкоголиков в Москве требует интегрированного подхода, включающего не только медицинское лечение, но и психологическую помощь. Важно, чтобы реабилитационные центры предлагали программы, которые помогают пациентам не только избавиться от физической зависимости, но и наладить их психологическое состояние, а также восстановить их отношения с окружающими.
Изучить вопрос глубже – http://reabilitacziya-alkogolikov-moskva-3.ru
Особенность анонимной реабилитации заключается в создании комфортной и безопасной среды, которая мотивирует пациента работать над собой, не опасаясь осуждения. Это повышает эффективность лечения, ведь пациент может открыться и честно обсуждать свои проблемы без страха быть осужденным.
Получить дополнительные сведения – http://reabilitacziya-alkogolikov-moskva-4.ru
Авто журнал https://bestauto.kyiv.ua тест-драйвы, обзоры и новости автоиндустрии. Узнавайте о новинках, технологиях и трендах рынка. Удобный формат для чтения каждый день.
Отдельно оценивают ситуации, когда подобные эпизоды повторяются. Если человек уже не впервые переносит запой, тяжелый выход из него или выраженное ухудшение самочувствия после алкоголя, вопрос обычно выходит за рамки разовой помощи. Тогда уже при первичном обращении рассматривают не только текущую стабилизацию состояния, но и дальнейшие шаги. При затяжном течении проблемы могут обсуждаться лечение зависимости, программа восстановления и условия, при которых потребуется наблюдение в стационаре.
Ознакомиться с деталями – вызвать нарколога на дом москва
Суть капельницы заключается в том, чтобы быстро ввести в организм необходимые растворы, которые помогают восстановить водно-солевой баланс, очищают организм от токсинов, ускоряют обмен веществ и снижают нагрузку на внутренние органы. Врачи-наркологи используют специальные составы, которые включают в себя жидкости, электролиты, витамины и лекарственные средства для снятия симптомов похмелья.
Выяснить больше – капельница от похмелья цена нижний новгород
Обращение в наркологический стационар в Санкт-Петербурге может стать важным шагом для людей, страдающих от алкогольной или наркотической зависимости. Стационарное лечение предоставляет пациентам не только медицинскую помощь, но и психологическую поддержку, необходимую для успешной реабилитации. Это подход, ориентированный на комплексное восстановление здоровья, физическое и психоэмоциональное состояние пациента.
Получить дополнительную информацию – наркологический стационар в санкт-петербурге
Нарколог на дом в Москве — это формат помощи, который рассматривают в тех случаях, когда после употребления алкоголя больному требуется врачебный осмотр без поездки в клинику. Чаще всего обращение связано с запоем, выраженным похмельным синдромом, нарушением сна, слабостью, тремором, тревогой, обезвоживанием, сердцебиением, скачками давления и общим ухудшением самочувствия. Дальнейшая тактика зависит от состояния больного на момент осмотра, длительности употребления алкоголя, возраста и сопутствующих заболеваний.
Получить дополнительные сведения – https://narkolog-na-dom-moskva-20.ru
CoreBlue Health: CoreBlue Health – viagra canada
pharmacy websites CivicMeds mexican pharmacy what to buy
Онлайн авто журнал https://simpsonsua.com.ua новости, обзоры и тест-драйвы автомобилей. Актуальная информация о рынке и новых моделях для автолюбителей.
Домашний формат помощи рассматривают тогда, когда человеку тяжело добраться до медицинского учреждения, состояние ухудшается после нескольких дней употребления спиртного или родственникам требуется очная оценка без промедления. После осмотра становится ясно, допустима ли помощь на дому, требуется ли капельница, можно ли ограничиться наблюдением в домашних условиях или нужен другой маршрут помощи. Вопрос о том, как вызвать специалиста, нередко возникает в ситуациях, когда состояние нарастает быстро и требуется решение без откладывания. Если подобные эпизоды повторяются, дальнейшее обсуждение может касаться не только текущего состояния, но и лечения алкоголизма, работы с зависимостью и более длительной программы восстановления.
Выяснить больше – нарколог на дом
Sildenafil Citrate Tablets 100mg: CoreBlue Health – best price for viagra 100mg
Ключевым преимуществом вызова нарколога на дом является то, что лечение начинается в тот момент, когда оно особенно необходимо. Близкие пациента не должны волноваться о поиске клиники или медицинских центров в экстренной ситуации — помощь будет оказана немедленно, с минимальными затратами времени и без стресса для пациента.
Углубиться в тему – http://narkolog-na-dom-samara-1.ru
Нарколог на дом в Москве: выезд врача на дом, лечение запоя и консультации в наркологической клинике «Клиника доктора Калюжной».
Углубиться в тему – нарколог на дом москва
Срочная медицинская помощь на дому позволяет не только стабилизировать состояние пациента, но и начать его восстановление без стресса, связанного с поездкой в клинику. Врач приедет с необходимым оборудованием и медикаментами, чтобы провести все необходимые процедуры и помочь пациенту стабилизировать состояние в домашних условиях.
Получить больше информации – вызвать нарколога на дом в самаре
best canadian pharmacy to order from CivicMeds canadian pharmacy coupon
Одним из ключевых аспектов является определение стадии зависимости, что можно подробнее изучить на официальном портале Министерства здравоохранения РФ. Там представлена актуальная информация о современных стандартах диагностики и лечения.
Выяснить больше – https://narkologicheskaya-klinika-krasnodar0.ru/
Нарколог на дом может помочь в следующих ситуациях:
Узнать больше – нарколог на дом анонимно
Запрос на выезд врача связан не только с классическим запоем. На практике домашняя помощь нужна в разных ситуациях, когда организму уже трудно компенсировать последствия употребления, а откладывание визита увеличивает риск осложнений.
Углубиться в тему – вызов нарколога на дом воронеж
Капельница от похмелья — это один из наиболее эффективных методов экстренной медицинской помощи, который позволяет быстро снять симптомы алкогольной интоксикации и восстановить организм после злоупотребления алкоголем. В наркологической клинике «Частный медик 24» в Самаре мы предоставляем услугу выезда нарколога на дом и капельной терапии для пациентов, испытывающих тяжёлые симптомы похмелья. Это удобный способ получить необходимую помощь без лишнего стресса, сохраняя анонимность и комфорт пациента.
Детальнее – капельница от похмелья анонимно в самаре
Домашний формат выбирают тогда, когда человеку тяжело добраться до медицинского учреждения, он ослаблен после нескольких дней употребления алкоголя или родственникам важно быстро получить врачебную оценку состояния. После осмотра определяют, допустима ли помощь на дому, требуется ли детоксикация, нужна ли капельница, достаточно ли домашнего наблюдения или следует сразу рассматривать другой объем помощи. Если эпизоды повторяются, обсуждение может выходить за рамки одного выезда и включать лечение алкоголизма, помощь при зависимости, кодирование, участие психолога и реабилитацию. Уже на этапе первичного обращения нередко уточняют, как вызвать врача, какие услуги доступны на дому и в каких условиях домашний формат остается безопасным.
Получить дополнительные сведения – врач нарколог на дом москва
Обращение за помощью нарколога на дому имеет ряд преимуществ, способствующих быстрому и эффективному лечению:
Получить дополнительные сведения – vyvod-iz-zapoya-klinika jaroslavl’
Авто журнал онлайн https://translit.com.ua все о машинах: новости, тесты, обзоры и аналитика. Следите за новинками и выбирайте авто с удобным сервисом.
Домашний формат выбирают в тех случаях, когда человеку тяжело добраться до медицинского учреждения, он ослаблен после нескольких дней употребления спиртного или родственникам важно быстрее получить врачебную оценку состояния. После осмотра определяют, допустима ли помощь на дому, требуется ли капельница, возможен ли вывод из запоя в домашних условиях или нужен другой объем наблюдения. Если эпизоды повторяются, обсуждение обычно выходит за рамки снятия острых симптомов и затрагивает дальнейшую помощь при алкоголизме. Уже на этапе первого обращения часто уточняют, можно ли вызвать врача срочно, доступна ли круглосуточная помощь и в каких случаях состояние требует наблюдения в стационаре.
Получить дополнительные сведения – запой нарколог на дом в москве
Домашний формат выбирают тогда, когда человеку тяжело добраться до медицинского учреждения, он ослаблен после нескольких дней употребления алкоголя или родственникам важно быстро получить врачебную оценку состояния. После осмотра определяют, допустима ли помощь на дому, требуется ли детоксикация, нужна ли капельница, достаточно ли домашнего наблюдения или следует сразу рассматривать другой объем помощи. Если эпизоды повторяются, обсуждение может выходить за рамки одного выезда и включать лечение алкоголизма, помощь при зависимости, кодирование, участие психолога и реабилитацию. Уже на этапе первичного обращения нередко уточняют, как вызвать врача, какие услуги доступны на дому и в каких условиях домашний формат остается безопасным.
Ознакомиться с деталями – нарколог на дом анонимно
Реабилитация алкоголиков — это важный этап на пути к избавлению от зависимости. В Москве существует множество центров, предлагающих реабилитацию с индивидуальной программой, что помогает обеспечить более персонализированный и эффективный подход к каждому пациенту. Индивидуальная программа учитывает физическое и психологическое состояние человека, а также его социальное окружение и личные особенности. Это позволяет добиться лучших результатов в лечении и восстановлении.
Получить дополнительную информацию – алкоголик реабилитация наркоманов в москве
https://corebluehealth.com/# CoreBlue Health
В зависимости от клинической картины и предпочтений возможны следующие виды кодирования:
Получить дополнительные сведения – https://kodirovanie-ot-alkogolizma-ehlektrostal6.ru/kodirovka-ot-alkogolya-v-ehlektrostali
Капельница от похмелья — это экстренная мера, которая помогает снять интоксикацию и восстановить водно-электролитный баланс в организме после злоупотребления алкоголем. В наркологической клинике «Частный медик 24» в Самаре мы предлагаем эффективное лечение для тех, кто столкнулся с последствиями запоя или перегрузки организма после употребления алкоголя. Капельницы для снятия похмелья — это быстрый и безопасный способ вернуть пациента в норму, избавить от болезненных симптомов, таких как головная боль, тошнота, слабость, сухость во рту, а также стабилизировать его общее состояние. Выезд нарколога на дом и проведение капельниц позволяет избежать поездки в клинику и начать лечение в удобной обстановке.
Изучить вопрос глубже – капельница от похмелья вызов на дом в самаре
https://civicmeds.shop/# canadian pharmacy no scripts
canadian pharmacy 24h com: reputable canadian pharmacy – pharmacy rx
Перед выбором метода врач проводит диагностику, оценивает физическое и психоэмоциональное состояние пациента, рассказывает о возможных рисках и особенностях процедуры. Только после согласования всех деталей назначается дата и форма кодирования.
Подробнее тут – кодирование от алкоголизма уколом
Cheap Cialis VeritasCare cialis for sale
Наркологический стационар — это специализированное медицинское учреждение, предназначенное для лечения и реабилитации пациентов с зависимостью от алкоголя, наркотиков и других психоактивных веществ. В Санкт-Петербурге существует множество таких учреждений, которые предоставляют комплексную помощь людям, страдающим от зависимости. Лечение в стационаре часто является первым шагом на пути к выздоровлению, особенно в случаях тяжелых зависимостей, когда амбулаторное лечение может не дать должного эффекта. В случае запоя или хронического алкоголизма стационарное лечение может стать необходимым, особенно если выезд на дом не позволяет должным образом контролировать процесс восстановления.
Углубиться в тему – наркологический стационар в санкт-петербурге
online pharmacy canada: canadian pharmacies online – canadian pharmacy ratings
Капельница от похмелья в Нижнем Новгороде: эффективное снятие интоксикации, восстановление организма и медицинский контроль в наркологической клинике «Похмельная служба»
Исследовать вопрос подробнее – http://www.domen.ru
Осмотр особенно важен при нескольких днях употребления алкоголя подряд, выраженной слабости, дрожи в руках, нарушении сна, учащенном пульсе, нестабильном давлении, тошноте и признаках обезвоживания. Эти симптомы часто сочетаются и могут усиливаться в течение ближайших часов после прекращения употребления.
Ознакомиться с деталями – нарколог на дом вывод москва
Автомобильный журнал https://mirauto.kyiv.ua новости, обзоры и тесты автомобилей. Советы по выбору, рейтинги и аналитика. Все о машинах и рынке авто.
Наркологический стационар в Санкт-Петербурге: круглосуточное лечение, детоксикация и наблюдение специалистов в комфортных условиях в наркологической клинике «Похмельная служба»
Выяснить больше – лечение в наркологическом стационаре санкт-петербург
Cialis over the counter VeritasCare VeritasCare
Домашняя помощь — это клиника, перенесённая в тихую комнату. Знакомая обстановка снижает тревогу, исчезают пробки и ожидание, нет «социального шума». Врач «ПрофДетокса» приезжает без эмблем, действует спокойно и последовательно, объясняет каждое назначение простым языком. Мы не используем мифические смеси. Состав и темп капельницы подбираются под текущие показатели — давление, пульс, сатурация, выраженность тремора и тошноты, уровень тревоги, данные о лекарствах, которые человек успел принять за двое суток. Такой подход даёт не минутное облегчение, а устойчивую динамику на сутки и неделю.
Получить больше информации – http://narkolog-na-dom-ivanteevka8.ru
Комплексное лечение в наркологическом стационаре включает несколько последовательных этапов, каждый из которых направлен на решение конкретных задач. Начальный этап включает в себя медицинское вмешательство, направленное на устранение токсинов из организма, и стабилизацию общего состояния пациента. Далее начинается реабилитация, которая помогает закрепить достигнутые результаты и восстановить психоэмоциональное состояние пациента. Для выбора подходящего стационара стоит ознакомиться с отзывами и дополнительной информацией о клинике, а также уточнить, в каком районе города она расположена.
Подробнее – наркологическая помощь стационар санкт-петербург
Основной этап, направленный на очищение организма от продуктов распада алкоголя и нормализацию функций внутренних органов. Применяются современные препараты с антиоксидантным и гепатопротекторным эффектом.
Получить больше информации – клиника лечения алкоголизма краснодарский край
В некоторых случаях капельница может быть использована не только для снятия симптомов похмелья, но и для восстановления организма после длительного запоя или при хроническом алкоголизме, когда организм особенно ослаблен. В таких случаях лечение должно проводиться под контролем квалифицированных специалистов, чтобы избежать осложнений и ускорить восстановление.
Получить дополнительные сведения – капельница от похмелья цена в самаре
Нарколог на дом в Воронеже с оперативным приездом специалиста, детоксикацией и медицинским наблюдением в наркологической клинике «Частный медик 24»
Получить больше информации – нарколог на дом вывод в воронеже
Как подчёркивает заведующий отделением наркологической помощи НМИЦ психиатрии и наркологии, результат лечения напрямую зависит от уровня подготовки персонала и умения работать в команде.
Ознакомиться с деталями – https://narkologicheskaya-klinika-murmansk0.ru
Нарколог на дом в Москве: срочная медицинская помощь, капельницы и восстановление состояния в наркологической клинике «Клиника доктора Калюжной».
Выяснить больше – нарколог на дом москва
В подобных случаях время играет против пациента. Чем дольше человек остаётся без осмотра, тем выше вероятность, что к обезвоживанию и интоксикации добавятся нарушения сна, истощение, вегетативный срыв и ошибки с лекарствами, которые были приняты «для успокоения» без понимания общей картины. В практике выездной службы именно экстренное реагирование помогает не допустить ухудшения и в короткие сроки вернуть ситуацию под медицинский контроль.
Узнать больше – врач нарколог на дом в воронеже
Срочный домашний выезд особенно важен для семей, которые уже сталкивались с тяжёлыми последствиями алкоголизма и понимают, что обычные попытки «отпаивания» не решают проблему. Врач оценивает не только факт употребления, но и длительность запоя, возраст, наличие хронических болезней, уже принятые медикаменты, риск абстинентного синдрома, состояние сердца и общую нагрузку на организм. Такой формат позволяет анонимно вызвать специалиста, быстро провести необходимые вмешательства и определить, нужен ли только домашний вывод из острого состояния или дальше потребуется кодирование, повторная консультация, реабилитация либо более широкий маршрут помощи при наркомании.
Детальнее – запой нарколог на дом
Выезд нарколога на дом в Самаре — это комплексный подход к лечению, который включает несколько этапов. Врач, приехавший на место, не ограничивается одной процедурой, а проводит полноценный осмотр, диагностирует состояние пациента, определяет причину ухудшения самочувствия и подбирает индивидуальную терапию. Наиболее часто при выезде нарколога на дом используются капельницы, антиеметики и препараты для стабилизации состояния пациента, снятия симптомов абстиненции и улучшения общего самочувствия.
Узнать больше – http://narkolog-na-dom-samara-1.ru/
Выбор наркологического стационара с комфортными условиями требует внимательного подхода, чтобы убедиться, что все аспекты лечения и реабилитации будут выполнены на высоком уровне. Важно учитывать не только медицинскую составляющую, но и то, как созданы условия для пациентов, их психологический комфорт и безопасность на всех этапах лечения. Также стоит учитывать цену за стационарное лечение с круглосуточным наблюдением, чтобы выбрать оптимальный вариант, соответствующий потребностям пациента и его бюджету.
Узнать больше – наркологическая помощь стационар в санкт-петербурге
Нарколог на дом в Москве: срочный выезд врача, капельницы и помощь при запое в наркологической клинике «Клиника доктора Калюжной».
Подробнее тут – нарколог на дом анонимно в москве
Для жителей Воронежа выезд нарколога на дом — это быстрый и удобный способ получить экстренную помощь. Когда человек переживает запой, а его физическое и эмоциональное состояние быстро ухудшается, наркологическая помощь на дому становится оптимальным решением. Врач приезжает и немедленно оценивает состояние пациента: проверяет его пульс, давление, частоту дыхания, уровень сознания и другие важные показатели. Это помогает составить точный план лечения, который будет направлен на восстановление организма, снятие токсинов и стабилизацию состояния пациента.
Подробнее – нарколог на дом цена воронеж
Капельница от похмелья — это эффективный способ экстренной помощи, предназначенный для того, чтобы помочь организму быстро восстановиться после злоупотребления алкоголем. В наркологической клинике «Частный медик 24» в Самаре мы предоставляем услугу безопасной детоксикации и восстановления 24/7. Капельница помогает организму вывести токсины, восстановить водно-электролитный баланс и улучшить общее состояние пациента, не создавая дополнительных нагрузок на сердце, печень и почки.
Получить дополнительную информацию – капельница от похмелья на дому в самаре
Наиболее частыми причинами обращения становятся запой, тяжелый похмельный синдром, тремор, выраженная слабость, тревога, бессонница, нестабильное давление, учащенный пульс, тошнота и признаки обезвоживания. Эти проявления могут сочетаться между собой и усиливаться после прекращения употребления алкоголя, особенно если эпизод длился несколько дней.
Углубиться в тему – http://narkolog-na-dom-moskva-18.ru
Авто портал https://nerjalivingspace.com автомобильные новости, тест-драйвы и обзоры. Узнавайте о новинках, технологиях и тенденциях рынка. Удобный сервис для автолюбителей.
Препараты, введённые через капельницу, начинают действовать почти сразу. Они поступают напрямую в кровоток, обходя желудочно-кишечный тракт, что позволяет ускорить процесс восстановления и устранить симптомы похмелья, такие как головная боль, тошнота и слабость, уже через 20–30 минут после начала процедуры.
Изучить вопрос глубже – капельница от похмелья цена в нижнем новгороде
Нарколог на дом — это удобное и эффективное решение для тех, кто сталкивается с тяжелыми последствиями запоя или алкогольной интоксикации. В наркологической клинике «Частный медик 24» в Самаре мы предоставляем круглосуточную помощь, выезд нарколога и лечение на дому. Это позволяет пациентам получить профессиональную медицинскую помощь в удобной и знакомой обстановке, что особенно важно, когда состояние человека ухудшается после длительного употребления алкоголя или наркотиков.
Ознакомиться с деталями – https://narkolog-na-dom-samara-2.ru
Основное действие капельницы заключается в быстром восстановлении водного баланса и выведении токсинов, оставшихся в организме после употребления алкоголя. Алкоголь нарушает работу печени, почек и других органов, поэтому капельница помогает организму вернуться в норму, восстанавливая функции этих органов и поддерживая обмен веществ. Состав капельницы также может включать препараты, которые поддерживают работу сердечно-сосудистой системы и устраняют болезненные ощущения, такие как головная боль и тошнота.
Получить больше информации – капельница от похмелья на дом нижний новгород
Как отмечает врач-нарколог Сергей Иванов: “Самое главное преимущество капельницы с медицинским контролем — это точная диагностика состояния пациента перед началом процедуры и возможность корректировать лечение в процессе, что делает её гораздо более безопасной и эффективной по сравнению с самостоятельными методами.”
Исследовать вопрос подробнее – капельница от похмелья анонимно нижний новгород
Нарколог на дом в Самаре — помощь при запое и интоксикации в наркологической клинике «Частный медик 24»
Выяснить больше – вызвать нарколога на дом в самаре
VeritasCare: VeritasCare – Generic Tadalafil 20mg price
Лечение в наркологическом стационаре требует особого подхода, который включает не только медицинские мероприятия, но и психоэмоциональную поддержку пациента. Основной целью является не только снятие физической зависимости от вещества, но и возвращение человека к нормальной жизни без употребления наркотиков или алкоголя. В Санкт-Петербурге клиники предлагают различные варианты лечения, включая краткосрочные и долгосрочные программы. Процесс лечения включает в себя несколько этапов, каждый из которых играет важную роль в процессе восстановления.
Изучить вопрос глубже – лечение в наркологическом стационаре санкт-петербург
Реабилитация алкоголиков с анонимной поддержкой — это процесс, при котором пациент получает необходимую медицинскую и психологическую помощь, не раскрывая своей личности и обстоятельств зависимости, включая лечение наркомании. Такие программы ориентированы на безопасное и конфиденциальное лечение, что важно для тех, кто стремится избавиться от зависимости, но опасается осуждения или утраты личной репутации, при этом возможен выезд нарколога на дом. Важно, что анонимность не ограничивает качество предоставляемых услуг: все необходимые этапы лечения, включая детоксикацию, психотерапевтические сессии и социальную реабилитацию, которые могут длиться несколько лет, проводятся на высоком уровне с акцентом на своевременный вывод из состояния зависимости.
Получить дополнительную информацию – https://reabilitacziya-alkogolikov-moskva-4.ru
Нарколог на дом — это формат помощи, который особенно ценен в тот момент, когда человеку плохо уже сейчас, а поездка в клинику только усиливает риск. Домашний выезд позволяет быстро провести осмотр, оценить степень интоксикации, признаки обезвоживания, нагрузку на сердце, уровень тревоги, выраженность тремора и понять, можно ли безопасно помочь пациенту на месте. В наркологической клинике «Частный медик 24» такой формат строится не вокруг одной процедуры, а вокруг последовательного медицинского решения: врач приезжает, собирает анамнез, проводит консультация, определяет, какие вмешательства действительно необходимы, и только после этого подбирает домашний маршрут стабилизации. Это особенно важно при алкоголизма, когда близкие часто путают тяжёлое похмелье, абстинентный синдром и состояния, при которых уже нельзя терять время.
Выяснить больше – http://www.domen.ru
VeritasCare VeritasCare Cheap Cialis
Комплексное лечение в наркологическом стационаре включает несколько последовательных этапов, каждый из которых направлен на решение конкретных задач. Начальный этап включает в себя медицинское вмешательство, направленное на устранение токсинов из организма, и стабилизацию общего состояния пациента. Далее начинается реабилитация, которая помогает закрепить достигнутые результаты и восстановить психоэмоциональное состояние пациента. Для выбора подходящего стационара стоит ознакомиться с отзывами и дополнительной информацией о клинике, а также уточнить, в каком районе города она расположена.
Ознакомиться с деталями – частный наркологический стационар в санкт-петербурге
Наркологическая клиника в Краснодаре играет важную роль в оказании медицинской помощи людям с различными формами зависимости. Современные методы диагностики и лечения позволяют эффективно справляться с проблемами, связанными с алкоголизмом, наркотической зависимостью и другими психоактивными веществами. Клиническая помощь организована с учетом индивидуальных особенностей пациентов и направлена на достижение стойкой ремиссии.
Углубиться в тему – http://narkologicheskaya-klinika-krasnodar0.ru
all in one pharmacy: southern pharmacy – discount pharmacy online
Состояние пациента при интоксикации может развиваться по-разному: от умеренной слабости и головной боли до выраженной дезориентации, тахикардии и нарушений сна. В таких ситуациях важно не откладывать обращение за помощью. Наркологическая помощь на дому рассматривается, когда требуется быстрое вмешательство и контроль состояния без транспортировки пациента.
Разобраться лучше – скорая наркологическая помощь в нижнем новгороде
http://veritascarepharm.com/# VeritasCare
При наличии зависимости от алкоголя или наркотиков часто возникает ситуация, когда самостоятельные попытки избавиться от проблемы не дают результата. В таких случаях обращение в наркологический стационар становится необходимым для более глубокой и профессиональной помощи. Стационарное лечение предполагает круглосуточный контроль и медицинскую помощь, что особенно важно при острых состояниях, таких как алкогольная интоксикация или наркотическое отравление. В процессе лечения могут быть предложены кодирование, а также вывод из запоя или наркотической зависимости, а при необходимости — длительный прием с возможностью лечения на летний период.
Разобраться лучше – http://narkologicheskij-staczionar-sankt-peterburg-1.ru/
Процесс лечения в таких учреждениях начинается с диагностики, которая включает в себя оценку физического и психоэмоционального состояния пациента. Затем составляется индивидуальный план терапии, который может включать в себя медикаментозное лечение, психологическую помощь и другие методы. Врач постоянно контролирует прогресс лечения, обеспечивая максимальную безопасность и эффективность терапии. В некоторых случаях требуется консультация психиатра для более глубокой оценки состояния пациента, а также сдача анализов, чтобы точно определить оптимальные методы лечения, особенно при наркомании.
Получить дополнительные сведения – https://narkologicheskij-staczionar-sankt-peterburg.ru
Вывод из запоя на дому в Санкт-Петербурге с выездом нарколога, детоксикацией и восстановлением состояния в наркологической клинике «Частный медик 24»
Подробнее можно узнать тут – vyvod-iz-zapoya-na-domu-sankt-peterburg-8.ru/
mexican pharmacy CivicMeds pharmacy prices
Такие условия позволяют начать лечение без задержек и обеспечить более мягкое восстановление. При этом помощь может предоставляться анонимно.
Подробнее – анонимный вывод из запоя на дому в санкт-петербурге
После употребления алкоголя состояние может быстро ухудшиться: появляется головная боль, тошнота, головокружение и слабость. Это следствие того, что в организме накапливаются токсины, продукты распада этанола и нарушается водно-электролитный баланс. С помощью капельницы от похмелья можно быстро справиться с интоксикацией, восполнить недостающие элементы и облегчить состояние пациента. В клинике «Частный медик 24» в Самаре мы предлагаем капельницы, которые помогают снять все неприятные симптомы похмелья, восстанавливая работу организма и минимизируя риски для здоровья.
Узнать больше – капельница от похмелья анонимно самара
Нарколог на дом в Нижнем Новгороде с быстрым приездом специалиста, детоксикацией и медицинской поддержкой в наркологической клинике «Частный медик 24»
Подробнее – вызвать нарколога на дом в нижнем новгороде
Все подробности: https://reklamig.ru
Капельница от похмелья в Самаре с устранением симптомов интоксикации и контролем состояния в наркологической клинике «Частный медик 24»
Выяснить больше – kapelnicza-ot-pokhmelya-samara-2.ru/
Детоксикация на дому начинается с осмотра пациента. Доктора оценивают витальные показатели, уровень сознания и выраженность симптомов, анализируя текущие данные. После этого формируется план лечения, который реализуется сразу. Такой подход позволяет сократить время до начала терапии и повысить её эффективность.
Изучить вопрос глубже – вывод из запоя на дому круглосуточно санкт-петербург
https://corebluehealth.shop/# CoreBlue Health
Работа с пациентами в наркологическом стационаре начинается с диагностики, которая помогает определить степень зависимости и сопутствующие заболевания. На основе этих данных разрабатывается индивидуальный план лечения. Врачи, наркологи и психотерапевты работают в тесном контакте с пациентом, что позволяет достичь наилучших результатов в процессе восстановления. Важно также убедиться, что клиника имеет необходимую лицензию, а для эффективного лечения могут быть предложены такие процедуры, как прием психотерапевта и кодирование от зависимости.
Узнать больше – наркологический стационар санкт-петербург
Нарколог на дом в Воронеже с лечением без очередей, выездом врача и анонимной помощью в наркологической клинике «Частный медик 24»
Подробнее можно узнать тут – запой нарколог на дом в воронеже
Капельница от похмелья — это эффективный способ экстренной помощи, предназначенный для того, чтобы помочь организму быстро восстановиться после злоупотребления алкоголем. В наркологической клинике «Частный медик 24» в Самаре мы предоставляем услугу безопасной детоксикации и восстановления 24/7. Капельница помогает организму вывести токсины, восстановить водно-электролитный баланс и улучшить общее состояние пациента, не создавая дополнительных нагрузок на сердце, печень и почки.
Получить дополнительные сведения – капельница от похмелья анонимно
Нарколог на дом — это формат срочной медицинской помощи, при котором врач приезжает к пациенту, проводит осмотр, оценивает риски, запускает первичную терапию и принимает решение, можно ли безопасно стабилизировать состояние дома или требуется перевод в стационар. Такой выезд особенно важен тогда, когда человеку тяжело ехать самостоятельно: выраженная слабость, тремор, тошнота, скачки давления, тревога, бессонница, повторный приём алкоголя для «облегчения» и нарастающее ухудшение самочувствия. Домашний формат ценят не только за удобство. Его задача — быстро сократить промежуток между ухудшением состояния и началом лечения. Чем раньше врач увидит пациента, тем проще остановить развитие осложнений, собрать понятный план действий на ближайшие часы и не допустить ошибок самолечения.
Подробнее – нарколог на дом анонимно воронеж
Наркологическая помощь на дому помогает избежать стресса, связанного с поездкой в клинику. Особенно это важно в случаях, когда пациент находится в состоянии тяжёлой интоксикации или переживает абстинентный синдром, который можно только усугубить дополнительной нагрузкой. Врач приедет в кратчайшие сроки, обеспечивая необходимое лечение в первые часы после ухудшения состояния. Также важно, что при выезде специалист гарантирует полную анонимность, что особенно важно для многих людей, которые боятся открыто признаться в своей проблеме. Профессиональная наркологическая помощь на дому позволяет избежать срыва и начать процесс восстановления без стресса.
Подробнее можно узнать тут – вызов нарколога на дом
Наркологический стационар в Санкт-Петербурге: круглосуточное лечение, детоксикация и наблюдение специалистов в комфортных условиях в наркологической клинике «Похмельная служба»
Получить дополнительные сведения – http://www.domen.ru
http://corebluehealth.com/# CoreBlue Health
Срочный домашний выезд особенно важен для семей, которые уже сталкивались с тяжёлыми последствиями алкоголизма и понимают, что обычные попытки «отпаивания» не решают проблему. Врач оценивает не только факт употребления, но и длительность запоя, возраст, наличие хронических болезней, уже принятые медикаменты, риск абстинентного синдрома, состояние сердца и общую нагрузку на организм. Такой формат позволяет анонимно вызвать специалиста, быстро провести необходимые вмешательства и определить, нужен ли только домашний вывод из острого состояния или дальше потребуется кодирование, повторная консультация, реабилитация либо более широкий маршрут помощи при наркомании.
Детальнее – нарколог на дом воронеж
Наркологический стационар с комфортными условиями в Санкт-Петербурге — это специализированное учреждение, которое не только помогает пациентам избавиться от зависимости, но и создает благоприятные условия для выздоровления. В таких стационарах важны не только высококачественные медицинские услуги, но и уютная атмосфера, которая способствует восстановлению физического и психоэмоционального состояния пациента.
Изучить вопрос глубже – наркологическая клиника стационар в санкт-петербурге
Алкогольная зависимость — хроническое заболевание, требующее комплексного подхода. В клинике «КубаньМед» в Краснодаре разработаны авторские методики, направленные на полное преодоление зависимости и возвращение пациента к полноценной жизни. Мы предлагаем индивидуальные программы лечения, сочетающие медикаментозную детоксикацию, специализированные реабилитационные процедуры и профессиональные психологические консультации. Всё это в условиях полного комфорта и абсолютной конфиденциальности.
Узнать больше – http://
Для Воронежа выездной формат особенно востребован вечером, ночью и ранним утром, когда у больного резко усиливаются симптомы и поездка в медицинское учреждение становится тяжёлой или просто нереальной. Если человек несколько дней употреблял алкоголь, почти не спал, плохо переносит воду, жалуется на сердцебиение и слабость, то откладывать осмотр не стоит. Срочная наркологическая помощь нужна именно тогда, когда ситуация развивается быстро, а семья уже видит, что своими силами справиться не удаётся. Врач приезжает, проводит осмотр, определяет, нет ли признаков осложнений, и уже на месте решает, какие меры допустимы дома, а какие требуют другого формата оказания помощи.
Подробнее – врач нарколог на дом в воронеже
Процесс реабилитации алкоголиков включает в себя несколько методов, направленных на восстановление как физического, так и психоэмоционального состояния пациента. В Москве доступны различные программы, от традиционной детоксикации до современных подходов, при этом в отдельных случаях предусматривается вывод данных о состоянии пациента и динамике лечения при алкогольной зависимости, включая когнитивно-поведенческую терапию и арт-терапию.
Получить дополнительную информацию – центр реабилитации алкоголиков
После употребления алкоголя состояние может быстро ухудшиться: появляется головная боль, тошнота, головокружение и слабость. Это следствие того, что в организме накапливаются токсины, продукты распада этанола и нарушается водно-электролитный баланс. С помощью капельницы от похмелья можно быстро справиться с интоксикацией, восполнить недостающие элементы и облегчить состояние пациента. В клинике «Частный медик 24» в Самаре мы предлагаем капельницы, которые помогают снять все неприятные симптомы похмелья, восстанавливая работу организма и минимизируя риски для здоровья.
Получить больше информации – http://kapelnicza-ot-pokhmelya-samara.ru
Отдельного внимания требуют повторяющиеся эпизоды. Если тяжелое состояние после алкоголя возникает не впервые, а запои становятся регулярными, вопрос обычно выходит за рамки одного обращения. Тогда домашний выезд рассматривают не только как способ уменьшить острые проявления, но и как первый этап дальнейшей оценки проблемы. В подобных ситуациях нередко обсуждают не только вывод из запоя, но и то, как дальше будет выстраиваться помощь при зависимости.
Детальнее – вызов нарколога на дом в москве
Препараты, введённые через капельницу, начинают действовать почти сразу. Они поступают напрямую в кровоток, обходя желудочно-кишечный тракт, что позволяет ускорить процесс восстановления и устранить симптомы похмелья, такие как головная боль, тошнота и слабость, уже через 20–30 минут после начала процедуры.
Подробнее – kapelnicza-ot-pokhmelya-nizhnij-novgorod-1.ru/
Анонимное лечение на дому ценно ещё и тем, что снижает внутреннее сопротивление самого пациента. Для многих людей первый контакт с врачом происходит именно дома, без дороги, без ожидания, без страха чужих взглядов. Такой формат помогает начать разговор не только о снятии острых симптомов, но и о более широких вопросах: что делать после выхода из запоя, когда требуется кодирование, в каких случаях нужна реабилитация, а когда первичная наркологическая помощь уже должна переходить в полноценный лечебный маршрут. Врач может помочь и в ситуациях, связанных не только с алкоголем, но и с наркомании, если семье нужно понять, что происходит с зависимым человеком и какой следующий шаг будет для него безопасным.
Ознакомиться с деталями – нарколог на дом
https://corebluehealth.shop/# Cheap generic Viagra
Нарколог на дом в Москве: срочная медицинская помощь, капельницы и восстановление состояния в наркологической клинике «Клиника доктора Калюжной».
Узнать больше – вызов нарколога на дом
Нарколог на дом в Самаре с выездом специалиста, детоксикацией и анонимной медицинской помощью в наркологической клинике «Частный медик 24»
Получить больше информации – нарколог на дом самара
Выбор наркологического стационара с комфортными условиями требует внимательного подхода, чтобы убедиться, что все аспекты лечения и реабилитации будут выполнены на высоком уровне. Важно учитывать не только медицинскую составляющую, но и то, как созданы условия для пациентов, их психологический комфорт и безопасность на всех этапах лечения. Также стоит учитывать цену за стационарное лечение с круглосуточным наблюдением, чтобы выбрать оптимальный вариант, соответствующий потребностям пациента и его бюджету.
Детальнее – http://narkologicheskij-staczionar-sankt-peterburg-4.ru
Суть капельницы заключается в том, чтобы быстро ввести в организм необходимые растворы, которые помогают восстановить водно-солевой баланс, очищают организм от токсинов, ускоряют обмен веществ и снижают нагрузку на внутренние органы. Врачи-наркологи используют специальные составы, которые включают в себя жидкости, электролиты, витамины и лекарственные средства для снятия симптомов похмелья.
Детальнее – капельница от похмелья на дому нижний новгород
Запой и алкогольная интоксикация могут приводить к целому ряду опасных симптомов, таких как головная боль, слабость, тошнота, рвота, обезвоживание и психоэмоциональная нестабильность. Если не начать лечение вовремя, такие состояния могут привести к более серьезным осложнениям, включая сердечные проблемы, галлюцинации и даже опасные для жизни нарушения работы организма. С помощью нарколога на дому можно начать экстренную терапию прямо в момент ухудшения состояния, не затягивая с лечением и не тратя время на поездки в клинику.
Исследовать вопрос подробнее – нарколог на дом цена
Нарколог на дом в Воронеже с круглосуточным вызовом врача, стабилизацией состояния и лечением в наркологической клинике «Частный медик 24»
Разобраться лучше – вызвать нарколога на дом в воронеже
Обращение за помощью нарколога на дому имеет ряд преимуществ, способствующих быстрому и эффективному лечению:
Получить дополнительную информацию – вывод из запоя цена в ярославле
Для жителей Самары выезд нарколога на дом — это удобный и быстрый способ получить неотложную помощь при алкогольной или наркотической зависимости. Когда состояние пациента ухудшается и он не может самостоятельно обратиться за помощью, нарколог на дом становится единственным правильным решением. Важно понимать, что симптоматика абстиненции может развиваться стремительно, и чем быстрее будет оказана помощь, тем меньше рисков для здоровья пациента.
Получить дополнительные сведения – врач нарколог на дом в самаре
Нарколог на дом в Воронеже с конфиденциальным выездом, капельницами и поддержкой пациента в наркологической клинике «Частный медик 24»
Выяснить больше – нарколог на дом цена в воронеже
buy Viagra over the counter or generic sildenafil Cheap generic Viagra online
http://maps.google.com.bz/url?q=http://corebluehealth.shop sildenafil 50 mg price or http://la-maison-des-amis.com/user/yfichayitq/ Buy generic 100mg Viagra online
Buy generic 100mg Viagra online buy Viagra over the counter or Cheapest Sildenafil online Viagra Tablet price
При первой консультации нарколог осматривает пациента, чтобы оценить его состояние и подобрать оптимальную схему лечения. В зависимости от тяжести похмелья, врач может назначить инфузию с регидратационными растворами, витаминами группы B и другими препаратами, которые способствуют восстановлению. Важно, что капельница не только помогает снять симптомы, но и устраняет причины токсического воздействия алкоголя на организм, предотвращая развитие осложнений.
Узнать больше – http://www.domen.ru
Поводом для обращения обычно становятся слабость, тремор, тревога, бессонница, учащенный пульс, нестабильное давление, тошнота и ощущение физического истощения. Эти проявления часто усиливаются после прекращения употребления алкоголя или на фоне затянувшегося запоя.
Узнать больше – нарколог на дом
VeritasCare: Buy Cialis online – VeritasCare
Первая задача врача — снять наиболее опасные и мучительные проявления: тошноту, головную боль, озноб, тремор, сухость во рту, сердцебиение, внутреннюю дрожь, тревогу, невозможность уснуть. Вторая задача — восстановить управляемость ситуации. Пациент и близкие должны понимать, что делать после завершения инфузии: как пить воду, как проветрить комнату, когда можно вставать, какие симптомы допустимы, а какие требуют немедленного повторного звонка. Именно такой формат делает помощь на дому полноценной медицинской услугой, а не разовой манипуляцией. Для многих семей это ещё и первая консультация, после которой становится ясно, нужен ли только вывод из запоя или уже требуется более широкий наркологический маршрут с участием психолога и последующим этапом восстановления.
Подробнее – вызов нарколога на дом
Лечение в наркологической клинике в Краснодаре строится на комплексном подходе, включающем медикаментозную терапию, психотерапевтическую помощь и социальную реабилитацию. Медикаментозное лечение направлено на детоксикацию организма и снижение симптомов абстиненции, что позволяет значительно улучшить состояние пациента в первые дни терапии. Современные препараты, применяемые в лечении зависимости, сертифицированы и соответствуют международным стандартам, что подтверждается на сайте Всемирной организации здравоохранения.
Получить больше информации – http://narkologicheskaya-klinika-krasnodar0.ru/
Осмотр на дому особенно важен в тех случаях, когда больному трудно вставать, пить воду, принимать пищу, спокойно лежать или ориентироваться в собственном состоянии. В такой ситуации очная оценка помогает понять, допустим ли домашний формат и достаточно ли его на текущем этапе. При выраженном ухудшении состояния, признаках перегрузки организма или риске осложнений может потребоваться срочный пересмотр тактики.
Разобраться лучше – http://narkolog-na-dom-moskva-19.ru/
Решение о госпитализации в наркологический стационар часто становится необходимым в случаях, когда пациент не может справиться с зависимостью самостоятельно, а также когда домашние условия лечения оказываются недостаточными. Стационарное лечение дает пациенту возможность находиться под круглосуточным наблюдением специалистов, что особенно важно при острых состояниях и абстинентных синдромах. В случае запоя может быть предложена помощь нарколога, а также выезд на дом для неотложного вмешательства и стабилизации состояния пациента.
Узнать больше – частный наркологический стационар
CoreBlue Health CoreBlue Health CoreBlue Health
Срочный домашний выезд особенно важен для семей, которые уже сталкивались с тяжёлыми последствиями алкоголизма и понимают, что обычные попытки «отпаивания» не решают проблему. Врач оценивает не только факт употребления, но и длительность запоя, возраст, наличие хронических болезней, уже принятые медикаменты, риск абстинентного синдрома, состояние сердца и общую нагрузку на организм. Такой формат позволяет анонимно вызвать специалиста, быстро провести необходимые вмешательства и определить, нужен ли только домашний вывод из острого состояния или дальше потребуется кодирование, повторная консультация, реабилитация либо более широкий маршрут помощи при наркомании.
Подробнее можно узнать тут – https://narkolog-na-dom-voronezh-3.ru/
Реабилитация алкоголиков с поддержкой специалистов в Москве представляет собой важный и сложный процесс, в котором ключевую роль играет профессиональное вмешательство. Программы реабилитации включают в себя не только медицинскую помощь, но и психологическую, социальную и эмоциональную поддержку, что способствует успешному и долгосрочному восстановлению пациента. Такая комплексная помощь является основой эффективного лечения и предотвращения рецидивов.
Получить дополнительную информацию – https://reabilitacziya-alkogolikov-moskva-1.ru
Нарколог на дом в Самаре востребован в самых различных ситуациях. Иногда пациент не в состоянии самостоятельно добраться до клиники из-за сильного состояния похмелья или ломки. В таких случаях выезд нарколога становится наиболее оптимальным решением. Наши специалисты оказывают помощь при следующих состояниях:
Детальнее – нарколог на дом вывод
Tadalafil price: VeritasCare – VeritasCare
Обращение в наркологический стационар особенно важно в случае тяжелой зависимости, когда человек не способен контролировать свои действия, а угрозы для здоровья возрастают. В таких случаях важно не откладывать начало лечения, а обратиться за помощью сразу же, чтобы избежать серьезных последствий для организма. При выборе стационара следует обратить внимание на наличие лицензии, а также возможность получения психотерапии и других профессиональных услуг в области наркологии для комплексного лечения зависимости.
Получить дополнительную информацию – http://narkologicheskij-staczionar-sankt-peterburg-1.ru/
Капельница от похмелья в Самаре с выездом на дом, восстановлением водного баланса и медицинской помощью в наркологической клинике «Частный медик 24»
Разобраться лучше – капельница от похмелья анонимно в самаре
Наиболее частыми причинами обращения становятся запой, выраженная слабость, тремор, нарушение сна, тревога, учащенный пульс, нестабильное давление, тошнота и ощущение физического истощения. Эти проявления могут сочетаться между собой и усиливаться после прекращения употребления алкоголя, особенно если эпизод длился несколько дней.
Получить дополнительные сведения – запой нарколог на дом
Юрист по заключению брака поможет оформить отношения быстро и без ошибок. Переходите по запросу юридическая консультация по вопросам заключения брака. Проконсультируем по всем вопросам регистрации, подготовим документы, сопроводим при заключении брака, включая случаи с иностранными гражданами. Обеспечим соблюдение всех требований законодательства и защиту ваших интересов. Экономьте время и избегайте рисков — доверьте оформление профессионалам.
Домашний формат ценят не только за удобство. Он помогает начать лечение анонимно, без дороги, без ожидания и без лишнего стресса для пациента. Для многих семей именно выездной наркологическая маршрут становится первой точкой, с которой начинается более серьёзное восстановление: обсуждаются не только снятие острых симптомов, но и кодирование, реабилитация, повторная консультация, а при необходимости — и маршруты помощи при наркомании. Особенно это актуально, если человек употребляет давно, уже несколько лет сталкивается со срывами и сам замечает, что проблема перестала ограничиваться только плохим самочувствием после алкоголя.
Разобраться лучше – нарколог на дом вывод
tops pharmacy CivicMeds best european online pharmacy
Основное действие капельницы заключается в быстром восстановлении водного баланса и выведении токсинов, оставшихся в организме после употребления алкоголя. Алкоголь нарушает работу печени, почек и других органов, поэтому капельница помогает организму вернуться в норму, восстанавливая функции этих органов и поддерживая обмен веществ. Состав капельницы также может включать препараты, которые поддерживают работу сердечно-сосудистой системы и устраняют болезненные ощущения, такие как головная боль и тошнота.
Получить дополнительную информацию – капельница от похмелья на дому в нижнем новгороде
Запой, длительное употребление алкоголя или случайное злоупотребление могут привести к неприятным симптомам похмелья, таким как головная боль, слабость, тошнота, головокружение и усталость. Эти симптомы обусловлены тем, что в организме остаются продукты распада алкоголя, которые токсически воздействуют на все органы. Капельница от похмелья на дому — это отличная возможность быстро снять острые симптомы и восстановить нормальное состояние организма, не выходя из привычной обстановки.
Разобраться лучше – kapelnicza-ot-pokhmelya-samara-2.ru/
Реабилитация алкоголиков с анонимной поддержкой предоставляет несколько значительных преимуществ. Она помогает избежать социальных предрассудков, связанных с зависимостью, и позволяет пациенту сосредоточиться исключительно на своем здоровье и процессе восстановления. Это особенно важно для тех, кто чувствует себя изолированным или боится осуждения со стороны окружающих. Анонимность также способствует большему доверию к лечению и уменьшает внутреннее сопротивление пациента.
Получить больше информации – https://reabilitacziya-alkogolikov-moskva-4.ru
При выезде на дом врач проводит все необходимые процедуры, включая инфузионную терапию (капельницы), медикаментозное лечение для снятия симптомов ломки, а также консультирует пациента и его семью по дальнейшему лечению. Важно, что после стабилизации состояния нарколог может дать рекомендации по дальнейшей реабилитации, возможному кодированию, а также предложить программу для восстановления здоровья на длительный срок.
Разобраться лучше – нарколог на дом в воронеже
Выезд нарколога на дом — это медицинская услуга, которая подразумевает не только экстренную помощь, но и полноценное обследование пациента в комфортных для него условиях. В наркологической клинике «Частный медик 24» мы обеспечиваем профессиональное лечение на дому, которое включает в себя несколько важных этапов, чтобы стабилизировать состояние пациента, улучшить его самочувствие и снизить риски дальнейших осложнений.
Углубиться в тему – нарколог на дом вывод в самаре
Анонимное лечение на дому ценно ещё и тем, что снижает внутреннее сопротивление самого пациента. Для многих людей первый контакт с врачом происходит именно дома, без дороги, без ожидания, без страха чужих взглядов. Такой формат помогает начать разговор не только о снятии острых симптомов, но и о более широких вопросах: что делать после выхода из запоя, когда требуется кодирование, в каких случаях нужна реабилитация, а когда первичная наркологическая помощь уже должна переходить в полноценный лечебный маршрут. Врач может помочь и в ситуациях, связанных не только с алкоголем, но и с наркомании, если семье нужно понять, что происходит с зависимым человеком и какой следующий шаг будет для него безопасным.
Узнать больше – http://narkolog-na-dom-voronezh-1.ru
Есть состояния, при которых откладывать вызов врача рискованно. Домашний выезд нужен не только при «тяжёлом похмелье», но и тогда, когда самочувствие становится нестабильным, а попытки справиться своими силами уже не работают. Ниже перечислены ситуации, при которых обращение за помощью оправдано именно в ближайшее время, а не «если не станет легче к вечеру».
Получить больше информации – нарколог на дом в воронеже
Доставка свежих цветов в день заказа. Флористы собирают букеты из проверенных поставок, бережно упаковывают и передают курьеру. Работаем ежедневно, гарантируем сохранность и точное время вручения. Анонимная отправка и фотоотчёт включены https://buketico.ru/
Домашний формат выбирают тогда, когда человеку тяжело добраться до медицинского учреждения, он ослаблен после нескольких дней употребления алкоголя или родственникам важно быстро получить врачебную оценку состояния. После осмотра определяют, допустима ли помощь на дому, требуется ли детоксикация, нужна ли капельница, достаточно ли домашнего наблюдения или следует сразу рассматривать другой объем помощи. Если эпизоды повторяются, обсуждение может выходить за рамки одного выезда и включать лечение алкоголизма, помощь при зависимости, кодирование, участие психолога и реабилитацию. Уже на этапе первичного обращения нередко уточняют, как вызвать врача, какие услуги доступны на дому и в каких условиях домашний формат остается безопасным.
Ознакомиться с деталями – вызов нарколога на дом москва
Перед выбором метода врач проводит диагностику, оценивает физическое и психоэмоциональное состояние пациента, рассказывает о возможных рисках и особенностях процедуры. Только после согласования всех деталей назначается дата и форма кодирования.
Подробнее тут – http://kodirovanie-ot-alkogolizma-ehlektrostal6.ru/
В Воронеже услуга «нарколог на дом» востребована прежде всего тогда, когда состояние развивается быстро, а запас сил у пациента почти исчерпан. После нескольких дней употребления человеку бывает трудно даже выйти из квартиры: сохраняются слабость, дрожь, бессонница, тошнота, скачки давления, потливость, раздражительность и ощущение, что без новой дозы алкоголя легче уже не станет. Именно в этот момент домашний выезд специалиста помогает разорвать опасный цикл. Наркологическая помощь начинается там, где человек находится, а не там, куда он в идеале должен был бы доехать.
Ознакомиться с деталями – запой нарколог на дом
Каждый элемент программы направлен на создание комплексного подхода к лечению зависимости, обеспечивая помощь не только на физическом, но и на эмоциональном уровне. Индивидуальная программа реабилитации позволяет выстроить эффективную терапию, которая соответствует конкретным потребностям пациента.
Изучить вопрос глубже – клиника реабилитации алкоголиков город
Основное действие капельницы заключается в быстром восстановлении водного баланса и выведении токсинов, оставшихся в организме после употребления алкоголя. Алкоголь нарушает работу печени, почек и других органов, поэтому капельница помогает организму вернуться в норму, восстанавливая функции этих органов и поддерживая обмен веществ. Состав капельницы также может включать препараты, которые поддерживают работу сердечно-сосудистой системы и устраняют болезненные ощущения, такие как головная боль и тошнота.
Получить дополнительную информацию – капельница от похмелья вызов на дом в нижнем новгороде
Наркологическая помощь в Нижнем Новгороде с выездом врача, капельницами и наблюдением пациента в наркологической клинике «Частный медик 24»
Исследовать вопрос подробнее – https://narkologicheskaya-pomoshh-nizhnij-novgorod-8.ru/
canada discount pharmacy: CivicMeds – pharmacy rx
Наркологический стационар в Санкт-Петербурге: круглосуточная помощь, лечение зависимости и восстановление в наркологической клинике «Похмельная служба»
Изучить вопрос глубже – наркологическая помощь стационар в санкт-петербурге
Домашняя помощь — это клиника, перенесённая в тихую комнату. Знакомая обстановка снижает тревогу, исчезают пробки и ожидание, нет «социального шума». Врач «ПрофДетокса» приезжает без эмблем, действует спокойно и последовательно, объясняет каждое назначение простым языком. Мы не используем мифические смеси. Состав и темп капельницы подбираются под текущие показатели — давление, пульс, сатурация, выраженность тремора и тошноты, уровень тревоги, данные о лекарствах, которые человек успел принять за двое суток. Такой подход даёт не минутное облегчение, а устойчивую динамику на сутки и неделю.
Разобраться лучше – http://narkolog-na-dom-ivanteevka8.ru
Процесс введения капельницы с медицинским контролем начинается с того, что медицинский специалист оценивает общее состояние пациента: измеряет артериальное давление, пульс, температуру тела, а также учитывает историю заболеваний. Это позволяет выбрать оптимальный состав растворов и препаратов для максимально быстрого и безопасного восстановления.
Ознакомиться с деталями – капельница от похмелья вызов на дом нижний новгород
Ключевым преимуществом вызова нарколога на дом является то, что лечение начинается в тот момент, когда оно особенно необходимо. Близкие пациента не должны волноваться о поиске клиники или медицинских центров в экстренной ситуации — помощь будет оказана немедленно, с минимальными затратами времени и без стресса для пациента.
Детальнее – нарколог на дом анонимно самара
Ключевым преимуществом вызова нарколога на дом является то, что лечение начинается в тот момент, когда оно особенно необходимо. Близкие пациента не должны волноваться о поиске клиники или медицинских центров в экстренной ситуации — помощь будет оказана немедленно, с минимальными затратами времени и без стресса для пациента.
Подробнее можно узнать тут – вызов нарколога на дом
Вывод из запоя на дому в Санкт-Петербурге с выездом нарколога, детоксикацией и восстановлением состояния в наркологической клинике «Частный медик 24»
Получить дополнительную информацию – вывод из запоя на дому цена в санкт-петербурге
Наркологическая помощь на дому помогает избежать стресса, связанного с поездкой в клинику. Особенно это важно в случаях, когда пациент находится в состоянии тяжёлой интоксикации или переживает абстинентный синдром, который можно только усугубить дополнительной нагрузкой. Врач приедет в кратчайшие сроки, обеспечивая необходимое лечение в первые часы после ухудшения состояния. Также важно, что при выезде специалист гарантирует полную анонимность, что особенно важно для многих людей, которые боятся открыто признаться в своей проблеме. Профессиональная наркологическая помощь на дому позволяет избежать срыва и начать процесс восстановления без стресса.
Подробнее тут – вызвать нарколога на дом в воронеже
Нарколог на дом в Москве — это формат врачебной помощи, который рассматривают при состояниях после употребления алкоголя, когда больному требуется осмотр без посещения клиники. Чаще всего обращение связано с запоем, тяжелым похмельным синдромом, слабостью, нарушением сна, тремором, тревогой, тошнотой, сухостью во рту, скачками давления, сердцебиением и общим ухудшением самочувствия. Дальнейшая тактика определяется после осмотра, с учетом длительности употребления алкоголя, возраста, сопутствующих заболеваний и выраженности текущих симптомов.
Изучить вопрос глубже – нарколог на дом вывод москва
Реабилитация алкоголиков в Москве с комплексным подходом — это многогранный процесс, включающий в себя не только медицинские процедуры, но и психологическую поддержку, физическую реабилитацию и помощь в социальной адаптации. Профессиональный реабилитационный центр обеспечивает индивидуальный подход к каждому пациенту, включая такие методы, как кодирование и своевременное лечение запоя. Важно отметить, что успешное лечение алкоголизма требует учета множества факторов, таких как степень зависимости, психоэмоциональное состояние пациента, а также его физическое здоровье. Комплексный подход помогает эффективно устранить все составляющие проблемы, минимизируя риски рецидивов.
Выяснить больше – реабилитация алкоголиков в москве
canadian pharmacy meds CivicMeds canadian pharmacy ratings
http://corebluehealth.com/# CoreBlue Health
safe reliable canadian pharmacy: save on pharmacy – canada drugs online reviews
Такие условия позволяют начать лечение без задержек и обеспечить более мягкое восстановление. При этом помощь может предоставляться анонимно.
Исследовать вопрос подробнее – https://vyvod-iz-zapoya-na-domu-sankt-peterburg-11.ru
Существует ряд ситуаций, при которых вызов специалиста на дом является обоснованным решением:
Изучить вопрос глубже – врач нарколог на дом нижний новгород
Реабилитация алкоголиков в Москве с комплексным подходом — это многогранный процесс, включающий в себя не только медицинские процедуры, но и психологическую поддержку, физическую реабилитацию и помощь в социальной адаптации. Профессиональный реабилитационный центр обеспечивает индивидуальный подход к каждому пациенту, включая такие методы, как кодирование и своевременное лечение запоя. Важно отметить, что успешное лечение алкоголизма требует учета множества факторов, таких как степень зависимости, психоэмоциональное состояние пациента, а также его физическое здоровье. Комплексный подход помогает эффективно устранить все составляющие проблемы, минимизируя риски рецидивов.
Ознакомиться с деталями – реабилитация алкоголиков стоимость в москве
http://corebluehealth.com/# CoreBlue Health
Основной этап, направленный на очищение организма от продуктов распада алкоголя и нормализацию функций внутренних органов. Применяются современные препараты с антиоксидантным и гепатопротекторным эффектом.
Получить больше информации – http://lechenie-alkogolizma-krasnodar0.ru/metody-lecheniya-alkogolizma-krasnodar/
Такие признаки требуют быстрого вмешательства, поскольку состояние может ухудшаться. Выезд врача позволяет стабилизировать показатели и предотвратить развитие осложнений. При этом помощь может предоставляться анонимно.
Подробнее тут – нарколог на дом вывод из запоя
canadian pharmacy discount coupon canadian pharmacy mall online pharmacy no presc uk
Наркологический стационар с круглосуточным наблюдением — это не просто место для детоксикации, но и пространство для комплексного лечения и реабилитации. Постоянное присутствие медицинского персонала помогает избежать опасных ситуаций, таких как психозы или физиологические сбои, характерные для абстиненции. Прием пациентов может включать кодирование, а также индивидуальные программы лечения, которые разрабатываются в зависимости от состояния пациента и его потребностей на протяжении года.
Детальнее – наркологическая клиника стационар в санкт-петербурге
Выбирая наркологический стационар в Санкт-Петербурге, важно учитывать не только стоимость лечения, но и репутацию учреждения, а также подход, который применяется к лечению зависимых. Подходящее учреждение обеспечит не только лечение физической зависимости, но и долгосрочное восстановление и психологическую поддержку. Важно, чтобы в клинике предоставлялась психотерапия и была возможность консультации психиатра для комплексной помощи пациенту.
Получить дополнительные сведения – лечение в наркологическом стационаре в санкт-петербурге
Капельница от похмелья — это экстренная мера, которая помогает снять интоксикацию и восстановить водно-электролитный баланс в организме после злоупотребления алкоголем. В наркологической клинике «Частный медик 24» в Самаре мы предлагаем эффективное лечение для тех, кто столкнулся с последствиями запоя или перегрузки организма после употребления алкоголя. Капельницы для снятия похмелья — это быстрый и безопасный способ вернуть пациента в норму, избавить от болезненных симптомов, таких как головная боль, тошнота, слабость, сухость во рту, а также стабилизировать его общее состояние. Выезд нарколога на дом и проведение капельниц позволяет избежать поездки в клинику и начать лечение в удобной обстановке.
Подробнее тут – http://kapelnicza-ot-pokhmelya-samara.ru/
После снятия острой интоксикации переходим к физическому и психическому восстановлению — комплекс лечебной гимнастики, массажи, физиопроцедуры и сеансы ароматерапии для снятия стресса и повышения общего тонуса.
Подробнее тут – https://lechenie-alkogolizma-krasnodar0.ru/metody-lecheniya-alkogolizma-krasnodar/
Обращение в наркологический стационар особенно важно в случае тяжелой зависимости, когда человек не способен контролировать свои действия, а угрозы для здоровья возрастают. В таких случаях важно не откладывать начало лечения, а обратиться за помощью сразу же, чтобы избежать серьезных последствий для организма. При выборе стационара следует обратить внимание на наличие лицензии, а также возможность получения психотерапии и других профессиональных услуг в области наркологии для комплексного лечения зависимости.
Получить дополнительные сведения – narkologicheskij-staczionar-sankt-peterburg-1.ru/
Мы стремимся обеспечить пациентам максимальный уровень доверия и результативности лечения, сочетая передовые технологии и многолетний опыт специалистов:
Разобраться лучше – центр лечения алкоголизма краснодар.
После употребления алкоголя состояние может быстро ухудшиться: появляется головная боль, тошнота, головокружение и слабость. Это следствие того, что в организме накапливаются токсины, продукты распада этанола и нарушается водно-электролитный баланс. С помощью капельницы от похмелья можно быстро справиться с интоксикацией, восполнить недостающие элементы и облегчить состояние пациента. В клинике «Частный медик 24» в Самаре мы предлагаем капельницы, которые помогают снять все неприятные симптомы похмелья, восстанавливая работу организма и минимизируя риски для здоровья.
Подробнее – http://kapelnicza-ot-pokhmelya-samara.ru
Осмотр на дому особенно важен в тех случаях, когда больному трудно вставать, пить воду, принимать пищу, спокойно лежать или ориентироваться в собственном состоянии. В такой ситуации очная оценка помогает понять, допустим ли домашний формат и достаточно ли его на текущем этапе. При выраженном ухудшении состояния, признаках перегрузки организма или риске осложнений может потребоваться срочный пересмотр тактики.
Выяснить больше – нарколог на дом вывод москва
Мы стремимся обеспечить пациентам максимальный уровень доверия и результативности лечения, сочетая передовые технологии и многолетний опыт специалистов:
Получить больше информации – центр лечения алкоголизма
Отдельно оценивают ситуации, когда эпизоды повторяются и становятся частью более устойчивой проблемы. Если после алкоголя регулярно развивается тяжелое состояние, нарушается привычный режим жизни, усиливаются последствия алкоголизма и возникают сложности с контролем употребления, домашний выезд может быть только первым этапом более длинного маршрута помощи. При этом наркологическая помощь может включать не только снятие острых проявлений, но и дальнейшую программу лечения зависимости, если речь идет о длительном течении заболевания.
Подробнее можно узнать тут – нарколог на дом цена
Метод кодирования
Ознакомиться с деталями – https://kodirovanie-ot-alkogolizma-ehlektrostal6.ru/kodirovka-ot-alkogolya-v-ehlektrostali/
Когда такие симптомы становятся ярко выраженными, важно не откладывать вызов нарколога. В противном случае токсическое воздействие алкоголя может повлиять на другие органы, такие как печень, почки и сердце, что приведёт к более серьёзным последствиям. Врач на дому проведет экстренную помощь, обеспечит безопасность и поможет избежать ухудшения состояния.
Получить дополнительную информацию – http://kapelnicza-ot-pokhmelya-samara-2.ru
VeritasCare: VeritasCare – VeritasCare
При выезде нарколога на дом в Самаре мы проводим диагностику состояния пациента, чтобы понять, какие препараты и процедуры необходимы для стабилизации. Это может включать регидратацию, витамины группы B, антиеметики и другие препараты для снятия симптомов похмелья. Все препараты подбираются индивидуально в зависимости от состояния пациента и его нужд. Это позволяет значительно сократить время на восстановление и быстро вернуться к нормальному состоянию.
Углубиться в тему – капельница от похмелья на дому
В подобных случаях время играет против пациента. Чем дольше человек остаётся без осмотра, тем выше вероятность, что к обезвоживанию и интоксикации добавятся нарушения сна, истощение, вегетативный срыв и ошибки с лекарствами, которые были приняты «для успокоения» без понимания общей картины. В практике выездной службы именно экстренное реагирование помогает не допустить ухудшения и в короткие сроки вернуть ситуацию под медицинский контроль.
Изучить вопрос глубже – narkolog-na-dom-voronezh.ru/
Помощь на дому рассматривают при состояниях, которые сопровождаются заметным ухудшением самочувствия после алкоголя. Это может быть запой на протяжении нескольких дней, тяжелое похмелье, дрожь в руках, нарушение сна, выраженная слабость, тревога, тошнота, сухость во рту, снижение аппетита и признаки обезвоживания. В таких случаях осмотр врача нужен для того, чтобы оценить тяжесть состояния и понять, безопасно ли оставаться дома.
Получить дополнительные сведения – врач нарколог на дом
CoreBlue Health Buy generic 100mg Viagra online CoreBlue Health
Капельница от похмелья в Нижнем Новгороде: эффективное снятие интоксикации, восстановление организма и медицинский контроль в наркологической клинике «Похмельная служба»
Подробнее тут – капельница от похмелья нижний новгород
Tadalafil price: Buy Tadalafil 10mg – VeritasCare
Нарколог на дом в Воронеже с быстрым выездом, индивидуальным подбором терапии и наблюдением в наркологической клинике «Частный медик 24»
Ознакомиться с деталями – запой нарколог на дом в воронеже
Наши врачи приезжают в удобное для пациента время и проводят полный осмотр. В зависимости от состояния пациента, они подбирают необходимое лечение: капельницы для снятия токсинов, медикаментозные препараты для стабилизации состояния, а также дают рекомендации по дальнейшему восстановлению. Важно, что лечение на дому позволяет избежать медицинской огласки и лишнего стресса, а также гарантирует полную конфиденциальность.
Детальнее – нарколог на дом анонимно в самаре
Сразу после вызова нарколог прибывает на дом для проведения тщательного первичного осмотра. На этом этапе специалист собирает краткий анамнез, измеряет жизненно важные показатели – пульс, артериальное давление, температуру – и оценивает степень алкогольной интоксикации. Полученные данные служат основой для составления индивидуального плана лечения, позволяющего подобрать оптимальные методы детоксикации.
Детальнее – вывод из запоя цена ярославль.
Для жителей Воронежа выезд нарколога на дом — это быстрый и удобный способ получить экстренную помощь. Когда человек переживает запой, а его физическое и эмоциональное состояние быстро ухудшается, наркологическая помощь на дому становится оптимальным решением. Врач приезжает и немедленно оценивает состояние пациента: проверяет его пульс, давление, частоту дыхания, уровень сознания и другие важные показатели. Это помогает составить точный план лечения, который будет направлен на восстановление организма, снятие токсинов и стабилизацию состояния пациента.
Узнать больше – http://narkolog-na-dom-voronezh-4.ru/
Нарколог на дом в Москве: срочная медицинская помощь, капельницы и восстановление состояния в наркологической клинике «Клиника доктора Калюжной».
Изучить вопрос глубже – вызов нарколога на дом в москве
Безопасность — это не лозунг, а набор решений. Мы избегаем «жёстких» седативных доз, которые создают видимость улучшения и повышают риск скрытых осложнений. Наращивание темпа инфузии происходит постепенно и увязано с динамикой симптомов и цифрами измерений. Любой шаг объясняется пациенту и семье: зачем он выбран, что считается нормальной волной улучшения, в какой момент нужно связаться с дежурным. Такой прозрачный формат снимает тревогу и помогает всем участникам действовать согласованно.
Изучить вопрос глубже – https://narkolog-na-dom-ivanteevka8.ru/
Нарколог на дом — это услуга, которая позволяет получить медицинскую помощь в комфортной и привычной обстановке, не выходя из дома. В наркологической клинике «Частный медик 24» в Самаре мы предоставляем профессиональную помощь нарколога прямо на дому. Это идеальное решение для тех, кто испытывает симптомы абстиненции, ломки или алкогольной интоксикации, но не может или не хочет ехать в клинику. Выезд врача на дом позволяет начать лечение сразу, без задержек, минимизируя стрессы и сложности, связанные с поездкой.
Получить дополнительные сведения – нарколог на дом в самаре
Мы стремимся обеспечить пациентам максимальный уровень доверия и результативности лечения, сочетая передовые технологии и многолетний опыт специалистов:
Разобраться лучше – http://lechenie-alkogolizma-krasnodar0.ru/klinika-lecheniya-alkogolizma-krasnodar/
Для жителей Самары выезд нарколога на дом — это удобный и быстрый способ получить неотложную помощь при алкогольной или наркотической зависимости. Когда состояние пациента ухудшается и он не может самостоятельно обратиться за помощью, нарколог на дом становится единственным правильным решением. Важно понимать, что симптоматика абстиненции может развиваться стремительно, и чем быстрее будет оказана помощь, тем меньше рисков для здоровья пациента.
Подробнее – вызвать нарколога на дом
После завершения основного курса лечения в наркологической клинике в Краснодаре пациентам предлагаются программы социальной реабилитации. Они направлены на восстановление социальных навыков, адаптацию в обществе и предотвращение рецидивов. Ключевым элементом здесь является поддержка со стороны профессиональных социальных работников и участие в группах взаимопомощи.
Разобраться лучше – наркологическая клиника в краснодаре
Наиболее частыми причинами обращения становятся запой, выраженная слабость, тремор, нарушение сна, тревога, учащенный пульс, нестабильное давление, тошнота и ощущение физического истощения. Эти проявления могут сочетаться между собой и усиливаться после прекращения употребления алкоголя, особенно если эпизод длился несколько дней.
Детальнее – нарколог на дом анонимно москва
Запой и алкогольная интоксикация могут приводить к целому ряду опасных симптомов, таких как головная боль, слабость, тошнота, рвота, обезвоживание и психоэмоциональная нестабильность. Если не начать лечение вовремя, такие состояния могут привести к более серьезным осложнениям, включая сердечные проблемы, галлюцинации и даже опасные для жизни нарушения работы организма. С помощью нарколога на дому можно начать экстренную терапию прямо в момент ухудшения состояния, не затягивая с лечением и не тратя время на поездки в клинику.
Углубиться в тему – narkolog-na-dom-samara-2.ru/
Нарколог на дом в Воронеже с конфиденциальным выездом, капельницами и поддержкой пациента в наркологической клинике «Частный медик 24»
Детальнее – врач нарколог на дом в воронеже
pin up pin up az
Специалисты рекомендуют не откладывать вызов врача, если симптомы похмелья сильно нарушают обычный режим жизни. Чем раньше начнется лечение, тем быстрее произойдет стабилизация состояния. Наркологи также подчеркивают, что капельница от похмелья не является решением проблемы алкоголизма, но она помогает избавиться от острого дискомфорта и подготовить организм к более длительному восстановлению.
Ознакомиться с деталями – http://www.domen.ru
https://pinupaz.online/ pin up casino
Осмотр на дому особенно важен в тех случаях, когда больному трудно вставать, пить воду, принимать пищу, спокойно лежать или ориентироваться в собственном состоянии. Чем тяжелее переносится выход из употребления, тем выше значение очной оценки, потому что по телефону невозможно полноценно определить границы безопасной помощи. При выраженных симптомах может потребоваться срочный выезд, чтобы вовремя оценить риски и определить, допустим ли вывод из запоя дома или необходимо наблюдение в стационаре.
Получить больше информации – нарколог на дом в москве
Процесс лечения в таких учреждениях начинается с диагностики, которая включает в себя оценку физического и психоэмоционального состояния пациента. Затем составляется индивидуальный план терапии, который может включать в себя медикаментозное лечение, психологическую помощь и другие методы. Врач постоянно контролирует прогресс лечения, обеспечивая максимальную безопасность и эффективность терапии. В некоторых случаях требуется консультация психиатра для более глубокой оценки состояния пациента, а также сдача анализов, чтобы точно определить оптимальные методы лечения, особенно при наркомании.
Получить дополнительные сведения – частный наркологический стационар в санкт-петербурге
Нарколог на дом в Москве: выезд врача на дом, лечение запоя и консультации в наркологической клинике «Клиника доктора Калюжной».
Узнать больше – вызвать нарколога на дом
pin-up pin up casino
После введения капельницы пациент сразу чувствует облегчение, так как токсические вещества, отравляющие организм, начинают вымываться, а уровень обезвоживания снижается. Важно отметить, что капельница позволяет быстро снять острые симптомы и вернуть человека к нормальному состоянию.
Подробнее тут – капельница от похмелья на дому в нижнем новгороде
Когда зависимости становятся хроническими и угрожают жизни пациента, комплексная реабилитация при наркомании в специализированных клиниках Москвы, включая вывод из состояния в стационаре и последующий анализ данных о состоянии пациента, может стать единственным возможным решением. Процесс восстановления включает в себя работу не только с зависимостью, но и с психоэмоциональным состоянием, что делает лечение более эффективным и долговечным.
Получить дополнительные сведения – клиника реабилитации алкоголиков в москве
Метод кодирования
Подробнее – kodirovanie-ot-alkogolizma-ukolom
При выборе наркологического стационара с комфортными условиями в Санкт-Петербурге важно учитывать несколько ключевых факторов, которые могут повлиять на успех лечения. Кроме высококвалифицированных специалистов и индивидуального подхода, комфортные условия для проживания играют важную роль в процессе восстановления пациента. Это создаёт оптимальные условия для того, чтобы человек мог сосредоточиться на своём здоровье и восстановлении, не отвлекаясь на неприятные или неудобные условия. В некоторых случаях может быть предложено кодирование, а также получение дополнительных данных и консультаций для более точного подхода к лечению.
Углубиться в тему – лечение в наркологическом стационаре в санкт-петербурге
пин ап пин ап казино
Капельница от похмелья — это один из наиболее эффективных методов экстренной медицинской помощи, который позволяет быстро снять симптомы алкогольной интоксикации и восстановить организм после злоупотребления алкоголем. В наркологической клинике «Частный медик 24» в Самаре мы предоставляем услугу выезда нарколога на дом и капельной терапии для пациентов, испытывающих тяжёлые симптомы похмелья. Это удобный способ получить необходимую помощь без лишнего стресса, сохраняя анонимность и комфорт пациента.
Подробнее – капельница от похмелья на дом самара
pin up pin-up oyunu
Капельница от похмелья применяется в тех случаях, когда человек ощущает сильное недомогание после употребления алкоголя. Основные симптомы, при которых рекомендуется лечение капельницей, включают:
Подробнее – капельница от похмелья на дом в самаре
Особенность анонимной реабилитации заключается в создании комфортной и безопасной среды, которая мотивирует пациента работать над собой, не опасаясь осуждения. Это повышает эффективность лечения, ведь пациент может открыться и честно обсуждать свои проблемы без страха быть осужденным.
Узнать больше – https://reabilitacziya-alkogolikov-moskva-4.ru
https://pinupaz.online/ pin up az
Работа с пациентами в наркологическом стационаре начинается с диагностики, которая помогает определить степень зависимости и сопутствующие заболевания. На основе этих данных разрабатывается индивидуальный план лечения. Врачи, наркологи и психотерапевты работают в тесном контакте с пациентом, что позволяет достичь наилучших результатов в процессе восстановления. Важно также убедиться, что клиника имеет необходимую лицензию, а для эффективного лечения могут быть предложены такие процедуры, как прием психотерапевта и кодирование от зависимости.
Получить больше информации – http://narkologicheskij-staczionar-sankt-peterburg-3.ru
Выбор наркологического стационара в Санкт-Петербурге — это важный шаг, который требует внимательного подхода. Каждое медицинское учреждение имеет свои особенности, что может влиять на качество предоставляемых услуг. Важно учитывать как репутацию клиники, так и квалификацию врачей, а также доступные методы лечения и реабилитации.
Получить больше информации – лечение в наркологическом стационаре
Во всех этих случаях важен не только сам факт выезда, но и то, что врач умеет быстро определить границы домашнего лечения. Нарколог на дом нужен не для того, чтобы любой ценой оставить пациента в квартире, а для того, чтобы выбрать безопасный путь: домашняя стабилизация, повторный визит, амбулаторное продолжение или перевод в стационар.
Изучить вопрос глубже – вызов нарколога на дом воронеж
Отдельно оценивают ситуации, когда эпизоды повторяются и становятся частью более устойчивой проблемы. Если после алкоголя регулярно развивается тяжелое состояние, нарушается привычный режим жизни, усиливаются последствия алкоголизма и возникают сложности с контролем употребления, домашний выезд может быть только первым этапом более длинного маршрута помощи. При этом наркологическая помощь может включать не только снятие острых проявлений, но и дальнейшую программу лечения зависимости, если речь идет о длительном течении заболевания.
Подробнее можно узнать тут – нарколог на дом
Каждый элемент программы направлен на создание комплексного подхода к лечению зависимости, обеспечивая помощь не только на физическом, но и на эмоциональном уровне. Индивидуальная программа реабилитации позволяет выстроить эффективную терапию, которая соответствует конкретным потребностям пациента.
Получить больше информации – http://www.domen.ru
Выезд нарколога на дом — это медицинская услуга, которая подразумевает не только экстренную помощь, но и полноценное обследование пациента в комфортных для него условиях. В наркологической клинике «Частный медик 24» мы обеспечиваем профессиональное лечение на дому, которое включает в себя несколько важных этапов, чтобы стабилизировать состояние пациента, улучшить его самочувствие и снизить риски дальнейших осложнений.
Углубиться в тему – нарколог на дом анонимно в самаре
https://pinupazz.top/ pin up casino
Капельница от похмелья в Самаре с выездом на дом, восстановлением водного баланса и медицинской помощью в наркологической клинике «Частный медик 24»
Подробнее – капельница от похмелья вызов на дом самара
Обращение в наркологический стационар особенно важно в случае тяжелой зависимости, когда человек не способен контролировать свои действия, а угрозы для здоровья возрастают. В таких случаях важно не откладывать начало лечения, а обратиться за помощью сразу же, чтобы избежать серьезных последствий для организма. При выборе стационара следует обратить внимание на наличие лицензии, а также возможность получения психотерапии и других профессиональных услуг в области наркологии для комплексного лечения зависимости.
Подробнее – частный наркологический стационар в санкт-петербурге
pin up az online pin-up oyunu
Стационарное лечение в наркологическом стационаре дает целый ряд преимуществ, которые трудно переоценить, особенно в случае тяжелых зависимостей. Пребывание в стационаре позволяет сосредоточиться исключительно на восстановлении здоровья, не отвлекаясь на внешние факторы, и получать постоянную помощь профессионалов. В некоторых случаях, в зависимости от состояния пациента, может потребоваться вывод из запоя, а также консультация специалистов, которые будут сопровождать пациента на протяжении года для долгосрочной реабилитации.
Получить дополнительную информацию – наркологическая клиника стационар
Препараты, введённые через капельницу, начинают действовать почти сразу. Они поступают напрямую в кровоток, обходя желудочно-кишечный тракт, что позволяет ускорить процесс восстановления и устранить симптомы похмелья, такие как головная боль, тошнота и слабость, уже через 20–30 минут после начала процедуры.
Ознакомиться с деталями – капельница от похмелья на дом в нижнем новгороде
Капельница от похмелья применяется, когда симптомы интоксикации становятся выраженными и мешают нормальной жизнедеятельности пациента. Основные показания для использования капельницы включают:
Получить дополнительные сведения – капельница от похмелья на дом
Процесс лечения начинается с консультации врача, который оценивает состояние пациента, его анамнез и определяет, какие процедуры и препараты нужно использовать. В большинстве случаев капельница включает в себя регидратацию, витамины группы B, антиеметики, препараты для улучшения работы печени и почек. Важно, что капельница не только помогает организму вывести токсины, но и восстанавливает нормальную работу всех систем организма, обеспечивая быстрое улучшение самочувствия.
Подробнее можно узнать тут – капельница от похмелья цена самара
В данной обзорной статье представлены интригующие факты, которые не оставят вас равнодушными. Мы критикуем и анализируем события, которые изменили наше восприятие мира. Узнайте, что стоит за новыми открытиями и как они могут изменить ваше восприятие реальности.
Перейти к статье – http://ekarasaa.com/homeo-clinic-wall-drawing
Для семьи это тоже имеет большое значение. Пока врач в пути, родственники часто совершают одни и те же ошибки: пытаются «отпаивать» человека через силу, смешивают несовместимые медикаменты, дают советы, которые только повышают тревогу, спорят или требуют немедленно взять себя в руки. Профессиональный выезд снимает эту хаотичность. После осмотра врач объясняет, какие симптомы связаны с алкогольной интоксикацией, какие могут указывать на осложнения, что допустимо дома, а что требует перевода в стационар. В этом и состоит ценность выезда: он возвращает контроль над ситуацией и позволяет начать лечение без лишних задержек.
Разобраться лучше – нарколог на дом вывод
Этот информационный материал собраны данные, которые помогут лучше понять текущие тенденции и процессы в различных сферах жизни. Мы предоставляем четкий анализ, графики и примеры, чтобы информация была не только понятной, но и практичной для принятия решений.
Провести детальное исследование – https://www2.geo.sc.chula.ac.th/the-perfect-layout-for-your-kitchen
Эта статья сочетает познавательный и занимательный контент, что делает ее идеальной для любителей глубоких исследований. Мы рассмотрим увлекательные аспекты различных тем и предоставим вам новые знания, которые могут оказаться полезными в будущем.
Интересует подробная информация – https://setcelebs.com/damon-herriman-biography
Есть состояния, при которых откладывать вызов врача рискованно. Домашний выезд нужен не только при «тяжёлом похмелье», но и тогда, когда самочувствие становится нестабильным, а попытки справиться своими силами уже не работают. Ниже перечислены ситуации, при которых обращение за помощью оправдано именно в ближайшее время, а не «если не станет легче к вечеру».
Выяснить больше – нарколог на дом анонимно воронеж
В статье представлены ключевые моменты по актуальной теме, дополненные советами экспертов и ссылками на дополнительные ресурсы. Цель материала — дать читателю инструменты для самостоятельного развития и принятия осознанных решений.
Проследить причинно-следственные связи – https://fisip.upnvj.ac.id/download/pob-prosedur-ujian-skripsi
пин ап пин ап казахстан
Этот текст призван помочь читателю расширить кругозор и получить практические знания. Мы используем простой язык, наглядные примеры и структурированное изложение, чтобы сделать обучение максимально эффективным и увлекательным.
Прочитать подробнее – https://www.seft.world/top-fashion-designers
Реабилитация алкоголиков с поддержкой специалистов в Москве представляет собой важный и сложный процесс, в котором ключевую роль играет профессиональное вмешательство. Программы реабилитации включают в себя не только медицинскую помощь, но и психологическую, социальную и эмоциональную поддержку, что способствует успешному и долгосрочному восстановлению пациента. Такая комплексная помощь является основой эффективного лечения и предотвращения рецидивов.
Разобраться лучше – алкоголик реабилитация наркоманов в москве
pin up pin up az
Капельница от похмелья — это одна из самых эффективных процедур для быстрого облегчения симптомов интоксикации после употребления алкоголя. В Нижнем Новгороде существует множество клиник и медицинских центров, которые предлагают услуги капельниц, направленных на восстановление водно-электролитного баланса, улучшение общего самочувствия и снятие неприятных симптомов похмелья. Процесс введения капельницы можно адаптировать под индивидуальные особенности пациента для достижения наилучшего результата.
Разобраться лучше – http://kapelnicza-ot-pokhmelya-nizhnij-novgorod.ru
https://pin-up-kz.space/ пин ап казино
В этом информативном обзоре собраны самые интересные статистические данные и факты, которые помогут лучше понять текущие тренды. Мы представим вам цифры и графики, которые иллюстрируют, как развиваются различные сферы жизни. Эта информация станет отличной основой для глубокого анализа и принятия обоснованных решений.
Перейти к статье – https://theunionbrief.com/the-complete-guide-to-somalia
https://pinupazz.top/ pin up casino
В этой публикации мы предлагаем подробные объяснения по актуальным вопросам, чтобы помочь читателям глубже понять их. Четкость и структурированность материала сделают его удобным для усвоения и применения в повседневной жизни.
Нажмите, чтобы узнать больше – https://mybestbox.shop/index.php/2023/04/09/revolutionize-your-business-with-our-cutting-edge
В Санкт-Петербурге услуга вывода из запоя на дому применяется в ситуациях, когда требуется медицинская помощь, но нет показаний к стационарному лечению. Врач проводит консультацию, оценивает состояние пациента, длительность употребления и выраженность симптомов, после чего принимает решение о тактике лечения при алкоголизме. Важно, что терапия начинается сразу после осмотра, а при необходимости можно заранее заказать выезд специалистов.
Подробнее – вывод из запоя на дому анонимно в санкт-петербурге
Этот интересный отчет представляет собой сборник полезных фактов, касающихся актуальных тем. Мы проанализируем данные, чтобы вы могли сделать обоснованные выводы. Читайте, чтобы узнать больше о последних трендах и значимых событиях!
Узнать больше – https://cuahiendai.com/chung-cu-blue-sapphire-binh-phu-quan-6
Существует ряд ситуаций, при которых вызов специалиста на дом является обоснованным решением:
Исследовать вопрос подробнее – нарколог на дом нижний новгород
Женский портал https://muz-hoz.com.ua мода, красота, здоровье и психология. Советы, тренды и полезные статьи для современной женщины. Удобный онлайн формат для ежедневного чтения.
Строительный портал https://zip.org.ua все для ремонта и строительства в одном месте. Актуальные статьи, советы экспертов, обзоры материалов и технологий. Найдите подрядчиков, сравните цены и выберите лучшие решения для дома, квартиры или бизнеса быстро и удобно.
https://pinupaz.online/ pin-up online casino
Мы собрали для вас самые захватывающие факты из мира науки и истории. От малознакомых деталей до грандиозных событий — эта статья расширит ваш кругозор и подарит новое понимание того, как устроен наш мир.
Изучить материалы по теме – http://www.acupunctureinrichmond.co.uk/uncategorized/545
Вывод из запоя на дому в Санкт-Петербурге с инфузионной терапией и контролем состояния пациента в наркологической клинике «Частный медик 24»
Исследовать вопрос подробнее – http://www.domen.ru
Нарколог на дом в Самаре с выездом специалиста, детоксикацией и анонимной медицинской помощью в наркологической клинике «Частный медик 24»
Выяснить больше – нарколог на дом анонимно самара
https://pinupaz.online/ pin-up oyunu
В этом информативном обзоре собраны самые интересные статистические данные и факты, которые помогут лучше понять текущие тренды. Мы представим вам цифры и графики, которые иллюстрируют, как развиваются различные сферы жизни. Эта информация станет отличной основой для глубокого анализа и принятия обоснованных решений.
Не упусти важное! – https://scribblersindia.com/blog/8-fantastic-budget-content-marketing-ideas-for-your-growing-business
Эта статья погружает вас в увлекательный мир знаний, где каждый факт становится открытием. Мы расскажем о ключевых исторических поворотных моментах и научных прорывах, которые изменили ход цивилизации. Поймите, как прошлое формирует настоящее и как его уроки могут помочь нам строить будущее.
Как это работает — подробно – https://japanimports.net/product/1999-nissan-skyline-gt25
https://pin-up-kz.space/ пин ап кз
Запой сопровождается выраженной интоксикацией, нарушением сна, слабостью и нестабильностью работы сердечно-сосудистой системы, что характерно для алкоголизма и других форм зависимости, включая наркомании. Самостоятельный выход из этого состояния может быть затруднён и сопровождаться усилением симптомов. Медицинская помощь на дому позволяет снизить риски и начать восстановление под контролем специалиста, помогая человеку быстрее стабилизировать состояние.
Детальнее – https://vyvod-iz-zapoya-na-domu-sankt-peterburg-12.ru/
Мы собрали для вас самые захватывающие факты из мира науки и истории. От малознакомых деталей до грандиозных событий — эта статья расширит ваш кругозор и подарит новое понимание того, как устроен наш мир.
Это стоит прочитать полностью – https://pmg-mechanical.com/electric-vs-gas-water-heaters-which-one-is-right-for-your-home
Сразу после вызова нарколог прибывает на дом для проведения тщательного первичного осмотра. На этом этапе специалист собирает краткий анамнез, измеряет жизненно важные показатели – пульс, артериальное давление, температуру – и оценивает степень алкогольной интоксикации. Полученные данные служат основой для составления индивидуального плана лечения, позволяющего подобрать оптимальные методы детоксикации.
Подробнее тут – https://vyvod-iz-zapoya-yaroslavl00.ru/vyvod-iz-zapoya-kruglosutochno-yaroslavl/
https://pinupazz.top/ pin up casino
https://pin-up-kz.space/ пин ап казино
pin up pin-up online casino
Консультация жилищного юриста — это быстрый и эффективный способ разобраться в сложных вопросах, связанных с недвижимостью. Переходите по запросу рейтиг юридических консультаций по жилищным вопросам. Специалист оценит вашу ситуацию, разъяснит нормы законодательства, расскажет о правах собственников и предложит оптимальный план действий для защиты ваших интересов.
Капельница от похмелья в Самаре с подбором препаратов, улучшением самочувствия и наблюдением в наркологической клинике «Частный медик 24»
Выяснить больше – http://www.domen.ru
Нарколог на дом в Воронеже с круглосуточным вызовом врача, стабилизацией состояния и лечением в наркологической клинике «Частный медик 24»
Ознакомиться с деталями – http://narkolog-na-dom-voronezh-2.ru/
Процесс лечения начинается с консультации врача, который оценивает состояние пациента, его анамнез и определяет, какие процедуры и препараты нужно использовать. В большинстве случаев капельница включает в себя регидратацию, витамины группы B, антиеметики, препараты для улучшения работы печени и почек. Важно, что капельница не только помогает организму вывести токсины, но и восстанавливает нормальную работу всех систем организма, обеспечивая быстрое улучшение самочувствия.
Выяснить больше – kapelnicza-ot-pokhmelya-samara.ru/
https://pinupaz.online/ pin-up online casino
Нарколог на дом — это услуга, которая позволяет получить медицинскую помощь в комфортной и привычной обстановке, не выходя из дома. В наркологической клинике «Частный медик 24» в Самаре мы предоставляем профессиональную помощь нарколога прямо на дому. Это идеальное решение для тех, кто испытывает симптомы абстиненции, ломки или алкогольной интоксикации, но не может или не хочет ехать в клинику. Выезд врача на дом позволяет начать лечение сразу, без задержек, минимизируя стрессы и сложности, связанные с поездкой.
Подробнее можно узнать тут – запой нарколог на дом самара
Когда зависимости становятся хроническими и угрожают жизни пациента, комплексная реабилитация при наркомании в специализированных клиниках Москвы, включая вывод из состояния в стационаре и последующий анализ данных о состоянии пациента, может стать единственным возможным решением. Процесс восстановления включает в себя работу не только с зависимостью, но и с психоэмоциональным состоянием, что делает лечение более эффективным и долговечным.
Подробнее можно узнать тут – http://reabilitacziya-alkogolikov-moskva-2.ru/
Для вашего удобства и прозрачности планирования лечения мы собрали ориентировочные цены на ключевые процедуры и форматы оказания помощи. Это позволит заранее оценить бюджет и подобрать оптимальный вариант терапии в зависимости от степени абстинентного синдрома и индивидуальных потребностей пациента.
Получить дополнительную информацию – нарколог на дом раменское
пин ап пин ап кз
https://pinupazz.top/ pin up az
Алкогольная зависимость — это не просто вредная привычка, а серьёзное заболевание, которое разрушает здоровье, психологическое состояние, семейные и рабочие отношения. Когда силы для самостоятельной борьбы на исходе, а традиционные методы не дают результата, современное кодирование становится эффективным решением для возвращения к трезвой жизни. В наркологической клинике «Новый Путь» в Электростали применяется весь спектр современных методик кодирования — с гарантией анонимности, профессиональным подходом и поддержкой опытных специалистов на каждом этапе.
Детальнее – https://kodirovanie-ot-alkogolizma-ehlektrostal6.ru/kodirovka-ot-alkogolya-v-ehlektrostali/
https://pinupaz.online/ pin up
pin up pin up casino
Срочный домашний выезд особенно важен для семей, которые уже сталкивались с тяжёлыми последствиями алкоголизма и понимают, что обычные попытки «отпаивания» не решают проблему. Врач оценивает не только факт употребления, но и длительность запоя, возраст, наличие хронических болезней, уже принятые медикаменты, риск абстинентного синдрома, состояние сердца и общую нагрузку на организм. Такой формат позволяет анонимно вызвать специалиста, быстро провести необходимые вмешательства и определить, нужен ли только домашний вывод из острого состояния или дальше потребуется кодирование, повторная консультация, реабилитация либо более широкий маршрут помощи при наркомании.
Изучить вопрос глубже – вызвать нарколога на дом
пин ап пин ап казахстан
https://pinupaz.online/ pin-up oyunu
Нарколог на дом в Самаре востребован в самых различных ситуациях. Иногда пациент не в состоянии самостоятельно добраться до клиники из-за сильного состояния похмелья или ломки. В таких случаях выезд нарколога становится наиболее оптимальным решением. Наши специалисты оказывают помощь при следующих состояниях:
Изучить вопрос глубже – врач нарколог на дом
Процесс реабилитации алкоголиков включает в себя несколько методов, направленных на восстановление как физического, так и психоэмоционального состояния пациента. В Москве доступны различные программы, от традиционной детоксикации до современных подходов, при этом в отдельных случаях предусматривается вывод данных о состоянии пациента и динамике лечения при алкогольной зависимости, включая когнитивно-поведенческую терапию и арт-терапию.
Подробнее можно узнать тут – reabilitacziya-alkogolikov-moskva-3.ru/
При выезде нарколога на дом в Самаре мы проводим диагностику состояния пациента, чтобы понять, какие препараты и процедуры необходимы для стабилизации. Это может включать регидратацию, витамины группы B, антиеметики и другие препараты для снятия симптомов похмелья. Все препараты подбираются индивидуально в зависимости от состояния пациента и его нужд. Это позволяет значительно сократить время на восстановление и быстро вернуться к нормальному состоянию.
Ознакомиться с деталями – https://kapelnicza-ot-pokhmelya-samara-1.ru
Реабилитация алкоголиков с индивидуальной программой — это комплексный подход, включающий медицинскую, психотерапевтическую и социальную поддержку, направленный на восстановление человека после длительного злоупотребления алкоголем. Программа подбирается с учетом всех особенностей пациента, его состояния, сопутствующих заболеваний и эмоциональных проблем. Реабилитация не ограничивается только детоксикацией, но включает также работу с психологом и социальную адаптацию. В некоторых случаях может быть рекомендован выезд на дом для проведения лечения, а также кодирование, чтобы помочь пациенту справиться с зависимостью на всех этапах восстановления. Наркоманическая зависимость может требовать дополнительной терапии и профессиональной помощи для успешного преодоления всех трудностей.
Получить дополнительную информацию – реабилитация алкоголиков в москве
Нарколог на дом в Воронеже с оперативным приездом специалиста, детоксикацией и медицинским наблюдением в наркологической клинике «Частный медик 24»
Детальнее – врач нарколог на дом в воронеже
Основной этап, направленный на очищение организма от продуктов распада алкоголя и нормализацию функций внутренних органов. Применяются современные препараты с антиоксидантным и гепатопротекторным эффектом.
Углубиться в тему – https://lechenie-alkogolizma-krasnodar0.ru/klinika-lecheniya-alkogolizma-krasnodar
Во всех этих случаях врач нужен не только для облегчения симптомов. Его задача — понять, можно ли ограничиться домашней терапией или уже сейчас необходимо менять маршрут лечения. Именно этот этап и делает домашний выезд профессиональной услугой, а не упрощённой заменой клиники.
Получить больше информации – нарколог на дом анонимно воронеж
https://pinupazz.top/ pin-up online casino
Для жителей Воронежа выезд нарколога на дом — это быстрый и удобный способ получить экстренную помощь. Когда человек переживает запой, а его физическое и эмоциональное состояние быстро ухудшается, наркологическая помощь на дому становится оптимальным решением. Врач приезжает и немедленно оценивает состояние пациента: проверяет его пульс, давление, частоту дыхания, уровень сознания и другие важные показатели. Это помогает составить точный план лечения, который будет направлен на восстановление организма, снятие токсинов и стабилизацию состояния пациента.
Подробнее – нарколог на дом воронеж
https://pin-up-kz.space/ пин ап казино
Капельница от похмелья может быть рекомендована, когда симптомы становятся настолько выраженными, что пациент не может нормально функционировать в повседневной жизни. Если вы или ваши близкие сталкиваетесь с такими признаками, как головная боль, тошнота, слабость, тошнота и невозможность пить, вызов нарколога на дом станет необходимостью.
Получить дополнительную информацию – капельница от похмелья анонимно самара
pin up pin up az
Процесс вывода из запоя на дому в Ярославле строится по четко отлаженной схеме, включающей несколько последовательных этапов, направленных на максимально быстрое и безопасное восстановление здоровья пациента.
Получить дополнительную информацию – http://vyvod-iz-zapoya-yaroslavl00.ru
Есть состояния, при которых откладывать обращение не стоит. Ниже перечислены признаки, при которых вызывать врача на дом разумно именно в ближайшее время, а не после очередной неудачной попытки «перележать» тяжёлый период самостоятельно.
Ознакомиться с деталями – нарколог на дом вывод воронеж
Нарколог на дом в Самаре востребован в самых различных ситуациях. Иногда пациент не в состоянии самостоятельно добраться до клиники из-за сильного состояния похмелья или ломки. В таких случаях выезд нарколога становится наиболее оптимальным решением. Наши специалисты оказывают помощь при следующих состояниях:
Подробнее тут – нарколог на дом вывод самара
Капельница от похмелья нужна не только в случаях тяжёлой интоксикации, но и при более лёгких симптомах, когда пациент ощущает себя уставшим и измотанным, но не может справиться с проблемами самостоятельно. Некоторые из симптомов, при которых капельница может быть особенно полезна, включают:
Подробнее можно узнать тут – капельница от похмелья в екатеринбурге
Особенность анонимной реабилитации заключается в создании комфортной и безопасной среды, которая мотивирует пациента работать над собой, не опасаясь осуждения. Это повышает эффективность лечения, ведь пациент может открыться и честно обсуждать свои проблемы без страха быть осужденным.
Разобраться лучше – центр реабилитации алкоголиков
пин ап пин ап казино kz
Нарколог на дом в Воронеже с лечением без очередей, выездом врача и анонимной помощью в наркологической клинике «Частный медик 24»
Получить дополнительную информацию – запой нарколог на дом воронеж
Вывод из запоя на дому в Санкт-Петербурге с подбором терапии, наблюдением врача и комфортным лечением в наркологической клинике «Частный медик 24»
Узнать больше – вывод из запоя на дому круглосуточно в санкт-петербурге
Комплексный подход, включающий эти методы, значительно повышает шансы на успешное и долговременное восстановление. Современные реабилитационные центры в Москве предлагают целый ряд программ, которые способствуют полному возвращению пациента к здоровой и активной жизни.
Узнать больше – алкоголик реабилитация наркоманов
https://pinupaz.online/ pin up az
При выезде нарколога на дом в Самаре мы проводим диагностику состояния пациента, чтобы понять, какие препараты и процедуры необходимы для стабилизации. Это может включать регидратацию, витамины группы B, антиеметики и другие препараты для снятия симптомов похмелья. Все препараты подбираются индивидуально в зависимости от состояния пациента и его нужд. Это позволяет значительно сократить время на восстановление и быстро вернуться к нормальному состоянию.
Подробнее тут – капельница от похмелья анонимно самара
Запой и алкогольная интоксикация могут приводить к целому ряду опасных симптомов, таких как головная боль, слабость, тошнота, рвота, обезвоживание и психоэмоциональная нестабильность. Если не начать лечение вовремя, такие состояния могут привести к более серьезным осложнениям, включая сердечные проблемы, галлюцинации и даже опасные для жизни нарушения работы организма. С помощью нарколога на дому можно начать экстренную терапию прямо в момент ухудшения состояния, не затягивая с лечением и не тратя время на поездки в клинику.
Узнать больше – https://narkolog-na-dom-samara-2.ru
Реабилитация включает несколько ключевых этапов, каждый из которых направлен на решение определённых проблем пациента. Важно, чтобы все этапы были комплексными и последовательными, чтобы достичь наиболее эффективного результата.
Получить дополнительные сведения – реабилитация алкоголиков
Основной этап, направленный на очищение организма от продуктов распада алкоголя и нормализацию функций внутренних органов. Применяются современные препараты с антиоксидантным и гепатопротекторным эффектом.
Узнать больше – клиника лечения алкоголизма в краснодаре
Запрос на выезд врача связан не только с классическим запоем. На практике домашняя помощь нужна в разных ситуациях, когда организму уже трудно компенсировать последствия употребления, а откладывание визита увеличивает риск осложнений.
Выяснить больше – вызвать нарколога на дом в воронеже
https://ejfe.ru/
Реабилитация алкоголиков с индивидуальной программой — это комплексный подход, включающий медицинскую, психотерапевтическую и социальную поддержку, направленный на восстановление человека после длительного злоупотребления алкоголем. Программа подбирается с учетом всех особенностей пациента, его состояния, сопутствующих заболеваний и эмоциональных проблем. Реабилитация не ограничивается только детоксикацией, но включает также работу с психологом и социальную адаптацию. В некоторых случаях может быть рекомендован выезд на дом для проведения лечения, а также кодирование, чтобы помочь пациенту справиться с зависимостью на всех этапах восстановления. Наркоманическая зависимость может требовать дополнительной терапии и профессиональной помощи для успешного преодоления всех трудностей.
Подробнее – реабилитация алкоголиков город
pin-up pin-up oyunu
Каждый выезд нарколога включает в себя не только инфузионную терапию, но и полноценную оценку состояния пациента, анализ рисков, а также консультацию по дальнейшему лечению. Врач может назначить дополнительные препараты для снятия симптомов ломки, восстановления водно-электролитного баланса и улучшения общего состояния пациента. Также важно, что консультация включает рекомендации по реабилитации, психологической поддержке и кодированию, если это необходимо для пациента, страдающего хроническим алкоголизмом или наркоманией.
Получить дополнительные сведения – вызвать нарколога на дом в воронеже
В подобных случаях время играет против пациента. Чем дольше человек остаётся без осмотра, тем выше вероятность, что к обезвоживанию и интоксикации добавятся нарушения сна, истощение, вегетативный срыв и ошибки с лекарствами, которые были приняты «для успокоения» без понимания общей картины. В практике выездной службы именно экстренное реагирование помогает не допустить ухудшения и в короткие сроки вернуть ситуацию под медицинский контроль.
Получить дополнительные сведения – нарколог на дом в воронеже
Состояние пациента при интоксикации может развиваться по-разному: от умеренной слабости и головной боли до выраженной дезориентации, тахикардии и нарушений сна. В таких ситуациях важно не откладывать обращение за помощью. Наркологическая помощь на дому рассматривается, когда требуется быстрое вмешательство и контроль состояния без транспортировки пациента.
Получить дополнительную информацию – http://narkologicheskaya-pomoshh-nizhnij-novgorod-8.ru/
Капельница от похмелья в Екатеринбурге с выездом специалиста, подбором терапии и восстановлением состояния в наркологической клинике «Частный медик 24»
Получить дополнительные сведения – капельница от похмелья вызов на дом в екатеринбурге
Каждый пациент уникален — именно поэтому мы не применяем «типовых» решений. После первичной консультации и диагностики специалисты «КубаньМед» разрабатывают персональную программу, учитывающую состояние здоровья, психологические особенности и социальные обстоятельства пациента.
Подробнее – lechenie alkogolizma krasnodar
pin up az online pin-up online casino
Срочный домашний выезд особенно важен для семей, которые уже сталкивались с тяжёлыми последствиями алкоголизма и понимают, что обычные попытки «отпаивания» не решают проблему. Врач оценивает не только факт употребления, но и длительность запоя, возраст, наличие хронических болезней, уже принятые медикаменты, риск абстинентного синдрома, состояние сердца и общую нагрузку на организм. Такой формат позволяет анонимно вызвать специалиста, быстро провести необходимые вмешательства и определить, нужен ли только домашний вывод из острого состояния или дальше потребуется кодирование, повторная консультация, реабилитация либо более широкий маршрут помощи при наркомании.
Получить больше информации – вызвать нарколога на дом в воронеже
Каждый выезд нарколога включает в себя не только инфузионную терапию, но и полноценную оценку состояния пациента, анализ рисков, а также консультацию по дальнейшему лечению. Врач может назначить дополнительные препараты для снятия симптомов ломки, восстановления водно-электролитного баланса и улучшения общего состояния пациента. Также важно, что консультация включает рекомендации по реабилитации, психологической поддержке и кодированию, если это необходимо для пациента, страдающего хроническим алкоголизмом или наркоманией.
Выяснить больше – вызов нарколога на дом воронеж
Капельница от похмелья — это один из наиболее эффективных методов экстренной медицинской помощи, который позволяет быстро снять симптомы алкогольной интоксикации и восстановить организм после злоупотребления алкоголем. В наркологической клинике «Частный медик 24» в Самаре мы предоставляем услугу выезда нарколога на дом и капельной терапии для пациентов, испытывающих тяжёлые симптомы похмелья. Это удобный способ получить необходимую помощь без лишнего стресса, сохраняя анонимность и комфорт пациента.
Выяснить больше – капельница от похмелья вызов на дом
pin-up pin up
Каждый из этапов важен для успешного лечения наркомании и требует квалифицированной наркологической медицинской помощи. Реабилитационные программы, предлагаемые в Москве, часто включают в себя все эти компоненты, при этом в ряде случаев консультации могут предоставляться бесплатно, что способствует комплексному подходу к решению проблемы зависимости.
Подробнее можно узнать тут – reabilitacziya-alkogolikov-moskva-3.ru/
Запой, длительное употребление алкоголя или случайное злоупотребление могут привести к неприятным симптомам похмелья, таким как головная боль, слабость, тошнота, головокружение и усталость. Эти симптомы обусловлены тем, что в организме остаются продукты распада алкоголя, которые токсически воздействуют на все органы. Капельница от похмелья на дому — это отличная возможность быстро снять острые симптомы и восстановить нормальное состояние организма, не выходя из привычной обстановки.
Ознакомиться с деталями – http://www.domen.ru
Реабилитация алкоголиков с анонимной поддержкой — это процесс, при котором пациент получает необходимую медицинскую и психологическую помощь, не раскрывая своей личности и обстоятельств зависимости, включая лечение наркомании. Такие программы ориентированы на безопасное и конфиденциальное лечение, что важно для тех, кто стремится избавиться от зависимости, но опасается осуждения или утраты личной репутации, при этом возможен выезд нарколога на дом. Важно, что анонимность не ограничивает качество предоставляемых услуг: все необходимые этапы лечения, включая детоксикацию, психотерапевтические сессии и социальную реабилитацию, которые могут длиться несколько лет, проводятся на высоком уровне с акцентом на своевременный вывод из состояния зависимости.
Углубиться в тему – клиника реабилитации алкоголиков
Нарколог на дом — это формат помощи, который особенно ценен в тот момент, когда человеку плохо уже сейчас, а поездка в клинику только усиливает риск. Домашний выезд позволяет быстро провести осмотр, оценить степень интоксикации, признаки обезвоживания, нагрузку на сердце, уровень тревоги, выраженность тремора и понять, можно ли безопасно помочь пациенту на месте. В наркологической клинике «Частный медик 24» такой формат строится не вокруг одной процедуры, а вокруг последовательного медицинского решения: врач приезжает, собирает анамнез, проводит консультация, определяет, какие вмешательства действительно необходимы, и только после этого подбирает домашний маршрут стабилизации. Это особенно важно при алкоголизма, когда близкие часто путают тяжёлое похмелье, абстинентный синдром и состояния, при которых уже нельзя терять время.
Разобраться лучше – вызов нарколога на дом в воронеже
pin up pin up casino
При выезде на дом врач проводит все необходимые процедуры, включая инфузионную терапию (капельницы), медикаментозное лечение для снятия симптомов ломки, а также консультирует пациента и его семью по дальнейшему лечению. Важно, что после стабилизации состояния нарколог может дать рекомендации по дальнейшей реабилитации, возможному кодированию, а также предложить программу для восстановления здоровья на длительный срок.
Подробнее можно узнать тут – http://www.domen.ru
Запойное состояние сопровождается выраженной интоксикацией, нарушением сна, слабостью и тревожностью, что характерно для алкоголизма и различных форм зависимости. При этом самостоятельный выход из него часто затруднён из-за ухудшения самочувствия и отсутствия контроля над симптомами. Выезд нарколога позволяет быстро стабилизировать состояние человека и начать восстановление без дополнительной нагрузки, связанной с поездкой в клинику, а при необходимости вовремя определить показания к лечению в стационаре.
Детальнее – нарколог на дом вывод из запоя
Каждый элемент программы направлен на создание комплексного подхода к лечению зависимости, обеспечивая помощь не только на физическом, но и на эмоциональном уровне. Индивидуальная программа реабилитации позволяет выстроить эффективную терапию, которая соответствует конкретным потребностям пациента.
Углубиться в тему – https://reabilitacziya-alkogolikov-moskva.ru
Анонимность позволяет пациентам сосоточиться на процессе лечения алкогольной зависимости, не переживая о последствиях для своей репутации или безопасности. Важно, чтобы каждый этап был подробно обсужден с пациентом, что помогает снизить уровень стресса и тревожности, связанные с лечением зависимых, включая терапию в стационаре.
Получить дополнительную информацию – реабилитация алкоголиков стоимость
Каждый выезд нарколога включает в себя не только инфузионную терапию, но и полноценную оценку состояния пациента, анализ рисков, а также консультацию по дальнейшему лечению. Врач может назначить дополнительные препараты для снятия симптомов ломки, восстановления водно-электролитного баланса и улучшения общего состояния пациента. Также важно, что консультация включает рекомендации по реабилитации, психологической поддержке и кодированию, если это необходимо для пациента, страдающего хроническим алкоголизмом или наркоманией.
Подробнее можно узнать тут – нарколог на дом цена воронеж
Капельница от похмелья — это эффективный способ экстренной помощи, предназначенный для того, чтобы помочь организму быстро восстановиться после злоупотребления алкоголем. В наркологической клинике «Частный медик 24» в Самаре мы предоставляем услугу безопасной детоксикации и восстановления 24/7. Капельница помогает организму вывести токсины, восстановить водно-электролитный баланс и улучшить общее состояние пациента, не создавая дополнительных нагрузок на сердце, печень и почки.
Узнать больше – http://www.domen.ru
Запойное состояние сопровождается выраженной интоксикацией, нарушением сна, слабостью и тревожностью, что характерно для алкоголизма и различных форм зависимости. При этом самостоятельный выход из него часто затруднён из-за ухудшения самочувствия и отсутствия контроля над симптомами. Выезд нарколога позволяет быстро стабилизировать состояние человека и начать восстановление без дополнительной нагрузки, связанной с поездкой в клинику, а при необходимости вовремя определить показания к лечению в стационаре.
Получить дополнительные сведения – vyvod-iz-zapoya-na-domu-sankt-peterburg-9.ru/
пин ап пин ап казахстан
pin up pin-up oyunu
Нарколог на дом в Воронеже с конфиденциальным выездом, капельницами и поддержкой пациента в наркологической клинике «Частный медик 24»
Подробнее тут – врач нарколог на дом в воронеже
Эти симптомы характерны для алкогольной интоксикации, и их быстрое устранение с помощью капельницы позволяет пациенту почувствовать себя лучше и избежать более серьёзных последствий. В клинике «Частный медик 24» мы подбираем индивидуальную программу лечения, чтобы ускорить восстановление организма и улучшить общее самочувствие пациента.
Детальнее – http://kapelnicza-ot-pokhmelya-ekaterinburg-5.ru
Первая задача врача — снять наиболее опасные и мучительные проявления: тошноту, головную боль, озноб, тремор, сухость во рту, сердцебиение, внутреннюю дрожь, тревогу, невозможность уснуть. Вторая задача — восстановить управляемость ситуации. Пациент и близкие должны понимать, что делать после завершения инфузии: как пить воду, как проветрить комнату, когда можно вставать, какие симптомы допустимы, а какие требуют немедленного повторного звонка. Именно такой формат делает помощь на дому полноценной медицинской услугой, а не разовой манипуляцией. Для многих семей это ещё и первая консультация, после которой становится ясно, нужен ли только вывод из запоя или уже требуется более широкий наркологический маршрут с участием психолога и последующим этапом восстановления.
Подробнее можно узнать тут – запой нарколог на дом
Срочный домашний выезд особенно важен для семей, которые уже сталкивались с тяжёлыми последствиями алкоголизма и понимают, что обычные попытки «отпаивания» не решают проблему. Врач оценивает не только факт употребления, но и длительность запоя, возраст, наличие хронических болезней, уже принятые медикаменты, риск абстинентного синдрома, состояние сердца и общую нагрузку на организм. Такой формат позволяет анонимно вызвать специалиста, быстро провести необходимые вмешательства и определить, нужен ли только домашний вывод из острого состояния или дальше потребуется кодирование, повторная консультация, реабилитация либо более широкий маршрут помощи при наркомании.
Получить больше информации – вызвать нарколога на дом воронеж
Во всех этих случаях врач нужен не только для облегчения симптомов. Его задача — понять, можно ли ограничиться домашней терапией или уже сейчас необходимо менять маршрут лечения. Именно этот этап и делает домашний выезд профессиональной услугой, а не упрощённой заменой клиники.
Разобраться лучше – нарколог на дом воронеж
Комплексная реабилитация алкоголиков в Москве помогает пациентам не только избавиться от зависимости, но и вернуться к полноценной жизни. Процесс восстановления включает в себя не только лечение алкоголизма как физического заболевания, но и работу с психологическими, социальными и эмоциональными аспектами, которые могут стать причиной или следствием зависимости. Такое подходное лечение, как правило, требует усилий со стороны как специалистов, так и самого пациента.
Получить дополнительную информацию – клиника реабилитации алкоголиков
Помощь на дому рассматривают при состояниях, которые сопровождаются заметным ухудшением самочувствия после алкоголя. Это может быть запой на протяжении нескольких дней, тяжелое похмелье, дрожь в руках, нарушение сна, выраженная слабость, тревога, тошнота, сухость во рту, снижение аппетита и признаки обезвоживания. В таких случаях осмотр врача нужен для того, чтобы оценить тяжесть состояния и понять, безопасно ли оставаться дома.
Выяснить больше – запой нарколог на дом москва
пин ап пин ап казахстан
Детоксикация на дому начинается с осмотра пациента. Доктора оценивают витальные показатели, уровень сознания и выраженность симптомов, анализируя текущие данные. После этого формируется план лечения, который реализуется сразу. Такой подход позволяет сократить время до начала терапии и повысить её эффективность.
Подробнее можно узнать тут – вывод из запоя на дому цена
Капельница от похмелья — это экстренная мера, которая помогает снять интоксикацию и восстановить водно-электролитный баланс в организме после злоупотребления алкоголем. В наркологической клинике «Частный медик 24» в Самаре мы предлагаем эффективное лечение для тех, кто столкнулся с последствиями запоя или перегрузки организма после употребления алкоголя. Капельницы для снятия похмелья — это быстрый и безопасный способ вернуть пациента в норму, избавить от болезненных симптомов, таких как головная боль, тошнота, слабость, сухость во рту, а также стабилизировать его общее состояние. Выезд нарколога на дом и проведение капельниц позволяет избежать поездки в клинику и начать лечение в удобной обстановке.
Разобраться лучше – капельница от похмелья цена в самаре
Реабилитация алкоголиков с поддержкой специалистов в Москве представляет собой важный и сложный процесс, в котором ключевую роль играет профессиональное вмешательство. Программы реабилитации включают в себя не только медицинскую помощь, но и психологическую, социальную и эмоциональную поддержку, что способствует успешному и долгосрочному восстановлению пациента. Такая комплексная помощь является основой эффективного лечения и предотвращения рецидивов.
Подробнее тут – реабилитация алкоголиков стоимость
Домашний формат ценят не только за удобство. Он помогает начать лечение анонимно, без дороги, без ожидания и без лишнего стресса для пациента. Для многих семей именно выездной наркологическая маршрут становится первой точкой, с которой начинается более серьёзное восстановление: обсуждаются не только снятие острых симптомов, но и кодирование, реабилитация, повторная консультация, а при необходимости — и маршруты помощи при наркомании. Особенно это актуально, если человек употребляет давно, уже несколько лет сталкивается со срывами и сам замечает, что проблема перестала ограничиваться только плохим самочувствием после алкоголя.
Подробнее можно узнать тут – https://narkolog-na-dom-voronezh-2.ru
Нарколог на дом — это формат помощи, при котором врач приезжает к пациенту в момент, когда состояние уже не позволяет спокойно ждать или самостоятельно ехать в клинику. При запое и выраженной интоксикации такой выезд особенно важен: человек может испытывать слабость, тошноту, тремор, сухость во рту, сердцебиение, скачки давления, тревогу и бессонницу. В наркологической клинике «Частный медик 24» домашний вызов строится не вокруг одной капельницы, а вокруг полноценного врачебного решения. Сначала проводится консультация, затем оцениваются симптомы, сопутствующие болезни, уже принятые медикаменты, риски для сердца, сосудов и нервной системы, и только после этого врач подбирает подходящую схему помощи. Такой подход особенно важен при алкоголизма, когда ошибка в самостоятельном лечении может быстро усилить нагрузку на организм.
Подробнее – нарколог на дом цена воронеж
Капельница от похмелья — это экстренная мера, которая помогает снять интоксикацию и восстановить водно-электролитный баланс в организме после злоупотребления алкоголем. В наркологической клинике «Частный медик 24» в Самаре мы предлагаем эффективное лечение для тех, кто столкнулся с последствиями запоя или перегрузки организма после употребления алкоголя. Капельницы для снятия похмелья — это быстрый и безопасный способ вернуть пациента в норму, избавить от болезненных симптомов, таких как головная боль, тошнота, слабость, сухость во рту, а также стабилизировать его общее состояние. Выезд нарколога на дом и проведение капельниц позволяет избежать поездки в клинику и начать лечение в удобной обстановке.
Получить больше информации – http://kapelnicza-ot-pokhmelya-samara.ru/
Реабилитация алкоголиков в Москве: лечение зависимости, восстановление и поддержка под контролем специалистов в наркологической клинике «Похмельная служба»
Детальнее – реабилитация алкоголиков стоимость
После оформления вызова нарколог приезжает к пациенту и проводит комплексную оценку состояния. Врач измеряет давление, частоту пульса, оценивает уровень сознания и выраженность симптомов. На основании полученных данных формируется план лечения, который реализуется сразу на месте.
Узнать больше – врач нарколог на дом
Наркологический стационар в Санкт-Петербурге: лечение зависимости, детоксикация и круглосуточный медицинский контроль в наркологической клинике «Похмельная служба»
Получить дополнительную информацию – частный наркологический стационар
Запой и алкогольная интоксикация могут приводить к целому ряду опасных симптомов, таких как головная боль, слабость, тошнота, рвота, обезвоживание и психоэмоциональная нестабильность. Если не начать лечение вовремя, такие состояния могут привести к более серьезным осложнениям, включая сердечные проблемы, галлюцинации и даже опасные для жизни нарушения работы организма. С помощью нарколога на дому можно начать экстренную терапию прямо в момент ухудшения состояния, не затягивая с лечением и не тратя время на поездки в клинику.
Подробнее тут – нарколог на дом анонимно
При выборе наркологического стационара в Санкт-Петербурге важно ориентироваться на несколько ключевых критериев. В первую очередь, следует учитывать опыт и квалификацию специалистов, условия пребывания, а также отзывы пациентов. Ведь выбор медицинского учреждения — это не только вопрос качества лечения, но и обеспечения психологического комфорта пациента, что особенно важно при лечении зависимостей. Стоит обратить внимание на стационары, специализирующиеся на лечении наркомании и наркологии, а также учитывать расположение клиники в удобном районе города.
Выяснить больше – наркологическая помощь стационар
Состояние пациента при интоксикации может развиваться по-разному: от умеренной слабости и головной боли до выраженной дезориентации, тахикардии и нарушений сна. В таких ситуациях важно не откладывать обращение за помощью. Наркологическая помощь на дому рассматривается, когда требуется быстрое вмешательство и контроль состояния без транспортировки пациента.
Подробнее – оказание наркологической помощи нижний новгород
Наркологический стационар с круглосуточным наблюдением — это не просто место для детоксикации, но и пространство для комплексного лечения и реабилитации. Постоянное присутствие медицинского персонала помогает избежать опасных ситуаций, таких как психозы или физиологические сбои, характерные для абстиненции. Прием пациентов может включать кодирование, а также индивидуальные программы лечения, которые разрабатываются в зависимости от состояния пациента и его потребностей на протяжении года.
Подробнее тут – наркологическая помощь стационар санкт-петербург
Капельница от похмелья — это не просто средство для снятия симптомов, но и эффективный способ быстрого восстановления организма после алкогольной интоксикации. В наркологической клинике «Частный медик 24» в Екатеринбурге мы предоставляем услугу выезда нарколога на дом, что позволяет пациентам получить необходимую медицинскую помощь, не покидая комфорт своей обстановки. Это особенно важно в случае, если состояние пациента серьёзно ухудшилось, и он не может поехать в клинику самостоятельно.
Ознакомиться с деталями – https://kapelnicza-ot-pokhmelya-ekaterinburg-7.ru/
В Санкт-Петербурге услуга вывода из запоя на дому применяется в ситуациях, когда требуется медицинская помощь, но нет показаний к стационарному лечению. Врач проводит консультацию, оценивает состояние пациента, длительность употребления и выраженность симптомов, после чего принимает решение о тактике лечения при алкоголизме. Важно, что терапия начинается сразу после осмотра, а при необходимости можно заранее заказать выезд специалистов.
Подробнее – https://vyvod-iz-zapoya-na-domu-sankt-peterburg-9.ru/
Решение о госпитализации в наркологический стационар часто становится необходимым в случаях, когда пациент не может справиться с зависимостью самостоятельно, а также когда домашние условия лечения оказываются недостаточными. Стационарное лечение дает пациенту возможность находиться под круглосуточным наблюдением специалистов, что особенно важно при острых состояниях и абстинентных синдромах. В случае запоя может быть предложена помощь нарколога, а также выезд на дом для неотложного вмешательства и стабилизации состояния пациента.
Получить дополнительную информацию – http://narkologicheskij-staczionar-sankt-peterburg-2.ru
Наркологическая помощь на дому помогает избежать стресса, связанного с поездкой в клинику. Особенно это важно в случаях, когда пациент находится в состоянии тяжёлой интоксикации или переживает абстинентный синдром, который можно только усугубить дополнительной нагрузкой. Врач приедет в кратчайшие сроки, обеспечивая необходимое лечение в первые часы после ухудшения состояния. Также важно, что при выезде специалист гарантирует полную анонимность, что особенно важно для многих людей, которые боятся открыто признаться в своей проблеме. Профессиональная наркологическая помощь на дому позволяет избежать срыва и начать процесс восстановления без стресса.
Подробнее можно узнать тут – вызвать нарколога на дом воронеж
Выезд нарколога на дом в Воронеже становится особенно важным, когда пациент переживает острые симптомы абстиненции или интоксикации. Это может быть связано с запоем, наркотической ломкой или последствиями длительного употребления алкоголя или наркотиков. В таких случаях медицинская помощь должна быть оказана как можно скорее, чтобы предотвратить серьёзные осложнения, такие как сердечные сбои, психозы, судороги или делирий. От того, насколько быстро будет оказана помощь, зависит успешность стабилизации состояния и вероятность долгосрочного выздоровления.
Подробнее можно узнать тут – нарколог на дом в воронеже
Запрос на выезд врача связан не только с классическим запоем. На практике домашняя помощь нужна в разных ситуациях, когда организму уже трудно компенсировать последствия употребления, а откладывание визита увеличивает риск осложнений.
Изучить вопрос глубже – нарколог на дом анонимно в воронеже
Анонимность позволяет пациентам сосоточиться на процессе лечения алкогольной зависимости, не переживая о последствиях для своей репутации или безопасности. Важно, чтобы каждый этап был подробно обсужден с пациентом, что помогает снизить уровень стресса и тревожности, связанные с лечением зависимых, включая терапию в стационаре.
Углубиться в тему – алкоголик реабилитация наркоманов
pin up pin-up oyunu
Нарколог на дом в Самаре — помощь при запое и интоксикации в наркологической клинике «Частный медик 24»
Подробнее можно узнать тут – вызов нарколога на дом в самаре
pin up pin up casino
Наркологическая помощь в Нижнем Новгороде с выездом врача, капельницами и наблюдением пациента в наркологической клинике «Частный медик 24»
Подробнее – скорая наркологическая помощь нижний новгород
Капельница от похмелья — это эффективный способ экстренной помощи, предназначенный для того, чтобы помочь организму быстро восстановиться после злоупотребления алкоголем. В наркологической клинике «Частный медик 24» в Самаре мы предоставляем услугу безопасной детоксикации и восстановления 24/7. Капельница помогает организму вывести токсины, восстановить водно-электролитный баланс и улучшить общее состояние пациента, не создавая дополнительных нагрузок на сердце, печень и почки.
Получить больше информации – https://kapelnicza-ot-pokhmelya-samara-2.ru
https://pin-up-kz.space/ пин ап казахстан
Для семьи это тоже имеет большое значение. Пока врач в пути, родственники часто совершают одни и те же ошибки: пытаются «отпаивать» человека через силу, смешивают несовместимые медикаменты, дают советы, которые только повышают тревогу, спорят или требуют немедленно взять себя в руки. Профессиональный выезд снимает эту хаотичность. После осмотра врач объясняет, какие симптомы связаны с алкогольной интоксикацией, какие могут указывать на осложнения, что допустимо дома, а что требует перевода в стационар. В этом и состоит ценность выезда: он возвращает контроль над ситуацией и позволяет начать лечение без лишних задержек.
Подробнее можно узнать тут – вызов нарколога на дом
В некоторых случаях одной капельницы достаточно для полного восстановления. Однако при тяжёлой интоксикации или длительном употреблении алкоголя врач может рекомендовать повторную инфузию для закрепления эффекта и более глубокого очищения организма.
Детальнее – капельница от похмелья вызов на дом в самаре
https://pinupaz.online/ pin up az
Сразу после вызова нарколог прибывает на дом для проведения тщательного первичного осмотра. На этом этапе специалист собирает краткий анамнез, измеряет жизненно важные показатели – пульс, артериальное давление, температуру – и оценивает степень алкогольной интоксикации. Полученные данные служат основой для составления индивидуального плана лечения, позволяющего подобрать оптимальные методы детоксикации.
Узнать больше – вывод из запоя в стационаре
Каждый пациент уникален — именно поэтому мы не применяем «типовых» решений. После первичной консультации и диагностики специалисты «КубаньМед» разрабатывают персональную программу, учитывающую состояние здоровья, психологические особенности и социальные обстоятельства пациента.
Углубиться в тему – https://lechenie-alkogolizma-krasnodar0.ru/metody-lecheniya-alkogolizma-krasnodar/
Реабилитация алкоголиков в Москве: комплексное лечение и восстановление под наблюдением специалистов в наркологической клинике «Похмельная служба»
Подробнее – центр реабилитации алкоголиков
пин ап пин ап кз
https://pinupaz.online/ pin up
Эти симптомы характерны для алкогольной интоксикации, и их быстрое устранение с помощью капельницы позволяет пациенту почувствовать себя лучше и избежать более серьёзных последствий. В клинике «Частный медик 24» мы подбираем индивидуальную программу лечения, чтобы ускорить восстановление организма и улучшить общее самочувствие пациента.
Подробнее – капельница от похмелья на дому екатеринбург
В таких ситуациях стационарный уход позволяет обеспечить безопасность пациента, эффективно справиться с его состоянием и подготовить его к дальнейшему лечению или реабилитации. В случае алкоголизма может быть назначена капельница для снятия острых симптомов интоксикации, а также лечение в специализированном центре для комплексного восстановления и профилактики рецидивов.
Изучить вопрос глубже – наркологическая помощь стационар
Наиболее частыми причинами обращения становятся запой, выраженная слабость, тремор, тревога, бессонница, тошнота, нестабильное давление, учащенный пульс и ощущение физического истощения. Эти проявления могут сочетаться между собой и усиливаться после прекращения употребления алкоголя, особенно если эпизод длился несколько дней подряд.
Исследовать вопрос подробнее – http://narkolog-na-dom-moskva-20.ru/
Капельница от похмелья применяется, когда симптомы интоксикации становятся выраженными и мешают нормальной жизнедеятельности пациента. Основные показания для использования капельницы включают:
Ознакомиться с деталями – капельница от похмелья
Наши врачи приезжают в удобное для пациента время и проводят полный осмотр. В зависимости от состояния пациента, они подбирают необходимое лечение: капельницы для снятия токсинов, медикаментозные препараты для стабилизации состояния, а также дают рекомендации по дальнейшему восстановлению. Важно, что лечение на дому позволяет избежать медицинской огласки и лишнего стресса, а также гарантирует полную конфиденциальность.
Исследовать вопрос подробнее – http://narkolog-na-dom-samara-1.ru/
Комплексное лечение в наркологическом стационаре включает несколько последовательных этапов, каждый из которых направлен на решение конкретных задач. Начальный этап включает в себя медицинское вмешательство, направленное на устранение токсинов из организма, и стабилизацию общего состояния пациента. Далее начинается реабилитация, которая помогает закрепить достигнутые результаты и восстановить психоэмоциональное состояние пациента. Для выбора подходящего стационара стоит ознакомиться с отзывами и дополнительной информацией о клинике, а также уточнить, в каком районе города она расположена.
Получить больше информации – частный наркологический стационар
https://pinupaz.online/ pin up casino
Реабилитация алкоголиков в Москве с поддержкой специалистов направлена не только на избавление от зависимости, но и на восстановление полноценной жизни пациента. В процессе реабилитации особое внимание уделяется не только медицинским методам, но и психологической поддержке, что помогает пациенту разобраться в причинах своей зависимости, научиться справляться с трудными ситуациями и адаптироваться к социальной жизни без алкоголя.
Получить дополнительные сведения – http://reabilitacziya-alkogolikov-moskva-1.ru
Капельница от похмелья — это один из наиболее эффективных методов экстренной медицинской помощи, который позволяет быстро снять симптомы алкогольной интоксикации и восстановить организм после злоупотребления алкоголем. В наркологической клинике «Частный медик 24» в Самаре мы предоставляем услугу выезда нарколога на дом и капельной терапии для пациентов, испытывающих тяжёлые симптомы похмелья. Это удобный способ получить необходимую помощь без лишнего стресса, сохраняя анонимность и комфорт пациента.
Подробнее можно узнать тут – капельница от похмелья анонимно в самаре
К ситуациям, при которых используется домашний формат, относятся:
Подробнее можно узнать тут – вывод из запоя на дому круглосуточно в санкт-петербурге
Реабилитация алкоголиков — это важный этап на пути к избавлению от зависимости. В Москве существует множество центров, предлагающих реабилитацию с индивидуальной программой, что помогает обеспечить более персонализированный и эффективный подход к каждому пациенту. Индивидуальная программа учитывает физическое и психологическое состояние человека, а также его социальное окружение и личные особенности. Это позволяет добиться лучших результатов в лечении и восстановлении.
Получить дополнительную информацию – алкоголик реабилитация наркоманов в москве
Для жителей Екатеринбурга наркологическая клиника «Частный медик 24» предлагает платную услугу выезда врача на дом для проведения капельницы от похмелья. Когда человек переживает сильные симптомы похмелья, такие как головная боль, тошнота, слабость, важно не тянуть с лечением и начать восстановление как можно скорее. Капельница от похмелья помогает хорошо облегчить самочувствие пациента, снять головную боль и улучшить общее состояние, восстановив водно-электролитный баланс в организме.
Подробнее – http://kapelnicza-ot-pokhmelya-ekaterinburg-4.ru
pin up pin up az
Нарколог на дом — это не просто возможность получить медицинскую помощь в удобное время, но и решение важнейших задач по стабилизации состояния пациента, избавлению от острых симптомов абстиненции и восстановлению его здоровья. В случае с алкоголизмом и наркоманией выезд врача на дом в Воронеже — это важный шаг к восстановлению, который начинается там, где пациент находится, в удобной и привычной обстановке. Клиника «Частный медик 24» предлагает круглосуточные выезды нарколога, предоставляя экстренную помощь при запоях, наркозависимости, а также консультации по дальнейшему лечению и реабилитации. Врач приедет по указанному адресу и проведёт все необходимые процедуры, включая капельницы для стабилизации состояния пациента.
Ознакомиться с деталями – https://narkolog-na-dom-voronezh-4.ru
Процесс лечения капельницей помогает улучшить состояние пациента уже через короткий период. Важно, что процедура не только снимает симптомы похмелья, но и восстанавливает нормальную работу печени, почек и других органов, пострадавших от токсического воздействия алкоголя. Это помогает предотвратить долгосрочные последствия интоксикации, такие как хроническая усталость, проблемы с органами и психоэмоциональные расстройства.
Выяснить больше – капельница от похмелья вызов на дом
Нарколог на дом в Москве: выезд врача на дом, лечение запоя и консультации в наркологической клинике «Клиника доктора Калюжной».
Углубиться в тему – https://narkolog-na-dom-moskva-21.ru/
После введения капельницы пациент сразу чувствует облегчение, так как токсические вещества, отравляющие организм, начинают вымываться, а уровень обезвоживания снижается. Важно отметить, что капельница позволяет быстро снять острые симптомы и вернуть человека к нормальному состоянию.
Разобраться лучше – капельница от похмелья цена нижний новгород
https://pinupazz.top/ pin up casino
Капельница от похмелья в Екатеринбурге с медицинским контролем и поддержкой организма в наркологической клинике «Частный медик 24»
Исследовать вопрос подробнее – капельница от похмелья цена в екатеринбурге
Домашняя помощь — это клиника, перенесённая в тихую комнату. Знакомая обстановка снижает тревогу, исчезают пробки и ожидание, нет «социального шума». Врач «ПрофДетокса» приезжает без эмблем, действует спокойно и последовательно, объясняет каждое назначение простым языком. Мы не используем мифические смеси. Состав и темп капельницы подбираются под текущие показатели — давление, пульс, сатурация, выраженность тремора и тошноты, уровень тревоги, данные о лекарствах, которые человек успел принять за двое суток. Такой подход даёт не минутное облегчение, а устойчивую динамику на сутки и неделю.
Исследовать вопрос подробнее – нарколог в Ивантеевке, часы работы
В подобных случаях время играет против пациента. Чем дольше человек остаётся без осмотра, тем выше вероятность, что к обезвоживанию и интоксикации добавятся нарушения сна, истощение, вегетативный срыв и ошибки с лекарствами, которые были приняты «для успокоения» без понимания общей картины. В практике выездной службы именно экстренное реагирование помогает не допустить ухудшения и в короткие сроки вернуть ситуацию под медицинский контроль.
Разобраться лучше – нарколог на дом вывод
https://pinupaz.online/ pin up az
Нарколог на дом в Самаре востребован в самых различных ситуациях. Иногда пациент не в состоянии самостоятельно добраться до клиники из-за сильного состояния похмелья или ломки. В таких случаях выезд нарколога становится наиболее оптимальным решением. Наши специалисты оказывают помощь при следующих состояниях:
Детальнее – врач нарколог на дом в самаре
пин ап пин ап казино
Для Воронежа выездной формат особенно востребован вечером, ночью и ранним утром, когда у больного резко усиливаются симптомы и поездка в медицинское учреждение становится тяжёлой или просто нереальной. Если человек несколько дней употреблял алкоголь, почти не спал, плохо переносит воду, жалуется на сердцебиение и слабость, то откладывать осмотр не стоит. Срочная наркологическая помощь нужна именно тогда, когда ситуация развивается быстро, а семья уже видит, что своими силами справиться не удаётся. Врач приезжает, проводит осмотр, определяет, нет ли признаков осложнений, и уже на месте решает, какие меры допустимы дома, а какие требуют другого формата оказания помощи.
Получить дополнительную информацию – запой нарколог на дом в воронеже
Услуга
Исследовать вопрос подробнее – https://narkolog-na-dom-ramenskoe4.ru
Помощь на дому рассматривают при состояниях, которые сопровождаются заметным ухудшением самочувствия после алкоголя. Обычно это запой на протяжении нескольких дней, тяжелое похмелье, выраженная слабость, бессонница, тревога, дрожь в руках, сухость во рту, отсутствие аппетита, тошнота, раздражительность и ощущение истощения. В подобных случаях врачебный осмотр нужен для того, чтобы оценить тяжесть состояния и определить, безопасен ли домашний формат в конкретной ситуации.
Детальнее – вызвать нарколога на дом москва
Наркологическая помощь на дому помогает избежать стресса, связанного с поездкой в клинику. Особенно это важно в случаях, когда пациент находится в состоянии тяжёлой интоксикации или переживает абстинентный синдром, который можно только усугубить дополнительной нагрузкой. Врач приедет в кратчайшие сроки, обеспечивая необходимое лечение в первые часы после ухудшения состояния. Также важно, что при выезде специалист гарантирует полную анонимность, что особенно важно для многих людей, которые боятся открыто признаться в своей проблеме. Профессиональная наркологическая помощь на дому позволяет избежать срыва и начать процесс восстановления без стресса.
Ознакомиться с деталями – narkolog-na-dom-voronezh-4.ru/
Наркологический стационар в Санкт-Петербурге предоставляет пациентам комплексное лечение зависимости от психоактивных веществ. Проблемы, связанные с алкоголизмом, наркоманией и другими формами зависимости, требуют индивидуального подхода и профессиональной помощи. Комплексное лечение в таких учреждениях позволяет не только пройти детоксикацию, но и получить полноценную реабилитацию, что дает пациентам шанс на долгосрочную ремиссию и улучшение качества жизни. В некоторых случаях, при запое или необходимости выезда на дом, может быть предложен центр, где решаются все вопросы, связанные с лечением зависимости и восстановлением пациента.
Изучить вопрос глубже – наркологический стационар санкт-петербург
Нарколог на дом — это срочная врачебная помощь, которая нужна в тот момент, когда больного уже сложно везти в клинику, а ждать улучшения без осмотра опасно. Домашний формат особенно актуален при запое, выраженной интоксикации, повторной рвоте, скачках давления, сильном треморе, бессоннице и тревоге. В такой ситуации важно не просто заказать выезд и получить капельницу, а сразу запустить понятный медицинский маршрут: осмотр, консультация, оценка рисков, подбор терапии и решение, можно ли безопасно оставаться дома. Именно поэтому услуга «нарколог на дом» воспринимается не как разовая процедура, а как полноценная наркологическая помощь, где каждое действие связано с текущим состоянием пациента и его безопасностью.
Получить больше информации – нарколог на дом цена
Реабилитация алкоголиков с анонимной поддержкой — это важный процесс, который помогает людям справиться с зависимостью в условиях конфиденциальности и безопасности. Многие пациенты опасаются обращаться за помощью из-за стереотипов и страха осуждения. Анонимность в реабилитации становится важным фактором для обеспечения доверия и максимальной эффективности лечения, при этом в ряде случаев доступны такие услуги, как кодирование и консультации наркологической помощи бесплатно, особенно при обращении после запоя. В Москве существует множество центров, которые предлагают реабилитацию алкоголиков с анонимной поддержкой, что позволяет пациентам пройти лечение, не раскрывая своей личности и не беспокоясь о социальном осуждении.
Разобраться лучше – реабилитация алкоголиков в москве
Нарколог на дом — это формат медицинской помощи, при котором пациент получает лечение без посещения стационара. В наркологической клинике «Частный медик 24» в Нижнем Новгороде такая услуга используется при острых состояниях: запой, выраженная алкогольная интоксикация, абстинентный синдром, а также при необходимости срочного вмешательства без транспортировки больного. Выезд врача позволяет начать терапию в первые часы ухудшения состояния, что снижает риск осложнений и облегчает переносимость лечения.
Узнать больше – нарколог на дом вывод
При выборе наркологического стационара в Санкт-Петербурге важно ориентироваться на несколько ключевых критериев. В первую очередь, следует учитывать опыт и квалификацию специалистов, условия пребывания, а также отзывы пациентов. Ведь выбор медицинского учреждения — это не только вопрос качества лечения, но и обеспечения психологического комфорта пациента, что особенно важно при лечении зависимостей. Стоит обратить внимание на стационары, специализирующиеся на лечении наркомании и наркологии, а также учитывать расположение клиники в удобном районе города.
Изучить вопрос глубже – частный наркологический стационар санкт-петербург
Мы стремимся обеспечить пациентам максимальный уровень доверия и результативности лечения, сочетая передовые технологии и многолетний опыт специалистов:
Выяснить больше – лечение наркомании и алкоголизма краснодар
https://pin-up-kz.space/ пин ап казахстан
Главное преимущество такого выезда в том, что лечение начинается сразу. Не нужно ждать утра, искать транспорт, уговаривать человека ехать в тяжёлом состоянии или рисковать, пока он снова тянется к алкоголю, чтобы временно заглушить симптомы. Домашний визит даёт возможность быстро стабилизировать ситуацию и убрать хаотичность, которая часто возникает в семье в острый момент.
Разобраться лучше – нарколог на дом цена воронеж
Капельница от похмелья — это не просто средство для снятия симптомов, но и эффективный способ быстрого восстановления организма после алкогольной интоксикации. В наркологической клинике «Частный медик 24» в Екатеринбурге мы предоставляем услугу выезда нарколога на дом, что позволяет пациентам получить необходимую медицинскую помощь, не покидая комфорт своей обстановки. Это особенно важно в случае, если состояние пациента серьёзно ухудшилось, и он не может поехать в клинику самостоятельно.
Подробнее – капельница от похмелья на дом екатеринбург
Процедура проводится опытными наркологами, которые подбирают необходимое лечение на основе индивидуальных особенностей пациента. В клинике «Частный медик 24» применяются только эффективные и безопасные препараты, которые помогают организму восстановиться и избавиться от токсинов. Важно помнить, что капельница от похмелья — это не просто временное облегчение, а важный шаг к долгосрочному восстановлению организма и профилактике алкоголизма.
Изучить вопрос глубже – капельница от похмелья анонимно в екатеринбурге
Наркологический стационар с круглосуточным наблюдением в Санкт-Петербурге — это специализированное медицинское учреждение, предоставляющее помощь пациентам с зависимостью от алкоголя, наркотиков или других психоактивных веществ. В таких стационарах пациенты получают не только лечение, но и постоянное медицинское наблюдение, что значительно повышает безопасность и эффективность терапии. Круглосуточная поддержка специалистов позволяет предотвратить осложнения и быстро реагировать на изменения в состоянии пациента. В некоторых случаях, таких как запой или хронический алкоголизм, может быть рекомендован выезд на дом для оказания неотложной помощи, прежде чем пациент будет переведен в стационар.
Ознакомиться с деталями – наркологический стационар
Реабилитация алкоголиков в Москве представляет собой многократный процесс восстановления, который включает несколько этапов, направленных на очищение организма, психологическое восстановление и возвращение пациента к полноценной жизни. Этапное восстановление помогает обеспечить стабильный результат и минимизировать риск рецидива, позволяя человеку постепенно вернуться к нормальной социальной и трудовой жизни.
Подробнее тут – алкоголик реабилитация наркоманов город
Стационарное лечение в наркологическом стационаре дает целый ряд преимуществ, которые трудно переоценить, особенно в случае тяжелых зависимостей. Пребывание в стационаре позволяет сосредоточиться исключительно на восстановлении здоровья, не отвлекаясь на внешние факторы, и получать постоянную помощь профессионалов. В некоторых случаях, в зависимости от состояния пациента, может потребоваться вывод из запоя, а также консультация специалистов, которые будут сопровождать пациента на протяжении года для долгосрочной реабилитации.
Ознакомиться с деталями – наркологическая помощь стационар санкт-петербург
Реабилитация алкоголиков в Москве с комплексным подходом — это многогранный процесс, включающий в себя не только медицинские процедуры, но и психологическую поддержку, физическую реабилитацию и помощь в социальной адаптации. Профессиональный реабилитационный центр обеспечивает индивидуальный подход к каждому пациенту, включая такие методы, как кодирование и своевременное лечение запоя. Важно отметить, что успешное лечение алкоголизма требует учета множества факторов, таких как степень зависимости, психоэмоциональное состояние пациента, а также его физическое здоровье. Комплексный подход помогает эффективно устранить все составляющие проблемы, минимизируя риски рецидивов.
Исследовать вопрос подробнее – клиника реабилитации алкоголиков
Препараты, введённые через капельницу, начинают действовать почти сразу. Они поступают напрямую в кровоток, обходя желудочно-кишечный тракт, что позволяет ускорить процесс восстановления и устранить симптомы похмелья, такие как головная боль, тошнота и слабость, уже через 20–30 минут после начала процедуры.
Изучить вопрос глубже – капельница от похмелья вызов на дом в нижнем новгороде
При первой консультации нарколог осматривает пациента, чтобы оценить его состояние и подобрать оптимальную схему лечения. В зависимости от тяжести похмелья, врач может назначить инфузию с регидратационными растворами, витаминами группы B и другими препаратами, которые способствуют восстановлению. Важно, что капельница не только помогает снять симптомы, но и устраняет причины токсического воздействия алкоголя на организм, предотвращая развитие осложнений.
Получить дополнительные сведения – капельница от похмелья анонимно в самаре
Комплексная реабилитация алкоголиков в Москве помогает пациентам не только избавиться от зависимости, но и вернуться к полноценной жизни. Процесс восстановления включает в себя не только лечение алкоголизма как физического заболевания, но и работу с психологическими, социальными и эмоциональными аспектами, которые могут стать причиной или следствием зависимости. Такое подходное лечение, как правило, требует усилий со стороны как специалистов, так и самого пациента.
Углубиться в тему – алкоголик реабилитация наркоманов
Запрос на выезд врача связан не только с классическим запоем. На практике домашняя помощь нужна в разных ситуациях, когда организму уже трудно компенсировать последствия употребления, а откладывание визита увеличивает риск осложнений.
Получить дополнительную информацию – нарколог на дом анонимно воронеж
Необходимость обращения за наркологической помощью определяется по совокупности симптомов и их выраженности. При ухудшении состояния важно ориентироваться на объективные признаки, а не ждать самостоятельного улучшения.
Получить больше информации – https://narkologicheskaya-pomoshh-nizhnij-novgorod-8.ru/
pin up az online pin-up oyunu
Анонимное лечение на дому ценно ещё и тем, что снижает внутреннее сопротивление самого пациента. Для многих людей первый контакт с врачом происходит именно дома, без дороги, без ожидания, без страха чужих взглядов. Такой формат помогает начать разговор не только о снятии острых симптомов, но и о более широких вопросах: что делать после выхода из запоя, когда требуется кодирование, в каких случаях нужна реабилитация, а когда первичная наркологическая помощь уже должна переходить в полноценный лечебный маршрут. Врач может помочь и в ситуациях, связанных не только с алкоголем, но и с наркомании, если семье нужно понять, что происходит с зависимым человеком и какой следующий шаг будет для него безопасным.
Выяснить больше – narkolog-na-dom-voronezh-1.ru/
https://pinupazz.top/ pin-up online casino
После употребления алкоголя у человека может наблюдаться ряд неприятных симптомов: головная боль, слабость, тошнота, головокружение, сухость во рту и тремор. Эти признаки являются следствием алкогольной интоксикации, и в такой ситуации крайне важно вовремя принять меры. В клинике «Частный медик 24» в Самаре мы предоставляем капельную терапию, которая помогает снять токсическую нагрузку с организма, восстановить водно-электролитный баланс и облегчить общее самочувствие пациента. Капельница от похмелья помогает снять симптомы абстиненции и улучшить физическое состояние пациента, возвращая его к нормальной жизни.
Выяснить больше – капельница от похмелья на дом в самаре
К ситуациям, при которых используется домашний формат, относятся:
Подробнее тут – vyvod-iz-zapoya-na-domu-sankt-peterburg-9.ru/
https://pinupazz.top/ pin-up oyunu
Нарколог на дом в Воронеже с круглосуточным вызовом врача, стабилизацией состояния и лечением в наркологической клинике «Частный медик 24»
Получить дополнительную информацию – https://narkolog-na-dom-voronezh-2.ru/
https://pinupaz.online/ pin-up oyunu
Процесс лечения начинается с консультации врача, который оценивает состояние пациента, его анамнез и определяет, какие процедуры и препараты нужно использовать. В большинстве случаев капельница включает в себя регидратацию, витамины группы B, антиеметики, препараты для улучшения работы печени и почек. Важно, что капельница не только помогает организму вывести токсины, но и восстанавливает нормальную работу всех систем организма, обеспечивая быстрое улучшение самочувствия.
Исследовать вопрос подробнее – капельница от похмелья цена
Помощь на дому рассматривают при состояниях, которые сопровождаются заметным ухудшением самочувствия после алкоголя. Это может быть запой на протяжении нескольких дней, тяжелое похмелье, дрожь в руках, нарушение сна, выраженная слабость, тревога, тошнота, сухость во рту, снижение аппетита и признаки обезвоживания. В таких случаях осмотр врача нужен для того, чтобы оценить тяжесть состояния и понять, безопасно ли оставаться дома.
Подробнее можно узнать тут – нарколог на дом анонимно москва
Реабилитация алкоголиков — это важный этап на пути к избавлению от зависимости. В Москве существует множество центров, предлагающих реабилитацию с индивидуальной программой, что помогает обеспечить более персонализированный и эффективный подход к каждому пациенту. Индивидуальная программа учитывает физическое и психологическое состояние человека, а также его социальное окружение и личные особенности. Это позволяет добиться лучших результатов в лечении и восстановлении.
Получить дополнительную информацию – реабилитация алкоголиков в москве
Для жителей Воронежа выезд нарколога на дом — это быстрый и удобный способ получить экстренную помощь. Когда человек переживает запой, а его физическое и эмоциональное состояние быстро ухудшается, наркологическая помощь на дому становится оптимальным решением. Врач приезжает и немедленно оценивает состояние пациента: проверяет его пульс, давление, частоту дыхания, уровень сознания и другие важные показатели. Это помогает составить точный план лечения, который будет направлен на восстановление организма, снятие токсинов и стабилизацию состояния пациента.
Ознакомиться с деталями – нарколог на дом анонимно воронеж
Домашний формат ценят не только за удобство. Он помогает начать лечение анонимно, без дороги, без ожидания и без лишнего стресса для пациента. Для многих семей именно выездной наркологическая маршрут становится первой точкой, с которой начинается более серьёзное восстановление: обсуждаются не только снятие острых симптомов, но и кодирование, реабилитация, повторная консультация, а при необходимости — и маршруты помощи при наркомании. Особенно это актуально, если человек употребляет давно, уже несколько лет сталкивается со срывами и сам замечает, что проблема перестала ограничиваться только плохим самочувствием после алкоголя.
Получить больше информации – нарколог на дом цена
Капельница от похмелья в Самаре с подбором препаратов, улучшением самочувствия и наблюдением в наркологической клинике «Частный медик 24»
Выяснить больше – http://www.domen.ru
https://pin-up-kz.space/ пин ап казино
Капельница от похмелья — это медицинская процедура, направленная на быстрое восстановление организма после алкогольной интоксикации. Она помогает устранить обезвоживание, нормализовать обменные процессы и снизить токсическую нагрузку на внутренние органы. В отличие от домашних методов, инфузионная терапия действует напрямую через кровоток, обеспечивая более быстрый и выраженный эффект.
Изучить вопрос глубже – капельница от похмелья цена самара
Нарколог на дом в Москве — это формат врачебной помощи, который рассматривают при состояниях после употребления алкоголя, когда больному требуется осмотр без посещения клиники. Чаще всего обращение связано с запоем, тяжелым похмельным синдромом, слабостью, нарушением сна, тремором, тревогой, тошнотой, сухостью во рту, скачками давления, сердцебиением и общим ухудшением самочувствия. Дальнейшая тактика определяется после осмотра, с учетом длительности употребления алкоголя, возраста, сопутствующих заболеваний и выраженности текущих симптомов.
Подробнее можно узнать тут – narkolog-na-dom-moskva-21.ru/
пин ап пин ап казино kz
Капельница от похмелья — это эффективное средство для быстрого снятия симптомов алкогольной интоксикации и восстановления организма после злоупотребления алкоголем. В наркологической клинике «Частный медик 24» в Екатеринбурге мы предоставляем услуги по экстренной помощи и детоксикации на дому, включая установку капельниц, которые позволяют улучшить состояние пациента за короткое время. Процедура включает в себя введение специальных растворов, которые восстанавливают водно-электролитный баланс, выводят токсины и устраняют основные симптомы похмелья, такие как головная боль, слабость, тошнота и головокружение.
Подробнее – https://kapelnicza-ot-pokhmelya-ekaterinburg-4.ru/
Мы собрали для вас самые захватывающие факты из мира науки и истории. От малознакомых деталей до грандиозных событий — эта статья расширит ваш кругозор и подарит новое понимание того, как устроен наш мир.
Что ещё? Расскажи всё! – https://www.leonarditturkey.com/urunler/kirik-gubre
Мы собрали для вас самые захватывающие факты из мира науки и истории. От малознакомых деталей до грандиозных событий — эта статья расширит ваш кругозор и подарит новое понимание того, как устроен наш мир.
Узнать напрямую – https://econtutorials.com/what-is-regression-analysis
Домашний формат помощи рассматривают тогда, когда человеку тяжело добраться до медицинского учреждения, состояние ухудшается после нескольких дней употребления спиртного или родственникам требуется очная оценка без промедления. После осмотра становится ясно, допустима ли помощь на дому, требуется ли капельница, можно ли ограничиться наблюдением в домашних условиях или нужен другой маршрут помощи. Вопрос о том, как вызвать специалиста, нередко возникает в ситуациях, когда состояние нарастает быстро и требуется решение без откладывания. Если подобные эпизоды повторяются, дальнейшее обсуждение может касаться не только текущего состояния, но и лечения алкоголизма, работы с зависимостью и более длительной программы восстановления.
Выяснить больше – нарколог на дом в москве
Реабилитация алкоголиков с анонимной поддержкой — это процесс, при котором пациент получает необходимую медицинскую и психологическую помощь, не раскрывая своей личности и обстоятельств зависимости, включая лечение наркомании. Такие программы ориентированы на безопасное и конфиденциальное лечение, что важно для тех, кто стремится избавиться от зависимости, но опасается осуждения или утраты личной репутации, при этом возможен выезд нарколога на дом. Важно, что анонимность не ограничивает качество предоставляемых услуг: все необходимые этапы лечения, включая детоксикацию, психотерапевтические сессии и социальную реабилитацию, которые могут длиться несколько лет, проводятся на высоком уровне с акцентом на своевременный вывод из состояния зависимости.
Подробнее можно узнать тут – центр реабилитации алкоголиков в москве
Эта статья сочетает познавательный и занимательный контент, что делает ее идеальной для любителей глубоких исследований. Мы рассмотрим увлекательные аспекты различных тем и предоставим вам новые знания, которые могут оказаться полезными в будущем.
Интересует подробная информация – https://www.asap64.fr/groupe-dechanges-des-pratiques
В таких ситуациях стационарный уход позволяет обеспечить безопасность пациента, эффективно справиться с его состоянием и подготовить его к дальнейшему лечению или реабилитации. В случае алкоголизма может быть назначена капельница для снятия острых симптомов интоксикации, а также лечение в специализированном центре для комплексного восстановления и профилактики рецидивов.
Выяснить больше – http://narkologicheskij-staczionar-sankt-peterburg-2.ru
Отдельно оценивают ситуации, когда подобные эпизоды повторяются. Если человек уже не впервые переносит запой, тяжелый выход из него или выраженное ухудшение самочувствия после алкоголя, вопрос обычно выходит за рамки разовой помощи. Тогда уже при первичном обращении рассматривают не только текущую стабилизацию состояния, но и дальнейшие шаги. При затяжном течении проблемы могут обсуждаться лечение зависимости, программа восстановления и условия, при которых потребуется наблюдение в стационаре.
Исследовать вопрос подробнее – врач нарколог на дом в москве
После того как вы вызвали нарколога на дом, врач проводит первичную консультацию и осмотр пациента, чтобы оценить его состояние. На основе полученных данных подбирается подходящая терапия, которая может включать в себя капельницу, препараты для снятия симптомов похмелья и других проблем, связанных с интоксикацией. Процесс лечения проводится с использованием препаратов, которые помогают восстановить нормальное функционирование организма и снять токсическое воздействие алкоголя на сердце, печень и другие органы.
Подробнее можно узнать тут – капельница от похмелья на дому в екатеринбурге
В Нижнем Новгороде выезд нарколога на дом используется при состояниях, требующих оперативной медицинской оценки и начала терапии. Врач приезжает с необходимыми препаратами, проводит осмотр и формирует план лечения на месте. Такой формат позволяет сократить время до начала помощи и снизить нагрузку на пациента.
Изучить вопрос глубже – наркологическая помощь анонимно нижний новгород
Запойное состояние сопровождается выраженной интоксикацией, нарушением сна, слабостью и тревожностью, что характерно для алкоголизма и различных форм зависимости. При этом самостоятельный выход из него часто затруднён из-за ухудшения самочувствия и отсутствия контроля над симптомами. Выезд нарколога позволяет быстро стабилизировать состояние человека и начать восстановление без дополнительной нагрузки, связанной с поездкой в клинику, а при необходимости вовремя определить показания к лечению в стационаре.
Узнать больше – вывод из запоя на дому
Обращение за помощью нарколога на дому имеет ряд преимуществ, способствующих быстрому и эффективному лечению:
Углубиться в тему – вывод из запоя цена ярославль.
Обращение за помощью нарколога на дому имеет ряд преимуществ, способствующих быстрому и эффективному лечению:
Подробнее – нарколог вывод из запоя в ярославле
Срочный домашний выезд особенно важен для семей, которые уже сталкивались с тяжёлыми последствиями алкоголизма и понимают, что обычные попытки «отпаивания» не решают проблему. Врач оценивает не только факт употребления, но и длительность запоя, возраст, наличие хронических болезней, уже принятые медикаменты, риск абстинентного синдрома, состояние сердца и общую нагрузку на организм. Такой формат позволяет анонимно вызвать специалиста, быстро провести необходимые вмешательства и определить, нужен ли только домашний вывод из острого состояния или дальше потребуется кодирование, повторная консультация, реабилитация либо более широкий маршрут помощи при наркомании.
Разобраться лучше – нарколог на дом вывод воронеж
Помощь на дому рассматривают при состояниях, которые сопровождаются заметным ухудшением самочувствия после алкоголя. Обычно это запой на протяжении нескольких дней, тяжелое похмелье, выраженная слабость, бессонница, тревога, дрожь в руках, сухость во рту, отсутствие аппетита, тошнота, раздражительность и ощущение истощения. В подобных случаях врачебный осмотр нужен для того, чтобы оценить тяжесть состояния и определить, безопасен ли домашний формат в конкретной ситуации.
Углубиться в тему – нарколог на дом москва
Наркологический стационар в Санкт-Петербурге предоставляет пациентам комплексное лечение зависимости от психоактивных веществ. Проблемы, связанные с алкоголизмом, наркоманией и другими формами зависимости, требуют индивидуального подхода и профессиональной помощи. Комплексное лечение в таких учреждениях позволяет не только пройти детоксикацию, но и получить полноценную реабилитацию, что дает пациентам шанс на долгосрочную ремиссию и улучшение качества жизни. В некоторых случаях, при запое или необходимости выезда на дом, может быть предложен центр, где решаются все вопросы, связанные с лечением зависимости и восстановлением пациента.
Изучить вопрос глубже – частный наркологический стационар санкт-петербург
Для жителей Воронежа выезд нарколога на дом — это быстрый и удобный способ получить экстренную помощь. Когда человек переживает запой, а его физическое и эмоциональное состояние быстро ухудшается, наркологическая помощь на дому становится оптимальным решением. Врач приезжает и немедленно оценивает состояние пациента: проверяет его пульс, давление, частоту дыхания, уровень сознания и другие важные показатели. Это помогает составить точный план лечения, который будет направлен на восстановление организма, снятие токсинов и стабилизацию состояния пациента.
Детальнее – нарколог на дом цена в воронеже
Капельница от похмелья — это эффективный способ снятия симптомов алкогольной интоксикации, который позволяет быстро восстановить организм после длительного употребления алкоголя. В наркологической клинике «Частный медик 24» в Екатеринбурге мы предлагаем капельную терапию, которая включает в себя комплекс препаратов для восстановления водно-электролитного баланса, выведения токсинов и нормализации состояния пациента. Процедура проводится в удобной обстановке, и мы обеспечиваем полное наблюдение врача на протяжении всего процесса лечения.
Подробнее можно узнать тут – капельница от похмелья екатеринбург
Алкогольная зависимость — хроническое заболевание, требующее комплексного подхода. В клинике «КубаньМед» в Краснодаре разработаны авторские методики, направленные на полное преодоление зависимости и возвращение пациента к полноценной жизни. Мы предлагаем индивидуальные программы лечения, сочетающие медикаментозную детоксикацию, специализированные реабилитационные процедуры и профессиональные психологические консультации. Всё это в условиях полного комфорта и абсолютной конфиденциальности.
Получить дополнительную информацию – https://lechenie-alkogolizma-krasnodar0.ru/lechenie-alkogolizma-anonimno-krasnodar/
Наиболее частыми причинами обращения становятся запой, выраженная слабость, тремор, нарушение сна, тревога, учащенный пульс, нестабильное давление, тошнота и ощущение физического истощения. Эти проявления могут сочетаться между собой и усиливаться после прекращения употребления алкоголя, особенно если эпизод длился несколько дней.
Подробнее – врач нарколог на дом в москве
Домашний формат выбирают тогда, когда человеку тяжело добраться до медицинского учреждения, он ослаблен после нескольких дней употребления алкоголя или родственникам важно быстро получить врачебную оценку состояния. После осмотра определяют, допустима ли помощь на дому, требуется ли детоксикация, нужна ли капельница, достаточно ли домашнего наблюдения или следует сразу рассматривать другой объем помощи. Если эпизоды повторяются, обсуждение может выходить за рамки одного выезда и включать лечение алкоголизма, помощь при зависимости, кодирование, участие психолога и реабилитацию. Уже на этапе первичного обращения нередко уточняют, как вызвать врача, какие услуги доступны на дому и в каких условиях домашний формат остается безопасным.
Подробнее можно узнать тут – https://narkolog-na-dom-moskva-18.ru/
Реабилитация алкоголиков проходит через несколько обязательных этапов. Каждый этап фокусируется на определенных аспектах восстановления и помогает человеку не только избавиться от физической зависимости, но и научиться жить без алкоголя в долгосрочной перспективе, включая кодирование, особенно после длительных лет запоя, а также восстановление в условиях специализированного дома. Этапное восстановление помогает избежать перегрузки пациента, обеспечивая плавный переход от одной стадии лечения к другой.
Исследовать вопрос подробнее – центр реабилитации алкоголиков
Процесс лечения строится поэтапно, что позволяет пациенту проходить все стадии восстановления в безопасном и контролируемом режиме.
Подробнее можно узнать тут – http://lechenie-alkogolizma-doneczk0.ru/lechenie-alkogolizma-dnr/
Во всех этих случаях врач нужен не только для облегчения симптомов. Его задача — понять, можно ли ограничиться домашней терапией или уже сейчас необходимо менять маршрут лечения. Именно этот этап и делает домашний выезд профессиональной услугой, а не упрощённой заменой клиники.
Узнать больше – http://www.domen.ru
Запой и алкогольная интоксикация могут приводить к целому ряду опасных симптомов, таких как головная боль, слабость, тошнота, рвота, обезвоживание и психоэмоциональная нестабильность. Если не начать лечение вовремя, такие состояния могут привести к более серьезным осложнениям, включая сердечные проблемы, галлюцинации и даже опасные для жизни нарушения работы организма. С помощью нарколога на дому можно начать экстренную терапию прямо в момент ухудшения состояния, не затягивая с лечением и не тратя время на поездки в клинику.
Выяснить больше – нарколог на дом вывод в самаре
Реабилитация алкоголиков в Москве с комплексным подходом — это многогранный процесс, включающий в себя не только медицинские процедуры, но и психологическую поддержку, физическую реабилитацию и помощь в социальной адаптации. Профессиональный реабилитационный центр обеспечивает индивидуальный подход к каждому пациенту, включая такие методы, как кодирование и своевременное лечение запоя. Важно отметить, что успешное лечение алкоголизма требует учета множества факторов, таких как степень зависимости, психоэмоциональное состояние пациента, а также его физическое здоровье. Комплексный подход помогает эффективно устранить все составляющие проблемы, минимизируя риски рецидивов.
Выяснить больше – алкоголик реабилитация наркоманов в москве
Вывод из запоя на дому в Санкт-Петербурге с подбором терапии, наблюдением врача и комфортным лечением в наркологической клинике «Частный медик 24»
Подробнее можно узнать тут – https://vyvod-iz-zapoya-na-domu-sankt-peterburg-9.ru/
Реабилитация алкоголиков в Москве: лечение зависимости, восстановление и поддержка под контролем специалистов в наркологической клинике «Похмельная служба»
Подробнее – реабилитация алкоголиков в москве
Реабилитация алкоголиков в Москве с комплексным подходом — это многогранный процесс, включающий в себя не только медицинские процедуры, но и психологическую поддержку, физическую реабилитацию и помощь в социальной адаптации. Профессиональный реабилитационный центр обеспечивает индивидуальный подход к каждому пациенту, включая такие методы, как кодирование и своевременное лечение запоя. Важно отметить, что успешное лечение алкоголизма требует учета множества факторов, таких как степень зависимости, психоэмоциональное состояние пациента, а также его физическое здоровье. Комплексный подход помогает эффективно устранить все составляющие проблемы, минимизируя риски рецидивов.
Получить больше информации – реабилитация алкоголиков стоимость
Нарколог на дом — это удобное и эффективное решение для тех, кто сталкивается с тяжелыми последствиями запоя или алкогольной интоксикации. В наркологической клинике «Частный медик 24» в Самаре мы предоставляем круглосуточную помощь, выезд нарколога и лечение на дому. Это позволяет пациентам получить профессиональную медицинскую помощь в удобной и знакомой обстановке, что особенно важно, когда состояние человека ухудшается после длительного употребления алкоголя или наркотиков.
Подробнее – нарколог на дом
Откройте для себя скрытые страницы истории и малоизвестные научные открытия, которые оказали колоссальное влияние на развитие человечества. Статья предлагает свежий взгляд на события, которые заслуживают большего внимания.
Ознакомиться с полной информацией – https://fgsstore.us/product/lumineux-teeth-whitening-strips-7-treatments-enamel-safe-for-whiter-teeth
Наиболее частыми причинами обращения становятся запой, выраженная слабость, тремор, тревога, бессонница, тошнота, нестабильное давление, учащенный пульс и ощущение физического истощения. Эти проявления могут сочетаться между собой и усиливаться после прекращения употребления алкоголя, особенно если эпизод длился несколько дней подряд.
Подробнее можно узнать тут – нарколог на дом в москве
В этой информационной статье вы найдете интересное содержание, которое поможет вам расширить свои знания. Мы предлагаем увлекательный подход и уникальные взгляды на обсуждаемые темы, побуждая пользователей к активному мышлению и критическому анализу.
Узнать больше – https://www.nicolascarles.com/Un-doublet-de-grilse-sur-la-Dee
Нарколог на дом в Москве: выезд врача на дом, лечение запоя и консультации в наркологической клинике «Клиника доктора Калюжной».
Получить дополнительную информацию – врач нарколог на дом москва
В этой информационной статье вы найдете интересное содержание, которое поможет вам расширить свои знания. Мы предлагаем увлекательный подход и уникальные взгляды на обсуждаемые темы, побуждая пользователей к активному мышлению и критическому анализу.
Ознакомьтесь с аналитикой – https://inverterindia.com/switching-to-lithium-battery-bank
Безопасность — это не лозунг, а набор решений. Мы избегаем «жёстких» седативных доз, которые создают видимость улучшения и повышают риск скрытых осложнений. Наращивание темпа инфузии происходит постепенно и увязано с динамикой симптомов и цифрами измерений. Любой шаг объясняется пациенту и семье: зачем он выбран, что считается нормальной волной улучшения, в какой момент нужно связаться с дежурным. Такой прозрачный формат снимает тревогу и помогает всем участникам действовать согласованно.
Углубиться в тему – http://narkolog-na-dom-ivanteevka8.ru
Нарколог на дом — это не просто возможность получить медицинскую помощь в удобное время, но и решение важнейших задач по стабилизации состояния пациента, избавлению от острых симптомов абстиненции и восстановлению его здоровья. В случае с алкоголизмом и наркоманией выезд врача на дом в Воронеже — это важный шаг к восстановлению, который начинается там, где пациент находится, в удобной и привычной обстановке. Клиника «Частный медик 24» предлагает круглосуточные выезды нарколога, предоставляя экстренную помощь при запоях, наркозависимости, а также консультации по дальнейшему лечению и реабилитации. Врач приедет по указанному адресу и проведёт все необходимые процедуры, включая капельницы для стабилизации состояния пациента.
Изучить вопрос глубже – запой нарколог на дом в воронеже
Каждый этап имеет ключевое значение и обеспечивает устойчивость результата.
Подробнее тут – http://www.domen.ru
Реабилитация алкоголиков с анонимной поддержкой — это процесс, при котором пациент получает необходимую медицинскую и психологическую помощь, не раскрывая своей личности и обстоятельств зависимости, включая лечение наркомании. Такие программы ориентированы на безопасное и конфиденциальное лечение, что важно для тех, кто стремится избавиться от зависимости, но опасается осуждения или утраты личной репутации, при этом возможен выезд нарколога на дом. Важно, что анонимность не ограничивает качество предоставляемых услуг: все необходимые этапы лечения, включая детоксикацию, психотерапевтические сессии и социальную реабилитацию, которые могут длиться несколько лет, проводятся на высоком уровне с акцентом на своевременный вывод из состояния зависимости.
Углубиться в тему – центр реабилитации алкоголиков город
Нарколог на дом в Самаре — помощь при запое и интоксикации в наркологической клинике «Частный медик 24»
Подробнее тут – нарколог на дом самара
В таких ситуациях стационарный уход позволяет обеспечить безопасность пациента, эффективно справиться с его состоянием и подготовить его к дальнейшему лечению или реабилитации. В случае алкоголизма может быть назначена капельница для снятия острых симптомов интоксикации, а также лечение в специализированном центре для комплексного восстановления и профилактики рецидивов.
Узнать больше – наркологическая помощь стационар
Когда зависимости становятся хроническими и угрожают жизни пациента, комплексная реабилитация при наркомании в специализированных клиниках Москвы, включая вывод из состояния в стационаре и последующий анализ данных о состоянии пациента, может стать единственным возможным решением. Процесс восстановления включает в себя работу не только с зависимостью, но и с психоэмоциональным состоянием, что делает лечение более эффективным и долговечным.
Детальнее – https://reabilitacziya-alkogolikov-moskva-2.ru/
Эти направления терапии помогают создать прочный фундамент для дальнейшей ремиссии и снижают риск рецидива.
Детальнее – https://lechenie-alkogolizma-doneczk0.ru/lechenie-alkogolizma-doneczk-dnr/
Нарколог на дом в Москве — это формат помощи, который рассматривают в тех случаях, когда после употребления алкоголя больному требуется врачебный осмотр без поездки в клинику. Чаще всего обращение связано с запоем, выраженным похмельным синдромом, нарушением сна, слабостью, тремором, тревогой, обезвоживанием, сердцебиением, скачками давления и общим ухудшением самочувствия. Дальнейшая тактика зависит от состояния больного на момент осмотра, длительности употребления алкоголя, возраста и сопутствующих заболеваний.
Выяснить больше – вызов нарколога на дом москва
Срочный домашний выезд особенно важен для семей, которые уже сталкивались с тяжёлыми последствиями алкоголизма и понимают, что обычные попытки «отпаивания» не решают проблему. Врач оценивает не только факт употребления, но и длительность запоя, возраст, наличие хронических болезней, уже принятые медикаменты, риск абстинентного синдрома, состояние сердца и общую нагрузку на организм. Такой формат позволяет анонимно вызвать специалиста, быстро провести необходимые вмешательства и определить, нужен ли только домашний вывод из острого состояния или дальше потребуется кодирование, повторная консультация, реабилитация либо более широкий маршрут помощи при наркомании.
Подробнее – нарколог на дом анонимно в воронеже
Домашняя помощь — это клиника, перенесённая в тихую комнату. Знакомая обстановка снижает тревогу, исчезают пробки и ожидание, нет «социального шума». Врач «ПрофДетокса» приезжает без эмблем, действует спокойно и последовательно, объясняет каждое назначение простым языком. Мы не используем мифические смеси. Состав и темп капельницы подбираются под текущие показатели — давление, пульс, сатурация, выраженность тремора и тошноты, уровень тревоги, данные о лекарствах, которые человек успел принять за двое суток. Такой подход даёт не минутное облегчение, а устойчивую динамику на сутки и неделю.
Детальнее – http://narkolog-na-dom-ivanteevka8.ru/narkolog-na-dom-anonimno-v-ivanteevke/
Если вы ищете надежное онлайн-казино, обязательно посетите 888starz букмекерская контора — лучший выбор для игры и ставок.
Регистрация проходит быстро и без сложностей, что обеспечивает молниеносный доступ к играм.
Нарколог на дом в Москве: круглосуточный выезд, детоксикация и лечение зависимостей в наркологической клинике «Клиника доктора Калюжной».
Узнать больше – вызвать нарколога на дом москва
Реабилитация алкоголиков в Москве с комплексным подходом — это многогранный процесс, включающий в себя не только медицинские процедуры, но и психологическую поддержку, физическую реабилитацию и помощь в социальной адаптации. Профессиональный реабилитационный центр обеспечивает индивидуальный подход к каждому пациенту, включая такие методы, как кодирование и своевременное лечение запоя. Важно отметить, что успешное лечение алкоголизма требует учета множества факторов, таких как степень зависимости, психоэмоциональное состояние пациента, а также его физическое здоровье. Комплексный подход помогает эффективно устранить все составляющие проблемы, минимизируя риски рецидивов.
Получить дополнительную информацию – https://reabilitacziya-alkogolikov-moskva-2.ru
Нарколог на дом — это не просто возможность получить медицинскую помощь в удобное время, но и решение важнейших задач по стабилизации состояния пациента, избавлению от острых симптомов абстиненции и восстановлению его здоровья. В случае с алкоголизмом и наркоманией выезд врача на дом в Воронеже — это важный шаг к восстановлению, который начинается там, где пациент находится, в удобной и привычной обстановке. Клиника «Частный медик 24» предлагает круглосуточные выезды нарколога, предоставляя экстренную помощь при запоях, наркозависимости, а также консультации по дальнейшему лечению и реабилитации. Врач приедет по указанному адресу и проведёт все необходимые процедуры, включая капельницы для стабилизации состояния пациента.
Получить дополнительную информацию – narkolog-na-dom-voronezh-4.ru/
Реабилитация алкоголиков с анонимной поддержкой — это процесс, при котором пациент получает необходимую медицинскую и психологическую помощь, не раскрывая своей личности и обстоятельств зависимости, включая лечение наркомании. Такие программы ориентированы на безопасное и конфиденциальное лечение, что важно для тех, кто стремится избавиться от зависимости, но опасается осуждения или утраты личной репутации, при этом возможен выезд нарколога на дом. Важно, что анонимность не ограничивает качество предоставляемых услуг: все необходимые этапы лечения, включая детоксикацию, психотерапевтические сессии и социальную реабилитацию, которые могут длиться несколько лет, проводятся на высоком уровне с акцентом на своевременный вывод из состояния зависимости.
Разобраться лучше – реабилитация алкоголиков город
Нарколог на дом в Москве — это формат медицинской помощи, который рассматривают при состояниях после употребления алкоголя, когда больному требуется осмотр врача без поездки в клинику. Чаще всего обращение связано с запоем, выраженным похмельным синдромом, бессонницей, тревогой, слабостью, тремором, обезвоживанием, скачками давления, сердцебиением и общим ухудшением самочувствия. Дальнейшая тактика зависит от состояния больного на момент осмотра, продолжительности употребления алкоголя и сопутствующих заболеваний.
Узнать больше – нарколог на дом вывод в москве
Методика подбирается не только исходя из медицинских показаний, но и личных ожиданий пациента, его опыта и жизненной ситуации. Такой подход позволяет сделать процесс максимально комфортным и результативным.
Получить дополнительную информацию – https://kodirovanie-ot-alkogolizma-ehlektrostal6.ru/kodirovka-ot-alkogolya-v-ehlektrostali/
canadian pharmacy ed medications: canadian drugstore online – canadian pharmacy online reviews
AccessBridge: AccessBridge Pharmacy – AccessBridge
В Нижнем Новгороде стационарное лечение используется при выраженных симптомах или наличии факторов риска, особенно при тяжелом состоянии больного на фоне алкоголизма или длительного употребления алкоголя. Это позволяет исключить внешние нагрузки, обеспечить непрерывный мониторинг и при необходимости быстро скорректировать терапию. Решение о госпитализации принимается на основе осмотра, консультации специалиста и оценки текущего состояния человека, с учётом клинических данных.
Подробнее – нарколог вывод из запоя в нижнем новгороде
SteadyMeds pharmacy: SteadyMeds – canadian drugs
Комплексная реабилитация алкоголиков в Москве помогает пациентам не только избавиться от зависимости, но и вернуться к полноценной жизни. Процесс восстановления включает в себя не только лечение алкоголизма как физического заболевания, но и работу с психологическими, социальными и эмоциональными аспектами, которые могут стать причиной или следствием зависимости. Такое подходное лечение, как правило, требует усилий со стороны как специалистов, так и самого пациента.
Подробнее – http://www.domen.ru
SteadyMeds pharmacy SteadyMeds canadadrugpharmacy com
Реабилитация алкоголиков в Москве: восстановление после зависимости и поддержка специалистов в наркологической клинике «Похмельная служба»
Узнать больше – reabilitacziya-alkogolikov-moskva-4.ru/
https://formulinepharmacy.com/# foreign online pharmacy
Капельница от похмелья в Екатеринбурге с выездом специалиста, подбором терапии и восстановлением состояния в наркологической клинике «Частный медик 24»
Получить больше информации – капельница от похмелья анонимно екатеринбург
Наркологическая помощь на дому помогает избежать стресса, связанного с поездкой в клинику. Особенно это важно в случаях, когда пациент находится в состоянии тяжёлой интоксикации или переживает абстинентный синдром, который можно только усугубить дополнительной нагрузкой. Врач приедет в кратчайшие сроки, обеспечивая необходимое лечение в первые часы после ухудшения состояния. Также важно, что при выезде специалист гарантирует полную анонимность, что особенно важно для многих людей, которые боятся открыто признаться в своей проблеме. Профессиональная наркологическая помощь на дому позволяет избежать срыва и начать процесс восстановления без стресса.
Подробнее тут – вызов нарколога на дом воронеж
Нарколог на дом — это не просто возможность получить медицинскую помощь в удобное время, но и решение важнейших задач по стабилизации состояния пациента, избавлению от острых симптомов абстиненции и восстановлению его здоровья. В случае с алкоголизмом и наркоманией выезд врача на дом в Воронеже — это важный шаг к восстановлению, который начинается там, где пациент находится, в удобной и привычной обстановке. Клиника «Частный медик 24» предлагает круглосуточные выезды нарколога, предоставляя экстренную помощь при запоях, наркозависимости, а также консультации по дальнейшему лечению и реабилитации. Врач приедет по указанному адресу и проведёт все необходимые процедуры, включая капельницы для стабилизации состояния пациента.
Получить дополнительные сведения – вызвать нарколога на дом
Нарколог на дом в Самаре — помощь при запое и интоксикации в наркологической клинике «Частный медик 24»
Изучить вопрос глубже – нарколог на дом вывод самара
SteadyMeds canada drugs online reviews SteadyMeds pharmacy
los algodones pharmacy online: AccessBridge Pharmacy – AccessBridge
http://steadymedspharmacy.com/# SteadyMeds
При первой консультации нарколог осматривает пациента, чтобы оценить его состояние и подобрать оптимальную схему лечения. В зависимости от тяжести похмелья, врач может назначить инфузию с регидратационными растворами, витаминами группы B и другими препаратами, которые способствуют восстановлению. Важно, что капельница не только помогает снять симптомы, но и устраняет причины токсического воздействия алкоголя на организм, предотвращая развитие осложнений.
Получить больше информации – kapelnicza-ot-pokhmelya-samara-2.ru/
После оформления вызова нарколог приезжает к пациенту и проводит комплексную оценку состояния. Врач измеряет давление, частоту пульса, оценивает уровень сознания и выраженность симптомов. На основании полученных данных формируется план лечения, который реализуется сразу на месте.
Разобраться лучше – запой нарколог на дом нижний новгород
Нарколог на дом в Воронеже с круглосуточным вызовом врача, стабилизацией состояния и лечением в наркологической клинике «Частный медик 24»
Получить больше информации – запой нарколог на дом
SteadyMeds: certified canadian pharmacy – SteadyMeds
Когда зависимости становятся хроническими и угрожают жизни пациента, комплексная реабилитация при наркомании в специализированных клиниках Москвы, включая вывод из состояния в стационаре и последующий анализ данных о состоянии пациента, может стать единственным возможным решением. Процесс восстановления включает в себя работу не только с зависимостью, но и с психоэмоциональным состоянием, что делает лечение более эффективным и долговечным.
Получить дополнительную информацию – клиника реабилитации алкоголиков
Лучшие профессии архивариус курсы онлайн москва возможность получить практические знания и освоить востребованные специальности в короткие сроки. Обучение подходит для тех, кто хочет начать карьеру или сменить сферу деятельности. Все материалы доступны онлайн и сопровождаются поддержкой преподавателей.
Нужен грузовик? https://neotruck.ru компания «НЕО ТРАК» — это современный дилерский центр полного цикла, работающий на рынке коммерческого транспорта и спецтехники уже более 20 лет. Являясь официальным дилером ведущих производителей, таких как DONGFENG, JAC, FAW, DAEWOO TRUCKS, ISUZU, HYUNDAI и других, компания предлагает широкий выбор грузовых автомобилей различной тоннажности, спецтехники, от фургонов и бортовых платформ до эвакуаторов и крано-манипуляторных установок.
SteadyMeds pharmacy: SteadyMeds – SteadyMeds
worldwide pharmacy online: FormuLine Pharmacy – reputable online pharmacy no prescription
Такие состояния требуют не только лечения, но и наблюдения, поскольку динамика может меняться в течение короткого времени. Стационар позволяет минимизировать риски и обеспечить безопасность пациента. При этом услуга может предоставляться анонимно, а цена лечения зависит от состояния пациента.
Ознакомиться с деталями – наркология вывод из запоя в нижнем новгороде
Выезд нарколога начинается с осмотра пациента. Доктора измеряют давление, пульс, оценивают уровень сознания и выраженность симптомов. На основании этих данных формируется план лечения, который реализуется сразу на месте. Такой подход позволяет быстро перейти к стабилизации состояния без лишних этапов.
Подробнее можно узнать тут – вывод из запоя на дому цена в санкт-петербурге
Капельница от похмелья направлена на восстановление водно-электролитного баланса, выведение токсинов, нормализацию работы печени и почек, а также улучшение общего состояния пациента. В клинике «Частный медик 24» мы подходим к каждому случаю индивидуально, учитывая состояние пациента, его анамнез и особенности организма. Важно, чтобы помощь была оказана вовремя, так как откладывание лечения может привести к осложнениям, таким как сердечные проблемы, психозы или нарушения сна. Выезд нарколога на дом в Самаре позволяет быстро начать лечение, не тратя времени на дорогу и дополнительные усилия.
Детальнее – капельница от похмелья самара
Капельница от похмелья может быть необходима в самых разных ситуациях, когда симптомы становятся слишком выраженными и мешают нормальному функционированию пациента. Если вы или ваши близкие сталкиваетесь с такими признаками, как сильная головная боль, рвота, слабость и головокружение, то немедленный вызов нарколога на дом станет необходимостью. Важно не откладывать помощь, так как интоксикация может усугубить состояние пациента и привести к осложнениям, таким как обезвоживание или нарушения работы сердца.
Детальнее – капельница от похмелья на дом в екатеринбурге
http://accessbridgepharmacy.com/# affordable pharmacy
Наркологический стационар в Санкт-Петербурге: лечение зависимости, детоксикация и круглосуточный медицинский контроль в наркологической клинике «Похмельная служба»
Подробнее тут – narkologicheskij-staczionar-sankt-peterburg-1.ru/
Для жителей Екатеринбурга наркологическая клиника «Частный медик 24» предлагает платную услугу выезда врача на дом для проведения капельницы от похмелья. Когда человек переживает сильные симптомы похмелья, такие как головная боль, тошнота, слабость, важно не тянуть с лечением и начать восстановление как можно скорее. Капельница от похмелья помогает хорошо облегчить самочувствие пациента, снять головную боль и улучшить общее состояние, восстановив водно-электролитный баланс в организме.
Ознакомиться с деталями – капельница от похмелья на дому в екатеринбурге
Реабилитация алкоголиков невозможна без участия высококвалифицированных специалистов. Это врачи-наркологи, психологи, психотерапевты и социальные работники, каждый из которых вносит свой вклад в восстановление пациента. Психологическая поддержка особенно важна на всех этапах лечения, поскольку помогает пациенту осознать проблему, справиться с внутренними конфликтами и выработать стратегии для предотвращения рецидивов. В некоторых случаях, например, при длительном запое или наркомании, может быть рекомендован выезд на дом для предоставления первой медицинской помощи и дальнейшей реабилитации.
Разобраться лучше – реабилитация алкоголиков город
http://accessbridgepharmacy.com/# AccessBridge Pharmacy
Помощь на дому рассматривают при состояниях, которые сопровождаются выраженным ухудшением самочувствия после алкоголя. Обычно речь идет о нескольких днях запоя, тяжелом похмелье, бессоннице, тревоге, дрожи в руках, слабости, тошноте, сухости во рту, отсутствии аппетита и признаках обезвоживания. В таких случаях врачебный осмотр нужен для оценки тяжести состояния и выбора безопасной тактики.
Ознакомиться с деталями – вызов нарколога на дом
Капельница от похмелья с мягким восстановлением — это метод, направленный на быстрое восстановление организма после алкогольной интоксикации, при котором используется более щадящий подход. В отличие от стандартных капельниц, целью которых является быстрый вывод токсинов из организма, капельница с мягким восстановлением действует постепенно, восстанавливая водно-солевой баланс и поддерживая внутренние органы без перегрузки организма. Эта процедура особенно полезна тем, кто предпочитает не только избавиться от похмелья, но и почувствовать себя восстановленным и энергичным, при этом помощь может оказываться при запое, когда врач выезжает на дом для лечения алкоголизма.
Подробнее – http://kapelnicza-ot-pokhmelya-samara-12.ru
mexican pharmacy online: mexican drug store – AccessBridge Pharmacy
worldwide pharmacy: AccessBridge Pharmacy – AccessBridge Pharmacy
AccessBridge: AccessBridge Pharmacy – AccessBridge
Выезд нарколога начинается с оценки состояния пациента. Доктора измеряют давление, пульс, оценивают уровень сознания и выраженность симптомов. На основании этих данных формируется план лечения, который реализуется сразу на месте. Такой подход позволяет очень быстро перейти к стабилизации состояния и начать основные этапы работы.
Получить дополнительные сведения – анонимный вывод из запоя на дому в санкт-петербурге
Необходимость обращения за наркологической помощью определяется по совокупности симптомов и их выраженности. При ухудшении состояния важно ориентироваться на объективные признаки, а не ждать самостоятельного улучшения.
Изучить вопрос глубже – оказание наркологической помощи нижний новгород
Процедура проводится опытными наркологами, которые подбирают необходимое лечение на основе индивидуальных особенностей пациента. В клинике «Частный медик 24» применяются только эффективные и безопасные препараты, которые помогают организму восстановиться и избавиться от токсинов. Важно помнить, что капельница от похмелья — это не просто временное облегчение, а важный шаг к долгосрочному восстановлению организма и профилактике алкоголизма.
Подробнее можно узнать тут – капельница от похмелья анонимно екатеринбург
В Санкт-Петербурге вывод из запоя на дому используется в ситуациях, когда состояние пациента требует медицинской помощи, но позволяет обойтись без лечения в стационаре. Врач проводит консультацию, оценивает длительность запоя, выраженность симптомов и общее состояние, анализируя данные пациента, после чего принимает решение о тактике лечения при алкоголизме. При необходимости можно оформить вызов специалиста или заказать услугу заранее.
Выяснить больше – вывод из запоя на дому анонимно санкт-петербург
Реабилитация алкоголиков с анонимной поддержкой — это важный процесс, который помогает людям справиться с зависимостью в условиях конфиденциальности и безопасности. Многие пациенты опасаются обращаться за помощью из-за стереотипов и страха осуждения. Анонимность в реабилитации становится важным фактором для обеспечения доверия и максимальной эффективности лечения, при этом в ряде случаев доступны такие услуги, как кодирование и консультации наркологической помощи бесплатно, особенно при обращении после запоя. В Москве существует множество центров, которые предлагают реабилитацию алкоголиков с анонимной поддержкой, что позволяет пациентам пройти лечение, не раскрывая своей личности и не беспокоясь о социальном осуждении.
Разобраться лучше – клиника реабилитации алкоголиков город
Реабилитация алкоголиков с анонимной поддержкой — это важный процесс, который помогает людям справиться с зависимостью в условиях конфиденциальности и безопасности. Многие пациенты опасаются обращаться за помощью из-за стереотипов и страха осуждения. Анонимность в реабилитации становится важным фактором для обеспечения доверия и максимальной эффективности лечения, при этом в ряде случаев доступны такие услуги, как кодирование и консультации наркологической помощи бесплатно, особенно при обращении после запоя. В Москве существует множество центров, которые предлагают реабилитацию алкоголиков с анонимной поддержкой, что позволяет пациентам пройти лечение, не раскрывая своей личности и не беспокоясь о социальном осуждении.
Подробнее можно узнать тут – https://reabilitacziya-alkogolikov-moskva-4.ru/
express scripts mail order pharmacy: FormuLine Pharmacy – trusted online pharmacy
Наркологический стационар с круглосуточным наблюдением предлагает комплексное лечение и восстановление для людей, страдающих от алкогольной или наркотической зависимости. Пациенты получают помощь в условиях стационара, что позволяет устранить риск срыва и обеспечить безопасное и комфортное выздоровление. В таких клиниках работают квалифицированные наркологи, психологи и другие специалисты, которые контролируют процесс реабилитации на всех этапах. В некоторых случаях может потребоваться вывод из запоя с применением капельниц, а также лечение в специализированном центре для более комплексного восстановления.
Исследовать вопрос подробнее – наркологическая помощь стационар в санкт-петербурге
Вывод из запоя на дому в Санкт-Петербурге с анонимным выездом врача, снятием интоксикации и поддержкой в наркологической клинике «Частный медик 24»
Получить дополнительные сведения – http://vyvod-iz-zapoya-na-domu-sankt-peterburg-12.ru
Нарколог на дом — это удобное и эффективное решение для тех, кто сталкивается с тяжелыми последствиями запоя или алкогольной интоксикации. В наркологической клинике «Частный медик 24» в Самаре мы предоставляем круглосуточную помощь, выезд нарколога и лечение на дому. Это позволяет пациентам получить профессиональную медицинскую помощь в удобной и знакомой обстановке, что особенно важно, когда состояние человека ухудшается после длительного употребления алкоголя или наркотиков.
Получить дополнительные сведения – нарколог на дом анонимно самара
https://formulinepharmacy.com/# п»їinternational drug mart
Врач-нарколог, оценивая состояние пациента, может рекомендовать проведение капельницы для ускоренного восстановления организма. Применение капельницы позволяет снять острые симптомы интоксикации и снизить риск развития более серьезных последствий. В некоторых случаях, если необходимо интенсивное наблюдение, пациенту может быть предложено лечение в стационаре, и услугу можно заказать на летний период для более длительного контроля.
Исследовать вопрос подробнее – капельница от запоя в нижнем новгороде
В таких ситуациях стационарный уход позволяет обеспечить безопасность пациента, эффективно справиться с его состоянием и подготовить его к дальнейшему лечению или реабилитации. В случае алкоголизма может быть назначена капельница для снятия острых симптомов интоксикации, а также лечение в специализированном центре для комплексного восстановления и профилактики рецидивов.
Изучить вопрос глубже – наркологическая помощь стационар в санкт-петербурге
SteadyMeds pharmacy SteadyMeds pharmacy SteadyMeds pharmacy
Нарколог на дом в Нижнем Новгороде с быстрым приездом специалиста, детоксикацией и медицинской поддержкой в наркологической клинике «Частный медик 24»
Углубиться в тему – нарколог на дом
Капельница от похмелья в Самаре с устранением симптомов интоксикации и контролем состояния в наркологической клинике «Частный медик 24»
Подробнее тут – капельница от похмелья цена
https://accessbridgepharmacy.shop/# AccessBridge Pharmacy
Реабилитация алкоголиков в Москве представляет собой многократный процесс восстановления, который включает несколько этапов, направленных на очищение организма, психологическое восстановление и возвращение пациента к полноценной жизни. Этапное восстановление помогает обеспечить стабильный результат и минимизировать риск рецидива, позволяя человеку постепенно вернуться к нормальной социальной и трудовой жизни.
Ознакомиться с деталями – реабилитация алкоголиков стоимость москва
Препараты, введённые через капельницу, начинают действовать почти сразу. Они поступают напрямую в кровоток, обходя желудочно-кишечный тракт, что позволяет ускорить процесс восстановления и устранить симптомы похмелья, такие как головная боль, тошнота и слабость, уже через 20–30 минут после начала процедуры.
Получить дополнительную информацию – капельница от похмелья вызов на дом в нижнем новгороде
Капельница помогает организму быстрее справиться с этими симптомами и восстановить нормальное функционирование, а также значительно снижает время, необходимое для полного выздоровления. Даже при значительном похмелье, как показывает практика, пациент уже через несколько часов чувствует значительное улучшение. Важно учитывать противопоказания к проведению процедуры, однако все услуги могут быть предоставлены анонимно. При необходимости подключается психиатр для более комплексной оценки состояния пациента.
Исследовать вопрос подробнее – https://kapelnicza-ot-pokhmelya-nizhnij-novgorod.ru
Такие симптомы требуют медицинского вмешательства, поскольку могут приводить к ухудшению состояния. Капельница помогает стабилизировать самочувствие и снизить нагрузку на организм. Услуги могут предоставляться анонимно, а при необходимости пациент направляется на лечение в стационаре.
Исследовать вопрос подробнее – http://www.domen.ru
Капельница от похмелья в Самаре: быстрое снятие интоксикации, восстановление после алкоголя и улучшение самочувствия под контролем специалистов в наркологической клинике «Похмельная служба»
Разобраться лучше – капельница от похмелья на дом самара
Нарколог на дом в Москве: круглосуточный выезд, детоксикация и лечение зависимостей в наркологической клинике «Клиника доктора Калюжной».
Детальнее – https://narkolog-na-dom-moskva-18.ru/
Домашний формат ценят не только за удобство. Он помогает начать лечение анонимно, без дороги, без ожидания и без лишнего стресса для пациента. Для многих семей именно выездной наркологическая маршрут становится первой точкой, с которой начинается более серьёзное восстановление: обсуждаются не только снятие острых симптомов, но и кодирование, реабилитация, повторная консультация, а при необходимости — и маршруты помощи при наркомании. Особенно это актуально, если человек употребляет давно, уже несколько лет сталкивается со срывами и сам замечает, что проблема перестала ограничиваться только плохим самочувствием после алкоголя.
Разобраться лучше – нарколог на дом цена
Капельница рекомендуется в тех случаях, когда симптомы похмелья становятся настолько выраженными, что человек не в состоянии справиться с ними самостоятельно, и необходима квалифицированная помощь, например, в стационаре. Это может быть сильная головная боль, многократная рвота, головокружение, слабость, а также другие признаки алкогольной интоксикации. Капельница быстро помогает снять эти симптомы, восстановив нормальное состояние организма.
Получить больше информации – капельница от похмелья цена самара
best rx pharmacy online FormuLine Pharmacy safe online pharmacies
legitimate canadian pharmacy online: SteadyMeds pharmacy – legitimate canadian pharmacies
Капельница от похмелья с контролем врача в Самаре представляет собой эффективную терапевтическую процедуру, позволяющую значительно улучшить самочувствие пациента за короткий срок. Врач, контролируя весь процесс, может точно определить, какие компоненты необходимы для каждого пациента. Состав капельницы зависит от симптомов похмелья, состояния пациента и его индивидуальных потребностей. Это позволяет обеспечить максимально безопасное и эффективное лечение, которое помогает организму быстро восстановиться.
Узнать больше – http://kapelnicza-ot-pokhmelya-samara-13.ru/
Каждый выезд нарколога включает в себя не только инфузионную терапию, но и полноценную оценку состояния пациента, анализ рисков, а также консультацию по дальнейшему лечению. Врач может назначить дополнительные препараты для снятия симптомов ломки, восстановления водно-электролитного баланса и улучшения общего состояния пациента. Также важно, что консультация включает рекомендации по реабилитации, психологической поддержке и кодированию, если это необходимо для пациента, страдающего хроническим алкоголизмом или наркоманией.
Ознакомиться с деталями – нарколог на дом
К основным показаниям относятся:
Углубиться в тему – http://www.domen.ru
canadian pharmacy meds reviews: SteadyMeds – safe reliable canadian pharmacy
Реабилитация алкоголиков в Москве: эффективные программы восстановления и медицинская помощь в наркологической клинике «Похмельная служба»
Исследовать вопрос подробнее – https://reabilitacziya-alkogolikov-moskva-2.ru/
Капельница от похмелья в Воронеже с выездом на дом, подбором препаратов и контролем состояния в наркологической клинике «Похмельная служба»
Подробнее можно узнать тут – капельница от похмелья вызов на дом воронеж
На первом этапе специалист проводит визуальный осмотр пациента, измеряет артериальное давление, пульс, уровень кислорода в крови и оценивает общее психоэмоциональное состояние. Важно выявить степень интоксикации, наличие осложнений и противопоказаний к проведению терапии на дому. В случае наркомании и длительного употребления наркотиков, пациенту может быть предложена консультация и лечение, включая реабилитацию на летний период, если состояние требует интенсивного контроля.
Разобраться лучше – запой нарколог на дом самара
В Нижнем Новгороде стационарный формат лечения применяется при наличии факторов, повышающих риск осложнений или снижающих эффективность домашней терапии. Врач принимает решение на основании осмотра, консультации и анализа данных, оценивая текущее состояние пациента и его реакцию на предыдущие попытки лечения. При необходимости можно заранее обратиться в центр лечения алкоголизма и наркомании или заказать услугу по телефону.
Подробнее – https://vyvod-iz-zapoya-v-staczionare-nizhnij-novgorod-2.ru/
SteadyMeds pharmacy: SteadyMeds pharmacy – SteadyMeds pharmacy
https://accessbridgepharmacy.com/# AccessBridge
Нарколог на дом в Москве: выезд врача на дом, лечение запоя и консультации в наркологической клинике «Клиника доктора Калюжной».
Изучить вопрос глубже – нарколог на дом цена в москве
Процесс лечения капельницей помогает улучшить состояние пациента уже через короткий период. Важно, что процедура не только снимает симптомы похмелья, но и восстанавливает нормальную работу печени, почек и других органов, пострадавших от токсического воздействия алкоголя. Это помогает предотвратить долгосрочные последствия интоксикации, такие как хроническая усталость, проблемы с органами и психоэмоциональные расстройства.
Узнать больше – капельница от похмелья цена
AccessBridge Pharmacy: AccessBridge – AccessBridge
https://steadymedspharmacy.shop/# SteadyMeds pharmacy
Наркологический стационар в Санкт-Петербурге предоставляет пациентам комплексное лечение зависимости от психоактивных веществ. Проблемы, связанные с алкоголизмом, наркоманией и другими формами зависимости, требуют индивидуального подхода и профессиональной помощи. Комплексное лечение в таких учреждениях позволяет не только пройти детоксикацию, но и получить полноценную реабилитацию, что дает пациентам шанс на долгосрочную ремиссию и улучшение качества жизни. В некоторых случаях, при запое или необходимости выезда на дом, может быть предложен центр, где решаются все вопросы, связанные с лечением зависимости и восстановлением пациента.
Изучить вопрос глубже – http://www.domen.ru
buy canadian drugs: SteadyMeds – SteadyMeds pharmacy
Помощь на дому рассматривают при состояниях, которые сопровождаются заметным ухудшением самочувствия после алкоголя. Обычно это несколько дней запоя, тяжелое похмелье, дрожь в руках, бессонница, выраженная слабость, раздражительность, тревога, тошнота, сухость во рту, отсутствие аппетита и признаки обезвоживания. В таких случаях осмотр врача нужен для оценки тяжести состояния и определения безопасной тактики.
Получить дополнительную информацию – нарколог на дом вывод в москве
Ни форма, ни машины с надписями, ни громкие атрибуты «скорой» — мы приезжаем тихо. Контакт в телефоне сохраняется с нейтральным названием, документы оформляются только по запросу и в сдержанной формулировке, доступ к данным внутри «ПрофДетокса» ограничен регламентами. Мы понимаем, что стыд и страх огласки часто тормозят обращение за помощью, поэтому приватность включена в стандарт и не влияет на стоимость.
Подробнее – http://narkolog-na-dom-ivanteevka8.ru/pomoshch-narkologa-na-domu-v-ivanteevke/
shop medicine online: best online pharmacy india – pharmacy online
Процесс реабилитации алкоголиков включает в себя несколько методов, направленных на восстановление как физического, так и психоэмоционального состояния пациента. В Москве доступны различные программы, от традиционной детоксикации до современных подходов, при этом в отдельных случаях предусматривается вывод данных о состоянии пациента и динамике лечения при алкогольной зависимости, включая когнитивно-поведенческую терапию и арт-терапию.
Получить дополнительную информацию – клиника реабилитации алкоголиков город
“Капельница с мягким восстановлением идеально подходит тем, кто ищет постепенный и безопасный способ вернуть себе нормальное состояние после пьянки. Такой подход не перегружает организм и помогает избежать нежелательных эффектов от слишком резкого восстановления.” — Алексей Смирнов, нарколог, клиника восстановления.
Получить дополнительную информацию – капельница от похмелья
Нарколог на дом в Москве — это формат помощи, который рассматривают в тех случаях, когда после употребления алкоголя больному требуется врачебный осмотр без поездки в клинику. Чаще всего обращение связано с запоем, выраженным похмельным синдромом, нарушением сна, слабостью, тремором, тревогой, обезвоживанием, сердцебиением, скачками давления и общим ухудшением самочувствия. Дальнейшая тактика зависит от состояния больного на момент осмотра, длительности употребления алкоголя, возраста и сопутствующих заболеваний.
Получить дополнительные сведения – нарколог на дом
http://steadymedspharmacy.com/# real canadian pharmacy
pharmacy online: indianpharmacy com – pharmacy no prescription required
В Санкт-Петербурге услуга вывода из запоя на дому применяется в ситуациях, когда требуется медицинская помощь, но нет показаний к стационарному лечению. Врач проводит консультацию, оценивает состояние пациента, длительность употребления и выраженность симптомов, после чего принимает решение о тактике лечения при алкоголизме. Важно, что терапия начинается сразу после осмотра, а при необходимости можно заранее заказать выезд специалистов.
Узнать больше – http://vyvod-iz-zapoya-na-domu-sankt-peterburg-9.ru/
https://formulinepharmacy.com/# worldwide pharmacy
Вывод из запоя на дому в Санкт-Петербурге с выездом специалиста, стабилизацией состояния и медицинской поддержкой в наркологической клинике «Частный медик 24»
Подробнее можно узнать тут – vyvod-iz-zapoya-na-domu-sankt-peterburg-11.ru/
Срочный домашний выезд особенно важен для семей, которые уже сталкивались с тяжёлыми последствиями алкоголизма и понимают, что обычные попытки «отпаивания» не решают проблему. Врач оценивает не только факт употребления, но и длительность запоя, возраст, наличие хронических болезней, уже принятые медикаменты, риск абстинентного синдрома, состояние сердца и общую нагрузку на организм. Такой формат позволяет анонимно вызвать специалиста, быстро провести необходимые вмешательства и определить, нужен ли только домашний вывод из острого состояния или дальше потребуется кодирование, повторная консультация, реабилитация либо более широкий маршрут помощи при наркомании.
Подробнее тут – нарколог на дом вывод
Чаще всего помощь требуется при следующих состояниях:
Выяснить больше – вывод из запоя на дому цена
SteadyMeds: legitimate canadian mail order pharmacy – SteadyMeds pharmacy
tijuana pharmacy online AccessBridge AccessBridge
SteadyMeds pharmacy: SteadyMeds – SteadyMeds
SteadyMeds: canadian pharmacies comparison – SteadyMeds
Наркологический стационар с круглосуточным наблюдением — это не просто место для детоксикации, но и пространство для комплексного лечения и реабилитации. Постоянное присутствие медицинского персонала помогает избежать опасных ситуаций, таких как психозы или физиологические сбои, характерные для абстиненции. Прием пациентов может включать кодирование, а также индивидуальные программы лечения, которые разрабатываются в зависимости от состояния пациента и его потребностей на протяжении года.
Изучить вопрос глубже – лечение в наркологическом стационаре санкт-петербург
Запой — это состояние, которое развивается на фоне длительного употребления алкоголя, сопровождающееся острыми симптомами интоксикации. Капельница от запоя может быть необходима, когда состояние пациента требует немедленного вмешательства. Важно своевременно заметить признаки, указывающие на необходимость медицинской помощи, таких как признаки алкоголизма, и в случае необходимости — кодирование или вывод из запоя для более комплексного лечения.
Узнать больше – капельница от запоя цена нижний новгород
Наркологическая помощь в Нижнем Новгороде с выездом врача, капельницами и наблюдением пациента в наркологической клинике «Частный медик 24»
Ознакомиться с деталями – наркологическая помощь на дому в нижнем новгороде
Анонимность позволяет пациентам сосоточиться на процессе лечения алкогольной зависимости, не переживая о последствиях для своей репутации или безопасности. Важно, чтобы каждый этап был подробно обсужден с пациентом, что помогает снизить уровень стресса и тревожности, связанные с лечением зависимых, включая терапию в стационаре.
Исследовать вопрос подробнее – клиника реабилитации алкоголиков город
AccessBridge Pharmacy AccessBridge AccessBridge
Запой и алкогольная интоксикация могут приводить к целому ряду опасных симптомов, таких как головная боль, слабость, тошнота, рвота, обезвоживание и психоэмоциональная нестабильность. Если не начать лечение вовремя, такие состояния могут привести к более серьезным осложнениям, включая сердечные проблемы, галлюцинации и даже опасные для жизни нарушения работы организма. С помощью нарколога на дому можно начать экстренную терапию прямо в момент ухудшения состояния, не затягивая с лечением и не тратя время на поездки в клинику.
Изучить вопрос глубже – вызов нарколога на дом самара
Выезд нарколога на дом в Самаре — это комплексный подход к лечению, который включает несколько этапов. Врач, приехавший на место, не ограничивается одной процедурой, а проводит полноценный осмотр, диагностирует состояние пациента, определяет причину ухудшения самочувствия и подбирает индивидуальную терапию. Наиболее часто при выезде нарколога на дом используются капельницы, антиеметики и препараты для стабилизации состояния пациента, снятия симптомов абстиненции и улучшения общего самочувствия.
Исследовать вопрос подробнее – вызвать нарколога на дом самара
https://formulinepharmacy.com/# reputable online pharmacy no prescription
Таблетки и народные методы требуют времени для усвоения и часто дают ограниченный результат. Капельница же позволяет обойти желудочно-кишечный тракт и сразу доставить необходимые вещества в кровь, что особенно важно при выраженном похмельном синдроме.
Ознакомиться с деталями – капельница от похмелья цена в самаре
Реабилитация алкоголиков с поддержкой специалистов — это системный подход к лечению алкогольной зависимости, который включает в себя различные медицинские, психологические и социальные методы. В Москве существует множество наркологических центров, предлагающих такие программы, где пациентам предоставляется комплексное лечение под наблюдением квалифицированных специалистов. Процесс реабилитации направлен не только на избавление от алкогольной зависимости, но и на восстановление социальной адаптации пациента, улучшение его психоэмоционального состояния и предотвращение рецидивов. В клиниках также могут предложить кодирование от алкоголизма, что помогает значительно снизить риск возвращения к прежним привычкам и обеспечить долгосрочную трезвость пациента.
Выяснить больше – реабилитация алкоголиков стоимость москва
Методика подбирается не только исходя из медицинских показаний, но и личных ожиданий пациента, его опыта и жизненной ситуации. Такой подход позволяет сделать процесс максимально комфортным и результативным.
Исследовать вопрос подробнее – kodirovanie-ot-alkogolizma-na-domu-v-ehlektrostali
Обращение в наркологический стационар в Санкт-Петербурге может стать важным шагом для людей, страдающих от алкогольной или наркотической зависимости. Стационарное лечение предоставляет пациентам не только медицинскую помощь, но и психологическую поддержку, необходимую для успешной реабилитации. Это подход, ориентированный на комплексное восстановление здоровья, физическое и психоэмоциональное состояние пациента.
Подробнее – https://narkologicheskij-staczionar-sankt-peterburg-2.ru/
Капельница от похмелья — это медицинская процедура, направленная на быстрое устранение симптомов алкогольной интоксикации и восстановление нормальной работы организма. При выраженном похмельном синдроме самостоятельные методы часто оказываются недостаточными, поскольку не воздействуют на причины состояния. В наркологической клинике «Похмельная служба» используется инфузионная терапия с круглосуточным выездом специалиста, что позволяет начать лечение сразу после обращения.
Подробнее тут – kapelnicza-ot-pokhmelya-voronezh-7.ru/
https://steadymedspharmacy.com/# northwest canadian pharmacy
Реабилитация алкоголиков в Москве: лечение зависимости, восстановление и поддержка под контролем специалистов в наркологической клинике «Похмельная служба»
Изучить вопрос глубже – http://www.domen.ru
Реабилитация алкоголиков проходит через несколько обязательных этапов. Каждый этап фокусируется на определенных аспектах восстановления и помогает человеку не только избавиться от физической зависимости, но и научиться жить без алкоголя в долгосрочной перспективе, включая кодирование, особенно после длительных лет запоя, а также восстановление в условиях специализированного дома. Этапное восстановление помогает избежать перегрузки пациента, обеспечивая плавный переход от одной стадии лечения к другой.
Ознакомиться с деталями – http://www.domen.ru
Запой сопровождается выраженной интоксикацией, нарушением сна, нестабильностью давления и изменениями в работе нервной системы. При длительном течении состояние может ухудшаться, и самостоятельный выход становится затруднённым. В таких случаях стационар рассматривается как пространство, где можно безопасно стабилизировать показатели и обеспечить постепенное восстановление.
Разобраться лучше – вывод из запоя дешево нижний новгород
Процесс капельницы включает внутривенное введение различных растворов, которые помогают нейтрализовать эффекты алкогольной интоксикации, включая последствия запоя и алкоголизма. Наиболее часто в составе капельницы используются солевые и глюкозные растворы, витамины группы B, а также препараты для детоксикации организма. Эти компоненты помогают быстро восстановить водно-электролитный баланс, улучшить обмен веществ и ускорить выведение продуктов распада алкоголя.
Подробнее можно узнать тут – капельница от похмелья анонимно самара
Основной этап включает постановку капельницы с растворами, направленными на выведение токсинов, восстановление водно-солевого баланса и нормализацию работы внутренних органов. В состав могут входить витамины, седативные препараты, гепатопротекторы и кардиопротекторные средства. В случае ломки и снятия симптомов зависимости у больного, все препараты подбираются индивидуально, чтобы минимизировать дискомфорт и ускорить восстановление.
Получить больше информации – вызов нарколога на дом
Капельница от похмелья в Нижнем Новгороде: быстрое восстановление, снятие интоксикации и улучшение состояния под контролем специалистов в наркологической клинике «Похмельная служба»
Исследовать вопрос подробнее – https://kapelnicza-ot-pokhmelya-nizhnij-novgorod.ru
mexican pharmacies that ship to us and pharmacies in mexico buying prescriptions in mexico
http://id.nan-net.jp/system/login/link.cgi?jump=http://accessbridgepharmacy.com/ mexican pharmacy ship to usa or https://alphafocusir.com/user/brbgusdgwi/?um_action=edit mexicanrxpharm
mexico prescriptions mexican online mail order pharmacy or phentermine in mexico pharmacy can i order online from a mexican pharmacy
Процесс введения капельницы с медицинским контролем начинается с того, что медицинский специалист оценивает общее состояние пациента: измеряет артериальное давление, пульс, температуру тела, а также учитывает историю заболеваний. Это позволяет выбрать оптимальный состав растворов и препаратов для максимально быстрого и безопасного восстановления.
Детальнее – http://kapelnicza-ot-pokhmelya-nizhnij-novgorod-1.ru
Перед выбором метода врач проводит диагностику, оценивает физическое и психоэмоциональное состояние пациента, рассказывает о возможных рисках и особенностях процедуры. Только после согласования всех деталей назначается дата и форма кодирования.
Получить больше информации – kodirovanie-ot-alkogolizma
online pharmacy: cheapest online pharmacy india – reputable overseas online pharmacies
Комплексный подход, включающий эти методы, значительно повышает шансы на успешное и долговременное восстановление. Современные реабилитационные центры в Москве предлагают целый ряд программ, которые способствуют полному возвращению пациента к здоровой и активной жизни.
Исследовать вопрос подробнее – reabilitacziya-alkogolikov-moskva-3.ru/
order meds from mexico: AccessBridge – AccessBridge Pharmacy
best india pharmacy or india pharmacy indian pharmacy paypal
https://maps.google.com.au/url?sa=t&url=https://formulinepharmacy.com best india pharmacy or http://orbita-3.ru/forum/index.php?PAGE_NAME=profile_view&UID=105684 top 10 pharmacies in india
reputable indian online pharmacy cheapest online pharmacy india or best online pharmacy india cheapest online pharmacy india
Похмельный синдром сопровождается головной болью, слабостью, тошнотой, сухостью во рту и нарушением сна, что часто возникает после запоя или при алкоголизме. Эти симптомы появляются из-за накопления токсинов и нарушения водно-солевого баланса. Капельница помогает ускорить выведение вредных веществ и восстановить нормальные функции организма, снижая нагрузку на внутренние системы и помогая человеку быстрее выйти из состояния запоев.
Подробнее – капельница от похмелья вызов на дом в воронеже
Процесс реабилитации алкоголиков включает в себя несколько методов, направленных на восстановление как физического, так и психоэмоционального состояния пациента. В Москве доступны различные программы, от традиционной детоксикации до современных подходов, при этом в отдельных случаях предусматривается вывод данных о состоянии пациента и динамике лечения при алкогольной зависимости, включая когнитивно-поведенческую терапию и арт-терапию.
Подробнее – реабилитация алкоголиков стоимость москва
Нарколог на дом в Воронеже с круглосуточным вызовом врача, стабилизацией состояния и лечением в наркологической клинике «Частный медик 24»
Узнать больше – запой нарколог на дом в воронеже
Отдельно оценивают ситуации, когда подобные эпизоды повторяются. Если человек уже не впервые переносит запой, тяжелый выход из него или выраженное ухудшение самочувствия после алкоголя, вопрос обычно выходит за рамки разовой помощи. Тогда уже при первичном обращении рассматривают не только текущую стабилизацию состояния, но и дальнейшие шаги. При затяжном течении проблемы могут обсуждаться лечение зависимости, программа восстановления и условия, при которых потребуется наблюдение в стационаре.
Изучить вопрос глубже – нарколог на дом анонимно
п»їinternational drug mart: FormuLine Pharmacy – pharmacy order online
Процесс лечения начинается с консультации врача, который оценивает состояние пациента, его анамнез и определяет, какие процедуры и препараты нужно использовать. В большинстве случаев капельница включает в себя регидратацию, витамины группы B, антиеметики, препараты для улучшения работы печени и почек. Важно, что капельница не только помогает организму вывести токсины, но и восстанавливает нормальную работу всех систем организма, обеспечивая быстрое улучшение самочувствия.
Ознакомиться с деталями – капельница от похмелья анонимно в самаре
Процесс реабилитации алкоголиков включает в себя несколько методов, направленных на восстановление как физического, так и психоэмоционального состояния пациента. В Москве доступны различные программы, от традиционной детоксикации до современных подходов, при этом в отдельных случаях предусматривается вывод данных о состоянии пациента и динамике лечения при алкогольной зависимости, включая когнитивно-поведенческую терапию и арт-терапию.
Подробнее тут – клиника реабилитации алкоголиков
Процедура капельницы от похмелья с контролем врача в Самаре начинается с первичной консультации, на которой врач осматривает пациента, измеряет его основные показатели (давление, пульс, температуру) и оценивает общее состояние. На основе этих данных выбирается оптимальный состав капельницы, которая может включать в себя различные компоненты, такие как солевые растворы, витамины, антиоксиданты и медикаменты для снятия симптомов похмелья.
Выяснить больше – капельница от похмелья цена в самаре
К основным показаниям относятся:
Получить дополнительные сведения – вывод из запоя на дому
Наркологический стационар с комфортными условиями в Санкт-Петербурге — это специализированное учреждение, которое не только помогает пациентам избавиться от зависимости, но и создает благоприятные условия для выздоровления. В таких стационарах важны не только высококачественные медицинские услуги, но и уютная атмосфера, которая способствует восстановлению физического и психоэмоционального состояния пациента.
Узнать больше – наркологическая помощь стационар
https://steadymedspharmacy.com/# SteadyMeds
cheapest online pharmacy india and indianpharmacy com india online pharmacy
https://www.google.com.bh/url?q=https://formulinepharmacy.com mail order pharmacy india or http://sotoycasal.com/user/fthboffncr/ buy medicines online in india
buy medicines online in india pharmacy website india and cheapest online pharmacy india indian pharmacy paypal
Реабилитация алкоголиков проходит через несколько обязательных этапов. Каждый этап фокусируется на определенных аспектах восстановления и помогает человеку не только избавиться от физической зависимости, но и научиться жить без алкоголя в долгосрочной перспективе, включая кодирование, особенно после длительных лет запоя, а также восстановление в условиях специализированного дома. Этапное восстановление помогает избежать перегрузки пациента, обеспечивая плавный переход от одной стадии лечения к другой.
Разобраться лучше – реабилитация алкоголиков
farmacias mexicanas: AccessBridge – mexican medicine store
http://steadymedspharmacy.com/# SteadyMeds pharmacy
https://accessbridgepharmacy.shop/# legitimate mexican pharmacy online
best india pharmacy or mail order pharmacy india top 10 pharmacies in india
http://support.4ats.ru/redir_exit.php?url=formulinepharmacy.shop cheapest online pharmacy india and https://gikar.it/user/bhiywvfrgx/ india pharmacy
india pharmacy mail order top 10 online pharmacy in india or indianpharmacy com mail order pharmacy india
https://formulinepharmacy.com/# shop medicine online
Алкогольная интоксикация оказывает серьёзное влияние на организм, вызывая головную боль, тошноту, слабость и головокружение. Капельница помогает организму быстро избавиться от продуктов распада алкоголя, восстановить нормальное функционирование органов и минимизировать последствия для здоровья. Важно, что мы обеспечиваем полное наблюдение врача на протяжении всей процедуры, что помогает гарантировать безопасность пациента и максимальную эффективность лечения.
Получить дополнительную информацию – капельница от похмелья анонимно в екатеринбурге
SteadyMeds: SteadyMeds – canadian discount pharmacy
Перед постановкой капельницы специалист оценивает общее состояние пациента, измеряет давление, пульс, уточняет анамнез и возможные противопоказания. На основании этих данных формируется индивидуальный состав, который обеспечивает не только устранение симптомов похмелья, но и безопасное восстановление организма.
Выяснить больше – https://kapelnicza-ot-pokhmelya-samara-7.ru/
Дополнительным поводом для обращения становится состояние, при котором больному тяжело вставать, пить воду, есть, спокойно лежать или переносить обычную бытовую нагрузку. В таких ситуациях домашний осмотр помогает быстрее определить, какого объема помощи достаточно на текущем этапе. Если обращение связано не только с алкоголем, но и с подозрением на употребление наркотиков, оценка проводится особенно осторожно, поскольку при наркомании клиническая картина может быть иной.
Исследовать вопрос подробнее – вызвать нарколога на дом москва
Для жителей Воронежа выезд нарколога на дом — это быстрый и удобный способ получить экстренную помощь. Когда человек переживает запой, а его физическое и эмоциональное состояние быстро ухудшается, наркологическая помощь на дому становится оптимальным решением. Врач приезжает и немедленно оценивает состояние пациента: проверяет его пульс, давление, частоту дыхания, уровень сознания и другие важные показатели. Это помогает составить точный план лечения, который будет направлен на восстановление организма, снятие токсинов и стабилизацию состояния пациента.
Ознакомиться с деталями – вызвать нарколога на дом воронеж
SteadyMeds: canadian online drugs – canadian pharmacy prices
Каждый из этих этапов играет важную роль в процессе восстановления. Лечение проводится под контролем опытных врачей и психологов, которые оценивают состояние пациента и адаптируют программу лечения в зависимости от его потребностей. Комплексный подход позволяет добиться наилучших результатов и помогает пациенту вернуться к нормальной жизни, свободной от зависимости.
Получить больше информации – http://reabilitacziya-alkogolikov-moskva-2.ru
Домашняя помощь — это клиника, перенесённая в тихую комнату. Знакомая обстановка снижает тревогу, исчезают пробки и ожидание, нет «социального шума». Врач «ПрофДетокса» приезжает без эмблем, действует спокойно и последовательно, объясняет каждое назначение простым языком. Мы не используем мифические смеси. Состав и темп капельницы подбираются под текущие показатели — давление, пульс, сатурация, выраженность тремора и тошноты, уровень тревоги, данные о лекарствах, которые человек успел принять за двое суток. Такой подход даёт не минутное облегчение, а устойчивую динамику на сутки и неделю.
Выяснить больше – http://narkolog-na-dom-ivanteevka8.ru/
В Санкт-Петербурге услуга срочного вывода из запоя на дому востребована в ситуациях, когда состояние пациента ухудшается и требуется немедленная помощь. Врач проводит консультацию, оценивает общее состояние, длительность запоя и выраженность симптомов, после чего определяет тактику лечения при алкоголизме. При необходимости помощь оказывается в кратчайшие сроки, без ожидания госпитализации в стационаре. Услугу можно заказать заранее или срочно через сайт клиники.
Выяснить больше – вывод из запоя на дому санкт-петербург
AccessBridge Pharmacy: AccessBridge – legitimate mexican pharmacy online
https://accessbridgepharmacy.shop/# AccessBridge
AccessBridge online mexican pharmacy AccessBridge
Реабилитация включает несколько ключевых этапов, каждый из которых направлен на решение определённых проблем пациента. Важно, чтобы все этапы были комплексными и последовательными, чтобы достичь наиболее эффективного результата.
Получить дополнительные сведения – реабилитация алкоголиков город
Процесс восстановления с помощью капельницы с мягким восстановлением происходит в несколько этапов. Вначале происходит нормализация водно-солевого баланса, что помогает предотвратить обезвоживание и улучшить состояние кожи. Затем происходит восстановление энергетических запасов организма, что помогает уменьшить усталость и слабость, что также важно при лечении наркомании. Витамины и антиоксиданты восстанавливают функции клеток и органов, что способствует более быстрому очищению организма от продуктов распада алкоголя, при этом пациентам может быть доступна анонимное консультация и дальнейшая реабилитация.
Получить дополнительные сведения – капельница от похмелья на дому самара
http://accessbridgepharmacy.com/# mexico medicine
Услуги нарколога на дому в Самаре включают не только экстренный осмотр, но и комплекс медицинских мероприятий, направленных на снижение интоксикации, облегчение тяжелых симптомов и общее восстановление состояния пациента. Объем помощи зависит от клинической картины, длительности употребления алкоголя или других психоактивных веществ, возраста, хронических заболеваний и текущих рисков. Врач подбирает схему индивидуально, исходя из того, какие задачи необходимо решить в конкретный момент — снять острые проявления, стабилизировать самочувствие или подготовить пациента к дальнейшему лечению зависимости.
Подробнее можно узнать тут – https://narkolog-na-dom-samara-5.ru/
AccessBridge Pharmacy: AccessBridge – mexican rx pharm
Реабилитация алкоголиков в Москве представляет собой многократный процесс восстановления, который включает несколько этапов, направленных на очищение организма, психологическое восстановление и возвращение пациента к полноценной жизни. Этапное восстановление помогает обеспечить стабильный результат и минимизировать риск рецидива, позволяя человеку постепенно вернуться к нормальной социальной и трудовой жизни.
Выяснить больше – reabilitacziya-alkogolikov-moskva-3.ru/
Наркологическая помощь на дому помогает избежать стресса, связанного с поездкой в клинику. Особенно это важно в случаях, когда пациент находится в состоянии тяжёлой интоксикации или переживает абстинентный синдром, который можно только усугубить дополнительной нагрузкой. Врач приедет в кратчайшие сроки, обеспечивая необходимое лечение в первые часы после ухудшения состояния. Также важно, что при выезде специалист гарантирует полную анонимность, что особенно важно для многих людей, которые боятся открыто признаться в своей проблеме. Профессиональная наркологическая помощь на дому позволяет избежать срыва и начать процесс восстановления без стресса.
Подробнее – нарколог на дом цена в воронеже
mail order pharmacies AccessBridge Pharmacy AccessBridge Pharmacy
Процесс реабилитации алкоголиков включает в себя несколько методов, направленных на восстановление как физического, так и психоэмоционального состояния пациента. В Москве доступны различные программы, от традиционной детоксикации до современных подходов, при этом в отдельных случаях предусматривается вывод данных о состоянии пациента и динамике лечения при алкогольной зависимости, включая когнитивно-поведенческую терапию и арт-терапию.
Изучить вопрос глубже – http://reabilitacziya-alkogolikov-moskva-3.ru/
cheap canadian pharmacy and safe canadian pharmacies canadianpharmacymeds com
https://images.google.sh/url?q=https://steadymedspharmacy.shop canadian pharmacy phone number or http://www.1gmoli.com/home.php?mod=space&uid=549208 legitimate canadian pharmacy online
canadian pharmacy phone number the canadian drugstore and thecanadianpharmacy canada ed drugs
Запой сопровождается выраженной интоксикацией, нарушением сна, слабостью и нестабильностью работы сердечно-сосудистой системы, что характерно для алкоголизма и других форм зависимости, включая наркомании. Самостоятельный выход из этого состояния может быть затруднён и сопровождаться усилением симптомов. Медицинская помощь на дому позволяет снизить риски и начать восстановление под контролем специалиста, помогая человеку быстрее стабилизировать состояние.
Подробнее – http://vyvod-iz-zapoya-na-domu-sankt-peterburg-12.ru
indian pharmacy paypal and mail order pharmacy india buy medicines online in india
http://www.slotgemeinde.de/go.php?url=http://formulinepharmacy.shop buy medicines online in india or http://bbs.ebnew.com/home.php?mod=space&uid=776322 indian pharmacy
buy medicines online in india indian pharmacy online or top 10 online pharmacy in india indianpharmacy com
https://formulinepharmacy.com/# legitimate online pharmacy
best mail order pharmacy: FormuLine Pharmacy – safe online pharmacies
Перед началом терапии врач проводит осмотр пациента. Измеряются основные показатели, включая давление и пульс, оценивается выраженность симптомов. На основании этих данных формируется состав капельницы и определяется тактика лечения, что позволяет эффективно провести вывод из запоя.
Узнать больше – капельница от похмелья анонимно
foreign online pharmacy: FormuLine Pharmacy – top online pharmacy
https://accessbridgepharmacy.shop/# AccessBridge
Online medicine order or reputable indian online pharmacy top 10 online pharmacy in india
https://www.google.com.tj/url?q=https://formulinepharmacy.com mail order pharmacy india and https://www.emlynmodels.co.uk/user/isvnhgsfvk/ mail order pharmacy india
online shopping pharmacy india mail order pharmacy india or cheapest online pharmacy india online shopping pharmacy india
Реабилитация алкоголиков в Москве: лечение зависимости, восстановление и поддержка под контролем специалистов в наркологической клинике «Похмельная служба»
Узнать больше – клиника реабилитации алкоголиков
Показания к проведению инфузионной терапии включают:
Узнать больше – капельница от похмелья вызов на дом воронеж
Поводом для обращения обычно становятся слабость, тремор, тревога, бессонница, учащенный пульс, нестабильное давление, тошнота и ощущение физического истощения. Эти проявления часто усиливаются после прекращения употребления алкоголя или на фоне затянувшегося запоя.
Подробнее – нарколог на дом вывод москва
https://accessbridgepharmacy.shop/# tijuana pharmacy online
buy prescription drugs from india or Online medicine home delivery indian pharmacies safe
https://cse.google.ms/url?sa=t&url=https://formulinepharmacy.com top online pharmacy india or https://www.trendyxxx.com/user/zwdencgrga/videos indian pharmacy online
pharmacy website india indian pharmacy and cheapest online pharmacy india indian pharmacy online
Выбор наркологического стационара с круглосуточным наблюдением в Санкт-Петербурге — это важный шаг на пути к выздоровлению. При таком выборе следует обратить внимание на несколько ключевых аспектов, которые помогут определить подходящее место для лечения и реабилитации. Правильный стационар поможет не только справиться с зависимостью, но и минимизировать риск рецидивов в будущем. Круглосуточно предоставляется прием пациентов, а также возможность кодирования, что значительно повышает эффективность лечения и ускоряет процесс восстановления.
Подробнее можно узнать тут – http://narkologicheskij-staczionar-sankt-peterburg.ru
https://formulinepharmacy.shop/# express scripts mail order pharmacy
mexican online pharmacy or pharmacy in mexico that ships to us mexi pharmacy
http://hamas.opoint.com/?url=http://accessbridgepharmacy.com los algodones pharmacy online or https://rightcoachforme.com/author/iedyqsirql/ purple pharmacy mexico
online pharmacy order medicine from mexico and pharmacy in mexico mexican pharmacy prices
После введения растворов активные вещества быстро распределяются по организму. Это способствует выведению продуктов распада алкоголя, улучшению работы нервной системы и восстановлению энергетического баланса. Уже в процессе инфузии уменьшаются головная боль, тошнота и слабость.
Подробнее тут – капельница от похмелья на дом
Первичный осмотр включает оценку витальных показателей, уровня сознания, выраженности симптомов и факторов риска. После этого врач определяет объём вмешательства и приступает к терапии. В большинстве случаев применяется инфузионное лечение, направленное на восстановление водного баланса и выведение токсинов.
Изучить вопрос глубже – наркологическая помощь на дому нижний новгород
Если симптомы похмелья становятся настолько выраженными, что мешают нормальному функционированию, капельница становится необходимостью. Это особенно важно, если организм не справляется с токсинами самостоятельно.
Получить дополнительные сведения – капельница от похмелья
Домашний формат помощи рассматривают тогда, когда человеку тяжело добраться до медицинского учреждения, состояние ухудшается после нескольких дней употребления спиртного или родственникам требуется очная оценка без промедления. После осмотра становится ясно, допустима ли помощь на дому, требуется ли капельница, можно ли ограничиться наблюдением в домашних условиях или нужен другой маршрут помощи. Вопрос о том, как вызвать специалиста, нередко возникает в ситуациях, когда состояние нарастает быстро и требуется решение без откладывания. Если подобные эпизоды повторяются, дальнейшее обсуждение может касаться не только текущего состояния, но и лечения алкоголизма, работы с зависимостью и более длительной программы восстановления.
Исследовать вопрос подробнее – вызвать нарколога на дом в москве
SteadyMeds: SteadyMeds pharmacy – canadian neighbor pharmacy
Основной задачей капельницы от запоя является быстрое устранение симптомов интоксикации, связанных с длительным употреблением алкоголя. Введение в вену специальных растворов помогает не только вывести алкогольные токсины, но и восстановить нормальное функционирование внутренних органов, пострадавших от воздействия алкоголя. Подбор состава капельницы всегда индивидуален и зависит от состояния пациента, а также может включать дополнительные методы лечения, такие как кодирование от алкоголизма.
Разобраться лучше – капельница от запоя на дому
В Воронеже круглосуточная помощь при похмелье востребована в ситуациях, когда симптомы появляются внезапно или усиливаются в ночное время, особенно в запое или после запоя. Врач проводит консультацию, оценивает состояние пациента и принимает решение о проведении инфузионной терапии. Такой подход позволяет своевременно устранить симптомы и предотвратить их дальнейшее развитие. При необходимости можно оставить заявку, уточнить цены или получить помощь бесплатно на первичном этапе.
Подробнее тут – капельница от похмелья цена воронеж
Как поясняет нарколог Дмитрий Кузнецов: “Реабилитация алкоголиков должна быть многогранной. Только при сочетании медицинских и психологических методов, а также поддержке со стороны специалистов на всех этапах лечения, можно добиться устойчивого результата. Психологическая работа с пациентом помогает ему не только преодолеть зависимость, но и восстановить нормальное функционирование в обществе.” Также стоит отметить, что в некоторых случаях помощь может быть предоставлена бесплатно, и пациент может получить доступ к данным о возможных вариантах бесплатной реабилитации, что значительно облегчает процесс выздоровления.
Получить дополнительную информацию – клиника реабилитации алкоголиков город
В «Новом Пути» используются только научно обоснованные и одобренные Минздравом РФ технологии кодирования. К основным направлениям относятся:
Получить дополнительные сведения – klinika-kodirovaniya-ot-alkogolizma
canada online pharmacy and п»їcanadian pharmacy uk delivery pharmacy canadian superstore
https://toolbarqueries.google.com.bz/url?sa=t&url=https://steadymedspharmacy.shop reliable canadian pharmacy reviews and https://www.0468wudi.com/home.php?mod=space&uid=190218 canadian pharmacy ratings
reliable canadian pharmacy pharmacy rx world canada or legit canadian pharmacy online maple leaf pharmacy in canada
legitimate canadian mail order pharmacy: buying drugs from canada – SteadyMeds
Реабилитация алкоголиков в Москве представляет собой многократный процесс восстановления, который включает несколько этапов, направленных на очищение организма, психологическое восстановление и возвращение пациента к полноценной жизни. Этапное восстановление помогает обеспечить стабильный результат и минимизировать риск рецидива, позволяя человеку постепенно вернуться к нормальной социальной и трудовой жизни.
Выяснить больше – алкоголик реабилитация наркоманов в москве
Наркологический стационар — это специализированное медицинское учреждение, предназначенное для лечения и реабилитации пациентов с зависимостью от алкоголя, наркотиков и других психоактивных веществ. В Санкт-Петербурге существует множество таких учреждений, которые предоставляют комплексную помощь людям, страдающим от зависимости. Лечение в стационаре часто является первым шагом на пути к выздоровлению, особенно в случаях тяжелых зависимостей, когда амбулаторное лечение может не дать должного эффекта. В случае запоя или хронического алкоголизма стационарное лечение может стать необходимым, особенно если выезд на дом не позволяет должным образом контролировать процесс восстановления.
Подробнее – наркологический стационар санкт-петербург
Нарколог на дом в Москве: срочная медицинская помощь, капельницы и восстановление состояния в наркологической клинике «Клиника доктора Калюжной».
Выяснить больше – https://narkolog-na-dom-moskva-20.ru
Алкогольная зависимость — это не просто вредная привычка, а серьёзное заболевание, которое разрушает здоровье, психологическое состояние, семейные и рабочие отношения. Когда силы для самостоятельной борьбы на исходе, а традиционные методы не дают результата, современное кодирование становится эффективным решением для возвращения к трезвой жизни. В наркологической клинике «Новый Путь» в Электростали применяется весь спектр современных методик кодирования — с гарантией анонимности, профессиональным подходом и поддержкой опытных специалистов на каждом этапе.
Ознакомиться с деталями – http://kodirovanie-ot-alkogolizma-ehlektrostal6.ru/anonimnoe-kodirovanie-ot-alkogolizma-v-ehlektrostali/
AccessBridge: AccessBridge – mexican pharmacies
Наиболее частыми причинами обращения становятся запой, тяжелый похмельный синдром, тремор, выраженная слабость, тревога, бессонница, нестабильное давление, учащенный пульс, тошнота и признаки обезвоживания. Эти проявления могут сочетаться между собой и усиливаться после прекращения употребления алкоголя, особенно если эпизод длился несколько дней.
Ознакомиться с деталями – запой нарколог на дом в москве
Таким образом, стационарный режим предоставляет не только медицинскую помощь, но и обеспечивает необходимую психологическую и эмоциональную поддержку для успешного восстановления пациента.
Углубиться в тему – лечение в наркологическом стационаре санкт-петербург
Каждый выезд нарколога включает в себя не только инфузионную терапию, но и полноценную оценку состояния пациента, анализ рисков, а также консультацию по дальнейшему лечению. Врач может назначить дополнительные препараты для снятия симптомов ломки, восстановления водно-электролитного баланса и улучшения общего состояния пациента. Также важно, что консультация включает рекомендации по реабилитации, психологической поддержке и кодированию, если это необходимо для пациента, страдающего хроническим алкоголизмом или наркоманией.
Изучить вопрос глубже – narkolog-na-dom-voronezh-4.ru/
Анонимность позволяет пациентам сосоточиться на процессе лечения алкогольной зависимости, не переживая о последствиях для своей репутации или безопасности. Важно, чтобы каждый этап был подробно обсужден с пациентом, что помогает снизить уровень стресса и тревожности, связанные с лечением зависимых, включая терапию в стационаре.
Исследовать вопрос подробнее – алкоголик реабилитация наркоманов город
п»їinternational drug mart: FormuLine Pharmacy – top online pharmacy
Калибровочные гири для весов нужного класса точности и номинальной массы для калибровки весов.
В нашей компании можно купить калибровочные гири классов точности E1, E2, F1, F2, M1, M2.
Чем выше класс точности, тем меньше будет разница между номинальным и действительным значениями массы калибровочной гири.
https://steadymedspharmacy.com/# online pharmacy canada
Капельница от похмелья с медицинским контролем в Нижнем Новгороде — это эффективный способ восстановления после алкогольной интоксикации, который позволяет быстро и безопасно нормализовать состояние пациента. Основное отличие такой капельницы от домашних методов состоит в том, что вся процедура проходит под контролем профессионалов, что минимизирует риски для здоровья и повышает эффективность лечения.
Узнать больше – капельница от похмелья анонимно нижний новгород
https://formulinepharmacy.com/# online pharmacy no rx
Комплексный подход, включающий эти методы, значительно повышает шансы на успешное и долговременное восстановление. Современные реабилитационные центры в Москве предлагают целый ряд программ, которые способствуют полному возвращению пациента к здоровой и активной жизни.
Получить больше информации – алкоголик реабилитация наркоманов в москве
https://formulinepharmacy.com/# no script pharmacy
Отдельно оценивают ситуации, когда эпизоды повторяются и становятся частью более устойчивой проблемы. Если после алкоголя регулярно развивается тяжелое состояние, нарушается привычный режим жизни, усиливаются последствия алкоголизма и возникают сложности с контролем употребления, домашний выезд может быть только первым этапом более длинного маршрута помощи. При этом наркологическая помощь может включать не только снятие острых проявлений, но и дальнейшую программу лечения зависимости, если речь идет о длительном течении заболевания.
Углубиться в тему – вызов нарколога на дом в москве
http://formulinepharmacy.com/# secure medical online pharmacy
Online medicine home delivery or п»їlegitimate online pharmacies india cheapest online pharmacy india
http://www.voidstar.com/opml/?url=http://formulinepharmacy.shop/ mail order pharmacy india and http://jonnywalker.net/user/zbwmbtsuly/ п»їlegitimate online pharmacies india
best online pharmacy india online pharmacy india or indian pharmacy indian pharmacies safe
AccessBridge Pharmacy AccessBridge best mexican pharmacy online
Комплексный подход, включающий эти методы, значительно повышает шансы на успешное и долговременное восстановление. Современные реабилитационные центры в Москве предлагают целый ряд программ, которые способствуют полному возвращению пациента к здоровой и активной жизни.
Углубиться в тему – http://reabilitacziya-alkogolikov-moskva-3.ru/
Наиболее частыми причинами обращения становятся запой, выраженная слабость, тремор, нарушение сна, тревога, учащенный пульс, нестабильное давление, тошнота и ощущение физического истощения. Эти проявления могут сочетаться между собой и усиливаться после прекращения употребления алкоголя, особенно если эпизод длился несколько дней.
Подробнее тут – нарколог на дом цена москва
Перед выбором метода врач проводит диагностику, оценивает физическое и психоэмоциональное состояние пациента, рассказывает о возможных рисках и особенностях процедуры. Только после согласования всех деталей назначается дата и форма кодирования.
Получить дополнительную информацию – анонимное кодирование от алкоголизма
buy prescription drugs from canada cheap: SteadyMeds – SteadyMeds
Многие не учитывают особенности покрытия фасадов, из-за чего сталкиваются с постоянными следами, царапинами и сложным уходом. Это делает кухню менее практичной в повседневной жизни https://medyn.su/materialy-i-fasady-kuhon/matovoe-ili-glyancevoe-pokrytie-fasadov-ku/
Реабилитация алкоголиков в Москве требует интегрированного подхода, включающего не только медицинское лечение, но и психологическую помощь. Важно, чтобы реабилитационные центры предлагали программы, которые помогают пациентам не только избавиться от физической зависимости, но и наладить их психологическое состояние, а также восстановить их отношения с окружающими.
Исследовать вопрос подробнее – центр реабилитации алкоголиков в москве
Реабилитация алкоголиков с анонимной поддержкой предоставляет несколько значительных преимуществ. Она помогает избежать социальных предрассудков, связанных с зависимостью, и позволяет пациенту сосредоточиться исключительно на своем здоровье и процессе восстановления. Это особенно важно для тех, кто чувствует себя изолированным или боится осуждения со стороны окружающих. Анонимность также способствует большему доверию к лечению и уменьшает внутреннее сопротивление пациента.
Узнать больше – алкоголик реабилитация наркоманов в москве
canadian pharmacy 24h com safe and vipps approved canadian online pharmacy canada drugs online reviews
http://birddelacoeur.com.au/?URL=https://steadymedspharmacy.shop:: best canadian pharmacy online or http://mbuild.store/user/xzckntrlbv/?um_action=edit canadianpharmacyworld com
pharmacies in canada that ship to the us best online canadian pharmacy and reputable canadian pharmacy pharmacy com canada
mexican pharmacy what to buy: AccessBridge Pharmacy – AccessBridge
Реабилитация алкоголиков в Москве: лечение зависимости, восстановление и поддержка под контролем специалистов в наркологической клинике «Похмельная служба»
Детальнее – https://reabilitacziya-alkogolikov-moskva-1.ru/
AccessBridge Pharmacy AccessBridge Pharmacy AccessBridge Pharmacy
п»їlegitimate online pharmacies india and best online pharmacy india pharmacy website india
http://www.tanadakenzai.co.jp/feed2js/feed2js.php?src=http://formulinepharmacy.com online shopping pharmacy india or https://kigalilife.co.rw/author/dtrdxslwaw/ Online medicine order
best india pharmacy best india pharmacy or п»їlegitimate online pharmacies india Online medicine home delivery
canadian pharmacy phone number: canadian world pharmacy – SteadyMeds
https://steadymedspharmacy.shop/# canadian pharmacy 24h com safe
В Воронеже капельница от похмелья применяется в ситуациях, когда симптомы выражены и не проходят самостоятельно, особенно после запоя или в запое. Врач проводит консультацию, оценивает состояние пациента, выраженность интоксикации и принимает решение о проведении процедуры. Важно, что лечение направлено не только на снятие симптомов, но и на восстановление организма после алкоголизма. При необходимости можно оставить заявку и уточнить цены или получить помощь бесплатно в рамках первичной консультации.
Выяснить больше – http://kapelnicza-ot-pokhmelya-voronezh-4.ru/
reputable indian online pharmacy and reputable indian online pharmacy Online medicine order
http://www.wittstock.chemie.uni-oldenburg.de/agef/link_extern.html?link=https://formulinepharmacy.com mail order pharmacy india and http://www.ktmoli.com/home.php?mod=space&uid=627251 india online pharmacy
buy prescription drugs from india best online pharmacy india and reputable indian pharmacies cheapest online pharmacy india
Каждый из этапов важен для успешного лечения наркомании и требует квалифицированной наркологической медицинской помощи. Реабилитационные программы, предлагаемые в Москве, часто включают в себя все эти компоненты, при этом в ряде случаев консультации могут предоставляться бесплатно, что способствует комплексному подходу к решению проблемы зависимости.
Узнать больше – реабилитация алкоголиков
https://steadymedspharmacy.shop/# canada drug pharmacy
Нарколог на дом в Воронеже с лечением без очередей, выездом врача и анонимной помощью в наркологической клинике «Частный медик 24»
Изучить вопрос глубже – вызвать нарколога на дом воронеж
Безопасность — это не лозунг, а набор решений. Мы избегаем «жёстких» седативных доз, которые создают видимость улучшения и повышают риск скрытых осложнений. Наращивание темпа инфузии происходит постепенно и увязано с динамикой симптомов и цифрами измерений. Любой шаг объясняется пациенту и семье: зачем он выбран, что считается нормальной волной улучшения, в какой момент нужно связаться с дежурным. Такой прозрачный формат снимает тревогу и помогает всем участникам действовать согласованно.
Подробнее тут – https://narkolog-na-dom-ivanteevka8.ru/narkolog-na-dom-srochno-v-ivanteevke/
Каждый из этих этапов играет важную роль в процессе восстановления. Лечение проводится под контролем опытных врачей и психологов, которые оценивают состояние пациента и адаптируют программу лечения в зависимости от его потребностей. Комплексный подход позволяет добиться наилучших результатов и помогает пациенту вернуться к нормальной жизни, свободной от зависимости.
Разобраться лучше – реабилитация алкоголиков стоимость
Реабилитация алкоголиков с поддержкой специалистов — это системный подход к лечению алкогольной зависимости, который включает в себя различные медицинские, психологические и социальные методы. В Москве существует множество наркологических центров, предлагающих такие программы, где пациентам предоставляется комплексное лечение под наблюдением квалифицированных специалистов. Процесс реабилитации направлен не только на избавление от алкогольной зависимости, но и на восстановление социальной адаптации пациента, улучшение его психоэмоционального состояния и предотвращение рецидивов. В клиниках также могут предложить кодирование от алкоголизма, что помогает значительно снизить риск возвращения к прежним привычкам и обеспечить долгосрочную трезвость пациента.
Исследовать вопрос подробнее – алкоголик реабилитация наркоманов
Комплексный подход, включающий эти методы, значительно повышает шансы на успешное и долговременное восстановление. Современные реабилитационные центры в Москве предлагают целый ряд программ, которые способствуют полному возвращению пациента к здоровой и активной жизни.
Подробнее можно узнать тут – реабилитация алкоголиков стоимость
SteadyMeds pharmacy: northwest pharmacy canada – SteadyMeds
Каждый выезд нарколога включает в себя не только инфузионную терапию, но и полноценную оценку состояния пациента, анализ рисков, а также консультацию по дальнейшему лечению. Врач может назначить дополнительные препараты для снятия симптомов ломки, восстановления водно-электролитного баланса и улучшения общего состояния пациента. Также важно, что консультация включает рекомендации по реабилитации, психологической поддержке и кодированию, если это необходимо для пациента, страдающего хроническим алкоголизмом или наркоманией.
Узнать больше – нарколог на дом цена в воронеже
Когда зависимости становятся хроническими и угрожают жизни пациента, комплексная реабилитация при наркомании в специализированных клиниках Москвы, включая вывод из состояния в стационаре и последующий анализ данных о состоянии пациента, может стать единственным возможным решением. Процесс восстановления включает в себя работу не только с зависимостью, но и с психоэмоциональным состоянием, что делает лечение более эффективным и долговечным.
Изучить вопрос глубже – http://reabilitacziya-alkogolikov-moskva-2.ru/
Выезд нарколога на дом — это медицинская услуга, которая подразумевает не только экстренную помощь, но и полноценное обследование пациента в комфортных для него условиях. В наркологической клинике «Частный медик 24» мы обеспечиваем профессиональное лечение на дому, которое включает в себя несколько важных этапов, чтобы стабилизировать состояние пациента, улучшить его самочувствие и снизить риски дальнейших осложнений.
Получить дополнительную информацию – https://narkolog-na-dom-samara-2.ru
medication from mexico or farmacia pharmacy mexico mail order pharmacy mexico
https://maps.google.ne/url?q=https://accessbridgepharmacy.com mexico drug store or http://georgiantheatre.ge/user/wyixmcqrun/ mexican pharmacies that ship
medicine from mexico mexican pharmacy prices and pharmacy mexico city order medicine from mexico
buy online medicine: FormuLine Pharmacy – online pharmacy discount code
Алкогольная зависимость — это не просто вредная привычка, а серьёзное заболевание, которое разрушает здоровье, психологическое состояние, семейные и рабочие отношения. Когда силы для самостоятельной борьбы на исходе, а традиционные методы не дают результата, современное кодирование становится эффективным решением для возвращения к трезвой жизни. В наркологической клинике «Новый Путь» в Электростали применяется весь спектр современных методик кодирования — с гарантией анонимности, профессиональным подходом и поддержкой опытных специалистов на каждом этапе.
Узнать больше – https://kodirovanie-ot-alkogolizma-ehlektrostal6.ru/anonimnoe-kodirovanie-ot-alkogolizma-v-ehlektrostali
Нарколог на дом в Москве: круглосуточный выезд, детоксикация и лечение зависимостей в наркологической клинике «Клиника доктора Калюжной».
Ознакомиться с деталями – вызов нарколога на дом
https://steadymedspharmacy.com/# SteadyMeds
new pharmacy online: indian pharmacy paypal – online pharmacy without scripts
online pharmacy india or best online pharmacy india Online medicine home delivery
http://www.leimbach-coaching.de/url?q=https://formulinepharmacy.shop indian pharmacies safe and https://afafnetwork.com/user/urbufiefwq/?um_action=edit indian pharmacy online
п»їlegitimate online pharmacies india reputable indian pharmacies or Online medicine order india online pharmacy
canada pharmacy and reddit canadian pharmacy reliable canadian pharmacy
http://www.kip-k.ru/best/sql.php?=steadymedspharmacy.shop escrow pharmacy canada or https://www.emlynmodels.co.uk/user/ajtjzdydcf/ legitimate canadian pharmacy
canada pharmacy store canadian drugs and canadian drug pharmacy canadian pharmacy online store
https://steadymedspharmacy.com/# SteadyMeds pharmacy
Нарколог на дом в Москве: срочный выезд врача, капельницы и помощь при запое в наркологической клинике «Клиника доктора Калюжной».
Изучить вопрос глубже – запой нарколог на дом москва
Реабилитация алкоголиков в Москве требует интегрированного подхода, включающего не только медицинское лечение, но и психологическую помощь. Важно, чтобы реабилитационные центры предлагали программы, которые помогают пациентам не только избавиться от физической зависимости, но и наладить их психологическое состояние, а также восстановить их отношения с окружающими.
Ознакомиться с деталями – https://reabilitacziya-alkogolikov-moskva-3.ru/
Каждый из этих этапов играет важную роль в процессе восстановления. Лечение проводится под контролем опытных врачей и психологов, которые оценивают состояние пациента и адаптируют программу лечения в зависимости от его потребностей. Комплексный подход позволяет добиться наилучших результатов и помогает пациенту вернуться к нормальной жизни, свободной от зависимости.
Узнать больше – реабилитация алкоголиков стоимость москва
https://accessbridgepharmacy.shop/# the purple pharmacy mexico
Анонимное лечение на дому ценно ещё и тем, что снижает внутреннее сопротивление самого пациента. Для многих людей первый контакт с врачом происходит именно дома, без дороги, без ожидания, без страха чужих взглядов. Такой формат помогает начать разговор не только о снятии острых симптомов, но и о более широких вопросах: что делать после выхода из запоя, когда требуется кодирование, в каких случаях нужна реабилитация, а когда первичная наркологическая помощь уже должна переходить в полноценный лечебный маршрут. Врач может помочь и в ситуациях, связанных не только с алкоголем, но и с наркомании, если семье нужно понять, что происходит с зависимым человеком и какой следующий шаг будет для него безопасным.
Получить больше информации – http://narkolog-na-dom-voronezh-1.ru/
Особенность анонимной реабилитации заключается в создании комфортной и безопасной среды, которая мотивирует пациента работать над собой, не опасаясь осуждения. Это повышает эффективность лечения, ведь пациент может открыться и честно обсуждать свои проблемы без страха быть осужденным.
Получить дополнительные сведения – реабилитация алкоголиков стоимость
Нарколог на дом — это не просто возможность получить медицинскую помощь в удобное время, но и решение важнейших задач по стабилизации состояния пациента, избавлению от острых симптомов абстиненции и восстановлению его здоровья. В случае с алкоголизмом и наркоманией выезд врача на дом в Воронеже — это важный шаг к восстановлению, который начинается там, где пациент находится, в удобной и привычной обстановке. Клиника «Частный медик 24» предлагает круглосуточные выезды нарколога, предоставляя экстренную помощь при запоях, наркозависимости, а также консультации по дальнейшему лечению и реабилитации. Врач приедет по указанному адресу и проведёт все необходимые процедуры, включая капельницы для стабилизации состояния пациента.
Получить дополнительную информацию – вызов нарколога на дом
Реабилитация алкоголиков проходит через несколько обязательных этапов. Каждый этап фокусируется на определенных аспектах восстановления и помогает человеку не только избавиться от физической зависимости, но и научиться жить без алкоголя в долгосрочной перспективе, включая кодирование, особенно после длительных лет запоя, а также восстановление в условиях специализированного дома. Этапное восстановление помогает избежать перегрузки пациента, обеспечивая плавный переход от одной стадии лечения к другой.
Изучить вопрос глубже – алкоголик реабилитация наркоманов
https://formulinepharmacy.com/# reputable online pharmacy no prescription
online pharmacy no prescription needed: reputable indian pharmacies – no rx needed pharmacy
Капельница от похмелья направлена на восстановление водно-электролитного баланса, выведение токсинов, нормализацию работы печени и почек, а также улучшение общего состояния пациента. В клинике «Частный медик 24» мы подходим к каждому случаю индивидуально, учитывая состояние пациента, его анамнез и особенности организма. Важно, чтобы помощь была оказана вовремя, так как откладывание лечения может привести к осложнениям, таким как сердечные проблемы, психозы или нарушения сна. Выезд нарколога на дом в Самаре позволяет быстро начать лечение, не тратя времени на дорогу и дополнительные усилия.
Выяснить больше – капельница от похмелья на дом самара
Отдельно оценивают ситуации, когда эпизоды повторяются и становятся частью более устойчивой проблемы. Если после алкоголя регулярно развивается тяжелое состояние, нарушается привычный режим жизни, усиливаются последствия алкоголизма и возникают сложности с контролем употребления, домашний выезд может быть только первым этапом более длинного маршрута помощи. При этом наркологическая помощь может включать не только снятие острых проявлений, но и дальнейшую программу лечения зависимости, если речь идет о длительном течении заболевания.
Выяснить больше – нарколог на дом москва
AccessBridge medicine from mexico AccessBridge Pharmacy
SteadyMeds pharmacy: SteadyMeds pharmacy – SteadyMeds pharmacy
Для жителей Воронежа выезд врача на дом особенно востребован в те часы, когда состояние ухудшается быстро, а сил на поездку уже нет. После нескольких дней употребления человеку часто тяжело даже выйти из квартиры: сохраняются слабость, рвотные позывы, дрожь, потливость, тревога, невозможность нормально спать и выраженное желание снова выпить, чтобы хоть ненадолго почувствовать облегчение. В этот момент домашняя помощь позволяет сократить время между ухудшением и началом лечения. Врач выезжает, проводит осмотр, определяет, нет ли признаков опасных осложнений, и сразу решает, можно ли стабилизировать пациента дома или безопаснее менять формат оказания помощи.
Подробнее – нарколог на дом вывод воронеж
AccessBridge Pharmacy: AccessBridge Pharmacy – AccessBridge Pharmacy
Домашний формат выбирают в тех случаях, когда человеку тяжело добраться до медицинского учреждения, он ослаблен после нескольких дней употребления спиртного или родственникам важно быстрее получить врачебную оценку состояния. После осмотра определяют, допустима ли помощь на дому, требуется ли капельница, возможен ли вывод из запоя в домашних условиях или нужен другой объем наблюдения. Если эпизоды повторяются, обсуждение обычно выходит за рамки снятия острых симптомов и затрагивает дальнейшую помощь при алкоголизме. Уже на этапе первого обращения часто уточняют, можно ли вызвать врача срочно, доступна ли круглосуточная помощь и в каких случаях состояние требует наблюдения в стационаре.
Получить больше информации – нарколог на дом москва
Для жителей Екатеринбурга наркологическая клиника «Частный медик 24» предлагает платную услугу выезда врача на дом для проведения капельницы от похмелья. Когда человек переживает сильные симптомы похмелья, такие как головная боль, тошнота, слабость, важно не тянуть с лечением и начать восстановление как можно скорее. Капельница от похмелья помогает хорошо облегчить самочувствие пациента, снять головную боль и улучшить общее состояние, восстановив водно-электролитный баланс в организме.
Подробнее тут – капельница от похмелья цена в екатеринбурге
pharmacy canadian and canadian pharmacy com canadian pharmacy meds
https://maps.google.com.cu/url?q=https://steadymedspharmacy.shop canadian online drugstore or https://brueckrachdorf.de/user/seufrfjmbc/ canadian pharmacy world
canadian pharmacy india canadian pharmacy ratings and canadian pharmacy online ship to usa canadian pharmacy meds reviews
Когда зависимости становятся хроническими и угрожают жизни пациента, комплексная реабилитация при наркомании в специализированных клиниках Москвы, включая вывод из состояния в стационаре и последующий анализ данных о состоянии пациента, может стать единственным возможным решением. Процесс восстановления включает в себя работу не только с зависимостью, но и с психоэмоциональным состоянием, что делает лечение более эффективным и долговечным.
Детальнее – реабилитация алкоголиков стоимость
https://steadymedspharmacy.shop/# SteadyMeds pharmacy
mail order pharmacy india and india pharmacy mail order pharmacy website india
https://www.google.gy/url?q=https://formulinepharmacy.com world pharmacy india or https://bbs.9uv5.com/home.php?mod=space&uid=32355 indian pharmacies safe
indian pharmacies safe pharmacy website india or п»їlegitimate online pharmacies india buy medicines online in india
Нарколог на дом в Москве: выезд врача на дом, лечение запоя и консультации в наркологической клинике «Клиника доктора Калюжной».
Детальнее – нарколог на дом вывод
SteadyMeds SteadyMeds SteadyMeds
Домашний формат помощи рассматривают тогда, когда человеку тяжело добраться до медицинского учреждения, состояние ухудшается после нескольких дней употребления спиртного или родственникам требуется очная оценка без промедления. После осмотра становится ясно, допустима ли помощь на дому, требуется ли капельница, можно ли ограничиться наблюдением в домашних условиях или нужен другой маршрут помощи. Вопрос о том, как вызвать специалиста, нередко возникает в ситуациях, когда состояние нарастает быстро и требуется решение без откладывания. Если подобные эпизоды повторяются, дальнейшее обсуждение может касаться не только текущего состояния, но и лечения алкоголизма, работы с зависимостью и более длительной программы восстановления.
Углубиться в тему – вызвать нарколога на дом москва
Помощь на дому рассматривают при состояниях, которые сопровождаются заметным ухудшением самочувствия после алкоголя. Это может быть запой на протяжении нескольких дней, тяжелое похмелье, дрожь в руках, нарушение сна, выраженная слабость, тревога, тошнота, сухость во рту, снижение аппетита и признаки обезвоживания. В таких случаях осмотр врача нужен для того, чтобы оценить тяжесть состояния и понять, безопасно ли оставаться дома.
Подробнее можно узнать тут – https://narkolog-na-dom-moskva-17.ru/
prescriptions from mexico: AccessBridge – AccessBridge
https://steadymedspharmacy.shop/# SteadyMeds pharmacy
Benefits of using a single bet calculator include saving time and increasing accuracy.
ew double bet calculator https://singlebetcalculator.com/bet-calculator/double/
https://steadymedspharmacy.shop/# SteadyMeds pharmacy
Реабилитация алкоголиков в Москве: лечение зависимости, восстановление и поддержка под контролем специалистов в наркологической клинике «Похмельная служба»
Получить дополнительные сведения – реабилитация алкоголиков стоимость в москве
К основным показаниям относятся:
Выяснить больше – наркология вывод из запоя нижний новгород
buy medicines online in india or buy prescription drugs from india reputable indian pharmacies
https://www.livecmc.com/?lang=fr&id=Ld9efT&url=http://formulinepharmacy.com/ Online medicine home delivery or http://erooups.com/user/bgqqykbqfk/ top 10 online pharmacy in india
reputable indian pharmacies online pharmacy india or india pharmacy reputable indian online pharmacy
http://accessbridgepharmacy.com/# AccessBridge Pharmacy
Капельница от похмелья в Екатеринбурге с инфузионной терапией и быстрым облегчением симптомов в наркологической клинике «Частный медик 24»
Подробнее – капельница от похмелья екатеринбург
SteadyMeds: SteadyMeds – SteadyMeds pharmacy
Отдельно оценивают ситуации, когда эпизоды повторяются и становятся частью более устойчивой проблемы. Если после алкоголя регулярно развивается тяжелое состояние, нарушается привычный режим жизни, усиливаются последствия алкоголизма и возникают сложности с контролем употребления, домашний выезд может быть только первым этапом более длинного маршрута помощи. При этом наркологическая помощь может включать не только снятие острых проявлений, но и дальнейшую программу лечения зависимости, если речь идет о длительном течении заболевания.
Детальнее – нарколог на дом в москве
Реабилитация алкоголиков в Москве с комплексным подходом — это многогранный процесс, включающий в себя не только медицинские процедуры, но и психологическую поддержку, физическую реабилитацию и помощь в социальной адаптации. Профессиональный реабилитационный центр обеспечивает индивидуальный подход к каждому пациенту, включая такие методы, как кодирование и своевременное лечение запоя. Важно отметить, что успешное лечение алкоголизма требует учета множества факторов, таких как степень зависимости, психоэмоциональное состояние пациента, а также его физическое здоровье. Комплексный подход помогает эффективно устранить все составляющие проблемы, минимизируя риски рецидивов.
Узнать больше – клиника реабилитации алкоголиков
legal online pharmacy: FormuLine Pharmacy – new pharmacy online
Для жителей Воронежа выезд нарколога на дом — это быстрый и удобный способ получить экстренную помощь. Когда человек переживает запой, а его физическое и эмоциональное состояние быстро ухудшается, наркологическая помощь на дому становится оптимальным решением. Врач приезжает и немедленно оценивает состояние пациента: проверяет его пульс, давление, частоту дыхания, уровень сознания и другие важные показатели. Это помогает составить точный план лечения, который будет направлен на восстановление организма, снятие токсинов и стабилизацию состояния пациента.
Подробнее можно узнать тут – нарколог на дом анонимно воронеж
Помощь на дому рассматривают при состояниях, которые сопровождаются заметным ухудшением самочувствия после алкоголя. Обычно это запой на протяжении нескольких дней, тяжелое похмелье, выраженная слабость, бессонница, тревога, дрожь в руках, сухость во рту, отсутствие аппетита, тошнота, раздражительность и ощущение истощения. В подобных случаях врачебный осмотр нужен для того, чтобы оценить тяжесть состояния и определить, безопасен ли домашний формат в конкретной ситуации.
Углубиться в тему – narkolog-na-dom-moskva-18.ru/
https://accessbridgepharmacy.com/# AccessBridge
canadian pharmacy 24 com and canadian online drugs canada ed drugs
https://cse.google.com.br/url?sa=t&url=https://steadymedspharmacy.shop canadian drugstore online and http://nidobirmingham.com/user/bpxvdcpkyz/ best canadian online pharmacy reviews
canadian pharmacy drugs online canada pharmacy world and canada drug pharmacy is canadian pharmacy legit
Особенность анонимной реабилитации заключается в создании комфортной и безопасной среды, которая мотивирует пациента работать над собой, не опасаясь осуждения. Это повышает эффективность лечения, ведь пациент может открыться и честно обсуждать свои проблемы без страха быть осужденным.
Выяснить больше – реабилитация алкоголиков стоимость москва
Реабилитация алкоголиков проходит через несколько обязательных этапов. Каждый этап фокусируется на определенных аспектах восстановления и помогает человеку не только избавиться от физической зависимости, но и научиться жить без алкоголя в долгосрочной перспективе, включая кодирование, особенно после длительных лет запоя, а также восстановление в условиях специализированного дома. Этапное восстановление помогает избежать перегрузки пациента, обеспечивая плавный переход от одной стадии лечения к другой.
Подробнее тут – https://reabilitacziya-alkogolikov-moskva-3.ru/
medicine mexico: mexican drugstore – mexican online pharmacy wegovy
Алкогольная интоксикация оказывает серьёзное влияние на организм, вызывая головную боль, тошноту, слабость и головокружение. Капельница помогает организму быстро избавиться от продуктов распада алкоголя, восстановить нормальное функционирование органов и минимизировать последствия для здоровья. Важно, что мы обеспечиваем полное наблюдение врача на протяжении всей процедуры, что помогает гарантировать безопасность пациента и максимальную эффективность лечения.
Получить дополнительную информацию – капельница от похмелья цена екатеринбург
http://formulinepharmacy.com/# online pharmacy no rx
Реабилитация алкоголиков с анонимной поддержкой — это важный процесс, который помогает людям справиться с зависимостью в условиях конфиденциальности и безопасности. Многие пациенты опасаются обращаться за помощью из-за стереотипов и страха осуждения. Анонимность в реабилитации становится важным фактором для обеспечения доверия и максимальной эффективности лечения, при этом в ряде случаев доступны такие услуги, как кодирование и консультации наркологической помощи бесплатно, особенно при обращении после запоя. В Москве существует множество центров, которые предлагают реабилитацию алкоголиков с анонимной поддержкой, что позволяет пациентам пройти лечение, не раскрывая своей личности и не беспокоясь о социальном осуждении.
Получить дополнительную информацию – http://reabilitacziya-alkogolikov-moskva-4.ru/
mexico pharmacy online and the purple pharmacy mexico best online mexican pharmacy
https://mitsui-shopping-park.com/lalaport/iwata/redirect.html?url=https://accessbridgepharmacy.com mexican pharmacy ship to usa and http://lenhong.fr/user/nlqsnkyvij/ pharmacies in mexico that ship to the us
mexico prescription online mexican pharmacies that ship to us and mexico pharmacy online mexico pharmacy list
Нарколог на дом может помочь в следующих ситуациях:
Подробнее – нарколог на дом
Наиболее частыми причинами обращения становятся запой, выраженная слабость, тремор, нарушение сна, тревога, учащенный пульс, нестабильное давление, тошнота и ощущение физического истощения. Эти проявления могут сочетаться между собой и усиливаться после прекращения употребления алкоголя, особенно если эпизод длился несколько дней.
Ознакомиться с деталями – нарколог на дом анонимно в москве
pharmacy in mexico that ships to us: AccessBridge – mexico pharmacy
Алкогольная зависимость — это не просто вредная привычка, а серьёзное заболевание, которое разрушает здоровье, психологическое состояние, семейные и рабочие отношения. Когда силы для самостоятельной борьбы на исходе, а традиционные методы не дают результата, современное кодирование становится эффективным решением для возвращения к трезвой жизни. В наркологической клинике «Новый Путь» в Электростали применяется весь спектр современных методик кодирования — с гарантией анонимности, профессиональным подходом и поддержкой опытных специалистов на каждом этапе.
Разобраться лучше – https://kodirovanie-ot-alkogolizma-ehlektrostal6.ru/
best online pharmacy: top online pharmacy india – best online pharmacy
Нарколог на дом — это не просто возможность получить медицинскую помощь в удобное время, но и решение важнейших задач по стабилизации состояния пациента, избавлению от острых симптомов абстиненции и восстановлению его здоровья. В случае с алкоголизмом и наркоманией выезд врача на дом в Воронеже — это важный шаг к восстановлению, который начинается там, где пациент находится, в удобной и привычной обстановке. Клиника «Частный медик 24» предлагает круглосуточные выезды нарколога, предоставляя экстренную помощь при запоях, наркозависимости, а также консультации по дальнейшему лечению и реабилитации. Врач приедет по указанному адресу и проведёт все необходимые процедуры, включая капельницы для стабилизации состояния пациента.
Получить больше информации – нарколог на дом цена воронеж
no prescription needed pharmacy: FormuLine Pharmacy – best online pharmacy no prescription
Наркологическая помощь на дому помогает избежать стресса, связанного с поездкой в клинику. Особенно это важно в случаях, когда пациент находится в состоянии тяжёлой интоксикации или переживает абстинентный синдром, который можно только усугубить дополнительной нагрузкой. Врач приедет в кратчайшие сроки, обеспечивая необходимое лечение в первые часы после ухудшения состояния. Также важно, что при выезде специалист гарантирует полную анонимность, что особенно важно для многих людей, которые боятся открыто признаться в своей проблеме. Профессиональная наркологическая помощь на дому позволяет избежать срыва и начать процесс восстановления без стресса.
Получить больше информации – вызвать нарколога на дом
https://accessbridgepharmacy.shop/# order medication from mexico
https://steadymedspharmacy.com/# pharmacy com canada
http://accessbridgepharmacy.com/# mexican pharmacy near me
Вывод из запоя в стационаре в Нижнем Новгороде с круглосуточным наблюдением и поэтапным восстановлением в наркологической клинике «Частный медик 24»
Подробнее можно узнать тут – скорая вывод из запоя нижний новгород
SteadyMeds canadian pharmacies pharmacy canadian
canadapharmacyonline and canadian pharmacy online ship to usa canadian pharmacy online
https://www.bausch.co.jp/ja-jp/redirect/?url=https://steadymedspharmacy.shop canadian pharmacy tampa and http://ragnarokneon.online/home.php?mod=space&uid=48021 ed drugs online from canada
canadian pharmacy store certified canadian international pharmacy and canada drugs online review canadian pharmacy reviews
top online pharmacy india and best india pharmacy indian pharmacy paypal
https://clients1.google.gy/url?q=https://formulinepharmacy.com india pharmacy mail order and https://www.liveviolet.net/user/nuxegryjmw/videos Online medicine home delivery
best india pharmacy top online pharmacy india or best online pharmacy india pharmacy website india
Такие симптомы важны не только сами по себе. Они показывают, что организму уже трудно поддерживать стабильность без медицинского вмешательства. Чем дольше в этот момент ждать, тем выше вероятность, что потребуется более жёсткий формат оказания помощи. Поэтому экстренное обращение в некоторых случаях не просто облегчает состояние, а предотвращает дальнейшее ухудшение здоровья.
Узнать больше – запой нарколог на дом в воронеже
Запой и алкогольная интоксикация могут приводить к целому ряду опасных симптомов, таких как головная боль, слабость, тошнота, рвота, обезвоживание и психоэмоциональная нестабильность. Если не начать лечение вовремя, такие состояния могут привести к более серьезным осложнениям, включая сердечные проблемы, галлюцинации и даже опасные для жизни нарушения работы организма. С помощью нарколога на дому можно начать экстренную терапию прямо в момент ухудшения состояния, не затягивая с лечением и не тратя время на поездки в клинику.
Подробнее можно узнать тут – нарколог на дом
Анонимность позволяет пациентам сосоточиться на процессе лечения алкогольной зависимости, не переживая о последствиях для своей репутации или безопасности. Важно, чтобы каждый этап был подробно обсужден с пациентом, что помогает снизить уровень стресса и тревожности, связанные с лечением зависимых, включая терапию в стационаре.
Углубиться в тему – http://www.domen.ru
https://steadymedspharmacy.com/# canada drugs
Процесс восстановления с помощью капельницы с мягким восстановлением происходит в несколько этапов. Вначале происходит нормализация водно-солевого баланса, что помогает предотвратить обезвоживание и улучшить состояние кожи. Затем происходит восстановление энергетических запасов организма, что помогает уменьшить усталость и слабость, что также важно при лечении наркомании. Витамины и антиоксиданты восстанавливают функции клеток и органов, что способствует более быстрому очищению организма от продуктов распада алкоголя, при этом пациентам может быть доступна анонимное консультация и дальнейшая реабилитация.
Исследовать вопрос подробнее – капельница от похмелья анонимно
Реабилитация алкоголиков в Москве с комплексным подходом — это многогранный процесс, включающий в себя не только медицинские процедуры, но и психологическую поддержку, физическую реабилитацию и помощь в социальной адаптации. Профессиональный реабилитационный центр обеспечивает индивидуальный подход к каждому пациенту, включая такие методы, как кодирование и своевременное лечение запоя. Важно отметить, что успешное лечение алкоголизма требует учета множества факторов, таких как степень зависимости, психоэмоциональное состояние пациента, а также его физическое здоровье. Комплексный подход помогает эффективно устранить все составляющие проблемы, минимизируя риски рецидивов.
Получить дополнительную информацию – алкоголик реабилитация наркоманов
Наиболее частыми причинами обращения становятся запой, выраженная слабость, тремор, тревога, бессонница, тошнота, нестабильное давление, учащенный пульс и ощущение физического истощения. Эти проявления могут сочетаться между собой и усиливаться после прекращения употребления алкоголя, особенно если эпизод длился несколько дней подряд.
Получить дополнительные сведения – нарколог на дом вывод
Поводом для обращения обычно становятся слабость, тремор, тревога, бессонница, учащенный пульс, нестабильное давление, тошнота и ощущение физического истощения. Эти проявления часто усиливаются после прекращения употребления алкоголя или на фоне затянувшегося запоя.
Ознакомиться с деталями – врач нарколог на дом
indianpharmacy com and world pharmacy india buy medicines online in india
https://clients1.google.co.ck/url?q=https://formulinepharmacy.com top 10 pharmacies in india and https://gikar.it/user/ovfotvqsol/ india pharmacy
top online pharmacy india buy prescription drugs from india or top 10 online pharmacy in india Online medicine home delivery
farmacia pharmacy mexico purchase online medication in mexico AccessBridge Pharmacy
SteadyMeds pharmacy: pharmacy in canada – northwest canadian pharmacy
canadian pharmacy 24h com safe: canadian pharmacy scam – SteadyMeds pharmacy
SteadyMeds: SteadyMeds pharmacy – SteadyMeds
Когда зависимости становятся хроническими и угрожают жизни пациента, комплексная реабилитация при наркомании в специализированных клиниках Москвы, включая вывод из состояния в стационаре и последующий анализ данных о состоянии пациента, может стать единственным возможным решением. Процесс восстановления включает в себя работу не только с зависимостью, но и с психоэмоциональным состоянием, что делает лечение более эффективным и долговечным.
Получить дополнительные сведения – реабилитация алкоголиков стоимость в москве
Такие состояния требуют профессионального вмешательства, так как без лечения могут усиливаться и приводить к ухудшению самочувствия. При этом помощь может предоставляться анонимно, в соответствии с политикой конфиденциальности данных пациента.
Ознакомиться с деталями – вывод из запоя на дому санкт-петербург
Нарколог на дом в Москве: срочный выезд врача, капельницы и помощь при запое в наркологической клинике «Клиника доктора Калюжной».
Подробнее тут – нарколог на дом цена москва
Капельница от похмелья в Екатеринбурге с выездом специалиста, подбором терапии и восстановлением состояния в наркологической клинике «Частный медик 24»
Подробнее можно узнать тут – капельница от похмелья на дому в екатеринбурге
Капельница от похмелья в Екатеринбурге с инфузионной терапией и быстрым облегчением симптомов в наркологической клинике «Частный медик 24»
Получить больше информации – капельница от похмелья на дом
Ключевым преимуществом вызова нарколога на дом является то, что лечение начинается в тот момент, когда оно особенно необходимо. Близкие пациента не должны волноваться о поиске клиники или медицинских центров в экстренной ситуации — помощь будет оказана немедленно, с минимальными затратами времени и без стресса для пациента.
Ознакомиться с деталями – нарколог на дом цена в самаре
http://formulinepharmacy.com/# express scripts mail order pharmacy
Комплексная реабилитация алкоголиков в Москве помогает пациентам не только избавиться от зависимости, но и вернуться к полноценной жизни. Процесс восстановления включает в себя не только лечение алкоголизма как физического заболевания, но и работу с психологическими, социальными и эмоциональными аспектами, которые могут стать причиной или следствием зависимости. Такое подходное лечение, как правило, требует усилий со стороны как специалистов, так и самого пациента.
Изучить вопрос глубже – реабилитация алкоголиков
В зависимости от клинической картины и предпочтений возможны следующие виды кодирования:
Разобраться лучше – medicinskoe-kodirovanie-ot-alkogolizma
Для жителей Воронежа выезд нарколога на дом — это быстрый и удобный способ получить экстренную помощь. Когда человек переживает запой, а его физическое и эмоциональное состояние быстро ухудшается, наркологическая помощь на дому становится оптимальным решением. Врач приезжает и немедленно оценивает состояние пациента: проверяет его пульс, давление, частоту дыхания, уровень сознания и другие важные показатели. Это помогает составить точный план лечения, который будет направлен на восстановление организма, снятие токсинов и стабилизацию состояния пациента.
Детальнее – врач нарколог на дом в воронеже
canada rx pharmacy or maple leaf pharmacy in canada online canadian pharmacy reviews
http://www.tiny.dk/l.php?url=http://steadymedspharmacy.shop canadian online pharmacy reviews and http://fog.gain.tw/space.php?uid=199173 pharmacy canadian superstore
best rated canadian pharmacy legal canadian pharmacy online or best rated canadian pharmacy www canadianonlinepharmacy
SteadyMeds: safe canadian pharmacies – SteadyMeds pharmacy
http://accessbridgepharmacy.com/# best online mexican pharmacy
Нарколог на дом в Москве: срочный выезд врача, капельницы и помощь при запое в наркологической клинике «Клиника доктора Калюжной».
Подробнее тут – https://narkolog-na-dom-moskva-17.ru
Реабилитация алкоголиков в Москве требует интегрированного подхода, включающего не только медицинское лечение, но и психологическую помощь. Важно, чтобы реабилитационные центры предлагали программы, которые помогают пациентам не только избавиться от физической зависимости, но и наладить их психологическое состояние, а также восстановить их отношения с окружающими.
Детальнее – алкоголик реабилитация наркоманов
http://accessbridgepharmacy.com/# online pharmacy mexico
https://formulinepharmacy.com/# legal online pharmacies in the us
Капельница от похмелья в Екатеринбурге с инфузионной терапией и быстрым облегчением симптомов в наркологической клинике «Частный медик 24»
Углубиться в тему – капельница от похмелья цена екатеринбург
medstore online pharmacy: top online pharmacy india – safe online pharmacies
Капельница от похмелья — это эффективный и быстрый способ снятия симптомов алкогольной интоксикации и восстановления организма после злоупотребления алкоголем. В наркологической клинике «Частный медик 24» в Екатеринбурге мы предлагаем анонимное лечение на дому, которое позволяет пациентам без лишнего стресса и беспокойства начать процесс восстановления прямо в удобной для них обстановке. Мы обеспечиваем профессиональную помощь при похмелье, устраняем токсикоз, восстанавливаем водно-электролитный баланс и помогаем вернуть здоровье после употребления алкоголя.
Ознакомиться с деталями – капельница от похмелья
medicine online: FormuLine Pharmacy – best mail order pharmacy
Отдельно оценивают ситуации, когда эпизоды повторяются и становятся частью более устойчивой проблемы. Если после алкоголя регулярно развивается тяжелое состояние, нарушается привычный режим жизни, усиливаются последствия алкоголизма и возникают сложности с контролем употребления, домашний выезд может быть только первым этапом более длинного маршрута помощи. При этом наркологическая помощь может включать не только снятие острых проявлений, но и дальнейшую программу лечения зависимости, если речь идет о длительном течении заболевания.
Подробнее тут – запой нарколог на дом в москве
medication from mexico or the purple pharmacy mexico purple pharmacy mexico
https://images.google.com.br/url?q=https://accessbridgepharmacy.com mexican pharmacies near me or https://www.emlynmodels.co.uk/user/hifxbquyac/ online pharmacies in mexico
order meds from mexico can i buy meds from mexico online and order meds from mexico my mexican pharmacy
http://steadymedspharmacy.com/# SteadyMeds pharmacy
Нарколог на дом в Москве: выезд врача на дом, лечение запоя и консультации в наркологической клинике «Клиника доктора Калюжной».
Узнать больше – нарколог на дом вывод в москве
Особенность анонимной реабилитации заключается в создании комфортной и безопасной среды, которая мотивирует пациента работать над собой, не опасаясь осуждения. Это повышает эффективность лечения, ведь пациент может открыться и честно обсуждать свои проблемы без страха быть осужденным.
Узнать больше – http://www.domen.ru
Запой и алкогольная интоксикация могут приводить к целому ряду опасных симптомов, таких как головная боль, слабость, тошнота, рвота, обезвоживание и психоэмоциональная нестабильность. Если не начать лечение вовремя, такие состояния могут привести к более серьезным осложнениям, включая сердечные проблемы, галлюцинации и даже опасные для жизни нарушения работы организма. С помощью нарколога на дому можно начать экстренную терапию прямо в момент ухудшения состояния, не затягивая с лечением и не тратя время на поездки в клинику.
Детальнее – нарколог на дом цена
Для жителей Воронежа выезд нарколога на дом — это быстрый и удобный способ получить экстренную помощь. Когда человек переживает запой, а его физическое и эмоциональное состояние быстро ухудшается, наркологическая помощь на дому становится оптимальным решением. Врач приезжает и немедленно оценивает состояние пациента: проверяет его пульс, давление, частоту дыхания, уровень сознания и другие важные показатели. Это помогает составить точный план лечения, который будет направлен на восстановление организма, снятие токсинов и стабилизацию состояния пациента.
Детальнее – нарколог на дом цена воронеж
Нарколог на дом в Воронеже с конфиденциальным выездом, капельницами и поддержкой пациента в наркологической клинике «Частный медик 24»
Выяснить больше – нарколог на дом цена
Домашний формат выбирают тогда, когда человеку тяжело добраться до медицинского учреждения, он ослаблен после нескольких дней употребления алкоголя или родственникам важно быстро получить врачебную оценку состояния. После осмотра определяют, допустима ли помощь на дому, требуется ли детоксикация, нужна ли капельница, достаточно ли домашнего наблюдения или следует сразу рассматривать другой объем помощи. Если эпизоды повторяются, обсуждение может выходить за рамки одного выезда и включать лечение алкоголизма, помощь при зависимости, кодирование, участие психолога и реабилитацию. Уже на этапе первичного обращения нередко уточняют, как вызвать врача, какие услуги доступны на дому и в каких условиях домашний формат остается безопасным.
Получить дополнительные сведения – вызов нарколога на дом в москве
Осмотр на дому особенно важен в тех случаях, когда больному трудно вставать, пить воду, принимать пищу, спокойно лежать или ориентироваться в собственном состоянии. Чем тяжелее переносится выход из употребления, тем выше значение очной оценки, потому что по телефону невозможно полноценно определить границы безопасной помощи. При выраженных симптомах может потребоваться срочный выезд, чтобы вовремя оценить риски и определить, допустим ли вывод из запоя дома или необходимо наблюдение в стационаре.
Исследовать вопрос подробнее – нарколог на дом в москве
https://accessbridgepharmacy.shop/# AccessBridge
pharmacy order online: FormuLine Pharmacy – online pharmacy
buy prescription drugs from india and Online medicine order cheapest online pharmacy india
https://maps.google.lv/url?q=https://formulinepharmacy.com buy prescription drugs from india and https://virtualchemicalsales.ca/user/imdipwxqcj/?um_action=edit india pharmacy
cheapest online pharmacy india indian pharmacies safe or india pharmacy india online pharmacy
canadian compounding pharmacy and best canadian pharmacy online canadian pharmacy india
https://images.google.ki/url?sa=t&url=https://steadymedspharmacy.shop canadian pharmacies shipping to usa or https://mantiseye.com/community/gnwipwqscf canadian pharmacy antibiotics
canadian pharmacy 24h com canadianpharmacymeds com or canada online pharmacy canadian pharmacies comparison
Когда зависимости становятся хроническими и угрожают жизни пациента, комплексная реабилитация при наркомании в специализированных клиниках Москвы, включая вывод из состояния в стационаре и последующий анализ данных о состоянии пациента, может стать единственным возможным решением. Процесс восстановления включает в себя работу не только с зависимостью, но и с психоэмоциональным состоянием, что делает лечение более эффективным и долговечным.
Получить больше информации – реабилитация алкоголиков город
Thanks for sharing. I read many of your blog posts, cool, your blog is very good.
SteadyMeds: pet meds without vet prescription canada – canada drugs online review
medication from mexico AccessBridge medication in mexico
best online pharmacy india or mail order pharmacy india indianpharmacy com
https://cse.google.com.ng/url?sa=t&url=https://formulinepharmacy.com online pharmacy india or http://asresin.cn/home.php?mod=space&uid=730752 top 10 online pharmacy in india
best india pharmacy india pharmacy mail order or best india pharmacy top 10 pharmacies in india
overseas online pharmacy: pharmacy website india – online pharmacy without scripts
AccessBridge Pharmacy: AccessBridge Pharmacy – AccessBridge
Реабилитация алкоголиков в Москве: эффективные программы восстановления и медицинская помощь в наркологической клинике «Похмельная служба»
Выяснить больше – реабилитация алкоголиков стоимость в москве
Наркологический стационар с круглосуточным наблюдением предлагает комплексное лечение и восстановление для людей, страдающих от алкогольной или наркотической зависимости. Пациенты получают помощь в условиях стационара, что позволяет устранить риск срыва и обеспечить безопасное и комфортное выздоровление. В таких клиниках работают квалифицированные наркологи, психологи и другие специалисты, которые контролируют процесс реабилитации на всех этапах. В некоторых случаях может потребоваться вывод из запоя с применением капельниц, а также лечение в специализированном центре для более комплексного восстановления.
Углубиться в тему – http://narkologicheskij-staczionar-sankt-peterburg.ru/
https://formulinepharmacy.shop/# express scripts mail order pharmacy
Процедура проводится опытными наркологами, которые подбирают необходимое лечение на основе индивидуальных особенностей пациента. В клинике «Частный медик 24» применяются только эффективные и безопасные препараты, которые помогают организму восстановиться и избавиться от токсинов. Важно помнить, что капельница от похмелья — это не просто временное облегчение, а важный шаг к долгосрочному восстановлению организма и профилактике алкоголизма.
Исследовать вопрос подробнее – капельница от похмелья анонимно
AccessBridge AccessBridge AccessBridge Pharmacy
Нарколог на дом — это не просто возможность получить медицинскую помощь в удобное время, но и решение важнейших задач по стабилизации состояния пациента, избавлению от острых симптомов абстиненции и восстановлению его здоровья. В случае с алкоголизмом и наркоманией выезд врача на дом в Воронеже — это важный шаг к восстановлению, который начинается там, где пациент находится, в удобной и привычной обстановке. Клиника «Частный медик 24» предлагает круглосуточные выезды нарколога, предоставляя экстренную помощь при запоях, наркозависимости, а также консультации по дальнейшему лечению и реабилитации. Врач приедет по указанному адресу и проведёт все необходимые процедуры, включая капельницы для стабилизации состояния пациента.
Выяснить больше – запой нарколог на дом
Процедура начинается с осмотра пациента. Врач оценивает основные показатели, включая давление и пульс, а также выраженность симптомов. После этого формируется состав капельницы и определяется тактика лечения, что позволяет эффективно провести вывод из запоя.
Выяснить больше – https://kapelnicza-ot-pokhmelya-voronezh-7.ru/
Первичный осмотр включает оценку витальных показателей, уровня сознания, выраженности симптомов и факторов риска. После этого врач определяет объём вмешательства и приступает к терапии. В большинстве случаев применяется инфузионное лечение, направленное на восстановление водного баланса и выведение токсинов.
Подробнее – наркологическая помощь нижний новгород
Этот текст сочетает в себе элементы познавательного рассказа и аналитической подачи информации. Читатель получает доступ к уникальным данным, которые соединяют прошлое с настоящим и открывают двери в будущее.
Получить исчерпывающие сведения – https://template145.webekspor.com/physical-features-and-adaptations
Эта познавательная публикация погружает вас в море интересного контента, который быстро захватит ваше внимание. Мы рассмотрим важные аспекты темы и предоставим вам уникальные Insights и полезные сведения для дальнейшего изучения.
Проверенные методы — узнай сейчас – https://infobrasilia.com.br/2024/02/agencia-minas-gerais-hospital-julia-kubitschek-abre-unidade-de-hidratacao-para-pacientes-com-dengue
Наркологическая помощь на дому помогает избежать стресса, связанного с поездкой в клинику. Особенно это важно в случаях, когда пациент находится в состоянии тяжёлой интоксикации или переживает абстинентный синдром, который можно только усугубить дополнительной нагрузкой. Врач приедет в кратчайшие сроки, обеспечивая необходимое лечение в первые часы после ухудшения состояния. Также важно, что при выезде специалист гарантирует полную анонимность, что особенно важно для многих людей, которые боятся открыто признаться в своей проблеме. Профессиональная наркологическая помощь на дому позволяет избежать срыва и начать процесс восстановления без стресса.
Подробнее тут – narkolog-na-dom-voronezh-4.ru/
Мы собрали для вас самые захватывающие факты из мира науки и истории. От малознакомых деталей до грандиозных событий — эта статья расширит ваш кругозор и подарит новое понимание того, как устроен наш мир.
Интересует подробная информация – https://az.wikipedia.org/wiki/Kontroller
https://accessbridgepharmacy.shop/# progreso, mexico pharmacy online
Этот текст призван помочь читателю расширить кругозор и получить практические знания. Мы используем простой язык, наглядные примеры и структурированное изложение, чтобы сделать обучение максимально эффективным и увлекательным.
Связаться за уточнением – https://fotografietabeahoernlein.de/auszeichnungen-familienfotografie
Существует ряд ситуаций, при которых вызов специалиста на дом является обоснованным решением:
Ознакомиться с деталями – врач нарколог на дом
В данной обзорной статье представлены интригующие факты, которые не оставят вас равнодушными. Мы критикуем и анализируем события, которые изменили наше восприятие мира. Узнайте, что стоит за новыми открытиями и как они могут изменить ваше восприятие реальности.
Это ещё не всё… – https://ethics-formation.com/e-t-h-i-c-s-rejoint-le-board-de-la-french-tech
http://steadymedspharmacy.com/# SteadyMeds pharmacy
Вывод из запоя в стационаре в Нижнем Новгороде с детоксикацией, мониторингом состояния и медицинской помощью в наркологической клинике «Частный медик 24»
Подробнее тут – нарколог на дом вывод из запоя в нижнем новгороде
Этот информационный материал собраны данные, которые помогут лучше понять текущие тенденции и процессы в различных сферах жизни. Мы предоставляем четкий анализ, графики и примеры, чтобы информация была не только понятной, но и практичной для принятия решений.
Познакомиться с результатами исследований – https://ok.ru/group/53584708239536
india online pharmacy and india pharmacy mail order best india pharmacy
https://cse.google.com.bz/url?sa=t&url=https://formulinepharmacy.com mail order pharmacy india and http://orbita-3.ru/forum/index.php?PAGE_NAME=profile_view&UID=106576 top online pharmacy india
online shopping pharmacy india indian pharmacy and best india pharmacy indian pharmacy online
Этот информационный материал собраны данные, которые помогут лучше понять текущие тенденции и процессы в различных сферах жизни. Мы предоставляем четкий анализ, графики и примеры, чтобы информация была не только понятной, но и практичной для принятия решений.
Полная информация здесь – https://logsheet.digital/blog/apa-itu-logsheet-digital-dan-bagaimana-membantu-meningkatkan-efisiensi-operasional
SteadyMeds pharmacy: SteadyMeds – SteadyMeds
reputable overseas online pharmacies: reputable indian online pharmacy – online pharmacy no prescription needed
AccessBridge Pharmacy: AccessBridge Pharmacy – medicine from mexico
online shopping pharmacy india or top online pharmacy india indian pharmacy paypal
http://cwa4100.org/uebimiau/redir.php?http://formulinepharmacy.com/ indian pharmacy and http://www.garmoniya.uglich.ru/user/sxlnzkwzey/ online shopping pharmacy india
п»їlegitimate online pharmacies india indian pharmacies safe or pharmacy website india indian pharmacies safe
https://accessbridgepharmacy.shop/# AccessBridge Pharmacy
top 10 online pharmacy in india or indianpharmacy com Online medicine order
https://www.google.sm/url?q=https://formulinepharmacy.shop reputable indian pharmacies or http://mbuild.store/user/gkmzowzmph/?um_action=edit online pharmacy india
reputable indian online pharmacy indianpharmacy com and buy prescription drugs from india buy medicines online in india
mexican meds and farmacia online usa phentermine in mexico pharmacy
https://www.google.com.cu/url?q=https://accessbridgepharmacy.com pharmacies in mexico that ship to the us and http://www.sportchap.ru/user/euemnuspaq/ best online mexican pharmacy
best online mexican pharmacy mexican online mail order pharmacy and order medication from mexico mexican pharmacies that ship to the united states
SteadyMeds pharmacy: SteadyMeds – SteadyMeds
https://formulinepharmacy.com/# reliable online pharmacy
SteadyMeds SteadyMeds SteadyMeds pharmacy
Процесс лечения строится поэтапно, что позволяет пациенту проходить все стадии восстановления в безопасном и контролируемом режиме.
Изучить вопрос глубже – лечение хронического алкоголизма в донце
mexico prescription online: mexican pharma – pharmacy mexico city
reputable online pharmacy no prescription reputable indian pharmacies reputable overseas online pharmacies
pharmacy com canada: canadadrugpharmacy com – SteadyMeds pharmacy
Выбор между домашней помощью и стационарным лечением определяется не удобством, а медицинской целесообразностью. В условиях клиники исключаются внешние триггеры, обеспечивается изоляция от источников алкоголя и создается контролируемая среда, где терапевтические решения принимаются на основе объективных показателей, а не субъективных ощущений пациента. Такой подход критически важен для предотвращения осложнений, минимизации дискомфорта абстиненции и формирования устойчивой базы для дальнейшей противорецидивной работы.
Исследовать вопрос подробнее – вывод из запоя в стационаре
Если пациент не может самостоятельно выйти из запоя или симптомы похмелья слишком сильны, вызов нарколога для вывода из запоя на дому с детоксикацией помогает избежать осложнений и минимизировать риски для здоровья. Врач на дому подберет индивидуальный план лечения и проведет все необходимые процедуры для безопасного восстановления организма.
Разобраться лучше – вывод из запоя на дому круглосуточно в екатеринбурге
online pharmacy discount code: indian pharmacy paypal – no script pharmacy
Вывод из запоя в стационаре в Санкт-Петербурге: профессиональное лечение, капельницы и контроль состояния пациента в наркологической клинике «Элегия Мед».
Получить дополнительную информацию – вывод из запоя в стационаре клиника
https://accessbridgepharmacy.shop/# AccessBridge
К показаниям относятся: запой длительностью более 72 часов, выраженная абстиненция с тахикардией, артериальной гипертензией, профузным потоотделением, наличие в анамнезе алкогольных делириев или судорожных эпизодов, сопутствующие хронические заболевания печени, сердца, поджелудочной железы. При тяжелых формах интоксикации, когда в организме накапливаются токсичные продукты распада веществ, резкое прекращение употребления без медицинской поддержки может спровоцировать отек мозга, острую сердечную недостаточность или желудочно-кишечное кровотечение. Стационар позволяет провести полноценную диагностику, включая ЭКГ, экспресс-анализы крови и мониторинг сатурации, что формирует точную картину состояния и исключает шаблонные назначения. В случаях сочетанной зависимости, когда в анамнезе присутствует наркомании, протоколы детоксикации адаптируются под специфику психоактивных соединений и включают усиленный нейрологический контроль.
Получить дополнительные сведения – вывод из запоя в стационаре клиника
india pharmacy mail order or indian pharmacy indian pharmacies safe
https://www.google.co.uz/url?sa=t&url=https://formulinepharmacy.shop online pharmacy india or https://radiationsafe.co.za/user/vvwlwtkyqk/?um_action=edit indian pharmacy
buy prescription drugs from india top online pharmacy india and best india pharmacy buy prescription drugs from india
Основой стационарного лечения является инфузионная терапия, направленная на ускоренное выведение токсинов, коррекцию кислотно-щелочного баланса и восстановление метаболических процессов. Стандартная капельница при выходе из запоя включает кристаллоидные и коллоидные растворы, витаминные комплексы группы B и C, гепатопротекторы, антиоксиданты и симптоматические препараты для нормализации сна и снижения тревожности. Состав, объем и скорость инфузии рассчитываются индивидуально с учетом возраста, массы тела, длительности интоксикации, функции почек и печени, а также наличия аллергических реакций. Мы быстро купируем мучительные проявления абстиненции, восстанавливаем аппетит, устраняем мышечные спазмы и нормализуем суточные ритмы. При необходимости подключаются препараты для стабилизации сердечного ритма, коррекции артериального давления и защиты нейрональных структур от эксайтотоксичности. Все медикаменты сертифицированы, применяются в строгом соответствии с клиническими рекомендациями Минздрава РФ и не вызывают вторичной зависимости. Дозировки ежедневно пересматриваются лечащим врачом на основе лабораторных анализов и клинической динамики, что гарантирует высокий уровень качества медицинской помощи и безопасность пациента. Снятие острых симптомов происходит уже в первые сутки, что значительно улучшает общее самочувствие и возвращает способность к адекватному восприятию действительности.
Углубиться в тему – вывод из запоя в стационаре
Помимо физиологических факторов, важную роль играет психологическая устойчивость пациента. Длительный запой формирует патологическую потребность, при которой человек утрачивает способность добровольно отказаться от очередной дозы в привычной среде. Изоляция в условиях клиники разрывает этот цикл, создавая пространство для мотивационной работы и снижения тревожности. Специалисты клиники работают с когнитивными искажениями, поддерживающими аддикцию, и помогают справиться с внутренним сопротивлением лечению. Такой подход особенно важен при сочетанных расстройствах, когда алкогольная зависимость сопровождается депрессивными проявлениями или генерализованной тревогой.
Выяснить больше – наркология вывод из запоя в стационаре нижний новгород
После снятия острой интоксикации переходим к физическому и психическому восстановлению — комплекс лечебной гимнастики, массажи, физиопроцедуры и сеансы ароматерапии для снятия стресса и повышения общего тонуса.
Выяснить больше – https://lechenie-alkogolizma-krasnodar0.ru/
Если у пациента наблюдаются эти симптомы, важно своевременно обратиться к специалисту для назначения вывода из запоя на дому, что поможет предотвратить более серьезные осложнения и ускорить процесс восстановления, при этом можно заранее заказать помощь с учетом возраста пациента (в том числе после 40–50 лет), данных больного и особенностей его состояния.
Подробнее можно узнать тут – анонимный вывод из запоя на дому екатеринбург
Специалисты компании выполнят изготовление этикеток любого формата и сложности: тканых жаккардовых, деревянных, металлических, кожаных и проч.
Чтобы нейлоновые бирки для одежды не утратили своего первоначального вида и были износостойкими, мы используем только качественные материалы.
http://formulinepharmacy.com/# no prescription needed pharmacy
Вывод из запоя на дому с быстрым облегчением в Екатеринбурге — это процедура, направленная на быстрое снятие острых симптомов алкогольного абстинентного синдрома и возвращение пациента к нормальному состоянию, включая случаи алкоголизма и наркомании. Такая услуга удобна тем, что позволяет не только эффективно справиться с зависимостью, но и избавиться от неприятных проявлений запоя, таких как головная боль, тошнота, слабость и психоэмоциональное напряжение, в комфортной домашней обстановке, при этом оказывается наркологическая помощь. Быстрое облегчение без необходимости госпитализации делает этот метод популярным среди пациентов, которым важен быстрый и безопасный результат, а при необходимости можно заказать дальнейшее кодирование или лечение в стационаре.
Подробнее тут – вывод из запоя на дому круглосуточно
best rx pharmacy online: top online pharmacy india – legal online pharmacies in the us
Терапевтический процесс в стационаре строится по принципу последовательного выполнения клинических задач: диагностика, стабилизация, медикаментозная поддержка и подготовка к амбулаторному этапу. При поступлении врач проводит детальный осмотр, собирает анамнез, оценивает неврологический статус и при необходимости назначает лабораторные исследования. На основе полученных данных формируется индивидуальный протокол, учитывающий возраст, длительность интоксикации, наличие сопутствующих патологий и переносимость лекарственных компонентов. Мы применяем только сертифицированные препараты, зарегистрированные в РФ, и строго соблюдаем клинические рекомендации Минздрава, исключая псевдонаучные методики. Стандарты оказания медицинской помощи фиксируются во внутренних регламентах и регулярно проверяются независимыми аудиторами.
Выяснить больше – вывод из запоя в стационаре санкт-петербург
Процесс вывода из запоя на дому с выездом врача в Екатеринбурге включает несколько этапов, начиная с первичного осмотра пациента и заканчивая корректировкой лечения в зависимости от его состояния. Врач-нарколог проводит полный осмотр, анализирует симптомы и составляет план лечения, который включает детоксикацию организма, поддерживающую терапию и медикаментозное лечение для снятия симптомов абстиненции.
Исследовать вопрос подробнее – вывод из запоя на дому цена
Домашняя детоксикация подходит для ранних стадий интоксикации, когда состояние пациента стабильно, а сопутствующие заболевания отсутствуют. Однако при длительном употреблении алкоголя физиологические изменения требуют более глубокого вмешательства. Стационар обеспечивает изоляцию от триггеров, исключает риск самостоятельного повторного употребления и позволяет врачам динамически корректировать терапию на основе лабораторных показателей и реакции организма. В 2026 году стандарты наркологической помощи делают акцент на превентивной безопасности: раннее выявление признаков делирия, судорожной готовности или кардиологических осложнений позволяет предотвратить критические состояния до их развития. Клиника «Стармед» выстроила работу так, чтобы каждый этап госпитализации логически вытекал из предыдущего, формируя непрерывную цепочку от острой стабилизации до планирования долгосрочной ремиссии.
Подробнее тут – нарколог вывод из запоя в стационаре нижний новгород
Выбор между домашней помощью и стационарным лечением часто определяется степенью физиологической зависимости и наличием сопутствующих патологий. В условиях клиники исключаются внешние триггеры, обеспечивается изоляция от источников алкоголя и создается контролируемая среда, где медицинские решения принимаются на основе объективных показателей, а не субъективных ощущений пациента. Такой подход критически важен для предотвращения осложнений, минимизации дискомфорта абстиненции и формирования устойчивой базы для дальнейшей противорецидивной работы.
Углубиться в тему – вывод из запоя в стационаре клиника
Стационарное наблюдение также целесообразно тогда, когда больному трудно соблюдать рекомендации дома, состояние быстро меняется или родственники не могут обеспечить полноценный контроль. В таких условиях медицинское сопровождение позволяет своевременно оценивать динамику и корректировать лечение. При выраженных психических нарушениях, тревожно-депрессивных проявлениях или изменении поведения к оценке состояния может подключаться психиатр, поскольку у части больных запой сопровождается не только соматическими, но и психическими осложнениями алкогольной зависимости.
Подробнее – вывод из запоя в стационаре анонимно
Услуга
Подробнее можно узнать тут – narkolog-na-dom-ramenskoe4.ru/
https://pravdadaily.com.ua/stsenariy-vertepu-na-10-osib-povnyy-tekst-dlia-rizdvianoho-sviatkuvannia-v-shkoli-ta-tserkvi/
Непрерывный мониторинг витальных показателей — ключевое отличие стационарного формата, делающее его золотым стандартом при лечении запойного синдрома. В палатах клиники «Стармед» установлены автоматизированные системы отслеживания частоты пульса, уровня кислорода в крови, температуры и артериального давления, данные с которых интегрируются в единую электронную медицинскую карту. Медицинский персонал дежурит круглосуточно, что обеспечивает мгновенную реакцию на любое ухудшение состояния: оперативную коррекцию инфузионной терапии, введение симптоматических препаратов, привлечение смежных специалистов при выявлении соматических осложнений. Такой подход исключает полипрагмазию, предотвращает избыточную фармакологическую нагрузку на ослабленный организма и гарантирует, что каждая стадия детоксикации проходит под строгим клиническим контролем, минимизируя риски для жизни и здоровья пациента.
Получить больше информации – наркология вывод из запоя в стационаре нижний новгород
Вывод из запоя на дому в Екатеринбурге: эффективное лечение, детоксикация и восстановление организма в наркологической клинике «Детокс»
Ознакомиться с деталями – http://www.domen.ru
india pharmacy and buy prescription drugs from india indian pharmacy paypal
https://www.google.is/url?q=https://formulinepharmacy.com best online pharmacy india or http://erooups.com/user/osgwslszjk/ top 10 online pharmacy in india
best online pharmacy india indianpharmacy com or Online medicine home delivery indianpharmacy com
safe online pharmacies in canada: canadian mail order pharmacy – SteadyMeds
К стационарному формату чаще всего прибегают в следующих случаях:
Углубиться в тему – вывод из запоя в стационаре анонимно нижний новгород
canadian pharmacy checker: canada rx pharmacy – SteadyMeds pharmacy
reputable indian online pharmacy or mail order pharmacy india top 10 pharmacies in india
http://www.manchestercommunitychurch.com/System/Login.asp?id=54398&Referer=https://formulinepharmacy.com Online medicine home delivery or https://alphafocusir.com/user/asuoeamcxw/?um_action=edit best india pharmacy
india online pharmacy Online medicine order or indian pharmacy online indian pharmacy paypal
AccessBridge Pharmacy: AccessBridge – AccessBridge Pharmacy
В клинике применяются методы, позволяющие воздействовать на все аспекты зависимости. Это обеспечивает комплексное и устойчивое восстановление.
Подробнее можно узнать тут – лечение пивного алкоголизма
Услуга
Исследовать вопрос подробнее – vrach narkolog na dom ramenskoe
http://formulinepharmacy.com/# legitimate online pharmacy
Наркологический стационар с круглосуточным наблюдением — это не просто место для детоксикации, но и пространство для комплексного лечения и реабилитации. Постоянное присутствие медицинского персонала помогает избежать опасных ситуаций, таких как психозы или физиологические сбои, характерные для абстиненции. Прием пациентов может включать кодирование, а также индивидуальные программы лечения, которые разрабатываются в зависимости от состояния пациента и его потребностей на протяжении года.
Углубиться в тему – https://narkologicheskij-staczionar-sankt-peterburg.ru/
pharmacy website india or buy prescription drugs from india online pharmacy india
http://privatelink.de/?https://formulinepharmacy.shop/ top 10 pharmacies in india and https://armandohart.com/user/gsmbiamuaj/?um_action=edit indian pharmacy online
reputable indian pharmacies reputable indian online pharmacy and best india pharmacy india pharmacy
После оформления заявки по телефону или на сайте оператор уточняет адрес и текущее состояние пациента. В критических ситуациях врач может прибыть в течение 60 минут, в стандартном режиме — за 1–2 часа. На месте проводится сбор анамнеза и оценка жизненных показателей: артериального давления, пульса, сатурации и температуры тела. Затем выбирается оптимальный протокол детоксикации — «мягкий» метод для постепенного выведения токсинов или экспресс-методика при острой интоксикации. Процедура капельного введения комбинированного раствора длится от двух до четырёх часов: специалист контролирует состояние пациента, корректирует дозировки и при необходимости вводит корригирующие препараты. По окончании врач оставляет детальный план поддерживающей терапии, включающий рекомендации по питанию, приёму сорбентов и витаминов, а также график повторных осмотров.
Детальнее – нарколог на дом недорого
safe online pharmacies: top 10 online pharmacy in india – legal online pharmacy
Основной этап, направленный на очищение организма от продуктов распада алкоголя и нормализацию функций внутренних органов. Применяются современные препараты с антиоксидантным и гепатопротекторным эффектом.
Изучить вопрос глубже – центр лечения алкоголизма
Срочный домашний выезд особенно важен для семей, которые уже сталкивались с тяжёлыми последствиями алкоголизма и понимают, что обычные попытки «отпаивания» не решают проблему. Врач оценивает не только факт употребления, но и длительность запоя, возраст, наличие хронических болезней, уже принятые медикаменты, риск абстинентного синдрома, состояние сердца и общую нагрузку на организм. Такой формат позволяет анонимно вызвать специалиста, быстро провести необходимые вмешательства и определить, нужен ли только домашний вывод из острого состояния или дальше потребуется кодирование, повторная консультация, реабилитация либо более широкий маршрут помощи при наркомании.
Ознакомиться с деталями – нарколог на дом вывод
За выездом врача обращаются в тех случаях, когда человеку тяжело добраться до клиники, он ослаблен после нескольких дней употребления спиртного или родственникам важно быстрее получить медицинскую консультацию на месте. После осмотра определяют, допустим ли домашний формат, требуется ли капельница, достаточно ли наблюдения на дому или нужен другой объем помощи. Если эпизоды повторяются, в дальнейшем могут обсуждаться лечение алкоголизма, кодирование, участие психолога, реабилитация и более широкая программа помощи при зависимости. Уже на этапе первичного обращения нередко уточняют, как вызвать специалиста, какие услуги доступны на дому и в каких случаях вывод из запоя рассматривают не дома, а в стационаре.
Разобраться лучше – врач нарколог на дом
purple pharmacy online or online pharmacies medicine mexico
https://www.google.ad/url?q=http://accessbridgepharmacy.com best mexican pharmacy and https://exhibitioncourthotel4.co.uk/user-2/jmcesgrjcq/?um_action=edit purple pharmacy online ordering
pharmacy mexico mexican pharma or farmacias online usa mexican pharma
На первом этапе проводится осмотр: врач измеряет давление, пульс, уровень кислорода, температуру тела, оценивает общее состояние, собирает анамнез и анализирует возможные сопутствующие заболевания. При необходимости пациент проходит экспресс-диагностику, включая лабораторные анализы, ЭКГ и консультации других специалистов (кардиолога, невролога).
Выяснить больше – vyvod-iz-zapoya-na-domu-kruglosutochno
best price rx pharmacy canada: SteadyMeds – canadian pharmacy no rx needed
medicine online order FormuLine Pharmacy online pharmacy without scripts
the canadian drugstore: SteadyMeds – SteadyMeds pharmacy
Капельница, как правило, включает в себя не только детоксикацию, но и дополнительные компоненты, такие как витамины, антидепрессанты или препараты для стабилизации сердечного ритма, что делает лечение более комплексным и эффективным.
Детальнее – капельница от запоя цена нижний новгород
За выездом врача чаще обращаются тогда, когда человеку тяжело добраться до клиники, он ослаблен после нескольких дней употребления алкоголя или родственникам важно быстрее понять, какая тактика будет безопасной. После осмотра можно определить, нужна ли капельница, достаточно ли детоксикации на дому, требуется ли повторное наблюдение, а в дальнейшем — консультация по лечению алкоголизма, кодирование или реабилитация. В части случаев уже первый звонок позволяет понять, идет ли речь только о временном ухудшении самочувствия или о состоянии, при котором может потребоваться вывод из запоя в стационаре.
Подробнее тут – https://narkolog-na-dom-ekaterinburg-3.ru/
Нарколог на дом в Самаре: круглосуточная помощь, вывод из запоя и медицинская поддержка на дому под контролем специалистов в наркологической клинике «Похмельная служба»
Узнать больше – вызов нарколога на дом
https://accessbridgepharmacy.com/# AccessBridge Pharmacy
Медицинский контроль играет ключевую роль в безопасности и эффективности процедуры. Под присмотром опытного специалиста исключаются риски неправильной дозировки препаратов, побочных эффектов и осложнений, что особенно важно при проведении капельниц у пациентов с хроническими заболеваниями или при наличии индивидуальных противопоказаний.
Получить больше информации – капельница от похмелья вызов на дом
Реабилитация алкоголиков в Москве: восстановление после зависимости и поддержка специалистов в наркологической клинике «Похмельная служба»
Разобраться лучше – реабилитация алкоголиков в москве
Капельница — это способ быстро облегчить состояние и нормализовать работу организма, не дожидаясь естественного выхода из запоя. Она помогает предотвратить осложнения и ускоряет восстановление. В некоторых случаях, если состояние пациента требует дополнительной помощи, может быть рекомендована консультация психиатра для более комплексной оценки и лечения.
Разобраться лучше – капельницы от запоя вызов город
farmacia pharmacy mexico: AccessBridge – AccessBridge
Отдельно стоит выделить ситуации, когда семья сталкивается не только с алкоголем, но и с употреблением наркотиков. В таких случаях врачебная консультация особенно важна, поскольку последствия интоксикации могут отличаться, а признаки наркомании и алкоголизма иногда накладываются друг на друга. Если речь идет о смешанном употреблении, подход к помощи на дому требует особой осторожности.
Выяснить больше – запой нарколог на дом екатеринбург
Выезд врача на дом рассматривают в ситуациях, когда человеку тяжело добраться до медицинского учреждения, он ослаблен после нескольких дней употребления спиртного или родственникам важно быстро получить очную оценку состояния. После осмотра определяют, допустим ли домашний формат, нужна ли капельница, достаточно ли наблюдения на дому или следует сразу рассматривать другой объем помощи. Если подобные эпизоды повторяются, дальнейшее обсуждение может касаться не только текущего состояния, но и лечения алкоголизма, кодирования, участия психолога, психиатра и реабилитации. В таких случаях наркологическая помощь рассматривается шире, чем разовый вызов на дом.
Узнать больше – http://www.domen.ru
http://formulinepharmacy.com/# online pharmacies
Капельница от похмелья — это одна из самых эффективных процедур для быстрого облегчения симптомов интоксикации после употребления алкоголя. В Нижнем Новгороде существует множество клиник и медицинских центров, которые предлагают услуги капельниц, направленных на восстановление водно-электролитного баланса, улучшение общего самочувствия и снятие неприятных симптомов похмелья. Процесс введения капельницы можно адаптировать под индивидуальные особенности пациента для достижения наилучшего результата.
Получить дополнительную информацию – капельница от похмелья на дому в нижнем новгороде
Капельница от похмелья — это медицинская процедура, которая помогает организму быстрее восстанавливаться после чрезмерного употребления алкоголя, включая последствия запоя и хронического алкоголизма. Эффект капельницы заключается в быстром восстановлении водно-электролитного баланса, выведении токсинов и устранении неприятных симптомов похмелья, таких как головная боль, тошнота и слабость. В отличие от обычных методов, капельница позволяет минимизировать время восстановления и улучшить состояние пациента значительно быстрее.
Получить дополнительную информацию – капельница от похмелья анонимно в самаре
Осмотр на дому особенно важен в тех случаях, когда больному трудно вставать, пить воду, принимать пищу, спокойно лежать или ориентироваться в собственном состоянии. Чем тяжелее переносится выход из употребления, тем выше значение очной оценки, потому что по телефону невозможно полноценно определить границы безопасной помощи. При выраженных симптомах может потребоваться срочный выезд, чтобы вовремя оценить риски и определить, допустим ли вывод из запоя дома или необходимо наблюдение в стационаре.
Детальнее – врач нарколог на дом в москве
pharmacy in mexico that ships to us AccessBridge Pharmacy AccessBridge
На первом этапе проводится осмотр: врач измеряет давление, пульс, уровень кислорода, температуру тела, оценивает общее состояние, собирает анамнез и анализирует возможные сопутствующие заболевания. При необходимости пациент проходит экспресс-диагностику, включая лабораторные анализы, ЭКГ и консультации других специалистов (кардиолога, невролога).
Получить дополнительную информацию – pomoshch-vyvod-iz-zapoya
online pharmacy india or indian pharmacy paypal online shopping pharmacy india
https://toolbarqueries.google.co.th/url?sa=i&url=https://formulinepharmacy.shop top 10 pharmacies in india or http://orbita-3.ru/forum/index.php?PAGE_NAME=profile_view&UID=106482 indianpharmacy com
indian pharmacy indian pharmacy paypal and india online pharmacy indian pharmacy online
Домашний формат помощи рассматривают тогда, когда человеку тяжело добраться до медицинского учреждения, состояние ухудшается после нескольких дней употребления спиртного или родственникам требуется очная оценка без промедления. После осмотра становится ясно, допустима ли помощь на дому, требуется ли капельница, можно ли ограничиться наблюдением в домашних условиях или нужен другой маршрут помощи. Вопрос о том, как вызвать специалиста, нередко возникает в ситуациях, когда состояние нарастает быстро и требуется решение без откладывания. Если подобные эпизоды повторяются, дальнейшее обсуждение может касаться не только текущего состояния, но и лечения алкоголизма, работы с зависимостью и более длительной программы восстановления.
Ознакомиться с деталями – врач нарколог на дом
После диагностики нарколог принимает решение о тактике помощи. Если состояние позволяет проводить лечение вне стационара, врач приступает к детоксикации, восстановлению водно-электролитного баланса и симптоматической терапии. При необходимости используются инфузионные растворы, препараты для снижения интоксикации, нормализации сна, уменьшения тревожности и поддержки работы сердечно-сосудистой системы. Все назначения зависят от состояния пациента и не применяются по шаблону. В случае необходимости может быть направлен к психиатру для дальнейшей реабилитации или отправки в стационар на летний период для более интенсивного наблюдения и лечения.
Выяснить больше – врач нарколог на дом
Далее начинается этап детоксикации — это основа безопасного и эффективного вывода из запоя. Используются капельницы с современными очищающими и поддерживающими препаратами, комплекс витаминов, препараты для поддержки печени, почек и сердечно-сосудистой системы. При необходимости назначаются средства для стабилизации психоэмоционального состояния, купирования судорог, нормализации сна и снижения тревожности.
Получить дополнительные сведения – круглосуточный вывод из запоя балашиха
Отдельно оценивают ситуации, когда подобные эпизоды повторяются. Если человек уже не впервые переносит запой, тяжелый выход из него или выраженное ухудшение самочувствия после алкоголя, вопрос обычно выходит за рамки разовой помощи. Тогда уже при первичном обращении рассматривают не только текущую стабилизацию состояния, но и дальнейшие шаги. При затяжном течении проблемы могут обсуждаться лечение зависимости, программа восстановления и условия, при которых потребуется наблюдение в стационаре.
Разобраться лучше – https://narkolog-na-dom-moskva-17.ru
best online pharmacy no prescription: india pharmacy mail order – us pharmacy no prescription
После оформления заявки по телефону или на сайте оператор уточняет адрес и текущее состояние пациента. В критических ситуациях врач может прибыть в течение 60 минут, в стандартном режиме — за 1–2 часа. На месте проводится сбор анамнеза и оценка жизненных показателей: артериального давления, пульса, сатурации и температуры тела. Затем выбирается оптимальный протокол детоксикации — «мягкий» метод для постепенного выведения токсинов или экспресс-методика при острой интоксикации. Процедура капельного введения комбинированного раствора длится от двух до четырёх часов: специалист контролирует состояние пациента, корректирует дозировки и при необходимости вводит корригирующие препараты. По окончании врач оставляет детальный план поддерживающей терапии, включающий рекомендации по питанию, приёму сорбентов и витаминов, а также график повторных осмотров.
Углубиться в тему – https://narkolog-na-dom-ramenskoe4.ru/narkolog-na-dom-srochno-v-ramenskom/
Для семьи это тоже имеет большое значение. Пока врач в пути, родственники часто совершают одни и те же ошибки: пытаются «отпаивать» человека через силу, смешивают несовместимые медикаменты, дают советы, которые только повышают тревогу, спорят или требуют немедленно взять себя в руки. Профессиональный выезд снимает эту хаотичность. После осмотра врач объясняет, какие симптомы связаны с алкогольной интоксикацией, какие могут указывать на осложнения, что допустимо дома, а что требует перевода в стационар. В этом и состоит ценность выезда: он возвращает контроль над ситуацией и позволяет начать лечение без лишних задержек.
Исследовать вопрос подробнее – врач нарколог на дом
Запрос на выезд врача связан не только с классическим запоем. На практике домашняя помощь нужна в разных ситуациях, когда организму уже трудно компенсировать последствия употребления, а откладывание визита увеличивает риск осложнений.
Подробнее – вызвать нарколога на дом воронеж
Нарколог на дом — это формат срочной медицинской помощи, при котором врач приезжает к пациенту, проводит осмотр, оценивает риски, запускает первичную терапию и принимает решение, можно ли безопасно стабилизировать состояние дома или требуется перевод в стационар. Такой выезд особенно важен тогда, когда человеку тяжело ехать самостоятельно: выраженная слабость, тремор, тошнота, скачки давления, тревога, бессонница, повторный приём алкоголя для «облегчения» и нарастающее ухудшение самочувствия. Домашний формат ценят не только за удобство. Его задача — быстро сократить промежуток между ухудшением состояния и началом лечения. Чем раньше врач увидит пациента, тем проще остановить развитие осложнений, собрать понятный план действий на ближайшие часы и не допустить ошибок самолечения.
Подробнее – https://narkolog-na-dom-voronezh.ru
world pharmacy india and indian pharmacy online buy prescription drugs from india
https://maps.google.com.gi/url?sa=t&url=https://formulinepharmacy.com best india pharmacy and https://www.ixxxnxx.com/user/csoibtsjae/videos indian pharmacy paypal
top 10 pharmacies in india best india pharmacy or reputable indian pharmacies best india pharmacy
Суть капельницы заключается в том, чтобы быстро ввести в организм необходимые растворы, которые помогают восстановить водно-солевой баланс, очищают организм от токсинов, ускоряют обмен веществ и снижают нагрузку на внутренние органы. Врачи-наркологи используют специальные составы, которые включают в себя жидкости, электролиты, витамины и лекарственные средства для снятия симптомов похмелья.
Подробнее – капельница от похмелья вызов на дом
SteadyMeds: SteadyMeds – SteadyMeds
Перед постановкой капельницы специалист оценивает общее состояние пациента, измеряет давление, пульс, уточняет анамнез и возможные противопоказания. На основании этих данных формируется индивидуальный состав, который обеспечивает не только устранение симптомов похмелья, но и безопасное восстановление организма.
Ознакомиться с деталями – капельница от похмелья в самаре
SteadyMeds: SteadyMeds – SteadyMeds pharmacy
Реабилитация алкоголиков с индивидуальной программой — это комплексный подход, включающий медицинскую, психотерапевтическую и социальную поддержку, направленный на восстановление человека после длительного злоупотребления алкоголем. Программа подбирается с учетом всех особенностей пациента, его состояния, сопутствующих заболеваний и эмоциональных проблем. Реабилитация не ограничивается только детоксикацией, но включает также работу с психологом и социальную адаптацию. В некоторых случаях может быть рекомендован выезд на дом для проведения лечения, а также кодирование, чтобы помочь пациенту справиться с зависимостью на всех этапах восстановления. Наркоманическая зависимость может требовать дополнительной терапии и профессиональной помощи для успешного преодоления всех трудностей.
Получить дополнительную информацию – центр реабилитации алкоголиков в москве
Сразу после вызова нарколог прибывает на дом для проведения тщательного первичного осмотра. На этом этапе специалист собирает краткий анамнез, измеряет жизненно важные показатели – пульс, артериальное давление, температуру – и оценивает степень алкогольной интоксикации. Полученные данные служат основой для составления индивидуального плана лечения, позволяющего подобрать оптимальные методы детоксикации.
Углубиться в тему – https://vyvod-iz-zapoya-yaroslavl00.ru/vyvod-iz-zapoya-na-domu-yaroslavl
https://formulinepharmacy.shop/# online pharmacy
best india pharmacy and indian pharmacy online cheapest online pharmacy india
http://cse.google.li/url?q=https://formulinepharmacy.com reputable indian online pharmacy or http://sotoycasal.com/user/aiqmnqtlqz/ buy prescription drugs from india
cheapest online pharmacy india online shopping pharmacy india or pharmacy website india reputable indian online pharmacy
За выездом врача обращаются в тех случаях, когда человеку тяжело добраться до клиники, он ослаблен после нескольких дней употребления спиртного или родственникам важно быстрее получить медицинскую консультацию на месте. После осмотра определяют, допустим ли домашний формат, требуется ли капельница, достаточно ли наблюдения на дому или нужен другой объем помощи. Если эпизоды повторяются, в дальнейшем могут обсуждаться лечение алкоголизма, кодирование, участие психолога, реабилитация и более широкая программа помощи при зависимости. Уже на этапе первичного обращения нередко уточняют, как вызвать специалиста, какие услуги доступны на дому и в каких случаях вывод из запоя рассматривают не дома, а в стационаре.
Исследовать вопрос подробнее – вызвать нарколога на дом екатеринбург
https://accessbridgepharmacy.shop/# farmacia mexicana en chicago
После оформления заявки по телефону или на сайте оператор уточняет адрес и текущее состояние пациента. В критических ситуациях врач может прибыть в течение 60 минут, в стандартном режиме — за 1–2 часа. На месте проводится сбор анамнеза и оценка жизненных показателей: артериального давления, пульса, сатурации и температуры тела. Затем выбирается оптимальный протокол детоксикации — «мягкий» метод для постепенного выведения токсинов или экспресс-методика при острой интоксикации. Процедура капельного введения комбинированного раствора длится от двух до четырёх часов: специалист контролирует состояние пациента, корректирует дозировки и при необходимости вводит корригирующие препараты. По окончании врач оставляет детальный план поддерживающей терапии, включающий рекомендации по питанию, приёму сорбентов и витаминов, а также график повторных осмотров.
Изучить вопрос глубже – нарколог на дом срочно раменское
pharmacy no prescription required: indian pharmacy paypal – no prescription pharmacy paypal
Реабилитация включает несколько ключевых этапов, каждый из которых направлен на решение определённых проблем пациента. Важно, чтобы все этапы были комплексными и последовательными, чтобы достичь наиболее эффективного результата.
Детальнее – http://reabilitacziya-alkogolikov-moskva-1.ru
Многодневные алкогольные запои опасны не только для здоровья, но и для жизни. В этот период организм подвергается тяжелейшей интоксикации, страдают сердце, печень, нервная система, а психоэмоциональное состояние может выйти из-под контроля. Самостоятельно выйти из запоя очень трудно и опасно: любое промедление или попытка “перетерпеть” чреваты судорогами, галлюцинациями, инфарктом, тяжелой депрессией или делирием. Именно поэтому своевременное обращение к профессионалам — залог не только скорого, но и безопасного восстановления. В наркологической клинике «НаркоМедцентр» в Балашихе организован современный и медицински обоснованный вывод из запоя: здесь пациентов ждет индивидуальный подход, круглосуточное медицинское наблюдение и полная конфиденциальность.
Детальнее – врач вывод из запоя
Каждый пациент уникален — именно поэтому мы не применяем «типовых» решений. После первичной консультации и диагностики специалисты «КубаньМед» разрабатывают персональную программу, учитывающую состояние здоровья, психологические особенности и социальные обстоятельства пациента.
Узнать больше – https://lechenie-alkogolizma-krasnodar0.ru/lechenie-alkogolizma-anonimno-krasnodar/
AccessBridge Pharmacy: AccessBridge – AccessBridge Pharmacy
Домашний формат выбирают в тех случаях, когда человеку тяжело добраться до медицинского учреждения, он ослаблен после нескольких дней употребления спиртного или родственникам важно быстрее получить врачебную оценку состояния. После осмотра определяют, допустима ли помощь на дому, требуется ли капельница, возможен ли вывод из запоя в домашних условиях или нужен другой объем наблюдения. Если эпизоды повторяются, обсуждение обычно выходит за рамки снятия острых симптомов и затрагивает дальнейшую помощь при алкоголизме. Уже на этапе первого обращения часто уточняют, можно ли вызвать врача срочно, доступна ли круглосуточная помощь и в каких случаях состояние требует наблюдения в стационаре.
Детальнее – запой нарколог на дом
Нарколог на дом в Екатеринбурге — это формат помощи, который рассматривают в тех случаях, когда после употребления алкоголя больному требуется врачебный осмотр без поездки в клинику. Обычно речь идет о запое, выраженном похмельном синдроме, обезвоживании, слабости, треморе, тревоге, бессоннице, скачках давления, сердцебиении и общем ухудшении самочувствия. В такой ситуации состояние оценивают на месте и определяют, допустима ли помощь дома или нужен другой объем наблюдения.
Получить дополнительные сведения – нарколог на дом цена екатеринбург
Таблетки и народные методы требуют времени для усвоения и часто дают ограниченный результат. Капельница же позволяет обойти желудочно-кишечный тракт и сразу доставить необходимые вещества в кровь, что особенно важно при выраженном похмельном синдроме.
Углубиться в тему – https://kapelnicza-ot-pokhmelya-samara-8.ru
Нарколог на дом в Екатеринбурге: анонимная помощь при алкоголизме, вывод из запоя и поддержка специалистов в наркологической клинике «НЕО+».
Подробнее – вызвать нарколога на дом в екатеринбурге
Эта статья предлагает уникальную подборку занимательных фактов и необычных историй, которые вы, возможно, не знали. Мы постараемся вдохновить ваше воображение и разнообразить ваш кругозор, погружая вас в мир, полный интересных открытий. Читайте и открывайте для себя новое!
Углубить понимание вопроса – https://web.owencloud.ru/site/about
В этом информативном обзоре собраны самые интересные статистические данные и факты, которые помогут лучше понять текущие тренды. Мы представим вам цифры и графики, которые иллюстрируют, как развиваются различные сферы жизни. Эта информация станет отличной основой для глубокого анализа и принятия обоснованных решений.
Перейти к статье – https://www.oconowocc.com/%C2%BFquien-hizo-las-piramides-de-egipto
AccessBridge: AccessBridge Pharmacy – mexican meds
Эта статья сочетает познавательный и занимательный контент, что делает ее идеальной для любителей глубоких исследований. Мы рассмотрим увлекательные аспекты различных тем и предоставим вам новые знания, которые могут оказаться полезными в будущем.
Более того — здесь – https://roskip.ru/OWEN_HMI_SP
purple pharmacy: AccessBridge Pharmacy – AccessBridge Pharmacy
Can you be more specific about the content of your article? After reading it, I still have some doubts. Hope you can help me. https://accounts.binance.info/register-person?ref=JW3W4Y3A
Этот текст сочетает в себе элементы познавательного рассказа и аналитической подачи информации. Читатель получает доступ к уникальным данным, которые соединяют прошлое с настоящим и открывают двери в будущее.
Не упусти шанс – https://ruggedroutes.com/blog/lowrance-off-road-gps-maps-new-limits
https://pinnacle-bet.com.mx/
Pinnacle casino no constituye el casino habitual que te engancha con ofertas masivas cargados de terminos inviables; su oferta de valor descansa sobre comisiones bajas, cuotas de alto valor y un modelo transparente sin artimanas.
https://pharmrate.shop/# Pharm Rate
top online pharmacy: Pharm Rate – best online pharmacy
online ed treatments erectile dysfunction medication online us pharmacy no prescription
ed medication online: cheap ed medication – legal online pharmacies in the us
https://pharmrate.shop/# Pharm Rate
Эта познавательная публикация погружает вас в море интересного контента, который быстро захватит ваше внимание. Мы рассмотрим важные аспекты темы и предоставим вам уникальные Insights и полезные сведения для дальнейшего изучения.
Получить дополнительную информацию – https://borsettastivali.com/product/borsetta-stivali-classic-bag-black-with-black-interior
no prescription pharmacy paypal: buy drugs online – Pharm Rate
Pharm Rate Pharm Rate online pharmacy
Эта статья сочетает в себе как полезные, так и интересные сведения, которые обогатят ваше понимание насущных тем. Мы предлагаем практические советы и рекомендации, которые легко внедрить в повседневную жизнь. Узнайте, как улучшить свои навыки и обогатить свой опыт с помощью простых, но эффективных решений.
Не упусти важное! – https://pgs.uscws.com/about/6th-box
pet pharmacy online: Pet Canada Direct – pet drugs online
legal online pharmacies in the us https://pharmrate.com/# trustworthy online pharmacy
https://pharmrate.shop/# Pharm Rate
buy drugs online http://petcanadadirect.com/# dog medication online
Консультацию психолога https://психолог38.рф в Иркутске можно получить в центре Психолог38. Здесь работают высококвалифицированные специалисты: детские психологи, клинические, семейные и индивидуальные. Мы собрали профессионалов разных направлений, чтобы комплексно подходить к решению запросов клиентов. Бережно, деликатно, с научным подходом. Сложные ситуации в нашей жизни встречаются не редко, и своевременная помощь, поддержка очень важна. Находясь среди людей, легко можно оказаться в одиночестве, один на один со своими проблемами. Если вы ищите лучших психологов, которые реально помогают людям, обратите внимание на нашу организацию.
Публикация предлагает читателю не просто информацию, а инструменты для анализа и саморазвития. Мы стимулируем критическое мышление, предлагая различные точки зрения и призывая к самостоятельному поиску решений.
Не упусти шанс – https://articles.connectnigeria.com/interesting-facts-about-5-nigerian-heroes-and-heroines
Pharm Rate: Pharm Rate – safe online pharmacies
перепланировка в москве pereplanirovka-kvartir15.ru .
https://pharmrate.com/# online pharmacy
cherry 5000 cherry 5000
low cost ed pills: cheap erection pills – medicine online
Если пациент находится в остром состоянии — начинается с детоксикации. Это не только капельницы для вывода токсинов и восстановления баланса в организме, но и поддержка работы сердца, печени, почек, купирование тревоги и бессонницы, снятие судорог, коррекция давления. Весь процесс проходит под наблюдением опытного нарколога, который учитывает хронические заболевания, особенности организма, степень интоксикации.
Ознакомиться с деталями – http://lechenie-alkogolizma-korolev5.ru
http://edmedscoupon.com/# cheap ed pills online
Pharm Rate: Pharm Rate – Pharm Rate
pet rx Pet Canada Direct Pet Canada Direct
Покупка шаблона «Аспро Максимум» — быстрый способ запустить мощный интернет-магазин на 1С-Битрикс без долгой разработки. Переходите по запросу цена Аспро Максимум на 1С Битрикс24. Вы получите готовую структуру, адаптивный дизайн, продуманный каталог и встроенные инструменты для продаж и SEO. Решение легко настраивается под задачи бизнеса и помогает выйти на рынок в кратчайшие сроки.
Такие симптомы требуют медицинского вмешательства, поскольку могут усиливаться без лечения. Капельница позволяет стабилизировать состояние и ускорить восстановление. Услуги могут предоставляться анонимно, а при необходимости пациент направляется на лечение в стационаре.
Исследовать вопрос подробнее – капельница от похмелья анонимно
Консультацию психолога https://психолог38.рф в Иркутске можно получить в центре Психолог38. Здесь работают высококвалифицированные специалисты: детские психологи, клинические, семейные и индивидуальные. Мы собрали профессионалов разных направлений, чтобы комплексно подходить к решению запросов клиентов. Бережно, деликатно, с научным подходом. Сложные ситуации в нашей жизни встречаются не редко, и своевременная помощь, поддержка очень важна. Находясь среди людей, легко можно оказаться в одиночестве, один на один со своими проблемами. Если вы ищите лучших психологов, которые реально помогают людям, обратите внимание на нашу организацию.
best ed medication online: Ed Meds Coupon – top-rated online pharmacies
crazy time game crazy time game
Похмельный синдром сопровождается головной болью, слабостью, нарушением сна, сухостью во рту и нестабильностью давления, что часто наблюдается после запоя или при алкоголизме. Эти симптомы связаны с накоплением токсинов и нарушением водно-солевого баланса. Капельница позволяет ускорить выведение вредных веществ и восстановить нормальное функционирование организма, помогая человеку быстрее выйти из состояния запоев.
Подробнее – http://kapelnicza-ot-pokhmelya-voronezh-4.ru
После употребления алкоголя организм испытывает нагрузку из-за накопления токсинов и нарушения водно-солевого баланса, что особенно выражено после запоя или при алкоголизме. Это проявляется головной болью, слабостью, тошнотой и нарушением сна. Капельница позволяет ускорить выведение вредных веществ и восстановить нормальные процессы, обеспечивая более мягкое и контролируемое восстановление и помогая человеку быстрее выйти из состояния запоев.
Подробнее можно узнать тут – http://www.domen.ru
overseas pharmacy no prescription: overseas online pharmacy – online pharmacy discount code
В зависимости от тяжести состояния подбирается индивидуальная программа детоксикации. В неё входят: — Инфузионная терапия (капельницы) для очищения организма от токсинов; — Поддерживающие препараты для работы сердца, печени, нервной системы; — Симптоматическое лечение (устранение рвоты, судорог, бессонницы); — Витамины и средства для восстановления водно-солевого баланса.
Разобраться лучше – частные наркологические клиники подольск
https://edmedscoupon.com/# cheap ed treatment
trustworthy online pharmacy http://edmedscoupon.com/# ed prescription online
Неотъемлемой частью программы становится психотерапия — работа с мотивацией, психологической поддержкой, поиском и устранением “триггеров” зависимости, проработка самооценки, стрессоустойчивости. К работе обязательно подключаются близкие: совместные консультации помогают восстановить доверие, снизить уровень конфликтов, научиться поддерживать без контроля и упрёков.
Получить больше информации – lechenie-alkogolizma-na-domu-stoimost
pharmacy websites https://edmedscoupon.com/# best online ed meds
pet drugs online: online pet pharmacy – pet pharmacy
Pet Canada Direct Pet Canada Direct online vet pharmacy
Неотъемлемой частью программы становится психотерапия — работа с мотивацией, психологической поддержкой, поиском и устранением “триггеров” зависимости, проработка самооценки, стрессоустойчивости. К работе обязательно подключаются близкие: совместные консультации помогают восстановить доверие, снизить уровень конфликтов, научиться поддерживать без контроля и упрёков.
Получить больше информации – https://lechenie-alkogolizma-korolev5.ru/lechenie-alkogolizma-cena-v-koroleve
https://edmedscoupon.com/# cheap ed medicine
Pharm Rate: pharmacy online – secure medical online pharmacy
Проблемы с алкоголем и наркотиками — это не просто личные трудности, а серьёзное испытание для всей семьи и общества. Самостоятельные попытки справиться с зависимостью редко приводят к успеху и часто только усугубляют ситуацию. Оптимальное решение — обратиться за профессиональной помощью в специализированное учреждение. В наркологической клинике «ВитаРеабилит» в Подольске пациенты получают комплексное лечение под контролем опытных врачей, современные методики детоксикации и реабилитации, а также полную поддержку на всех этапах выздоровления.
Узнать больше – anonimnaya-narkologicheskaya-klinika
us pharmacy no prescription: buy online medicine – worldwide pharmacy online
В зависимости от тяжести состояния подбирается индивидуальная программа детоксикации. В неё входят: — Инфузионная терапия (капельницы) для очищения организма от токсинов; — Поддерживающие препараты для работы сердца, печени, нервной системы; — Симптоматическое лечение (устранение рвоты, судорог, бессонницы); — Витамины и средства для восстановления водно-солевого баланса.
Разобраться лучше – https://narkologicheskaya-klinika-podolsk5.ru/narkologicheskaya-klinika-stacionar-v-podolske
https://pharmrate.shop/# Pharm Rate
ed online pharmacy: Ed Meds Coupon – pharmacy no prescription required
К основным показаниям относятся:
Углубиться в тему – быстрый вывод из запоя в стационаре
ed meds cheap: ed medicines – legit online pharmacy
Капельница от запоя в Нижнем Новгороде: снятие интоксикации, восстановление организма и помощь при запое под контролем специалистов в наркологической клинике «Похмельная служба»
Ознакомиться с деталями – капельница от запоя на дому цена нижний новгород
Выезд нарколога начинается с оценки состояния пациента. Доктора измеряют давление, пульс, оценивают уровень сознания и выраженность симптомов. На основании этих данных формируется план лечения, который реализуется сразу на месте. Такой подход позволяет очень быстро перейти к стабилизации состояния и начать основные этапы работы.
Подробнее – http://vyvod-iz-zapoya-na-domu-sankt-peterburg-9.ru
Наркологическая клиника в Омске оказывает квалифицированную помощь пациентам, страдающим от различных видов зависимости. Основой успешного лечения является комплексный подход, который включает тщательную диагностику, медикаментозное сопровождение, психологическую поддержку и реабилитационные программы. В «АльфаМед» применяются передовые технологии и индивидуальные методики, направленные на восстановление здоровья и предупреждение рецидивов.
Ознакомиться с деталями – https://narkologicheskaya-klinika-omsk0.ru/
https://petcanadadirect.com/# Pet Canada Direct
Капельница от похмелья в Нижнем Новгороде: эффективное снятие интоксикации, восстановление организма и медицинский контроль в наркологической клинике «Похмельная служба»
Подробнее можно узнать тут – капельница от похмелья вызов на дом в нижнем новгороде
Запой сопровождается выраженной интоксикацией, нарушением сна, нестабильностью давления и изменениями в работе нервной системы. При длительном течении состояние может ухудшаться, и самостоятельный выход становится затруднённым. В таких случаях стационар рассматривается как пространство, где можно безопасно стабилизировать показатели и обеспечить постепенное восстановление.
Получить дополнительные сведения – https://vyvod-iz-zapoya-v-staczionare-nizhnij-novgorod-1.ru
cheap erectile dysfunction pills п»їed pills online foreign online pharmacy
worldwide pharmacy online http://edmedscoupon.com/# erectile dysfunction drugs online
legal online pharmacies in the us https://petcanadadirect.com/# pet pharmacy
Pharm Rate: Pharm Rate – online pharmacy
Далее, когда физическое состояние стабилизировано, совместно с врачом выбирается стратегия дальнейшего лечения. В «Новая Точка» доступны современные методы кодирования (уколы, таблетки, вшивание препаратов, гипнотерапия), но решение всегда принимается осознанно, с объяснением плюсов, рисков и индивидуальным подбором метода.
Исследовать вопрос подробнее – http://lechenie-alkogolizma-korolev5.ru/lechenie-alkogolizma-cena-v-koroleve/
Постановка капельницы — это не просто средство для снятия головной боли или тошноты, а комплексное восстановление организма. Состав раствора подбирается в зависимости от симптомов и состояния пациента. Врач-нарколог оценивает общее состояние пациента и выбирает наиболее подходящий состав, который будет наиболее эффективен для него. При необходимости может быть предложена дополнительная помощь, включая кодирование от алкогольной зависимости.
Ознакомиться с деталями – капельница от похмелья нижний новгород
В зависимости от тяжести состояния подбирается индивидуальная программа детоксикации. В неё входят: — Инфузионная терапия (капельницы) для очищения организма от токсинов; — Поддерживающие препараты для работы сердца, печени, нервной системы; — Симптоматическое лечение (устранение рвоты, судорог, бессонницы); — Витамины и средства для восстановления водно-солевого баланса.
Подробнее можно узнать тут – https://narkologicheskaya-klinika-podolsk5.ru/chastnaya-narkologicheskaya-klinika-v-podolske/
pet pharmacy: Pet Canada Direct – Pet Canada Direct
Такие признаки требуют быстрого вмешательства, поскольку состояние может ухудшаться. Выезд врача позволяет стабилизировать показатели и предотвратить развитие осложнений. При этом помощь может предоставляться анонимно.
Разобраться лучше – вывод из запоя на дому санкт-петербург
Услуги нарколога на дому в Самаре включают не только экстренный осмотр, но и комплекс медицинских мероприятий, направленных на снижение интоксикации, облегчение тяжелых симптомов и общее восстановление состояния пациента. Объем помощи зависит от клинической картины, длительности употребления алкоголя или других психоактивных веществ, возраста, хронических заболеваний и текущих рисков. Врач подбирает схему индивидуально, исходя из того, какие задачи необходимо решить в конкретный момент — снять острые проявления, стабилизировать самочувствие или подготовить пациента к дальнейшему лечению зависимости.
Узнать больше – нарколог на дом цена в самаре
Сразу после вызова нарколог прибывает на дом для проведения тщательного первичного осмотра. На этом этапе специалист собирает краткий анамнез, измеряет жизненно важные показатели – пульс, артериальное давление, температуру – и оценивает степень алкогольной интоксикации. Полученные данные служат основой для составления индивидуального плана лечения, позволяющего подобрать оптимальные методы детоксикации.
Получить дополнительную информацию – вывод из запоя цена ярославль
https://pharmrate.shop/# international pharmacy
Капельница от похмелья в Самаре с устранением симптомов интоксикации и контролем состояния в наркологической клинике «Частный медик 24»
Исследовать вопрос подробнее – капельница от похмелья анонимно самара
Каждый пациент уникален — именно поэтому мы не применяем «типовых» решений. После первичной консультации и диагностики специалисты «КубаньМед» разрабатывают персональную программу, учитывающую состояние здоровья, психологические особенности и социальные обстоятельства пациента.
Подробнее тут – https://lechenie-alkogolizma-krasnodar0.ru/lechenie-alkogolizma-anonimno-krasnodar
Нарколог на дом в Воронеже с конфиденциальным выездом, капельницами и поддержкой пациента в наркологической клинике «Частный медик 24»
Узнать больше – нарколог на дом в воронеже
boner pills online: boner pills online – online pharmacy without prescription
dog medicine: п»їdog medication online – pet meds official website
Pet Canada Direct pet med Pet Canada Direct
Многие семьи слишком долго откладывают обращение к услугам нарколога, надеясь, что человек «отойдет сам», выспится, восстановится за день-два или просто даст очередное обещание больше не повторять употребление. На практике такие ожидания часто только отнимают время. Если зависимость уже начала формироваться, самочувствие после алкоголя становится тяжелее, а промежутки между срывами сокращаются, это говорит о том, что проблема вышла за пределы бытовой и требует профессиональной оценки.
Получить дополнительную информацию – оказание наркологической помощи воронеж
Срочная медицинская помощь на дому позволяет не только стабилизировать состояние пациента, но и начать его восстановление без стресса, связанного с поездкой в клинику. Врач приедет с необходимым оборудованием и медикаментами, чтобы провести все необходимые процедуры и помочь пациенту стабилизировать состояние в домашних условиях.
Узнать больше – http://narkolog-na-dom-samara-2.ru
https://edmedscoupon.com/# ed doctor online
Pour une pause jeu, Visitez https://hugobets.wixsite.com/hugo-bets-blog afin de retrouver un casino en ligne avec des parties vives et des options utiles. Ici, le blackjack avance a bon rythme, et le jeu reste facile a suivre. Cette formule attire facilement les joueurs de casino.
Каждый выезд нарколога включает в себя не только инфузионную терапию, но и полноценную оценку состояния пациента, анализ рисков, а также консультацию по дальнейшему лечению. Врач может назначить дополнительные препараты для снятия симптомов ломки, восстановления водно-электролитного баланса и улучшения общего состояния пациента. Также важно, что консультация включает рекомендации по реабилитации, психологической поддержке и кодированию, если это необходимо для пациента, страдающего хроническим алкоголизмом или наркоманией.
Получить дополнительную информацию – narkolog-na-dom-voronezh-4.ru/
Таблетки и народные методы требуют времени для усвоения и часто дают ограниченный результат. Капельница же позволяет обойти желудочно-кишечный тракт и сразу доставить необходимые вещества в кровь, что особенно важно при выраженном похмельном синдроме.
Получить дополнительную информацию – капельница от похмелья на дом в самаре
Основной этап включает постановку капельницы с растворами, направленными на выведение токсинов, восстановление водно-солевого баланса и нормализацию работы внутренних органов. В состав могут входить витамины, седативные препараты, гепатопротекторы и кардиопротекторные средства. В случае ломки и снятия симптомов зависимости у больного, все препараты подбираются индивидуально, чтобы минимизировать дискомфорт и ускорить восстановление.
Подробнее тут – вызов нарколога на дом
Основной задачей капельницы от запоя является быстрое устранение симптомов интоксикации, связанных с длительным употреблением алкоголя. Введение в вену специальных растворов помогает не только вывести алкогольные токсины, но и восстановить нормальное функционирование внутренних органов, пострадавших от воздействия алкоголя. Подбор состава капельницы всегда индивидуален и зависит от состояния пациента, а также может включать дополнительные методы лечения, такие как кодирование от алкоголизма.
Ознакомиться с деталями – капельница от запоя цена в нижнем новгороде
Когда человек или его родственники понимают, что нужна наркологическая помощь в Воронеже, время становится решающим фактором. Запой, ломка, тяжёлая интоксикация — в таких ситуациях промедление может привести к необратимым последствиям для здоровья и жизни. Наша клиника создана именно для того, чтобы оказывать эффективную круглосуточную наркологическую помощь в Воронеже в самых сложных случаях. Мы не заставляем ждать в очередях государственных учреждений, не ставим на учёт и не разглашаем информацию. Всё происходит анонимно, на дому или в комфортных условиях нашей партнёрской клиники. Пациенты из Воронежа, Воронежской области, а также соседних регионов уже более 12 лет выбирают «Клиника Плюс» благодаря сочетанию скорости, профессионализма, полной анонимности и доказанной результативности.
Исследовать вопрос подробнее – narkologicheskaya-pomoshh-voronezh-2.ru/
Наркологический стационар с комфортными условиями сочетает в себе высококлассное медицинское обслуживание и удобства, которые способствуют более быстрому восстановлению пациента. В таких клиниках пациенты не только получают лечение от зависимости, но и имеют возможность восстановиться в комфортных условиях, что важно для психоэмоционального состояния. Комфортные условия способствуют улучшению настроения, уменьшению стресса и созданию более эффективной атмосферы для лечения. В случае запоя или алкоголизма врач может предоставить помощь на дому, чтобы стабилизировать состояние пациента до перевода в стационар.
Изучить вопрос глубже – наркологическая клиника стационар
В клинике каждому пациенту уделяют особое внимание. Врачи знают: универсальных решений нет, за каждым случаем — своя история и свои причины. Первый контакт начинается с конфиденциальной консультации. Можно просто позвонить или написать онлайн — уже на этом этапе врач поможет оценить ситуацию, объяснит возможные этапы и даст рекомендации по подготовке к визиту.
Узнать больше – https://lechenie-alkogolizma-korolev5.r
reputable overseas online pharmacies: Pharm Rate – online pharmacy no rx
После алкоголя в организме накапливаются токсичные продукты распада, нарушается водно-солевой баланс и страдает нервная система, что особенно выражено после запоя или при алкоголизме. Это проявляется головной болью, слабостью, тошнотой и нарушением сна. Капельница помогает ускорить процессы очищения и восстановить внутренние системы, обеспечивая более быстрое облегчение состояния и помогая человеку выйти из состояния запоев.
Детальнее – https://kapelnicza-ot-pokhmelya-voronezh-8.ru
При выборе наркологического стационара в Санкт-Петербурге важно ориентироваться на несколько ключевых критериев. В первую очередь, следует учитывать опыт и квалификацию специалистов, условия пребывания, а также отзывы пациентов. Ведь выбор медицинского учреждения — это не только вопрос качества лечения, но и обеспечения психологического комфорта пациента, что особенно важно при лечении зависимостей. Стоит обратить внимание на стационары, специализирующиеся на лечении наркомании и наркологии, а также учитывать расположение клиники в удобном районе города.
Разобраться лучше – наркологическая клиника стационар
Процесс проведения капельницы от похмелья обычно включает в себя несколько ключевых этапов. Несмотря на простоту процедуры, важно, чтобы её проводил квалифицированный специалист. Каждый этап — от консультации до завершения процедуры — направлен на безопасность пациента и максимальную эффективность лечения.
Разобраться лучше – капельница от похмелья вызов на дом в самаре
dog medicine: Pet Canada Direct – pet med
https://pharmrate.com/# Pharm Rate
Перед постановкой капельницы специалист оценивает общее состояние пациента, измеряет давление, пульс, уточняет анамнез и возможные противопоказания. На основании этих данных формируется индивидуальный состав, который обеспечивает не только устранение симптомов похмелья, но и безопасное восстановление организма.
Подробнее можно узнать тут – капельница от похмелья цена
Pharm Rate: express scripts mail order pharmacy – pharmacy websites
Наркологическая помощь в Воронеже: срочный выезд нарколога, капельницы и лечение зависимостей в наркологической клинике «Клиника Плюс».
Углубиться в тему – наркологическая помощь в воронеже
pharmacy online http://petcanadadirect.com/# Pet Canada Direct
Психологическая помощь сопровождает медикаментозное лечение, способствуя преодолению эмоциональных и поведенческих трудностей. Важным элементом является мотивационная работа, направленная на формирование устойчивого стремления к жизни без зависимости.
Разобраться лучше – https://narkologicheskaya-klinika-omsk0.ru/narkologi-omska
trusted online pharmacy https://petcanadadirect.shop/# Pet Canada Direct
Pet Canada Direct: Pet Canada Direct – Pet Canada Direct
https://edmedscoupon.shop/# pills for ed online
low cost ed meds online Ed Meds Coupon reliable online pharmacy
Наркологический стационар с круглосуточным наблюдением предлагает комплексное лечение и восстановление для людей, страдающих от алкогольной или наркотической зависимости. Пациенты получают помощь в условиях стационара, что позволяет устранить риск срыва и обеспечить безопасное и комфортное выздоровление. В таких клиниках работают квалифицированные наркологи, психологи и другие специалисты, которые контролируют процесс реабилитации на всех этапах. В некоторых случаях может потребоваться вывод из запоя с применением капельниц, а также лечение в специализированном центре для более комплексного восстановления.
Ознакомиться с деталями – наркологическая помощь стационар
Работа с пациентами в наркологическом стационаре начинается с диагностики, которая помогает определить степень зависимости и сопутствующие заболевания. На основе этих данных разрабатывается индивидуальный план лечения. Врачи, наркологи и психотерапевты работают в тесном контакте с пациентом, что позволяет достичь наилучших результатов в процессе восстановления. Важно также убедиться, что клиника имеет необходимую лицензию, а для эффективного лечения могут быть предложены такие процедуры, как прием психотерапевта и кодирование от зависимости.
Подробнее – наркологический стационар санкт-петербург
cheap ed pills or online erectile dysfunction prescription ed drugs online
https://maps.google.co.ke/url?q=https://edmedscoupon.com ed pills or https://lifnest.site/user/vewzksqlrpvewzksqlrp/?um_action=edit order ed pills
cheapest ed treatment online ed pharmacy and cheap ed buy erectile dysfunction pills online
Наркологическая помощь в Воронеже: эффективное лечение запоя, детокс и поддержка специалистов в наркологической клинике «Клиника Плюс».
Подробнее тут – наркологическая помощь на дому
При наличии зависимости от алкоголя или наркотиков часто возникает ситуация, когда самостоятельные попытки избавиться от проблемы не дают результата. В таких случаях обращение в наркологический стационар становится необходимым для более глубокой и профессиональной помощи. Стационарное лечение предполагает круглосуточный контроль и медицинскую помощь, что особенно важно при острых состояниях, таких как алкогольная интоксикация или наркотическое отравление. В процессе лечения могут быть предложены кодирование, а также вывод из запоя или наркотической зависимости, а при необходимости — длительный прием с возможностью лечения на летний период.
Подробнее можно узнать тут – http://narkologicheskij-staczionar-sankt-peterburg-1.ru
Публикация приглашает вас исследовать неизведанное — от древних тайн до современных достижений науки. Вы узнаете, как случайные находки превращались в революции, а смелые мысли — в новые эры человеческого прогресса.
Где можно узнать подробнее? – https://ycems.edu.in/?p=5054
В этой статье-обзоре мы соберем актуальную информацию и интересные факты, которые освещают важные темы. Читатели смогут ознакомиться с различными мнениями и подходами, что позволит им расширить кругозор и глубже понять обсуждаемые вопросы.
Подробнее – https://handicraftsglobalstore.com/vk-com-%E0%B8%A7%E0%B8%B5%E0%B9%80%E0%B8%84-3
online pet pharmacy: pet drugs online – vet pharmacy online
Эта статья сочетает познавательный и занимательный контент, что делает ее идеальной для любителей глубоких исследований. Мы рассмотрим увлекательные аспекты различных тем и предоставим вам новые знания, которые могут оказаться полезными в будущем.
Где можно узнать подробнее? – https://allaroundaccounts.net/tips-to-easily-erase-playback-function-from-dmm-tv-continuation
Публикация приглашает вас исследовать неизведанное — от древних тайн до современных достижений науки. Вы узнаете, как случайные находки превращались в революции, а смелые мысли — в новые эры человеческого прогресса.
Что скрывают от вас? – https://owen-russia.ru/product/as4m
В этой статье представлен занимательный и актуальный контент, который заставит вас задуматься. Мы обсуждаем насущные вопросы и проблемы, а также освещаем истории, которые вдохновляют на действия и изменения. Узнайте, что стоит за событиями нашего времени!
Обратиться к источнику – https://www.aviation-design.fr/laoreet-sit-amet-cursus-sit-amet-dictum/comment-page-91
1xbet g?ncel 1xbet g?ncel .
перепланировка помещения pereplanirovka-kvartir16.ru .
worldwide pharmacy online: Pharm Rate – overseas pharmacy no prescription
В таких ситуациях стационарный уход позволяет обеспечить безопасность пациента, эффективно справиться с его состоянием и подготовить его к дальнейшему лечению или реабилитации. В случае алкоголизма может быть назначена капельница для снятия острых симптомов интоксикации, а также лечение в специализированном центре для комплексного восстановления и профилактики рецидивов.
Подробнее тут – лечение в наркологическом стационаре санкт-петербург
Эта статья сочетает в себе как полезные, так и интересные сведения, которые обогатят ваше понимание насущных тем. Мы предлагаем практические советы и рекомендации, которые легко внедрить в повседневную жизнь. Узнайте, как улучшить свои навыки и обогатить свой опыт с помощью простых, но эффективных решений.
Осуществить глубокий анализ – https://polimed.wroclaw.pl/masz-uporczywe-objawy-somatyczne-wypelnij-ankiete
В этой статье-обзоре мы соберем актуальную информацию и интересные факты, которые освещают важные темы. Читатели смогут ознакомиться с различными мнениями и подходами, что позволит им расширить кругозор и глубже понять обсуждаемые вопросы.
Всё самое вкусное внутри – https://trippy420.org/product/buy-wonka-bar-online
https://pharmrate.com/# Pharm Rate
pharmacy websites or online pharmacy worldwide pharmacy
https://maps.google.com.pa/url?sa=i&url=https://pharmrate.shop legit online pharmacy or https://mantiseye.com/community/jhbxpiqqvr shop medicine online
shop medicine online pharmacy no prescription required or reputable online pharmacy no prescription reliable online pharmacy
buy cannabis online
Pharm Rate: best mail order pharmacy – top online pharmacy
Этот информационный материал собраны данные, которые помогут лучше понять текущие тенденции и процессы в различных сферах жизни. Мы предоставляем четкий анализ, графики и примеры, чтобы информация была не только понятной, но и практичной для принятия решений.
Где можно узнать подробнее? – https://horizon-data.tn/2020/05/29/govern-and-secure-my-organizations-information-4
Наркологическая помощь в Воронеже актуальна в тех случаях, когда проблема с алкоголем или наркотическими веществами переходит в стадию, когда ситуация требует вмешательства специалиста. Это может быть как первый серьезный срыв, так и долгосрочное ухудшение самочувствия, вызванное хроническим употреблением. В обоих случаях крайне важно не упустить момент и обратиться за помощью, пока болезнь не привела к необратимым последствиям.
Детальнее – круглосуточная наркологическая помощь
Pharm Rate Pharm Rate Pharm Rate
Pharm Rate: Pharm Rate – Pharm Rate
vet pharmacy or pet pharmacy pet pharmacy online
http://images.google.ad/url?q=https://petcanadadirect.com discount pet meds or http://fog.gain.tw/space.php?uid=203709 pet pharmacy
pet prescriptions online pet meds for dogs or dog prescriptions online online pet pharmacy
https://pharmrate.shop/# Pharm Rate
where to get ed pills or cheapest ed pills erectile dysfunction online
https://www.google.co.uz/url?sa=t&url=https://edmedscoupon.com cheap ed medicine or https://www.emlynmodels.co.uk/user/ximwvgdljn/ ed pills
online ed medications ed prescription online or erectile dysfunction pills for sale best online ed medication
new pharmacy online and online pharmacy no rx overseas pharmacy no prescription
http://forum.ssmd.com/proxy.php?link=https://pharmrate.com online pharmacies or https://afafnetwork.com/user/qvlfeqeepk/?um_action=edit online pharmacy no rx
worldwide pharmacy trustworthy online pharmacy and online pharmacy without scripts safe online pharmacies
Предлагаем вашему вниманию интересную справочную статью, в которой собраны ключевые моменты и нюансы по актуальным вопросам. Эта информация будет полезна как для профессионалов, так и для тех, кто только начинает изучать тему. Узнайте ответы на важные вопросы и расширьте свои знания!
Заходи — там интересно – https://goldwell-logistics.vn/dich-vu-xuat-nhap-khau
gay sex porn
reliable online pharmacy or trustworthy online pharmacy pharmacy online
http://interflex.biz/url?q=https://pharmrate.com:: no rx needed pharmacy and http://fog.gain.tw/space.php?uid=203166 pharmacy no prescription required
express scripts mail order pharmacy overseas online pharmacy and medicine online order best mail order pharmacy
заказать проект перепланировки квартиры заказать проект перепланировки квартиры .
discount ed meds: cheap erectile dysfunction pills – legitimate online pharmacy
no script pharmacy https://edmedscoupon.com/# cheap ed treatment
Наркологическая помощь в Воронеже становится необходимой в тот момент, когда эпизоды употребления перерастают в клиническую картину алкоголизма или наркомании, а бытовые трудности сменяются устойчивыми симптомами наркозависимости. Для одних семей поводом для обращения становится затяжной запой, сопровождающийся физическим истощением и обезвоживанием. Для других — выраженная тревожность, тремор, скачки артериального давления, агрессия или повторяющиеся срывы после попыток сократить дозировку самостоятельно. Во всех этих случаях важна не разовая процедура, а медицински обоснованная помощь, которая учитывает текущее состояние пациента, минимизирует риски осложнений и определяет дальнейший маршрут восстановления. Когда близкие начинают искать специалиста, они, как правило, хотят решить комплекс задач: стабилизировать самочувствие, понять, достаточно ли домашнего формата или нужна госпитализация, оценить степень сформированной зависимости и выстроить план действий, который не вернет человека в кризис через несколько дней. Именно поэтому профессиональная наркология рассматривается как последовательная система вмешательств — от осмотра и первичной стабилизации до работы с мотивацией, психотерапии и профилактики рецидивов.
Разобраться лучше – скорая наркологическая помощь воронеж
Наркологическая помощь нужна не только тогда, когда ситуация выглядит критической со стороны. Она необходима и в тех случаях, когда зависимость повторяется циклично, а семья уже понимает, что прежние способы не работают. Чем раньше человек переходит от стихийных попыток справиться самостоятельно к профессиональной тактике, тем выше шансы стоновить процесс на менее тяжелом этапе.
Детальнее – наркологическая помощь воронеж
overseas online pharmacy https://petcanadadirect.com/# best pet rx
safe online pharmacies and legal online pharmacy top online pharmacy
https://profitquery.com/share/?url=https://pharmrate.shop safe online pharmacies or https://rightcoachforme.com/author/ylddkwpqvj/ top-rated online pharmacies
safe online pharmacies shop medicine online and no prescription pharmacy paypal legal online pharmacy
vet pharmacy: best pet rx – canada pet meds
http://petcanadadirect.com/# vet pharmacy
buy ed medication online: cheap ed treatment – top-rated online pharmacies
Домашний формат помощи рассматривают тогда, когда человеку тяжело добраться до медицинского учреждения, состояние ухудшается после нескольких дней употребления спиртного или родственникам требуется очная оценка без промедления. После осмотра становится ясно, допустима ли помощь на дому, требуется ли капельница, можно ли ограничиться наблюдением в домашних условиях или нужен другой маршрут помощи. Вопрос о том, как вызвать специалиста, нередко возникает в ситуациях, когда состояние нарастает быстро и требуется решение без откладывания. Если подобные эпизоды повторяются, дальнейшее обсуждение может касаться не только текущего состояния, но и лечения алкоголизма, работы с зависимостью и более длительной программы восстановления.
Подробнее – вызов нарколога на дом
Каждый из этапов важен для успешного лечения наркомании и требует квалифицированной наркологической медицинской помощи. Реабилитационные программы, предлагаемые в Москве, часто включают в себя все эти компоненты, при этом в ряде случаев консультации могут предоставляться бесплатно, что способствует комплексному подходу к решению проблемы зависимости.
Получить дополнительную информацию – центр реабилитации алкоголиков в москве
Основные услуги наркологической помощи
Подробнее можно узнать тут – наркологическая помощь на дому круглосуточно
Реабилитация алкоголиков — это важный этап на пути к избавлению от зависимости. В Москве существует множество центров, предлагающих реабилитацию с индивидуальной программой, что помогает обеспечить более персонализированный и эффективный подход к каждому пациенту. Индивидуальная программа учитывает физическое и психологическое состояние человека, а также его социальное окружение и личные особенности. Это позволяет добиться лучших результатов в лечении и восстановлении.
Ознакомиться с деталями – алкоголик реабилитация наркоманов город
Наиболее частыми причинами обращения становятся запой, выраженная слабость, тремор, тревога, бессонница, тошнота, нестабильное давление, учащенный пульс и ощущение физического истощения. Эти проявления могут сочетаться между собой и усиливаться после прекращения употребления алкоголя, особенно если эпизод длился несколько дней подряд.
Ознакомиться с деталями – врач нарколог на дом в москве
Капельница от похмелья с медицинским контролем в Нижнем Новгороде — это эффективный способ восстановления после алкогольной интоксикации, который позволяет быстро и безопасно нормализовать состояние пациента. Основное отличие такой капельницы от домашних методов состоит в том, что вся процедура проходит под контролем профессионалов, что минимизирует риски для здоровья и повышает эффективность лечения.
Подробнее можно узнать тут – капельница от похмелья на дом
Капельница действует быстро благодаря тому, что активные вещества вводятся непосредственно в кровь, минуя желудочно-кишечный тракт. Это позволяет быстро уменьшить симптомы, такие как головная боль, тошнота, слабость, а также нормализовать работу печени и почек, которые страдают от длительного употребления алкоголя. В некоторых случаях, если требуется длительное наблюдение, пациент может быть направлен в стационар, и лечение может продолжаться на летний период с более тщательным контролем состояния.
Получить дополнительную информацию – капельница от запоя на дому цена в нижнем новгороде
Наркологический стационар в Санкт-Петербурге: помощь при зависимости, восстановление и круглосуточное наблюдение в наркологической клинике «Похмельная служба»
Углубиться в тему – наркологическая клиника стационар
family incest porn
Выезд нарколога на дом в Самаре организован так, чтобы пациент получил помощь без ожидания и без лишней нагрузки на организм. После обращения специалист приезжает по указанному адресу, проводит первичный осмотр, оценивает общее состояние, уровень интоксикации, показатели давления, пульса, дыхания и собирает краткий анамнез. На основании этой оценки врач определяет, можно ли безопасно оказывать помощь на дому, и подбирает подходящую схему лечения, включая возможное кодирование или вывод из алкоголизма. Такой формат позволяет начать медицинские мероприятия сразу после осмотра и быстро перейти к стабилизации состояния.
Подробнее можно узнать тут – narkolog-na-dom-samara-5.ru/
cheap boner pills: Ed Meds Coupon – pharmacy no prescription required
https://edmedscoupon.shop/# cheap erection pills
Когда человек или его родственники понимают, что нужна наркологическая помощь в Воронеже, время становится решающим фактором. Запой, ломка, тяжёлая интоксикация — в таких ситуациях промедление может привести к необратимым последствиям для здоровья и жизни. Наша клиника создана именно для того, чтобы оказывать эффективную наркологическую помощь в Воронеже в самых сложных случаях. Мы не заставляем ждать в очередях государственных учреждений, не ставим на учёт и не разглашаем информацию. Всё происходит конфиденциально, на дому или в комфортных условиях нашей партнёрской клиники. Пациенты из Воронежа, Воронежской области, а также соседних регионов уже более 12 лет выбирают «Клиника Плюс» благодаря сочетанию скорости, профессионализма и доказанной результативности.
Изучить вопрос глубже – клиника наркологической помощи в воронеже
При выборе наркологического стационара в Санкт-Петербурге важно ориентироваться на несколько ключевых критериев. В первую очередь, следует учитывать опыт и квалификацию специалистов, условия пребывания, а также отзывы пациентов. Ведь выбор медицинского учреждения — это не только вопрос качества лечения, но и обеспечения психологического комфорта пациента, что особенно важно при лечении зависимостей. Стоит обратить внимание на стационары, специализирующиеся на лечении наркомании и наркологии, а также учитывать расположение клиники в удобном районе города.
Углубиться в тему – http://www.domen.ru
Pet Canada Direct Pet Canada Direct Pet Canada Direct
Наркологическая помощь в Воронеже сегодня — это не просто медицинская услуга, а реальный шанс быстро и безопасно вернуть контроль над жизнью себе или своему близкому человеку. В крупном городе Центрального Черноземья, где ритм жизни высокий, а стресс и доступность веществ создают серьёзные риски, тысячи жителей ежегодно сталкиваются с проблемой зависимости. Алкоголь, синтетические наркотики, соли, спайсы — всё это требует немедленного профессионального вмешательства. Клиника «Клиника Плюс» предоставляет полную наркологическую помощь в Воронеже 24 часа в сутки, 7 дней в неделю. Мы гарантируем анонимное лечение алкоголизма и наркомании, срочный выезд нарколога на дом в течение 30–60 минут, полную конфиденциальность и современные протоколы лечения 2026 года, которые позволяют купировать острое состояние уже в первые часы.
Детальнее – narkologicheskaya-pomoshh-voronezh-2.ru/
Планируете запуск интернет-магазина на 1С-Битрикс? Шаблон «Аспро: Лайтшоп» — это готовое решение с продуманной структурой, адаптивным дизайном и широкими возможностями настройки. Переходите по запросу интернет-магазин Aspro Liteshop demo. Быстрый старт, удобная админка и интеграция с популярными сервисами позволяют запустить проект без лишних затрат времени и ресурсов. Отличный выбор для эффективного онлайн-бизнеса.
erectile dysfunction online prescription and get ed meds online where to get ed pills
https://www.google.gp/url?sa=t&url=https://edmedscoupon.com best ed meds online or http://yangtaochun.cn/profile/ukndgwouya/ online ed medications
best online ed pills pills for erectile dysfunction online and cheap ed meds online cheap ed drugs
Pharm Rate: legitimate online pharmacy – Pharm Rate
Наркологический стационар с комфортными условиями в Санкт-Петербурге — это специализированное учреждение, которое не только помогает пациентам избавиться от зависимости, но и создает благоприятные условия для выздоровления. В таких стационарах важны не только высококачественные медицинские услуги, но и уютная атмосфера, которая способствует восстановлению физического и психоэмоционального состояния пациента.
Получить дополнительную информацию – лечение в наркологическом стационаре санкт-петербург
Когда клиника далеко, время позднее или важна конфиденциальность, помощь на дому позволяет начать лечение немедленно и в комфортной обстановке. Ниже — типичные ситуации, когда визит нарколога на дом особенно уместен.
Подробнее тут – chastnyj-narkolog-na-dom
https://pharmrate.com/# legitimate online pharmacy
ed pills cheap: Ed Meds Coupon – online pharmacy
Стоимость капельницы от похмелья в Самаре зависит не только от прайса клиники, но и от состава инфузионной терапии, срочности выезда, времени суток и общего состояния пациента, включая возможные последствия алкоголизма. Базовые программы обычно включают осмотр специалиста, постановку капельницы и стандартный набор растворов для снятия интоксикации. Если состояние тяжелее, может потребоваться кодирование или лечение в стационаре, что увеличивает цену из-за расширенного состава препаратов и более длительного наблюдения.
Исследовать вопрос подробнее – http://kapelnicza-ot-pokhmelya-samara-7.ru
pet med and pet rx pet meds official website
https://images.google.gr/url?sa=t&url=http://petcanadadirect.com online vet pharmacy and https://lifnest.site/user/moyaryislumoyaryislu/?um_action=edit best pet rx
pet drugs online vet pharmacy or online vet pharmacy online pet pharmacy
Особенность анонимной реабилитации заключается в создании комфортной и безопасной среды, которая мотивирует пациента работать над собой, не опасаясь осуждения. Это повышает эффективность лечения, ведь пациент может открыться и честно обсуждать свои проблемы без страха быть осужденным.
Подробнее – реабилитация алкоголиков город
Наркологическая помощь в Воронеже сегодня — это не просто медицинская услуга, а реальный шанс быстро и безопасно вернуть контроль над жизнью себе или своему близкому человеку. В крупном городе Центрального Черноземья, где ритм жизни высокий, а стресс и доступность веществ создают серьёзные риски, тысячи жителей ежегодно сталкиваются с проблемой зависимости. Алкоголь, синтетические наркотики, соли, спайсы — всё это требует немедленного профессионального вмешательства. Клиника «Клиника Плюс» предоставляет полную наркологическую помощь в Воронеже 24 часа в сутки, 7 дней в неделю. Мы гарантируем срочный выезд нарколога на дом в течение 30–60 минут, полную анонимность и современные протоколы лечения 2026 года, которые позволяют купировать острое состояние уже в первые часы.
Подробнее тут – оказание наркологической помощи
Наркологическая помощь в Воронеже сегодня — это не просто медицинская услуга, а реальный шанс быстро и безопасно вернуть контроль над жизнью себе или своему близкому человеку. В крупном городе Центрального Черноземья, где ритм жизни высокий, а стресс и доступность веществ создают серьёзные риски, тысячи жителей ежегодно сталкиваются с проблемой зависимости. Алкоголь, синтетические наркотики, соли, спайсы — всё это требует немедленного профессионального вмешательства. Клиника «Клиника Плюс» предоставляет полную наркологическую помощь в Воронеже 24 часа в сутки, 7 дней в неделю. Мы гарантируем анонимное лечение алкоголизма и наркомании, срочный выезд нарколога на дом в течение 30–60 минут, полную конфиденциальность и современные протоколы лечения 2026 года, которые позволяют купировать острое состояние уже в первые часы.
Получить больше информации – круглосуточная наркологическая помощь воронеж
Наркологический стационар в Санкт-Петербурге: круглосуточное лечение, детоксикация и наблюдение специалистов в комфортных условиях в наркологической клинике «Похмельная служба»
Ознакомиться с деталями – narkologicheskij-staczionar-sankt-peterburg.ru/
Pharm Rate: reputable online pharmacy no prescription – pharmacy order online
legitimate online pharmacy or online pharmacy without scripts no prescription pharmacy paypal
http://cse.google.sr/url?q=http://pharmrate.shop medicine online and http://bbs.51pinzhi.cn/home.php?mod=space&uid=7846506 pharmacy websites
buy online medicine medicine online order and best online pharmacy pharmacy websites
Наркологическая помощь в Воронеже актуальна в тех случаях, когда проблема с алкоголем или наркотическими веществами переходит в стадию, когда ситуация требует вмешательства специалиста. Это может быть как первый серьезный срыв, так и долгосрочное ухудшение самочувствия, вызванное хроническим употреблением. В обоих случаях крайне важно не упустить момент и обратиться за помощью, пока болезнь не привела к необратимым последствиям.
Изучить вопрос глубже – narkologicheskaya-pomoshh-voronezh-4.ru/
Особое внимание мы уделяем психологической составляющей. Наркологическая помощь в Воронеже в «Клиника Плюс» — это не только физическое очищение, но и работа с мотивацией, разрушение психологических триггеров зависимости. Родственники получают отдельную поддержку: консультации психолога помогают правильно выстроить общение с зависимым человеком и мотивировать его на дальнейшее лечение. Реабилитация может проходить амбулаторно или в стационаре партнёрских центров с комфортабельными условиями, где пациенты находятся под круглосуточным наблюдением.
Изучить вопрос глубже – клиника наркологической помощи воронеж
Этап вывода из запоя
Ознакомиться с деталями – vyvod-iz-zapoya-kruglosutochno-shchelkovo
Работа с пациентами в наркологическом стационаре начинается с диагностики, которая помогает определить степень зависимости и сопутствующие заболевания. На основе этих данных разрабатывается индивидуальный план лечения. Врачи, наркологи и психотерапевты работают в тесном контакте с пациентом, что позволяет достичь наилучших результатов в процессе восстановления. Важно также убедиться, что клиника имеет необходимую лицензию, а для эффективного лечения могут быть предложены такие процедуры, как прием психотерапевта и кодирование от зависимости.
Изучить вопрос глубже – частный наркологический стационар санкт-петербург
Первые положительные изменения обычно появляются уже через 15–20 минут после начала капельницы. Уменьшается головная боль, снижается чувство тошноты, стабилизируется давление и пульс. К концу процедуры большинство симптомов становится значительно менее выраженными.
Подробнее тут – http://www.domen.ru
Выезд нарколога на дом в Самаре представляет собой структурированный медицинский процесс, направленный на быстрое облегчение состояния пациента и устранение последствий интоксикации. Все этапы оказания помощи проводятся с учетом клинической картины, длительности употребления и индивидуальных особенностей организма. В случае алкоголизма могут быть предложены процедуры кодирования, а также вывод из состояния запоя. При необходимости подключается психиатр для дополнительной оценки и лечения.
Ознакомиться с деталями – http://www.domen.ru
Капельница от запоя с детоксикацией организма в Нижнем Новгороде представляет собой одну из самых эффективных процедур для быстрого улучшения состояния пациента, страдающего от алкогольной зависимости. Такой подход направлен не только на устранение токсинов, но и на восстановление нормального функционирования внутренних органов, которые пострадали от длительного употребления алкоголя.
Ознакомиться с деталями – капельница от запоя на дому нижний новгород
Осмотр на дому особенно важен в тех случаях, когда больному трудно вставать, пить воду, принимать пищу, спокойно лежать или ориентироваться в собственном состоянии. В такой ситуации очная оценка помогает понять, допустим ли домашний формат и достаточно ли его на текущем этапе. При выраженном ухудшении состояния, признаках перегрузки организма или риске осложнений может потребоваться срочный пересмотр тактики.
Получить дополнительную информацию – запой нарколог на дом в москве
При выборе наркологического стационара с комфортными условиями в Санкт-Петербурге важно учитывать несколько ключевых факторов, которые могут повлиять на успех лечения. Кроме высококвалифицированных специалистов и индивидуального подхода, комфортные условия для проживания играют важную роль в процессе восстановления пациента. Это создаёт оптимальные условия для того, чтобы человек мог сосредоточиться на своём здоровье и восстановлении, не отвлекаясь на неприятные или неудобные условия. В некоторых случаях может быть предложено кодирование, а также получение дополнительных данных и консультаций для более точного подхода к лечению.
Разобраться лучше – лечение в наркологическом стационаре санкт-петербург
Наркологическая помощь в Воронеже сегодня — это не просто медицинская услуга, а реальный шанс быстро и безопасно вернуть контроль над жизнью себе или своему близкому человеку. В крупном городе Центрального Черноземья, где ритм жизни высокий, а стресс и доступность веществ создают серьёзные риски, тысячи жителей ежегодно сталкиваются с проблемой зависимости. Алкоголь, синтетические наркотики, соли, спайсы — всё это требует немедленного профессионального вмешательства. Клиника «Клиника Плюс» предоставляет полную наркологическую помощь в Воронеже 24 часа в сутки, 7 дней в неделю. Мы гарантируем срочный выезд нарколога на дом в течение 30–60 минут, полную анонимность и современные протоколы лечения 2026 года, которые позволяют купировать острое состояние уже в первые часы.
Разобраться лучше – оказание наркологической помощи в воронеже
no rx needed pharmacy https://petcanadadirect.com/# Pet Canada Direct
Помощь на дому рассматривают при состояниях, которые сопровождаются заметным ухудшением самочувствия после алкоголя. Обычно это запой на протяжении нескольких дней, тяжелое похмелье, выраженная слабость, бессонница, тревога, дрожь в руках, сухость во рту, отсутствие аппетита, тошнота, раздражительность и ощущение истощения. В подобных случаях врачебный осмотр нужен для того, чтобы оценить тяжесть состояния и определить, безопасен ли домашний формат в конкретной ситуации.
Разобраться лучше – вызвать нарколога на дом москва
Наркологический стационар с комфортными условиями в Санкт-Петербурге — это специализированное учреждение, которое не только помогает пациентам избавиться от зависимости, но и создает благоприятные условия для выздоровления. В таких стационарах важны не только высококачественные медицинские услуги, но и уютная атмосфера, которая способствует восстановлению физического и психоэмоционального состояния пациента.
Исследовать вопрос подробнее – частный наркологический стационар в санкт-петербурге
Многие семьи откладывают визит к наркологу, надеясь, что организм восстановится самостоятельно после отдыха, а обещания «больше не повторится» окажутся надежным ориентиром. На практике при сформированной зависимости такие ожидания лишь отнимают критическое время. Если промежутки между эпизодами употребления сокращаются, похмелье переносится тяжелее, а контроль над дозой утрачивается, проблема переходит из бытовой плоскости в медицинскую. Откладывание помощи формирует ложное чувство контроля, истощает ресурсы организма и снижает готовность пациента к терапии в будущем. Решение обратиться к профессионалам часто принимается на пределе эмоциональных и физических сил, но именно своевременный шаг определяет прогноз восстановления.
Разобраться лучше – наркологическая помощь анонимно
Реабилитация алкоголиков с поддержкой специалистов в Москве представляет собой важный и сложный процесс, в котором ключевую роль играет профессиональное вмешательство. Программы реабилитации включают в себя не только медицинскую помощь, но и психологическую, социальную и эмоциональную поддержку, что способствует успешному и долгосрочному восстановлению пациента. Такая комплексная помощь является основой эффективного лечения и предотвращения рецидивов.
Детальнее – reabilitacziya-alkogolikov-moskva-1.ru/
Выбирая наркологический стационар в Санкт-Петербурге, важно учитывать не только стоимость лечения, но и репутацию учреждения, а также подход, который применяется к лечению зависимых. Подходящее учреждение обеспечит не только лечение физической зависимости, но и долгосрочное восстановление и психологическую поддержку. Важно, чтобы в клинике предоставлялась психотерапия и была возможность консультации психиатра для комплексной помощи пациенту.
Изучить вопрос глубже – лечение в наркологическом стационаре в санкт-петербурге
Нужна градирня? что такое градирня и для чего она нужна ключевой элемент системы охлаждения, позволяющий эффективно снижать температуру воды за счет теплообмена с воздухом. Применяется в промышленности, энергетике и на предприятиях. Обеспечивает стабильную и экономичную работу оборудования.
https://edmedscoupon.shop/# erection pills online
buy erectile dysfunction pills online: Ed Meds Coupon – buy online medicine
order ed meds online Ed Meds Coupon online pharmacy no prescription
online pharmacy no prescription needed https://petcanadadirect.shop/# pet pharmacy online
Этот перечень помогает быстро оценить необходимость вызова. Если вы узнали в нем свою ситуацию — оптимально начать терапию как можно раньше: так детокс проходит мягче, а риск осложнений и срывов в первые сутки ниже.
Получить дополнительные сведения – https://narkolog-na-dom-serpuhov6.ru/vrach-narkolog-na-dom-v-serpuhove/
Перед постановкой капельницы специалист оценивает общее состояние пациента, измеряет давление, пульс, уточняет анамнез и возможные противопоказания. На основании этих данных формируется индивидуальный состав, который обеспечивает не только устранение симптомов похмелья, но и безопасное восстановление организма.
Подробнее тут – капельница от похмелья на дому самара
Похмельный синдром сопровождается головной болью, слабостью, тошнотой, сухостью во рту и нарушением сна, что часто возникает после запоя или при алкоголизме. Эти симптомы появляются из-за накопления токсинов и нарушения водно-солевого баланса. Капельница помогает ускорить выведение вредных веществ и восстановить нормальные функции организма, снижая нагрузку на внутренние системы и помогая человеку быстрее выйти из состояния запоев.
Подробнее тут – капельница от похмелья вызов на дом в воронеже
ed pills or online erectile dysfunction pills buy ed pills
https://images.google.com.ai/url?sa=t&url=https://edmedscoupon.com cheap ed medicine or http://clubdetenisalbatera.es/user/qwjsniuixu/ buy erectile dysfunction medication
ed pills cheap pills for erectile dysfunction online and ed treatment online discount ed pills
В некоторых случаях одной капельницы достаточно для полного восстановления. Однако при тяжёлой интоксикации или длительном употреблении алкоголя врач может рекомендовать повторную инфузию для закрепления эффекта и более глубокого очищения организма.
Разобраться лучше – капельница от похмелья на дом в самаре
Сначала администратор собирает ключевые данные: возраст и примерный вес, длительность употребления, описание симптомов, хронические заболевания, аллергии и принимаемые лекарства. По этой информации врач заранее продумывает схему инфузии и прогнозирует длительность процедуры.
Получить дополнительные сведения – https://narkolog-na-dom-serpuhov6.ru/narkolog-na-dom-ceny-v-serpuhove
Стоимость капельницы от похмелья в Самаре зависит не только от прайса клиники, но и от состава инфузионной терапии, срочности выезда, времени суток и общего состояния пациента, включая возможные последствия алкоголизма. Базовые программы обычно включают осмотр специалиста, постановку капельницы и стандартный набор растворов для снятия интоксикации. Если состояние тяжелее, может потребоваться кодирование или лечение в стационаре, что увеличивает цену из-за расширенного состава препаратов и более длительного наблюдения.
Разобраться лучше – http://www.domen.ru
no prescription needed pharmacy or trusted online pharmacy reliable online pharmacy
https://www.winplc7.com/download.php?Link=https://pharmrate.com/ online drugs order or https://www.hapkido.com.au/user/ddd23fastmailonii-org/ online pharmacy discount code
legal online pharmacies in the us online pharmacy no rx or foreign online pharmacy pharmacy websites
Капельница от запоя с детоксикацией организма в Нижнем Новгороде представляет собой одну из самых эффективных процедур для быстрого улучшения состояния пациента, страдающего от алкогольной зависимости. Такой подход направлен не только на устранение токсинов, но и на восстановление нормального функционирования внутренних органов, которые пострадали от длительного употребления алкоголя.
Выяснить больше – капельница от запоя цена
Капельница от похмелья — это медицинская процедура, направленная на быстрое восстановление организма после алкогольной интоксикации. Она помогает устранить обезвоживание, нормализовать обменные процессы и снизить токсическую нагрузку на внутренние органы. В отличие от домашних методов, инфузионная терапия действует напрямую через кровоток, обеспечивая более быстрый и выраженный эффект.
Детальнее – http://www.domen.ru
Выбор наркологического стационара с круглосуточным наблюдением в Санкт-Петербурге — это важный шаг на пути к выздоровлению. При таком выборе следует обратить внимание на несколько ключевых аспектов, которые помогут определить подходящее место для лечения и реабилитации. Правильный стационар поможет не только справиться с зависимостью, но и минимизировать риск рецидивов в будущем. Круглосуточно предоставляется прием пациентов, а также возможность кодирования, что значительно повышает эффективность лечения и ускоряет процесс восстановления.
Углубиться в тему – наркологический стационар в санкт-петербурге
Помощь на дому рассматривают при состояниях, которые сопровождаются заметным ухудшением самочувствия после алкоголя. Это может быть запой на протяжении нескольких дней, тяжелое похмелье, дрожь в руках, нарушение сна, выраженная слабость, тревога, тошнота, сухость во рту, снижение аппетита и признаки обезвоживания. В таких случаях осмотр врача нужен для того, чтобы оценить тяжесть состояния и понять, безопасно ли оставаться дома.
Исследовать вопрос подробнее – запой нарколог на дом
Наркологическая помощь в Воронеже: анонимное лечение алкоголизма и наркомании, круглосуточная помощь в наркологической клинике «Клиника Плюс».
Получить больше информации – вызов наркологической помощи в воронеже
Pet Canada Direct: pet meds online – best pet rx
top online pharmacy and online pharmacy no prescription needed top-rated online pharmacies
http://kartinki.net/a/redir/?url=https://pharmrate.com:: online pharmacy without scripts or https://afafnetwork.com/user/wsraekjhfq/?um_action=edit worldwide pharmacy online
no prescription pharmacy paypal safe online pharmacies or pharmacy online no rx needed pharmacy
Капельница от запоя в Нижнем Новгороде используется для облегчения состояния пациента в момент абстиненции после длительного употребления алкоголя. Этот метод дает возможность быстро вывести токсины из организма, восстановить водно-солевой баланс и нормализовать работу внутренних органов. Все это способствует более легкому переходу пациента к процессу реабилитации и улучшению его самочувствия.
Разобраться лучше – вызов на дом капельницы от запоя нижний новгород
Нарколог на дом в Самаре: круглосуточная помощь, вывод из запоя и медицинская поддержка на дому под контролем специалистов в наркологической клинике «Похмельная служба»
Детальнее – вызвать нарколога на дом в самаре
Нужна септик или погреб? https://septikidlyadoma.mystrikingly.com эффективное решение для автономной канализации. Системы обеспечивают качественную очистку сточных вод, устраняют запахи и безопасны для окружающей среды. Подходят для частных домов, коттеджей и загородных участков.
http://edmedscoupon.com/# erectile dysfunction medication online
Наркологический стационар в Санкт-Петербурге: круглосуточная помощь, лечение зависимости и восстановление в наркологической клинике «Похмельная служба»
Углубиться в тему – http://narkologicheskij-staczionar-sankt-peterburg-4.ru
Наркологический стационар с круглосуточным наблюдением в Санкт-Петербурге — это специализированное медицинское учреждение, предоставляющее помощь пациентам с зависимостью от алкоголя, наркотиков или других психоактивных веществ. В таких стационарах пациенты получают не только лечение, но и постоянное медицинское наблюдение, что значительно повышает безопасность и эффективность терапии. Круглосуточная поддержка специалистов позволяет предотвратить осложнения и быстро реагировать на изменения в состоянии пациента. В некоторых случаях, таких как запой или хронический алкоголизм, может быть рекомендован выезд на дом для оказания неотложной помощи, прежде чем пациент будет переведен в стационар.
Изучить вопрос глубже – лечение в наркологическом стационаре
Когда зависимости становятся хроническими и угрожают жизни пациента, комплексная реабилитация при наркомании в специализированных клиниках Москвы, включая вывод из состояния в стационаре и последующий анализ данных о состоянии пациента, может стать единственным возможным решением. Процесс восстановления включает в себя работу не только с зависимостью, но и с психоэмоциональным состоянием, что делает лечение более эффективным и долговечным.
Получить дополнительную информацию – центр реабилитации алкоголиков
Острые состояния могут проявляться по-разному: от выраженной слабости, тошноты, тремора и бессонницы до мучительной ломки, резкой тревоги, скачков артериального давления, учащенного сердцебиения, раздражительности и спутанности сознания. У пациентов с хроническими заболеваниями, в пожилом возрасте или после длительного употребления риски возрастают еще сильнее. Особенно опасно ориентироваться только на внешнее впечатление, потому что даже в тех случаях, когда человек находится дома и формально «в сознании», его состояние уже может требовать медицинского вмешательства.
Получить дополнительную информацию – круглосуточная наркологическая помощь воронеж
Если вы заметили, что проблема с алкоголем или наркотиками становится серьезной, или если близкий человек страдает от длительного запоя, рекомендуется не откладывать обращение за помощью. Зависимость, даже если она кажется «легкой» на первых порах, быстро прогрессирует, а запои становятся все более продолжительными. Постоянные срывы, ухудшение физического состояния, проблемы со здоровьем — это все признаки того, что необходимо вмешательство квалифицированного нарколога.
Получить больше информации – наркологическая помощь
Такие симптомы требуют медицинского вмешательства, поскольку могут усиливаться и приводить к ухудшению состояния. Капельница помогает стабилизировать самочувствие и снизить нагрузку на организм. Услуги могут предоставляться анонимно, а при необходимости пациент направляется на лечение в стационаре.
Детальнее – капельница от похмелья вызов на дом
Реабилитация алкоголиков с анонимной поддержкой предоставляет несколько значительных преимуществ. Она помогает избежать социальных предрассудков, связанных с зависимостью, и позволяет пациенту сосредоточиться исключительно на своем здоровье и процессе восстановления. Это особенно важно для тех, кто чувствует себя изолированным или боится осуждения со стороны окружающих. Анонимность также способствует большему доверию к лечению и уменьшает внутреннее сопротивление пациента.
Получить больше информации – http://www.domen.ru
Pharm Rate: Pharm Rate – Pharm Rate
В Воронеже капельница от похмелья применяется в ситуациях, когда симптомы выражены и не проходят самостоятельно, особенно после запоя или в запое. Врач проводит консультацию, оценивает состояние пациента, выраженность интоксикации и принимает решение о проведении процедуры. Важно, что лечение направлено не только на снятие симптомов, но и на восстановление организма после алкоголизма. При необходимости можно оставить заявку и уточнить цены или получить помощь бесплатно в рамках первичной консультации.
Исследовать вопрос подробнее – капельница от похмелья анонимно
Ситуации, когда требуется срочный вызов нарколога на дом в Самаре, как правило, связаны с острыми проявлениями алкогольной или наркотической интоксикации, а также с ухудшением общего состояния пациента на фоне длительного употребления психоактивных веществ. Важно понимать, что своевременное вмешательство специалиста позволяет предотвратить развитие тяжелых осложнений, включая нарушения работы сердечно-сосудистой системы, дыхания и центральной нервной системы.
Исследовать вопрос подробнее – нарколог на дом самара
Капельница от похмелья с медицинским контролем представляет собой комплексную терапию, которая включает в себя различные препараты, направленные на быстрое восстановление организма. Каждый элемент процедуры подобран с учётом состояния пациента, что позволяет обеспечить максимальную эффективность лечения и минимизировать возможные риски.
Изучить вопрос глубже – капельница от похмелья на дом в нижнем новгороде
reputable online pharmacy no prescription or overseas pharmacy no prescription us pharmacy no prescription
http://www.prolog.gr/portfolio.php?n=2&comp=freeblue&link=pharmrate.shop legitimate online pharmacy and http://www.donggoudi.com/home.php?mod=space&uid=4268763 legal online pharmacy
buy online medicine medicine online order or secure medical online pharmacy no rx needed pharmacy
erectile dysfunction pills online: ed meds on line – online pharmacy no rx
Наиболее частыми причинами обращения становятся запой, выраженная слабость, тремор, нарушение сна, тревога, учащенный пульс, нестабильное давление, тошнота и ощущение физического истощения. Эти проявления могут сочетаться между собой и усиливаться после прекращения употребления алкоголя, особенно если эпизод длился несколько дней.
Ознакомиться с деталями – https://narkolog-na-dom-moskva-19.ru
Процедура проведения капельницы от запоя обычно не занимает много времени и проводится в условиях медицинского центра. Во время процедуры пациент может ощущать незначительный дискомфорт при введении иглы, но процесс восстановления организма через вену происходит быстро и эффективно. Капельница помогает снизить уровень алкоголя в крови, улучшить метаболизм и предотвратить ухудшение состояния.
Получить дополнительную информацию – http://www.domen.ru
После введения растворов активные вещества быстро распределяются по организму. Это способствует выведению продуктов распада алкоголя, улучшению работы нервной системы и восстановлению энергетического баланса. Уже в процессе инфузии уменьшаются головная боль, тошнота и слабость.
Получить дополнительную информацию – капельница от похмелья самара
Обращение в наркологический стационар в Санкт-Петербурге может стать важным шагом для людей, страдающих от алкогольной или наркотической зависимости. Стационарное лечение предоставляет пациентам не только медицинскую помощь, но и психологическую поддержку, необходимую для успешной реабилитации. Это подход, ориентированный на комплексное восстановление здоровья, физическое и психоэмоциональное состояние пациента.
Узнать больше – частный наркологический стационар санкт-петербург
Реабилитация алкоголиков с поддержкой специалистов в Москве представляет собой важный и сложный процесс, в котором ключевую роль играет профессиональное вмешательство. Программы реабилитации включают в себя не только медицинскую помощь, но и психологическую, социальную и эмоциональную поддержку, что способствует успешному и долгосрочному восстановлению пациента. Такая комплексная помощь является основой эффективного лечения и предотвращения рецидивов.
Углубиться в тему – алкоголик реабилитация наркоманов в москве
Наиболее частыми причинами обращения становятся запой, выраженная слабость, тремор, нарушение сна, тревога, учащенный пульс, нестабильное давление, тошнота и ощущение физического истощения. Эти проявления могут сочетаться между собой и усиливаться после прекращения употребления алкоголя, особенно если эпизод длился несколько дней.
Изучить вопрос глубже – http://narkolog-na-dom-moskva-19.ru/
Домашний формат выбирают тогда, когда человеку тяжело добраться до медицинского учреждения, он ослаблен после нескольких дней употребления алкоголя или родственникам важно быстро получить врачебную оценку состояния. После осмотра определяют, допустима ли помощь на дому, требуется ли детоксикация, нужна ли капельница, достаточно ли домашнего наблюдения или следует сразу рассматривать другой объем помощи. Если эпизоды повторяются, обсуждение может выходить за рамки одного выезда и включать лечение алкоголизма, помощь при зависимости, кодирование, участие психолога и реабилитацию. Уже на этапе первичного обращения нередко уточняют, как вызвать врача, какие услуги доступны на дому и в каких условиях домашний формат остается безопасным.
Выяснить больше – нарколог на дом вывод москва
Алкоголизм и наркомания — это не просто физическая зависимость, но и психологическая. Зависимые люди часто не осознают всю степень своей проблемы и откладывают лечение, что делает ситуацию только хуже. Родственники могут долго терпеть, не зная, как помочь, но в таких случаях лучший шаг — обратиться к квалифицированному специалисту.
Подробнее можно узнать тут – круглосуточная наркологическая помощь в воронеже
Капельница от похмелья — это одна из самых эффективных процедур для быстрого облегчения симптомов интоксикации после употребления алкоголя. В Нижнем Новгороде существует множество клиник и медицинских центров, которые предлагают услуги капельниц, направленных на восстановление водно-электролитного баланса, улучшение общего самочувствия и снятие неприятных симптомов похмелья. Процесс введения капельницы можно адаптировать под индивидуальные особенности пациента для достижения наилучшего результата.
Подробнее тут – капельница от похмелья на дом
Когда человек или его родственники понимают, что нужна наркологическая помощь в Воронеже, время становится решающим фактором. Запой, ломка, тяжёлая интоксикация — в таких ситуациях промедление может привести к необратимым последствиям для здоровья и жизни. Наша клиника создана именно для того, чтобы оказывать эффективную наркологическую помощь в Воронеже в самых сложных случаях. Мы не заставляем ждать в очередях государственных учреждений, не ставим на учёт и не разглашаем информацию. Всё происходит конфиденциально, на дому или в комфортных условиях нашей партнёрской клиники. Пациенты из Воронежа, Воронежской области, а также соседних регионов уже более 12 лет выбирают «Клиника Плюс» благодаря сочетанию скорости, профессионализма и доказанной результативности.
Получить больше информации – круглосуточная наркологическая помощь
Запой — это состояние, которое развивается на фоне длительного употребления алкоголя, сопровождающееся острыми симптомами интоксикации. Капельница от запоя может быть необходима, когда состояние пациента требует немедленного вмешательства. Важно своевременно заметить признаки, указывающие на необходимость медицинской помощи, таких как признаки алкоголизма, и в случае необходимости — кодирование или вывод из запоя для более комплексного лечения.
Разобраться лучше – поставить капельницу от запоя
Реабилитация алкоголиков с анонимной поддержкой предоставляет несколько значительных преимуществ. Она помогает избежать социальных предрассудков, связанных с зависимостью, и позволяет пациенту сосредоточиться исключительно на своем здоровье и процессе восстановления. Это особенно важно для тех, кто чувствует себя изолированным или боится осуждения со стороны окружающих. Анонимность также способствует большему доверию к лечению и уменьшает внутреннее сопротивление пациента.
Подробнее – https://reabilitacziya-alkogolikov-moskva-4.ru
https://edmedscoupon.com/# erection pills online
ed treatment online: ed online pharmacy – reputable online pharmacy no prescription
Нарколог на дом в Москве: круглосуточный выезд, детоксикация и лечение зависимостей в наркологической клинике «Клиника доктора Калюжной».
Детальнее – нарколог на дом вывод в москве
При выборе наркологического стационара в Санкт-Петербурге важно ориентироваться на несколько ключевых критериев. В первую очередь, следует учитывать опыт и квалификацию специалистов, условия пребывания, а также отзывы пациентов. Ведь выбор медицинского учреждения — это не только вопрос качества лечения, но и обеспечения психологического комфорта пациента, что особенно важно при лечении зависимостей. Стоит обратить внимание на стационары, специализирующиеся на лечении наркомании и наркологии, а также учитывать расположение клиники в удобном районе города.
Углубиться в тему – narkologicheskij-staczionar-sankt-peterburg-3.ru/
Этот перечень помогает быстро оценить необходимость вызова. Если вы узнали в нем свою ситуацию — оптимально начать терапию как можно раньше: так детокс проходит мягче, а риск осложнений и срывов в первые сутки ниже.
Исследовать вопрос подробнее – http://narkolog-na-dom-serpuhov6.ru
Реабилитация алкоголиков в Москве: лечение зависимости, восстановление и поддержка под контролем специалистов в наркологической клинике «Похмельная служба»
Разобраться лучше – клиника реабилитации алкоголиков
Наркологическая помощь в Воронеже: анонимное лечение алкоголизма и наркомании, круглосуточная помощь в наркологической клинике «Клиника Плюс».
Получить дополнительные сведения – http://www.domen.ru
Перед постановкой капельницы специалист оценивает общее состояние пациента, измеряет давление, пульс, уточняет анамнез и возможные противопоказания. На основании этих данных формируется индивидуальный состав, который обеспечивает не только устранение симптомов похмелья, но и безопасное восстановление организма.
Исследовать вопрос подробнее – капельница от похмелья на дом самара
Нарколог на дом в Москве — это формат медицинской помощи, который рассматривают при состояниях после употребления алкоголя, когда больному требуется осмотр врача без поездки в клинику. Чаще всего обращение связано с запоем, выраженным похмельным синдромом, бессонницей, тревогой, слабостью, тремором, обезвоживанием, скачками давления, сердцебиением и общим ухудшением самочувствия. Дальнейшая тактика зависит от состояния больного на момент осмотра, продолжительности употребления алкоголя и сопутствующих заболеваний.
Подробнее можно узнать тут – вызов нарколога на дом в москве
Pharm Rate: no script pharmacy – best online pharmacy
Острые состояния редко развиваются внезапно без предпосылок. Чаще всего им предшествуют недели или месяцы нарастающей нагрузки на нервную и сердечно-сосудистую системы. Игнорирование ранних сигналов приводит к тому, что в момент кризиса требуются уже не профилактические меры, а экстренная стабилизация. Профессиональная оценка позволяет разграничить ситуации, где достаточно амбулаторной поддержки, и те, где необходимо круглосуточное наблюдение. Своевременное вмешательство снижает вероятность осложнений, сокращает длительность восстановления и повышает готовность пациента к дальнейшей терапии.
Получить больше информации – скорая наркологическая помощь в воронеже
low cost ed medication ed medicines online buy online medicine
Комплексный подход, включающий эти методы, значительно повышает шансы на успешное и долговременное восстановление. Современные реабилитационные центры в Москве предлагают целый ряд программ, которые способствуют полному возвращению пациента к здоровой и активной жизни.
Выяснить больше – центр реабилитации алкоголиков в москве
erectile dysfunction pills online and cheapest ed treatment ed med online
https://www.domaininfofree.com/domain-traffic/edmedscoupon.com order ed meds online and https://www.wearebusiness.org/user/rgruoedkuq/?um_action=edit what is the cheapest ed medication
ed prescription online cheap ed pills and ed meds cheap online ed prescription
Когда зависимости становятся хроническими и угрожают жизни пациента, комплексная реабилитация при наркомании в специализированных клиниках Москвы, включая вывод из состояния в стационаре и последующий анализ данных о состоянии пациента, может стать единственным возможным решением. Процесс восстановления включает в себя работу не только с зависимостью, но и с психоэмоциональным состоянием, что делает лечение более эффективным и долговечным.
Получить дополнительную информацию – центр реабилитации алкоголиков в москве
Многие семьи откладывают визит к наркологу, надеясь, что организм восстановится самостоятельно после отдыха, а обещания «больше не повторится» окажутся надежным ориентиром. На практике при сформированной зависимости такие ожидания лишь отнимают критическое время. Если промежутки между эпизодами употребления сокращаются, похмелье переносится тяжелее, а контроль над дозой утрачивается, проблема переходит из бытовой плоскости в медицинскую. Откладывание помощи формирует ложное чувство контроля, истощает ресурсы организма и снижает готовность пациента к терапии в будущем. Решение обратиться к профессионалам часто принимается на пределе эмоциональных и физических сил, но именно своевременный шаг определяет прогноз восстановления.
Изучить вопрос глубже – круглосуточная наркологическая помощь в воронеже
pharmacy online http://edmedscoupon.com/# erectile dysfunction medication online
Помощь на дому рассматривают при состояниях, которые сопровождаются заметным ухудшением самочувствия после алкоголя. Это может быть запой на протяжении нескольких дней, тяжелое похмелье, дрожь в руках, нарушение сна, выраженная слабость, тревога, тошнота, сухость во рту, снижение аппетита и признаки обезвоживания. В таких случаях осмотр врача нужен для того, чтобы оценить тяжесть состояния и понять, безопасно ли оставаться дома.
Подробнее тут – врач нарколог на дом москва
При выборе наркологического стационара с комфортными условиями в Санкт-Петербурге важно учитывать несколько ключевых факторов, которые могут повлиять на успех лечения. Кроме высококвалифицированных специалистов и индивидуального подхода, комфортные условия для проживания играют важную роль в процессе восстановления пациента. Это создаёт оптимальные условия для того, чтобы человек мог сосредоточиться на своём здоровье и восстановлении, не отвлекаясь на неприятные или неудобные условия. В некоторых случаях может быть предложено кодирование, а также получение дополнительных данных и консультаций для более точного подхода к лечению.
Изучить вопрос глубже – наркологическая клиника стационар санкт-петербург
https://petcanadadirect.com/# Pet Canada Direct
Когда зависимости становятся хроническими и угрожают жизни пациента, комплексная реабилитация при наркомании в специализированных клиниках Москвы, включая вывод из состояния в стационаре и последующий анализ данных о состоянии пациента, может стать единственным возможным решением. Процесс восстановления включает в себя работу не только с зависимостью, но и с психоэмоциональным состоянием, что делает лечение более эффективным и долговечным.
Исследовать вопрос подробнее – центр реабилитации алкоголиков город
secure medical online pharmacy https://pharmrate.com/# international drug mart
vet pharmacy online: best pet rx – pet prescriptions online
Таблетки и народные методы требуют времени для усвоения и часто дают ограниченный результат. Капельница же позволяет обойти желудочно-кишечный тракт и сразу доставить необходимые вещества в кровь, что особенно важно при выраженном похмельном синдроме.
Подробнее можно узнать тут – капельница от похмелья самара
Особое внимание мы уделяем психологической составляющей. Наркологическая помощь в Воронеже в «Клиника Плюс» — это не только физическое очищение, но и работа с мотивацией, разрушение психологических триггеров зависимости. Родственники получают отдельную поддержку: консультации психолога помогают правильно выстроить общение с зависимым человеком и мотивировать его на дальнейшее лечение. Реабилитация может проходить амбулаторно или в стационаре партнёрских центров с комфортабельными условиями, где пациенты находятся под круглосуточным наблюдением.
Получить дополнительную информацию – наркологическая помощь в воронеже
Pet Canada Direct: pet med – Pet Canada Direct
На первом этапе специалист проводит визуальный осмотр пациента, измеряет артериальное давление, пульс, уровень кислорода в крови и оценивает общее психоэмоциональное состояние. Важно выявить степень интоксикации, наличие осложнений и противопоказаний к проведению терапии на дому. В случае наркомании и длительного употребления наркотиков, пациенту может быть предложена консультация и лечение, включая реабилитацию на летний период, если состояние требует интенсивного контроля.
Подробнее можно узнать тут – нарколог на дом самара
Наркологический стационар с круглосуточным наблюдением предлагает комплексное лечение и восстановление для людей, страдающих от алкогольной или наркотической зависимости. Пациенты получают помощь в условиях стационара, что позволяет устранить риск срыва и обеспечить безопасное и комфортное выздоровление. В таких клиниках работают квалифицированные наркологи, психологи и другие специалисты, которые контролируют процесс реабилитации на всех этапах. В некоторых случаях может потребоваться вывод из запоя с применением капельниц, а также лечение в специализированном центре для более комплексного восстановления.
Изучить вопрос глубже – https://narkologicheskij-staczionar-sankt-peterburg.ru/
Если симптомы похмелья становятся настолько выраженными, что мешают нормальному функционированию, капельница становится необходимостью. Это особенно важно, если организм не справляется с токсинами самостоятельно.
Исследовать вопрос подробнее – капельница от похмелья анонимно в нижнем новгороде
Капельница от похмелья — это одна из самых эффективных процедур для быстрого облегчения симптомов интоксикации после употребления алкоголя. В Нижнем Новгороде существует множество клиник и медицинских центров, которые предлагают услуги капельниц, направленных на восстановление водно-электролитного баланса, улучшение общего самочувствия и снятие неприятных симптомов похмелья. Процесс введения капельницы можно адаптировать под индивидуальные особенности пациента для достижения наилучшего результата.
Получить больше информации – капельница от похмелья на дому в нижнем новгороде
Наиболее частыми причинами обращения становятся запой, выраженная слабость, тремор, нарушение сна, тревога, учащенный пульс, нестабильное давление, тошнота и ощущение физического истощения. Эти проявления могут сочетаться между собой и усиливаться после прекращения употребления алкоголя, особенно если эпизод длился несколько дней.
Получить дополнительную информацию – нарколог на дом анонимно москва
best mail order pharmacy and best online pharmacy express scripts mail order pharmacy
https://lange-nacht-der-fotoworkshops.de/redirect.php?url=http://pharmrate.shop overseas online pharmacy and http://bbs.51pinzhi.cn/home.php?mod=space&uid=7846169 buy online medicine
overseas online pharmacy new pharmacy online and online pharmacy no prescription needed pharmacy
Когда клиника далеко, время позднее или важна конфиденциальность, помощь на дому позволяет начать лечение немедленно и в комфортной обстановке. Ниже — типичные ситуации, когда визит нарколога на дом особенно уместен.
Разобраться лучше – вызвать нарколога на дом серпухов
Реабилитация алкоголиков с индивидуальной программой — это комплексный подход, включающий медицинскую, психотерапевтическую и социальную поддержку, направленный на восстановление человека после длительного злоупотребления алкоголем. Программа подбирается с учетом всех особенностей пациента, его состояния, сопутствующих заболеваний и эмоциональных проблем. Реабилитация не ограничивается только детоксикацией, но включает также работу с психологом и социальную адаптацию. В некоторых случаях может быть рекомендован выезд на дом для проведения лечения, а также кодирование, чтобы помочь пациенту справиться с зависимостью на всех этапах восстановления. Наркоманическая зависимость может требовать дополнительной терапии и профессиональной помощи для успешного преодоления всех трудностей.
Ознакомиться с деталями – реабилитация алкоголиков
https://edmedscoupon.shop/# erectile dysfunction medications online
Капельница, как правило, включает в себя не только детоксикацию, но и дополнительные компоненты, такие как витамины, антидепрессанты или препараты для стабилизации сердечного ритма, что делает лечение более комплексным и эффективным.
Детальнее – http://kapelnica-ot-zapoya-nizhnij-novgorod-4.ru/
Перед постановкой капельницы специалист оценивает общее состояние пациента, измеряет давление, пульс, уточняет анамнез и возможные противопоказания. На основании этих данных формируется индивидуальный состав, который обеспечивает не только устранение симптомов похмелья, но и безопасное восстановление организма.
Разобраться лучше – капельница от похмелья вызов на дом
Работа с пациентами в наркологическом стационаре начинается с диагностики, которая помогает определить степень зависимости и сопутствующие заболевания. На основе этих данных разрабатывается индивидуальный план лечения. Врачи, наркологи и психотерапевты работают в тесном контакте с пациентом, что позволяет достичь наилучших результатов в процессе восстановления. Важно также убедиться, что клиника имеет необходимую лицензию, а для эффективного лечения могут быть предложены такие процедуры, как прием психотерапевта и кодирование от зависимости.
Углубиться в тему – наркологическая клиника стационар санкт-петербург
Капельница от похмелья в Нижнем Новгороде: быстрое восстановление, снятие интоксикации и улучшение состояния под контролем специалистов в наркологической клинике «Похмельная служба»
Получить дополнительную информацию – капельница от похмелья цена нижний новгород
pet pharmacy online: online pet pharmacy – canada pet meds
Как реализовано в «РеабилитейшнПро»
Получить дополнительную информацию – срочная наркологическая помощь
Когда человек или его родственники понимают, что нужна наркологическая помощь в Воронеже, время становится решающим фактором. Запой, ломка, тяжёлая интоксикация — в таких ситуациях промедление может привести к необратимым последствиям для здоровья и жизни. Наша клиника создана именно для того, чтобы оказывать эффективную круглосуточную наркологическую помощь в Воронеже в самых сложных случаях. Мы не заставляем ждать в очередях государственных учреждений, не ставим на учёт и не разглашаем информацию. Всё происходит анонимно, на дому или в комфортных условиях нашей партнёрской клиники. Пациенты из Воронежа, Воронежской области, а также соседних регионов уже более 12 лет выбирают «Клиника Плюс» благодаря сочетанию скорости, профессионализма, полной анонимности и доказанной результативности.
Ознакомиться с деталями – скорая наркологическая помощь в воронеже
Препараты, введённые через капельницу, начинают действовать почти сразу. Они поступают напрямую в кровоток, обходя желудочно-кишечный тракт, что позволяет ускорить процесс восстановления и устранить симптомы похмелья, такие как головная боль, тошнота и слабость, уже через 20–30 минут после начала процедуры.
Разобраться лучше – капельница от похмелья вызов на дом
dog prescriptions online vet pharmacy Pet Canada Direct
Домашний формат помощи рассматривают тогда, когда человеку тяжело добраться до медицинского учреждения, состояние ухудшается после нескольких дней употребления спиртного или родственникам требуется очная оценка без промедления. После осмотра становится ясно, допустима ли помощь на дому, требуется ли капельница, можно ли ограничиться наблюдением в домашних условиях или нужен другой маршрут помощи. Вопрос о том, как вызвать специалиста, нередко возникает в ситуациях, когда состояние нарастает быстро и требуется решение без откладывания. Если подобные эпизоды повторяются, дальнейшее обсуждение может касаться не только текущего состояния, но и лечения алкоголизма, работы с зависимостью и более длительной программы восстановления.
Подробнее – вызвать нарколога на дом в москве
Медицинский контроль играет ключевую роль в безопасности и эффективности процедуры. Под присмотром опытного специалиста исключаются риски неправильной дозировки препаратов, побочных эффектов и осложнений, что особенно важно при проведении капельниц у пациентов с хроническими заболеваниями или при наличии индивидуальных противопоказаний.
Детальнее – http://kapelnicza-ot-pokhmelya-nizhnij-novgorod-1.ru/
ed pills for sale and ed online treatment erectile dysfunction medication online
http://eu-clearance.satfrance.com/?a=cialis+tablets best ed pills online and https://www.94intr.com/home.php?mod=space&uid=682955 online ed drugs
online ed prescription online ed prescription and cheap erectile dysfunction pills best online ed meds
ed treatment online: Ed Meds Coupon – us pharmacy no prescription
Выезд врача на дом рассматривают в ситуациях, когда человеку тяжело добраться до медицинского учреждения, он ослаблен после нескольких дней употребления спиртного или родственникам важно быстро получить очную оценку состояния. После осмотра определяют, допустим ли домашний формат, нужна ли капельница, достаточно ли наблюдения на дому или следует сразу рассматривать другой объем помощи. Если подобные эпизоды повторяются, дальнейшее обсуждение может касаться не только текущего состояния, но и лечения алкоголизма, кодирования, участия психолога, психиатра и реабилитации. В таких случаях наркологическая помощь рассматривается шире, чем разовый вызов на дом.
Исследовать вопрос подробнее – нарколог на дом анонимно москва
Наркологическая помощь нужна не только тогда, когда ситуация выглядит критической со стороны. Она необходима и в тех случаях, когда зависимость повторяется циклично, а семья уже понимает, что прежние способы не работают. Чем раньше человек переходит от стихийных попыток справиться самостоятельно к профессиональной тактике, тем выше шансы стоновить процесс на менее тяжелом этапе.
Детальнее – оказание наркологической помощи в воронеже
При выборе наркологического стационара с комфортными условиями в Санкт-Петербурге важно учитывать несколько ключевых факторов, которые могут повлиять на успех лечения. Кроме высококвалифицированных специалистов и индивидуального подхода, комфортные условия для проживания играют важную роль в процессе восстановления пациента. Это создаёт оптимальные условия для того, чтобы человек мог сосредоточиться на своём здоровье и восстановлении, не отвлекаясь на неприятные или неудобные условия. В некоторых случаях может быть предложено кодирование, а также получение дополнительных данных и консультаций для более точного подхода к лечению.
Получить дополнительную информацию – частный наркологический стационар
Эта информационная заметка содержит увлекательные сведения, которые могут вас удивить! Мы собрали интересные факты, которые сделают вашу жизнь ярче и полнее. Узнайте нечто новое о привычных аспектах повседневности и откройте для себя удивительный мир информации.
Это стоит прочитать полностью – https://staging.txtbox.in/docs/sf-quickstart/knowledge-base/configure-general-settings/comment-page-4840
Многие семьи откладывают визит к наркологу, надеясь, что организм восстановится самостоятельно после отдыха, а обещания «больше не повторится» окажутся надежным ориентиром. На практике при сформированной зависимости такие ожидания лишь отнимают критическое время. Если промежутки между эпизодами употребления сокращаются, похмелье переносится тяжелее, а контроль над дозой утрачивается, проблема переходит из бытовой плоскости в медицинскую. Откладывание помощи формирует ложное чувство контроля, истощает ресурсы организма и снижает готовность пациента к терапии в будущем. Решение обратиться к профессионалам часто принимается на пределе эмоциональных и физических сил, но именно своевременный шаг определяет прогноз восстановления.
Исследовать вопрос подробнее – наркологическая помощь
safe online pharmacies or new pharmacy online legit online pharmacy
https://www.google.gl/url?q=https://pharmrate.com no prescription needed pharmacy or http://la-maison-des-amis.com/user/byyrpzkclq/ online pharmacy without scripts
overseas online pharmacy legal online pharmacies in the us or legitimate online pharmacy safe online pharmacies
Игнорирование симптомов или попытки справиться самостоятельно могут усугубить состояние пациента. Домашние методы без медицинского контроля не обеспечивают полноценной детоксикации и не учитывают индивидуальные риски. Квалифицированный нарколог оценивает состояние пациента на месте, подбирает безопасную схему терапии и контролирует динамику, что особенно важно при тяжелых формах интоксикации.
Разобраться лучше – нарколог на дом анонимно
Наркологическая помощь в Воронеже: эффективное лечение запоя, детокс и поддержка специалистов в наркологической клинике «Клиника Плюс».
Получить дополнительную информацию – скорая наркологическая помощь
http://pharmrate.com/# Pharm Rate
Капельница от запоя в Нижнем Новгороде: эффективное выведение из запоя, детоксикация и медицинская помощь в наркологической клинике «Похмельная служба»
Узнать больше – поставить капельницу от запоя
В некоторых случаях одной капельницы достаточно для полного восстановления. Однако при тяжёлой интоксикации или длительном употреблении алкоголя врач может рекомендовать повторную инфузию для закрепления эффекта и более глубокого очищения организма.
Узнать больше – https://kapelnicza-ot-pokhmelya-samara-8.ru/
Наркологическая помощь нужна не только тогда, когда ситуация выглядит критической со стороны. Она необходима и в тех случаях, когда зависимость повторяется циклично, а семья уже понимает, что прежние способы не работают. Чем раньше человек переходит от стихийных попыток справиться самостоятельно к профессиональной тактике, тем выше шансы стоновить процесс на менее тяжелом этапе.
Выяснить больше – оказание наркологической помощи
no prescription pharmacy paypal and trusted online pharmacy legit online pharmacy
https://maps.google.com.sg/url?sa=t&url=https://pharmrate.com legal online pharmacies in the us and http://jonnywalker.net/user/suptspfomg/ express scripts mail order pharmacy
legit online pharmacy top online pharmacy or medstore online pharmacy medstore online pharmacy
best pet rx or online pet pharmacy dog medicine
http://www.hk-pub.com/forum/dedo_siteindex.php?q=<a+href=//petcanadadirect.com pet pharmacy online or https://istinastroitelstva.xyz/user/kqpayhoqvs/ pet prescriptions online
dog medicine pet pharmacy and pet meds official website pet prescriptions online
Pet Canada Direct: pet pharmacy online – Pet Canada Direct
Капельница от запоя показана в случае, если у пациента наблюдаются выраженные симптомы алкогольной интоксикации, такие как тяжелое похмелье, головная боль, слабость, бессонница, рвота и сильное обезвоживание. Эти симптомы часто сопровождают состояние, когда человек не может самостоятельно справиться с похмельем и продолжает испытывать физический и психоэмоциональный дискомфорт. Услугу можно заказать через специализированные клиники, где наркологическая помощь предоставляется опытными специалистами с большим стажем работы.
Подробнее тут – вызвать капельницу от запоя в нижнем новгороде
Выезд нарколога на дом в Самаре представляет собой структурированный медицинский процесс, направленный на быстрое облегчение состояния пациента и устранение последствий интоксикации. Все этапы оказания помощи проводятся с учетом клинической картины, длительности употребления и индивидуальных особенностей организма. В случае алкоголизма могут быть предложены процедуры кодирования, а также вывод из состояния запоя. При необходимости подключается психиатр для дополнительной оценки и лечения.
Выяснить больше – врач нарколог на дом в самаре
ed medications cost: ed medicine online – no prescription needed pharmacy
где заказать проект перепланировки квартиры в москве где заказать проект перепланировки квартиры в москве .
Публикация приглашает вас исследовать неизведанное — от древних тайн до современных достижений науки. Вы узнаете, как случайные находки превращались в революции, а смелые мысли — в новые эры человеческого прогресса.
Более того — здесь – https://az.wikipedia.org/wiki/Kontroller
Эта публикация завернет вас в вихрь увлекательного контента, сбрасывая стереотипы и открывая двери к новым идеям. Каждый абзац станет для вас открытием, полным ярких примеров и впечатляющих достижений. Подготовьтесь быть вовлеченными и удивленными каждый раз, когда продолжите читать.
Раскрыть тему полностью – https://becometallerclinic.com/2024/04/22/limb-lengthening-surgery-surgeons-techniques-and-costs-around-the-globe
1xbet azerbaijan 1xbet azerbaijan .
Поводом для обращения обычно становятся слабость, тремор, тревога, бессонница, учащенный пульс, нестабильное давление, тошнота и ощущение физического истощения. Эти проявления часто усиливаются после прекращения употребления алкоголя или на фоне затянувшегося запоя.
Изучить вопрос глубже – narkolog-na-dom-moskva-17.ru/
1xbet giri? azerbaycan 1xbet giri? azerbaycan .
1xbet az 1xbet az .
1xbet az 1xbet az .
Наркологический стационар с круглосуточным наблюдением предлагает комплексное лечение и восстановление для людей, страдающих от алкогольной или наркотической зависимости. Пациенты получают помощь в условиях стационара, что позволяет устранить риск срыва и обеспечить безопасное и комфортное выздоровление. В таких клиниках работают квалифицированные наркологи, психологи и другие специалисты, которые контролируют процесс реабилитации на всех этапах. В некоторых случаях может потребоваться вывод из запоя с применением капельниц, а также лечение в специализированном центре для более комплексного восстановления.
Выяснить больше – лечение в наркологическом стационаре
Комплексная реабилитация алкоголиков в Москве помогает пациентам не только избавиться от зависимости, но и вернуться к полноценной жизни. Процесс восстановления включает в себя не только лечение алкоголизма как физического заболевания, но и работу с психологическими, социальными и эмоциональными аспектами, которые могут стать причиной или следствием зависимости. Такое подходное лечение, как правило, требует усилий со стороны как специалистов, так и самого пациента.
Разобраться лучше – реабилитация алкоголиков город
реферат нейросеть реферат нейросеть .
best mail order pharmacy or express scripts mail order pharmacy buy drugs online
http://fotos24.org/url?q=https://pharmrate.shop best mail order pharmacy and https://vintage-car.eu/user/vnvwmtzzdf/ best rx pharmacy online
no rx needed pharmacy top-rated online pharmacies or top online pharmacy pharmacy online
нейросеть студент бот нейросеть студент бот .
Этот увлекательный информационный материал подарит вам массу новых знаний и ярких эмоций. Мы собрали для вас интересные факты и сведения, которые обогатят ваш опыт. Откройте для себя увлекательный мир информации и насладитесь процессом изучения!
Слушай внимательно — тут важно – https://owen-russia.ru/product/trm10_old
Анонимность позволяет пациентам сосоточиться на процессе лечения алкогольной зависимости, не переживая о последствиях для своей репутации или безопасности. Важно, чтобы каждый этап был подробно обсужден с пациентом, что помогает снизить уровень стресса и тревожности, связанные с лечением зависимых, включая терапию в стационаре.
Получить больше информации – реабилитация алкоголиков
Капельница, как правило, включает в себя не только детоксикацию, но и дополнительные компоненты, такие как витамины, антидепрессанты или препараты для стабилизации сердечного ритма, что делает лечение более комплексным и эффективным.
Подробнее – капельница от запоя на дому цена в нижнем новгороде
Комплексное лечение в наркологическом стационаре включает несколько последовательных этапов, каждый из которых направлен на решение конкретных задач. Начальный этап включает в себя медицинское вмешательство, направленное на устранение токсинов из организма, и стабилизацию общего состояния пациента. Далее начинается реабилитация, которая помогает закрепить достигнутые результаты и восстановить психоэмоциональное состояние пациента. Для выбора подходящего стационара стоит ознакомиться с отзывами и дополнительной информацией о клинике, а также уточнить, в каком районе города она расположена.
Подробнее можно узнать тут – частный наркологический стационар
ии для студентов nejroset-dlya-referatov-22.ru .
how long for rybelsus to leave your system: semaglutide life – secure medical online pharmacy
Затем организуется выезд специалиста — нарколог приезжает на дом или, по желанию, принимает пациента в стационаре. После осмотра и измерения жизненно важных показателей врач разрабатывает индивидуальную схему терапии. Главная цель — мягкая и безопасная детоксикация, восстановление работы органов и снятие психических и физических симптомов.
Узнать больше – http://vyvod-iz-zapoya-shchelkovo6.ru/skoryj-vyvod-iz-zapoya-v-shchelkovo/
https://semaglutide.life/# semaglutide injections
сайт для рефератов nejroset-dlya-referatov-25.ru .
https://semaglutide.life/# cost of rybelsus vs ozempic
https://antibiotics.cheap/# antibiotics cheap
Наиболее частыми причинами обращения становятся запой, выраженная слабость, тремор, нарушение сна, тревога, учащенный пульс, нестабильное давление, тошнота и ощущение физического истощения. Эти проявления могут сочетаться между собой и усиливаться после прекращения употребления алкоголя, особенно если эпизод длился несколько дней.
Подробнее можно узнать тут – вызвать нарколога на дом
чат нейросеть для учебы nejroset-dlya-referatov-25.ru .
Реабилитация алкоголиков в Москве: лечение зависимости, восстановление и поддержка под контролем специалистов в наркологической клинике «Похмельная служба»
Получить больше информации – реабилитация алкоголиков стоимость в москве
Публикация приглашает вас исследовать неизведанное — от древних тайн до современных достижений науки. Вы узнаете, как случайные находки превращались в революции, а смелые мысли — в новые эры человеческого прогресса.
Связаться за уточнением – https://klicked.com/maximize-your-website-revenue-with-klickeds-monetization-solutions
otc medicine: antibiotics cheap – antibiotics online prescription
1xbet az?rbaycan ulusalgenclikparlamentosu.net .
semaglutide for prediabetes rybelsus alternative semaglutide for pcos
Эта статья для ознакомления предлагает читателям общее представление об актуальной теме. Мы стремимся представить ключевые факты и идеи, которые помогут читателям получить представление о предмете и решить, стоит ли углубляться в изучение.
Расширить кругозор по теме – https://folhanoroeste.com.br/cotidiano/veja-como-solicitar-servico-de-poda-de-arvores-para-prefeitura-de-sp
нейросеть реферат нейросеть реферат .
https://semaglutide.life/# rybelsus 3 mg coupon
buy doxycycline antibiotics: antibiotics drugs – Over the counter antibiotics pills
В статье представлены ключевые моменты по актуальной теме, дополненные советами экспертов и ссылками на дополнительные ресурсы. Цель материала — дать читателю инструменты для самостоятельного развития и принятия осознанных решений.
Полная информация здесь – https://marineenfeites.com.br/exploring-atlantas-modern-homes
электронный карниз для штор elektrokarniz11.ru .
электрические гардины электрические гардины .
rybelsus lawsuit: semaglutide life – online drugs order
Затем организуется выезд специалиста — нарколог приезжает на дом или, по желанию, принимает пациента в стационаре. После осмотра и измерения жизненно важных показателей врач разрабатывает индивидуальную схему терапии. Главная цель — мягкая и безопасная детоксикация, восстановление работы органов и снятие психических и физических симптомов.
Подробнее можно узнать тут – вывод из запоя щелково стационар
Осмотр на дому особенно важен в тех случаях, когда больному трудно вставать, пить воду, принимать пищу, спокойно лежать или ориентироваться в собственном состоянии. Чем тяжелее переносится выход из употребления, тем выше значение очной оценки, потому что по телефону невозможно полноценно определить границы безопасной помощи. При выраженных симптомах может потребоваться срочный выезд, чтобы вовремя оценить риски и определить, допустим ли вывод из запоя дома или необходимо наблюдение в стационаре.
Узнать больше – нарколог на дом москва
https://antibiotics.cheap/# over the counter antibiotics
нейросеть для учебы нейросеть для учебы .
Магазин понравился с первого заказа. На все вопросы ответили быстро, помогли с выбором цвета и комплектации. Телефон приехал вовремя, коробка целая, документы в порядке. Всё организовано грамотно и удобно: озон клавиатуры игровые
rybelsus side effects vision semaglutide life rybelsus dosis
Реабилитация алкоголиков в Москве требует интегрированного подхода, включающего не только медицинское лечение, но и психологическую помощь. Важно, чтобы реабилитационные центры предлагали программы, которые помогают пациентам не только избавиться от физической зависимости, но и наладить их психологическое состояние, а также восстановить их отношения с окружающими.
Подробнее тут – клиника реабилитации алкоголиков
stromectol reviews: stromectol reviews – stromectol reviews
over the counter antibiotics: buy amoxicillin – antibiotics cheap
электрические гардины для штор электрические гардины для штор .
https://antibiotics.cheap/# antibiotics cheap
Are you looking for a fast, safe and hassle-free transfer in Valencia? We offer professional transport and moving services, both for individuals and companies. Request your budget without obligation and enjoy a quality service, servicio transfer valencia
https://antibiotics.cheap/# buy doxycycline antibiotics
Нарколог на дом в Москве: срочный выезд врача, капельницы и помощь при запое в наркологической клинике «Клиника доктора Калюжной».
Выяснить больше – запой нарколог на дом
is rybelsus covered by medicare part d: best time of day to take semaglutide – medicine online
Детоксикация в основном фокусируется на печени и почках, помогая этим органам быстрее справляться с продуктами распада алкоголя. Такой подход гарантирует не только улучшение самочувствия, но и восстановление работы внутренних органов, которые пострадали в процессе злоупотребления алкоголем.
Подробнее тут – капельница от похмелья анонимно
Женский онлайн портал https://stepandstep.com.ua все о жизни, стиле и здоровье. Статьи о красоте, отношениях, семье и саморазвитии. Полезный контент для женщин любого возраста.
https://semaglutide.life/# semaglutide pills weight loss
Вызов капельницы от похмелья с контролем врача в Самаре рекомендуется, когда симптомы похмелья становятся особенно тяжелыми и мешают нормальной жизнедеятельности. Несмотря на то, что многие пытаются справиться с похмельем с помощью домашних методов, такие как прием жидкости или таблеток, они не всегда оказываются достаточно эффективными. В случае сильных симптомов похмелья, капельница с врачебным контролем — это более безопасное и быстрое решение, при этом возможен вывод в стационаре, анонимное лечение и консультации по вопросам наркомании с учетом актуальной цены услуг.
Ознакомиться с деталями – капельница от похмелья анонимно
Женский журнал https://a-k-b.com.ua все о стиле, здоровье и отношениях. Практические советы, тренды и вдохновение для повседневной жизни.
Туристический портал https://swiss-watches.com.ua для путешественников: направления, маршруты, советы и лайфхаки. Подбор отелей, билетов и экскурсий, идеи для отдыха и полезные рекомендации. Планируйте поездки легко и открывайте новые страны с комфортом.
В Нижнем Новгороде стационарное лечение используется при выраженных симптомах или наличии факторов риска, особенно при тяжелом состоянии больного на фоне алкоголизма или длительного употребления алкоголя. Это позволяет исключить внешние нагрузки, обеспечить непрерывный мониторинг и при необходимости быстро скорректировать терапию. Решение о госпитализации принимается на основе осмотра, консультации специалиста и оценки текущего состояния человека, с учётом клинических данных.
Разобраться лучше – вывод из запоя в стационаре в нижнем новгороде
https://stromectol.reviews/# stromectol reviews
Решение вызвать нарколога для вывода из запоя должно приниматься незамедлительно, если наблюдаются тревожные признаки:
Исследовать вопрос подробнее – http://vyvod-iz-zapoya-himki5.ru/vyvod-iz-zapoya-kruglosutochno-v-himkah/
Аспро Премьер — современный шаблон для создания мощного интернет-магазина с продуманной структурой, высокой скоростью работы и широкими возможностями для продаж. Переходите по запросу Aspro Премьер. Решение подходит для бизнеса любого масштаба, поддерживает адаптивный дизайн, удобный каталог, SEO-настройки и интеграции. Купить шаблон Аспро Премьер — значит получить надежную платформу для эффективного онлайн-бизнеса и быстрого запуска проекта.
ivermectin 400 mg brands: stromectol reviews – stromectol australia
Вывод из запоя в стационаре — это медицинская помощь, при которой лечение проводится в условиях круглосуточного наблюдения и контролируемой среды. Такой формат применяется, когда состояние пациента требует постоянного мониторинга и поэтапной коррекции терапии. В наркологической клинике «Частный медик 24» в Нижнем Новгороде стационарное лечение выстраивается с учётом текущего состояния пациента, без перегрузки медикаментами и с регулярной оценкой результата на каждом этапе.
Выяснить больше – наркология вывод из запоя в стационаре нижний новгород
cheapest antibiotics: over the counter antibiotics – over the counter antibiotics
Реабилитация алкоголиков с поддержкой специалистов — это системный подход к лечению алкогольной зависимости, который включает в себя различные медицинские, психологические и социальные методы. В Москве существует множество наркологических центров, предлагающих такие программы, где пациентам предоставляется комплексное лечение под наблюдением квалифицированных специалистов. Процесс реабилитации направлен не только на избавление от алкогольной зависимости, но и на восстановление социальной адаптации пациента, улучшение его психоэмоционального состояния и предотвращение рецидивов. В клиниках также могут предложить кодирование от алкоголизма, что помогает значительно снизить риск возвращения к прежним привычкам и обеспечить долгосрочную трезвость пациента.
Детальнее – алкоголик реабилитация наркоманов в москве
Этот перечень помогает быстро оценить необходимость вызова. Если вы узнали в нем свою ситуацию — оптимально начать терапию как можно раньше: так детокс проходит мягче, а риск осложнений и срывов в первые сутки ниже.
Получить больше информации – http://narkolog-na-dom-serpuhov6.ru/vyzov-narkologa-na-dom-v-serpuhove/https://narkolog-na-dom-serpuhov6.ru
rybelsus formulation semaglutide life rybelsus 14 mg precio
Каждый из этих этапов играет важную роль в процессе восстановления. Лечение проводится под контролем опытных врачей и психологов, которые оценивают состояние пациента и адаптируют программу лечения в зависимости от его потребностей. Комплексный подход позволяет добиться наилучших результатов и помогает пациенту вернуться к нормальной жизни, свободной от зависимости.
Узнать больше – реабилитация алкоголиков стоимость в москве
https://antibiotics.cheap/# antibiotics cheap
semaglutide online prescription: how long after semaglutide injection do side effects start – overseas pharmacy no prescription
Когда такие симптомы становятся ярко выраженными, важно не затягивать с лечением и вызвать нарколога на дом. Это позволит своевременно устранить токсические вещества из организма и предотвратить серьёзные проблемы с органами. Важно, чтобы лечение началось как можно быстрее, что возможно только через экстренный выезд специалиста на дом.
Подробнее можно узнать тут – капельница от похмелья екатеринбург
Реабилитация алкоголиков в Москве: комплексное восстановление, помощь при зависимости и поддержка специалистов в наркологической клинике «Похмельная служба»
Узнать больше – http://reabilitacziya-alkogolikov-moskva.ru/
В зависимости от тяжести состояния и наличия осложнений клиника «Спасение Плюс» предлагает:
Получить больше информации – https://vyvod-iz-zapoya-himki5.ru/srochnyj-vyvod-iz-zapoya-v-himkah/
Наиболее частыми причинами обращения становятся запой, выраженная слабость, тремор, нарушение сна, тревога, учащенный пульс, нестабильное давление, тошнота и ощущение физического истощения. Эти проявления могут сочетаться между собой и усиливаться после прекращения употребления алкоголя, особенно если эпизод длился несколько дней.
Узнать больше – запой нарколог на дом москва
Затем организуется выезд специалиста — нарколог приезжает на дом или, по желанию, принимает пациента в стационаре. После осмотра и измерения жизненно важных показателей врач разрабатывает индивидуальную схему терапии. Главная цель — мягкая и безопасная детоксикация, восстановление работы органов и снятие психических и физических симптомов.
Получить больше информации – https://vyvod-iz-zapoya-shchelkovo6.ru/
Решение вызвать нарколога для вывода из запоя должно приниматься незамедлительно, если наблюдаются тревожные признаки:
Узнать больше – vyvod-iz-zapoya-himki-kruglosutochno
Когда похмелье переходит в тяжелое состояние, оно может сопровождаться сильной интоксикацией, головной болью, тошнотой, рвотой, резким падением давления и другими неприятными симптомами, что часто наблюдается при запое. В таких случаях капельница становится одним из самых эффективных методов лечения алкоголизма, позволяющим облегчить состояние пациента и быстро вывести токсины из организма, в том числе при проведении терапии в стационаре.
Получить дополнительные сведения – kapelnicza-ot-pokhmelya-samara-14.ru/
После оформления вызова нарколог приезжает к пациенту и проводит комплексную оценку состояния. Врач измеряет давление, частоту пульса, оценивает уровень сознания и выраженность симптомов. На основании полученных данных формируется план лечения, который реализуется сразу на месте.
Получить больше информации – нарколог на дом цена нижний новгород
Каждый элемент программы направлен на создание комплексного подхода к лечению зависимости, обеспечивая помощь не только на физическом, но и на эмоциональном уровне. Индивидуальная программа реабилитации позволяет выстроить эффективную терапию, которая соответствует конкретным потребностям пациента.
Подробнее – алкоголик реабилитация наркоманов город
Нарколог на дом в Москве: круглосуточный выезд, детоксикация и лечение зависимостей в наркологической клинике «Клиника доктора Калюжной».
Получить больше информации – нарколог на дом в москве
antibiotics cheap: best online doctor for antibiotics – antibiotics cheap
Многие семьи откладывают визит к наркологу, надеясь, что организм восстановится самостоятельно после отдыха, а обещания «больше не повторится» окажутся надежным ориентиром. На практике при сформированной зависимости такие ожидания лишь отнимают критическое время. Если промежутки между эпизодами употребления сокращаются, похмелье переносится тяжелее, а контроль над дозой утрачивается, проблема переходит из бытовой плоскости в медицинскую. Откладывание помощи формирует ложное чувство контроля, истощает ресурсы организма и снижает готовность пациента к терапии в будущем. Решение обратиться к профессионалам часто принимается на пределе эмоциональных и физических сил, но именно своевременный шаг определяет прогноз восстановления.
Узнать больше – круглосуточная наркологическая помощь в воронеже
Помощь на дому рассматривают при состояниях, связанных с острым ухудшением самочувствия после алкоголя. Чаще всего это несколько дней запоя, тяжелое похмелье, бессонница, тревога, дрожь в руках, слабость, отсутствие аппетита, тошнота, сухость во рту и ощущение истощения. В подобных случаях врачебный осмотр нужен для оценки общего состояния и выбора безопасной тактики.
Получить больше информации – врач нарколог на дом в екатеринбурге
Состояние пациента при интоксикации может развиваться по-разному: от умеренной слабости и головной боли до выраженной дезориентации, тахикардии и нарушений сна. В таких ситуациях важно не откладывать обращение за помощью. Наркологическая помощь на дому рассматривается, когда требуется быстрое вмешательство и контроль состояния без транспортировки пациента.
Получить больше информации – вызов наркологической помощи
Выезд нарколога на дом в Самаре — это комплексный подход к лечению, который включает несколько этапов. Врач, приехавший на место, не ограничивается одной процедурой, а проводит полноценный осмотр, диагностирует состояние пациента, определяет причину ухудшения самочувствия и подбирает индивидуальную терапию. Наиболее часто при выезде нарколога на дом используются капельницы, антиеметики и препараты для стабилизации состояния пациента, снятия симптомов абстиненции и улучшения общего самочувствия.
Подробнее тут – врач нарколог на дом в самаре
Советую сайт https://happyholi.ru отличные кухни. Качество супер, прайс адекватные, а сроки не затягивают. Рекомендую.
https://antibiotics.cheap/# antibiotics drugs
Лечение алкоголизма в Воронеже у нас проводится на всех стадиях: от первой помощи при запое до кодирования и долгосрочной поддержки. Для пациентов с наркотической зависимостью (включая синтетические каннабиноиды и опиоиды) мы применяем щадящие схемы детоксикации, которые минимизируют болезненные симптомы и снижают риск срывов. Кодирование от алкоголизма и наркомании доступно в нескольких вариантах: медикаментозное (инъекции, импланты, «Двойной блок»), гипносуггестивное и комбинированное. Каждый метод подбирается после тщательной диагностики, чтобы результат был максимально долгосрочным.
Разобраться лучше – наркологическая помощь на дому в воронеже
Затяжной запой перестает быть бытовой проблемой в тот момент, когда организм теряет способность самостоятельно восстанавливаться после интоксикации. Накопление ацетальдегида, нарушение водно-электролитного баланса, истощение запасов витаминов и перегрузка сердечно-сосудистой системы создают состояние, при котором домашние методы перестают быть безопасными. Срочно стабилизировать самочувствие и быстро купировать абстинентный синдром позволяет только контролируемая медицинская среда. Вывод из запоя в стационаре в Нижнем Новгороде становится клинически обоснованным решением, когда требуется не просто снятие симптомов, а комплексная детоксикация под круглосуточным наблюдением врачей. Наркологическая клиника «Стармед» организует процесс лечения в соответствии с актуальными стандартами доказательной медицины, обеспечивая безопасность пациента, прозрачность процедур и плавный переход к противорецидивной терапии. Мы понимаем, что решение о госпитализации часто принимается в состоянии стресса, поэтому наша работа начинается с четкой диагностики, честного объяснения плана лечения и соблюдения строгих протоколов конфиденциальности. Опытные специалисты клиники помогут вызвать доверие к процессу восстановления уже на этапе первого контакта.
Исследовать вопрос подробнее – вывод из запоя в стационаре
Домашний вызов нарколога удобен в случаях, когда человеку тяжело ехать в клинику, он отказывается от поездки или родственники хотят как можно быстрее заказать медицинскую помощь на месте. Формат выезда позволяет врачу оценить самочувствие, определить тяжесть состояния и подобрать дальнейшую тактику. Если ситуация требует расширенного подхода, может обсуждаться последующая консультация в центре, лечение алкоголизма, кодирование, а в более сложных случаях — длительная реабилитация.
Узнать больше – нарколог на дом цена в екатеринбурге
stromectol reviews stromectol reviews stromectol 6 mg tablet
antibiotics online pharmacy: antibiotics cheap – antibiotics cheap
https://antibiotics.cheap/# antibiotics cheap
Многие пациенты и их родственники выбирают выезд врача на дом, когда пациент не в состоянии самостоятельно приехать в клинику. Домашняя помощь подходит в ситуациях, когда состояние пациента резко ухудшается, и важно начать лечение как можно быстрее.
Изучить вопрос глубже – наркологическая помощь анонимно воронеж
К основным показаниям относятся:
Углубиться в тему – вывод из запоя в стационаре нижний новгород
Капельница от похмелья в Екатеринбурге с медицинским контролем и поддержкой организма в наркологической клинике «Частный медик 24»
Выяснить больше – капельница от похмелья в екатеринбурге
https://semaglutide.life/# is rybelsus a high risk medication?
электрокарнизы elektrokarnizy-dlya-shtor.ru .
вызов врача хирурга на дом онлайн консультация врача задать вопрос
Расширенная статья здесь: about vsu.by
Домашний формат выбирают в тех случаях, когда человеку тяжело добраться до медицинского учреждения, он ослаблен после нескольких дней употребления спиртного или родственникам важно быстрее получить врачебную оценку состояния. После осмотра определяют, допустима ли помощь на дому, требуется ли капельница, возможен ли вывод из запоя в домашних условиях или нужен другой объем наблюдения. Если эпизоды повторяются, обсуждение обычно выходит за рамки снятия острых симптомов и затрагивает дальнейшую помощь при алкоголизме. Уже на этапе первого обращения часто уточняют, можно ли вызвать врача срочно, доступна ли круглосуточная помощь и в каких случаях состояние требует наблюдения в стационаре.
Получить дополнительные сведения – врач нарколог на дом москва
Отдельного внимания требуют случаи, когда больной почти не ест, плохо пьет воду, не может спокойно лежать, жалуется на сильное сердцебиение, нехватку сна или выраженное внутреннее напряжение. В такой ситуации осмотр помогает определить, безопасно ли оставаться дома и какого объема помощи достаточно на текущем этапе. Если речь идет о выраженных проявлениях абстинентного синдрома, затягивать с обращением нецелесообразно.
Изучить вопрос глубже – нарколог на дом вывод в екатеринбурге
Решение вызвать нарколога для вывода из запоя должно приниматься незамедлительно, если наблюдаются тревожные признаки:
Разобраться лучше – http://vyvod-iz-zapoya-himki5.ru
Похмелье — это естественная реакция организма на алкогольную интоксикацию, но в некоторых случаях оно может переходить в более сложное и болезненное состояние, требующее немедленного вмешательства. Капельница от похмелья в таких ситуациях помогает ускорить восстановление организма и облегчить симптомы, существенно улучшая самочувствие пациента.
Исследовать вопрос подробнее – капельница от похмелья анонимно в самаре
https://semaglutide.life/# how much weight can you lose on semaglutide
Выбор наркологического стационара с комфортными условиями требует внимательного подхода, чтобы убедиться, что все аспекты лечения и реабилитации будут выполнены на высоком уровне. Важно учитывать не только медицинскую составляющую, но и то, как созданы условия для пациентов, их психологический комфорт и безопасность на всех этапах лечения. Также стоит учитывать цену за стационарное лечение с круглосуточным наблюдением, чтобы выбрать оптимальный вариант, соответствующий потребностям пациента и его бюджету.
Разобраться лучше – https://narkologicheskij-staczionar-sankt-peterburg-4.ru/
semaglutide b12 compound: how long can you take rybelsus – online pharmacy no prescription
Домашний формат помощи рассматривают тогда, когда человеку тяжело добраться до медицинского учреждения, состояние ухудшается после нескольких дней употребления спиртного или родственникам требуется очная оценка без промедления. После осмотра становится ясно, допустима ли помощь на дому, требуется ли капельница, можно ли ограничиться наблюдением в домашних условиях или нужен другой маршрут помощи. Вопрос о том, как вызвать специалиста, нередко возникает в ситуациях, когда состояние нарастает быстро и требуется решение без откладывания. Если подобные эпизоды повторяются, дальнейшее обсуждение может касаться не только текущего состояния, но и лечения алкоголизма, работы с зависимостью и более длительной программы восстановления.
Подробнее можно узнать тут – вызов нарколога на дом
После того как вы вызвали нарколога на дом, врач проводит первичную консультацию и осмотр пациента, чтобы оценить его состояние. На основе полученных данных подбирается подходящая терапия, которая может включать в себя капельницу, препараты для снятия симптомов похмелья и других проблем, связанных с интоксикацией. Процесс лечения проводится с использованием препаратов, которые помогают восстановить нормальное функционирование организма и снять токсическое воздействие алкоголя на сердце, печень и другие органы.
Получить дополнительную информацию – капельница от похмелья в екатеринбурге
В Нижнем Новгороде выезд нарколога на дом используется при состояниях, требующих оперативной медицинской оценки и начала терапии. Врач приезжает с необходимыми препаратами, проводит осмотр и формирует план лечения на месте. Такой формат позволяет сократить время до начала помощи и снизить нагрузку на пациента.
Углубиться в тему – наркологическая помощь на дому нижний новгород
Алкогольная интоксикация оказывает серьёзное влияние на организм, вызывая головную боль, тошноту, слабость и головокружение. Капельница помогает организму быстро избавиться от продуктов распада алкоголя, восстановить нормальное функционирование органов и минимизировать последствия для здоровья. Важно, что мы обеспечиваем полное наблюдение врача на протяжении всей процедуры, что помогает гарантировать безопасность пациента и максимальную эффективность лечения.
Исследовать вопрос подробнее – капельница от похмелья на дом екатеринбург
Состояние после длительного употребления алкоголя или наркотических веществ сопровождается комплексом симптомов: обезвоживание, нарушение работы сердечно-сосудистой системы, тревожность, бессонница, слабость. В таких случаях важно не откладывать помощь, поскольку самостоятельное восстановление организма может быть затруднено. Наркологическая помощь на дому позволяет быстро стабилизировать показатели и начать контролируемое лечение.
Изучить вопрос глубже – вызвать нарколога на дом в нижнем новгороде
При наличии этих симптомов помощь должна быть оказана в кратчайшие сроки. Выезд нарколога позволяет не только стабилизировать состояние, но и определить дальнейшую тактику лечения.
Разобраться лучше – клиника наркологической помощи нижний новгород
Реабилитация алкоголиков с анонимной поддержкой — это важный процесс, который помогает людям справиться с зависимостью в условиях конфиденциальности и безопасности. Многие пациенты опасаются обращаться за помощью из-за стереотипов и страха осуждения. Анонимность в реабилитации становится важным фактором для обеспечения доверия и максимальной эффективности лечения, при этом в ряде случаев доступны такие услуги, как кодирование и консультации наркологической помощи бесплатно, особенно при обращении после запоя. В Москве существует множество центров, которые предлагают реабилитацию алкоголиков с анонимной поддержкой, что позволяет пациентам пройти лечение, не раскрывая своей личности и не беспокоясь о социальном осуждении.
Разобраться лучше – клиника реабилитации алкоголиков город
Pour moi jai remarque cette table via jackpot https://ralphouensanga.com/read-blog/99837 cest imprevisible assez sympa
stromectol ivermectin tablets: stromectol reviews – ivermectin uk
Этот перечень помогает быстро оценить необходимость вызова. Если вы узнали в нем свою ситуацию — оптимально начать терапию как можно раньше: так детокс проходит мягче, а риск осложнений и срывов в первые сутки ниже.
Получить дополнительную информацию – частный нарколог на дом
Когда похмелье переходит в тяжелое состояние, оно может сопровождаться сильной интоксикацией, головной болью, тошнотой, рвотой, резким падением давления и другими неприятными симптомами, что часто наблюдается при запое. В таких случаях капельница становится одним из самых эффективных методов лечения алкоголизма, позволяющим облегчить состояние пациента и быстро вывести токсины из организма, в том числе при проведении терапии в стационаре.
Узнать больше – http://kapelnicza-ot-pokhmelya-samara-14.ru/
Нарколог на дом в Москве: срочный выезд врача, капельницы и помощь при запое в наркологической клинике «Клиника доктора Калюжной».
Ознакомиться с деталями – запой нарколог на дом в москве
Latest Liberian business news https://forbesliberia.com market analysis, economic trends, and technology developments. Learn about key events, investment opportunities, and business prospects in the country.
Нарколог на дом — это формат медицинской помощи, при котором пациент получает лечение без посещения стационара. В наркологической клинике «Частный медик 24» в Нижнем Новгороде такая услуга используется при острых состояниях: запой, выраженная алкогольная интоксикация, абстинентный синдром, а также при необходимости срочного вмешательства без транспортировки больного. Выезд врача позволяет начать терапию в первые часы ухудшения состояния, что снижает риск осложнений и облегчает переносимость лечения.
Подробнее – нарколог на дом в нижнем новгороде
Процесс реабилитации алкоголиков включает в себя несколько методов, направленных на восстановление как физического, так и психоэмоционального состояния пациента. В Москве доступны различные программы, от традиционной детоксикации до современных подходов, при этом в отдельных случаях предусматривается вывод данных о состоянии пациента и динамике лечения при алкогольной зависимости, включая когнитивно-поведенческую терапию и арт-терапию.
Получить больше информации – центр реабилитации алкоголиков город
https://stromectol.reviews/# stromectol reviews
Помощь на дому рассматривают при состояниях, которые сопровождаются выраженным ухудшением самочувствия после алкоголя. Обычно речь идет о нескольких днях запоя, тяжелом похмелье, бессоннице, тревоге, дрожи в руках, слабости, тошноте, сухости во рту, отсутствии аппетита и признаках обезвоживания. В таких случаях врачебный осмотр нужен для оценки тяжести состояния и выбора безопасной тактики.
Ознакомиться с деталями – нарколог на дом вывод
Реабилитация алкоголиков проходит через несколько обязательных этапов. Каждый этап фокусируется на определенных аспектах восстановления и помогает человеку не только избавиться от физической зависимости, но и научиться жить без алкоголя в долгосрочной перспективе, включая кодирование, особенно после длительных лет запоя, а также восстановление в условиях специализированного дома. Этапное восстановление помогает избежать перегрузки пациента, обеспечивая плавный переход от одной стадии лечения к другой.
Детальнее – клиника реабилитации алкоголиков в москве
rybelsus pill image: semaglutide life – trustworthy online pharmacy
Психологическая помощь сопровождает медикаментозное лечение, способствуя преодолению эмоциональных и поведенческих трудностей. Важным элементом является мотивационная работа, направленная на формирование устойчивого стремления к жизни без зависимости.
Получить больше информации – https://narkologicheskaya-klinika-omsk0.ru/chastnaya-narkologicheskaya-klinika-omsk/
Капельница от похмелья в Самаре: восстановление после алкоголя, снятие симптомов и медицинская помощь в наркологической клинике «Детокс»
Получить дополнительную информацию – капельница от похмелья в самаре
Если бизнес развивается, топ менедж онлайн помогает убрать хаос в процессах, файлах и ежедневной коммуникации между отделами. Система собирает ключевые процессы в одной системе, чтобы руководитель получал реальную картину по сотрудникам, поручениям, согласованиям и финансам без бесконечных таблиц вручную. Это удобное решение для компаний, которым важны контроль, прозрачность работы и уверенное масштабирование без лишней рутины и лишних задержек каждый день.
Когда человек оказывается в состоянии алкогольного запоя, самостоятельное преодоление последствий становится практически невозможным. Безопасно выйти из запоя без риска для жизни и здоровья можно только под медицинским наблюдением. В наркологической клинике «Содружество» в Щёлково вывод из запоя проводится круглосуточно, с профессиональной поддержкой, выездом врача на дом и гарантией индивидуального подхода к каждому пациенту. Здесь обеспечивается не только эффективное медикаментозное лечение, но и психологическая поддержка семьи, а также планирование последующего восстановления.
Подробнее – http://vyvod-iz-zapoya-shchelkovo6.ru
Полная версия по ссылке: https://amaliya-parfum.ru/index.php?manufacturers_id=431
Наиболее частыми причинами обращения становятся запой, выраженная слабость, тремор, тревога, бессонница, тошнота, нестабильное давление, учащенный пульс и ощущение физического истощения. Эти проявления могут сочетаться между собой и усиливаться после прекращения употребления алкоголя, особенно если эпизод длился несколько дней подряд.
Ознакомиться с деталями – https://narkolog-na-dom-moskva-20.ru
Острые состояния редко развиваются внезапно без предпосылок. Чаще всего им предшествуют недели или месяцы нарастающей нагрузки на нервную и сердечно-сосудистую системы. Игнорирование ранних сигналов приводит к тому, что в момент кризиса требуются уже не профилактические меры, а экстренная стабилизация. Профессиональная оценка позволяет разграничить ситуации, где достаточно амбулаторной поддержки, и те, где необходимо круглосуточное наблюдение. Своевременное вмешательство снижает вероятность осложнений, сокращает длительность восстановления и повышает готовность пациента к дальнейшей терапии.
Узнать больше – круглосуточная наркологическая помощь
Помощь на дому рассматривают при состояниях, связанных с острым ухудшением самочувствия после алкоголя. Чаще всего это несколько дней запоя, тяжелое похмелье, бессонница, тревога, дрожь в руках, слабость, отсутствие аппетита, тошнота, сухость во рту и ощущение истощения. В подобных случаях врачебный осмотр нужен для оценки общего состояния и выбора безопасной тактики.
Ознакомиться с деталями – нарколог на дом анонимно
Выезд нарколога на дом в Самаре — это комплексный подход к лечению, который включает несколько этапов. Врач, приехавший на место, не ограничивается одной процедурой, а проводит полноценный осмотр, диагностирует состояние пациента, определяет причину ухудшения самочувствия и подбирает индивидуальную терапию. Наиболее часто при выезде нарколога на дом используются капельницы, антиеметики и препараты для стабилизации состояния пациента, снятия симптомов абстиненции и улучшения общего самочувствия.
Подробнее – вызов нарколога на дом в самаре
semaglutide benefits rybelsus dose for diabetes how much does rybelsus cost with medicare
Капельница состоит из нескольких компонентов, которые способствуют восстановлению организма без чрезмерного стресса. Основные элементы включают в себя:
Получить дополнительные сведения – капельница от похмелья на дом самара
stromectol reviews: ivermectin purchase – cost of stromectol medication
Когда клиника далеко, время позднее или важна конфиденциальность, помощь на дому позволяет начать лечение немедленно и в комфортной обстановке. Ниже — типичные ситуации, когда визит нарколога на дом особенно уместен.
Разобраться лучше – anonimnyj-vrach-narkolog-na-dom
antibiotics cheap: otc medicine – antibiotics for uti
Состояние пациента при интоксикации может развиваться по-разному: от умеренной слабости и головной боли до выраженной дезориентации, тахикардии и нарушений сна. В таких ситуациях важно не откладывать обращение за помощью. Наркологическая помощь на дому рассматривается, когда требуется быстрое вмешательство и контроль состояния без транспортировки пациента.
Выяснить больше – клиника наркологической помощи
Помощь на дому рассматривают при состояниях, которые сопровождаются заметным ухудшением самочувствия после алкоголя. Обычно это несколько дней запоя, тяжелое похмелье, дрожь в руках, бессонница, выраженная слабость, раздражительность, тревога, тошнота, сухость во рту, отсутствие аппетита и признаки обезвоживания. В таких случаях осмотр врача нужен для оценки тяжести состояния и определения безопасной тактики.
Подробнее тут – запой нарколог на дом
https://stromectol.reviews/# how much does ivermectin cost
Особое внимание мы уделяем психологической составляющей. Наркологическая помощь в Воронеже в «Клиника Плюс» — это не только физическое очищение, но и работа с мотивацией, разрушение психологических триггеров зависимости. Родственники получают отдельную поддержку: консультации психолога помогают правильно выстроить общение с зависимым человеком и мотивировать его на дальнейшее лечение. Реабилитация может проходить амбулаторно или в стационаре партнёрских центров с комфортабельными условиями, где пациенты находятся под круглосуточным наблюдением.
Углубиться в тему – наркологическая помощь воронеж
Этот процесс не занимает много времени — обычно процедура длится от 30 до 60 минут. Важно, что врач контролирует все этапы, обеспечивая безопасность пациента и корректируя терапию по мере необходимости. Такой подход позволяет быстро и эффективно облегчить симптомы похмелья и вернуться к нормальной жизнедеятельности.
Получить дополнительную информацию – капельница от похмелья на дом самара
Фармакологическая поддержка в стационаре направлена на решение конкретных клинических задач: восполнение дефицита жидкости и электролитов, защиту гепатоцитов, нормализацию сна, снижение тревожности и купирование болевого синдрома. Стандартная капельница для вывода из запоя включает кристаллоиды для восстановления объема циркулирующей крови, витамины группы B и C для поддержки метаболизма, гепатопротекторы для снижения токсической нагрузки, седативные и противорвотные препараты для стабилизации нервной системы. При выраженном похмелья или тяжелой абстиненции могут назначаться препараты для коррекции нейромедиаторного обмена, однако их применение строго дозируется и контролируется. Дозировки корректируются ежедневно на основе динамики показателей, что обеспечивает безопасность и эффективность терапии без перегрузки организма. Стандарты качества в клинике «Стармед» исключают «универсальные» схемы и требуют строгого врачебного контроля на каждом этапе инфузии.
Подробнее – нарколог вывод из запоя в стационаре
Отдельно стоит выделить ситуации, когда семья сталкивается не только с алкоголем, но и с употреблением наркотиков. В таких случаях врачебная консультация особенно важна, поскольку последствия интоксикации могут отличаться, а признаки наркомании и алкоголизма иногда накладываются друг на друга. Если речь идет о смешанном употреблении, подход к помощи на дому требует особой осторожности.
Исследовать вопрос подробнее – вызов нарколога на дом екатеринбург
Процесс проведения капельницы от похмелья обычно включает в себя несколько ключевых этапов. Несмотря на простоту процедуры, важно, чтобы её проводил квалифицированный специалист. Каждый этап — от консультации до завершения процедуры — направлен на безопасность пациента и максимальную эффективность лечения.
Исследовать вопрос подробнее – http://kapelnicza-ot-pokhmelya-samara-6.ru
После обращения по телефону или через сайт оператор уточняет адрес, состояние пациента и срочность выезда. Врач прибывает в течение 1–2 часов, а в экстренных случаях — в течение часа. На месте специалист проводит первичный осмотр: измеряет давление, пульс, сатурацию, температуру, уточняет длительность запоя, сопутствующие заболевания, особенности реакции на лекарства.
Узнать больше – вывод из запоя недорого
Фундамент под ключ https://fundament-v-spb.ru любой сложности: ленточный, плитный, свайный. Профессиональный подход, современные технологии и точный расчет для долговечности и безопасности здания.
Expert construction https://trackbuilder.ru of BMX tracks, pump tracks, and dirt parks. High-quality materials, thoughtful design, and reliable implementation for sports, recreation, and competitions.
https://stromectol.reviews/# buy ivermectin uk
В малых группах пациенты учатся взаимодействию и поддержке друг друга, что укрепляет мотивацию. Арт-терапевтические занятия помогают выразить эмоции через творчество и снизить уровень внутреннего напряжения.
Получить дополнительную информацию – centr lecheniya alkogolizma krasnodar
Follow the matches online spor-x.com.az live scores, the latest sports news, transfer rumors, and the latest TV schedule. Everything you need is in one place.
При выезде на дом врач проводит все необходимые процедуры, включая инфузионную терапию (капельницы), медикаментозное лечение для снятия симптомов ломки, а также консультирует пациента и его семью по дальнейшему лечению. Важно, что после стабилизации состояния нарколог может дать рекомендации по дальнейшей реабилитации, возможному кодированию, а также предложить программу для восстановления здоровья на длительный срок.
Изучить вопрос глубже – нарколог на дом цена
Многие пациенты и их родственники выбирают выезд врача на дом, когда пациент не в состоянии самостоятельно приехать в клинику. Домашняя помощь подходит в ситуациях, когда состояние пациента резко ухудшается, и важно начать лечение как можно быстрее.
Подробнее тут – наркологическая помощь на дому в воронеже
https://stromectol.reviews/# ivermectin buy
Такие состояния требуют не только лечения, но и наблюдения, поскольку динамика может меняться в течение короткого времени. Стационар позволяет минимизировать риски и обеспечить безопасность пациента. При этом услуга может предоставляться анонимно, а цена лечения зависит от состояния пациента.
Углубиться в тему – вывод из запоя в стационаре анонимно нижний новгород
Когда зависимости становятся хроническими и угрожают жизни пациента, комплексная реабилитация при наркомании в специализированных клиниках Москвы, включая вывод из состояния в стационаре и последующий анализ данных о состоянии пациента, может стать единственным возможным решением. Процесс восстановления включает в себя работу не только с зависимостью, но и с психоэмоциональным состоянием, что делает лечение более эффективным и долговечным.
Узнать больше – центр реабилитации алкоголиков в москве
Для жителей Екатеринбурга наркологическая клиника «Частный медик 24» предлагает услуги выезда нарколога на дом для проведения капельницы от похмелья. Это удобный и эффективный способ лечения, особенно если пациент испытывает тяжёлые симптомы похмелья и не может поехать в клинику. Выезд нарколога на дом позволяет начать лечение сразу, не тратя время на поездку и ожидания в клинике. Врач приезжает с необходимыми препаратами и оборудованием, проводит осмотр и назначает необходимую терапию.
Исследовать вопрос подробнее – https://kapelnicza-ot-pokhmelya-ekaterinburg-8.ru/
За выездом врача чаще обращаются тогда, когда человеку тяжело добраться до клиники, он ослаблен после нескольких дней употребления алкоголя или родственникам важно быстрее понять, какая тактика будет безопасной. После осмотра можно определить, нужна ли капельница, достаточно ли детоксикации на дому, требуется ли повторное наблюдение, а в дальнейшем — консультация по лечению алкоголизма, кодирование или реабилитация. В части случаев уже первый звонок позволяет понять, идет ли речь только о временном ухудшении самочувствия или о состоянии, при котором может потребоваться вывод из запоя в стационаре.
Углубиться в тему – нарколог на дом цена в екатеринбурге
Капельница от похмелья в Екатеринбурге с медицинским контролем и поддержкой организма в наркологической клинике «Частный медик 24»
Подробнее тут – капельница от похмелья цена в екатеринбурге
Реабилитация алкоголиков в Москве представляет собой многократный процесс восстановления, который включает несколько этапов, направленных на очищение организма, психологическое восстановление и возвращение пациента к полноценной жизни. Этапное восстановление помогает обеспечить стабильный результат и минимизировать риск рецидива, позволяя человеку постепенно вернуться к нормальной социальной и трудовой жизни.
Получить дополнительные сведения – реабилитация алкоголиков стоимость москва
https://stromectol.reviews/# stromectol reviews
antibiotics cheap: antibiotics cheap – over the counter antibiotics
stromectol reviews stromectol reviews stromectol reviews
Таблетки и народные методы требуют времени для усвоения и часто дают ограниченный результат. Капельница же позволяет обойти желудочно-кишечный тракт и сразу доставить необходимые вещества в кровь, что особенно важно при выраженном похмельном синдроме.
Выяснить больше – капельница от похмелья на дом в самаре
Выбор наркологического стационара с комфортными условиями требует внимательного подхода, чтобы убедиться, что все аспекты лечения и реабилитации будут выполнены на высоком уровне. Важно учитывать не только медицинскую составляющую, но и то, как созданы условия для пациентов, их психологический комфорт и безопасность на всех этапах лечения. Также стоит учитывать цену за стационарное лечение с круглосуточным наблюдением, чтобы выбрать оптимальный вариант, соответствующий потребностям пациента и его бюджету.
Подробнее можно узнать тут – частный наркологический стационар санкт-петербург
Капельница от похмелья является одним из наиболее эффективных методов для быстрого улучшения состояния пациента. Это медицинская процедура, направленная на детоксикацию организма, восстановление водно-солевого баланса и устранение симптомов интоксикации, обеспечивая быстрый вывод токсинов. Важным моментом является то, что капельница оказывает комплексное воздействие на организм, помогая справиться с неприятными симптомами похмелья, при этом может сочетаться с дальнейшей терапией и кодированием.
Получить дополнительные сведения – капельница от похмелья вызов на дом самара
rybelsus constipation: semaglutide life – best online pharmacy
semaglutide vs metformin: semaglutide shots – reputable overseas online pharmacies
Процесс лечения капельницей помогает улучшить состояние пациента уже через короткий период. Важно, что процедура не только снимает симптомы похмелья, но и восстанавливает нормальную работу печени, почек и других органов, пострадавших от токсического воздействия алкоголя. Это помогает предотвратить долгосрочные последствия интоксикации, такие как хроническая усталость, проблемы с органами и психоэмоциональные расстройства.
Исследовать вопрос подробнее – http://kapelnicza-ot-pokhmelya-ekaterinburg-8.ru/
Эта статья погружает вас в увлекательный мир знаний, где каждый факт становится открытием. Мы расскажем о ключевых исторических поворотных моментах и научных прорывах, которые изменили ход цивилизации. Поймите, как прошлое формирует настоящее и как его уроки могут помочь нам строить будущее.
Познакомиться с результатами исследований – http://radiomilanomarittima.com/lume
https://antibiotics.cheap/# get antibiotics without seeing a doctor
Этот увлекательный информационный материал подарит вам массу новых знаний и ярких эмоций. Мы собрали для вас интересные факты и сведения, которые обогатят ваш опыт. Откройте для себя увлекательный мир информации и насладитесь процессом изучения!
Лучшее решение — прямо здесь – https://owen-energo.ru/product/prm
После оформления вызова нарколог приезжает к пациенту и проводит комплексную оценку состояния. Врач измеряет давление, частоту пульса, оценивает уровень сознания и выраженность симптомов. На основании полученных данных формируется план лечения, который реализуется сразу на месте.
Получить дополнительные сведения – http://narkolog-na-dom-nizhnij-novgorod.ru
Капельница от похмелья в Самаре становится все более популярным методом, благодаря своим преимуществам в восстановлении организма после алкогольного отравления. В отличие от традиционных методов лечения, таких как прием таблеток или напитков, капельница действует гораздо быстрее и более эффективно, особенно в случае тяжелого похмелья. Врачебные центры в Самаре предлагают услуги капельниц, которые могут быть настроены под конкретные нужды пациента, что увеличивает эффективность лечения.
Получить больше информации – капельница от похмелья
Капельница состоит из нескольких компонентов, которые способствуют восстановлению организма без чрезмерного стресса. Основные элементы включают в себя:
Выяснить больше – капельница от похмелья на дому самара
Такие критерии помогают определить, когда необходим более строгий контроль и постоянное наблюдение. В стационаре создаются условия, при которых лечение проходит без внешних факторов, влияющих на состояние пациента. При этом услуга может предоставляться анонимно, а цену лечения можно уточнить заранее по телефону или при обращении.
Ознакомиться с деталями – быстрый вывод из запоя в стационаре
Каждый элемент программы направлен на создание комплексного подхода к лечению зависимости, обеспечивая помощь не только на физическом, но и на эмоциональном уровне. Индивидуальная программа реабилитации позволяет выстроить эффективную терапию, которая соответствует конкретным потребностям пациента.
Изучить вопрос глубже – центр реабилитации алкоголиков
Состояние пациента при интоксикации может развиваться по-разному: от умеренной слабости и головной боли до выраженной дезориентации, тахикардии и нарушений сна. В таких ситуациях важно не откладывать обращение за помощью. Наркологическая помощь на дому рассматривается, когда требуется быстрое вмешательство и контроль состояния без транспортировки пациента.
Узнать больше – http://www.domen.ru
Капельница от похмелья с мягким восстановлением — это метод, направленный на быстрое восстановление организма после алкогольной интоксикации, при котором используется более щадящий подход. В отличие от стандартных капельниц, целью которых является быстрый вывод токсинов из организма, капельница с мягким восстановлением действует постепенно, восстанавливая водно-солевой баланс и поддерживая внутренние органы без перегрузки организма. Эта процедура особенно полезна тем, кто предпочитает не только избавиться от похмелья, но и почувствовать себя восстановленным и энергичным, при этом помощь может оказываться при запое, когда врач выезжает на дом для лечения алкоголизма.
Подробнее тут – http://kapelnicza-ot-pokhmelya-samara-12.ru
Капельница от похмелья в Самаре становится все более популярным методом, благодаря своим преимуществам в восстановлении организма после алкогольного отравления. В отличие от традиционных методов лечения, таких как прием таблеток или напитков, капельница действует гораздо быстрее и более эффективно, особенно в случае тяжелого похмелья. Врачебные центры в Самаре предлагают услуги капельниц, которые могут быть настроены под конкретные нужды пациента, что увеличивает эффективность лечения.
Разобраться лучше – капельница от похмелья на дом
Капельница от похмелья используется в тех случаях, когда симптомы интоксикации становятся слишком выраженными, чтобы пациент мог справиться с ними самостоятельно. Важно понимать, что капельница — это не только способ облегчить состояние пациента, но и метод профилактики осложнений, таких как хроническая интоксикация, нарушения работы внутренних органов и нервной системы. Вот основные симптомы, при которых рекомендуется вызвать нарколога на дом для проведения капельницы:
Разобраться лучше – капельница от похмелья цена
Эта статья сочетает познавательный и занимательный контент, что делает ее идеальной для любителей глубоких исследований. Мы рассмотрим увлекательные аспекты различных тем и предоставим вам новые знания, которые могут оказаться полезными в будущем.
А есть ли продолжение? – https://yupdeals.in/10-warning-signs-to-watch-out-for-phone-hacked
В обзорной статье вы найдете собрание важных фактов и аналитики по самым разнообразным темам. Мы рассматриваем как современные исследования, так и исторические контексты, чтобы вы могли получить полное представление о предмете. Погрузитесь в мир знаний и сделайте шаг к пониманию!
Прочесть заключение эксперта – https://finnurarnar.com/art/aeringur-family-exhibition-in-bolungavik/attachment/aeringur-9
Капельница от похмелья — это эффективный способ экстренной помощи, предназначенный для того, чтобы помочь организму быстро восстановиться после злоупотребления алкоголем. В наркологической клинике «Частный медик 24» в Самаре мы предоставляем услугу безопасной детоксикации и восстановления 24/7. Капельница помогает организму вывести токсины, восстановить водно-электролитный баланс и улучшить общее состояние пациента, не создавая дополнительных нагрузок на сердце, печень и почки.
Подробнее тут – http://www.domen.ru
how does semaglutide work to lose weight or rybelsus 3mg cost is semaglutide the same as wegovy
https://maps.google.co.ls/url?sa=t&url=https://semaglutide.life semaglutide generic or http://mbuild.store/user/bhtrsimybs/?um_action=edit semaglutide and cancer
semaglutide rybelsus how long does rybelsus take to work and rybelsus vs ozempic dosage rybelsus name
https://antibiotics.cheap/# antibiotics cheap
Нарколог на дом в Самаре — помощь при запое и интоксикации в наркологической клинике «Частный медик 24»
Получить дополнительную информацию – [url=https://narkolog-na-dom-samara-2.ru/]врач нарколог на дом самара[/url]
maximum dose of rybelsus: semaglutide life – pharmacy websites
Когда человек или его родственники понимают, что нужна наркологическая помощь в Воронеже, время становится решающим фактором. Запой, ломка, тяжёлая интоксикация — в таких ситуациях промедление может привести к необратимым последствиям для здоровья и жизни. Наша клиника создана именно для того, чтобы оказывать эффективную круглосуточную наркологическую помощь в Воронеже в самых сложных случаях. Мы не заставляем ждать в очередях государственных учреждений, не ставим на учёт и не разглашаем информацию. Всё происходит анонимно, на дому или в комфортных условиях нашей партнёрской клиники. Пациенты из Воронежа, Воронежской области, а также соседних регионов уже более 12 лет выбирают «Клиника Плюс» благодаря сочетанию скорости, профессионализма, полной анонимности и доказанной результативности.
Узнать больше – вызов наркологической помощи
over the counter antibiotics: over the counter antibiotics – over the counter antibiotics
Нарколог на дом может помочь в следующих ситуациях:
Узнать больше – нарколог на дом цена самара
В этой публикации мы предлагаем подробные объяснения по актуальным вопросам, чтобы помочь читателям глубже понять их. Четкость и структурированность материала сделают его удобным для усвоения и применения в повседневной жизни.
Ознакомиться с отчётом – https://bestbossideda.com/coyyn-com-innovation-revolutionizing-financial-transactions-and-beyond
https://antibiotics.cheap/# antibiotics cheap
https://semaglutide.life/# doses of rybelsus
antibiotics cheap: antibiotics cheap – over the counter antibiotics
В этой статье представлен занимательный и актуальный контент, который заставит вас задуматься. Мы обсуждаем насущные вопросы и проблемы, а также освещаем истории, которые вдохновляют на действия и изменения. Узнайте, что стоит за событиями нашего времени!
Как это работает — подробно – https://feitoparaela.com.br/2021/07/26/cancer-de-colo-de-utero-e-a-luta-pela-vacinacao-rastreamento-e-tratamento-precoce
https://semaglutide.life/# best vitamins to take while on semaglutide
antibiotic without presription over the counter antibiotics antibiotics cheap
В этой статье представлен занимательный и актуальный контент, который заставит вас задуматься. Мы обсуждаем насущные вопросы и проблемы, а также освещаем истории, которые вдохновляют на действия и изменения. Узнайте, что стоит за событиями нашего времени!
Ознакомиться с отчётом – https://www.workingcode.in/2023/06/22/use-case-integrationhub
generic antibiotics and antibiotics online pharmacy buy antibiotics from canada
http://images.google.com.tj/url?q=http://antibiotics.cheap antibiotics drugs and http://nidobirmingham.com/user/ckdxsqkbhg/ prescribed antibiotics online
otc medicine antibiotics for uti over the counter and antibiotics online prescription buy antibiotics from canada
why does semaglutide make you tired or semaglutide tablet rybelsus 7 mg efectos secundarios
https://images.google.li/url?sa=t&url=https://semaglutide.life rybelsus clinical trials and https://chinaexchangeonline.com/user/azgahujyhd/?um_action=edit rybelsus fda approved for weight loss
dulaglutide vs semaglutide ro semaglutide or semaglutide doses best online semaglutide
карниз электроприводом штор купить elektrokarniz-nedorogo77.ru .
https://stromectol.reviews/# stromectol reviews
rybelsus pronunciation: compound semaglutide vs ozempic – reliable online pharmacy
generic stromectol or stromectol covid ivermectin 6mg dosage
https://images.google.com.gt/url?q=https://stromectol.reviews ivermectin where to buy for humans and https://alphafocusir.com/user/ksviuvmaci/?um_action=edit stromectol medication
ivermectin 5 mg ivermectin 3mg tablets or ivermectin 1 cream 45gm ivermectin cream
нейросеть текст для учебы nejroset-dlya-referatov-23.ru .
stromectol reviews: stromectol for sale – ivermectin 5 mg price
stromectol 3 mg tablet and ivermectin uk buy ivermectin cream
https://www.google.vg/url?q=https://stromectol.reviews stromectol ivermectin tablets or https://cyl-sp.com/home.php?mod=space&uid=135341 ivermectin 2ml
ivermectin new zealand ivermectin lotion or stromectol tablets uk stromectol generic name
side effect of semaglutide or semaglutide and phentermine how fast does semaglutide work
https://clients1.google.vg/url?q=https://semaglutide.life how to open a rybelsus bottle or https://www.trendyxxx.com/user/lonrrxumum/videos what is a semaglutide injection
glp-1 rybelsus rybelsus and metformin together for weight loss and rybelsus 14 mg discontinued semaglutide long term effects
электрокарнизы цена электрокарнизы цена .
https://ecopolis-spb.ru/tvorchestvo_all/
rybelsus when to take: semaglutide life – best rx pharmacy online
generic ivermectin oral ivermectin cost ivermectin gel
электрокарнизы elektrokarnizy10.ru .
https://semaglutide.life/# sulfur burps semaglutide
электрические гардины elektrokarnizy-dlya-shtor150.ru .
электрический карниз для штор купить elektrokarnizy777.ru .
автоматические карнизы автоматические карнизы .
электрокарнизы elektrokarnizy33.ru .
stromectol reviews: stromectol reviews – stromectol reviews
Капельница от похмелья в Самаре: восстановление после алкоголя, снятие симптомов и медицинская помощь в наркологической клинике «Детокс»
Подробнее можно узнать тут – http://kapelnicza-ot-pokhmelya-samara-16.ru
нейросеть для рефератов нейросеть для рефератов .
https://antibiotics.cheap/# can you buy antibiotics over the counter
Капельница от похмелья в Самаре: снятие похмелья, детоксикация и восстановление организма в наркологической клинике «Детокс»
Подробнее тут – капельница от похмелья вызов на дом самара
автоматическое открывание жалюзи автоматическое открывание жалюзи .
https://antibiotics.cheap/# antibiotics cheap
https://stromectol.reviews/# stromectol reviews
нейросеть студент бот нейросеть студент бот .
Что писать парню при ссоре и после ссоры как начать разговор примеры сообщений и советы по примирению
antibiotics cheap: over the counter antibiotics – buy antibiotics for sinus
can semaglutide cause diabetes and is semaglutide covered by medicaid semaglutide where to inject
https://31.glawandius.com/index/d1?diff=0&utm_clickid=h9kro2itmnlr5ry2&aurl=https://semaglutide.life rybelsus drugs.com and http://mbuild.store/user/alhclosykp/?um_action=edit diabetes rybelsus
how fast can i lose 20 lbs on semaglutide? semaglutide and breastfeeding and not losing weight on semaglutide injecting semaglutide
how many units is 1.7 mg of semaglutide or rybelsus tablets price how much weight can you lose on semaglutide
https://www.google.ki/url?q=https://semaglutide.life hims semaglutide cost or https://vintage-car.eu/user/csiavbwcyh/ what is semaglutide used for
how long after taking rybelsus can i eat rybelsus cena or is rybelsus the same as ozempic semaglutide med spa near me
ролевые шторы elektricheskie-rulonnye-shtory77.ru .
Процесс проведения капельницы от похмелья в Самаре включает несколько важных этапов, каждый из которых направлен на быстрое восстановление организма и улучшение самочувствия пациента. В отличие от традиционных методов, таких как прием таблеток или напитков, капельница позволяет сразу получить все необходимые компоненты для восстановления, включая гидратацию, витамины и препараты для снятия токсинов. Эта процедура проводится в медицинских центрах Самары, и часто доступна с выездом на дом, что повышает ее удобство и доступность для пациента.
Подробнее тут – http://kapelnicza-ot-pokhmelya-samara-15.ru/
ivermectin uk coronavirus: stromectol reviews – ivermectin 3 mg
Помощь начинается с первичной оценки. Врач уточняет длительность запоя, время последнего приёма алкоголя, ведущие симптомы, хронические заболевания, прошлые осложнения, аллергии, а также препараты, которые пациент уже принимал самостоятельно. Далее проводится осмотр: измеряются давление и пульс, оценивается дыхание, температура, признаки обезвоживания, уровень сознания, выраженность тремора и тревоги. На основании этой информации выбирается тактика и формат — на дому, амбулаторно или в стационаре, если риски высокие.
Углубиться в тему – vyvod iz zapoya na domu kruglosutochno
Покупка шаблона Аспро Next — готовое решение для быстрого запуска современного интернет-магазина на 1С-Битрикс. Переходите по запросу интернет магазин Аспро Next. Шаблон сочетает стильный дизайн, удобный каталог, адаптивную верстку и широкий набор маркетинговых инструментов для увеличения продаж. Подходит для разных ниш бизнеса, легко настраивается и интегрируется с необходимыми сервисами. Оптимальный выбор для тех, кто хочет запустить эффективный онлайн-магазин без лишних затрат времени.
antibiotics cheap: over the counter antibiotics – antibiotics cheap
https://antibiotics.cheap/# antibiotics cheap
Капельница состоит из нескольких компонентов, которые способствуют восстановлению организма без чрезмерного стресса. Основные элементы включают в себя:
Выяснить больше – http://www.domen.ru
Диагностика начинается с момента первого контакта. Дистанционная оценка позволяет наркологу определить степень тяжести состояния, выявить противопоказания и согласовать оптимальное время поступления. При госпитализации проводится углубленный скрининг: оценка функции печени и почек, контроль уровня глюкозы и электролитов, проверка неврологических рефлексов и когнитивных функций. Результаты анализов становятся основой для составления плана лечения, где каждый препарат назначается с конкретным клиническим обоснованием. Пациент и его близкие получают подробное разъяснение этапов терапии, ожидаемых сроков стабилизации и условий дальнейшего наблюдения.
Разобраться лучше – наркология вывод из запоя в стационаре нижний новгород
over the counter antibiotics: antibiotics cheap – over the counter antibiotics
Есть несколько маркеров, по которым обычно становится ясно: речь уже не о привычке, а о заболевании, которое требует профессиональной помощи. Перед списком — короткий ориентир: не обязательно наличие всех пунктов сразу, достаточно устойчивого повторения части из них.
Детальнее – http://lechenie-alkogolizma-noginsk12.ru/klinika-lecheniya-alkogolizma-v-noginske/
Когда зависимость начинает диктовать настроение, сон и решения, человеку обычно нужно не «поговорить о силе воли», а получить понятную медицинскую помощь: оценку состояния, безопасную стабилизацию и план лечения, который снижает риск повторного ухудшения. В реальности обращаются по разным поводам: затяжной запой, тяжёлая абстиненция, приступы тревоги и бессонницы после прекращения употребления, срыв на фоне стресса, проблемы с контролем дозы или ситуации, когда близкие уже видят явное ухудшение и не понимают, как действовать. Наркологическая клиника в Пушкино — это формат, где помощь организована по шагам: сначала снимают острые риски, затем восстанавливают сон и базовую физиологию, после чего переходят к лечению зависимости как процесса, а не разовой процедуры. Такой подход важен потому, что кратковременное облегчение без дальнейшей работы часто заканчивается возвращением к употреблению в первые недели, когда нервная система ещё нестабильна.
Получить больше информации – narkologicheskaya-klinika-karta
Таким образом, стационарный режим предоставляет не только медицинскую помощь, но и обеспечивает необходимую психологическую и эмоциональную поддержку для успешного восстановления пациента.
Выяснить больше – https://narkologicheskij-staczionar-sankt-peterburg-2.ru
over the counter antibiotics buy antibiotics online antibiotics cheap
Наркологический стационар в Санкт-Петербурге предоставляет пациентам комплексное лечение зависимости от психоактивных веществ. Проблемы, связанные с алкоголизмом, наркоманией и другими формами зависимости, требуют индивидуального подхода и профессиональной помощи. Комплексное лечение в таких учреждениях позволяет не только пройти детоксикацию, но и получить полноценную реабилитацию, что дает пациентам шанс на долгосрочную ремиссию и улучшение качества жизни. В некоторых случаях, при запое или необходимости выезда на дом, может быть предложен центр, где решаются все вопросы, связанные с лечением зависимости и восстановлением пациента.
Подробнее – частный наркологический стационар
Выезд специалиста начинается с оценки состояния пациента. Врач измеряет давление, пульс, оценивает общее самочувствие и выраженность симптомов. На основании этих данных формируется план лечения и подбирается состав капельницы. Такой подход позволяет учитывать индивидуальные особенности пациента и эффективно провести вывод из запоя.
Исследовать вопрос подробнее – капельница от похмелья на дому
Основой стационарного лечения является инфузионная терапия, направленная на ускоренное выведение токсинов, коррекцию кислотно-щелочного баланса и восстановление метаболических процессов. Стандартная капельница при выходе из запоя включает кристаллоидные и коллоидные растворы, витаминные комплексы группы B и C, гепатопротекторы, антиоксиданты и симптоматические препараты для нормализации сна и снижения тревожности. Состав, объем и скорость инфузии рассчитываются индивидуально с учетом возраста, массы тела, длительности интоксикации, функции почек и печени, а также наличия аллергических реакций. Мы быстро купируем мучительные проявления абстиненции, восстанавливаем аппетит, устраняем мышечные спазмы и нормализуем суточные ритмы. При необходимости подключаются препараты для стабилизации сердечного ритма, коррекции артериального давления и защиты нейрональных структур от эксайтотоксичности. Все медикаменты сертифицированы, применяются в строгом соответствии с клиническими рекомендациями Минздрава РФ и не вызывают вторичной зависимости. Дозировки ежедневно пересматриваются лечащим врачом на основе лабораторных анализов и клинической динамики, что гарантирует высокий уровень качества медицинской помощи и безопасность пациента. Снятие острых симптомов происходит уже в первые сутки, что значительно улучшает общее самочувствие и возвращает способность к адекватному восприятию действительности.
Ознакомиться с деталями – наркология вывод из запоя в стационаре в нижнем новгороде
Отдельно выделяют ситуации, когда проблема выходит за рамки одного эпизода. Если запои повторяются, усиливаются последствия алкоголизма, нарушается обычный режим жизни, а состояние после употребления становится тяжелее, домашний выезд часто становится первым этапом более последовательной помощи. При выраженном ухудшении самочувствия, признаках отравлении алкоголем или высокой нагрузке на системы организма может потребоваться наблюдение не только дома, но и в стационаре.
Детальнее – нарколог на дом вывод в екатеринбурге
rybelsus long term side effects and semaglutide oral drops rybelsus anesthesia
https://toolbarqueries.google.co.ve/url?q=https://semaglutide.life is rybelsus safe or https://gikar.it/user/ocluhztmuj/ rybelsus before and after
cheapest compounded semaglutide can you drink on rybelsus or switching from rybelsus to wegovy what does semaglutide do to your body
https://stromectol.reviews/# ivermectin lice oral
stromectol price: ivermectin usa price – stromectol reviews
Перед началом процедуры врач проводит осмотр пациента. Оцениваются основные показатели, включая давление и пульс, а также выраженность симптомов. На основании полученных данных формируется состав капельницы и определяется тактика лечения, что позволяет эффективно провести вывод из запоя.
Разобраться лучше – капельница от похмелья на дому воронеж
semaglutide cost per month: rybelsus weight loss before and after – trusted online pharmacy
ivermectin cream 1% or stromectol buy ivermectin 3
http://jla.drmuller.net/r.php?url=https://stromectol.reviews:: ivermectin 2mg and http://fog.gain.tw/space.php?uid=205318 ivermectin uk
ivermectin 8000 ivermectin canada and stromectol tablet 3 mg ivermectin where to buy
buy stromectol uk and stromectol liquid ivermectin price usa
http://electronix.ru/redirect.php?http://stromectol.reviews ivermectin generic name or http://fog.gain.tw/space.php?uid=205351 ivermectin buy australia
ivermectin cost canada stromectol tab price and buy liquid ivermectin cost of ivermectin medicine
difference between ozempic and semaglutide and rybelsus 3mg weight loss reviews goodrx rybelsus
https://www.google.com.ni/url?sa=t&url=https://semaglutide.life when to stop rybelsus before surgery or https://gikar.it/user/qcpzykcnnf/ 3 mg rybelsus
40 units of semaglutide is how many mg rybelsus picture or rybelsus semaglutide tablets 3mg ro semaglutide reviews
https://antibiotics.cheap/# over the counter antibiotics
Когда человек или его родственники понимают, что нужен нарколог на дом в Екатеринбурге, время становится решающим фактором. Запой, ломка, тяжёлая интоксикация — в таких ситуациях промедление может привести к необратимым последствиям для здоровья и жизни. Наша клиника создана именно для того, чтобы оказывать эффективную круглосуточную помощь в самых сложных случаях. Мы не заставляем ждать в очередях государственных учреждений, не ставим на учёт и не разглашаем информацию. Всё происходит анонимно, в домашних условиях или в комфортных условиях нашей партнёрской клиники. Пациенты из Екатеринбурга, Свердловской области, а также соседних регионов уже более 12 лет выбирают «НЕО+» благодаря сочетанию скорости, профессионализма, полной анонимности и доказанной результативности. Алкогольной зависимости и проблем с наркотиками подвержены как алкоголиков, так и наркозависимых, и мы помогаем всем.
Выяснить больше – нарколог на дом анонимно в екатеринбурге
rybelsus drug interactions: semaglutide life – trusted online pharmacy
rent a coworking space coworking space dubai
https://semaglutide.life/# can you stop semaglutide cold turkey
https://semaglutide.life/# rybelsus who makes it
buy antibiotics for sinus buy antibiotics from india buy antibiotics online for tooth infection
generic ivermectin cream: ivermectin new zealand – stromectol reviews
cheap antibiotics and generic antibiotics antibiotics for uti
https://maps.google.com.py/url?sa=i&url=https://antibiotics.cheap buy antibiotics from canada or https://hiresine.com/user/banyfzgjrx/?um_action=edit antibiotics
Over the counter antibiotics for infection best online doctor for antibiotics and online antibiotics buy antibiotics online safely
Выезд врача — это не «процедура без вопросов», а клиническое решение. На месте оценивают давление, пульс, дыхание, степень обезвоживания, уровень сознания, выраженность тревоги, наличие боли, судорожных проявлений, неврологические симптомы. После этого подбирают схему поддержки, объясняют ограничения и ожидаемую динамику: что должно улучшаться в первые часы, какие симптомы допустимы, а какие требуют немедленного обращения. Важная часть — рекомендации на ближайшие сутки: режим питья и питания, сон, контроль давления, что категорически нельзя смешивать и почему. Такой подход снижает риск осложнений и помогает не «сорваться» в самостоятельные эксперименты.
Изучить вопрос глубже – стациомедика наркологическая клиника вывода из запоя москва отзывы
В Нижнем Новгороде стационарное лечение используется при выраженных симптомах или наличии факторов риска, особенно при тяжелом состоянии больного на фоне алкоголизма или длительного употребления алкоголя. Это позволяет исключить внешние нагрузки, обеспечить непрерывный мониторинг и при необходимости быстро скорректировать терапию. Решение о госпитализации принимается на основе осмотра, консультации специалиста и оценки текущего состояния человека, с учётом клинических данных.
Исследовать вопрос подробнее – http://www.domen.ru
Процесс начинается с оценки состояния. Врач уточняет длительность запоя, время последнего приёма алкоголя, выраженность симптомов, наличие хронических заболеваний, перенесённых осложнений, аллергий, принимаемых препаратов. После этого проводится осмотр: давление, пульс, дыхание, температура, уровень сознания, признаки обезвоживания, неврологический статус. На основании этой картины подбирается план детоксикации и поддержки.
Подробнее – http://vyvod-iz-zapoya-moskva1-12.ru/vyvod-iz-zapoya-v-moskve-stacionar/
После введения растворов активные вещества быстро распределяются по организму. Это способствует выведению продуктов распада алкоголя, улучшению работы нервной системы и восстановлению энергетического баланса. Уже в процессе инфузии уменьшаются головная боль, тошнота и слабость.
Подробнее – https://kapelnicza-ot-pokhmelya-samara-8.ru/
Самостоятельные попытки обычно идут по двум типичным маршрутам. Первый — «пить понемногу, чтобы не трясло». На практике это продлевает запой и усиливает истощение: сон остаётся поверхностным, тревога нарастает, давление и пульс становятся нестабильными, организм не успевает восстанавливаться. Второй маршрут — резко прекратить и «перетерпеть». Тогда симптомы отмены могут нарастать резко: паника, сильный тремор, потливость, тахикардия, скачки давления, тошнота, рвота, бессонница. Испугавшись ухудшения, человек снова возвращается к алкоголю, потому что это кажется единственным быстрым способом облегчить состояние.
Выяснить больше – narkologiya vyvod iz zapoya
https://stromectol.reviews/# ivermectin oral
Обращение на стадии, когда человек не может самостоятельно справиться с зависимостью, значительно повышает шансы на успешное лечение и восстановление. Важно начать лечение на раннем этапе, когда физическая и психологическая зависимость еще не столь выражены.
Углубиться в тему – клиника наркологической помощи в воронеже
В клинике «Ось Здоровья» помощь выстраивается по маршруту. Врач оценивает, насколько состояние стабильное, какие риски сейчас, что именно приводит к срывам — тяжёлая отмена, тревожность, нарушения сна, стресс и истощение. Затем подбирается формат лечения: стационар, амбулаторная программа или помощь на дому, если по состоянию это безопасно. После первичного облегчения обязательно составляется план на первые 24–72 часа — период, когда чаще всего случаются повторные ухудшения вечером и ночью. Когда у пациента есть ориентиры и поддержка по динамике, риск вернуться к алкоголю или веществам «для облегчения» становится ниже.
Выяснить больше – https://narkologicheskaya-klinika-klin12.ru
rybelsus semaglutide 3 mg: him and hers semaglutide – no prescription pharmacy paypal
После стабилизации важно закрепить результат. В первые 1–3 дня сохраняются слабость, раздражительность, эмоциональные качели, нарушения сна. Без плана и поддержки многие срываются, потому что пугаются ухудшения вечером или ночью и пытаются снять дискомфорт алкоголем. Поэтому врач даёт рекомендации на ближайшие сутки и несколько дней: как организовать сон, питание, питьевой режим, что контролировать по давлению и пульсу, какие нагрузки исключить и по каким признакам нужно срочно обращаться повторно.
Узнать больше – https://narkologicheskaya-klinika-zhukovskij12.ru/narkologicheskaya-klinika-otzyvy-v-zhukovskom/
rybelsus weight loss dosage: what does semaglutide do – online pharmacy discount code
what does rybelsus treat or rybelsus and thyroid cancer rybelsus brand name
http://pravorostov.ru/redirect.php?url=http://semaglutide.life how much weight can you lose on rybelsus 3 mg or http://clubdetenisalbatera.es/user/sxaqhivouj/ rybelsus not working for weight loss
se puede tomar rybelsus y metformina juntos rybelsus 14mg price or semaglutide expiration how many mg is 40 units of semaglutide
does insurance cover semaglutide and semaglutide dry mouth does rybelsus cause anxiety
https://toolbarqueries.google.com.mm/url?q=https://semaglutide.life rybelsus (semaglutide) and http://www.xunlong.tv/en/orangepibbsen/home.php?mod=space&uid=6406487 3mg rybelsus
semaglutide injection price 50 units of semaglutide or how can i get rybelsus how much is compounded semaglutide
Зависимость меняет работу нервной системы: алкоголь начинает выполнять функцию регулятора — сна, тревоги, настроения и даже физического самочувствия. Когда человек прекращает пить, организм реагирует отменой, и именно она подталкивает вернуться к употреблению. Сила воли в этой точке часто проигрывает физиологии: тревога растёт, сон исчезает, сердце бьётся чаще, давление «скачет», появляется ощущение угрозы.
Исследовать вопрос подробнее – alkogolizm-lechenie-preparaty
ivermectin pills canada: stromectol reviews – stromectol usa
https://antibiotics.cheap/# over the counter antibiotics
Когда требуется нарколог на дом, обычно речь идёт не о «консультации на будущее», а о ситуации, которая уже мешает жить здесь и сейчас: затяжной запой, тяжёлая абстиненция, сильная тревога и бессонница, тремор, скачки давления, рвота, выраженная слабость, паника или состояние, при котором человек не готов ехать в клинику. В Пушкино выездная помощь востребована ещё и потому, что многим важно сохранить приватность и не вовлекать лишних людей: дома проще согласиться на осмотр, не тратить силы на дорогу и избежать стрессовой смены обстановки. В наркологической клинике «Стабильный Выбор» выезд врача строится по принципу «быстро, но безопасно»: сначала оценка состояния и рисков, затем индивидуальная тактика стабилизации и понятный план на ближайшие часы и сутки.
Получить дополнительные сведения – skolko-stoit-vyzov-narkologa-na-dom
over the counter antibiotics: buy zithromax antibiotic – antibiotics online pharmacy
Каждый выезд нарколога включает в себя не только инфузионную терапию, но и полноценную оценку состояния пациента, анализ рисков, а также консультацию по дальнейшему лечению. Врач может назначить дополнительные препараты для снятия симптомов ломки, восстановления водно-электролитного баланса и улучшения общего состояния пациента. Также важно, что консультация включает рекомендации по реабилитации, психологической поддержке и кодированию, если это необходимо для пациента, страдающего хроническим алкоголизмом или наркоманией.
Получить больше информации – нарколог на дом вывод
cost of rybelsus on medicare rybelsus semaglutide tablets rybelsus thyroid
https://antibiotics.cheap/# over the counter antibiotics
Многие семьи слишком долго откладывают обращение к услугам нарколога, надеясь, что человек «отойдет сам», выспится, восстановится за день-два или просто даст очередное обещание больше не повторять употребление. На практике такие ожидания часто только отнимают время. Если зависимость уже начала формироваться, самочувствие после алкоголя становится тяжелее, а промежутки между срывами сокращаются, это говорит о том, что проблема вышла за пределы бытовой и требует профессиональной оценки.
Подробнее – вызов наркологической помощи
https://antibiotics.cheap/# over the counter antibiotics
https://semaglutide.life/# is semaglutide the same as wegovy
how fast does semaglutide work for weight loss: metformin vs semaglutide – online pharmacy discount code
Многие боятся обращаться из-за стыда и опасений последствий: «кто-то узнает», «будут вопросы на работе», «поставят отметку». На практике главная ценность частной помощи — деликатность и структурность одновременно. Деликатность снижает барьер обращения, а структурность делает лечение безопасным: врач не действует «наугад», а оценивает риски, учитывает хронические заболевания, препараты, которые человек уже принимал, и строит тактику так, чтобы избежать ночных провалов, скачков давления и повторных “качелей”.
Получить дополнительные сведения – частная наркологическая клиника
difference between ozempic and semaglutide and semaglutide and fatigue oral semaglutide
http://promisec.net/info.php?a= semaglutide before and after 3 months or http://nidobirmingham.com/user/swlbukomni/ how many units of semaglutide is 2.4 mg
semaglutide weight loss rybelsus, weight loss before and after and can you cut rybelsus semaglutide and depression
rybelsus commercial 2024: rybelsus kaufen – top online pharmacy
Стационарный формат рекомендуется в следующих ситуациях:
Подробнее тут – вывод из запоя в стационаре клиника в нижнем новгороде
buy antibiotics online safely or antibiotics for uti buy amoxicillin antibiotic
https://www.google.com.bd/url?q=http://antibiotics.cheap antibiotics online purchase or https://raygunmvp.com/user/qtpyuillfv-qtpyuillfv/?um_action=edit antibiotics over the counter
antibiotics for uti over the counter prescribed antibiotics online and cheapest antibiotics Over the counter antibiotics pills
При первой консультации нарколог осматривает пациента, чтобы оценить его состояние и подобрать оптимальную схему лечения. В зависимости от тяжести похмелья, врач может назначить инфузию с регидратационными растворами, витаминами группы B и другими препаратами, которые способствуют восстановлению. Важно, что капельница не только помогает снять симптомы, но и устраняет причины токсического воздействия алкоголя на организм, предотвращая развитие осложнений.
Изучить вопрос глубже – капельница от похмелья на дому
https://semaglutide.life/# who makes rybelsus tablets
Капельница от похмелья — это медицинская процедура, направленная на быстрое восстановление организма после алкогольной интоксикации. Она помогает устранить обезвоживание, нормализовать обменные процессы и снизить токсическую нагрузку на внутренние органы. В отличие от домашних методов, инфузионная терапия действует напрямую через кровоток, обеспечивая более быстрый и выраженный эффект.
Узнать больше – капельница от похмелья в самаре
рулонные шторы с электроприводом на пластиковые окна rulonnye-zhalyuzi-avtomaticheskie.ru .
рулонные шторы в москве рулонные шторы в москве .
ролевые шторы ролевые шторы .
ozempic semaglutide and rybelsus name rybelsus rx
https://www.google.com.ar/url?q=https://semaglutide.life rybelsus other names and https://gikar.it/user/wopzezectq/ semaglutide dosages
is rybelsus a semaglutide does semaglutide cause hair loss and 3 mg rybelsus rybelsus reddit
stromectol reviews stromectol reviews stromectol reviews
buy antibiotics from canada: antibiotics cheap – antibiotics cheap
Лечение в наркологическом стационаре требует особого подхода, который включает не только медицинские мероприятия, но и психоэмоциональную поддержку пациента. Основной целью является не только снятие физической зависимости от вещества, но и возвращение человека к нормальной жизни без употребления наркотиков или алкоголя. В Санкт-Петербурге клиники предлагают различные варианты лечения, включая краткосрочные и долгосрочные программы. Процесс лечения включает в себя несколько этапов, каждый из которых играет важную роль в процессе восстановления.
Изучить вопрос глубже – наркологическая клиника стационар
Наркологическая помощь в Воронеже актуальна в тех случаях, когда проблема с алкоголем или наркотическими веществами переходит в стадию, когда ситуация требует вмешательства специалиста. Это может быть как первый серьезный срыв, так и долгосрочное ухудшение самочувствия, вызванное хроническим употреблением. В обоих случаях крайне важно не упустить момент и обратиться за помощью, пока болезнь не привела к необратимым последствиям.
Изучить вопрос глубже – наркологическая помощь на дому воронеж
https://semaglutide.life/# can i cut rybelsus in half
semaglutide injection instructions: how to get semaglutide cheap – top online pharmacy
Your point of view caught my eye and was very interesting. Thanks. I have a question for you. https://accounts.binance.com/ar-BH/register?ref=S5H7X3LP
Все подробности по ссылке: https://forum.i.ua/topic/27740
how to inject compounded semaglutide: semaglutide life – foreign online pharmacy
Такие симптомы требуют медицинского вмешательства, поскольку могут усиливаться без лечения. Капельница позволяет стабилизировать состояние и ускорить восстановление. Услуги могут предоставляться анонимно, а при необходимости пациент направляется на лечение в стационаре.
Исследовать вопрос подробнее – капельница от похмелья в воронеже
how much is 10 units of semaglutide or ro semaglutide reviews semaglutide (wegovy)
https://www.google.com.bd/url?sa=t&url=https://semaglutide.life rybelsus vs ozempic side effects or http://ussher.org.uk/user/estnszpbed/?um_action=edit how many mg is 50 units of semaglutide
semaglutide overdose symptoms rybelsus medicine or semaglutide b12 rybelsusВ®
Наркологическая клиника нужна, чтобы разорвать этот сценарий безопасно и без хаотичных решений. В клинике «Баланс Плюс» лечение выстраивается по этапам: оценка состояния и рисков, стабилизация (в том числе детоксикация при показаниях), подбор формата — стационар, амбулаторно или помощь на дому — и обязательно план на первые 24–72 часа. Эти дни критичны: именно в этот период чаще всего усиливаются тревога и бессонница, и без понятных ориентиров человек легко возвращается к алкоголю или веществам «чтобы отпустило».
Подробнее можно узнать тут – https://narkologicheskaya-klinika-orekhovo-zuevo2-12.ru
semaglutide results before and after: semaglutide life – shop medicine online
https://stromectol.reviews/# purchase ivermectin
https://semaglutide.life/# does rybelsus cause stomach pain
rybelsus tab or rybelsus bioavailability rybelsus starting dose
http://www.ixawiki.com/link.php?url=https://semaglutide.life rybelsus canada pharmacy and http://asresin.cn/home.php?mod=space&uid=741549 rybelsus for pcos
can you take rybelsus with other medications glp-1 semaglutide and how much weight can you lose on semaglutide in 3 months rybelsus saving card
Острые состояния требуют особенно аккуратного подхода, потому что при резкой отмене алкоголя или ряда веществ возможны волнообразные ухудшения. Сегодня стало легче — через несколько часов снова накрывает тремором, паникой, скачками давления или бессонницей. Поэтому грамотная помощь всегда начинается с очного осмотра и оценки жизненно важных показателей. Если состояние нестабильно, предпочтительнее стационар, где можно наблюдать динамику и быстро корректировать терапию. Если риски умеренные и человек сохранен, возможен выезд врача на дом, но с чёткими критериями, при которых нужно немедленно переводить пациента под круглосуточное наблюдение.
Изучить вопрос глубже – наркологическая москва
https://antibiotics.cheap/# antibiotics cheap
Nedbank down south-africa-outage.online .
is mounjaro semaglutide: semaglutide dallas – trusted online pharmacy
play winning blackjack
usa online casinos that accept mastercard
download slot machine
casino download
igt slots and multiplay video poker
Самостоятельные попытки обычно идут по двум типичным маршрутам. Первый — «пить понемногу, чтобы не трясло». На практике это продлевает запой и усиливает истощение: сон остаётся поверхностным, тревога нарастает, давление и пульс становятся нестабильными, организм не успевает восстанавливаться. Второй маршрут — резко прекратить и «перетерпеть». Тогда симптомы отмены могут нарастать резко: паника, сильный тремор, потливость, тахикардия, скачки давления, тошнота, рвота, бессонница. Испугавшись ухудшения, человек снова возвращается к алкоголю, потому что это кажется единственным быстрым способом облегчить состояние.
Детальнее – vyvod iz zapoya cena
Самостоятельный выход часто строится на ошибочных решениях: «уменьшать дозу», смешивать алкоголь со снотворными, принимать седативные без понимания влияния на дыхание и сердце, использовать сомнительные «похмельные» наборы. Такие действия могут временно приглушить симптомы, но повышают риск ухудшения и делают состояние непредсказуемым. Ещё одна проблема — отсутствие контроля: человек не замечает, как давление уходит в опасные цифры, как развивается обезвоживание или как усиливаются неврологические симптомы. В клинике же у врача есть задача не просто «снять неприятное», а стабилизировать организм, защитить сердце и сосуды, восстановить сон и снизить тревогу так, чтобы дальнейшее восстановление стало реальным.
Разобраться лучше – http://vyvod-iz-zapoya-moskva1-12.ru/vyvod-iz-zapoya-v-moskve-na-domu/
Показания к проведению инфузионной терапии включают:
Подробнее можно узнать тут – http://www.domen.ru
stromectol reviews ivermectin 3 mg stromectol reviews
https://stromectol.reviews/# stromectol reviews
1xbet giris 1xbet giris .
нейросеть генерации текстов для студентов нейросеть генерации текстов для студентов .
Стационарное лечение в наркологическом стационаре дает целый ряд преимуществ, которые трудно переоценить, особенно в случае тяжелых зависимостей. Пребывание в стационаре позволяет сосредоточиться исключительно на восстановлении здоровья, не отвлекаясь на внешние факторы, и получать постоянную помощь профессионалов. В некоторых случаях, в зависимости от состояния пациента, может потребоваться вывод из запоя, а также консультация специалистов, которые будут сопровождать пациента на протяжении года для долгосрочной реабилитации.
Изучить вопрос глубже – https://narkologicheskij-staczionar-sankt-peterburg-2.ru
rybelsus pronunciation: semaglutide life – online pharmacy without prescription
Комплексное лечение в наркологическом стационаре включает несколько последовательных этапов, каждый из которых направлен на решение конкретных задач. Начальный этап включает в себя медицинское вмешательство, направленное на устранение токсинов из организма, и стабилизацию общего состояния пациента. Далее начинается реабилитация, которая помогает закрепить достигнутые результаты и восстановить психоэмоциональное состояние пациента. Для выбора подходящего стационара стоит ознакомиться с отзывами и дополнительной информацией о клинике, а также уточнить, в каком районе города она расположена.
Ознакомиться с деталями – лечение в наркологическом стационаре санкт-петербург
over the counter antibiotics: antibiotics cheap – antibiotics cheap
rybelsus 14 mg weight loss reviews and is ozempic semaglutide semaglutide cyanocobalamin vs ozempic
https://images.google.com.na/url?sa=t&url=https://semaglutide.life does medicare pay for rybelsus and http://mbuild.store/user/utqjfqffdd/?um_action=edit semaglutide dose for weight loss
rybelsus best time to take why does semaglutide cause depression or rybelsus precio rybelsus 3 mg
Что означает oem в процессоре amd и amd ryzen подробное объяснение
Эта процедура помогает избежать агрессивных методов лечения, таких как медикаментозные таблетки, и оказывает мягкое, но эффективное влияние на организм.
Изучить вопрос глубже – капельница от похмелья вызов на дом в самаре
maryland live casino play online
top online casinos real money
virtual fusion bingo
best payout online casino real money
virtual casino paypal
электрические карнизы для штор в москве prokarniz17.ru .
how long after eating can i take rybelsus: compound semaglutide side effects – online pharmacy discount code
https://stromectol.reviews/# stromectol reviews
Зависимость меняет работу нервной системы: алкоголь начинает выполнять функцию регулятора — сна, тревоги, настроения и даже физического самочувствия. Когда человек прекращает пить, организм реагирует отменой, и именно она подталкивает вернуться к употреблению. Сила воли в этой точке часто проигрывает физиологии: тревога растёт, сон исчезает, сердце бьётся чаще, давление «скачет», появляется ощущение угрозы.
Получить дополнительную информацию – методы лечения алкоголизма
ivermectin buy nz or stromectol pills ivermectin 6mg
https://alt1.toolbarqueries.google.bj/url?q=https://stromectol.reviews ivermectin price canada or https://cyl-sp.com/home.php?mod=space&uid=135647 ivermectin for sale
=cialis+tablets]stromectol for sale stromectol covid 19 or stromectol buy stromectol uk buy
antibiotics cheap: antibiotics cheap – Over the counter antibiotics for infection
Острые состояния могут проявляться по-разному: от выраженной слабости, тошноты, тремора и бессонницы до мучительной ломки, резкой тревоги, скачков артериального давления, учащенного сердцебиения, раздражительности и спутанности сознания. У пациентов с хроническими заболеваниями, в пожилом возрасте или после длительного употребления риски возрастают еще сильнее. Особенно опасно ориентироваться только на внешнее впечатление, потому что даже в тех случаях, когда человек находится дома и формально «в сознании», его состояние уже может требовать медицинского вмешательства.
Получить дополнительные сведения – наркологическая помощь на дому в воронеже
https://semaglutide.life/# rybelsus canada cost
https://antibiotics.cheap/# antibiotics cheap
stromectol reviews: stromectol drug – stromectol reviews
https://stromectol.reviews/# stromectol reviews
Введение лекарственных препаратов через капельницу позволяет значительно ускорить процессы, которые происходят в организме, поскольку вещества поступают сразу в кровоток, минуя желудочно-кишечный тракт. Это значительно усиливает эффективность лечения и способствует быстрому улучшению самочувствия пациента, при этом проводится наркологическая терапия, а при необходимости можно заказать дополнительное лечение с учетом данных пациента.
Подробнее тут – капельница от похмелья на дом
buy ivermectin canada: buy stromectol canada – stromectol reviews
Алкогольная зависимость часто держится на страхе отмены. Человек пьёт не ради удовольствия, а чтобы не столкнуться с тремором, потливостью, тошнотой, скачками давления, тревогой и бессонницей. Поэтому лечение начинается с оценки состояния и рисков: насколько тяжёлая отмена, есть ли хронические болезни, были ли осложнения, какие препараты уже принимались. Чем точнее оценка, тем безопаснее стабилизация и тем меньше вероятность ночного ухудшения.
Изучить вопрос глубже – адреса наркологических клиник
buy antibiotics online safely or buy antibiotics for sinus over the counter antibiotics
https://cse.google.to/url?sa=t&url=https://antibiotics.cheap generic antibiotics online cheap and https://afafnetwork.com/user/wnyyghcgno/?um_action=edit antibiotics for uti over the counter
generic antibiotics online cheap otc antibiotics and buy amoxicillin generic antibiotics
В Самаре клиника «Частный медик 24» предоставляет круглосуточную помощь по выведению из запоя и снятию симптомов похмелья. Когда человек сталкивается с тяжёлым состоянием после длительного употребления алкоголя, важно вовремя оказать помощь. Врач приедет на дом и проведёт все необходимые процедуры, включая капельницу, которая поможет восстановить водно-электролитный баланс, нормализовать уровень сахара в крови и вывести токсины из организма.
Подробнее тут – капельница от похмелья на дом самара
semaglutide nausea: how many mg is 60 units of semaglutide – online pharmacy no prescription
https://semaglutide.life/# rybelsus pap
does rybelsus lower blood pressure and rybelsus patent expiration how to take rybelsus
http://www.pingsitemap.com/?action=submit&url=http://semaglutide.life/ rybelsus r1 vs r2 or http://bbs.ebnew.com/home.php?mod=space&uid=776698 rybelsus drug
can you drink alcohol on semaglutide for weight loss rybelsus how to take or does rybelsus need to be refrigerated semaglutide shot
Таблетки и народные методы требуют времени для усвоения и часто дают ограниченный результат. Капельница же позволяет обойти желудочно-кишечный тракт и сразу доставить необходимые вещества в кровь, что особенно важно при выраженном похмельном синдроме.
Подробнее – капельница от похмелья на дом в самаре
semaglutide injections for weight loss: semaglutide medication – worldwide pharmacy online
does rybelsus cause kidney problems or novo nordisk rybelsus coupon 50 units of semaglutide
https://clients1.google.com.sg/url?q=https://semaglutide.life how long does rybelsus stay in your system or https://bold-kw.com/user/sunqntnkwh/?um_action=edit 30 units of semaglutide is how many mg
side effects rybelsus semaglutide diarrhea after eating or what happens when you stop taking semaglutide semaglutide headache relief
Процедура капельницы от похмелья может быть рекомендована при наличии выраженных симптомов интоксикации, которые нарушают нормальное функционирование организма. Это особенно актуально в тех случаях, когда обычные методы, такие как принятие воды или таблетки, не приносят должного облегчения. Для получения дополнительной информации или записи на процедуру можно обратиться через сайт, а в сложных случаях может потребоваться стационарное лечение или наркологическая помощь.
Узнать больше – капельница от похмелья на дому в нижнем новгороде
Процесс восстановления с помощью капельницы с мягким восстановлением происходит в несколько этапов. Вначале происходит нормализация водно-солевого баланса, что помогает предотвратить обезвоживание и улучшить состояние кожи. Затем происходит восстановление энергетических запасов организма, что помогает уменьшить усталость и слабость, что также важно при лечении наркомании. Витамины и антиоксиданты восстанавливают функции клеток и органов, что способствует более быстрому очищению организма от продуктов распада алкоголя, при этом пациентам может быть доступна анонимное консультация и дальнейшая реабилитация.
Подробнее тут – капельница от похмелья на дом в самаре
Капельница от похмелья в Самаре используется для устранения симптомов алкогольной интоксикации, которые могут включать головную боль, тошноту, слабость, рвоту и обезвоживание. Это достигается за счет введения специальных растворов, которые помогают организму восстановиться и очиститься от токсинов.
Подробнее можно узнать тут – капельница от похмелья вызов на дом в самаре
https://antibiotics.cheap/# antibiotic without presription
1xbet giri? 1xbet giri? .
1xbet tr 1xbet tr .
1xbetgiri? 1xbetgiri? .
1xbet giri?i 1xbet giri?i .
over the counter antibiotics pills: antibiotics cheap – over the counter antibiotics
semaglutide mexico price semaglutide and hypothyroidism will insurance cover rybelsus for weight loss
Выбор между домашней помощью и стационарным лечением часто определяется степенью физиологической зависимости и наличием сопутствующих патологий. В условиях клиники исключаются внешние триггеры, обеспечивается изоляция от источников алкоголя и создается контролируемая среда, где медицинские решения принимаются на основе объективных показателей, а не субъективных ощущений пациента. Такой подход критически важен для предотвращения осложнений, минимизации дискомфорта абстиненции и формирования устойчивой базы для дальнейшей противорецидивной работы.
Подробнее тут – вывод из запоя в стационаре в нижнем новгороде
Наркологическая помощь в Воронеже актуальна в тех случаях, когда проблема с алкоголем или наркотическими веществами переходит в стадию, когда ситуация требует вмешательства специалиста. Это может быть как первый серьезный срыв, так и долгосрочное ухудшение самочувствия, вызванное хроническим употреблением. В обоих случаях крайне важно не упустить момент и обратиться за помощью, пока болезнь не привела к необратимым последствиям.
Подробнее тут – наркологическая помощь на дому в воронеже
semaglutide mexico price: oral vs injectable semaglutide – legal online pharmacy
rybelsus generic and semaglutide rybelsus 7mg can rybelsus cause high blood pressure
https://www.google.com.ua/url?q=https://semaglutide.life semaglutide shortage or http://www.garmoniya.uglich.ru/user/wlnjomfozp/ constipation on semaglutide
rybelsus used to treat semaglutide benefits or saxenda vs rybelsus accidentally took too much semaglutide
antibiotics cheap: get antibiotics without seeing a doctor – best online doctor for antibiotics
https://antibiotics.cheap/# get antibiotics without seeing a doctor
https://semaglutide.life/# rybelsus pronunciation
antibiotics cheap: buy antibiotics online for tooth infection – antibiotics cheap
https://semaglutide.life/# semaglutide buy online
Дополнительным поводом для вызова врача становится состояние, при котором больному трудно вставать, пить воду, есть, сохранять спокойствие или ориентироваться в самочувствии. В таких случаях осмотр на дому позволяет быстрее определить дальнейший маршрут помощи. Иногда уже первый звонок помогает понять, допустим ли домашний формат или лучше сразу рассматривать вывод в стационаре.
Подробнее – нарколог на дом вывод екатеринбург
ivermectin pills canada or stromectol price us ivermectin pills canada
https://www.google.am/url?sa=t&url=http://stromectol.reviews ivermectin 500mg and http://jonnywalker.net/user/tyfyjhkmjf/ stromectol cost
stromectol covid stromectol 3 mg tablets price or ivermectin 3mg tablets price stromectol south africa
ivermectin lotion cost and stromectol tablets ivermectin cost canada
http://albasu.jp/kyoto-quiz/_m/index.php?a=free_page/goto_mobile&referer=https://stromectol.reviews ivermectin stromectol and https://www.wearebusiness.org/user/xbkxiaryxn/?um_action=edit ivermectin generic name
ivermectin where to buy for humans ivermectin 10 mg and cost of ivermectin stromectol pill
Помимо физиологических аспектов, важнейшую роль играет психологическая устойчивость пациента и его окружения. Длительный запойный цикл формирует устойчивую патологическую потребность, при которой человек утрачивает способность добровольно отказаться от очередной дозы, находясь в привычной среде. Домашняя обстановка часто ассоциируется с триггерами употребления, межличностными конфликтами или легким доступом к алкоголю. Изоляция в условиях стационара разрывает этот порочный цикл, создавая терапевтическое пространство, свободное от внешних раздражителей. Специалисты работают с мотивационным кризисом, снижают уровень тревожности и формируют внутреннюю готовность к долгосрочным изменениям. Это особенно актуально при сочетанных расстройствах, когда алкоголизм сочетается с употреблением психоактивных веществ, и в анамнезе фигурируют наркотики, усиливающие нейротоксическую нагрузку. Комплексный мультидисциплинарный подход позволяет стабилизировать не только соматическое состояние, но и психическое равновесие, закладывая прочный фундамент для последующей противорецидивной терапии.
Исследовать вопрос подробнее – вывод из запоя в стационаре анонимно в нижнем новгороде
ivermectin buy online stromectol reviews stromectol reviews
antibiotics online purchase and antibiotics online prescription prescribed antibiotics online
http://lbast.ru/zhg_img.php?url=http://antibiotics.cheap/ cheap antibiotics and http://www.garmoniya.uglich.ru/user/hhfbtetrob/ antibiotics drugs
prescription antibiotic buy antibiotics from canada or antibiotics drugs otc uti medicine
https://antibiotics.cheap/# antibiotics cheap
how to inject semaglutide video and best vitamins to take while on semaglutide expired semaglutide
https://images.google.com.pk/url?sa=t&url=https://semaglutide.life best time of day to take rybelsus or http://georgiantheatre.ge/user/fufiyrkvlv/ rybelsus results
rybelsus max dose hers compounded semaglutide or rybelsus kaufen rybelsus daily
Выезд специалиста начинается с оценки состояния пациента. Врач измеряет давление, пульс, оценивает общее самочувствие и выраженность симптомов. На основании этих данных формируется план лечения и подбирается состав капельницы. Такой подход позволяет учитывать индивидуальные особенности пациента и эффективно провести вывод из запоя.
Получить больше информации – капельница от похмелья воронеж
cost of ivermectin pill: stromectol reviews – buy ivermectin pills
over the counter antibiotics: over the counter antibiotics – antibiotics cheap
При таких условиях стационар позволяет контролировать состояние в режиме 24/7 и при необходимости быстро корректировать лечение. Это снижает риски и делает процесс более предсказуемым. При этом услуга может предоставляться анонимно, а цену лечения можно уточнить по телефону или при обращении в центр лечения алкоголизма и наркомании.
Подробнее можно узнать тут – нарколог вывод из запоя в стационаре нижний новгород
https://antibiotics.cheap/# over the counter antibiotics
Показания к проведению инфузионной терапии включают:
Выяснить больше – капельница от похмелья анонимно воронеж
rybelsus online order or what supplements not to take with semaglutide rybelsus pill image
http://cse.google.mv/url?q=https://semaglutide.life best semaglutide and https://www.zhaopin0468.com/home.php?mod=space&uid=191387 semaglutide compounded
semaglutide and alcohol oral semaglutide for weight loss in non diabetics or low dose semaglutide rybelsus 3mg side effects
maximum dose of rybelsus: semaglutide life – foreign online pharmacy
1xbet spor bahislerinin adresi 1xbet spor bahislerinin adresi .
1 x bet giri? 1xbet-giris-67.com .
1xbet guncel 1xbet guncel .
kasyno online vulkan vegas http://vulkan-casino-onlayn.com .
https://semaglutide.life/# semaglutide vs phentermine
fda semaglutide shortage or rybelsus heartburn semaglutide ingredients
https://www.google.pt/url?sa=t&url=https://semaglutide.life is semaglutide safe for weight loss or https://radiationsafe.co.za/user/irljecoxru/?um_action=edit is mounjaro a semaglutide
semaglutide vs mounjaro do you lose weight on rybelsus or can you take semaglutide while breastfeeding rybelsus before surgery
stromectol reviews: ivermectin 1 cream generic – stromectol tablets uk
При наличии зависимости от алкоголя или наркотиков часто возникает ситуация, когда самостоятельные попытки избавиться от проблемы не дают результата. В таких случаях обращение в наркологический стационар становится необходимым для более глубокой и профессиональной помощи. Стационарное лечение предполагает круглосуточный контроль и медицинскую помощь, что особенно важно при острых состояниях, таких как алкогольная интоксикация или наркотическое отравление. В процессе лечения могут быть предложены кодирование, а также вывод из запоя или наркотической зависимости, а при необходимости — длительный прием с возможностью лечения на летний период.
Углубиться в тему – наркологическая клиника стационар
https://semaglutide.life/# does semaglutide help with inflammation
antibiotics cheap antibiotics cheap antibiotics cheap
https://semaglutide.life/# semaglutide weight loss reviews
ivermectin cost: price of ivermectin – ivermectin where to buy
Таким образом, стационарный режим предоставляет не только медицинскую помощь, но и обеспечивает необходимую психологическую и эмоциональную поддержку для успешного восстановления пациента.
Получить дополнительные сведения – наркологический стационар санкт-петербург
1xbet yeni giri? adresi 1xbet yeni giri? adresi .
нейросеть для школьников и студентов нейросеть для школьников и студентов .
antibiotics cheap: uti antibiotics online – antibiotics for uti over the counter
https://stromectol.reviews/# ivermectin generic name
Вывод из запоя в стационаре в Нижнем Новгороде с детоксикацией, мониторингом состояния и медицинской помощью в наркологической клинике «Частный медик 24»
Выяснить больше – vyvod-iz-zapoya-v-staczionare-nizhnij-novgorod.ru/
is rybelsus the same as wegovy or rybelsus 14 mg precio rybelsus costs
https://www.boatdesign.net/proxy.php?link=https://semaglutide.life semaglutide drops and http://www.orangepi.org/orangepibbsen/home.php?mod=space&uid=6406206 can you switch from semaglutide to tirzepatide
semaglutide ban semaglutide stomach pain relief and semaglutide dosage in ml para que sirve rybelsus 3 mg
stromectol reviews: stromectol reviews – stromectol reviews
Запой сопровождается выраженной интоксикацией, нарушением сна, нестабильностью давления и изменениями в работе нервной системы. При длительном течении состояние может ухудшаться, и самостоятельный выход становится затруднённым. В таких случаях стационар рассматривается как пространство, где можно безопасно стабилизировать показатели и обеспечить постепенное восстановление.
Подробнее тут – http://www.domen.ru
Стоимость капельницы от похмелья в Самаре зависит не только от прайса клиники, но и от состава инфузионной терапии, срочности выезда, времени суток и общего состояния пациента, включая возможные последствия алкоголизма. Базовые программы обычно включают осмотр специалиста, постановку капельницы и стандартный набор растворов для снятия интоксикации. Если состояние тяжелее, может потребоваться кодирование или лечение в стационаре, что увеличивает цену из-за расширенного состава препаратов и более длительного наблюдения.
Получить дополнительную информацию – https://kapelnicza-ot-pokhmelya-samara-7.ru/
1xbet guncel 1xbet guncel .
раскрутка и продвижение сайтов москва раскрутка и продвижение сайтов москва
https://semaglutide.life/# cheapest semaglutide online
ivermectin pills or ivermectin 3 mg tablet dosage cost of ivermectin medicine
https://maps.google.gl/url?q=https://stromectol.reviews stromectol tablet 3 mg and https://bbs.9uv5.com/home.php?mod=space&uid=33684 stromectol ivermectin
ivermectin cream uk stromectol in canada or stromectol tab price ivermectin 3mg tablets
antibiotics cheap over the counter antibiotics pills antibiotics cheap
stromectol buy or ivermectin new zealand ivermectin 1% cream generic
https://cse.google.com.ng/url?sa=t&url=https://stromectol.reviews stromectol buy uk or http://www.ktmoli.com/home.php?mod=space&uid=637424 ivermectin price usa
ivermectin 2mg where to buy ivermectin and stromectol covid stromectol cvs
Покупка шаблона Аспро Оптимус — это готовое решение для запуска современного интернет-магазина на 1С-Битрикс. Переходите по запросу цена Aspro Optimus. Адаптивный дизайн, удобный каталог, интеграция с CRM, высокая скорость работы и широкие возможности настройки позволяют быстро создать эффективную онлайн-площадку для продаж. Оптимальное решение для бизнеса, которому важны функциональность, стиль и стабильная работа сайта.
over the counter antibiotics: antibiotics cheap – over the counter antibiotics
rybelsus online order or rybelsus 21 mg can i take rybelsus at night
https://maps.google.tl/url?q=https://semaglutide.life weight loss on rybelsus or https://mantiseye.com/community/pyixhqlldn how long for rybelsus to work
semaglutide how it works how to take rybelsus for weight loss or how much does rybelsus cost side effects of semaglutide shots
Наркологический стационар предоставляет круглосуточное медицинское наблюдение и специализированное лечение для пациентов, страдающих от алкогольной и наркотической зависимости. Здесь пациенты могут пройти детоксикацию, получить помощь в снятии абстинентного синдрома, а также пройти курс реабилитации с целью стабилизации состояния и профилактики рецидивов. Лечение в стационаре направлено не только на устранение физической зависимости, но и на помощь в восстановлении психологического здоровья пациента. В некоторых случаях для более эффективного лечения могут быть предложены капельницы и вывод из запоя, а также долговременная реабилитация, которая может продолжаться на протяжении года.
Ознакомиться с деталями – http://www.domen.ru
stromectol reviews: ivermectin 500mg – stromectol reviews
888starz online 888starz online .
Когда требуется нарколог на дом, обычно речь идёт не о «консультации на будущее», а о ситуации, которая уже мешает жить здесь и сейчас: затяжной запой, тяжёлая абстиненция, сильная тревога и бессонница, тремор, скачки давления, рвота, выраженная слабость, паника или состояние, при котором человек не готов ехать в клинику. В Пушкино выездная помощь востребована ещё и потому, что многим важно сохранить приватность и не вовлекать лишних людей: дома проще согласиться на осмотр, не тратить силы на дорогу и избежать стрессовой смены обстановки. В наркологической клинике «Стабильный Выбор» выезд врача строится по принципу «быстро, но безопасно»: сначала оценка состояния и рисков, затем индивидуальная тактика стабилизации и понятный план на ближайшие часы и сутки.
Подробнее можно узнать тут – нарколог на дом стоимость
https://stromectol.reviews/# stromectol reviews
ivermectin 3 mg tablet dosage: stromectol reviews – where to buy stromectol
can i take rybelsus at night and semaglutide cyanocobalamin vs ozempic natural semaglutide alternatives
https://www.google.gr/url?sa=t&url=https://semaglutide.life best time of day to take semaglutide injection or https://www.9kuan9.com/home.php?mod=space&uid=4146196 rybelsus strengths
does rybelsus lower a1c rybelsus weight loss results or semaglutide peptide semaglutide .25 mg
https://semaglutide.life/# compounded semaglutide expiration
раскрутка сайта в москве раскрутка сайта в москве
продвижение сайтов google продвижение сайтов комплексный подход продвижение сайтов google продвижение сайтов комплексный подход
otc antibiotics and best online doctor for antibiotics antibiotics online pharmacy
https://profitquery.com/share/?url=https://antibiotics.cheap buy antibiotics from canada or https://www.9kuan9.com/home.php?mod=space&uid=4146442 buy zithromax antibiotic
antibiotics drugs buy antibiotics from canada and get antibiotics quickly otc medicine
Зависимость редко манифестирует резко. Обычно она развивается постепенно, маскируясь под усталость, стресс или временные трудности. Однако существует ряд клинических маркеров, указывающих на переход от эпизодического употребления к патологическому процессу. К ним относятся: увеличение толерантности к веществу, невозможность остановиться после первой дозы, провалы в памяти после употребления, пренебрежение обязанностями, социальная изоляция, раздражительность при попытках близких обсудить проблему. На ранних стадиях алкогольной зависимости пациенты часто отрицают наличие болезни, но физиологические изменения уже запущены. Появление двух-трех из этих признаков в течение нескольких месяцев — прямое показание для консультации со специалистом. Раннее обращение позволяет скорректировать поведение до формирования тяжелой физиологической зависимости.
Разобраться лучше – https://narkologicheskaya-pomoshh-voronezh-3.ru
https://antibiotics.cheap/# over the counter antibiotics
Вывод из запоя в стационаре в Нижнем Новгороде с круглосуточным наблюдением и поэтапным восстановлением в наркологической клинике «Частный медик 24»
Исследовать вопрос подробнее – вывод из запоя дешево нижний новгород
продвижение сайта смоленск продвижение сайта смоленск
rybelsusе‰ЇдЅњз”Ё: semaglutide life – no prescription pharmacy paypal
Лечение зависимости строится поэтапно: диагностика, стабилизация, восстановление сна и эмоциональной устойчивости, работа с тягой и триггерами, профилактика рецидива, сопровождение. У одного человека ведущий фактор — хроническая тревога и бессонница, у другого — стресс и конфликты, у третьего — социальная среда, у четвёртого — сочетание нескольких причин. Поэтому программа должна учитывать реальную жизнь пациента: график работы, семейную ситуацию, уровень поддержки, типичные «точки срыва» и реакции на стресс.
Углубиться в тему – http://narkologicheskaya-klinika-vidnoe12.ru/chastnaya-narkologicheskaya-klinika-v-vidnom/
max dose of semaglutide or semaglutide pill semaglutide alternatives
https://www.google.co.th/url?sa=t&url=https://semaglutide.life does semaglutide suppress appetite immediately or http://yangtaochun.cn/profile/bfaabuzhud/ rybelsus samples
rybelsus reddit semaglutide diarrhea how long does it last and semaglutide in pill form is rybelsus expensive
how long can you take rybelsus: semaglutide life – online pharmacy no prescription
stromectol reviews stromectol reviews stromectol reviews
порт ip камеры ip камеры
датчик пожарной сигнализации пожарная безопасность сигнализация установка
stromectol reviews: where to buy stromectol – stromectol reviews
https://stromectol.reviews/# ivermectin where to buy
rybelsus pill image and difference between compounded semaglutide and ozempic how effective is rybelsus for weight loss
https://95.cholteth.com/index/d1?diff=0&utm_clickid=g00w000go8sgcg0k&aurl=http://semaglutide.life can rybelsus cause depression and https://virtualchemicalsales.ca/user/pbvibmnwyw/?um_action=edit what not to eat on semaglutide
can you take semaglutide while breastfeeding semaglutide 1 mg weight loss and rybelsus icd 10 code semaglutide 2.5 mg vs 5 mg
over the counter antibiotics: over the counter antibiotics – over the counter antibiotics
К стационарному формату чаще всего прибегают в следующих случаях:
Получить дополнительную информацию – http://www.domen.ru
Помощь начинается с первичной оценки. Врач уточняет длительность запоя, время последнего приёма алкоголя, ведущие симптомы, хронические заболевания, прошлые осложнения, аллергии, а также препараты, которые пациент уже принимал самостоятельно. Далее проводится осмотр: измеряются давление и пульс, оценивается дыхание, температура, признаки обезвоживания, уровень сознания, выраженность тремора и тревоги. На основании этой информации выбирается тактика и формат — на дому, амбулаторно или в стационаре, если риски высокие.
Выяснить больше – vyvod iz zapoya na domu orekhovo zuevo
https://semaglutide.life/# semaglutide dose for weight loss
does semaglutide need to be refrigerated: semaglutide life – top online pharmacy
buy ivermectin pills ivermectin 50ml stromectol reviews
stromectol tablets buy online or stromectol for sale ivermectin coronavirus
http://www.osaka-girl.com/cgi/acc5/acc.cgi?redirect=https://stromectol.reviews stromectol how much it cost or http://orbita-3.ru/forum/index.php?PAGE_NAME=profile_view&UID=109153 ivermectin cream uk
stromectol 3 mg price generic ivermectin cream and stromectol order online stromectol for humans
stromectol covid or ivermectin nz ivermectin pills
https://www.domainsherpa.com/share.php?site=http://stromectol.reviews п»їorder stromectol online or http://www.donggoudi.com/home.php?mod=space&uid=4275632 ivermectin humans
ivermectin 8 mg stromectol 3 mg tablet and where to buy stromectol online buy stromectol pills
https://semaglutide.life/# semaglutide injections near me
buy antibiotics over the counter: over the counter antibiotics – antibiotics cheap
https://stromectol.reviews/# stromectol reviews
dulaglutide vs semaglutide or rybelsus r1 vs r2 ozempic vs rybelsus vs wegovy
http://www.yamadaseika.com/modules/todays0/wp-ktai.php?view=redir&url=https://semaglutide.life gaining weight on rybelsus or https://brueckrachdorf.de/user/oxokdcgwah/ rybelsus 7 mg price
does insurance cover rybelsus rybelsus price and why does semaglutide cause diarrhea does compound semaglutide work
buy amoxicillin antibiotic: antibiotics for uti over the counter – antibiotics cheap
https://semaglutide.life/# rybelsus packaging
otc uti medicine and buy zithromax antibiotic over the counter antibiotics pills
https://cse.google.com.sa/url?sa=i&url=https://antibiotics.cheap Over the counter antibiotics pills and https://psicologiasaludable.es/user/niacyptxfd/?um_action=edit antibiotics drugs
antibiotics online purchase antibiotics online pharmacy and antibiotics online pharmacy over the counter antibiotics pills
stromectol reviews: stromectol reviews – stromectol medicine
https://stromectol.reviews/# stromectol tablets for humans
Прогон сайта Хрумером — эффективный способ ускорить индексацию страниц, усилить ссылочный профиль и повысить видимость сайта в поисковых системах. Переходите по запросу сделать мощный прогон сайта хрумером. Размещаем ссылки по качественным базам, форумам, профилям и площадкам с учетом безопасности и естественности ссылочной массы. Подходит для SEO-продвижения, новых проектов и усиления существующих позиций. Быстро, мощно и с контролем качества результата.
buy ivermectin nz: stromectol reviews – stromectol how much it cost
rybelsus order online: semaglutide life – worldwide pharmacy
icd 10 code for long term use of rybelsus or does compound semaglutide work how to get semaglutide prescription
https://www.google.is/url?q=https://semaglutide.life rybelsus weight loss side effects or http://asresin.cn/home.php?mod=space&uid=740843 semaglutide otc equivalent
rybelsus 7 mg efectos secundarios rybelsus anesthesia and rybelsusдёж–‡ difference in semaglutide and tirzepatide
stromectol reviews stromectol reviews stromectol reviews
starting dose semaglutide: patient assistance for rybelsus – no rx needed pharmacy
https://antibiotics.cheap/# over the counter antibiotics
В этой статье-обзоре мы соберем актуальную информацию и интересные факты, которые освещают важные темы. Читатели смогут ознакомиться с различными мнениями и подходами, что позволит им расширить кругозор и глубже понять обсуждаемые вопросы.
Изучить вопрос глубже – https://crystalclean.ge/remontisshemdgomidalageba
средства пожарной сигнализации установка пожарной сигнализации организация
угол ip камеры ip камеры
https://semaglutide.life/# rybelsus online order
over the counter antibiotics: over the counter antibiotics – over the counter antibiotics
Эта обзорная заметка содержит ключевые моменты и факты по актуальным вопросам. Она поможет читателям быстро ориентироваться в теме и узнать о самых важных аспектах сегодня. Получите краткий курс по современной информации и оставайтесь в курсе событий!
Изучить рекомендации специалистов – https://2018.opensourcebody.eu/design-days-of-materials
how long after semaglutide injection do side effects start and whats the difference between semaglutide and tirzepatide semaglutide vs tirzepatide weight loss
https://www.google.dm/url?q=http://semaglutide.life what happens if you take rybelsus with food and http://www.sportchap.ru/user/bnjduwgfqh/ is rybelsus a glp 1
does aetna cover rybelsus pronounce rybelsus or rybelsus daily or weekly rybelsus lowest dose
https://stromectol.reviews/# stromectol reviews
продвижение сайта заказать мастер александр продвижение сайта заказать мастер александр
продвинуть сайт москва сео джамп продвинуть сайт продвинуть сайт москва сео джамп продвинуть сайт
buy antibiotics for uti: antibiotics cheap – over the counter antibiotics
В этом обзорном материале представлены увлекательные детали, которые находят отражение в различных аспектах жизни. Мы исследуем непонятные и интересные моменты, позволяя читателю увидеть картину целиком. Погрузитесь в мир знаний и удивительных открытий!
Подробная информация доступна по запросу – https://pinthemall.net/pin/5cbdae5470b4a
online shopping pharmacy india Indian Meds Delivery reputable online pharmacy no prescription
reputable indian online pharmacy: Online medicine order – online pharmacy no prescription needed
Наша клиника предлагает полный цикл услуг — от экстренного вызова нарколога до долгосрочной реабилитации. Каждый этап разрабатывается индивидуально с учётом возраста, стажа зависимости и сопутствующих заболеваний. Современные протоколы 2026 года позволяют проводить лечение максимально комфортно и эффективно, минимизируя болезненные симптомы и снижая риск срывов. В этом виде деятельности мы используем только проверенные методы медицины.
Выяснить больше – запой нарколог на дом в екатеринбурге
Реабилитация алкоголиков с анонимной поддержкой — это процесс, при котором пациент получает необходимую медицинскую и психологическую помощь, не раскрывая своей личности и обстоятельств зависимости, включая лечение наркомании. Такие программы ориентированы на безопасное и конфиденциальное лечение, что важно для тех, кто стремится избавиться от зависимости, но опасается осуждения или утраты личной репутации, при этом возможен выезд нарколога на дом. Важно, что анонимность не ограничивает качество предоставляемых услуг: все необходимые этапы лечения, включая детоксикацию, психотерапевтические сессии и социальную реабилитацию, которые могут длиться несколько лет, проводятся на высоком уровне с акцентом на своевременный вывод из состояния зависимости.
Получить дополнительную информацию – https://reabilitacziya-alkogolikov-moskva-4.ru/
Canadian Tabs: canadianpharmacyworld com – canadian pharmacy mall
В этой статье представлен занимательный и актуальный контент, который заставит вас задуматься. Мы обсуждаем насущные вопросы и проблемы, а также освещаем истории, которые вдохновляют на действия и изменения. Узнайте, что стоит за событиями нашего времени!
Не упусти шанс – https://www.kynologiasala.sk/bvk_skusobny_poriadok
http://indianmedsdelivery.com/# Online medicine home delivery
Помощь на дому рассматривают при состояниях, которые сопровождаются заметным ухудшением самочувствия после алкоголя. Обычно это несколько дней запоя, тяжелое похмелье, дрожь в руках, бессонница, выраженная слабость, раздражительность, тревога, тошнота, сухость во рту, отсутствие аппетита и признаки обезвоживания. В таких случаях осмотр врача нужен для оценки тяжести состояния и определения безопасной тактики.
Подробнее можно узнать тут – нарколог на дом цена москва
«Чем раньше начнётся профессиональная детоксикация, тем выше шанс избежать необратимых последствий и тяжёлых осложнений», — отмечает врач-нарколог клиники «Азимут Здоровья» Елена Степанова.
Получить дополнительные сведения – нарколог на дом круглосуточно
Эта информационная статья охватывает широкий спектр актуальных тем и вопросов. Мы стремимся осветить ключевые факты и события с ясностью и простотой, чтобы каждый читатель мог извлечь из нее полезные знания и полезные инсайты.
Уточнить детали – https://escapistasclub.com/best-escape-rooms-mallorca-palma-islas-baleares
legitimate mexican pharmacy online: Mexican Pharm – pharmacies in mexico
https://indianmedsdelivery.com/# online pharmacy india
раскрутка сайта дешево александр раскрутка сайта дешево александр
геолокация по номеру телефона finderphone.ru .
продвижение сайтов частный оптимизатор москва продвижение сайтов частный оптимизатор москва
pet meds without vet prescription canada: canada pharmacy – Canadian Tabs
indian pharmacy paypal: Indian Meds Delivery – medicine online order
http://canadiantabs.com/# my canadian pharmacy
indian pharmacy: Online medicine order – legal online pharmacy
Почему профессиональное лечение зависимости становится ключом к здоровому и стабильному будущему – рассказываем в статье. Хочу знать больше – http://mamuli.club/forum/topic/49669
http://canadiantabs.com/# Canadian Tabs
аренда яхты с капитаном на неделю arenda-yakhty-spb-9.ru
Помощь на дому рассматривают при состояниях, которые сопровождаются заметным ухудшением самочувствия после алкоголя. Обычно это запой на протяжении нескольких дней, тяжелое похмелье, выраженная слабость, бессонница, тревога, дрожь в руках, сухость во рту, отсутствие аппетита, тошнота, раздражительность и ощущение истощения. В подобных случаях врачебный осмотр нужен для того, чтобы оценить тяжесть состояния и определить, безопасен ли домашний формат в конкретной ситуации.
Подробнее – вызвать нарколога на дом москва
аренда яхты на день рождения спб arenda-yakhty-spb-8.ru
https://indianmedsdelivery.com/# reputable indian pharmacies
прокат яхт прокат яхт
Процедура капельницы от похмелья с контролем врача в Самаре начинается с первичной консультации, на которой врач осматривает пациента, измеряет его основные показатели (давление, пульс, температуру) и оценивает общее состояние. На основе этих данных выбирается оптимальный состав капельницы, которая может включать в себя различные компоненты, такие как солевые растворы, витамины, антиоксиданты и медикаменты для снятия симптомов похмелья.
Детальнее – капельница от похмелья цена
mexico pharmacy online Mexican Pharm mexico farmacia
Пациенты клиники «НаркоМед» полностью застрахованы от утечки личной информации. Приём и лечение оформляются по псевдониму, документы не передаются в другие организации.
Углубиться в тему – наркологическая клиника в екатеринбурге
Отдельного внимания требуют повторяющиеся эпизоды. Если тяжелое состояние после алкоголя возникает не впервые, а запои становятся регулярными, вопрос обычно выходит за рамки одного обращения. Тогда домашний выезд рассматривают не только как способ уменьшить острые проявления, но и как первый этап дальнейшей оценки проблемы. В подобных ситуациях нередко обсуждают не только вывод из запоя, но и то, как дальше будет выстраиваться помощь при зависимости.
Углубиться в тему – вызвать нарколога на дом
Помощь на дому рассматривают при состояниях, которые сопровождаются выраженным ухудшением самочувствия после алкоголя. Обычно речь идет о нескольких днях запоя, тяжелом похмелье, бессоннице, тревоге, дрожи в руках, слабости, тошноте, сухости во рту, отсутствии аппетита и признаках обезвоживания. В таких случаях врачебный осмотр нужен для оценки тяжести состояния и выбора безопасной тактики.
Ознакомиться с деталями – нарколог на дом цена москва
best mexican online pharmacy: Mexican Pharm – Mexican Pharm
аренда яхты с капитаном на неделю arenda-yakhty-spb-11.ru
Осмотр на дому особенно важен в тех случаях, когда больному трудно вставать, пить воду, принимать пищу, спокойно лежать или ориентироваться в собственном состоянии. Чем тяжелее переносится выход из употребления, тем выше значение очной оценки, потому что по телефону невозможно полноценно определить границы безопасной помощи. При выраженных симптомах может потребоваться срочный выезд, чтобы вовремя оценить риски и определить, допустим ли вывод из запоя дома или необходимо наблюдение в стационаре.
Разобраться лучше – нарколог на дом анонимно москва
Особенность анонимной реабилитации заключается в создании комфортной и безопасной среды, которая мотивирует пациента работать над собой, не опасаясь осуждения. Это повышает эффективность лечения, ведь пациент может открыться и честно обсуждать свои проблемы без страха быть осужденным.
Подробнее тут – реабилитация алкоголиков
https://mexicanpharm.com/# progreso, mexico pharmacy online
Нарколог на дом в Москве: круглосуточный выезд, детоксикация и лечение зависимостей в наркологической клинике «Клиника доктора Калюжной».
Углубиться в тему – запой нарколог на дом москва
buy medicines online in india: Indian Meds Delivery – medicine online
Капельница от похмелья с контролем врача в Самаре представляет собой эффективную терапевтическую процедуру, позволяющую значительно улучшить самочувствие пациента за короткий срок. Врач, контролируя весь процесс, может точно определить, какие компоненты необходимы для каждого пациента. Состав капельницы зависит от симптомов похмелья, состояния пациента и его индивидуальных потребностей. Это позволяет обеспечить максимально безопасное и эффективное лечение, которое помогает организму быстро восстановиться.
Получить дополнительные сведения – капельница от похмелья в самаре
Помощь на дому рассматривают при состояниях, которые сопровождаются заметным ухудшением самочувствия после алкоголя. Обычно это несколько дней запоя, тяжелое похмелье, дрожь в руках, бессонница, выраженная слабость, раздражительность, тревога, тошнота, сухость во рту, отсутствие аппетита и признаки обезвоживания. В таких случаях осмотр врача нужен для оценки тяжести состояния и определения безопасной тактики.
Получить дополнительные сведения – запой нарколог на дом
В Нижнем Новгороде выезд нарколога на дом используется при состояниях, требующих оперативной медицинской оценки и начала терапии. Врач приезжает с необходимыми препаратами, проводит осмотр и формирует план лечения на месте. Такой формат позволяет сократить время до начала помощи и снизить нагрузку на пациента.
Узнать больше – круглосуточная наркологическая помощь нижний новгород
Процедура капельницы от похмелья с контролем врача в Самаре начинается с первичной консультации, на которой врач осматривает пациента, измеряет его основные показатели (давление, пульс, температуру) и оценивает общее состояние. На основе этих данных выбирается оптимальный состав капельницы, которая может включать в себя различные компоненты, такие как солевые растворы, витамины, антиоксиданты и медикаменты для снятия симптомов похмелья.
Ознакомиться с деталями – https://kapelnicza-ot-pokhmelya-samara-13.ru
Каждый элемент программы направлен на создание комплексного подхода к лечению зависимости, обеспечивая помощь не только на физическом, но и на эмоциональном уровне. Индивидуальная программа реабилитации позволяет выстроить эффективную терапию, которая соответствует конкретным потребностям пациента.
Узнать больше – клиника реабилитации алкоголиков
Online medicine order Indian Meds Delivery no script pharmacy
После оформления заявки по телефону или на сайте оператор уточняет адрес и текущее состояние пациента. В критических ситуациях врач может прибыть в течение 60 минут, в стандартном режиме — за 1–2 часа. На месте проводится сбор анамнеза и оценка жизненных показателей: артериального давления, пульса, сатурации и температуры тела. Затем выбирается оптимальный протокол детоксикации — «мягкий» метод для постепенного выведения токсинов или экспресс-методика при острой интоксикации. Процедура капельного введения комбинированного раствора длится от двух до четырёх часов: специалист контролирует состояние пациента, корректирует дозировки и при необходимости вводит корригирующие препараты. По окончании врач оставляет детальный план поддерживающей терапии, включающий рекомендации по питанию, приёму сорбентов и витаминов, а также график повторных осмотров.
Получить дополнительную информацию – narkolog na dom ramenskoe
Нарколог на дом в Москве: выезд врача на дом, лечение запоя и консультации в наркологической клинике «Клиника доктора Калюжной».
Получить дополнительные сведения – нарколог на дом вывод
Ломка может казаться бесконечной, но знать её механизмы — значит делать первые шаги к свободе от зависимости и к спокойствию. Ознакомиться с теоретической базой – http://mamuli.club/forum/topic/51041
Online medicine order: Indian Meds Delivery – medstore online pharmacy
Осмотр особенно важен при нескольких днях употребления алкоголя подряд, выраженной слабости, дрожи в руках, нарушении сна, учащенном пульсе, нестабильном давлении, тошноте и признаках обезвоживания. Эти симптомы часто сочетаются и могут усиливаться в течение ближайших часов после прекращения употребления.
Детальнее – врач нарколог на дом
В статье подробно раскрывается, как пройти путь от признания проблемы алкоголизма к возвращению к полноценной жизни, с полезными советами и реальными шагами. Подробная информация доступна по запросу – http://www.artlib.ru/index.php?id=26&idr=16&idt=57619
pharmacy mexico online: Mexican Pharm – mexican pharmacy near me
https://canadiantabs.com/# safe canadian pharmacy
Нарколог на дом в Москве: срочная медицинская помощь, капельницы и восстановление состояния в наркологической клинике «Клиника доктора Калюжной».
Исследовать вопрос подробнее – вызов нарколога на дом москва
Часто сигналы о помощи мы пропускаем или списываем на усталость. В статье объясняем, какие признаки действительно стоит обратить внимание, чтобы не упустить важное. Ознакомиться с теоретической базой – http://www.allorus.ru/cat/question/11101
Entre nous la page d accueil met en avant bonus, sport et mobile. Voir https://www.biblegrove.org/profile/akkauntpleer21798/profile colle a promo casino aide a comprendre ou commencer. Je note que le style ne remplace jamais une politique de paiement claire.
видеонаблюдение запись комплект видеокамеры комплект видеонаблюдения
Нужна бесплатная юридическая консультация? Переходите по запросу городской юрист в Омске и получите помощь опытного юриста по любым правовым вопросам: семейные споры, долги, недвижимость, трудовые конфликты, защита прав потребителей и многое другое. Задайте вопрос онлайн или по телефону и получите подробный разбор вашей ситуации и рекомендации по дальнейшим действиям. Консультация проводится бесплатно и конфиденциально.
Помощь на дому рассматривают при состояниях, которые сопровождаются заметным ухудшением самочувствия после алкоголя. Обычно это запой на протяжении нескольких дней, тяжелое похмелье, выраженная слабость, бессонница, тревога, дрожь в руках, сухость во рту, отсутствие аппетита, тошнота, раздражительность и ощущение истощения. В подобных случаях врачебный осмотр нужен для того, чтобы оценить тяжесть состояния и определить, безопасен ли домашний формат в конкретной ситуации.
Получить дополнительную информацию – нарколог на дом анонимно в москве
Врач проводит подробную диагностику, оценивает как физическое, так и психологическое состояние пациента. На основании полученных данных формируется индивидуальная программа помощи, которая включает не только медикаментозное лечение, но и психотерапевтическую поддержку, консультации для семьи и рекомендации по восстановлению.
Изучить вопрос глубже – https://narkologicheskaya-pomoshch-domodedovo6.ru/skoraya-narkologicheskaya-pomoshch-v-domodedovo/
Реабилитация алкоголиков с поддержкой специалистов в Москве представляет собой важный и сложный процесс, в котором ключевую роль играет профессиональное вмешательство. Программы реабилитации включают в себя не только медицинскую помощь, но и психологическую, социальную и эмоциональную поддержку, что способствует успешному и долгосрочному восстановлению пациента. Такая комплексная помощь является основой эффективного лечения и предотвращения рецидивов.
Ознакомиться с деталями – клиника реабилитации алкоголиков
Материал объясняет, как работают разные методы лечения алкоголизма и чего реально ожидать на каждом этапе преодоления зависимости. Изучить эмпирические данные – http://salda.ws/f/topic.php?p=254485
Наркологическая клиника «Ренессанс» в Екатеринбурге предоставляет полный спектр услуг по лечению зависимости от психоактивных веществ. В основе её работы лежит интеграция современных медицинских технологий, психологических методов и социальной реабилитации. Комплексный подход позволяет не только купировать острые симптомы интоксикации, но и формировать у пациента устойчивую мотивацию к трезвому образу жизни. Высокая квалификация врачей-наркологов, психотерапевтов и социальных педагогов гарантирует индивидуальный маршрут выздоровления для каждого обратившегося.
Исследовать вопрос подробнее – наркологическое лечение наркомания екатеринбург
Выезд врача на дом рассматривают в ситуациях, когда человеку тяжело добраться до медицинского учреждения, он ослаблен после нескольких дней употребления спиртного или родственникам важно быстро получить очную оценку состояния. После осмотра определяют, допустим ли домашний формат, нужна ли капельница, достаточно ли наблюдения на дому или следует сразу рассматривать другой объем помощи. Если подобные эпизоды повторяются, дальнейшее обсуждение может касаться не только текущего состояния, но и лечения алкоголизма, кодирования, участия психолога, психиатра и реабилитации. В таких случаях наркологическая помощь рассматривается шире, чем разовый вызов на дом.
Ознакомиться с деталями – вызов нарколога на дом
canadian pharmacy mall: pet meds without vet prescription canada – Canadian Tabs
В статье подробно описаны современные методы лечения алкоголизма в медицинских центрах, которые помогают пациентам пройти путь к трезвой и полноценной жизни. Разобраться лучше – http://mamuli.club/forum/topic/49556
В Нижнем Новгороде выезд нарколога на дом используется при состояниях, требующих оперативной медицинской оценки и начала терапии. Врач приезжает с необходимыми препаратами, проводит осмотр и формирует план лечения на месте. Такой формат позволяет сократить время до начала помощи и снизить нагрузку на пациента.
Детальнее – круглосуточная наркологическая помощь
Домашний формат выбирают в тех случаях, когда человеку тяжело добраться до медицинского учреждения, он ослаблен после нескольких дней употребления спиртного или родственникам важно быстрее получить врачебную оценку состояния. После осмотра определяют, допустима ли помощь на дому, требуется ли капельница, возможен ли вывод из запоя в домашних условиях или нужен другой объем наблюдения. Если эпизоды повторяются, обсуждение обычно выходит за рамки снятия острых симптомов и затрагивает дальнейшую помощь при алкоголизме. Уже на этапе первого обращения часто уточняют, можно ли вызвать врача срочно, доступна ли круглосуточная помощь и в каких случаях состояние требует наблюдения в стационаре.
Подробнее – нарколог на дом москва
https://mexicanpharm.xyz/# Mexican Pharm
https://canadiantabs.com/# Canadian Tabs
Обращение к психиатру — не приговор, а шаг к облегчению. Разбираемся, как проходит приём и почему бояться на самом деле нечего. Изучить вопрос глубже – http://www.allorus.ru/cat/question/11106
Узнайте из материала, когда грань стирается в привычках и поведении, и что это может означать для вашего эмоционального состояния. Практические советы ждут тебя – http://nsibirsk.ru/forum/free/topic-45819.html
Вывод из запоя на дому — это не «самолечение», а медицинская помощь, которая помогает безопасно снять интоксикацию в привычной обстановке. Провести детальное исследование – http://automobilist.forum24.ru/?1-10-0-00000386-000-0-0-1773583662
mexican pharmacies that ship: Mexican Pharm – mexican pharma
Нарколог на дом в Москве: выезд врача на дом, лечение запоя и консультации в наркологической клинике «Клиника доктора Калюжной».
Детальнее – http://www.domen.ru
При наличии этих симптомов помощь должна быть оказана в кратчайшие сроки. Выезд нарколога позволяет не только стабилизировать состояние, но и определить дальнейшую тактику лечения.
Детальнее – наркологическая помощь анонимно
Наиболее частыми причинами обращения становятся запой, выраженная слабость, тремор, нарушение сна, тревога, учащенный пульс, нестабильное давление, тошнота и ощущение физического истощения. Эти проявления могут сочетаться между собой и усиливаться после прекращения употребления алкоголя, особенно если эпизод длился несколько дней.
Выяснить больше – https://narkolog-na-dom-moskva-19.ru
Лечение — это не только «перестать пить», а целая система: помощь врачей, работа с причинами и поддержка на каждом этапе. Узнайте, как выстроить этот путь грамотно. Лови подробности – http://kremlevsk.kamrbb.ru/?x=read&razdel=9&tema=2265
В Москве такие состояния нередко долго скрываются за занятостью, работой и внешним благополучием. Поэтому к специалисту часто обращаются уже тогда, когда собственные попытки справиться не дают результата. Аддиктолог оценивает не только сам факт зависимости, но и ее влияние на поведение, эмоциональное состояние, отношения и повседневные решения. Для многих особенно важен конфиденциальный формат: анонимный прием аддиктолога помогает обсудить ситуацию спокойно, без лишней огласки и внутреннего напряжения.
Получить больше информации – капельницы для печени на дому
https://canadiantabs.com/# canadian pharmacy world
Реабилитация алкоголиков в Москве с комплексным подходом — это многогранный процесс, включающий в себя не только медицинские процедуры, но и психологическую поддержку, физическую реабилитацию и помощь в социальной адаптации. Профессиональный реабилитационный центр обеспечивает индивидуальный подход к каждому пациенту, включая такие методы, как кодирование и своевременное лечение запоя. Важно отметить, что успешное лечение алкоголизма требует учета множества факторов, таких как степень зависимости, психоэмоциональное состояние пациента, а также его физическое здоровье. Комплексный подход помогает эффективно устранить все составляющие проблемы, минимизируя риски рецидивов.
Подробнее тут – реабилитация алкоголиков город
https://telegra.ph/PFL-Sioux-Falls-Betting-Preview-Storley-vs-Zendeli-04-27
The PFL comes back to the Sanford Pentagon on May 2, 2026 with a card that is built around category rankings as well as well-known veterans from the Bellator days.
Обращение за помощью нарколога на дому имеет ряд преимуществ, способствующих быстрому и эффективному лечению:
Исследовать вопрос подробнее – вывод из запоя на дому круглосуточно в ярославле
В центре «Время Возрождения» в Кемерово разрабатывают индивидуальные программы терапии при алкогольной и наркотической зависимости. Лечение строится с учётом состояния здоровья, стажа употребления и сопутствующих факторов, что повышает эффективность медицинской помощи.
Подробнее – спайс какой наркотик
Алкоголизм — это не приговор, а проблема, которую можно решать разными способами. Важно выбрать подходящий метод лечения, а не искать «чудо-способ». Что ещё? Расскажи всё! – http://primordogs.borda.ru/?1-6-0-00002865-000-0-0-1773509166
Процедура капельницы от похмелья с контролем врача в Самаре начинается с первичной консультации, на которой врач осматривает пациента, измеряет его основные показатели (давление, пульс, температуру) и оценивает общее состояние. На основе этих данных выбирается оптимальный состав капельницы, которая может включать в себя различные компоненты, такие как солевые растворы, витамины, антиоксиданты и медикаменты для снятия симптомов похмелья.
Получить дополнительную информацию – капельница от похмелья анонимно
Основной этап, направленный на очищение организма от продуктов распада алкоголя и нормализацию функций внутренних органов. Применяются современные препараты с антиоксидантным и гепатопротекторным эффектом.
Получить дополнительную информацию – https://lechenie-alkogolizma-krasnodar0.ru/klinika-lecheniya-alkogolizma-krasnodar
Seriously, if you’re backing the short-priced favorites purely based on the fact that the Aussie flag sits next to their name, you could just set your bankroll ablaze at the Perth Octagon rather.
safe online pharmacies in canada: canadian drugstore online – canadian pharmacy 24h com safe
«НаркоЗдравие» — московская клиника, где доступно лечение алкоголизма и наркомании, профессиональный вывод из запоя, кодирование и помощь нарколога на дому. Реабилитационный центр поддерживает пациентов в процессе восстановления и возвращения к стабильной жизни.
Подробнее тут – https://narko-zdravie.ru/uslugi/kodirovanie/kodirovanie-gipnozom
medications canada: canada pharmacy reviews – pharmacy canadian
Материал объясняет, какие услуги и методы используются в реабилитационных центрах, чтобы эффективно поддержать человека после зависимости. Открой скрытое – http://mamuli.club/forum/topic/49776
Реабилитация алкоголиков с индивидуальной программой — это комплексный подход, включающий медицинскую, психотерапевтическую и социальную поддержку, направленный на восстановление человека после длительного злоупотребления алкоголем. Программа подбирается с учетом всех особенностей пациента, его состояния, сопутствующих заболеваний и эмоциональных проблем. Реабилитация не ограничивается только детоксикацией, но включает также работу с психологом и социальную адаптацию. В некоторых случаях может быть рекомендован выезд на дом для проведения лечения, а также кодирование, чтобы помочь пациенту справиться с зависимостью на всех этапах восстановления. Наркоманическая зависимость может требовать дополнительной терапии и профессиональной помощи для успешного преодоления всех трудностей.
Углубиться в тему – алкоголик реабилитация наркоманов город
Canadian Tabs canadian pharmacies Canadian Tabs
http://canadiantabs.com/# canadian pharmacy phone number
Основные услуги наркологической помощи
Разобраться лучше – narkologicheskaya-pomoshch-domodedovo6.ru/
Наркологическая клиника «Ренессанс» в Екатеринбурге предоставляет полный спектр услуг по лечению зависимости от психоактивных веществ. В основе её работы лежит интеграция современных медицинских технологий, психологических методов и социальной реабилитации. Комплексный подход позволяет не только купировать острые симптомы интоксикации, но и формировать у пациента устойчивую мотивацию к трезвому образу жизни. Высокая квалификация врачей-наркологов, психотерапевтов и социальных педагогов гарантирует индивидуальный маршрут выздоровления для каждого обратившегося.
Подробнее можно узнать тут – лечение наркомании свердловская область
Осмотр на дому особенно важен в тех случаях, когда больному трудно вставать, пить воду, принимать пищу, спокойно лежать или ориентироваться в собственном состоянии. Чем тяжелее переносится выход из употребления, тем выше значение очной оценки, потому что по телефону невозможно полноценно определить границы безопасной помощи. При выраженных симптомах может потребоваться срочный выезд, чтобы вовремя оценить риски и определить, допустим ли вывод из запоя дома или необходимо наблюдение в стационаре.
Детальнее – нарколог на дом анонимно
UFC Perth Australia
The Octagon in Perth is always an incredible atmosphere, yet if you want to actually walk away with a profit, you need to distinguish the “Aussie, Aussie, Aussie” chants from the pure fight math and style comparisons.
В подробном материале рассказывается о современных методах лечения алкоголизма и наркомании в наркологическом центре в Красноярске, от детоксикации до успешной ресоциализации. Ознакомиться с отчётом – https://otvet.mail.ru/question/268904396
Реабилитация алкоголиков в Москве с поддержкой специалистов направлена не только на избавление от зависимости, но и на восстановление полноценной жизни пациента. В процессе реабилитации особое внимание уделяется не только медицинским методам, но и психологической поддержке, что помогает пациенту разобраться в причинах своей зависимости, научиться справляться с трудными ситуациями и адаптироваться к социальной жизни без алкоголя.
Исследовать вопрос подробнее – реабилитация алкоголиков стоимость москва
Как реализовано в «РеабилитейшнПро»
Исследовать вопрос подробнее – круглосуточная наркологическая помощь домодедово
Многие боятся последствий, но анонимность помогает сохранить работу, репутацию и доверие к врачам — а это уже половина успеха на пути к выздоровлению Открыть полностью – http://forum.marino-grad.ru/topic/7358-anonimnoe-lechenie-alkogolizma-i-narkomanii-v-pitere-realno-pomogaet-ili-eto-razvod
The Octagon in Perth on May 2, 2026 featuring a card led by high-stakes technical striking alongside a mix of seasoned veterans facing rising local prospects.
лента стальная 0 5 лента 12х18н10т
Материал раскрывает, чем современная выездная наркологическая помощь отличается от устаревших подходов и почему своевременное вмешательство решает всё. Только факты! – http://primordogs.borda.ru/?1-6-0-00002784-000-0-0-1771937085
После оформления заявки по телефону или на сайте оператор уточняет адрес и текущее состояние пациента. В критических ситуациях врач может прибыть в течение 60 минут, в стандартном режиме — за 1–2 часа. На месте проводится сбор анамнеза и оценка жизненных показателей: артериального давления, пульса, сатурации и температуры тела. Затем выбирается оптимальный протокол детоксикации — «мягкий» метод для постепенного выведения токсинов или экспресс-методика при острой интоксикации. Процедура капельного введения комбинированного раствора длится от двух до четырёх часов: специалист контролирует состояние пациента, корректирует дозировки и при необходимости вводит корригирующие препараты. По окончании врач оставляет детальный план поддерживающей терапии, включающий рекомендации по питанию, приёму сорбентов и витаминов, а также график повторных осмотров.
Углубиться в тему – vyzov narkologa na dom
Как поясняет нарколог Дмитрий Кузнецов: “Реабилитация алкоголиков должна быть многогранной. Только при сочетании медицинских и психологических методов, а также поддержке со стороны специалистов на всех этапах лечения, можно добиться устойчивого результата. Психологическая работа с пациентом помогает ему не только преодолеть зависимость, но и восстановить нормальное функционирование в обществе.” Также стоит отметить, что в некоторых случаях помощь может быть предоставлена бесплатно, и пациент может получить доступ к данным о возможных вариантах бесплатной реабилитации, что значительно облегчает процесс выздоровления.
Исследовать вопрос подробнее – центр реабилитации алкоголиков город
online canadian pharmacy reviews: Canadian Tabs – Canadian Tabs
В клинике используются запатентованные наборы для капельниц, включающие витамины группы B, мембранопротекторы и низкомолекулярные антиоксиданты. Автоматизированные насосы обеспечивают равномерный ввод растворов, минимизируя риск осложнений.
Получить дополнительную информацию – наркологическое лечение наркомания екатеринбург
Необходимость обращения за наркологической помощью определяется по совокупности симптомов и их выраженности. При ухудшении состояния важно ориентироваться на объективные признаки, а не ждать самостоятельного улучшения.
Узнать больше – скорая наркологическая помощь в нижнем новгороде
В статье подробно рассказывается о комплексном подходе к лечению наркомании и его роли в восстановлении жизни – переходите по ссылке. Разобраться лучше – http://mamuli.club/forum/topic/49552
После оформления заявки по телефону или на сайте оператор уточняет адрес и текущее состояние пациента. В критических ситуациях врач может прибыть в течение 60 минут, в стандартном режиме — за 1–2 часа. На месте проводится сбор анамнеза и оценка жизненных показателей: артериального давления, пульса, сатурации и температуры тела. Затем выбирается оптимальный протокол детоксикации — «мягкий» метод для постепенного выведения токсинов или экспресс-методика при острой интоксикации. Процедура капельного введения комбинированного раствора длится от двух до четырёх часов: специалист контролирует состояние пациента, корректирует дозировки и при необходимости вводит корригирующие препараты. По окончании врач оставляет детальный план поддерживающей терапии, включающий рекомендации по питанию, приёму сорбентов и витаминов, а также график повторных осмотров.
Узнать больше – нарколог на дом анонимно
https://canadiantabs.com/# Canadian Tabs
В клинике «НовыйЯ» доступна помощь при интоксикации, запое и тяжёлой абстиненции, когда важно быстро восстановить самочувствие и снизить риски осложнений. Проводится инфузионная терапия и симптоматическая коррекция под контролем специалистов.
Углубиться в тему – вызов нарколога на дом цена
Canadian Tabs: canadian online drugstore – canadian pharmacy price checker
После нескольких дней употребления алкоголя организм работает с перегрузкой. Усиливается обезвоживание, ухудшается сон, появляется дрожь, растет тревожность, нарушается аппетит, могут беспокоить скачки давления, сердцебиение, слабость и тошнота. В такой ситуации состояние нередко требует осмотра врача, особенно если самочувствие продолжает ухудшаться или уже были неудачные попытки справиться своими силами. Подобные состояния встречаются не только при последствиях алкоголизма, но и у людей, которые впервые столкнулись с тяжелой интоксикацией после приема спиртного.
Исследовать вопрос подробнее – вызвать нарколога на дом
Реабилитация алкоголиков в Москве: комплексное восстановление, помощь при зависимости и поддержка специалистов в наркологической клинике «Похмельная служба»
Детальнее – http://reabilitacziya-alkogolikov-moskva.ru/
Помощь на дому рассматривают при состояниях, которые сопровождаются заметным ухудшением самочувствия после алкоголя. Обычно это несколько дней запоя, тяжелое похмелье, дрожь в руках, бессонница, выраженная слабость, раздражительность, тревога, тошнота, сухость во рту, отсутствие аппетита и признаки обезвоживания. В таких случаях осмотр врача нужен для оценки тяжести состояния и определения безопасной тактики.
Получить дополнительные сведения – нарколог на дом вывод
Нарколог на дом в Москве — это формат врачебной помощи, который рассматривают при состояниях после употребления алкоголя, когда больному требуется осмотр без посещения клиники. Чаще всего обращение связано с запоем, тяжелым похмельным синдромом, слабостью, нарушением сна, тремором, тревогой, тошнотой, сухостью во рту, скачками давления, сердцебиением и общим ухудшением самочувствия. Дальнейшая тактика определяется после осмотра, с учетом длительности употребления алкоголя, возраста, сопутствующих заболеваний и выраженности текущих симптомов.
Подробнее можно узнать тут – http://narkolog-na-dom-moskva-21.ru
Капельница от похмелья с контролем врача в Самаре представляет собой эффективную терапевтическую процедуру, позволяющую значительно улучшить самочувствие пациента за короткий срок. Врач, контролируя весь процесс, может точно определить, какие компоненты необходимы для каждого пациента. Состав капельницы зависит от симптомов похмелья, состояния пациента и его индивидуальных потребностей. Это позволяет обеспечить максимально безопасное и эффективное лечение, которое помогает организму быстро восстановиться.
Углубиться в тему – капельница от похмелья анонимно
Помощь на дому рассматривают при состояниях, которые сопровождаются выраженным ухудшением самочувствия после алкоголя. Обычно речь идет о нескольких днях запоя, тяжелом похмелье, бессоннице, тревоге, дрожи в руках, слабости, тошноте, сухости во рту, отсутствии аппетита и признаках обезвоживания. В таких случаях врачебный осмотр нужен для оценки тяжести состояния и выбора безопасной тактики.
Изучить вопрос глубже – нарколог на дом в москве
Canadian Tabs Canadian Tabs trusted canadian pharmacy
Основной этап, направленный на очищение организма от продуктов распада алкоголя и нормализацию функций внутренних органов. Применяются современные препараты с антиоксидантным и гепатопротекторным эффектом.
Выяснить больше – центр лечения алкоголизма краснодарский край
Непрерывный мониторинг витальных показателей — ключевое отличие стационарного формата, делающее его золотым стандартом при лечении запойного синдрома. В палатах клиники «Стармед» установлены автоматизированные системы отслеживания частоты пульса, уровня кислорода в крови, температуры и артериального давления, данные с которых интегрируются в единую электронную медицинскую карту. Медицинский персонал дежурит круглосуточно, что обеспечивает мгновенную реакцию на любое ухудшение состояния: оперативную коррекцию инфузионной терапии, введение симптоматических препаратов, привлечение смежных специалистов при выявлении соматических осложнений. Такой подход исключает полипрагмазию, предотвращает избыточную фармакологическую нагрузку на ослабленный организма и гарантирует, что каждая стадия детоксикации проходит под строгим клиническим контролем, минимизируя риски для жизни и здоровья пациента.
Получить больше информации – нарколог вывод из запоя в стационаре
Помощь на дому рассматривают при состояниях, которые сопровождаются заметным ухудшением самочувствия после алкоголя. Обычно это запой на протяжении нескольких дней, тяжелое похмелье, выраженная слабость, бессонница, тревога, дрожь в руках, сухость во рту, отсутствие аппетита, тошнота, раздражительность и ощущение истощения. В подобных случаях врачебный осмотр нужен для того, чтобы оценить тяжесть состояния и определить, безопасен ли домашний формат в конкретной ситуации.
Получить дополнительную информацию – вызов нарколога на дом в москве
Обращение за помощью нарколога на дому имеет ряд преимуществ, способствующих быстрому и эффективному лечению:
Узнать больше – вывод из запоя в ярославле
Online medicine order: Indian Meds Delivery – no prescription pharmacy paypal
Когда зависимости становятся хроническими и угрожают жизни пациента, комплексная реабилитация при наркомании в специализированных клиниках Москвы, включая вывод из состояния в стационаре и последующий анализ данных о состоянии пациента, может стать единственным возможным решением. Процесс восстановления включает в себя работу не только с зависимостью, но и с психоэмоциональным состоянием, что делает лечение более эффективным и долговечным.
Выяснить больше – реабилитация алкоголиков стоимость
Каждый пациент уникален — именно поэтому мы не применяем «типовых» решений. После первичной консультации и диагностики специалисты «КубаньМед» разрабатывают персональную программу, учитывающую состояние здоровья, психологические особенности и социальные обстоятельства пациента.
Детальнее – https://lechenie-alkogolizma-krasnodar0.ru/lechenie-alkogolizma-anonimno-krasnodar
canadian king pharmacy: cheapest pharmacy canada – Canadian Tabs
https://indianmedsdelivery.com/# indian pharmacy
В Москве такие состояния нередко долго скрываются за занятостью, работой и внешним благополучием. Поэтому к специалисту часто обращаются уже тогда, когда собственные попытки справиться не дают результата. Аддиктолог оценивает не только сам факт зависимости, но и ее влияние на поведение, эмоциональное состояние, отношения и повседневные решения. Для многих особенно важен конфиденциальный формат: анонимный прием аддиктолога помогает обсудить ситуацию спокойно, без лишней огласки и внутреннего напряжения.
Изучить вопрос глубже – вывод из запоя стационар
http://mexicanpharm.com/# reliable rx pharmacy
Если вам важно понять, как анонимное лечение наркомании и современная детоксикация возвращают контроль над жизнью, этот материал даст чёткие и практичные ответы. Лови подробности – https://otvet.mail.ru/question/268895976
«Время Возрождения» — медицинский наркологический центр в Кемерово, где оказывают помощь при острых состояниях и хронических формах зависимости. В работе сочетаются медикаментозная поддержка, психотерапия и контроль динамики восстановления.
Выяснить больше – https://vozrojdenie.site/lechenie-ot-amfetamina
Кодирование — не конец пути, а часть комплексного процесса: правильный метод и поддержка специалистов увеличивают шансы на стабильный результат. Изучить вопрос глубже – https://otvet.mail.ru/question/268989458
https://canadiantabs.xyz/# canadian online pharmacy no prescription
Вывод из запоя на дому в Екатеринбурге: круглосуточная помощь, снятие симптомов и поддержка специалистов в наркологической клинике «Детокс»
Подробнее – вывод из запоя на дому
Процесс вывода из запоя на дому в Ярославле строится по четко отлаженной схеме, включающей несколько последовательных этапов, направленных на максимально быстрое и безопасное восстановление здоровья пациента.
Подробнее – https://vyvod-iz-zapoya-yaroslavl00.ru/vyvod-iz-zapoya-na-domu-yaroslavl
Страшно сделать первый шаг? Разбираем, что происходит внутри центра лечения и как начинается путь к новой жизни. Открыть полностью – http://dimitrov.forum24.ru/?1-18-0-00003491-000-0-0-1773607590
Для вашего удобства и прозрачности планирования лечения мы собрали ориентировочные цены на ключевые процедуры и форматы оказания помощи. Это позволит заранее оценить бюджет и подобрать оптимальный вариант терапии в зависимости от степени абстинентного синдрома и индивидуальных потребностей пациента.
Детальнее – врач нарколог на дом раменское
После детоксикации важна реабилитация, включающая психологическую помощь. Используются различные виды психотерапии, в том числе когнитивно-поведенческая терапия и мотивационное интервьюирование. Это помогает пациентам не только избавиться от зависимости, но и адаптироваться к жизни вне клиники. Подробнее о методах психотерапии можно узнать на ресурсе психологической помощи.
Исследовать вопрос подробнее – http://narkologicheskaya-klinika-kamensk-uralskij11.ru
pharmacy com canada: canada drugs – Canadian Tabs
Для вашего удобства и прозрачности планирования лечения мы собрали ориентировочные цены на ключевые процедуры и форматы оказания помощи. Это позволит заранее оценить бюджет и подобрать оптимальный вариант терапии в зависимости от степени абстинентного синдрома и индивидуальных потребностей пациента.
Выяснить больше – https://narkolog-na-dom-ramenskoe4.ru/vyzov-narkologa-na-dom-v-ramenskom
«НаркоЗдравие» — клиника в Москве, где оказывают наркологическую помощь любой сложности: вывод из запоя, кодирование, лечение зависимостей, работа реабилитационного центра. Специалисты выезжают на дом, обеспечивая анонимность и быструю поддержку пациенту.
Узнать больше – https://narko-zdravie.ru/uslugi/kodirovanie/dvoynoy-blok
https://indianmedsdelivery.com/# top 10 online pharmacy in india
canadian pharmacy scam: reddit canadian pharmacy – canada online pharmacy
Врач проводит подробную диагностику, оценивает как физическое, так и психологическое состояние пациента. На основании полученных данных формируется индивидуальная программа помощи, которая включает не только медикаментозное лечение, но и психотерапевтическую поддержку, консультации для семьи и рекомендации по восстановлению.
Детальнее – srochnaya-narkologicheskaya-pomoshch
Наркологическая клиника в Краснодаре играет важную роль в оказании медицинской помощи людям с различными формами зависимости. Современные методы диагностики и лечения позволяют эффективно справляться с проблемами, связанными с алкоголизмом, наркотической зависимостью и другими психоактивными веществами. Клиническая помощь организована с учетом индивидуальных особенностей пациентов и направлена на достижение стойкой ремиссии.
Углубиться в тему – http://narkologicheskaya-klinika-krasnodar0.ru/anonimnaya-narkologicheskaya-klinika-v-krasnodare/
Осмотр на дому особенно важен в тех случаях, когда больному трудно вставать, пить воду, принимать пищу, спокойно лежать или ориентироваться в собственном состоянии. Чем тяжелее переносится выход из употребления, тем выше значение очной оценки, потому что по телефону невозможно полноценно определить границы безопасной помощи. При выраженных симптомах может потребоваться срочный выезд, чтобы вовремя оценить риски и определить, допустим ли вывод из запоя дома или необходимо наблюдение в стационаре.
Получить больше информации – вызвать нарколога на дом
Домашний формат помощи рассматривают тогда, когда человеку тяжело добраться до медицинского учреждения, состояние ухудшается после нескольких дней употребления спиртного или родственникам требуется очная оценка без промедления. После осмотра становится ясно, допустима ли помощь на дому, требуется ли капельница, можно ли ограничиться наблюдением в домашних условиях или нужен другой маршрут помощи. Вопрос о том, как вызвать специалиста, нередко возникает в ситуациях, когда состояние нарастает быстро и требуется решение без откладывания. Если подобные эпизоды повторяются, дальнейшее обсуждение может касаться не только текущего состояния, но и лечения алкоголизма, работы с зависимостью и более длительной программы восстановления.
Подробнее тут – http://www.domen.ru
Помощь на дому рассматривают при состояниях, которые сопровождаются выраженным ухудшением самочувствия после алкоголя. Обычно речь идет о нескольких днях запоя, тяжелом похмелье, бессоннице, тревоге, дрожи в руках, слабости, тошноте, сухости во рту, отсутствии аппетита и признаках обезвоживания. В таких случаях врачебный осмотр нужен для оценки тяжести состояния и выбора безопасной тактики.
Подробнее можно узнать тут – narkolog-na-dom-moskva-20.ru/
После оформления заявки по телефону или на сайте оператор уточняет адрес и текущее состояние пациента. В критических ситуациях врач может прибыть в течение 60 минут, в стандартном режиме — за 1–2 часа. На месте проводится сбор анамнеза и оценка жизненных показателей: артериального давления, пульса, сатурации и температуры тела. Затем выбирается оптимальный протокол детоксикации — «мягкий» метод для постепенного выведения токсинов или экспресс-методика при острой интоксикации. Процедура капельного введения комбинированного раствора длится от двух до четырёх часов: специалист контролирует состояние пациента, корректирует дозировки и при необходимости вводит корригирующие препараты. По окончании врач оставляет детальный план поддерживающей терапии, включающий рекомендации по питанию, приёму сорбентов и витаминов, а также график повторных осмотров.
Узнать больше – http://narkolog-na-dom-ramenskoe4.ru/narkolog-na-dom-ceny-v-ramenskom/
Реабилитация алкоголиков с поддержкой специалистов — это системный подход к лечению алкогольной зависимости, который включает в себя различные медицинские, психологические и социальные методы. В Москве существует множество наркологических центров, предлагающих такие программы, где пациентам предоставляется комплексное лечение под наблюдением квалифицированных специалистов. Процесс реабилитации направлен не только на избавление от алкогольной зависимости, но и на восстановление социальной адаптации пациента, улучшение его психоэмоционального состояния и предотвращение рецидивов. В клиниках также могут предложить кодирование от алкоголизма, что помогает значительно снизить риск возвращения к прежним привычкам и обеспечить долгосрочную трезвость пациента.
Углубиться в тему – центр реабилитации алкоголиков город
При наличии этих симптомов помощь должна быть оказана в кратчайшие сроки. Выезд нарколога позволяет не только стабилизировать состояние, но и определить дальнейшую тактику лечения.
Получить дополнительную информацию – клиника наркологической помощи
Нарколог на дом в Екатеринбурге — это формат помощи, который рассматривают при состояниях после употребления алкоголя, когда больному требуется врачебный осмотр без поездки в клинику. Обычно речь идет о запое, выраженном похмельном синдроме, нарушении сна, обезвоживании, слабости, треморе, тревоге, скачках давления, сердцебиении и общем ухудшении самочувствия. Дальнейшая тактика зависит от состояния больного на момент осмотра, длительности употребления алкоголя и наличия сопутствующих заболеваний.
Подробнее можно узнать тут – вызвать нарколога на дом
escrow pharmacy canada: Canadian Tabs – reputable canadian pharmacy
К показаниям относятся: запой длительностью более 72 часов, выраженная абстиненция с тахикардией, артериальной гипертензией, профузным потоотделением, наличие в анамнезе алкогольных делириев или судорожных эпизодов, сопутствующие хронические заболевания печени, сердца, поджелудочной железы. При тяжелых формах интоксикации, когда в организме накапливаются токсичные продукты распада веществ, резкое прекращение употребления без медицинской поддержки может спровоцировать отек мозга, острую сердечную недостаточность или желудочно-кишечное кровотечение. Стационар позволяет провести полноценную диагностику, включая ЭКГ, экспресс-анализы крови и мониторинг сатурации, что формирует точную картину состояния и исключает шаблонные назначения. В случаях сочетанной зависимости, когда в анамнезе присутствует наркомании, протоколы детоксикации адаптируются под специфику психоактивных соединений и включают усиленный нейрологический контроль.
Детальнее – быстрый вывод из запоя в стационаре
Стационарное наблюдение также целесообразно тогда, когда больному трудно соблюдать рекомендации дома, состояние быстро меняется или родственники не могут обеспечить полноценный контроль. В таких условиях медицинское сопровождение позволяет своевременно оценивать динамику и корректировать лечение. При выраженных психических нарушениях, тревожно-депрессивных проявлениях или изменении поведения к оценке состояния может подключаться психиатр, поскольку у части больных запой сопровождается не только соматическими, но и психическими осложнениями алкогольной зависимости.
Получить дополнительную информацию – наркология вывод из запоя в стационаре в санкт-петербурге
п»їlegitimate online pharmacies india: Indian Meds Delivery – foreign online pharmacy
https://indianmedsdelivery.xyz/# mail order pharmacy india
Узнайте, какие преимущества даёт анонимное лечение наркомании и современная детоксикация, и как это помогает обрести уверенность и ясность. Разобраться лучше – http://dimitrov.forum24.ru/?1-18-0-00003100-000-0-0-1770444062
Материал объясняет, как работают разные методы лечения алкоголизма и чего реально ожидать на каждом этапе преодоления зависимости. Практические советы ждут тебя – http://salda.ws/f/topic.php?p=254485
Canadian Tabs Canadian Tabs Canadian Tabs
Для вашего удобства и прозрачности планирования лечения мы собрали ориентировочные цены на ключевые процедуры и форматы оказания помощи. Это позволит заранее оценить бюджет и подобрать оптимальный вариант терапии в зависимости от степени абстинентного синдрома и индивидуальных потребностей пациента.
Углубиться в тему – narkolog na dom
На втором этапе с пациентом работают психотерапевты, используя когнитивно-поведенческие и мотивационные техники. Основная задача — изменить стереотипы мышления и поведения, приводящие к употреблению веществ.
Углубиться в тему – http://lechenie-narkomanii-ekaterinburg0.ru/lechenie-narkomanii-klinika-v-ekb/https://lechenie-narkomanii-ekaterinburg0.ru
best canadian pharmacy to order from or canadian pharmacy online reliable canadian pharmacy
http://www.qqfuzhi.com/portal/play.php?url=http://canadiantabs.com canadian pharmacy king reviews or https://www.trendyxxx.com/user/ephaupukdj/videos canadian pharmacy ltd
canadadrugpharmacy com canadian pharmacy sarasota and my canadian pharmacy rx canada pharmacy 24h
Наиболее частыми поводами для вызова становятся несколько дней употребления алкоголя подряд, выраженная слабость, дрожь в руках, тревога, тошнота, нарушение сна, скачки давления, учащенный пульс и признаки обезвоживания. Эти симптомы могут сочетаться между собой и усиливаться по мере продолжения запоя или после резкого прекращения употребления.
Изучить вопрос глубже – врач нарколог на дом
Основной этап, направленный на очищение организма от продуктов распада алкоголя и нормализацию функций внутренних органов. Применяются современные препараты с антиоксидантным и гепатопротекторным эффектом.
Подробнее тут – http://lechenie-alkogolizma-krasnodar0.ru/lechenie-khronicheskogo-alkogolizma-krasnodar/
Наркологическая информационная сеть «Narkology» оказывает помощь при сложных стадиях зависимости, включая сопровождение после передозировок. Мы проводим удалённые консультации наркологов, психологов и предоставляем социальные рекомендации по дальнейшей адаптации. Мы гарантируем полную анонимность, внимательное сопровождение и оперативное реагирование на любые запросы клиентов. Наша цель — обеспечить высокоэффективную информационную и психологическую поддержку на всех этапах реабилитации.
Изучить вопрос глубже – https://narcologiya.info/sovmestimost-s-lekarstvami/snotvornoe-i-alkogol.html
Конфиденциальность и профессионализм — ключевые преимущества медицинской помощи на дому: врач работает без огласки, соблюдая анонимность и право пациента на комфорт. Изучить эмпирические данные – http://mamuli.club/forum/topic/51016
«НОВЫЙ НАРКОЛОГ» в СПб — это профессиональная наркология, где лечение зависимости строится на комплексном подходе. Пациентам доступны детоксикационные процедуры, медикаментозная поддержка и психотерапевтическое сопровождение. Внимание к безопасности и постоянный контроль состояния помогают пройти лечение максимально предсказуемо.
Получить больше информации – https://new-narkolog.ru/stati/ukol-ot-alkogolizma-pravda-i-mify.html
canada drugs online review and canadian pharmacy antibiotics legitimate canadian online pharmacies
https://www.google.com.ni/url?q=https://canadiantabs.com canadian pharmacies shipping to usa and https://virtualchemicalsales.ca/user/grqkhrcbto/?um_action=edit pharmacy wholesalers canada
77 canadian pharmacy canadian pharmacy 24h com safe or legitimate canadian pharmacy canadian pharmacy scam
Врач уточняет длительность запоя, тип употребляемого алкоголя и наличие сопутствующих заболеваний. Тщательный анализ этой информации позволяет оперативно определить степень интоксикации и подобрать наиболее эффективные методы терапии, минимизируя риск осложнений.
Подробнее тут – http://vyvod-iz-zapoya-yaroslavl00.ru
the canadian pharmacy or canadian pharmacy com cheap canadian pharmacy online
https://entdeckertouren.com/redirect/Index.asp?url=http://canadiantabs.com pharmacy canadian or https://www.trendyxxx.com/user/wjzhuqndxz/videos canadian pharmacy com
canadian online pharmacy canadian pharmacy store official website or canadian valley pharmacy canada drug pharmacy
Домашний формат выбирают в тех случаях, когда человеку тяжело добраться до медицинского учреждения, он ослаблен после нескольких дней употребления спиртного или родственникам важно быстрее получить врачебную оценку состояния. После осмотра определяют, допустима ли помощь на дому, требуется ли капельница, возможен ли вывод из запоя в домашних условиях или нужен другой объем наблюдения. Если эпизоды повторяются, обсуждение обычно выходит за рамки снятия острых симптомов и затрагивает дальнейшую помощь при алкоголизме. Уже на этапе первого обращения часто уточняют, можно ли вызвать врача срочно, доступна ли круглосуточная помощь и в каких случаях состояние требует наблюдения в стационаре.
Получить больше информации – нарколог на дом цена москва
Осмотр на дому особенно важен в тех случаях, когда больному трудно вставать, пить воду, принимать пищу, спокойно лежать или ориентироваться в собственном состоянии. Чем тяжелее переносится выход из употребления, тем выше значение очной оценки, потому что по телефону невозможно полноценно определить границы безопасной помощи. При выраженных симптомах может потребоваться срочный выезд, чтобы вовремя оценить риски и определить, допустим ли вывод из запоя дома или необходимо наблюдение в стационаре.
Получить дополнительную информацию – вызов нарколога на дом москва
Когда симптомы становятся настолько выраженными, что они мешают нормальному функционированию, капельница становится необходимостью. Она помогает избавиться от дискомфорта и значительно ускоряет процесс восстановления, давая организму все необходимые вещества для нормализации его работы, при этом может проводиться наркологическая детоксикация. Контроль врача на протяжении всей процедуры гарантирует, что капельница будет введена правильно и безопасно, с учетом всех показателей пациента, а при необходимости можно заказать дальнейшую реабилитацию и кодирование.
Углубиться в тему – капельница от похмелья цена в самаре
Лечение наркомании — это не один шаг, а целая система: от снятия ломки до глубокой работы с психикой. Разбираем, как проходит путь к трезвой жизни на самом деле. Изучить эмпирические данные – https://otvet.mail.ru/question/268834640
В клинике «НовыйЯ» доступна помощь при интоксикации, запое и тяжёлой абстиненции, когда важно быстро восстановить самочувствие и снизить риски осложнений. Проводится инфузионная терапия и симптоматическая коррекция под контролем специалистов.
Получить дополнительную информацию – вивитрол кодирование от алкоголизма
Высокий уровень лечения обеспечивается квалификацией врачей, имеющих опыт работы в области наркологии, а также современным медицинским оборудованием, позволяющим проводить диагностику и лечение на самом высоком уровне. Врачи регулярно повышают квалификацию, участвуя в конференциях и обучающих программах. Подробности о квалификации специалистов доступны на портале медицинского сообщества.
Подробнее – лечение в наркологической клинике в каменске-уральском
Mexican Pharm: Mexican Pharm – Mexican Pharm
https://canadiantabs.com/# Canadian Tabs
Canadian Tabs: canadian drug pharmacy – legit canadian pharmacy
Узнайте, в каких ситуациях нужна профессиональная наркологическая помощь и как её эффективно получить – читайте материал по ссылке. Разобраться лучше – http://www.allorus.ru/cat/question/10939
В кировской клинике «Оптимед» проводят лечение алкогольной и наркотической зависимости. Центр предлагает вывод из запоя, реабилитацию и круглосуточную наркологическую помощь. Подход основан на современных медицинских методиках и внимании к состоянию пациента.
Получить дополнительные сведения – наркологический диспансер киров
После детоксикации важна реабилитация, включающая психологическую помощь. Используются различные виды психотерапии, в том числе когнитивно-поведенческая терапия и мотивационное интервьюирование. Это помогает пациентам не только избавиться от зависимости, но и адаптироваться к жизни вне клиники. Подробнее о методах психотерапии можно узнать на ресурсе психологической помощи.
Выяснить больше – наркологическая клиника стационар
Узнайте, как работает вызов нарколога на дом, кому это нужно и чем такая помощь может быть полезна – читайте материал по ссылке. Изучить вопрос глубже – http://catsibiryak.forum24.ru/?1-24-0-00000604-000-0-0-1770390853
В зависимости от степени выраженности абстинентного синдрома и наличия сопутствующих осложнений клиника «Азимут Здоровья» предлагает два основных формата оказания помощи, позволяющих оптимально сочетать эффективность лечения и комфорт пациента. Каждый вариант тщательно продуман: мы учитываем не только медицинские показания, но и личные предпочтения, чтобы вы или ваш близкий чувствовали себя максимально защищённо и спокойно. Оба формата подразумевают строгий контроль жизненных показателей и сопровождение на всех этапах — от первой капельницы до завершения курса поддерживающей терапии.
Подробнее можно узнать тут – narkolog na dom srochno
https://indianmedsdelivery.xyz/# india online pharmacy
п»їlegitimate online pharmacies india or world pharmacy india online shopping pharmacy india
https://images.google.ch/url?sa=t&url=https://indianmedsdelivery.com buy prescription drugs from india and http://www.xunlong.tv/en/orangepibbsen/home.php?mod=space&uid=6428037 indian pharmacy paypal
reputable indian online pharmacy buy medicines online in india and india pharmacy mail order online pharmacy india
Нарколог на дом в Москве: выезд врача на дом, лечение запоя и консультации в наркологической клинике «Клиника доктора Калюжной».
Получить дополнительные сведения – нарколог на дом цена
Помощь на дому рассматривают при состояниях, которые сопровождаются заметным ухудшением самочувствия после алкоголя. Обычно это запой на протяжении нескольких дней, тяжелое похмелье, выраженная слабость, бессонница, тревога, дрожь в руках, сухость во рту, отсутствие аппетита, тошнота, раздражительность и ощущение истощения. В подобных случаях врачебный осмотр нужен для того, чтобы оценить тяжесть состояния и определить, безопасен ли домашний формат в конкретной ситуации.
Подробнее тут – http://narkolog-na-dom-moskva-18.ru/
создание pbn под ключ создание pbn под ключ
http://canadiantabs.com/# safe canadian pharmacy
Публикация приглашает вас исследовать неизведанное — от древних тайн до современных достижений науки. Вы узнаете, как случайные находки превращались в революции, а смелые мысли — в новые эры человеческого прогресса.
Выяснить больше – вывод из запоя круглосуточно
интернет маркетинг услуги продвижения интернет маркетинг услуги продвижения
Первичный осмотр включает оценку витальных показателей, уровня сознания, выраженности симптомов и факторов риска. После этого врач определяет объём вмешательства и приступает к терапии. В большинстве случаев применяется инфузионное лечение, направленное на восстановление водного баланса и выведение токсинов.
Подробнее тут – вызов наркологической помощи нижний новгород
Эта публикация завернет вас в вихрь увлекательного контента, сбрасывая стереотипы и открывая двери к новым идеям. Каждый абзац станет для вас открытием, полным ярких примеров и впечатляющих достижений. Подготовьтесь быть вовлеченными и удивленными каждый раз, когда продолжите читать.
Не упусти шанс – https://www.tunesbank.com/cs/spotify/download-spotify-playlists-to-mp3.html
В статье подробно рассказано, как проходит эффективное лечение наркозависимости от детоксикации к новой жизни и какие этапы ждут на пути к восстановлению. Открыть полностью – http://forum.marino-grad.ru/topic/7040-pomogite-brat-narkomaniya-sovsem-dostala-kak-vyyti-iz-etogo-ada
indianpharmacy com top 10 pharmacies in india online pharmacy
pharmacy website india: Indian Meds Delivery – best mail order pharmacy
Реабилитация алкоголиков — это важный этап на пути к избавлению от зависимости. В Москве существует множество центров, предлагающих реабилитацию с индивидуальной программой, что помогает обеспечить более персонализированный и эффективный подход к каждому пациенту. Индивидуальная программа учитывает физическое и психологическое состояние человека, а также его социальное окружение и личные особенности. Это позволяет добиться лучших результатов в лечении и восстановлении.
Углубиться в тему – http://reabilitacziya-alkogolikov-moskva.ru
Услуга
Ознакомиться с деталями – narkolog na dom kruglosutochno
https://mexicanpharm.xyz/# Mexican Pharm
Узнайте, какие методы лечения наркотической зависимости считаются эффективными сегодня и что важно учитывать при выборе помощи. Что ещё? Расскажи всё! – http://mamuli.club/forum/topic/49777
В этой статье представлен занимательный и актуальный контент, который заставит вас задуматься. Мы обсуждаем насущные вопросы и проблемы, а также освещаем истории, которые вдохновляют на действия и изменения. Узнайте, что стоит за событиями нашего времени!
Узнать из первых рук – https://tramites.bcs.gob.mx/2024/09/gobierno-de-baja-california-sur-resultados-de-un-trabajo-responsable-y-transparente-vmcc
Online medicine order: online shopping pharmacy india – shop medicine online
продвижение сайтов московский продвижение сайтов московский
global pharmacy canada or onlinepharmaciescanada com northern pharmacy canada
https://www.google.com.ph/url?q=https://canadiantabs.com canadapharmacyonline com or https://www.trendyxxx.com/user/tzlgbixwmg/videos reputable canadian online pharmacies
safe reliable canadian pharmacy canadian pharmacy meds or pharmacy com canada canadian pharmacy review
mexican drug store and mexican pharmacies online drugs farmacia mexicana en linea
https://www.google.sr/url?sa=t&url=http://mexicanpharm.com medicine from mexico or https://rightcoachforme.com/author/qiziztioom/ best mexican online pharmacy
mexico medicine pharmacies in mexico that ship to the us or mexico pet pharmacy mexican rx
Основные услуги наркологической помощи
Детальнее – https://narkologicheskaya-pomoshch-domodedovo6.ru/narkologicheskaya-pomoshch-na-domu-v-domodedovo
Капельница от похмелья в Самаре: эффективное восстановление, снятие интоксикации и помощь специалистов в наркологической клинике «Детокс»
Получить больше информации – https://kapelnicza-ot-pokhmelya-samara-13.ru/
Отдельно оценивают ситуации, когда эпизоды повторяются и становятся частью более устойчивой проблемы. Если после алкоголя регулярно развивается тяжелое состояние, нарушается привычный режим жизни, усиливаются последствия алкоголизма и возникают сложности с контролем употребления, домашний выезд может быть только первым этапом более длинного маршрута помощи. При этом наркологическая помощь может включать не только снятие острых проявлений, но и дальнейшую программу лечения зависимости, если речь идет о длительном течении заболевания.
Ознакомиться с деталями – http://narkolog-na-dom-moskva-19.ru
Дополнительным поводом для обращения становится состояние, при котором больному тяжело вставать, пить воду, есть, спокойно лежать или переносить обычную бытовую нагрузку. В таких ситуациях домашний осмотр помогает быстрее определить, какого объема помощи достаточно на текущем этапе. Если обращение связано не только с алкоголем, но и с подозрением на употребление наркотиков, оценка проводится особенно осторожно, поскольку при наркомании клиническая картина может быть иной.
Ознакомиться с деталями – нарколог на дом вывод москва
Нарколог на дом в Москве: срочная медицинская помощь, капельницы и восстановление состояния в наркологической клинике «Клиника доктора Калюжной».
Углубиться в тему – врач нарколог на дом москва
В статье вы найдёте полезную информацию о том, куда обратиться в Красноярске за помощью нарколога и психиатра и какие услуги можно получить на месте. Изучить эмпирические данные – http://zaqwer.ru/question/20948
В Москве клиника «НаркоЗдравие» предлагает комплексное лечение зависимостей: кодирование, вывод из запоя, терапию алкоголизма и наркомании. Реабилитационный центр обеспечивает длительное восстановление, а услуга «нарколог на дом» помогает в экстренных ситуациях.
Исследовать вопрос подробнее – кодирование гипнозом
http://indianmedsdelivery.com/# indian pharmacy online
top 10 pharmacies in india: Indian Meds Delivery – worldwide pharmacy online
online shopping pharmacy india: indian pharmacy paypal – online drugs order
заказать+раскрутку+сайта заказать+раскрутку+сайта
раскрутка и продвижение сайта москва александр раскрутка и продвижение сайта москва александр
internetagentur seo internetagentur seo
Если вам важно получить надёжную информацию о профессиональном выводе из запоя и поддержке при алкоголизме, переходите к статье. Хочу знать больше – http://volcodav.borda.ru/?1-6-0-00000671-000-0-0-1770453562
Mexican Pharm: mexican online pharmacy – mexican pharmacy what to buy
Реабилитация алкоголиков в Москве: лечение зависимости, восстановление и поддержка под контролем специалистов в наркологической клинике «Похмельная служба»
Получить дополнительную информацию – клиника реабилитации алкоголиков город
Узнайте, как профессиональный подход к помощи зависимым строит последовательный путь к трезвости и улучшению здоровья – читайте материал по ссылке. Ознакомиться с отчётом – http://mamuli.club/forum/topic/49566
https://canadiantabs.com/# legit canadian pharmacy
После оформления заявки по телефону или на сайте оператор уточняет адрес и текущее состояние пациента. В критических ситуациях врач может прибыть в течение 60 минут, в стандартном режиме — за 1–2 часа. На месте проводится сбор анамнеза и оценка жизненных показателей: артериального давления, пульса, сатурации и температуры тела. Затем выбирается оптимальный протокол детоксикации — «мягкий» метод для постепенного выведения токсинов или экспресс-методика при острой интоксикации. Процедура капельного введения комбинированного раствора длится от двух до четырёх часов: специалист контролирует состояние пациента, корректирует дозировки и при необходимости вводит корригирующие препараты. По окончании врач оставляет детальный план поддерживающей терапии, включающий рекомендации по питанию, приёму сорбентов и витаминов, а также график повторных осмотров.
Узнать больше – narkolog na dom anonimno
Первичный осмотр включает оценку витальных показателей, уровня сознания, выраженности симптомов и факторов риска. После этого врач определяет объём вмешательства и приступает к терапии. В большинстве случаев применяется инфузионное лечение, направленное на восстановление водного баланса и выведение токсинов.
Выяснить больше – наркологическая помощь на дому
Узнайте, в каких случаях оптимальным решением становится наркологическая помощь на дому, когда важен быстрый и деликатный подход, и какие преимущества она даёт. Что ещё? Расскажи всё! – http://kremlevsk.kamrbb.ru/?x=read&razdel=9&tema=1886
pharmacy in mexico that ships to us: online pharmacies – Mexican Pharm
Нарколог на дом в Москве: выезд врача на дом, лечение запоя и консультации в наркологической клинике «Клиника доктора Калюжной».
Подробнее можно узнать тут – запой нарколог на дом
online shopping pharmacy india reputable indian online pharmacy no prescription pharmacy paypal
https://mexicanpharm.com/# Mexican Pharm
northwest canadian pharmacy or buying from canadian pharmacies canadian drugs
http://joergschueler.de/redirect.php?blog=schbclers blog&url=https://canadiantabs.com certified canadian pharmacy and http://dnp-malinovka.ru/user/xhfvdxlvea/?um_action=edit canadian pharmacy ed medications
best price rx pharmacy canada canadian pharmacies shipping to usa and canadian drugs online canadian compounding pharmacy
Узнайте, как начинается выход из хронического алкоголизма с принятия себя и что помогает двигаться дальше – читайте материал по ссылке. Ознакомиться с теоретической базой – http://mymoscow.forum24.ru/?1-9-0-00000855-000-0-0-1770455516
buy prescription drugs from canada cheap or escrow pharmacy canada onlinecanadianpharmacy 24
https://images.google.mw/url?q=https://canadiantabs.com canada rx pharmacy or https://raygunmvp.com/user/gkvljeqelg-gkvljeqelg/?um_action=edit online canadian pharmacy
online pharmacy canada trustworthy canadian pharmacy or reliable canadian pharmacy canada drugs online
https://indianmedsdelivery.com/# top online pharmacy india
canadian online drugs and canadian pharmacy service canadian pharmacy india
https://www.google.pl/url?sa=t&url=https://canadiantabs.com canadian pharmacy checker or https://psicologiasaludable.es/user/uhfegkiuui/?um_action=edit canada drugstore pharmacy rx
canadian family pharmacy ed drugs online from canada or northwest canadian pharmacy canadian pharmacies
https://mexicanpharm.com/# buy drugs online
adderall canadian pharmacy: buying from canadian pharmacies – Canadian Tabs
Каждый элемент программы направлен на создание комплексного подхода к лечению зависимости, обеспечивая помощь не только на физическом, но и на эмоциональном уровне. Индивидуальная программа реабилитации позволяет выстроить эффективную терапию, которая соответствует конкретным потребностям пациента.
Углубиться в тему – http://reabilitacziya-alkogolikov-moskva.ru/
Canadian Tabs: Canadian Tabs – Canadian Tabs
Вывод из запоя на дому — это медицинская помощь, направленная на стабилизацию состояния пациента без госпитализации. Такой формат позволяет начать лечение сразу после обращения и снизить нагрузку на организм, связанную с транспортировкой. В наркологической клинике «Частный медик 24» помощь оказывается с выездом врача, который проводит диагностику и подбирает терапию в зависимости от текущего состояния.
Ознакомиться с деталями – нарколог на дом вывод из запоя в санкт-петербурге
Чому срібло темніє
Как реализовано в «РеабилитейшнПро»
Подробнее можно узнать тут – http://narkologicheskaya-pomoshch-domodedovo6.ru
Сколько времени занимает Гео оптимизация сайта до первых видимых результатов в картах?
Какие инструменты аналитики необходимы при Продвижение сайтов в google?
Домашний формат выбирают в тех случаях, когда человеку тяжело добраться до медицинского учреждения, он ослаблен после нескольких дней употребления спиртного или родственникам важно быстрее получить врачебную оценку состояния. После осмотра определяют, допустима ли помощь на дому, требуется ли капельница, возможен ли вывод из запоя в домашних условиях или нужен другой объем наблюдения. Если эпизоды повторяются, обсуждение обычно выходит за рамки снятия острых симптомов и затрагивает дальнейшую помощь при алкоголизме. Уже на этапе первого обращения часто уточняют, можно ли вызвать врача срочно, доступна ли круглосуточная помощь и в каких случаях состояние требует наблюдения в стационаре.
Исследовать вопрос подробнее – вызов нарколога на дом москва
Наркологическая информационная сеть «Narkology» предоставляет квалифицированную помощь в преодолении зависимостей и восстановлении психоэмоционального состояния. Наши специалисты проводят детальную диагностику, разрабатывают индивидуальные программы терапии и психологической поддержки, а также информируют о современных методах лечения. С использованием проверенных подходов и актуальных данных мы помогаем вернуть уверенность и сделать первый шаг на пути к здоровому образу жизни. Доверьтесь профессионалам «Narkology», чтобы эффективно решить проблемы зависимости и получить всестороннюю информационную помощь.
Получить больше информации – влияние алкоголя на
indian pharmacies safe or Online medicine home delivery india pharmacy mail order
https://images.google.tk/url?sa=t&url=https://indianmedsdelivery.com indianpharmacy com or http://www.1gmoli.com/home.php?mod=space&uid=581831 pharmacy website india
mail order pharmacy india best online pharmacy india and top 10 pharmacies in india reputable indian pharmacies
Нарколог на дом в Москве — это формат помощи, который рассматривают в тех случаях, когда после употребления алкоголя больному требуется врачебный осмотр без поездки в клинику. Чаще всего обращение связано с запоем, выраженным похмельным синдромом, нарушением сна, слабостью, тремором, тревогой, обезвоживанием, сердцебиением, скачками давления и общим ухудшением самочувствия. Дальнейшая тактика зависит от состояния больного на момент осмотра, длительности употребления алкоголя, возраста и сопутствующих заболеваний.
Получить дополнительные сведения – http://narkolog-na-dom-moskva-20.ru
Отдельно оценивают ситуации, когда эпизоды повторяются и становятся частью более устойчивой проблемы. Если после алкоголя регулярно развивается тяжелое состояние, нарушается привычный режим жизни, усиливаются последствия алкоголизма и возникают сложности с контролем употребления, домашний выезд может быть только первым этапом более длинного маршрута помощи. При этом наркологическая помощь может включать не только снятие острых проявлений, но и дальнейшую программу лечения зависимости, если речь идет о длительном течении заболевания.
Подробнее можно узнать тут – вызвать нарколога на дом в москве
mexican pharmacy what to buy or mexican pharmacies that ship mail order pharmacy mexico
http://forum.eternalmu.com/proxy.php?link=https://mexicanpharm.com mexico city pharmacy and https://www.emlynmodels.co.uk/user/xzyvhgcacr/ farmacia mexicana online
farmacia mexicana en linea online mexican pharmacies and pharmacy in mexico city pharma mexicana
Mexican Pharm: Mexican Pharm – Mexican Pharm
Разработка сайтов для B2B — в чём принципиальная специфика?
Нарколог на дом в Москве — это формат медицинской помощи, который рассматривают при состояниях после употребления алкоголя, когда больному требуется осмотр врача без поездки в клинику. Чаще всего обращение связано с запоем, выраженным похмельным синдромом, бессонницей, тревогой, слабостью, тремором, обезвоживанием, скачками давления, сердцебиением и общим ухудшением самочувствия. Дальнейшая тактика зависит от состояния больного на момент осмотра, продолжительности употребления алкоголя и сопутствующих заболеваний.
Изучить вопрос глубже – http://www.domen.ru
Этот информационный материал собраны данные, которые помогут лучше понять текущие тенденции и процессы в различных сферах жизни. Мы предоставляем четкий анализ, графики и примеры, чтобы информация была не только понятной, но и практичной для принятия решений.
Исследовать вопрос подробнее – наркологическая клиника
Canadian Tabs canadian pharmacy review pharmacy com canada
https://canadiantabs.com/# global pharmacy canada
Запой сопровождается выраженной интоксикацией, нарушением сна, слабостью, тревожностью и колебаниями давления, что характерно для алкоголизма и других форм зависимости. При этом самостоятельный выход из состояния часто оказывается затруднённым из-за ухудшения самочувствия и невозможности контролировать симптомы. В таких случаях выезд нарколога позволяет начать лечение без задержек и помочь пациенту снизить нагрузку на организм за счёт отсутствия транспортировки.
Ознакомиться с деталями – анонимный вывод из запоя на дому в санкт-петербурге
mail order pharmacy india: Indian Meds Delivery – medstore online pharmacy
Почему домашние животные иногда пьют воду из странных мест, а не из миски?
Помощь на дому рассматривают при состояниях, которые сопровождаются заметным ухудшением самочувствия после алкоголя. Обычно это запой на протяжении нескольких дней, тяжелое похмелье, выраженная слабость, бессонница, тревога, дрожь в руках, сухость во рту, отсутствие аппетита, тошнота, раздражительность и ощущение истощения. В подобных случаях врачебный осмотр нужен для того, чтобы оценить тяжесть состояния и определить, безопасен ли домашний формат в конкретной ситуации.
Подробнее – нарколог на дом цена в москве
Домашний формат помощи рассматривают тогда, когда человеку тяжело добраться до медицинского учреждения, состояние ухудшается после нескольких дней употребления спиртного или родственникам требуется очная оценка без промедления. После осмотра становится ясно, допустима ли помощь на дому, требуется ли капельница, можно ли ограничиться наблюдением в домашних условиях или нужен другой маршрут помощи. Вопрос о том, как вызвать специалиста, нередко возникает в ситуациях, когда состояние нарастает быстро и требуется решение без откладывания. Если подобные эпизоды повторяются, дальнейшее обсуждение может касаться не только текущего состояния, но и лечения алкоголизма, работы с зависимостью и более длительной программы восстановления.
Исследовать вопрос подробнее – нарколог на дом цена
Домашний формат помощи рассматривают тогда, когда человеку тяжело добраться до медицинского учреждения, состояние ухудшается после нескольких дней употребления спиртного или родственникам требуется очная оценка без промедления. После осмотра становится ясно, допустима ли помощь на дому, требуется ли капельница, можно ли ограничиться наблюдением в домашних условиях или нужен другой маршрут помощи. Вопрос о том, как вызвать специалиста, нередко возникает в ситуациях, когда состояние нарастает быстро и требуется решение без откладывания. Если подобные эпизоды повторяются, дальнейшее обсуждение может касаться не только текущего состояния, но и лечения алкоголизма, работы с зависимостью и более длительной программы восстановления.
Разобраться лучше – вызов нарколога на дом в москве
Помощь на дому рассматривают при состояниях, которые сопровождаются заметным ухудшением самочувствия после алкоголя. Это может быть запой на протяжении нескольких дней, тяжелое похмелье, дрожь в руках, нарушение сна, выраженная слабость, тревога, тошнота, сухость во рту, снижение аппетита и признаки обезвоживания. В таких случаях осмотр врача нужен для того, чтобы оценить тяжесть состояния и понять, безопасно ли оставаться дома.
Выяснить больше – нарколог на дом вывод в москве
Мы предлагаем вам окунуться в океан любопытных фактов и вдохновляющих историй. Эта публикация поможет расширить горизонты, разбудить интерес к науке и истории и увидеть мир с новой стороны.
Получить дополнительную информацию – вывод из запоя в стационаре анонимно
canada pharmacy or canada rx pharmacy reddit canadian pharmacy
https://images.google.bi/url?q=https://canadiantabs.com buy canadian drugs and http://bbs.51pinzhi.cn/home.php?mod=space&uid=7859941 canadianpharmacyworld com
reliable canadian online pharmacy canadian pharmacy phone number or safe online pharmacies in canada canadian king pharmacy
Этот информационный материал собраны данные, которые помогут лучше понять текущие тенденции и процессы в различных сферах жизни. Мы предоставляем четкий анализ, графики и примеры, чтобы информация была не только понятной, но и практичной для принятия решений.
Продолжить изучение – частная наркологическая клиника
Мы предлагаем вам окунуться в океан любопытных фактов и вдохновляющих историй. Эта публикация поможет расширить горизонты, разбудить интерес к науке и истории и увидеть мир с новой стороны.
Исследовать вопрос подробнее – нарколог на дом вывод из запоя
https://canadiantabs.xyz/# Canadian Tabs
Этот информационный материал собраны данные, которые помогут лучше понять текущие тенденции и процессы в различных сферах жизни. Мы предоставляем четкий анализ, графики и примеры, чтобы информация была не только понятной, но и практичной для принятия решений.
Кликни и узнай всё! – нарколог на дом круглосуточно самара цены
canadian pharmacy sarasota: best rated canadian pharmacy – real canadian pharmacy
Выезд нарколога начинается с осмотра пациента. Доктора измеряют давление, пульс, оценивают уровень сознания и выраженность симптомов. На основании этих данных формируется план лечения, который реализуется сразу на месте. Такой подход позволяет быстро перейти к стабилизации состояния без лишних этапов.
Узнать больше – http://www.domen.ru
Домашний выезд обычно выбирают тогда, когда человеку трудно добраться до медицинского учреждения, он ослаблен после нескольких дней употребления спиртного или родственникам важно быстро получить врачебную оценку состояния. После осмотра определяют, допустим ли домашний формат, нужна ли капельница, достаточно ли наблюдения на дому или следует рассматривать другой объем помощи. Уже на этапе первичного обращения нередко уточняют, как вызвать врача, какие наркологическая услуги доступны на дому, возможен ли срочный выезд круглосуточно и в каких случаях вывод из запоя безопаснее проводить не дома, а в стационаре.
Подробнее тут – нарколог на дом цена в москве
Вопрос обращения к специалисту редко возникает на пустом месте. Обычно человек или его близкие начинают искать помощь тогда, когда становится ясно: ситуация перестала быть разовым эпизодом и постепенно превращается в повторяющийся сценарий. Именно в этот момент аддиктолог в Москве становится не «крайней мерой», а разумным способом трезво оценить происходящее и понять, насколько далеко зашла проблема.
Подробнее можно узнать тут – капельницы для печени на дом
Canadian Tabs: canadian drug prices – pharmacy canadian superstore
Выезд врача начинается с оценки состояния пациента. Доктора измеряют давление, пульс, оценивают уровень сознания и выраженность симптомов. После этого формируется план лечения, который реализуется сразу. Такой подход позволяет быстро перейти к стабилизации состояния человека.
Разобраться лучше – вывод из запоя на дому цена в санкт-петербурге
Выезд нарколога начинается с осмотра пациента. Доктора измеряют давление, пульс, оценивают уровень сознания и выраженность симптомов. На основании этих данных формируется план лечения, который реализуется сразу на месте. Такой подход позволяет быстро перейти к стабилизации состояния без лишних этапов.
Изучить вопрос глубже – вывод из запоя на дому круглосуточно в санкт-петербурге
Наиболее частыми причинами обращения становятся запой, выраженная слабость, тремор, нарушение сна, тревога, учащенный пульс, нестабильное давление, тошнота и ощущение физического истощения. Эти проявления могут сочетаться между собой и усиливаться после прекращения употребления алкоголя, особенно если эпизод длился несколько дней.
Разобраться лучше – нарколог на дом москва
world pharmacy india and top 10 online pharmacy in india online pharmacy india
https://cse.google.com.py/url?sa=i&url=http://indianmedsdelivery.com top online pharmacy india and https://www.wearebusiness.org/user/lllnrbuith/?um_action=edit buy prescription drugs from india
reputable indian online pharmacy best india pharmacy and pharmacy website india reputable indian pharmacies
https://mexicanpharm.com/# Mexican Pharm
Как поясняет нарколог Дмитрий Кузнецов: “Реабилитация алкоголиков должна быть многогранной. Только при сочетании медицинских и психологических методов, а также поддержке со стороны специалистов на всех этапах лечения, можно добиться устойчивого результата. Психологическая работа с пациентом помогает ему не только преодолеть зависимость, но и восстановить нормальное функционирование в обществе.” Также стоит отметить, что в некоторых случаях помощь может быть предоставлена бесплатно, и пациент может получить доступ к данным о возможных вариантах бесплатной реабилитации, что значительно облегчает процесс выздоровления.
Разобраться лучше – reabilitacziya-alkogolikov-moskva-1.ru/
indian pharmacy paypal: buy prescription drugs from india – medicine online
http://canadiantabs.com/# Canadian Tabs
http://indianmedsdelivery.com/# Online medicine order
Эта статья сочетает познавательный и занимательный контент, что делает ее идеальной для любителей глубоких исследований. Мы рассмотрим увлекательные аспекты различных тем и предоставим вам новые знания, которые могут оказаться полезными в будущем.
Всё, что нужно знать – вывод из запоя анонимно недорого
Осмотр на дому особенно важен в тех случаях, когда больному трудно вставать, пить воду, принимать пищу, спокойно лежать или ориентироваться в собственном состоянии. В такой ситуации очная оценка помогает понять, допустим ли домашний формат и достаточно ли его на текущем этапе. При выраженном ухудшении состояния, признаках перегрузки организма или риске осложнений может потребоваться срочный пересмотр тактики.
Подробнее – врач нарколог на дом
can i buy meds from mexico online: mexico online pharmacy – order medicine from mexico
В Санкт-Петербурге вывод из запоя на дому используется в ситуациях, когда состояние пациента требует медицинской помощи, но позволяет обойтись без лечения в стационаре. Врач проводит консультацию, оценивает длительность запоя, выраженность симптомов и общее состояние, анализируя данные пациента, после чего принимает решение о тактике лечения при алкоголизме. При необходимости можно оформить вызов специалиста или заказать услугу заранее.
Получить больше информации – анонимный вывод из запоя на дому в санкт-петербурге
Помощь на дому рассматривают при состояниях, которые сопровождаются заметным ухудшением самочувствия после алкоголя. Обычно это несколько дней запоя, тяжелое похмелье, дрожь в руках, бессонница, выраженная слабость, раздражительность, тревога, тошнота, сухость во рту, отсутствие аппетита и признаки обезвоживания. В таких случаях осмотр врача нужен для оценки тяжести состояния и определения безопасной тактики.
Подробнее можно узнать тут – запой нарколог на дом в москве
Нужна бесплатная юридическая консультация? Переходите по запросу спросить юриста бесплатно онлайн без регистрации и телефона в Омской области и получите помощь опытного юриста по любым правовым вопросам: семейные споры, долги, недвижимость, трудовые конфликты, защита прав потребителей и многое другое. Задайте вопрос онлайн или по телефону и получите подробный разбор вашей ситуации и рекомендации по дальнейшим действиям. Консультация проводится бесплатно и конфиденциально.
Запой сопровождается интоксикацией, нарушением сна, слабостью, тревожностью и нестабильностью работы сердечно-сосудистой системы, что характерно для алкоголизма и других форм зависимости, включая наркомании. При этом самостоятельный выход из состояния может сопровождаться усилением симптомов, что требует медицинского вмешательства. Капельницы на дому позволяют очень быстро снизить выраженность проявлений и начать восстановление под наблюдением врача, помогая человеку стабилизировать состояние.
Получить дополнительную информацию – http://vyvod-iz-zapoya-na-domu-sankt-peterburg-11.ru/
farmacia pharmacy mexico purchase online Mexican Pharm purple pharmacy mexico
Помощь на дому рассматривают при состояниях, которые сопровождаются заметным ухудшением самочувствия после алкоголя. Это может быть запой на протяжении нескольких дней, тяжелое похмелье, дрожь в руках, нарушение сна, выраженная слабость, тревога, тошнота, сухость во рту, снижение аппетита и признаки обезвоживания. В таких случаях осмотр врача нужен для того, чтобы оценить тяжесть состояния и понять, безопасно ли оставаться дома.
Подробнее можно узнать тут – нарколог на дом вывод москва
Процедура начинается с осмотра и сбора анамнеза. После этого специалист проводит экстренную детоксикацию, снимает симптомы абстинентного синдрома, назначает поддерживающую терапию и даёт рекомендации по дальнейшим шагам. По желанию родственников или самого пациента помощь может быть оказана и в условиях стационара клиники.
Получить дополнительные сведения – narkologicheskaya-pomoshch-domodedovo6.ru/
canada pharmacy and legal canadian pharmacy online best online canadian pharmacy
https://maps.google.is/url?sa=t&url=https://canadiantabs.com the canadian drugstore and http://lenhong.fr/user/qkjzipgcxr/ canada pharmacy 24h
canadian online pharmacy no prescription canadapharmacyonline legit or safe canadian pharmacies canadian pharmacy 365
https://indianmedsdelivery.xyz/# top 10 online pharmacy in india
Такие состояния позволяют проводить лечение на дому с контролем динамики. При выявлении рисков врач может изменить тактику и рекомендовать стационар или другие методы лечения зависимости.
Разобраться лучше – вывод из запоя на дому анонимно санкт-петербург
canadian pharmacy 24 and www canadianonlinepharmacy best canadian pharmacy online
https://maps.google.at/url?q=https://canadiantabs.com precription drugs from canada or http://jonnywalker.net/user/qgeszlnifl/ canadian pharmacy store official website
reliable canadian online pharmacy canadian discount pharmacy or canadian pharmacy ltd safe canadian pharmacy
mexico pet pharmacy: Mexican Pharm – mexico farmacia
canadian pharmacy king reviews and legitimate canadian pharmacy online canadian pharmacy reviews
https://www.fahrschulen.de/clickcounter.asp?school_id=60913&u_link=https://canadiantabs.com cheapest pharmacy canada or http://yunduost.com/home.php?mod=space&uid=96853 canadian pharmacy antibiotics
canadian pharmacy mall pharmacy rx world canada or best canadian online pharmacy canadian pharmacy store official website
buy medicines online in india: Indian Meds Delivery – buy drugs online
Домашний формат выбирают в тех случаях, когда человеку тяжело добраться до медицинского учреждения, он ослаблен после нескольких дней употребления спиртного или родственникам важно быстрее получить врачебную оценку состояния. После осмотра определяют, допустима ли помощь на дому, требуется ли капельница, возможен ли вывод из запоя в домашних условиях или нужен другой объем наблюдения. Если эпизоды повторяются, обсуждение обычно выходит за рамки снятия острых симптомов и затрагивает дальнейшую помощь при алкоголизме. Уже на этапе первого обращения часто уточняют, можно ли вызвать врача срочно, доступна ли круглосуточная помощь и в каких случаях состояние требует наблюдения в стационаре.
Подробнее можно узнать тут – нарколог на дом анонимно в москве