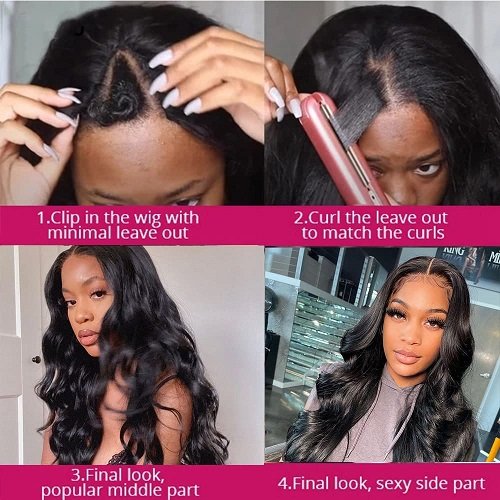
If you always focus on the wig market, you must have noticed the trending v part wigs recently. It’s beloved by so many beauty lovers of its easy installation and natural illusion.
Some may be wondering if they can make a v part wig by themselves at home? Sure, if you already have some idle human hair bundles at home, you can directly follow this tutorial to make a natural-looking v part wig. And we will also show you tips to take good care of this v part wig at the end of this post.
Before we start this small project, here are some items you need to prepare in advance:
A wig cap;
A foam head;
T-pins;
White chalk;
A pair of scissors;
Adjustable straps;
Clips and combs;
Curl-iron or flat-iron (optional );
A wide-tooth comb;
Curved needle and thread (pick a thread color that is close to the color of the human hair bundles);
Human hair bundles (2-3 bundles are enough, the specific amount depends on the density you desired; pick human hair bundles that have similar texture and color to your natural hair );
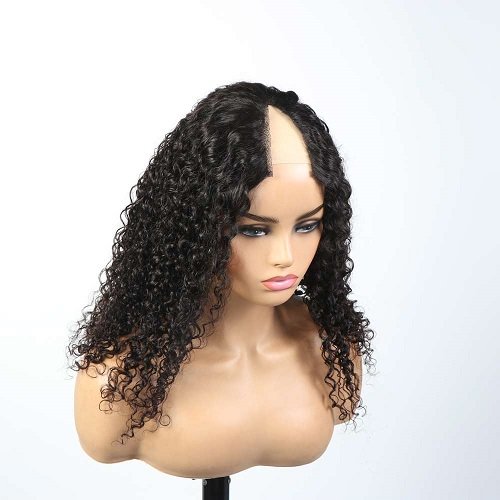
How to make a V part wig?
- Step 1: Pin the wig cap and draw the v shape part: Put the wig cap on the foam head and use some clips to fix four corners. Determine the position of the v shape opening. Use white chalk to draw down the v-shaped part on the front of the wig cap.
- Step 2: Sew in human hair bundles: Start to sew in the first track at about 2-3cm above the nape of the wig cap. Use the threaded needle to make a double knot at the end of the track inside the wig cap, anchor your human hair bundles onto the wig cap, and then continue sewing the bundle until you reach the other side of the track. Make a double knot again and cut the string. Start the next track at about 0.5-1cm above the first row, continue to sew in. Repeat the operations until it already arrives at the drawn v shape area.
- Step 3: Cut the v-shaped opening: Take the wig cap off and use a pair of scissors to cut the drawn v-shaped part. Avoid cutting the hair weft.
- Step 4: Sew in clips and combs: Turn the wig cap inside out and sew in 3-5clips along the edge v-shaped part. Sew in 2 combs on both sides of the wig cap and one on the back.
- Step 5: Sew in adjustable strap: Use thread and needle to sew the strap on the nape of the wig cap.
- Step 6: Comb and style your v part wig: Comb the hair with a wide-tooth comb, use a flat iron or curl iron to straighten or curl the wig to make it look more natural.
How to take good care of a V part wig?
- Tip 1: Shampoo your v part wig regularly with a mild shampoo.
- Tip 2: Make a deep condition once a week or twice a month.
- Tip 3: Avoid over-heat treatment while styling your wig.
- Tip 4: Avoid sleeping with your v part wig on. This may lead to tangling or hair loss.
- Tip 5: The v part wig is easy to remove, so we suggest you’d better take it off at night and set it on a mannequin head.
If you feel it is complicated to make a v part wig by yourself, or you don’t want to spend too much time on making a wig, why not buy a cheap v part wig human hair from China Hair Vendor directly.
China Hair Vendor offers 100% human hair v part wigs at a factory-direct price with no MOQ! Yeah, no MOQ, even you just buy one wig you will get the best price. Of course, the more your buy the bigger the discount you will get. If you wanna get a v part wig with a more natural-looking that can perfectly melt into your natural hair, we sincerely recommend you order our 100% hand-tied V part wigs. The price is affordable and the quality is guaranteed. The edges of the v-shaped part look more natural. So it can perfectly handle a no-leave-out style and provides a more natural appearance.
FAQ about v part wig:
Related Reading:
About V part wig | All you need to know
